Il vostro sito WordPress non riesce a inviare email. I moduli di contatto scompaiono e le notifiche che importano non arrivano mai.
Non siete soli e il problema non è WordPress. È il modo in cui i siti web solitamente inviano le email.
In questa guida vi sveleremo il vero problema che sta alla base del mancato invio di email da parte di WordPress e vi mostreremo come correggerlo utilizzando SMTP, lo standard del settore per una consegna affidabile delle email.
Perché non ricevete e-mail dal vostro sito WordPress?
Il motivo più comune per cui le e-mail scompaiono è che il vostro server di hosting WordPress non è configurato correttamente per utilizzare la funzione PHP mail().
Anche se il vostro hosting è configurato per utilizzarlo, molti fornitori di servizi di posta elettronica, come Gmail e altri, utilizzano una serie di strumenti per ridurre lo spam via e-mail. Questi strumenti cercano di rilevare che un’e-mail proviene dalla località da cui dichiara di provenire.
Le e-mail inviate dai siti web WordPress spesso non superano questo test.
Ciò significa che quando un’e-mail viene inviata dal vostro sito WordPress (da un plugin per i moduli di contatto, da una notifica dell’amministratore e così via), potrebbe non arrivare nemmeno nella cartella spam del destinatario, per non parlare della posta in arrivo.
Per questo motivo si consiglia di non utilizzare WordPress per l’invio di newsletter via e-mail.
Questo è anche il motivo per cui raccomandiamo a tutti di utilizzare SMTP per l’invio di e-mail in WordPress.
Che cos’è l’SMTP?
SMTP (Simple Mail Transfer Protocol) è lo standard industriale per l’invio di e-mail.
A differenza della funzione PHP mail(), SMTP utilizza un’autenticazione adeguata, che porta a un’elevata recapitabilità delle e-mail.
WordPress dispone di un plugin WP Mail SMTP che configura il vostro sito WordPress per l’invio di e-mail utilizzando SMTP invece della funzione PHP mail().
È possibile utilizzarlo per connettersi a tutti i servizi SMTP più diffusi, come SendLayer, Brevo (ex Sendinblue), Gmail (Google Workspace), Amazon SES e altri ancora.
Detto questo, vediamo come risolvere il problema del mancato invio di e-mail da parte di WordPress.
Alternativa: Se utilizzate WooCommerce e le email degli ordini non vengono recapitate, leggete la nostra guida su come correggere il problema dell’invio di email da parte di WooCommerce.
Video tutorial
Se preferite le istruzioni scritte, continuate a leggere. Per navigare in questo articolo è possibile utilizzare i collegamenti rapidi riportati di seguito:
Passo 1: Installare il plugin WP Mail SMTP
Qualunque sia il servizio SMTP scelto, è necessario che sul vostro sito sia installato il plugin WP Mail SMTP. Questo consente di passare dall’uso di WordPress della funzione PHP mail() integrata all’uso del vostro servizio SMTP.
Innanzitutto, installate e attivate il plugin WP Mail SMTP. Se non sapete come fare, consultate la nostra guida passo passo su come installare un plugin di WordPress.
Quindi, fare clic su “WP Mail SMTP” nella dashboard di WordPress per configurare le impostazioni del plugin.
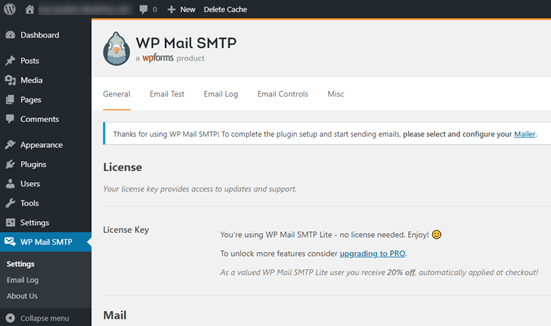
Dovrete iniziare inserendo il nome e l’indirizzo e-mail aziendale da cui volete che provengano le e-mail del vostro sito.
Assicuratevi di utilizzare lo stesso indirizzo e-mail che userete per il vostro servizio di posta elettronica SMTP.
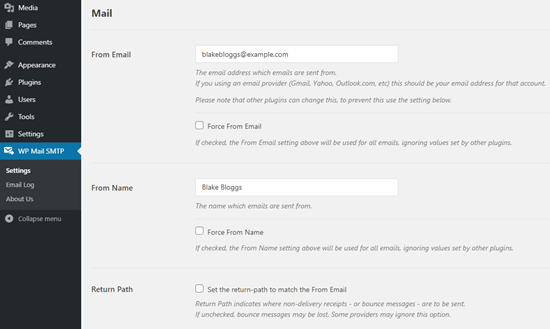
È possibile scegliere di forzare l’invio delle e-mail a utilizzare questo nome e questo indirizzo e-mail, anche se altri plugin, come WPForms, hanno impostazioni diverse. WP Mail SMTP sovrascriverà le impostazioni degli altri plugin.
Successivamente, è necessario scegliere un servizio di mailing SMTP per il proprio sito. Per questa esercitazione, configureremo l’SMTP utilizzando SendLayer.
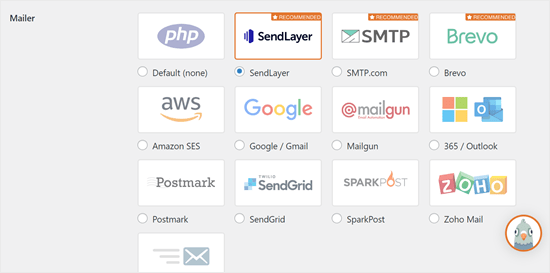
Per terminare la configurazione di WP Mail SMTP, è necessario creare un account con SendLayer. Procederemo a questo punto e poi torneremo a finalizzare la configurazione di WP Mail SMTP, quindi assicuratevi di tenere aperta questa scheda.
Fase 2: Impostazione del servizio di mailing SMTP
SendLayer è un fornitore di servizi e-mail affidabile. Consente di inviare un gran numero di e-mail con un’elevata deliverability.
Con SendLayer è possibile inviare gratuitamente fino a 200 e-mail, il che è più che sufficiente per la maggior parte dei piccoli siti web per iniziare.
Potrebbe trattarsi di e-mail provenienti dal modulo di contatto, di nuovi dati dell’account utente, di e-mail di recupero della password o di qualsiasi altra e-mail inviata tramite il vostro sito WordPress.
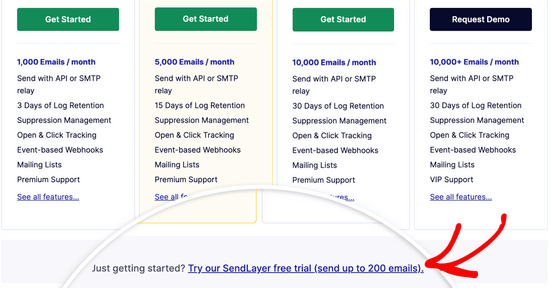
Innanzitutto, è necessario andare sul sito web di SendLayer per creare un account. Nella pagina dei prezzi, fate clic sul link “Prova la nostra prova gratuita di SendLayer (invia fino a 200 e-mail)” per configurare il vostro account.
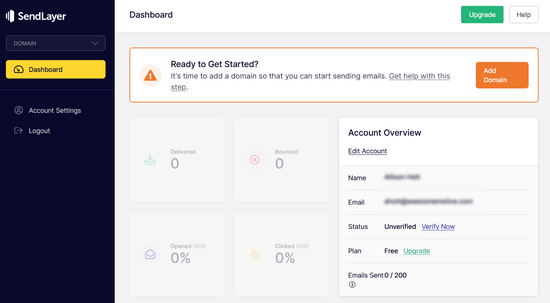
Una volta creato un account, vedrete la vostra dashboard di SendLayer.
Ora che avete un account SendLayer, configuriamo il vostro provider di posta elettronica con WordPress.
Passo 3: Collegare il sito WordPress a SendLayer
Prima di poter inviare e-mail con SendLayer, è necessario autorizzare il proprio dominio.
Questo dimostra ai server di posta elettronica che siete il proprietario confermato del dominio di invio e che le vostre e-mail sono inviate da una fonte legittima.
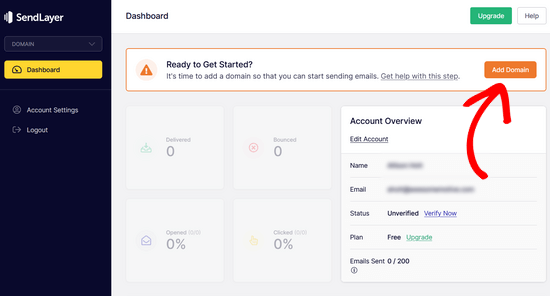
Per autorizzare il vostro dominio, fate clic sul pulsante arancione “Aggiungi dominio” dalla dashboard di SendLayer.
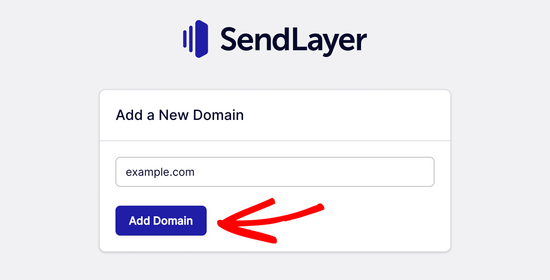
Nella pagina successiva, è sufficiente digitare il nome del dominio nell’apposito campo.
Quindi, fare clic sul pulsante “Aggiungi dominio”.
Nota: con altri servizi di mailing come Brevo (ex Sendinblue), è necessario impostare prima un sottodominio per il proprio sito web. Ma SendLayer aggiungerà automaticamente il sottodominio ai record DNS del dominio mittente.
Pertanto, non è necessario aggiungere un sottodominio aggiuntivo al momento della registrazione del dominio.
Una volta aggiunto il dominio, SendLayer mostrerà 5 record DNS da aggiungere alle impostazioni dei record DNS del dominio.
Queste righe di codice consentono a SendLayer di autorizzare il nome di dominio.
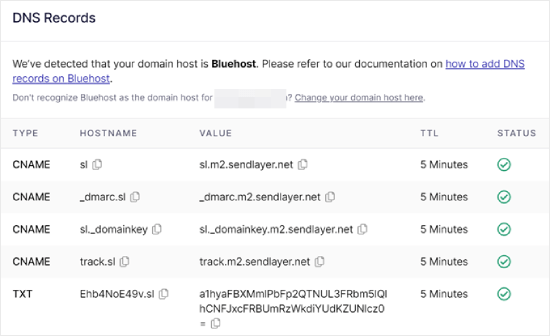
Dovrete aggiungere questi record DNS al vostro sito WordPress. Può sembrare complicato, ma è sufficiente copiare e incollare i record DNS nel posto giusto.
Ai fini di questo tutorial, dimostreremo il nostro esempio utilizzando il nostro account di hosting su Bluehost.
Se utilizzate altre società di hosting o se il vostro DNS è gestito da una società di registrazione di domini come Domain.com, Network Solutions o GoDaddy, seguite le rispettive istruzioni.
Innanzitutto, aprite una nuova scheda del browser e accedete al vostro account di hosting WordPress. Quindi, cercate i record DNS del vostro dominio.
In Bluehost, è possibile farlo andando su “Domini”. Quindi, fare clic su “Impostazioni” accanto al dominio che si desidera collegare a SendLayer.
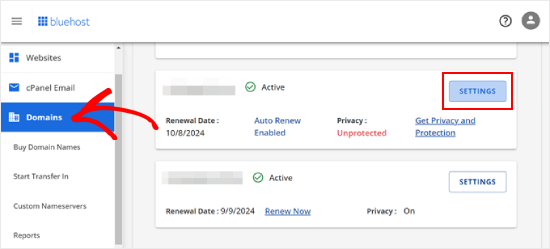
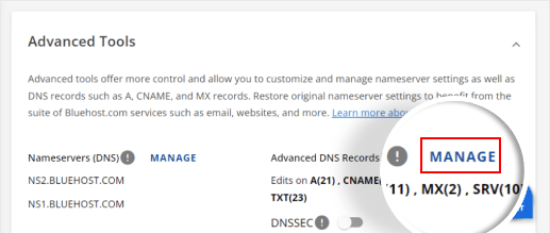
Nella pagina successiva, scorrere fino alla sezione “Strumenti avanzati”.
Successivamente, fare clic sul pulsante “Gestisci” accanto a Record DNS avanzati.
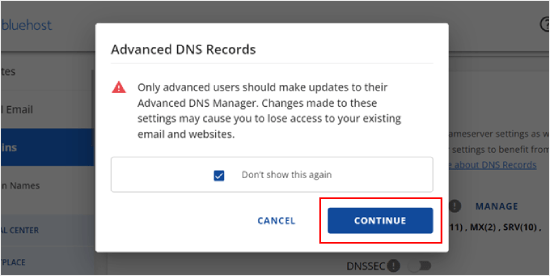
Verrà visualizzato un messaggio di avviso che indica che i record DNS devono essere modificati da un utente avanzato. Non preoccupatevi di questo messaggio, perché la procedura è piuttosto semplice.
Fare clic su “Continua” per procedere.
A questo punto si accede alla pagina Gestione dei record DNS avanzati.
Per iniziare, fare clic sul pulsante “+ Aggiungi record”.
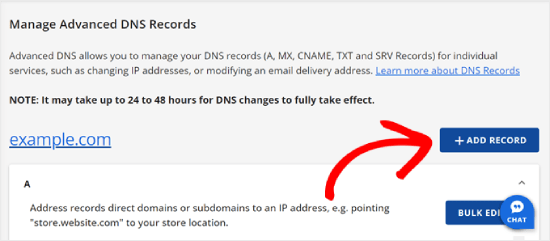
Ora iniziamo ad aggiungere i record DNS forniti da SendLayer.
Innanzitutto, selezionare il tipo di record DNS. In questo caso, utilizzeremo CNAME per il primo record.
Nella sezione “Riferimenti a”, fare clic su “Altro host”. In seguito si sceglierà questa stessa opzione per tutti i record DNS.
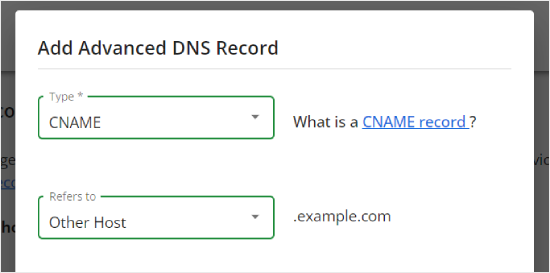
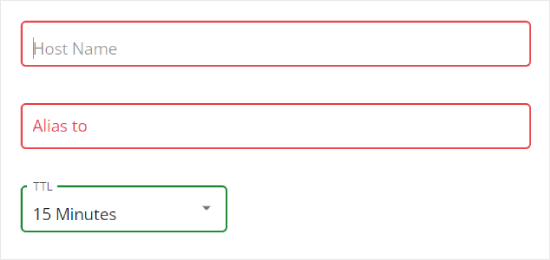
Scorrendo verso il basso, si vedranno tre campi: Nome host, Alias e TTL.
Il Nome host deve essere compilato con il valore di ‘Hostname’ fornito da SendLayer. L’Alias deve essere riempito con il valore in “Value”. Per quanto riguarda il TTL, è possibile lasciarlo a 15 minuti.
L’immagine seguente mostra l’aspetto della nostra schermata quando abbiamo aggiunto il nostro primo record CNAME.
Una volta terminato, basta fare clic su “Aggiungi”.
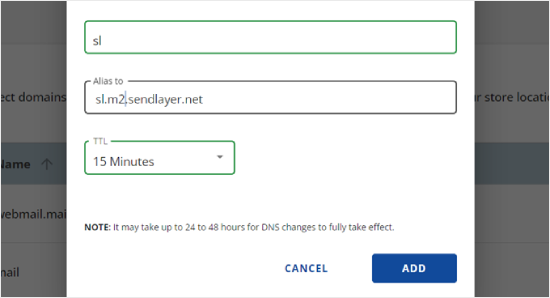
È possibile ripetere questi passaggi per tutti i record DNS (sia CNAME che TXT).
Quando si aggiunge il record TXT, assicurarsi di incollare il valore “Hostname” di SendLayer nel campo “Host Name” e quello di “Value” nel campo “TXT Value”.
Ecco come si presenta:
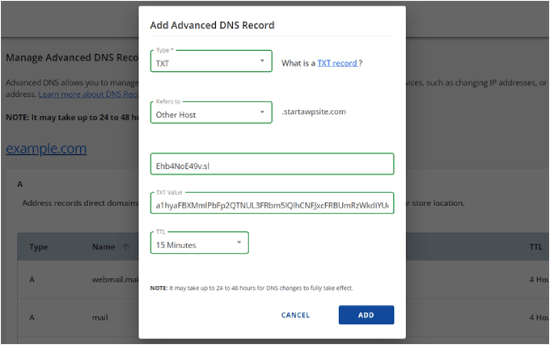
Dopo aver aggiunto i record, tornate a SendLayer e selezionate la casella “Ho aggiunto questi record DNS e sono pronto a procedere”.
Quindi, premere il pulsante “Verifica record DNS”.
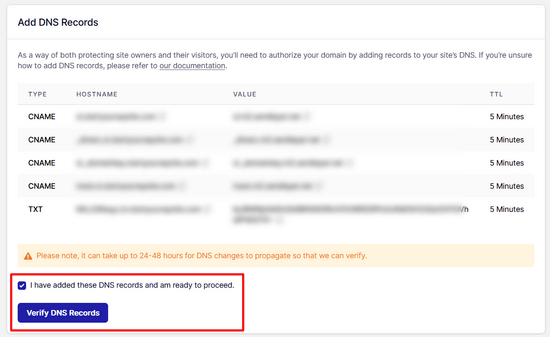
Potrebbero essere necessarie 24-48 ore prima che SendLayer sia in grado di verificare i vostri record. Nella nostra esperienza, ci sono volute diverse ore.
Se non succede nulla quando si fa clic su questo pulsante, i record non possono ancora essere verificati. È possibile ricontrollare in seguito se sono stati verificati andando su “Impostazioni” e navigando fino alla scheda “Registri e impostazioni DNS” dalla dashboard di SendLayer.
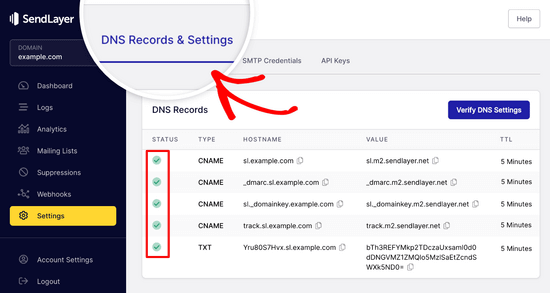
Qui troverete un elenco di tutti i vostri record DNS in un unico posto. Una volta che il vostro dominio è stato autorizzato con successo, vedrete dei segni di spunta verdi accanto a ciascun record DNS nella colonna “Stato”.
È possibile continuare a seguire questa esercitazione mentre si attende l’autorizzazione.
Passo 4: terminare l’impostazione di WP Mail SMTP per utilizzare SendLayer
Terminiamo la configurazione. Innanzitutto, accedere al proprio account SendLayer per trovare la chiave API.
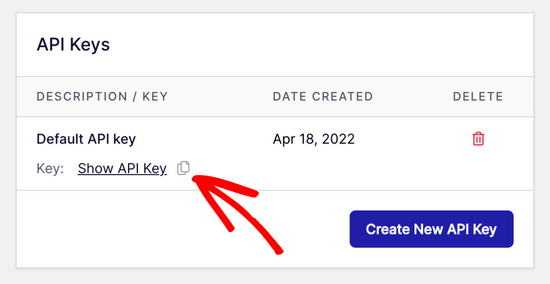
Dalla dashboard di SendLayer, basta andare alla pagina Impostazioni “ Chiavi API. Qui, verrà visualizzata una chiave API predefinita, generata al momento dell’autorizzazione del dominio in SendLayer.
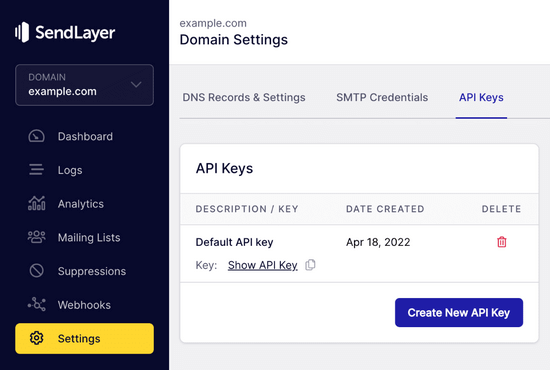
È possibile copiare la chiave API da questa pagina facendo clic sull’icona di copia.
Così:
Fatto questo, si può tornare alla scheda di configurazione guidata di WP Mail SMTP.
Quindi, incollare la chiave API dove necessario.

Congratulazioni. Ora avete configurato tutto. Il passo finale consiste nell’inviare un’e-mail di prova per assicurarsi che tutto funzioni.
Andate su WP Mail SMTP “ Strumenti. Nella scheda “Test e-mail”, inserite un indirizzo e-mail a cui inviare un’e-mail. Per impostazione predefinita, si tratta dell’email dell’amministratore del sito. Fare clic su “Invia e-mail”.
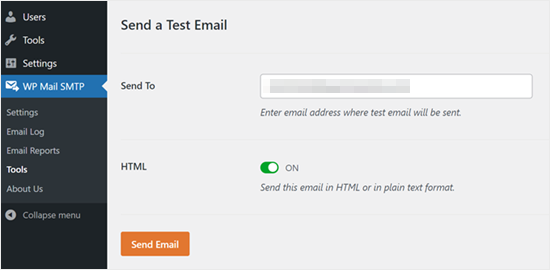
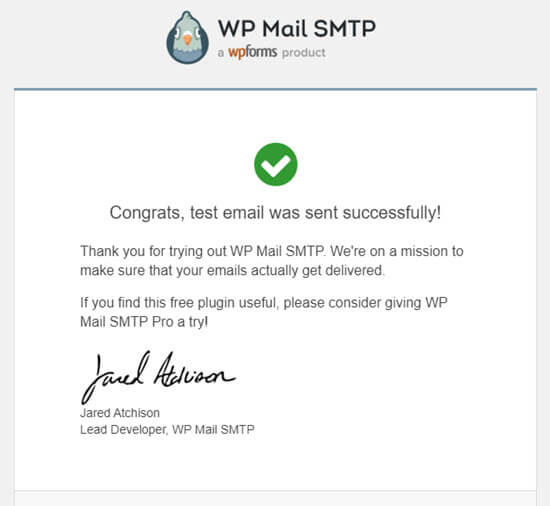
Dovrebbe apparire il messaggio ‘L’email HTML di prova è stata inviata con successo!
Controllate la vostra casella di posta per vedere se è arrivata. Avrà questo aspetto:
Nota: se l’account SendLayer non è ancora stato attivato, verrà visualizzato il messaggio: [permission_denied]: Impossibile inviare e-mail. L’account SMTP non è ancora attivato.
Metodi alternativi per risolvere il problema del mancato invio di e-mail da parte di WordPress
Come si può vedere dall’elenco delle opzioni del plugin WP Mail SMTP, non è necessario utilizzare SendLayer. Sebbene sia il nostro miglior consiglio gratuito, ci sono altre opzioni che potete utilizzare, tra cui Microsoft 365, Gmail(Google Workspace), Amazon SES, ecc.
Usare Gmail o Google Workspace con WP Mail SMTP per riparare le e-mail di WordPress
Se avete Gmail, potete usare quello per inviare le vostre e-mail. Non sarà necessario inserire i dati di accesso alla posta elettronica in WordPress quando si utilizza il plugin WP Mail SMTP.
Per utilizzare Gmail o Google Workspace, configurare WP Mail SMTP come mostrato sopra, quindi fare clic sull’opzione “Google / Gmail” per il proprio mailer.
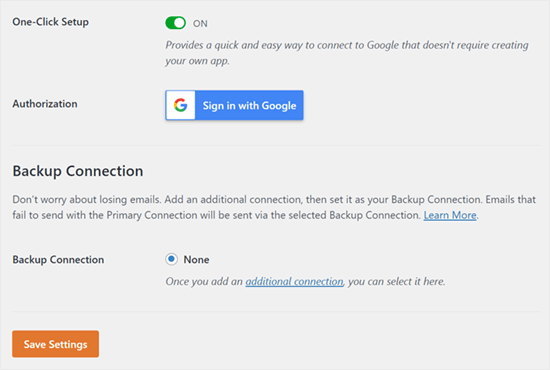
Successivamente, è possibile configurare le impostazioni del mailer utilizzando la configurazione in un clic di WP Mail SMTP.
Questo metodo non richiede la creazione di una propria app, il che è molto più semplice. È sufficiente accedere al proprio account Gmail e fare clic su “Salva impostazioni”.
L’utilizzo di Gmail o di Google Workspace a livello professionale presenta tuttavia un paio di svantaggi.
Uno di questi è che potrebbe essere necessario contattare l’host web per fargli installare il certificato giusto per farlo funzionare.
Inoltre, se in futuro cambierete l’indirizzo e-mail, dovrete ripetere l’intera procedura. Questo include la creazione di una nuova applicazione web.
Utilizzo di Microsoft 365 con WP Mail SMTP per riparare le e-mail di WordPress
Se utilizzate Microsoft Office 365 o Outlook per il vostro account di posta elettronica abituale, potete utilizzare anche quello per inviare e-mail attraverso WordPress. Tuttavia, questa non è un’opzione consigliata, perché è meno sicura.
È necessario configurare WP Mail SMTP come sopra, quindi fare clic sull’opzione “365 / Outlook” quando si sceglie il mailer SMTP. Quindi, è necessario registrare un’app su Microsoft Azure in modo da poter compilare i campi sottostanti.
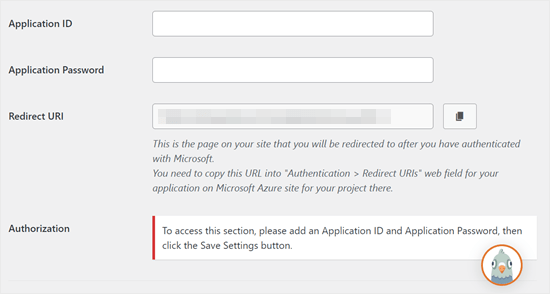
Per maggiori dettagli, consultare la guida dettagliata su come configurare Outlook con WP Mail SMTP.
Utilizzo di Amazon SES con WP Mail SMTP per riparare le e-mail di WordPress
La piattaforma Amazon AWS dispone di un Simple Email Service (SES) che è possibile utilizzare per risolvere il problema delle e-mail di WordPress.
L’aspetto migliore di Amazon è che consente di inviare gratuitamente fino a 62.000 e-mail al mese. Lo svantaggio è che la configurazione è un po’ più impegnativa per i principianti, motivo per cui non lo consigliamo come opzione preferita.
Ma come potete immaginare, molti professionisti ed esperti utilizzano Amazon SES per il loro servizio SMTP per le e-mail di WordPress, quindi non potevamo scrivere un articolo senza menzionarlo.
Se siete interessati a configurare Amazon SES con WordPress, consultate le istruzioni complete su come configurare Amazon SES con WordPress.
Qualunque sia il mailer che decidete di utilizzare, ricordate sempre di usare la funzione “Email di prova” per assicurarvi che l’invio dei messaggi di posta elettronica avvenga correttamente.
È necessario controllare anche la propria casella di posta elettronica e confermare di aver ricevuto l’e-mail di prova.
Avete riscontrato altri errori di WordPress? Selezionate queste verifiche
WordPress non è perfetto e di tanto in tanto si possono incontrare alcuni errori comuni. Ecco alcuni tutorial che potete consultare per risolverli:
- Come correggere il pulsante Aggiungi media non funzionante in WordPress
- Come correggere il problema del caricamento delle immagini in WordPress (passo dopo passo)
- Come correggere l’errore di contenuto misto in WordPress (passo dopo passo)
- Come correggere l’errore 404 restituito dalle pubblicazioni di WordPress (passo dopo passo)
- Come correggere l’errore “WordPress Database Error Disk Full”.
- Come correggere l’errore di stabilire una connessione al database in WordPress
- Come correggere l’errore “NON SI TRADUCE Questo tipo di file non è consentito per motivi di sicurezza” in WordPress
- Come correggere l’errore 502 Bad Gateway in WordPress
- Come correggere la ricerca di WordPress non funzionante
Speriamo che questo articolo vi abbia aiutato a capire come correggere il problema di WordPress che non invia email. Potreste anche voler consultare la nostra lista dei problemi più comuni dell’editor a blocchi di WordPress o la nostra selezione dei migliori plugin per personalizzare le email di WooCommerce.
Se questo articolo vi è piaciuto, iscrivetevi al nostro canale YouTube per le esercitazioni video su WordPress. Potete trovarci anche su Twitter e Facebook.


Syed Balkhi says
Hey WPBeginner readers,
Did you know you can win exciting prizes by commenting on WPBeginner?
Every month, our top blog commenters will win HUGE rewards, including premium WordPress plugin licenses and cash prizes.
You can get more details about the contest from here.
Start sharing your thoughts below to stand a chance to win!
Jiří Vaněk says
Im using WP Forms paid version with WP Mail SMTP in free version and this combination work pretty well together.
Jiří Vaněk says
Currently, the most problems that I have solved in the last year with sending emails on WordPress was the missing DNS record for SPF and DKIM. Specifically, it is most evident on the side of Google and Gmail, which rejects such emails. It is therefore a good idea to also focus on SPF and DKIM records for the domain.
WPBeginner Support says
If the method in this guide does not work then that could certainly be something to check
Admin
Moinuddin Waheed says
Sending emails and being hundred percent assured that it has got delivered is a must for any kind of online businesses.
This is where comes the role of this excellent plugin called wp SMTP mail which ensures that the email that has been sent has also been delivered to the recipient.
I have implemented wp mail SMTP to my websites and planning to use on all my wordpress websites.
Carol says
The best answer so far! I have been looking for this answer for 1 year!
WPBeginner Support says
Glad to hear our guide was helpful!
Admin
Abubakar Bala says
Wow! WP Beginner is my number 1 go to destination for WordPress bugs. I have been facing serious issues with the issues discussed in this article. Thank you so much for these detailed solutions.
WPBeginner Support says
Glad to hear our guide was helpful!
Admin
Joe says
What is the purpose of setting up the mail1 subdomain?
Bren says
Is there a code-only alternative? I’d like to avoid using plugins where possible.
WPBeginner Support says
We do not have any beginner-friendly methods for adding SMTP without a plugin, for not using a plugin, we would recommend taking a look at our site below that covers common concerns for using multiple plugins and why they aren’t as prevalent as they seem:
https://www.wpbeginner.com/opinion/how-many-wordpress-plugins-should-you-install-on-your-site
Admin
Tim says
I understand having to set up the WP Mail SMTP Plugin. That’s fabulous.
I suppose what I don’t understand is if I have SMTP with my hosting account and I can send through that, why use a third-party SMTP provider? Did I miss something? What benefit does the third-party provide? Thanks.
WPBeginner Support says
It would be a personal preference if you use a third party as we recommend or some hosting providers do not have the option to use SMTP through them.
Admin
Qudus says
Thank you for this great article.
I followed every step successfully until I got to AUTHENTICATE THIS DORMAIN.
when I clicked on manage domains, I couldn’t find any DNS record or TXT for me to add the codes from Sendinblue.
Please what do I do?
WPBeginner Support says
If you do not see where you can add the records, you would want to reach out to your hosting provider and they should be able to assist.
Admin
Brittany Pelegrino says
Thank you so much for this awesome article! I was wondering if you could advise on where you need to point your subdomain to when creating the DNS record?
WPBeginner Support says
Unless your hosting provider requires it, you shouldn’t need to point the subdomain to a specific location on your site or anywhere at all other than the records from our guide.
Admin
Oscar says
hey i have the setup correct the test email went through however the email from the contact form was sent to promotions. what can i do to fix this?
WPBeginner Support says
That would be determined by the email provider being used and not something the plugin would change sadly.
Admin
Michael says
Tnx a lot for your guide. After not less than 10 different attempts to make my emails functionable, this did it. THANKS!
WPBeginner Support says
Glad our guide was helpful
Admin
Paul says
What if email domain and web site domain are different? In your instructions and also the instructions of sendinblue it was confusing under which of the two domains am I putting the records, getting authorization, etc.
WPBeginner Support says
You would want to set up Sendinblue for the domain that is in the email address
Admin
Paul says
Excuse my SMTP ignorance but can I use Sendinblue for sending email from that email address from my wordpress account if I already have that email account functioning elsewhere (in my case outlook)?
WPBeginner Support says
Yes, you can customize the address you send the email from in Sendinblue.
Admin
Marlene Elizabeth says
It worked with the WP Mail SMTP Configuration perfectly. Literally just had to changed the E-Mail. Thanks.
WPBeginner Support says
Glad our guide was helpful
Admin
Lisa says
Two days trying to resolve wordpress not sending attachment bigger than 1mb; nothing works.
Resolved in 1 minute thanks to you.
WPBeginner Support says
Glad our guide was helpful
Admin
Martin N says
Is there any way to do this but without a plugin?
WPBeginner Support says
We do not have a recommended method to set this up without a plugin.
Admin
eva says
Hi,i follow your steps. but my WordPress still don’t send an email now. I think i set up WP Mail SMTP successfully and test my private email, but when my clients subscribed, placed an order, canceled, and order, i didn’t receive a notification, either my clients. i have checked with my host server several times, they don’t know how to help me, and only clients’ reset passwords email was sent successfully after their help. Now they think there are must be something wrong with my woo commerce plugin or my theme.
I don’t know how to deal with this problem now, can you give me your suggestion?
WPBeginner Support says
You may want to check with the support for the plugin to ensure they don’t override the sending method for emails.
Admin
Harold says
I was able to use sindInBlue and get it to work. Whenever a customer fills out my form, I get an email with all the customers information. They only problem I have is that I would like to send a “confirmation” email to my customers email address, stating that we received their email and will respond within 24 hours.
WPBeginner Support says
You would want to check with the options in your contact form for that.
Admin
Scott says
In the tutorial, there is the line “Open up a new browser tab and log back into your web hosting account. You need to find your domain and open up the DNS records. ”
Do I open up the DNS of my domain, or the newly created subdomain?
WPBeginner Support says
You would open your primary domain’s DNS and add the records that Sendinblue has given you to that.
Admin
Victoria says
I was really struggling with this issue and your article really helped – thank you!
WPBeginner Support says
You’re welcome, glad our guide helped
Admin
Tulay Girard says
Great tutorial. Thank you!
WPBeginner Support says
You’re welcome
Admin
Tolu says
I thought this guide would help as my issue seemed similar but after going through this guide, im still not sure how to fix my issue. I’ve been trying to change the Admin email so I can receive order details. when I try to change it says the new email will not be recognized until the confirmation email (sent to old) is accepted. But that confirmation email is nowhere to be found. How to I change the admin email?
WPBeginner Support says
If the message is not caught in your spam folder when you resent it, we would recommend taking a look at our guide below:
https://www.wpbeginner.com/beginners-guide/how-to-change-the-wordpress-admin-email
Admin
Rudy Ramkissoon says
I’m receiving emails from non gmail accounts and getting error. Like the following below.
Address not foundYour message wasn’t delivered to example@example.com because the domain example.com couldn’t be found. Check for typos or unnecessary spaces and try again.
What can cause this?
WPBeginner Support says
If the user did not type in their email address correctly would be the most common reason.
Admin
J H says
I followed this guide and got “test email sent successfully” but I didn’t receive an email on my email account, how come?
WPBeginner Support says
There are multiple possible reasons, you may want to ensure that the email did not get caught in your spam folder for a starting point
Admin
Joel says
Thank You so very much for the step by step guidance… Was using the same plugin earlier and it stopped working… Following your instructions, have signed up for Sendinblue & now it works like a charm.
I have always followed most of the instructions from your blog… Thank You
WPBeginner Support says
Glad our guide was able to help
Admin
lori says
Hello, I’m a little confused. When I set up our site I contacted the web host (BlueHost) and they set up our email accounts using G-Suite so that we could use @ourdomain for our emails. They said it would be complicated to do, so they set it up without explaining the details. We pay for each email account set up this way. After reading this post, I’m wondering if I’m also supposed to set up the WP Mail SMTP plugin. Do I need to go back and set up this plugin also for the best email performance, or would that not apply in our situation? Thank you.
WPBeginner Support says
We would recommend using SMTP to send your emails still as having a custom email address does not change how WordPress sends emails.
Admin
John says
Thanks for this but why do we need to create a subdomain?
WPBeginner Support says
To ensure that connections going there are for email and not possible site visitors
Admin
Jack says
This was super helpful, super easy to follow and fixed my issue Thanks!
WPBeginner Support says
You’re welcome, glad our guide was helpful
Admin
Daniel says
You guys really help me out . I really need this information.
WPBeginner Support says
Glad we could help you with our guide
Admin
Bob says
Thank you for the guidance..
WPBeginner Support says
You’re welcome
Admin
Julie says
Thank you for the guidance..
WPBeginner Support says
You’re welcome
Admin
Peter says
Thank you for the guidance.
WPBeginner Support says
You’re welcome
Admin
Corinne says
Followed along on how to fix the issue of WordPress not sending emails. Worked great until about half way through. What was on the website to what was actually happening totally off from each other. Did not successfully complete the task and not sure what to do next. Please update the help on the website. Thanks!!
WPBeginner Support says
We will certainly take a look at what needs to be updated in this article.
Admin
Kate says
Thanks for the tutorial, it has changed a bit in google dev since you wrote it but I got there in the end. And emails are being sent and received!
WPBeginner Support says
You’re welcome, it’s difficult to keep up with Google’s changes but glad our article could still be helpful
Admin
Shahbaaz says
I am not receiving WordPress password recovery emails or WordPress confirm emails. What should I do ? I am using Google cloud hosting trial. I am a beginner. Please help!
WPBeginner Support says
It may be the method that WordPress is sending emails, you can change the method your site sends emails using our article here: https://www.wpbeginner.com/plugins/how-to-send-email-in-wordpress-using-the-gmail-smtp-server/
Admin
Carla says
Hi there, thanks for this amazing tutorial and so well explained – However I’m still unable to overcome the problem on the main settings. I’m using contactform7 and forms aren’t working duo to this issue. I’m not receiving any email at all to be able to confirm the address change.
WPBeginner Support says
If you set up SMTP properly and the emails are not sending correctly then you would want to reach out to your form’s support to ensure there isn’t an issue with the form itself.
Admin
Emmanuel says
I am currently using Google Gmail setup and was able to follow the steps to create the Gmail api to connect the Client ID and Secret ID. I can test the redirection URL and login to Google all right. However, I’m unable to send a Test Email. All of sudden the “Force From Email” check box is also grayed out and uncheck. I can’t check that box. Please help
WPBeginner Support says
For issues with the plugin, please reach out to the plugin’s support through the support forum and they should be able to assist.
Admin
Adi Hermanto says
Thanks for brilliant tutorial mate, really did help solve an issue which wasted hours of my time.
WPBeginner Support says
Glad our article could help solve the problem
Admin
Ankit says
Thanks !!!
Which theme are you using?
WPBeginner Support says
Hi Ankit,
We are using a custom theme made on top of Genesis framework.
Admin
Penina says
Thank you for the tutorial. It works so well!
mudasir abbas turi says
Hello dear thank you very much i got success
Pugazhendhi says
I got an error message 403 forbidden at the last stage of setting up the gmail smtp.Can you suggest me something so that I can resolve it to send an email of the enquiry form that i have created using contact form 7.
Joel says
I installed the WP Mail SMTP plugin and although you made a great effort to demonstrate connectivity with mailgun, your info was not necessarily dated with Godaddy’s cpanel. I decided to go with Sendgrid which was a much easier set process than mailgun.
brad says
i successfully installed WP Mail SMTP and got the confirmation test email. However, I don’t know how to attach it to my website. The current contact form in zerif lite gives me an error message. Please advise. Thanks.
WPBeginner Support says
Hi Brad,
Please contact your theme support. Alternately you can use WPForms Lite to add a contact form to your website.
Admin
Jason says
I was able to set up WP Mail SMTP to work with Contact Form 7, but in all emails we receive they always show my gmail as the sender but not the real senders email. Is there anyway to fix this problem?
Josin says
I get the following error when I try to authorize the plugin to send mails using Gmail.
“The Web server is configured to not list the contents of this directory or you do not have enough permissions to access the resource”
How can I tackle this error?
Alicia says
I tried twice to follow these directions and everything was going according to plan… But then at the end… and error message! Anyone know what this means?
The OAuth client was not found.
Will says
My problem is that wordpress won’t send emails to or from an address that is coming from my domain name. E.g. @domain.com. But it will send from any other email address type.
Md Sajid says
i successfully setup my site, and it is working very well.
thanks for this nice and working tutorial..
i used gmail api first method..
SORRY FOR MY BAD ENGLISH