Das Hinzufügen eines Kontaktformulars zu Ihrer WordPress-Website ist der Schlüssel zur effektiven Kommunikation mit Ihren Besuchern. Mit einem Kontaktformular können sich Kunden beispielsweise mit Fragen oder Feedback zu Ihren Produkten und Dienstleistungen an Sie wenden.
WordPress verfügt jedoch nicht über ein eingebautes Kontaktformular, was frustrierend sein kann, wenn Sie mit der Programmierung nicht vertraut sind.
Zum Glück gibt es eine einfache Möglichkeit, Kontaktformulare ohne technische Kenntnisse hinzuzufügen. Mit den richtigen Tools können Sie leicht ein Formular erstellen, das den Anforderungen Ihrer Website entspricht. Dadurch wird das Problem der manuellen Weitergabe Ihrer E-Mail gelöst, die zu Spam und verpassten Anfragen führen kann.
Nach einer Recherche über gängige Tools haben wir festgestellt, dass die Erstellung eines Kontaktformulars mit WPForms am einfachsten ist. In dieser Anleitung führen wir Sie durch die einzelnen Schritte, damit Sie schnell ein funktionales und attraktives Kontaktformular erstellen können.
Warum brauchen Sie ein WordPress-Kontaktformular?
Sie fragen sich vielleicht, warum Sie ein Kontaktformular brauchen; kann ich nicht einfach meine E-Mail-Adresse auf meiner Website angeben, damit die Leute mir eine E-Mail schicken können?
Das ist eine sehr häufige Frage für Anfänger, weil sie befürchten, dass das Hinzufügen eines Kontaktformulars Programmierkenntnisse erfordert.
Glücklicherweise können Sie ein WordPress-Plugin verwenden, um Ihrer WordPress-Website ganz einfach ein Kontaktformular hinzuzufügen, ohne über Programmierkenntnisse zu verfügen.
Im Folgenden finden Sie die 3 wichtigsten Gründe, warum ein Kontaktformular besser ist als das Einfügen Ihrer E-Mail-Adresse auf einer Seite.
- Spam-Schutz – Spam-Bots durchsuchen regelmäßig Websites nach dem mailto: E-Mail-Adressen-Tag. Wenn Sie Ihre E-Mail-Adresse auf der Website veröffentlichen, werden Sie eine Menge Spam-E-Mails erhalten. Auf der anderen Seite kann Ihr Kontaktformular Spam blockieren und fast alle Spam-E-Mails stoppen.
- Konsistente Informationen – Beim Versand von E-Mails erhalten Sie nicht immer alle Informationen, die Sie benötigen. Mit einem Kontaktformular können Sie dem Nutzer genau sagen, welche Informationen Sie benötigen, z. B. seine Telefonnummer, sein Budget, Projektdetails und mehr.
- Zeitersparnis – Kontaktformulare helfen Ihnen, auf mehr Arten Zeit zu sparen, als Sie sich vorstellen können. Neben konsistenten Informationen können Sie auch Formularbestätigungen verwenden, um dem Nutzer mitzuteilen, welche Schritte er als Nächstes unternehmen soll. So können Sie zum Beispiel ein Video ansehen oder bis zu 24 Stunden auf eine Antwort warten, damit der Nutzer nicht mehrere Anfragen an Sie richtet.
In diesem Sinne zeigen wir Ihnen Schritt für Schritt, wie Sie ein Kontaktformular in WordPress erstellen können. Hier sind alle Schritte, die wir in diesem Leitfaden durchgehen werden:
- Step 1. Choosing the Best WordPress Contact Form Plugin
- Step 2. Install a Contact Form Plugin on WordPress
- Step 3. Create a Contact Form in WordPress
- Step 4. Configuring WordPress Form Notification and Confirmations
- Step 5. Adding WordPress Contact Form on a Page
- Step 6. Adding WordPress Contact Form in a Sidebar
- Bonus Tip: Taking Your WordPress Contact Form to the Next Level
- Video Tutorial
Lassen Sie uns gleich loslegen!
Schritt 1. Auswahl des besten WordPress-Kontaktformular-Plugins
Als Erstes müssen Sie ein WordPress-Kontaktformular-Plugin auswählen.
Es gibt zwar mehrere kostenlose und kostenpflichtige WordPress-Kontaktformular-Plugins, aus denen Sie wählen können, aber wir verwenden WPForms auf unserer Website und glauben, dass es die beste Option auf dem Markt ist.
Im Folgenden sind die drei Gründe, warum wir denken, WPForms ist die beste:
- Es ist das einsteigerfreundlichste Kontaktformular-Plugin auf dem Markt. Sie können den Drag-and-Drop-Builder verwenden, um ein Kontaktformular mit nur wenigen Klicks zu erstellen.
- WPForms Lite ist 100 % kostenlos und Sie können damit ein einfaches Kontaktformular erstellen (über 6 Millionen Websites verwenden es).
- Wenn Sie bereit sind für mehr leistungsstarke Funktionen, dann können Sie ein Upgrade auf WPForms Pro.
Um mehr zu erfahren, können Sie unsere detaillierte WPForms Überprüfung zu sehen.
Nachdem wir uns nun für das Kontaktformular-Plugin entschieden haben, können wir es auf Ihrer Website installieren.
Schritt 2. Installieren Sie ein Kontakt-Formular-Plugin auf WordPress
Für dieses Tutorial werden wir WPForms Lite verwenden, weil es kostenlos und einfach zu bedienen ist.
Sie können dieses Plugin auf Ihrer Website installieren, indem Sie sich in Ihr WordPress-Dashboard einloggen und zu Plugins “ Add New gehen.
Geben Sie dann in das Suchfeld „WPForms“ ein und klicken Sie auf die Schaltfläche „Jetzt installieren“.
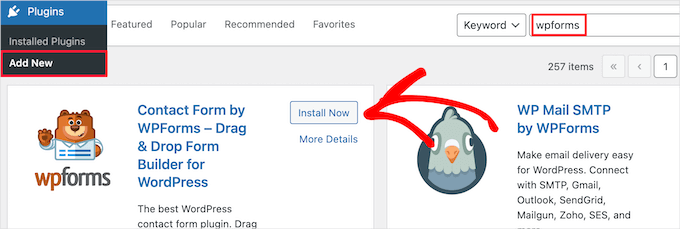
Dadurch wird das Plugin automatisch auf Ihrer Website installiert.
Als nächstes müssen Sie das Plugin aktivieren, indem Sie auf die Schaltfläche „Aktivieren“ klicken.

Wenn Sie das Plugin-Menü nicht sehen oder eine ausführlichere Anleitung wünschen, können Sie unsere Anleitung zur Installation eines WordPress-Plugins lesen.
Schritt 3. Erstellen Sie ein Kontaktformular in WordPress
Nachdem Sie nun WPForms aktiviert haben, können Sie ein Kontaktformular in WordPress erstellen.
Navigieren Sie dazu in Ihrem WordPress-Administrationsbereich zu WPForms “ Alle Formulare und klicken Sie dann auf die Schaltfläche „Neu hinzufügen“.

Dies öffnet die WPForms Drag-and-Drop-Formular-Builder-Vorlagenbibliothek. Beginnen Sie damit, Ihrem Kontaktformular einen Namen zu geben, und wählen Sie dann Ihre Kontaktformularvorlage aus.
Um eine Vorlage auszuwählen, fahren Sie einfach mit dem Mauszeiger über die Vorlage und klicken Sie auf die Schaltfläche „Vorlage verwenden“.
WPForms Lite wird mit über 20+ kostenlosen Formularvorlagen geliefert, aus denen Sie wählen können. Sie können diese verwenden, um so ziemlich jede Art von Kontaktformular zu erstellen, die Sie mögen.
Für dieses Beispiel wählen wir die Vorlage „Einfaches Kontaktformular“. Sie fügt automatisch die Felder Name, E-Mail und Nachricht hinzu.

Sie können auf jedes der Formularfelder klicken, um es zu bearbeiten.
Wenn Sie auf ein Formularfeld klicken, wird auf der linken Seite ein Feld „Feldoptionen“ angezeigt, in dem Sie Änderungen vornehmen können.

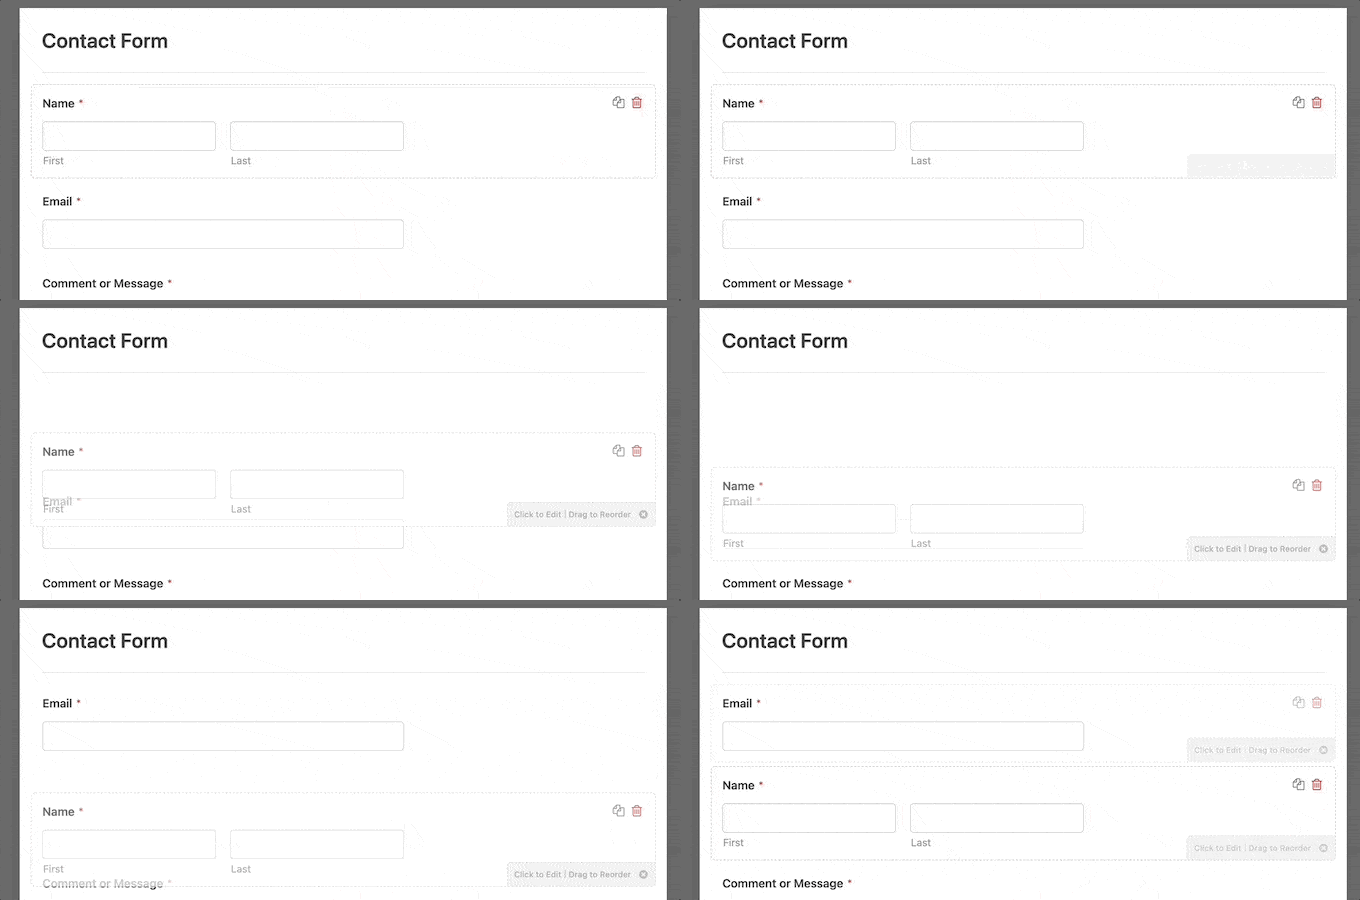
Sie können die Felder auch mit der Maus ziehen und ablegen, um die Reihenfolge zu ändern.
Hier ist ein Beispiel:
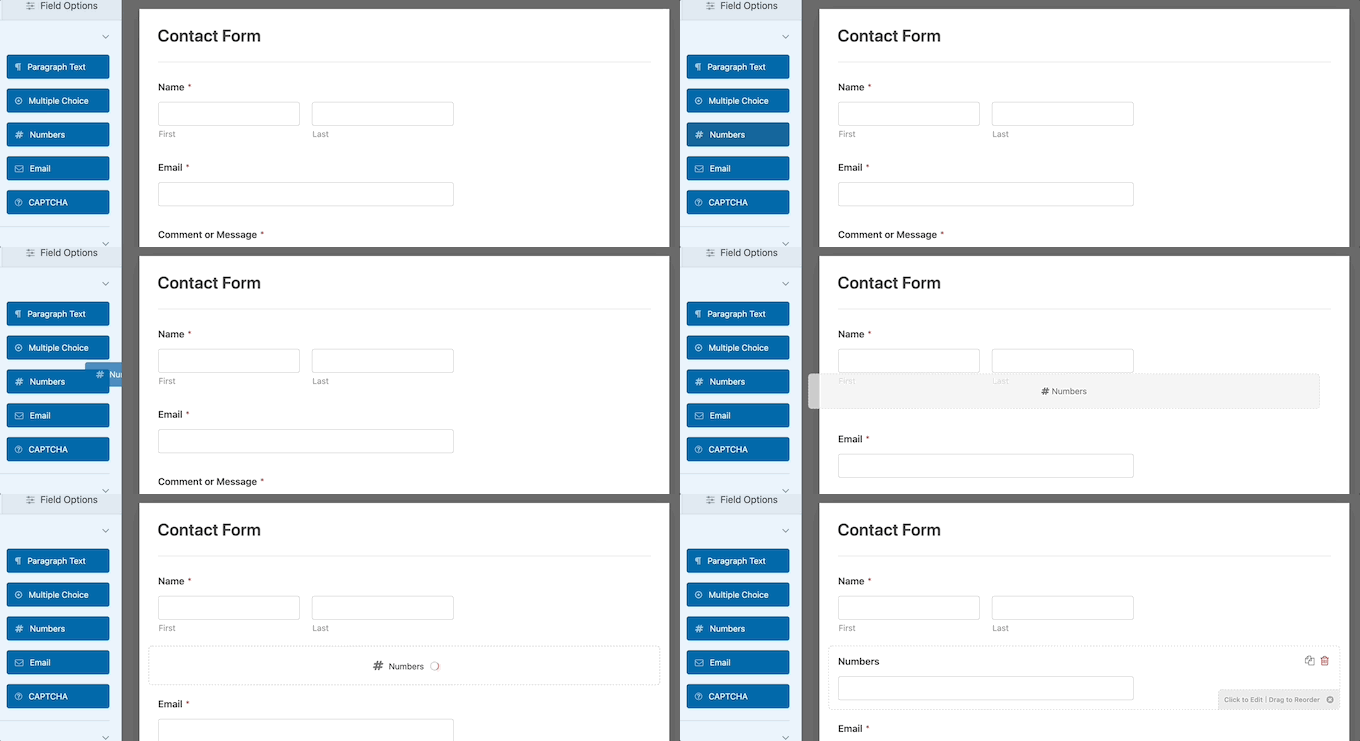
Wenn Sie ein neues Feld hinzufügen möchten, wählen Sie einfach eines der verfügbaren Felder in der linken Seitenleiste aus.
Sie können es auf Ihr Formular ziehen oder anklicken, und es wird automatisch zu Ihrem Formular hinzugefügt.
Wenn Sie mit dem Anpassen Ihres Formulars fertig sind, sollten Sie auf die Schaltfläche „Speichern“ klicken.
Schritt 4. WordPress-Formular-Benachrichtigungen und -Bestätigungen konfigurieren
Nachdem Sie nun Ihr Kontaktformular erstellt haben, ist es wichtig, dass Sie die Optionen für die Formularbenachrichtigung und die Formularbestätigung richtig konfigurieren.
Die Formularbestätigung ist das, was der Besucher Ihrer Website sieht, nachdem er das Formular abgeschickt hat. Das kann eine einfache Dankesnachricht sein, eine Seite, auf der Sie herunterladbare PDFs hochgeladen haben, oder alles, was Sie möchten.
Formularbenachrichtigung ist die E-Mail, die Sie erhalten, nachdem jemand das Kontaktformular in Ihrem WordPress-Blog ausgefüllt hat.
Um die Bestätigungsnachricht anzupassen, klicken wir auf die Registerkarte „Einstellungen“ und dann auf die Registerkarte „Bestätigungen“ im Formularersteller.
Es gibt bereits eine Standard-Dankesnachricht.
Sie können dies jedoch im Feld „Bestätigungsnachricht“ anpassen, wenn Sie dies wünschen.

Wenn Sie die Benutzer nach erfolgreicher Übermittlung des Formulars weiterleiten möchten, anstatt eine Nachricht anzuzeigen, wählen Sie im Dropdown-Menü „Bestätigungstyp“ die Option „Gehe zu URL“.
Dann geben Sie die URL ein, zu der Sie die Benutzer umleiten möchten.

Wenn Sie hier Änderungen vornehmen, müssen Sie auf die Schaltfläche „Speichern“ klicken.
Danach können Sie sicherstellen, dass die Einstellungen für die Formularbenachrichtigung korrekt sind. Klicken Sie einfach auf die Registerkarte „Benachrichtigungen“ im gleichen Menü „Einstellungen“.
Der beste Teil über WPForms ist, dass die Standardeinstellungen sind ideal für Anfänger. Wenn Sie zu den Benachrichtigungseinstellungen gehen, werden alle Felder dynamisch vorausgefüllt.

Die Benachrichtigungen werden standardmäßig an die E-Mail-Adresse des Administrators gesendet, die Sie bei der Erstellung Ihrer Website eingerichtet haben.
Wenn Sie die Benachrichtigung an eine benutzerdefinierte E-Mail-Adresse senden möchten, können Sie diese ändern. Wenn Sie die Benachrichtigung an mehrere E-Mail-Adressen senden möchten, trennen Sie die einzelnen E-Mail-Adressen einfach durch ein Komma.
Die „E-Mail-Betreffzeile“ wird mit dem Namen Ihres Formulars vorausgefüllt. Das Feld „Name des Absenders“ wird automatisch mit dem Namen Ihres Benutzers ausgefüllt.

Wenn Sie auf die Formularanfrage antworten, geht die Antwort an die E-Mail-Adresse, die der Benutzer zum Ausfüllen des Kontaktformulars verwendet hat.
Vergessen Sie nicht, auf die Schaltfläche „Speichern“ zu klicken, wenn Sie hier Änderungen vornehmen.
Wenn Sie Ihr E-Mail-Formular an mehrere Personen oder verschiedene Abteilungen senden möchten, sollten Sie sich unsere Anleitung zum Erstellen eines Kontaktformulars mit mehreren Empfängern ansehen.
Wenn Sie Probleme mit dem Empfang von Formular-E-Mails haben, lesen Sie unsere Anleitung zur Behebung von WordPress-Problemen beim Senden von E-Mails.
Schritt 5. Hinzufügen eines WordPress-Kontaktformulars auf einer Seite
Nun, da Sie Ihr WordPress-Kontaktformular konfiguriert haben, ist es an der Zeit, es zu einer Seite hinzuzufügen.
Sie können sie zu einer bestehenden Kontaktseite hinzufügen oder eine neue Seite in WordPress erstellen.
Wenn Sie eine neue Seite für ein Kontaktformular erstellen möchten, gehen Sie einfach auf Seiten “ Neu hinzufügen und geben Sie Ihrer Seite einen Namen.
Wir werden den WPForms-Block verwenden, um das Formular in eine Seite einzufügen. Klicken Sie einfach auf die Schaltfläche „Plus“ zum Hinzufügen von Blöcken und suchen Sie nach „WPForms“.
Anschließend können Sie auf den Block „WPForms“ klicken.

Der WPForms-Block wird nun im Inhaltsbereich Ihrer Seite angezeigt.
Sie müssen auf das Dropdown-Menü klicken, um das zuvor erstellte Formular auszuwählen.

WPForms lädt die Vorschau Ihres Kontaktformulars in den Editor. Sie können nun auf die Schaltfläche „Veröffentlichen“ oder „Aktualisieren“ klicken, um Ihr Formular zu speichern.
Weitere Einzelheiten finden Sie in unserem Leitfaden zum Einbetten von Formularen in WordPress.
Jetzt können Sie Ihre Website besuchen, um es in Aktion zu sehen. Hier sehen Sie, wie das Formular auf einer WordPress-Kontaktseite aussieht:
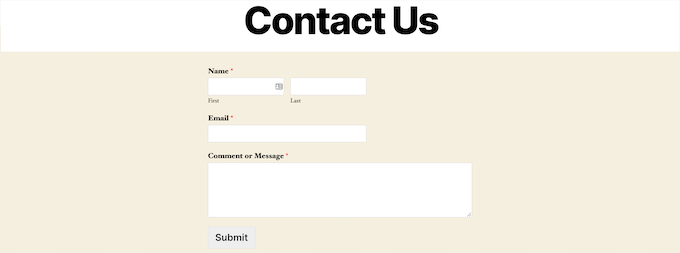
Wenn Sie nur das Kontaktformular auf der Seite hinzufügen wollten, sind Sie hier fertig. Herzlichen Glückwunsch!
Das heißt, WPForms kommt auch mit einem WordPress-Kontaktformular Shortcode. Sie können diesen verwenden, indem Sie WPForms “ Alle Formulare besuchen und dann den Shortcode neben Ihrem Formular kopieren.

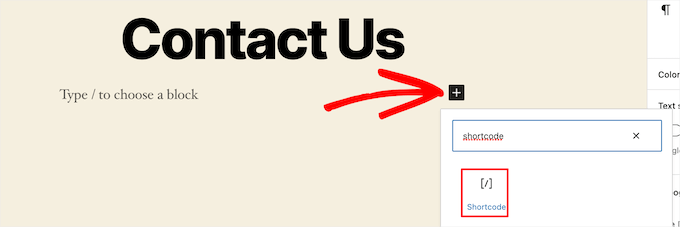
Dann müssen Sie nur noch die Seite öffnen, auf der Sie ihn hinzufügen möchten, auf die Schaltfläche „Plus“ für den Block klicken und nach „Shortcode“ suchen.
Als nächstes klicken wir auf den Block ‚Shortcode‘.
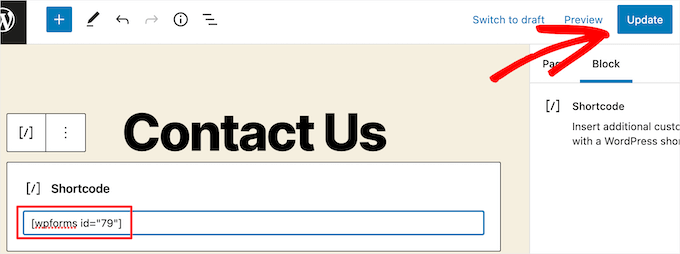
Fügen Sie dann den oben kopierten Shortcode in das Feld ein.
Danach können Sie auf „Aktualisieren“ oder „Veröffentlichen“ klicken, und Ihr Kontaktformular wird auf Ihrer Website live geschaltet, genau wie oben.
Wenn Sie mehr über Shortcodes erfahren möchten, sollten Sie sich unsere ultimative Anleitung zum Hinzufügen von Shortcodes in WordPress ansehen.
Schritt 6. Hinzufügen eines WordPress-Kontaktformulars in einer Seitenleiste
WPForms kommt auch mit einem WordPress-Kontaktformular-Widget, das Sie verwenden können, um Ihr Kontaktformular zu einer Seitenleiste oder einem anderen Widget-ready-Bereich in Ihrem WordPress-Theme hinzuzufügen.
Gehen Sie dazu auf Erscheinungsbild “ Widgets und klicken Sie auf das Plus-Symbol für das Hinzufügen von Blöcken in dem Widget-Bereich, in den Sie Ihr Formular einfügen möchten.

Als nächstes suchen wir nach „WPForms“.
Dann können Sie auf den Block „WPForms“ klicken, um ihn zu Ihrer Seitenleiste hinzuzufügen.

Danach müssen Sie Ihr Kontaktformular aus der Dropdown-Liste auswählen.
Dadurch wird automatisch eine Vorschau auf Ihr Formular geladen.

Klicken Sie nun auf die Schaltfläche „Aktualisieren“, um Ihre Änderungen zu speichern.
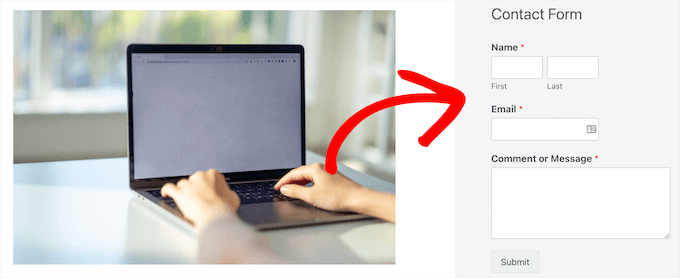
Jetzt können Sie Ihre Website besuchen und Ihr Kontaktformular live in Ihrer Seitenleiste oder einem anderen Widget-Bereich sehen.
Um mehr über Widgets zu erfahren, lesen Sie unseren Leitfaden zum Hinzufügen und Verwenden von Widgets in WordPress.
Bonus-Tipp: Bringen Sie Ihr WordPress-Kontaktformular auf die nächste Stufe
Abgesehen von der Erstellung einfacher Kontaktformulare enthält WPForms Pro über 2.000 vorgefertigte Formularvorlagen, mit denen Sie schnell jede Art von WordPress-Formular erstellen können, die Sie benötigen.
Es gibt leistungsstarke Funktionen wie bedingte Logik, Umfragen und Abstimmungen, elektronische Unterschriftensammlung, Formularabbrüche, Geolokalisierungsdaten, anpassbare Gutscheincodes und vieles mehr.
Außerdem können Sie problemlos Online-Zahlungen über Stripe, PayPal, Authorize.Net und Square akzeptieren. Selbst die kostenlose Version von WPForms ermöglicht es Ihnen, Stripe-Zahlungen zu sammeln.
Ganz zu schweigen davon, dass es mit Tausenden von Marketing- und Unternehmenstools wie Google Sheets, HubSpot und anderen integriert werden kann, um Ihren Workflow zu optimieren.
WPForms hat auch hinzugefügt Form Anpassungstools wie Form Landing Pages, Conversational Formen, führen Formen, und Rechner Formen, die Sie interaktive Formen auf Ihrer Website ohne die hohen Kosten hinzufügen können.

Weitere Tipps finden Sie in unserem Leitfaden zur Erstellung interaktiver Formulare in WordPress.
Treten Fehler im Kontaktformular auf? Lassen Sie sie von WPBeginner Pro Services beheben! Wir bieten erschwinglichen WordPress-Notfall-Support zur schnellen Problembehandlung und Behebung von Kontaktformular-Fehlern. Sparen Sie Zeit, sorgen Sie für Ruhe und stellen Sie sicher, dass Ihre Kunden Sie erreichen können. Vereinbaren Sie noch heute einen WordPress-Support-Dienst!
Video-Anleitung
Wenn Sie durch Zuschauen lernen, wird Ihnen unser Video-Tutorial gefallen:
Wir hoffen, dass dieser Artikel Ihnen geholfen hat, ein einfaches Kontaktformular in WordPress zu erstellen. Vielleicht interessieren Sie sich auch für unsere Expertenauswahl der besten Online-Formularersteller oder unseren ultimativen Leitfaden zur Verwendung von WordPress-Formularen.
Wenn Ihnen dieser Artikel gefallen hat, dann abonnieren Sie bitte unseren YouTube-Kanal für WordPress-Videotutorials. Sie können uns auch auf Twitter und Facebook finden.


Jiří Vaněk
I use WP Forms since I won a full license in your giveaway. I’ve never won anything before, and then I received a full license for WP Forms from you for free. I have to say, it’s a great plugin.
WPBeginner Support
Glad you liked the plugin
Admin
susan
Hello, I followed the steps howevert he contact page does not appear on the webite. How should I proceed as I have attempted it numerous times now.
WPBeginner Support
If you mean the page that you added the contact form to is not on your menu, then we would recommend taking a look at our article below for how to create and manage your menu:
https://www.wpbeginner.com/beginners-guide/how-to-add-navigation-menu-in-wordpress-beginners-guide/
Admin
Bryan
Hello, thanks for the help. You mentioned that the email address can be changed. Can you please share how this is done and where?
Thanks
Karolina
I followed all the steps but for whatever reason, this form doesn’t work. I uninstalled and installed it few times. I followed exactly as on video but when sending a test contact form I don’t receive any emails or notifications.
WPBeginner Support
If you’re not receiving emails on your site, we would recommend following our guide below as it is more than likely due to how WordPress sends emails than the form itself:
https://www.wpbeginner.com/plugins/how-to-send-email-in-wordpress-using-the-gmail-smtp-server/
Admin
Eric
I followed your video to put a contact form on my site and you made it easy and enjoyable. I noticed that you had your address and contact information on the side. How do I put my contact information there? Thank you in advance.
Eric
WPBeginner Support
If you mean from the video, we placed another block on the page and manually added the text
Admin
Natalia
hi, how to edit buttons and typeface in the form?
WPBeginner Support
It would depend on the form plugin you decide to use and there are different locations for that customization.
Admin
Amaka obi
I fid all these but when I tried to test it, I didn’t get any notification in my mail from my website. Please what could be the cause?
Thank you
WPBeginner Support
For the most common reason, it would be due to how WordPress sends emails, you can get around this issue by following our guide below:
https://www.wpbeginner.com/plugins/how-to-set-up-wp-mail-smtp-with-any-host-ultimate-guide/
Admin
Saiqa
Thank you so much! it really helped me:)
WPBeginner Support
Glad our guide was helpful
Admin
JITEN PATIL
Thanks! this plugin is nice. i am using it and it is very simple & easy to build forms in less time.
WPBeginner Support
Glad you found the plugin helpful
Admin
Brian Leggero
Wow! It sure doesn’t get any easier than that!
Great instructions! Nice slow talking too, easy to understand.
Keep up the GREAT work!
WPBeginner Support
Thank you, glad you found our guide helpful
Admin
Geoff Anderson
I’ve installed WPForms Lite and activated it but it doesn’t show up in the side menu bar in WordPress. I can see it in the Plugins but I don’t have an option to select settings just deactivate.
So I’m unable to access the plugin at all. Any suggestions?
Cheers, Geoff
WPBeginner Support
You may want to try reinstalling the plugin in case there was a hiccup with your download. Otherwise, please reach out directly to WPForms‘ support and they would be able to assist.
Admin
Flora tony
please when i click on submit, i go to my mail and i dont see any mail
i have tried it several times
WPBeginner Support
For not receiving emails there are a few possible reasons, to start we would recommend ensuring your site is using SMTP by following our guide below:
https://www.wpbeginner.com/plugins/how-to-send-email-in-wordpress-using-the-gmail-smtp-server/
Admin
Daniel Putman
I am getting very frustrated with your tutorials. They seem to be out of date because the view that I get is different than what you are showing. Please update these tutorials.
WPBeginner Support
This article is up to date, you may want to ensure you are not on WordPress.com, we cover the difference between WordPress.com and WordPress.org on our article below:
https://www.wpbeginner.com/beginners-guide/self-hosted-wordpress-org-vs-free-wordpress-com-infograph/
Admin
Court
This no longer works as your need a business plan to have a contact form.
WPBeginner Support
That is for WordPress.com, our tutorials are for WordPress.org. We cover the difference between the two in our article below:
https://www.wpbeginner.com/beginners-guide/self-hosted-wordpress-org-vs-free-wordpress-com-infograph/
Admin
Court
Thanks for the clarification!!
WPBeginner Support
You’re welcome
Chris
I just installed WPForms and created a contact form for my website.
When I visit the contact page, I see two contact forms; the one from WPForms and another one. I don’t have any other form plugin except WPForm.
How can I resolve this?
WPBeginner Support
By default, WordPress does not have a contact form tool, you would want to check through your plugins again for plugins that add a contact form tool.
Admin
Chris
I later found out that the problem was from my theme. I contacted support and they gave me a code to disable it.
Thanks for your feedback.
Marguerite F Cleveland
I have my form set up but when I test it in my site and click the submit button nothing happens. I set it up using the block editor.
WPBeginner Support
If you mean you did not receive an email then it is likely due to how WordPress is sending the emails, we would recommend setting up SMTP to help ensure you receive any messages from your site by following our guide here:
https://www.wpbeginner.com/plugins/how-to-send-email-in-wordpress-using-the-gmail-smtp-server/
Admin
Luz Manalo-Cruz
Hi. I am unable to add the contact form in Pages. When I click on Pages in my dashboard, there is no Add Forms field. Is there another way? I am on localhost.
WPBeginner Support
You’re likely using the block editor, you would want to check for the WPForms block to add the form to your page
Admin
Luz Manalo-Cruz
That worked, thanks!
WPBeginner Support
Glad we could help
Sakshi Kaushik
I have installed the WPforms plugin. but where do i check my form entries from? I am unable to see the entries that my viewers are giving. Please help.
WPBeginner Support
Under the WPForms menu item, there should be entires as an option. If you are unable to see the entires, you would want to reach out to WPForms‘ support and they would assist with your specific issue.
Admin
Adepoju Olaide
Thanks for this post. i hope this would work for me!
WPBeginner Support
You’re welcome, our guide should work for every WordPress.org site so it should work for you as well
Admin
Ainjel M
Great post! Thank you. Was so simple!
WPBeginner Support
You’re welcome, glad we could simplify the process for you
Admin
Jennifer Preissler
I am using divi theme and I am not finding the add form button…
WPBeginner Support
If you are editing a post/page with the block editor you would want to add the WPForms block instead of looking for a button
Admin
santoshrana
informative detail. That list has helped a lot in my task.
WPBeginner Support
Glad our guide could help
Admin
brenda s
I need help, I have created a form and would like to know how I can receive the information once submit button is pressed, where does my information go.
WPBeginner Support
It would depend on what form you are using but the default is to email the submissions to the email under Settings>General
Admin
beth pross
I have made my contact form too many times to count. I have tried to upload it also several times. it will be in the preview. It will NOT publish.
I have followed your directions every time. I have invested over ten hours on this one edit.
What am I doing wrong?
WPBeginner Support
It would depend on which plugin you’re using. If you reach out to your contact form plugin’s support they should be able to assist with what the issue could be.
Admin
Ranojit Kumar
Thanks for this post.
WPBeginner Support
You’re welcome
Admin
Kathy Rowland
Thanks for the great tutorial! Off to update and activate my Contact Form. Let the emails begin
WPBeginner Support
You’re welcome, glad you liked our article
Admin
Jochen Gererstorfer
Do we have to install another plugin, if we upgrade from the lite version to WPForms Pro?
WPBeginner Support
When you add your license key the lite version should replace itself with the pro version for you.
Admin
Kathleen
This is great…sounds easy enough. I’m going to try it with my granddaughters website. Thanks…
WPBeginner Support
You’re welcome, glad our guide is helpful
Admin
Burhan
The contact form is one of the must have elements of a website.
This article is all you need to learn making the best and proffessional contact form.
WPBeginner Support
Thank you for your recommendation of our article
Admin
Henry Bartimus
when I click „confirmation and an empty box opens with no content, thank you
WPBeginner Support
That’s quite strange, you could start by disabling your other plugins to see if it is a plugin conflict. Otherwise, please reach out to WPForms‘ support directly and they should be able to assist with the issue
Admin
Susan
I’ve installed WP forms Lite, but can’t see the configuration options anywhere in settings – there isn’t much at all there. Any clues?
WPBeginner Support
It would depend on what specific option you’re looking for as some options are in the forms themselves. If you reach out to the plugin’s support they can help point you to what you’re looking for
Admin
Greg
I created the Simple contact form and the problem I am having is the email that is sent goes into the Junk Email folder. I have tried adding the domain and sender as safe but it still goes to Junk Email. How can I stop this?
WPBeginner Support
If you’re sending emails using SMTP such as the method in our article: https://www.wpbeginner.com/plugins/how-to-send-email-in-wordpress-using-the-gmail-smtp-server/
You may want to reach out to the support for your email provider to see if there is a setting on their end that could be causing this.
Admin
Clement
Great tutorial for anyone who wants to create a contact form in an easy-to-follow manner
WPBeginner Support
THank you
Admin
Khan
Nice post Bro. I want to ask, does this form comply with GDPR?
WPBeginner Support
For specifics on GDPR compliance when creating a form, you would want to take a look at: https://www.wpbeginner.com/plugins/how-to-create-gdpr-compliant-forms-in-wordpress/
and
https://www.wpbeginner.com/beginners-guide/the-ultimate-guide-to-wordpress-and-gdpr-compliance-everything-you-need-to-know/
Admin
Jess
Hi there, thank you for your insightful articles, they have helped me a lot!
I am wondering if you know how to insert a code that allows the user to remove a file that has been uploaded to a Contact 7 form? Say it was uploaded by mistake and they want to remove it and try again. At the moment my form doesn’t allow me to delete any uploaded files… Appreciate your help.
WPBeginner Support
For a question specific to contact form 7, you would want to reach out to the plugin’s support and they should be able to assist.
Admin
Eucharia
Thanks for the wonderful article, I have been following it to create my site but I have problem with adding my Form to the contact page. When I click on add page it opens a bar to add title but I don’t see the add form option. I have not been able to add my contacts form to my contacts page.
Please I need you to help me. Thanks
John
When I make a new page, I don’t see an „add form“ button. This is WP 5.0.2, freshly reset.
WPBeginner Support
For the new blocks editor you would want to add a WPForms block and that would allow you to add the form
Admin
Himanshu
Thank you for your hard work and the videos. I learn a lot from your videos. However, one thing I noticed consistently is that often you skip some steps or zip past a simple action that confuses the newcomers, especially when you are ‚WPbeginner‘ instructors. Example. While tutoring the making of a Contact Us form, before publishing/updating it, you zipped past the text We’d Love to Hear From You text. This is the text you entered but did not show and that confused me a lot as to how come that text did not show up in my form because I have been following you step by step to create the form on my new website while I am watching your video. I went back and forth and created 4 forms to no avail–the text just would not show up. Then I said to my self, what the heck! and entered it on my own and proceeded to remaining video. I noticed the same issue in your other videos as well. Could you be a little slower and specific? Please note, this is not a criticism; this is a constructive suggestion. You folks do a great job and without you, I would not have my website created on my own and I would not be writing to you here. Thanks a million for doing this
WPBeginner Support
Hi Himanshu,
Thank you for your kind feedback, we really appreciate it. We are aware of the issue you are referring to, and our team is continuously working on improving the videos. We will put more effort into it.
Meanwhile, if you are unable to follow instructions shown in a video or one of our tutorials, then please do not hesitate to ask us. You can do so by leaving a comment or sending us a message using the contact form on our website. We try our best to answer all user questions.
Admin
Brenda Donovan
The simple form is all I need and it looks good and is looking good on cell phone too.
I set the reCaptcha up but it doesn’t show up on the contact page where the form code is.
Is there a short code for that also? and if so where in the settings is it?
Thanks…
WPBeginner Support
Hi Brenda,
No, you will need to setup recaptcha in plugin settings.
Admin
Michel Kapteijns
Hello,
I followed al the steps, I see the contact form on my site. I can fill in a message, and after I submit the message I neatly see the ‚thank you‘ message. Butt.. I do nog receive the mesage in my e-mail account. What am I doing wrong?
Thank you very much for your answer on this.
Regards, Michel
WPBeginner Support
Hi Michel,
Please see our article on how to fix WordPress not sending email issue.
Admin
Shamli
Hi, I’ve done all the steps as mentioned above, but I cannot see the Contact page when I preview.
Please help me to solve.
Thank you.
WPBeginner Support
Hi Shamli,
You need to edit the page, insert the form, and then click on the preview button. Your contact form will only appear on the page where you insert the form.
Admin
Brenda
HI – We are using this contact form and it’s fine but I would like to add Captcha and, more importantly, some text that can be overwritten in the message box. There is a local company with a very similar name so we are constantly receiving messages which relate to this other company. We want to have some text, that has to be overwritten, to reiterate what our company is to try and reduce these messages. Is this possible?
Brenda Donovan
I redid the form and rechecked the add recaptcha on the confirmation settings and it worked this time. I had done it before but somehow didn’t take.
now on to the mail problem. thanks
safi
sir how can i know which email system notify or receive message i did everything but don,t which i will receive the email from client i am beginner with wp
WPBeginner Support
Hi Safi,
Please see how to fix WordPress not sending emails issue
Admin
Yamin Kamboh
Thank you, was really helpful.
Sarah Zubair
So how do I access the library of media (if I’ve an option of attaching some files in my WP forms) then where do they all get stored?
WPBeginner Support
Hi Sarah,
By default, the user-uploaded files are stored in the WPForms folder inside the Uploads directory of your site.
If you’d prefer to upload the files to the WordPress Media Library, click on the File Upload field in the form builder. Then, under Advanced Options, check the box next to Store file in WordPress Media Library.
For more details see this guide.
Admin
marypeter
This is truly helpful. I can say it is my first time to leave a review in any website. The information you have provided has prompted me to do this. Thank you a thousand times!!
Eston
Hi
how do i set it up that i recieve emails in Gmail, and be able to reply to customers right there in Gmail.com?
WPBeginner Support
Hi Eston,
You can go to settings section of any form and click on the confirmation tab. From here you can add any email address where you want to be notified.
Admin
Cathy
I found this very helpful in setting up, however, after completion I ran a test, so did a friend of mine, I cannot figure out why we are not receiving the email tests sent from the web site? Although I’ve gone through the steps a second time to be sure all was correctly set up, I am not receiving messages from the web site, I hope you can assist with constructive suggestions to aid in problem solving, much appreciate the assistance…
Lori Jo
I am very new, easily confused! Regarding the assigned admin email address in my WP blog site, can that actually be used to receive messages from the contact form? I think the address looks more professional and it would be nice to have all site messages responding back to the actual site instead of an outside email like my Gmail. I did a test and I could not find the reply, installed Flamingo and I did see it but there is no reply option like regular email.
Please let me know, thanks!
Ron Isaac
Thanks, this was a great help to me!