
Machen Sie sich Sorgen um den Umzug Ihrer WordPress-Website auf eine neue Domain? Das ist für viele Website-Besitzer ein beängstigender Gedanke.
Sie möchten nicht die Suchrankings und den Traffic verlieren, für deren Aufbau Sie so hart gearbeitet haben. Ein falscher Schritt könnte zu defekten Links und verlorenen Besuchern führen.
Wir haben Hunderte von Websites erfolgreich migriert. Wir kennen die genauen Schritte, die Sie unternehmen müssen, um sicherzustellen, dass während des Prozesses nichts kaputt geht.
In diesem Leitfaden zeigen wir Ihnen, wie Sie WordPress einfach auf eine neue Domain verschieben, ohne SEO zu verlieren.
Die Migration Ihrer WordPress-Website zu einem neuen Domainnamen kann beängstigend sein, muss es aber nicht. Wir sind hier, um Sie Schritt für Schritt durch den Prozess zu führen.
Sie können auf einen der unten stehenden Links klicken, um zu einem bestimmten Schritt der Migration Ihrer WordPress-Website zu einer neuen Domain zu gelangen:
- Was Sie wissen sollten, bevor Sie Domains ändern
- Vorbereitungsschritte: Was Sie für den Start benötigen
- Schritt 1: Erstellen Sie ein Duplicator-Paket Ihrer WordPress-Website
- Schritt 2: Erstellen Sie eine Datenbank für Ihren neuen Domainnamen
- Schritt 3: WordPress auf Ihrem neuen Domainnamen entpacken
- Schritt 4: Permanente 301-Weiterleitungen einrichten
- Schritt 5: Benachrichtigen Sie Google über Ihre neue Domain
- Benachrichtigen Sie Ihre Benutzer über den neuen Domainnamen
- Häufig gestellte Fragen zum Umzug einer WordPress-Website
- Video-Tutorial
- Zusätzliche Ressourcen
Was Sie wissen sollten, bevor Sie Domains ändern
Bevor Sie beginnen, gibt es ein paar Dinge, die Sie wissen sollten.
Der Prozess der Übertragung auf eine neue Domain wird sich vorübergehend auf Ihre Suchmaschinenrankings auswirken, da Google und andere Suchmaschinen sich an die Änderungen anpassen müssen.
Dies wird sich auch vorübergehend auf Ihren Suchverkehr auswirken. Bitte beachten Sie, dass dies normal ist und bei allen Websites vorkommt, die zu einer neuen Domain wechseln.
Sie können jedoch die SEO-Auswirkungen drastisch reduzieren, indem Sie diesem Leitfaden folgen. Wir zeigen Ihnen den richtigen Weg, Ihre WordPress-Website auf einen neuen Domainnamen zu verschieben, richtige 301-Weiterleitungen einzurichten und Suchmaschinen zu benachrichtigen.
Bitte beachte, dass dieser Leitfaden nicht zum Umzug einer WordPress-Seite zu einem neuen Hoster dient. Es geht hierbei nur um den Wechsel eines Domainnamens. Obwohl der Vorgang ähnlich ist, gibt es ein paar zusätzliche Schritte. Diese zusätzlichen Schritte helfen dir, deine SEO-Rankings und deinen Traffic zu schützen.
Wenn deine alte Website auf WordPress.com gehostet wird, musst du stattdessen die Anweisungen in unserem Leitfaden Umzug von WordPress.com zu WordPress.org befolgen.
Vorbereitungsschritte: Was Sie für den Start benötigen
In dieser Anleitung gehen wir davon aus, dass Sie Ihre WordPress-Website auf oldsite.com eingerichtet haben und versuchen, sie auf newsite.com zu migrieren.
Wir gehen auch davon aus, dass du bereits ein WordPress-Hosting-Konto hast und mit dem Control Panel deines Webhosters vertraut bist.
Du musst auch wissen, wie man einen FTP-Client wie FileZilla benutzt oder wie man Dateien mit der File Manager-App bearbeitet, die im Dashboard deines Hosting-Kontos verfügbar ist.
Falls du keinen Webhosting-Anbieter hast oder zu einem neuen wechseln möchtest, empfehlen wir Bluehost (ideal für kleine Websites + kostenlose Domain) und entweder SiteGround oder WP Engine (ideal für größere Websites oder Online-Shops).
Sobald Sie diese Dinge erledigt haben, sind Sie bereit, den Prozess zu starten!
Schritt 1: Erstellen Sie ein Duplicator-Paket Ihrer WordPress-Website
Das Erste, was Sie tun müssen, ist ein vollständiges Backup Ihrer WordPress-Website zu erstellen.
Sie werden dieses Backup dann verwenden, um eine Duplikat Ihrer Website zu erstellen, damit Sie die Weiterleitungen von Ihrer alten Domain zur neuen korrekt einrichten können.
Es gibt zwar viele WordPress-Backup-Plugins, aber für dieses Tutorial verwenden wir Duplicator.
Duplicator ist das beste WordPress-Backup- und Migrations-Plugin. Wir haben es verwendet, um unzählige Websites für unsere eigenen Unternehmen und für Kunden zu migrieren. Wir haben festgestellt, dass es auch bei sehr großen Websites zuverlässig funktioniert.
Hinweis: Es gibt auch eine kostenlose Version von Duplicator, die du für diese Migration verwenden kannst. Wir empfehlen jedoch ein Upgrade auf einen kostenpflichtigen Plan, um weitere Funktionen wie automatische Cloud-Backups, 1-Klick-Website-Wiederherstellung, einfachere Migrationen und mehr freizuschalten.
Beginnen wir mit der Installation und Aktivierung des Duplicator-Plugins auf deinem alten Domainnamen. Weitere Details findest du in unserem Schritt-für-Schritt-Leitfaden zur Installation eines WordPress-Plugins.
Nach der Aktivierung fügt das Plugin einen Menüpunkt Duplicator in Ihrem WordPress-Admin hinzu. Sie müssen zur Seite Duplicator » Backups gehen und dann auf die Schaltfläche „Neu erstellen“ klicken, um ein neues Backup oder eine Kopie Ihrer WordPress-Website zu erstellen.

Duplicator wird nun den Backup-Assistenten initialisieren. Er wird diesem Paket automatisch einen Namen zuweisen.
Klicken Sie auf die Schaltfläche „Weiter“, um fortzufahren.

Duplicator führt nun einige Tests durch, um zu sehen, ob alles in Ordnung ist. Wenn das Plugin ein Problem findet, sehen Sie eine Warnung mit Anweisungen.
Wenn alle Elemente als „Gut“ markiert sind, klicken Sie auf die Schaltfläche „Erstellen“.

Das Plugin beginnt nun mit der Erstellung eines Duplikatpakets Ihrer Website-Dateien. Abhängig von der Größe Ihrer Website kann dieser Vorgang einige Minuten dauern.
Sobald Sie fertig sind, sehen Sie eine Option „Herunterladen“. Wenn Sie darauf klicken, werden Ihnen Optionen angezeigt, um Beide Dateien herunterzuladen oder Installer und Archiv (Zip) separat herunterzuladen.
Wählen Sie 'Beide Dateien herunterladen', um sie auf Ihren Computer herunterzuladen.

Die Archivdatei ist eine vollständige Kopie Ihrer WordPress-Dateien. Sie enthält Ihre WordPress-Themes, Permalink-Einstellungen, Plugins, Uploads und alle anderen Dateien, die von WordPress-Plugins erstellt wurden.
Das Installer-Skript ist eine PHP-Datei, die die WordPress-Migration automatisiert und durch Entpacken der Archivdatei ausführt.
Schritt 2: Erstellen Sie eine Datenbank für Ihren neuen Domainnamen
Bevor Sie Ihre WordPress-Website auf die neue Domain verschieben, benötigen Sie eine neue SQL-Datenbank, um WordPress auf Ihrem neuen Domainnamen zu entpacken.
Wenn Sie bereits eine Datenbank erstellt haben, können Sie diesen Schritt überspringen.
Um eine Datenbank zu erstellen, musst du das cPanel-Dashboard deines Hosting-Kontos aufrufen, nach unten zum Abschnitt 'Datenbanken' scrollen und dann auf das Symbol 'MySQL-Datenbanken' klicken.
Hinweis: Wenn Sie einen Managed WordPress Hosting-Anbieter wie WP Engine verwenden, müssen Sie diesen Schritt möglicherweise nicht manuell durchführen. Sie können die Dokumentation Ihres Hosts zum Hinzufügen einer neuen Website oder Datenbank konsultieren.
Wir zeigen dir, wie du es auf Bluehost findest, aber die grundlegenden Anweisungen sind gleich und sollten für alle Hosting-Anbieter gelten.
Melden Sie sich in Ihrem Bluehost-Konto-Dashboard an und klicken Sie unter Ihrer Website auf die Schaltfläche „Einstellungen“.

Unter Ihren Website-Einstellungen müssen Sie zum Tab „Erweitert“ wechseln.
Scrollen Sie ein wenig nach unten zum cPanel-Bereich und klicken Sie auf 'Verwalten'.

Dies öffnet das cPanel-Dashboard.
Scrollen Sie nach unten zum Abschnitt Datenbanken und klicken Sie auf die Option „MySQL-Datenbanken“.

Hinweis: Ihr Hosting-Kontrollpanel kann leicht von den Screenshots abweichen. Sie sollten jedoch immer noch einen Bereich für Datenbanken mit einer Option zum Erstellen einer neuen Datenbank finden.
Geben Sie einfach einen Namen für Ihre Datenbank ein und klicken Sie dann auf die Schaltfläche „Datenbank erstellen“.

cPanel erstellt nun eine neue Datenbank für Sie. Danach müssen Sie zum Abschnitt MySQL-Benutzer scrollen.
Geben Sie als Nächstes einen Benutzernamen und ein Passwort für Ihren neuen Benutzer ein und klicken Sie auf die Schaltfläche „Benutzer erstellen“. Stellen Sie sicher, dass Sie den Benutzernamen und das Passwort an einem sicheren Ort notieren.

Der neu erstellte Benutzer hat immer noch keine Berechtigung, an der Datenbank zu arbeiten. Ändern wir das.
Scrollen Sie nach unten zum Abschnitt „Benutzer zur Datenbank hinzufügen“. Wählen Sie zuerst den von Ihnen erstellten Datenbankbenutzer aus dem Dropdown-Menü neben dem Feld „Benutzer“ aus. Wählen Sie dann die neue Datenbank aus, die Sie gerade erstellt haben, und klicken Sie auf die Schaltfläche „Hinzufügen“.

Als Nächstes werden Sie aufgefordert, Berechtigungen für den Benutzer auszuwählen.
Wählen Sie „Alle Berechtigungen“ und klicken Sie auf die Schaltfläche „Änderungen vornehmen“, um fortzufahren.

Ihre Datenbank ist nun bereit und kann verwendet werden, um WordPress auf den neuen Domainnamen zu verschieben.
Stellen Sie sicher, dass Sie den Datenbanknamen, Benutzernamen und das Passwort notieren. Sie benötigen diese Informationen im nächsten Schritt.
Schritt 3: WordPress auf Ihrem neuen Domainnamen entpacken
Jetzt müssen Sie die Duplicator-Dateien, die Sie zuvor heruntergeladen haben, auf Ihren neuen Domainnamen hochladen.
Das Duplicator-Paket enthält auch Ihre WordPress-Installation. Das bedeutet, dass Sie WordPress nicht auf Ihrer neuen Domain installieren müssen.
Verbinde dich zuerst mit deinem Domainnamen über einen FTP-Client. Stelle nach der Verbindung sicher, dass das Stammverzeichnis deiner Website vollständig leer ist.
Danach können Sie die Archiv- und Installationsdateien in das Stammverzeichnis hochladen. Dieses wird normalerweise als public_html bezeichnet.
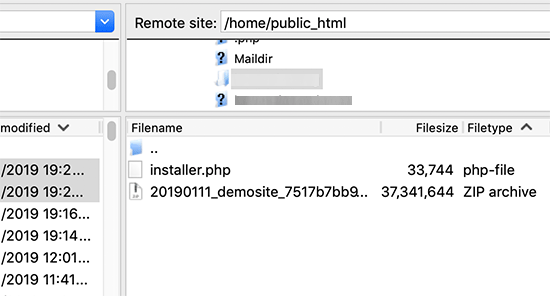
Sobald beide Dateien vollständig hochgeladen sind, können Sie WordPress entpacken.
Öffnen Sie einen neuen Browser-Tab und gehen Sie zur folgenden URL:
http://example.com/installer.php
Vergessen Sie nicht, example.com durch Ihren neuen Domainnamen zu ersetzen. Dies startet den Duplicator-Migrationsassistenten.
Hinweis: Wenn Ihre neue Domain nicht angezeigt wird oder Sie zu einer anderen Seite führt, müssen Sie möglicherweise warten, bis die DNS-Einstellungen aktualisiert sind. Dies kann bis zu 24 Stunden dauern, geschieht aber normalerweise viel schneller.

Der Installer sucht nach der Archivdatei und wählt dann automatisch Optionen für Sie auf dem Bildschirm aus.
Scrollen Sie ein wenig nach unten, um die Informationen für die Datenbank einzugeben, die Sie im vorherigen Schritt erstellt haben.

Darunter zeigt Duplicator automatisch die URL Ihrer alten und neuen Domain an.
Wenn alles gut aussieht, klicken Sie auf die Schaltfläche 'Validieren', um fortzufahren.

Duplicator versucht nun, mit den von Ihnen angegebenen Informationen eine Verbindung zur Datenbank herzustellen.
Bei Erfolg wird Ihnen ein Validierungs-Pass angezeigt. Andernfalls wird Ihnen eine Warnung mit Details zur Behebung angezeigt.

Klicken Sie auf die Schaltfläche „Weiter“, um fortzufahren.
Duplicator beginnt nun mit dem Import Ihrer WordPress-Website. Sobald dies abgeschlossen ist, sehen Sie eine Erfolgsmeldung mit einer Schaltfläche „Admin-Login“.

Duplicator aktualisiert automatisch die URLs zu Ihrer neuen Domain. Sie können nun auf die Schaltfläche 'Admin-Login' klicken, um den WordPress-Adminbereich Ihrer neuen Website aufzurufen.
Nach dem Login bereinigt Duplicator automatisch die Installationsdateien (installer.php und das Zip-Archiv). Dies ist ein wichtiger Sicherheitsschritt. Überprüfen Sie daher die Benachrichtigung, die die Löschung dieser Dateien bestätigt.
Schritt 4: Permanente 301-Weiterleitungen einrichten
Der nächste Schritt ist, Benutzer, die auf deinem alten Domainnamen landen, auf die neue Domain umzuleiten. Dies geschieht durch die Einrichtung von 301-Weiterleitungen.
301-Weiterleitungen sind sehr wichtig für SEO und Benutzererfahrung. Durch das Hinzufügen können Sie Benutzer und Suchmaschinen automatisch zu Ihrer neuen Domain weiterleiten.
Mit anderen Worten, wann immer jemand auf einem Beitrag oder einer Seite deiner alten Domain landet, wird er automatisch zum selben Beitrag oder derselben Seite deiner neuen Domain weitergeleitet, anstatt einen 404-Fehler zu sehen.
An diesem Punkt haben Sie zwei Websites: eine auf Ihrer alten Domain und eine identische auf Ihrer neuen Domain.
Um Ihre Weiterleitungen beizubehalten, müssen Sie Ihre alte WordPress-Installation aktiv lassen, damit sie weiterhin Besucher auf die neue Website weiterleiten kann.
Es gibt zwei Möglichkeiten, die Weiterleitungen einzurichten. Die erste Methode ist einfach und erfordert nur wenige Klicks. Die zweite Methode erfordert, dass Sie Dateien manuell bearbeiten.
Methode 1: 301-Weiterleitungen mit All in One SEO einrichten
Für diese Methode benötigst du All in One SEO (AIOSEO). Es ist das beste WordPress-SEO-Plugin auf dem Markt und ermöglicht es dir, deine WordPress-Website einfach für SEO zu optimieren.
Zuerst müssen Sie zum WordPress-Dashboard Ihrer alten Website zurückkehren. Installieren und aktivieren Sie dann das All in One SEO-Plugin. Weitere Details finden Sie in unserer Schritt-für-Schritt-Anleitung zum Installieren eines WordPress-Plugins.
Hinweis: Sie benötigen mindestens die Pro-Version des Plugins, um auf das Redirect Manager Addon zugreifen zu können. Sie können AIOSEO auch auf Ihrer neuen WordPress-Site einrichten, um Ihre Suchmaschinenrankings und Ihren Traffic noch weiter zu verbessern.
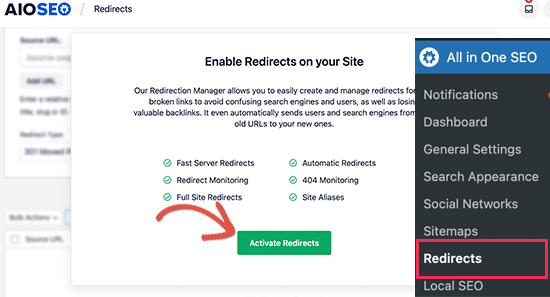
Nach der Aktivierung auf Ihrer alten Domain müssen Sie zur Seite All in One SEO » Weiterleitungen gehen und auf die Schaltfläche „Weiterleitungen aktivieren“ klicken.
Wechseln Sie als Nächstes zur Registerkarte „Full Site Redirect“ und aktivieren Sie den Schalter „Relocate Site“.
Danach müssen Sie Ihren neuen Domainnamen neben der Option 'Zu Domain verschieben' eingeben.
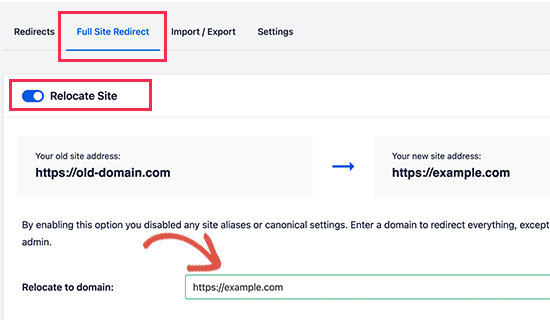
Vergessen Sie nicht, auf die Schaltfläche „Änderungen speichern“ zu klicken, um Ihre Einstellungen zu speichern.
Methode 2: Weiterleitungen manuell auf neue Domain einrichten
Diese Methode erfordert, dass Sie die WordPress .htaccess-Datei auf Ihrem alten Domainnamen bearbeiten.
Hinweis: Dies funktioniert nur, wenn Ihr Hosting-Server Apache verwendet. Wenn Sie NGINX verwenden (häufig bei Managed Hosting wie WP Engine), haben Sie keine .htaccess-Datei. Verwenden Sie in diesem Fall stattdessen Methode 1.
Zuerst müssen Sie sich per FTP mit Ihrer alten Website verbinden und die .htaccess-Datei bearbeiten.
Dies befindet sich im selben Verzeichnis wie Ihr wp-includes- oder wp-admin-Ordner. Öffnen Sie die .htaccess-Datei und fügen Sie die folgenden Codezeilen ganz oben ein:
#Options +FollowSymLinks
RewriteEngine on
Unchanged: RewriteRule ^(.*)$ http://www.newsite.com/$1 [R=301,L]
Stellen Sie sicher, dass Sie newsite.com in dem obigen Code durch Ihre neue Domain ersetzen.
Sobald Sie diese Änderungen vorgenommen haben, besuchen Sie Ihre alte Domain. Sie sollten automatisch zu Ihrer neuen Domain weitergeleitet werden.
Wenn dies nicht der Fall ist, bedeutet dies, dass die Weiterleitung nicht richtig eingerichtet ist und Ihr Server wahrscheinlich keine Weiterleitungsregeln unterstützt. Sie müssen sich an das Support-Team Ihres Webhosting-Unternehmens wenden, um RewriteEngine aktivieren zu lassen.
Schritt 5: Benachrichtigen Sie Google über Ihre neue Domain
Jetzt, da Sie WordPress auf eine neue Domain umgezogen und Weiterleitungen eingerichtet haben, ist es an der Zeit, Google über Ihre Adressänderung zu informieren. Dies hilft Google, Ihre neue Website-Domain schnell zu finden und sie in den Suchergebnissen anzuzeigen.
Stellen Sie zunächst sicher, dass sowohl Ihre neue als auch Ihre alte Domain als zwei verschiedene Eigenschaften in der Google Search Console hinzugefügt wurden. Anweisungen finden Sie in Schritt 1 unserer Anleitung zur Google Search Console.
Als Nächstes müssen Sie die alte Domain als aktive Property in Ihrem Google Search Console-Dashboard auswählen.
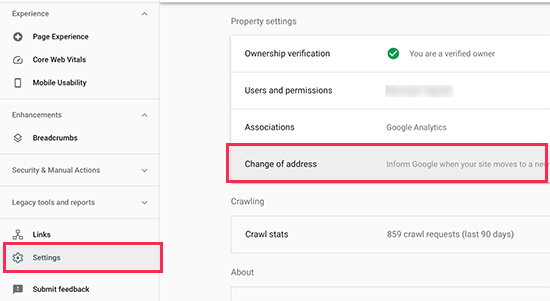
Klicken Sie danach im linken Menü auf das Menü Einstellungen.
Nun können Sie auf das Tool „Adressänderung“ klicken.
Jetzt müssen Sie Ihre neue Domain im Abschnitt Google aktualisieren auswählen.
Dann sollten Sie auf die Schaltfläche 'Validieren & Aktualisieren' klicken.
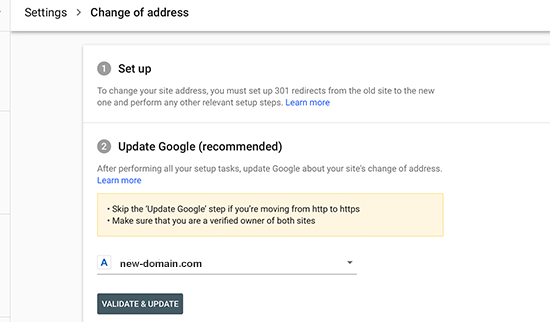
Das ist alles. Google wird nun überprüfen, ob Ihre alte Domain auf die neue Domain umgeleitet wird, und Ihre Änderungen speichern.
Auf dem nächsten Bildschirm zeigt Ihnen die Google Search Console einen Schritt-für-Schritt-Assistenten, um Ihre Adressänderungsanfrage einzureichen.
Benachrichtigen Sie Ihre Benutzer über den neuen Domainnamen
Während die 301-Weiterleitungen ihre Arbeit tun, ist es immer gut, die Migration öffentlich anzukündigen.
Sie können dies tun, indem Sie einfach einen Blogbeitrag auf Ihrer neuen Website schreiben und ihn in Ihren Social-Media-Konten teilen.
Wenn Sie einen E-Mail-Newsletter oder Push-Benachrichtigungsabonnenten haben, sollten Sie auch an diese eine Ankündigung senden.
Dies kann in vielerlei Hinsicht hilfreich sein.
In erster Linie werden sich Ihre Nutzer die neue Domain eher merken, wenn sie davon lesen.
Zweitens können Sie Ihre Benutzer bitten, Sie zu informieren, wenn sie Fehler sehen. Sie allein können Ihre Website nicht in jeder Art von Browser oder Systemumgebung testen, daher ist es immer hilfreich, frische Augen darauf werfen zu lassen.
Häufig gestellte Fragen zum Umzug einer WordPress-Website
Wir verstehen, dass Sie möglicherweise noch Fragen zur Migration Ihrer WordPress-Website auf eine neue Domain haben. Hier sind Antworten auf einige der häufigsten Fragen, die wir erhalten, um Ihnen vollständige Sicherheit bei diesem Prozess zu geben.
1. Wird die Änderung meines Domainnamens meine SEO dauerhaft beeinträchtigen?
Nein, das wird es nicht. Solange Sie die richtigen Schritte befolgen, wird die Verschiebung Ihrer Website Ihrer SEO nicht dauerhaft schaden. Während ein vorübergehender Rückgang der Rankings und des Traffics normal ist, während Suchmaschinen die Änderung verarbeiten, ist dieser Leitfaden darauf ausgelegt, diese Auswirkungen zu minimieren.
Durch die ordnungsgemäße Einrichtung von 301-Weiterleitungen (Schritt 4) und die Benachrichtigung von Google über die Search Console (Schritt 5) teilen Sie den Suchmaschinen genau mit, wohin Sie umgezogen sind, und ermöglichen es ihnen, Ihre bestehende Autorität auf die neue Domain zu übertragen.
Sie möchten vielleicht auch unseren Leitfaden lesen, wie Sie sicherstellen, dass Ihr SEO nach der WordPress-Domainmigration intakt ist.
2. Muss ich meine alte Domain nach dem Umzug auf die neue behalten?
Ja, Sie müssen Ihre alte Domain für absehbare Zeit aktiv halten. Ihre alte Domain hostet die permanenten 301-Weiterleitungen, die sowohl Benutzer als auch Suchmaschinen zu Ihrer neuen Website leiten. Wenn Sie sie ablaufen lassen, würden all diese Links brechen, was zu einem Verlust von Traffic und einem erheblichen Rückgang Ihrer SEO-Rankings führen würde.
3. Wie lange dauert der gesamte Domain-Migrationsprozess?
Die technischen Schritte in dieser Anleitung, vom Sichern Ihrer Website bis zum Einrichten von Weiterleitungen, können in der Regel in wenigen Stunden abgeschlossen werden. Es wird jedoch länger dauern, bis Suchmaschinen wie Google Ihre neue Domain vollständig durchsuchen und indexieren. Obwohl die Benachrichtigung von Google dies beschleunigt, kann es mehrere Wochen dauern, bis sich Ihre Rankings nach dem Umzug vollständig stabilisiert haben.
4. Kann ich meine WordPress-Website ohne ein Plugin wie Duplicator verschieben?
Obwohl es technisch möglich ist, eine Website manuell zu verschieben, indem Dateien per FTP übertragen und die Datenbank exportiert/importiert werden, raten wir den meisten Benutzern dringend davon ab.
Eine manuelle Migration ist komplex und birgt ein viel höheres Fehlerrisiko, wie z. B. übersehene URL-Aktualisierungen oder Probleme mit der Datenbankverbindung. Ein Plugin wie Duplicator automatisiert diese kritischen Schritte und macht den Prozess sicherer, schneller und zuverlässiger.
5. Was ist der Hauptunterschied zwischen einem Umzug zu einer neuen Domain und einem neuen Hoster?
Stellen Sie es sich so vor: Ein Umzug zu einer neuen Domain ist wie eine Änderung der Straßenadresse Ihres Unternehmens. Ein Umzug zu einem neuen Hoster ist wie die Änderung des Unternehmens, dem das Gebäude gehört, aber Ihre Adresse bleibt gleich. Diese Anleitung ist speziell für die Änderung Ihrer Adresse (Domain) gedacht, was einzigartige SEO-Anforderungen mit sich bringt, wie z. B. die 301-Weiterleitungen, die für den Erfolg entscheidend sind.
Video-Tutorial
Zusätzliche Ressourcen
Wir hoffen, dass Ihnen dieses Tutorial geholfen hat, Ihre WordPress-Website auf einen neuen Domainnamen zu verschieben. Die folgenden Artikel und Tutorials helfen Ihnen dabei, Ihre SEO-Rankings nach der Migration auf einen neuen Domainnamen zu verfolgen und wiederherzustellen:
- Die ultimative WordPress-SEO-Migrations-Checkliste (für Anfänger)
- So überprüfen Sie, ob Ihre WordPress-Blogbeiträge für die richtigen Keywords ranken
- So verfolgen Sie Website-Besucher auf Ihrer WordPress-Site
- Tipps zur Optimierung Ihrer Blogbeiträge für SEO wie ein Profi (Checkliste)
Wenn Ihnen dieser Artikel gefallen hat, abonnieren Sie bitte unseren YouTube-Kanal für WordPress-Video-Tutorials. Sie finden uns auch auf Twitter und Facebook.
")

")

John
Hallo, führt eine Weiterleitung auf der alten Domainregistrierung ebenfalls zu denselben SEO-Ergebnissen? Falls wir die alte Website löschen und die Domain nur für ein paar Jahre behalten wollen, danke.
WPBeginner-Support
Da es eine Domainänderung gibt, wird es eine kleine Änderung an Ihrem SEO geben, aber es sollte keine größere Änderung geben, wenn Sie auf die neue URL umleiten.
Administrator
Jiří Vaněk
Ich habe einen Blog auf einer Subdomain erstellt und überlege nun, ob ich den Blog nach zwei Jahren auf die Hauptdomain verschieben und als mein Wissensportfolio nutzen soll. Ich war ziemlich zögerlich, diesen Schritt zu tun, da ich offensichtlich befürchte, dass das SEO, das ich über zwei Jahre aufgebaut habe, verloren geht und ich meine Rankings verliere. Dieser Artikel hat mir einen ziemlich guten Einblick gegeben, wie man das mit minimalen Auswirkungen tun kann, und dafür bin ich dankbar. Jetzt habe ich die Hoffnung, dass es ohne zu schmerzhaft sein kann.
Dennis Muthomi
Ich schätze besonders die Betonung auf die Einrichtung von 301-Weiterleitungen (Schritt 4). Meiner Erfahrung nach war dies entscheidend für die Aufrechterhaltung der SEO-Rankings. Ich habe das All in One SEO-Plugin wie vorgeschlagen verwendet, und es hat den Prozess erheblich erleichtert.
Ein zusätzlicher Tipp, den ich gerne weitergeben möchte: Nach Abschluss der Migration war es meiner Erfahrung nach hilfreich, MonsterInsights zu verwenden, um meinen Traffic und das Nutzerverhalten auf der neuen Domain genau zu überwachen. Dies ermöglichte es mir, nach der Migration auftretende Probleme schnell zu erkennen und zu beheben.
Moinuddin Waheed
Wenn wir unseren Blog auf den neuen Domainnamen umziehen und alle Dateien und die Datenbank auf die neue Domain übertragen werden, wie lange dauert es, bis Google weiß, dass es diese neue Domain ranken muss?
Außerdem haben alte Domainnamen eine Domain Authority und neue Domainnamen brauchen Zeit, um eine Domain Authority aufzubauen. Wie bleibt SEO unbeeinflusst, wenn wir zu einer neuen Domain wechseln?
WPBeginner-Support
Die 301-Weiterleitungen sind es, die Google mitteilen, die neue Domain zu beachten. Es gibt keinen bestimmten Zeitplan, wann Google dies aktualisieren wird, aber während Google die 301-Weiterleitungen crawlt, wird es Ihre Einträge in den Suchergebnissen weiterleiten und aktualisieren. Während Ihre alten Links ranken, werden sie auch zur neuen Position weitergeleitet.
Administrator
Moinuddin Waheed
Vielen Dank für die Antwort und die Klärung der Anfrage.
Ich denke, nachdem die vollständige Einrichtung auf der neuen Domain eine Weile gedauert hat, ist es nicht ratsam, die alte Domain vollständig zu schließen und sich auf die neue Domain zu konzentrieren.
Oder ist es besser, 301-Weiterleitungen kontinuierlich zu den Beiträgen und Seiten umzuleiten und in der Zwischenzeit, wenn wir vollständig sicher sind, dass alle Anfragen von der alten Domain auf die neue umgeleitet werden, erst dann die Entscheidung zu treffen, die alte Domain abzuschalten.
WPBeginner-Support
Sie sollten die Analysen für die alte Domain überprüfen. Wenn Sie immer noch viel Traffic auf diese Domain erhalten, die weitergeleitet wird, dann würden Sie die alte Domain aktiv halten. Wenn Sie keine Besuche auf Ihrer alten Domain erhalten, würden Sie sie dann schließen.
Mrteesurez
Danke für diese Antwort und Unterstützung, sie ist auch für mich von Vorteil. Ich hätte nicht daran gedacht, den Analysebericht der alten Domain zu überprüfen, um festzustellen, ob dort viel Traffic vorhanden ist, um sie zu schließen oder nicht. Ich habe hier meine Lektion gelernt. Danke m
WPBeginner-Support
Wenn Sie sich an Ihren Hoster wenden, können diese manchmal helfen und ihre Upload-Limits vorübergehend überschreiben, um Ihre Dateien in Ihr Hosting zu bekommen.
Administrator
Jackie
Was ist, wenn meine hochzuladende Dateigröße über den maximalen 500 MB liegt und ich Bluehost zum Hochladen der Dateien verwende?
Moinuddin Waheed
Für die Weiterleitung auf eine neue Domain ist es besser, das von Ihnen vorgeschlagene Plugin selbst zu verwenden, d.h. All in One SEO, was für alle ohne Programmierkenntnisse einfach zu handhaben ist.
Und was den Zugriff auf die .htaccess-Datei und deren manuelle Änderung zur Weiterleitung betrifft, so werden sich das eher nur technisch versierte Personen ansehen.
Don
Hallo, vielen Dank für Ihren Leitfaden. Wir führen ein Rebranding durch, das zu einer Namensänderung und einer neuen URL führt. Unser WP-Administrator wird die Migration und die 301-Weiterleitung durchführen. Abgesehen davon, dass wir unsere Datenbank und Social-Media-Follower in unserem Newsletter informieren, frage ich mich, ob wir auf der neuen Website eine Landingpage für die Weiterleitungen erstellen können, die das Rebranding ankündigt und dann nach einem voreingestellten Intervall zur neuen Website überleitet.
WPBeginner-Support
Wenn Sie stattdessen die Artikel nicht 1 zu 1 weiterleiten wollten, könnten Sie sicherlich die gesamte Website auf eine Landingpage weiterleiten.
Administrator
Unarine Leo Netshifhefhe
Meine Website wurde gehackt und ich hatte nicht wirklich Zeit, mich darum zu kümmern. Ich würde gerne wissen, ob dieses Problem des Hackens Auswirkungen auf SEO hat? Beeinflusst es es schlecht? Und meine Website erscheint nicht mehr?
WPBeginner-Support
Es würde davon abhängen, ob sich etwas am Frontend Ihrer Website geändert hat, aber es kann sich negativ auf die SEO Ihrer Website auswirken.
Administrator
Simon
Wie verbinde ich meinen Domain mit einem FTP-Client?
WPBeginner-Support
Sie würden FTP nicht für Ihre Domain verwenden, sondern die Tools Ihres Domain-Registrars oder Hosting-Anbieters nutzen.
Administrator
Manu Philip
Danke! Es hat sehr geholfen
WPBeginner-Support
Wir freuen uns, dass unser Leitfaden hilfreich war!
Administrator
Saifullah Tamim
Vielen vielen Dank, Bruder. Dieser Artikel ist sehr hilfreich.
WPBeginner-Support
Wir freuen uns, dass unser Leitfaden hilfreich war!
Administrator
Sajid
für wie viele Tage ich die alte Website am Laufen halten muss. Für 301-Weiterleitungen
WPBeginner-Support
Es gibt keine universelle Antwort für jede Website, es würde von Ihrer Website und Ihrem Publikum abhängen, aber wenn Sie auf Nummer sicher gehen wollen, ist ein Jahr normalerweise lang genug für Benutzer, die Ihre Website erneut besuchen, um die Änderung zu sehen, besonders wenn sie Ihre Website auf saisonale Inhalte überprüfen.
Administrator
James
Hallo, ich hoffe, es geht Ihnen gut. Wie wäre es mit der Migration einer Subdomain auf einen komplett neuen Domainnamen? Zum Beispiel die Migration von „example.blog.com“ zu „example.com“.
WPBeginner-Support
Sie können diese Methode immer noch verwenden, um von einer Subdomain zu einer komplett neuen Domain zu wechseln
Administrator
ronald
Wir nutzen unsere bestehende Website noch für einige Dinge, aber nicht für Blogs. Diese wurden migriert. Wir haben 301-Weiterleitungen eingerichtet und alles funktioniert reibungslos, aber ich frage mich... sollten wir nach der Migration, mit allen eingerichteten 301-Weiterleitungen auf dem alten Server, die Beiträge auf dem alten Server nicht mehr veröffentlichen, damit sie nicht mehr auf der alten Sitemap sind?
WPBeginner-Support
Wenn Sie Ihre alte Website weiterhin für andere Zwecke nutzen möchten, ist es normalerweise am besten, die Inhalte zu entfernen, für die Sie Weiterleitungen eingerichtet haben.
Administrator
thierry
Vielen Dank für diesen Beitrag, die Befolgung dieser Anweisungen war wirklich klar und alles lief reibungslos ohne Probleme, danke, danke und danke!
WPBeginner-Support
Wir freuen uns, dass unser Leitfaden hilfreich war!
Administrator
Mark
Danke. Ich habe so viele andere Plugins und Techniken ausprobiert – keine hat sehr gut funktioniert.
Obwohl verrückt komplex für eine einfache Sache, ist dies eine großartige Technik. Nachdem ich meine früheren Versuche zunichte gemacht hatte, hat diese alles behoben. Schriftarten, Bilder, Thumbnails usw. Vielen Dank.
WPBeginner-Support
Wir freuen uns, dass Ihnen unsere Anleitung helfen konnte, den Prozess so zu vereinfachen, dass er für Sie funktioniert hat
Administrator
Manas Patil
Hallo, dieser Artikel war sehr hilfreich. Vielen Dank!
Aber ich möchte fragen – da ich ein SSL-Zertifikat habe, dachte ich, ich würde das SSL von meiner alten Website auf meine neue Website verschieben. Wenn ich es verschiebe, sollte dies Fehler verursachen, während ich von meiner alten auf meine neue Website weiterleite?
Vielen Dank im Voraus!
Manas
WPBeginner-Support
Sie sollten sich bei Ihrem Hosting-Anbieter erkundigen, da einige Methoden anbieten, um Fehler bei der Änderung von Domains auf demselben Host zu vermeiden, wenn sie nur ein SSL-Zertifikat haben. Im Allgemeinen sollte dies bei ordnungsgemäßer Einrichtung keine Probleme verursachen.
Administrator
Manas Patil
Vielen Dank! Ich habe es geschafft, meine Website komplett umzuziehen. Gegen Ende des Search Console-Teils, ist es notwendig, die Sitemap erneut einzureichen – da ich meine vorherigen Sitemap-Einreichungen auf meiner neuen Domain-Eigenschaft nicht sehe.
WPBeginner-Support
Wenn Sie noch keine Sitemap für die neue Domain eingereicht haben, sollten Sie dies tun, um Google beim Crawlen Ihrer URLs zu helfen
BIKRAMJIT KONWAR
Hallo, vielen Dank für den Artikel. Ich habe hier eine Verwirrung: Kann ich meine WordPress-Website auf eine neue Domain migrieren, ohne das bestehende Theme zu migrieren, da ich das Theme ändern möchte?
Amir
Hallo
Nach der Migration auf eine neue Domain, wie soll ich neue Beiträge auf meiner Website senden? Einen neuen Beitrag auf der alten oder neuen Domain senden?
Md Shuaib Raza
Kann ich meine alte Domain bei meinem Anbieter nach der Migration löschen und kündigen?
Paco
Ich ziehe auf eine neue Domain um, werde aber die alte Domain weiterhin für andere Zwecke nutzen. Ich möchte nicht die gesamte alte Website auf die neue Website umleiten. Was ist in diesem Fall die empfohlene Vorgehensweise? Danke.
Hassan
Es hat mir sehr geholfen, meine Frage ist, ob ich bei FTP meinen neuen Domainnamen sowie Benutzernamen und Passwort eingeben werde, dann sagten Sie, die Installer-Datei und die Archivdatei, ist die Installer-Datei die WordPress-ZIP-Datei oder etwas anderes?
WPBeginner-Support
Die Installer-Datei wäre das, was Sie vom Duplicator-Plugin heruntergeladen haben.
Administrator
F NIc
Hallo, vielen Dank für diese detaillierte Anleitung. Ich beabsichtige, meine Domain von Bluehost zu GoDaddy zu wechseln, und ich frage mich, ob meine WordPress-Website in Bezug auf ihr Aussehen nach dem Wechsel betroffen sein wird.
WPBeginner-Support
Ihr Hosting-Anbieter würde nicht beeinflussen, wie Ihre Website aussieht, solange es keine Probleme mit dem Duplizierungsprozess gibt, sollte die Website gleich aussehen.
Administrator
Sachin
Ich habe eine Frage, ich habe Single Webhosting, wie kann ich also von der alten Domain zur neuen Domain wechseln?
WPBeginner-Support
Wenn Sie auf demselben Host bleiben, sollten Sie sich zuerst an Ihren Hosting-Anbieter wenden, da einige Tools anbieten, die Ihnen bei der Änderung der Domain Ihrer Website helfen.
Administrator
Andy
Ich habe ein kleines Problem mit Schritt 5. Google über die Änderung informieren.
Als ich die Adressänderung eingereicht habe (die Search Console scheint sich seit dem Schreiben dieses Beitrags geändert zu haben, aber ich habe das neue Verfahren OK herausgefunden), schlug die Validierung fehl, weil Google die Homepage meiner alten Website nicht abrufen konnte.
WPBeginner-Support
Vielen Dank für die Benachrichtigung. In dieser Situation möchten Sie Google auf Ihre neue Website verweisen, damit es die Weiterleitungen testen kann.
Administrator
Sharon
Vielen Dank für dieses Tutorial, es war so einfach für mich, meine alte Domain umzuleiten
WPBeginner-Support
Wir freuen uns, dass unser Leitfaden hilfreich war
Administrator
amir
kann ich den alten Host und die alte Domain löschen, nachdem ich alle Schritte durchgeführt habe? oder sollte ich den Host und die Domain danach erneuern
Danke
WPBeginner-Support
Es ist normalerweise eine gute Idee, die alte Domain für einige Zeit auf die neue umzuleiten, aber Sie können das alte Hosting beenden und die alte Domain trotzdem umleiten, wenn Sie möchten.
Administrator
Dejan
Hallo Wpbeginner!
Sehr guter Artikel wie immer, ich habe eine Frage, nur um sicherzugehen, werden alle Pfade geändert? Zum Beispiel Medienlinks und so weiter? Danke nochmals
WPBeginner-Support
Mit dieser Methode sollten auch Ihre Links zu Bildern und anderen Medien aktualisiert werden.
Administrator
dariu
Danke dafür. Was ist der Unterschied bei der Migration zu einem neuen Hoster (und einer neuen Domain)? Gibt es einen Unterschied bei den Schritten und Anweisungen?
WPBeginner-Support
Sie würden die gleichen Schritte auch für einen neuen Host verwenden.
Administrator
Penny
Ich musste es in den public_html-Ordner legen, damit es funktioniert. Zuerst sehr frustrierend, bis ich das versucht habe!
Jose
Danke für ein tolles Tutorial!
Ich bin nach Befolgung aller Schritte auf eine Eigenart gestoßen.
Meine Website leitet alles weiter AUSSER dem Inhalt der Startseite.
Ich habe die Nameserver vor etwa zwei Tagen aktualisiert.
Ich habe die Weiterleitung über .htaccess vorgenommen.
Ich bin mir nicht sicher, wo ich nach der Ursache des Problems suchen soll. Jede Hilfe wird geschätzt. Nochmals vielen Dank!
WPBeginner-Support
Wir empfehlen, nach Caching-Plugins zu suchen und sich an Ihren Hosting-Anbieter zu wenden, um die häufigsten Gründe für dieses Problem zu erfahren. Ihr Hosting-Anbieter kann normalerweise auch von seiner Seite aus nachsehen.
Administrator
Jose
Nachverfolgung.
Ich habe/hatte W3 Total Cache verwendet.
Bevor ich migriert habe, habe ich vergessen, das Caching zu deaktivieren. Und das hat Probleme verursacht.
Nach der Migration musste ich W3 Total Cache manuell entfernen, um die neue Website wieder zum Laufen zu bringen.
Es gab einen Teil des Caching-Codes, der in der neuen .htaccess-Datei übrig geblieben war.
Seitdem ist alles gut!
WPBeginner-Support
Wir freuen uns, dass Sie das Problem lösen konnten
Haitham
Hallo,
Tolles Tutorial. Ich muss nach den SSL-Weiterleitungen fragen, da diese Probleme für Domains verursachen können, die Cloudflare für Instant verwenden.
Wie füge ich also beim Hinzufügen des Codes zur .htaccess-Datei auf der alten Website den Befehl newwebsite.com/1$ hinzu?
WPBeginner-Support
Wenn Sie meinen, wie Sie Ihre Website mit einem CDN wie Cloudflare auf eine neue Domain aktualisieren können, empfehlen wir Ihnen, sich an das von Ihnen verwendete CDN zu wenden, um deren aktuelle Methoden für diese Art von Änderung zu erfahren.
Administrator
Joe
Im letzten Schritt erwähnten Sie „Google über die Änderung informieren“.
Aber was ist, wenn ich Google die Änderung nicht mitteile, die Website einfach auf eine neue Domain verschiebe und alle Seiten von der alten Domain entferne (da meine Website neu ist und keinen organischen Traffic hat)?
Ist es gültig?
WPBeginner-Support
Das können Sie tun, wenn Sie möchten, aber Sie würden wahrscheinlich einen negativen Treffer in Ihren Suchmaschinenrankings erzielen.
Administrator
Jay Dee
Ich habe eine Frage zu Abonnenten der Website, die Profile erstellt haben. Muss ich für deren individuelle Profilseiten Weiterleitungen einrichten?
WPBeginner-Support
Wenn Sie dieselben Systeme verwenden, benötigen Sie keine zusätzliche Weiterleitung, es sei denn, das von Ihnen verwendete Tool gibt dies an.
Administrator
Rajesh
Ich habe eine Frage, ich habe bereits eine 301-Weiterleitung eingerichtet und alle Anfragen an die alte Website werden weitergeleitet. Nun ist meine Frage: Wann kann ich die alte Website und ihre Inhalte endgültig löschen?
WPBeginner-Support
Nachdem Sie Ihre Weiterleitungen erstellt haben, können Sie die alten Inhalte entfernen.
Administrator
Morgan
Hallo, bitte ich bin verwirrt wegen dieses Satzes „Stellen Sie nach der Verbindung sicher, dass das Stammverzeichnis Ihrer Website vollständig leer ist.“
Wie kann ich das Stammverzeichnis leer machen, da es einige Dateien und Ordner anzeigt. Bitte ich brauche eine Antwort, wie das geht. Danke
WPBeginner-Support
Sie können entweder FTP verwenden oder einige Hosts haben Dateimanager, die Sie zum Löschen der Ordner verwenden können, oder Sie können sich für Unterstützung an Ihren Host wenden.
Administrator
Braeden
Danke dafür! Wie würden Sie damit umgehen, wenn domain1 zu domain2 wechselt, aber viele der URL-Slugs auf domain1 auf domain2 unterschiedlich sind. Zum Beispiel wird domain1/this-is-a-post/ zu domain2/this-is-the-new-post/ wechseln?
WPBeginner-Support
Es würde von den spezifischen Änderungen abhängen, aber je nachdem, wie drastisch die Änderung ist, müssen Sie möglicherweise die einzelnen Weiterleitungen manuell einrichten.
Administrator
Marco
Vielen Dank für diesen Leitfaden. Er hat mir geholfen.
Ich habe die 301-Weiterleitung in htaccess versucht. Sie leitet jedoch nur die Homepage weiter. Gibt es eine Möglichkeit, Hilfe zu bekommen? Danke
WPBeginner-Support
Möglicherweise möchten Sie versuchen, Ihren Cache zu leeren und sich bei Ihrem Hosting-Anbieter zu erkundigen, um sicherzustellen, dass dort keine Fehler auftreten.
Administrator
Gosia
Das ist großartig, wenn man eine komplette alte Website auf eine neue Domain umzieht. Aber was tun, wenn man eine neue Website einrichtet und nur wenige Beiträge von der ersten Website übertragen möchte? Ich möchte keinen organischen Traffic verlieren.
WPBeginner-Support
Sie können unter Werkzeuge>Export nachsehen und die spezifischen Beiträge auswählen, die Sie auf Ihre Website übertragen möchten.
Administrator
Alexandre
Vielen Dank für dieses Tutorial.
Ich verstehe nicht, warum wir permanente 301-Weiterleitungen einrichten müssen, wenn ich denselben Domainnamen behalte?
Danke für deine Antwort,
Alex
WPBeginner-Support
Dieser Artikel handelt vom Umzug einer Website zu einem neuen Domainnamen. Wenn Sie nur den Hosting-Anbieter wechseln möchten, sollten Sie sich unseren Artikel unten ansehen:
https://www.wpbeginner.com/wp-tutorials/how-to-move-wordpress-to-a-new-host-or-server-with-no-downtime/
Administrator
Alexandre
Entschuldigung, vielen Dank.
Deine Blogbeiträge haben mir immer sehr geholfen
WPBeginner-Support
Schön, dass unsere Anleitungen hilfreich waren
Prasad Rane
Hey, vielen Dank für diese Schritt-für-Schritt-Anleitung. Ich konnte die Website eines Kunden in nur 30 Minuten umziehen. Er war überrascht. Vielen Dank.
WPBeginner-Support
Schön, dass unser Leitfaden helfen konnte
Administrator
Luiz Pedao
Hallo, ich habe hier ein kleines Problem. Ich habe meine PHP- und ZIP-Dateien in das öffentliche Verzeichnis übertragen, und trotzdem wird die Seite nicht gefunden, wenn ich zu mydomain/installer.php navigiere. Was könnte das Problem sein?
Danke im Voraus
WPBeginner-Support
Möglicherweise möchten Sie sich an Ihren Hosting-Anbieter wenden, um sicherzustellen, dass die Domain am richtigen Speicherort eingerichtet ist, an dem Sie die Dateien hinzufügen.
Administrator
Razi
Danke, Kumpel, nachdem ich deinen Artikel gelesen habe, ist es wie Kuchenessen
WPBeginner-Support
Wir freuen uns, dass unser Artikel hilfreich sein konnte
Administrator
hassan
GUTER Leitfaden.
aber wenn ich meine URLs auf einer neuen Domain ändern möchte
Mein Beitrag in der alten Domain ist: oldedoman.com/best-products-2020/
Ich möchte zu newdomain.com/best-products/ wechseln.
Wie leite ich alle meine Beiträge um
Danke
WPBeginner-Support
Für diese Art von Änderung müssten Sie manuelle Weiterleitungen erstellen, indem Sie unserer Anleitung unten folgen:
https://www.wpbeginner.com/beginners-guide/beginners-guide-to-creating-redirects-in-wordpress
Administrator
Adrian Filip
Brillantes Tutorial. Danke! Funktioniert wie ein Zauber!
WPBeginner-Support
Wir freuen uns, dass Sie unseren Leitfaden hilfreich fanden
Administrator
Megan
Funktioniert dieser Prozess mit einem Bluehost Basic-Konto? Ich habe meine neue Domain gekauft, kann sie aber nicht als Addon-Domain zuweisen, da ich nur 1 Website haben kann. Was ist der beste Weg, um damit zu arbeiten?
WPBeginner-Support
Wenn Sie kein Addon-Domain erstellen können, empfehlen wir Ihnen, sich an Ihren Hoster zu wenden. Einige bieten Unterstützung oder verschiedene Möglichkeiten zur Einrichtung an.
Administrator
Megan
Funktioniert diese Methode, wenn ich den Bluehost Basic Plan verwende, bei dem ich nur eine Website haben kann? Ich kann meine neue Domain nicht als Add-on-Domain hinzufügen.
WPBeginner-Support
Sie können mit dieser Anleitung von einem Hoster zu BlueHosts Basisplan wechseln
Administrator
Utsav
Hallo,
Ich habe Fragen dazu, wo 301-Weiterleitungen verwendet werden sollen, in der .htaccess-Datei der neuen Domain oder der .htaccess-Datei der alten Domain.
In meinem Fall habe ich meine Website-Domain sowie mein Webhosting geändert. Wo soll ich dann die 301-Weiterleitung anwenden und wie lange sollte ich meine alte Domain und mein altes Hosting aktiv lassen?
WPBeginner-Support
Sie möchten 301-Weiterleitungen zur alten Domain hinzufügen. Es hängt von Ihrer alten Website und Ihren persönlichen Vorlieben ab, wie lange Sie die alte Domain aktiv halten sollten, aber Sie benötigen das alte Hosting nicht.
Administrator
Suchitha
Ich hatte meine Domain zuvor auf einer WordPress-Site, die mir nicht gehört. Dort habe ich meine Website entwickelt. Jetzt habe ich meine Domain auf eine neue WordPress-Site umgezogen, die mir gehört, und auch die Export-/Import-Option verwendet, um meine Inhalte auf die neue Site zu übertragen. Allerdings muss ich meine Website neu gestalten. Stellt das hier beschriebene Verfahren sicher, dass meine Website intakt übertragen wird?
WPBeginner-Support
Die Methode in dieser Anleitung sollte es Ihnen ermöglichen, Ihr Theme und Ihre Plugins so zu belassen, wie sie eingerichtet sind.
Administrator