
Machen Sie sich Sorgen um den Umzug Ihrer WordPress-Website auf eine neue Domain? Das ist für viele Website-Besitzer ein beängstigender Gedanke.
Sie möchten nicht die Suchrankings und den Traffic verlieren, für deren Aufbau Sie so hart gearbeitet haben. Ein falscher Schritt könnte zu defekten Links und verlorenen Besuchern führen.
Wir haben Hunderte von Websites erfolgreich migriert. Wir kennen die genauen Schritte, die Sie unternehmen müssen, um sicherzustellen, dass während des Prozesses nichts kaputt geht.
In diesem Leitfaden zeigen wir Ihnen, wie Sie WordPress einfach auf eine neue Domain verschieben, ohne SEO zu verlieren.
Die Migration Ihrer WordPress-Website zu einem neuen Domainnamen kann beängstigend sein, muss es aber nicht. Wir sind hier, um Sie Schritt für Schritt durch den Prozess zu führen.
Sie können auf einen der unten stehenden Links klicken, um zu einem bestimmten Schritt der Migration Ihrer WordPress-Website zu einer neuen Domain zu gelangen:
- Was Sie wissen sollten, bevor Sie Domains ändern
- Vorbereitungsschritte: Was Sie für den Start benötigen
- Schritt 1: Erstellen Sie ein Duplicator-Paket Ihrer WordPress-Website
- Schritt 2: Erstellen Sie eine Datenbank für Ihren neuen Domainnamen
- Schritt 3: WordPress auf Ihrem neuen Domainnamen entpacken
- Schritt 4: Permanente 301-Weiterleitungen einrichten
- Schritt 5: Benachrichtigen Sie Google über Ihre neue Domain
- Benachrichtigen Sie Ihre Benutzer über den neuen Domainnamen
- Häufig gestellte Fragen zum Umzug einer WordPress-Website
- Video-Tutorial
- Zusätzliche Ressourcen
Was Sie wissen sollten, bevor Sie Domains ändern
Bevor Sie beginnen, gibt es ein paar Dinge, die Sie wissen sollten.
Der Prozess der Übertragung auf eine neue Domain wird sich vorübergehend auf Ihre Suchmaschinenrankings auswirken, da Google und andere Suchmaschinen sich an die Änderungen anpassen müssen.
Dies wird sich auch vorübergehend auf Ihren Suchverkehr auswirken. Bitte beachten Sie, dass dies normal ist und bei allen Websites vorkommt, die zu einer neuen Domain wechseln.
Sie können jedoch die SEO-Auswirkungen drastisch reduzieren, indem Sie diesem Leitfaden folgen. Wir zeigen Ihnen den richtigen Weg, Ihre WordPress-Website auf einen neuen Domainnamen zu verschieben, richtige 301-Weiterleitungen einzurichten und Suchmaschinen zu benachrichtigen.
Bitte beachte, dass dieser Leitfaden nicht zum Umzug einer WordPress-Seite zu einem neuen Hoster dient. Es geht hierbei nur um den Wechsel eines Domainnamens. Obwohl der Vorgang ähnlich ist, gibt es ein paar zusätzliche Schritte. Diese zusätzlichen Schritte helfen dir, deine SEO-Rankings und deinen Traffic zu schützen.
Wenn deine alte Website auf WordPress.com gehostet wird, musst du stattdessen die Anweisungen in unserem Leitfaden Umzug von WordPress.com zu WordPress.org befolgen.
Vorbereitungsschritte: Was Sie für den Start benötigen
In dieser Anleitung gehen wir davon aus, dass Sie Ihre WordPress-Website auf oldsite.com eingerichtet haben und versuchen, sie auf newsite.com zu migrieren.
Wir gehen auch davon aus, dass du bereits ein WordPress-Hosting-Konto hast und mit dem Control Panel deines Webhosters vertraut bist.
Du musst auch wissen, wie man einen FTP-Client wie FileZilla benutzt oder wie man Dateien mit der File Manager-App bearbeitet, die im Dashboard deines Hosting-Kontos verfügbar ist.
Falls du keinen Webhosting-Anbieter hast oder zu einem neuen wechseln möchtest, empfehlen wir Bluehost (ideal für kleine Websites + kostenlose Domain) und entweder SiteGround oder WP Engine (ideal für größere Websites oder Online-Shops).
Sobald Sie diese Dinge erledigt haben, sind Sie bereit, den Prozess zu starten!
Schritt 1: Erstellen Sie ein Duplicator-Paket Ihrer WordPress-Website
Das Erste, was Sie tun müssen, ist ein vollständiges Backup Ihrer WordPress-Website zu erstellen.
Sie werden dieses Backup dann verwenden, um eine Duplikat Ihrer Website zu erstellen, damit Sie die Weiterleitungen von Ihrer alten Domain zur neuen korrekt einrichten können.
Es gibt zwar viele WordPress-Backup-Plugins, aber für dieses Tutorial verwenden wir Duplicator.
Duplicator ist das beste WordPress-Backup- und Migrations-Plugin. Wir haben es verwendet, um unzählige Websites für unsere eigenen Unternehmen und für Kunden zu migrieren. Wir haben festgestellt, dass es auch bei sehr großen Websites zuverlässig funktioniert.
Hinweis: Es gibt auch eine kostenlose Version von Duplicator, die du für diese Migration verwenden kannst. Wir empfehlen jedoch ein Upgrade auf einen kostenpflichtigen Plan, um weitere Funktionen wie automatische Cloud-Backups, 1-Klick-Website-Wiederherstellung, einfachere Migrationen und mehr freizuschalten.
Beginnen wir mit der Installation und Aktivierung des Duplicator-Plugins auf deinem alten Domainnamen. Weitere Details findest du in unserem Schritt-für-Schritt-Leitfaden zur Installation eines WordPress-Plugins.
Nach der Aktivierung fügt das Plugin einen Menüpunkt Duplicator in Ihrem WordPress-Admin hinzu. Sie müssen zur Seite Duplicator » Backups gehen und dann auf die Schaltfläche „Neu erstellen“ klicken, um ein neues Backup oder eine Kopie Ihrer WordPress-Website zu erstellen.

Duplicator wird nun den Backup-Assistenten initialisieren. Er wird diesem Paket automatisch einen Namen zuweisen.
Klicken Sie auf die Schaltfläche „Weiter“, um fortzufahren.

Duplicator führt nun einige Tests durch, um zu sehen, ob alles in Ordnung ist. Wenn das Plugin ein Problem findet, sehen Sie eine Warnung mit Anweisungen.
Wenn alle Elemente als „Gut“ markiert sind, klicken Sie auf die Schaltfläche „Erstellen“.

Das Plugin beginnt nun mit der Erstellung eines Duplikatpakets Ihrer Website-Dateien. Abhängig von der Größe Ihrer Website kann dieser Vorgang einige Minuten dauern.
Sobald Sie fertig sind, sehen Sie eine Option „Herunterladen“. Wenn Sie darauf klicken, werden Ihnen Optionen angezeigt, um Beide Dateien herunterzuladen oder Installer und Archiv (Zip) separat herunterzuladen.
Wählen Sie 'Beide Dateien herunterladen', um sie auf Ihren Computer herunterzuladen.

Die Archivdatei ist eine vollständige Kopie Ihrer WordPress-Dateien. Sie enthält Ihre WordPress-Themes, Permalink-Einstellungen, Plugins, Uploads und alle anderen Dateien, die von WordPress-Plugins erstellt wurden.
Das Installer-Skript ist eine PHP-Datei, die die WordPress-Migration automatisiert und durch Entpacken der Archivdatei ausführt.
Schritt 2: Erstellen Sie eine Datenbank für Ihren neuen Domainnamen
Bevor Sie Ihre WordPress-Website auf die neue Domain verschieben, benötigen Sie eine neue SQL-Datenbank, um WordPress auf Ihrem neuen Domainnamen zu entpacken.
Wenn Sie bereits eine Datenbank erstellt haben, können Sie diesen Schritt überspringen.
Um eine Datenbank zu erstellen, musst du das cPanel-Dashboard deines Hosting-Kontos aufrufen, nach unten zum Abschnitt 'Datenbanken' scrollen und dann auf das Symbol 'MySQL-Datenbanken' klicken.
Hinweis: Wenn Sie einen Managed WordPress Hosting-Anbieter wie WP Engine verwenden, müssen Sie diesen Schritt möglicherweise nicht manuell durchführen. Sie können die Dokumentation Ihres Hosts zum Hinzufügen einer neuen Website oder Datenbank konsultieren.
Wir zeigen Ihnen, wie Sie sie auf Bluehost finden, aber die grundlegenden Anweisungen sind gleich und sollten für alle Hosting-Anbieter gelten.
Melden Sie sich im Dashboard Ihres Bluehost-Kontos an und klicken Sie unter Ihrer Website auf die Schaltfläche „Einstellungen“.

Unter Ihren Website-Einstellungen müssen Sie zum Tab „Erweitert“ wechseln.
Scrollen Sie ein wenig nach unten zum cPanel-Bereich und klicken Sie auf 'Verwalten'.

Dies öffnet das cPanel-Dashboard.
Scrollen Sie nach unten zum Abschnitt Datenbanken und klicken Sie auf die Option „MySQL-Datenbanken“.

Hinweis: Ihr Hosting-Kontrollpanel kann leicht von den Screenshots abweichen. Sie sollten jedoch immer noch einen Bereich für Datenbanken mit einer Option zum Erstellen einer neuen Datenbank finden.
Geben Sie einfach einen Namen für Ihre Datenbank ein und klicken Sie dann auf die Schaltfläche „Datenbank erstellen“.

cPanel erstellt nun eine neue Datenbank für Sie. Danach müssen Sie zum Abschnitt MySQL-Benutzer scrollen.
Geben Sie als Nächstes einen Benutzernamen und ein Passwort für Ihren neuen Benutzer ein und klicken Sie auf die Schaltfläche „Benutzer erstellen“. Stellen Sie sicher, dass Sie den Benutzernamen und das Passwort an einem sicheren Ort notieren.

Der neu erstellte Benutzer hat immer noch keine Berechtigung, an der Datenbank zu arbeiten. Ändern wir das.
Scrollen Sie nach unten zum Abschnitt „Benutzer zur Datenbank hinzufügen“. Wählen Sie zuerst den von Ihnen erstellten Datenbankbenutzer aus dem Dropdown-Menü neben dem Feld „Benutzer“ aus. Wählen Sie dann die neue Datenbank aus, die Sie gerade erstellt haben, und klicken Sie auf die Schaltfläche „Hinzufügen“.

Als Nächstes werden Sie aufgefordert, Berechtigungen für den Benutzer auszuwählen.
Wählen Sie „Alle Berechtigungen“ und klicken Sie auf die Schaltfläche „Änderungen vornehmen“, um fortzufahren.

Ihre Datenbank ist nun bereit und kann verwendet werden, um WordPress auf den neuen Domainnamen zu verschieben.
Stellen Sie sicher, dass Sie den Datenbanknamen, Benutzernamen und das Passwort notieren. Sie benötigen diese Informationen im nächsten Schritt.
Schritt 3: WordPress auf Ihrem neuen Domainnamen entpacken
Jetzt müssen Sie die Duplicator-Dateien, die Sie zuvor heruntergeladen haben, auf Ihren neuen Domainnamen hochladen.
Das Duplicator-Paket enthält auch Ihre WordPress-Installation. Das bedeutet, dass Sie WordPress nicht auf Ihrer neuen Domain installieren müssen.
Verbinde dich zuerst mit deinem Domainnamen über einen FTP-Client. Stelle nach der Verbindung sicher, dass das Stammverzeichnis deiner Website vollständig leer ist.
Danach können Sie die Archiv- und Installationsdateien in das Stammverzeichnis hochladen. Dieses wird normalerweise als public_html bezeichnet.
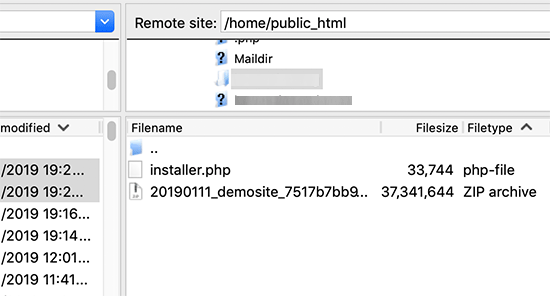
Sobald beide Dateien vollständig hochgeladen sind, können Sie WordPress entpacken.
Öffnen Sie einen neuen Browser-Tab und gehen Sie zur folgenden URL:
http://example.com/installer.php
Vergessen Sie nicht, example.com durch Ihren neuen Domainnamen zu ersetzen. Dies startet den Duplicator-Migrationsassistenten.
Hinweis: Wenn Ihre neue Domain nicht angezeigt wird oder Sie zu einer anderen Seite führt, müssen Sie möglicherweise warten, bis die DNS-Einstellungen aktualisiert sind. Dies kann bis zu 24 Stunden dauern, geschieht aber normalerweise viel schneller.

Der Installer sucht nach der Archivdatei und wählt dann automatisch Optionen für Sie auf dem Bildschirm aus.
Scrollen Sie ein wenig nach unten, um die Informationen für die Datenbank einzugeben, die Sie im vorherigen Schritt erstellt haben.

Darunter zeigt Duplicator automatisch die URL Ihrer alten und neuen Domain an.
Wenn alles gut aussieht, klicken Sie auf die Schaltfläche 'Validieren', um fortzufahren.

Duplicator versucht nun, mit den von Ihnen angegebenen Informationen eine Verbindung zur Datenbank herzustellen.
Bei Erfolg wird Ihnen ein Validierungs-Pass angezeigt. Andernfalls wird Ihnen eine Warnung mit Details zur Behebung angezeigt.

Klicken Sie auf die Schaltfläche „Weiter“, um fortzufahren.
Duplicator beginnt nun mit dem Import Ihrer WordPress-Website. Sobald dies abgeschlossen ist, sehen Sie eine Erfolgsmeldung mit einer Schaltfläche „Admin-Login“.

Duplicator aktualisiert automatisch die URLs zu Ihrer neuen Domain. Sie können nun auf die Schaltfläche 'Admin-Login' klicken, um den WordPress-Adminbereich Ihrer neuen Website aufzurufen.
Nach dem Login bereinigt Duplicator automatisch die Installationsdateien (installer.php und das Zip-Archiv). Dies ist ein wichtiger Sicherheitsschritt. Überprüfen Sie daher die Benachrichtigung, die die Löschung dieser Dateien bestätigt.
Schritt 4: Permanente 301-Weiterleitungen einrichten
Der nächste Schritt ist, Benutzer, die auf deinem alten Domainnamen landen, auf die neue Domain umzuleiten. Dies geschieht durch die Einrichtung von 301-Weiterleitungen.
301-Weiterleitungen sind sehr wichtig für SEO und Benutzererfahrung. Durch das Hinzufügen können Sie Benutzer und Suchmaschinen automatisch zu Ihrer neuen Domain weiterleiten.
Mit anderen Worten, wann immer jemand auf einem Beitrag oder einer Seite deiner alten Domain landet, wird er automatisch zum selben Beitrag oder derselben Seite deiner neuen Domain weitergeleitet, anstatt einen 404-Fehler zu sehen.
An diesem Punkt haben Sie zwei Websites: eine auf Ihrer alten Domain und eine identische auf Ihrer neuen Domain.
Um Ihre Weiterleitungen beizubehalten, müssen Sie Ihre alte WordPress-Installation aktiv lassen, damit sie weiterhin Besucher auf die neue Website weiterleiten kann.
Es gibt zwei Möglichkeiten, die Weiterleitungen einzurichten. Die erste Methode ist einfach und erfordert nur wenige Klicks. Die zweite Methode erfordert, dass Sie Dateien manuell bearbeiten.
Methode 1: 301-Weiterleitungen mit All in One SEO einrichten
Für diese Methode benötigst du All in One SEO (AIOSEO). Es ist das beste WordPress-SEO-Plugin auf dem Markt und ermöglicht es dir, deine WordPress-Website einfach für SEO zu optimieren.
Zuerst müssen Sie zum WordPress-Dashboard Ihrer alten Website zurückkehren. Installieren und aktivieren Sie dann das All in One SEO-Plugin. Weitere Details finden Sie in unserer Schritt-für-Schritt-Anleitung zum Installieren eines WordPress-Plugins.
Hinweis: Sie benötigen mindestens die Pro-Version des Plugins, um auf das Redirect Manager Addon zugreifen zu können. Sie können AIOSEO auch auf Ihrer neuen WordPress-Site einrichten, um Ihre Suchmaschinenrankings und Ihren Traffic noch weiter zu verbessern.
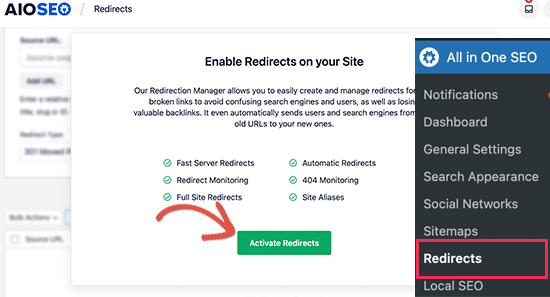
Nach der Aktivierung auf Ihrer alten Domain müssen Sie zur Seite All in One SEO » Weiterleitungen gehen und auf die Schaltfläche „Weiterleitungen aktivieren“ klicken.
Wechseln Sie als Nächstes zur Registerkarte „Full Site Redirect“ und aktivieren Sie den Schalter „Relocate Site“.
Danach müssen Sie Ihren neuen Domainnamen neben der Option 'Zu Domain verschieben' eingeben.
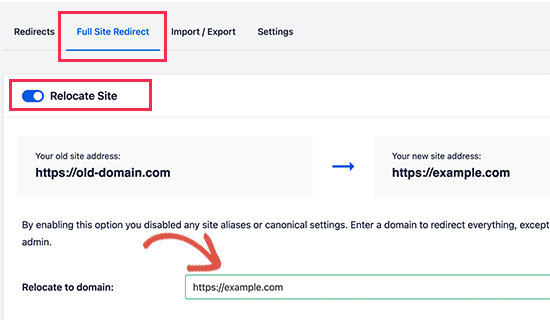
Vergessen Sie nicht, auf die Schaltfläche „Änderungen speichern“ zu klicken, um Ihre Einstellungen zu speichern.
Methode 2: Weiterleitungen manuell auf neue Domain einrichten
Diese Methode erfordert, dass Sie die WordPress .htaccess-Datei auf Ihrem alten Domainnamen bearbeiten.
Hinweis: Dies funktioniert nur, wenn Ihr Hosting-Server Apache verwendet. Wenn Sie NGINX verwenden (häufig bei Managed Hosting wie WP Engine), haben Sie keine .htaccess-Datei. Verwenden Sie in diesem Fall stattdessen Methode 1.
Zuerst müssen Sie sich per FTP mit Ihrer alten Website verbinden und die .htaccess-Datei bearbeiten.
Dies befindet sich im selben Verzeichnis wie Ihr wp-includes- oder wp-admin-Ordner. Öffnen Sie die .htaccess-Datei und fügen Sie die folgenden Codezeilen ganz oben ein:
#Options +FollowSymLinks
RewriteEngine on
Unchanged: RewriteRule ^(.*)$ http://www.newsite.com/$1 [R=301,L]
Stellen Sie sicher, dass Sie newsite.com in dem obigen Code durch Ihre neue Domain ersetzen.
Sobald Sie diese Änderungen vorgenommen haben, besuchen Sie Ihre alte Domain. Sie sollten automatisch zu Ihrer neuen Domain weitergeleitet werden.
Wenn dies nicht der Fall ist, bedeutet dies, dass die Weiterleitung nicht richtig eingerichtet ist und Ihr Server wahrscheinlich keine Weiterleitungsregeln unterstützt. Sie müssen sich an das Support-Team Ihres Webhosting-Unternehmens wenden, um RewriteEngine aktivieren zu lassen.
Schritt 5: Benachrichtigen Sie Google über Ihre neue Domain
Jetzt, da Sie WordPress auf eine neue Domain umgezogen und Weiterleitungen eingerichtet haben, ist es an der Zeit, Google über Ihre Adressänderung zu informieren. Dies hilft Google, Ihre neue Website-Domain schnell zu finden und sie in den Suchergebnissen anzuzeigen.
Stellen Sie zunächst sicher, dass sowohl Ihre neue als auch Ihre alte Domain als zwei verschiedene Eigenschaften in der Google Search Console hinzugefügt wurden. Anweisungen finden Sie in Schritt 1 unserer Anleitung zur Google Search Console.
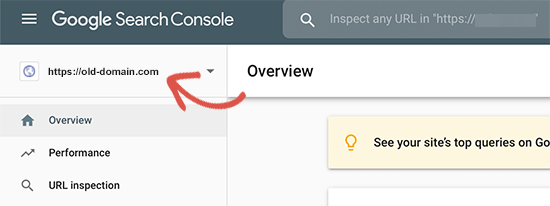
Als Nächstes müssen Sie die alte Domain als aktive Property in Ihrem Google Search Console-Dashboard auswählen.
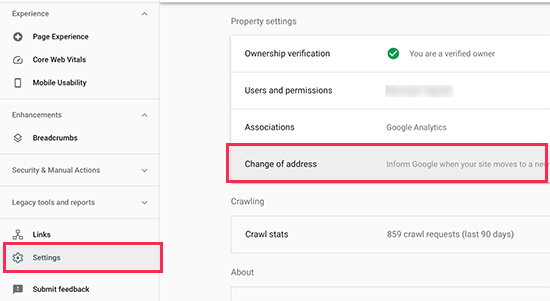
Klicken Sie danach im linken Menü auf das Menü Einstellungen.
Nun können Sie auf das Tool „Adressänderung“ klicken.
Jetzt müssen Sie Ihre neue Domain im Abschnitt Google aktualisieren auswählen.
Dann sollten Sie auf die Schaltfläche 'Validieren & Aktualisieren' klicken.
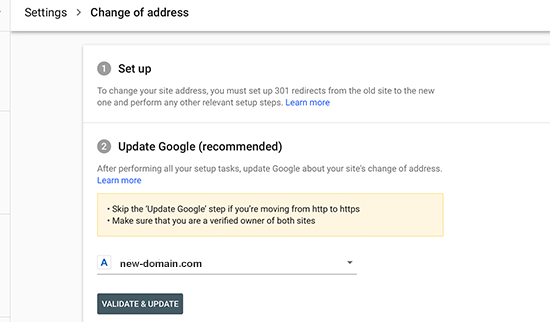
Das ist alles. Google wird nun überprüfen, ob Ihre alte Domain auf die neue Domain umgeleitet wird, und Ihre Änderungen speichern.
Auf dem nächsten Bildschirm zeigt Ihnen die Google Search Console einen Schritt-für-Schritt-Assistenten, um Ihre Adressänderungsanfrage einzureichen.
Benachrichtigen Sie Ihre Benutzer über den neuen Domainnamen
Während die 301-Weiterleitungen ihre Arbeit tun, ist es immer gut, die Migration öffentlich anzukündigen.
Sie können dies tun, indem Sie einfach einen Blogbeitrag auf Ihrer neuen Website schreiben und ihn in Ihren Social-Media-Konten teilen.
Wenn Sie einen E-Mail-Newsletter oder Push-Benachrichtigungsabonnenten haben, sollten Sie auch an diese eine Ankündigung senden.
Dies kann in vielerlei Hinsicht hilfreich sein.
In erster Linie werden sich Ihre Nutzer die neue Domain eher merken, wenn sie davon lesen.
Zweitens können Sie Ihre Benutzer bitten, Sie zu informieren, wenn sie Fehler sehen. Sie allein können Ihre Website nicht in jeder Art von Browser oder Systemumgebung testen, daher ist es immer hilfreich, frische Augen darauf werfen zu lassen.
Häufig gestellte Fragen zum Umzug einer WordPress-Website
Wir verstehen, dass Sie möglicherweise noch Fragen zur Migration Ihrer WordPress-Website auf eine neue Domain haben. Hier sind Antworten auf einige der häufigsten Fragen, die wir erhalten, um Ihnen vollständige Sicherheit bei diesem Prozess zu geben.
1. Wird die Änderung meines Domainnamens meine SEO dauerhaft beeinträchtigen?
Nein, das wird es nicht. Solange Sie die richtigen Schritte befolgen, wird die Verschiebung Ihrer Website Ihrer SEO nicht dauerhaft schaden. Während ein vorübergehender Rückgang der Rankings und des Traffics normal ist, während Suchmaschinen die Änderung verarbeiten, ist dieser Leitfaden darauf ausgelegt, diese Auswirkungen zu minimieren.
Durch die ordnungsgemäße Einrichtung von 301-Weiterleitungen (Schritt 4) und die Benachrichtigung von Google über die Search Console (Schritt 5) teilen Sie den Suchmaschinen genau mit, wohin Sie umgezogen sind, und ermöglichen es ihnen, Ihre bestehende Autorität auf die neue Domain zu übertragen.
Sie möchten vielleicht auch unseren Leitfaden lesen, wie Sie sicherstellen, dass Ihr SEO nach der WordPress-Domainmigration intakt ist.
2. Muss ich meine alte Domain nach dem Umzug auf die neue behalten?
Ja, Sie müssen Ihre alte Domain für absehbare Zeit aktiv halten. Ihre alte Domain hostet die permanenten 301-Weiterleitungen, die sowohl Benutzer als auch Suchmaschinen zu Ihrer neuen Website leiten. Wenn Sie sie ablaufen lassen, würden all diese Links brechen, was zu einem Verlust von Traffic und einem erheblichen Rückgang Ihrer SEO-Rankings führen würde.
3. Wie lange dauert der gesamte Domain-Migrationsprozess?
Die technischen Schritte in dieser Anleitung, vom Sichern Ihrer Website bis zum Einrichten von Weiterleitungen, können in der Regel in wenigen Stunden abgeschlossen werden. Es wird jedoch länger dauern, bis Suchmaschinen wie Google Ihre neue Domain vollständig durchsuchen und indexieren. Obwohl die Benachrichtigung von Google dies beschleunigt, kann es mehrere Wochen dauern, bis sich Ihre Rankings nach dem Umzug vollständig stabilisiert haben.
4. Kann ich meine WordPress-Website ohne ein Plugin wie Duplicator verschieben?
Obwohl es technisch möglich ist, eine Website manuell zu verschieben, indem Dateien per FTP übertragen und die Datenbank exportiert/importiert werden, raten wir den meisten Benutzern dringend davon ab.
Eine manuelle Migration ist komplex und birgt ein viel höheres Fehlerrisiko, wie z. B. übersehene URL-Aktualisierungen oder Probleme mit der Datenbankverbindung. Ein Plugin wie Duplicator automatisiert diese kritischen Schritte und macht den Prozess sicherer, schneller und zuverlässiger.
5. Was ist der Hauptunterschied zwischen einem Umzug zu einer neuen Domain und einem neuen Hoster?
Stellen Sie es sich so vor: Ein Umzug zu einer neuen Domain ist wie eine Änderung der Straßenadresse Ihres Unternehmens. Ein Umzug zu einem neuen Hoster ist wie die Änderung des Unternehmens, dem das Gebäude gehört, aber Ihre Adresse bleibt gleich. Diese Anleitung ist speziell für die Änderung Ihrer Adresse (Domain) gedacht, was einzigartige SEO-Anforderungen mit sich bringt, wie z. B. die 301-Weiterleitungen, die für den Erfolg entscheidend sind.
Video-Tutorial
Zusätzliche Ressourcen
Wir hoffen, dass Ihnen dieses Tutorial geholfen hat, Ihre WordPress-Website auf einen neuen Domainnamen zu verschieben. Die folgenden Artikel und Tutorials helfen Ihnen dabei, Ihre SEO-Rankings nach der Migration auf einen neuen Domainnamen zu verfolgen und wiederherzustellen:
- Die ultimative WordPress-SEO-Migrations-Checkliste (für Anfänger)
- So überprüfen Sie, ob Ihre WordPress-Blogbeiträge für die richtigen Keywords ranken
- So verfolgen Sie Website-Besucher auf Ihrer WordPress-Site
- Tipps zur Optimierung Ihrer Blogbeiträge für SEO wie ein Profi (Checkliste)
Wenn Ihnen dieser Artikel gefallen hat, abonnieren Sie bitte unseren YouTube-Kanal für WordPress-Video-Tutorials. Sie finden uns auch auf Twitter und Facebook.
")


")
WPBeginner-Mitarbeiter
Wir sind uns bei dieser Option nicht sicher, wir haben sie selbst nicht ausprobiert, daher können wir sie nicht empfehlen. Jede von Ihnen eingerichtete Weiterleitung muss eine 301 sein, damit Suchmaschinen den neuen Standort aktualisieren können.
vikramforever
Ich habe meine Domain bei GoDaddy und sie bieten eine Weiterleitungsoption mit Pfadabgleich, wie auf ihrer Hilfeseite beschrieben – http://support.godaddy.com/help/article/5120/redirect-urls-with-your-hosting-account.
Ist dies eine praktikable Option, wenn ich meine aktive Website auf eine andere Domain übertrage? Gemäß der Option im Beitrag muss ich das Hosting für meine alte Domain beibehalten, bis die Weiterleitungen funktionieren. Die Verwendung einer Weiterleitung mit der Option 'Pfad abgleichen' würde dies überflüssig machen. Aber ich möchte sicher sein, dass dies eine Option ist, die genauso funktioniert wie das Skript (wie Sie erwähnt haben).
Keely Worth
Ausgezeichnet – das macht den Prozess der Verschiebung einer WordPress-Website zum Kinderspiel. Danke.
Ayman
Ich habe gerade eine Website von einer URL zu einer anderen migriert. Ich möchte Ihnen wirklich für diesen großartigen Beitrag danken. 100% funktionierend und eine sehr einfache Anleitung
Anas Khan
Guter Beitrag. Ich habe auch ein paar Fragen,
Ich habe 2 Blogs auf WordPress. Der neue Blog ist aktiv und ich habe 45 Beiträge in meinem neuen Blog. Der alte Blog hat 192 Beiträge und alle Beiträge sind bei Google indexiert.
Jetzt möchte ich alle alten 192 Beiträge übertragen und veröffentlichen, damit alle Beiträge auf meinem neuen Blog angezeigt werden können. Wenn ich alle Beiträge von meinem alten Blog lösche, die Sitemap und das Webmaster-Tool des alten Blogs entferne und nach 30 Tagen die alten Beiträge über die Schaltfläche "Neuen Beitrag hinzufügen" in den neuen Blog veröffentliche, funktioniert das dann? Gilt das als doppelter Inhalt?
WPBeginner-Support
Sie können diese Beiträge einfach in Ihren neuen Blog importieren und eine 301-Weiterleitung für Ihre alten Beiträge einzeln einrichten.
Administrator
Mohammed Saimon
Ja, das ist ein schöner Beitrag. Danke an den Autor.
Vinish Garg
Dies ist ein ausgezeichneter Beitrag und hat mir neue Richtungen für die Umstellung meines WP-Blogs von einer Domain auf eine andere gegeben. Ich wäre dankbar, wenn Sie mich korrigieren könnten, falls meine Planung wie folgt falsch ist.
– Ich kenne Hostgator und verstehe, wie man den Dateimanager benutzt und WP, Datenbank einrichtet und Datenbanken importiert/exportiert (XML-Dateien)
– Mein aktueller WP-Blog befindet sich unter: http;//www.example.com, und ich möchte ihn auf eine andere Domain verschieben http://www.example.org.
– Erstens werde ich ein neues WP auf dem Stammverzeichnis der neuen Domain einrichten (Datenbank, Konfigurationsdatei, benutzerdefiniertes Theme und Importdatei von der alten Website)
– Die neue Website wird genau wie die alte Website aussehen, ABER der einzige Unterschied ist die URL (wegen der neuen Domain).
Wenn bisher alles korrekt ist... bin ich mir nicht sicher, wie ich Weiterleitungen für alle Seiten/Beiträge meiner alten Domain auf die neue Domain verwenden soll. Können Sie mir bitte Ratschläge geben?
WPBeginner-Support
Das können Sie tun, indem Sie Schritt 3 dieser Anleitung befolgen und 301-Weiterleitungen einrichten.
Administrator
Stefan
Toller Beitrag, leider habe ich ihn zu spät gelesen und meine Domain bereits verschoben. Alles, was ich getan habe, ist, dass ich eine neue Domain für meinen Blog gekauft habe (, davor war sie noch 2 Monate aktiv). Ich habe die WordPress-URL und die Website-Adresse in den allgemeinen WordPress-Einstellungen geändert und die Sitemap mit der neuen URL erneut eingereicht. Das ist alles, was ich getan habe.
Das war vor einem Monat und seitdem ist der Traffic total eingebrochen, von mehr als 1.000 Seitenaufrufen pro Tag auf jetzt nicht einmal 200.
Wenn ich bei Google nach „thailand redcat“ suche, erscheint keine meiner Seiten. Die Sitemap wurde jedoch erfolgreich übermittelt:
14:51:35 Uhr Stefan
Wissen Sie, was der Grund dafür sein könnte und wie ich das Problem lösen und die Suchergebnisse und schließlich den Traffic wieder normalisieren kann?
Jede Hilfe wäre sehr willkommen. Prost!
WPBeginner-Support
Stefan, wir sind uns nicht sicher, ob wir den Prozess verstehen, den Sie befolgt haben, um Ihre Website auf eine neue Domain zu verschieben. Hier sind einige allgemeine Tipps. Stellen Sie zuerst sicher, dass Such-Bots Ihre Website crawlen und indexieren können? Überprüfen Sie Ihre Website in den Google Webmaster Tools auf Crawling-Fehler.
Administrator
Charlie
Ich habe dasselbe Problem. Google-Crawler finden seit der Migration einen 500-Fehler auf der gesamten Website. Ich habe es auf 2 verschiedenen Umgebungen/Anbietern versucht, verschiedene PHP-Versionen, ich habe versucht, alle meine Plugins einzeln zu deaktivieren/reaktivieren, ich habe versucht, die Permalinks, die htaccess, die robots.txt neu zu generieren… nichts funktioniert.
Mr Joy
Vielen Dank für Ihren großartigen Beitrag. Ich habe Ihrem Beitrag gefolgt und meine Website auf eine neue Domain verschoben. Alles funktioniert gut, aber es gibt nur ein Problem mit dem visuellen WordPress-Editor. Das Problem ist: „Wenn ich ein Bild in einem Beitrag über die Option Medien hinzufügen hochlade, dann auf die Bildminiaturansicht „Bild bearbeiten“ klicke, erscheint ein iFrame mit einem Not Found-Fehler. Aber wenn ich auf Löschen klicke, funktioniert es. Bitte helfen Sie mir, das Problem zu lösen. Überprüfen Sie den Screenshot: http://bit.ly/1fqjE1b
WPBeginner-Support
Das Erste, was Sie versuchen können, ist, Ihre Permalinks zu aktualisieren. Gehen Sie einfach zu Einstellungen » Permalinks und klicken Sie auf die Schaltfläche Änderungen speichern.
Administrator
AP
Ausgezeichnete Arbeit – vielen Dank! Es könnte hilfreich sein, die obige Antwort – die sich mit der Erstellung und Verwendung der neuen Datenbank befasst – zu den anfänglichen Anweisungen hinzuzufügen, da nicht jeder die Kommentare liest, bevor er eine Übertragung versucht.
Gary Kirwan
Toller Artikel. Meine Frage ist: Ich verwende die Affiliate-Cloaking-Methode, die von Yoast empfohlen wird, was bedeutet, dass ich eine .htaccess-Datei in einem Ordner namens /out/
Brauche ich denselben 301-Redirect-Code, der im Artikel erwähnt wird, sowohl in die .htaccess-Dateien im Stammverzeichnis als auch im Unterordner für Affiliate-Links einzufügen? Deckt das Hinzufügen des 301-Redirect-Codes zur .htaccess-Datei im Stammverzeichnis automatisch auch die Unterordner ab?
Mein Ziel ist es, sicherzustellen, dass externe Affiliate-Links korrekt funktionieren.
Kingsley
Tolles Tutorial, ich werde es verwenden, um http://www.ideacrunch.org in den nächsten Tagen auf http://technblogging.com zu migrieren, aber ich habe eine Frage. Werden das Datenbankpasswort und der Benutzername die gleichen sein wie auf der alten Website?
Craig
Hallo, ich weiß, dass dies etwas spät ist. Aber ich möchte buchstäblich nur von http://www.unlockworldtv.co.uk zu http://www.unlockworldtv.com wechseln. Ist dieses Tutorial dafür geeignet? Ich wechsle nicht den Hoster, nur die URL
WPBeginner-Support
Ja, das ist es.
Administrator
Craig
Danke. Ich stecke bei go to newsite.com/installer.php fest, ich bekomme nur meine alte Website, aber mit 404. Ich habe WP nicht im neuen Verzeichnis installiert, sondern nur ein leeres Verzeichnis erstellt, um den Installer und die ZIP-Datei hineinzulegen. Ich leite meine neue Domain vom Registrar-Konto auf dieses neue Verzeichnis bei meinem Webhost um, aber ich bekomme nichts außer dem Theme und 404. Gibt es offensichtliche Tipps?
Craig
Nur zur Info, ich habe das Problem gelöst. Es scheint ein Problem mit 1&1 zu sein (keine Überraschung), das aber behoben werden kann, indem eine index.html-Datei vorhanden ist. Also für alle auf 1&1, passen Sie Schritt 2 an von
„Stellen Sie sicher, dass das Stammverzeichnis oder das Verzeichnis, in das Sie Ihre Website kopieren möchten, vollständig leer ist.“ zu „Stellen Sie sicher, dass das Stammverzeichnis oder das Verzeichnis, in das Sie Ihre Website kopieren möchten, vollständig leer ist, außer installer.php, der .zip-Datei UND einer index.html-Seite“
Ich glaube, das hat mit der Art und Weise zu tun, wie 1&1 Seiten auf seinem Server priorisiert.
Denis Fitzgerald
Hallo – Danke für den Artikel. Ich habe eine Frage: Ich wechsle meine Website von Tumblr zu WordPress. Sie hat eine eigene Domain. Ich möchte wissen, ob die Schaltflächen am Ende jedes Artikels, die soziale Shares, Twitter, Facebook, Google+ anzeigen, die ursprüngliche Share-Anzahl beibehalten oder auf Null zurückfallen. Vielen Dank.
WPBeginner-Support
Wenn es sich um dieselbe Domain handelt und Ihre URL-Struktur intakt bleibt, können Sie hoffentlich diese Social-Counts beibehalten.
Administrator
Bertjan
Ausgezeichneter Leitfaden! Vielen Dank.
Sudha Mathew
Hallo, ich habe meine Website vor etwa 6 Monaten mit Weiterleitungen umgezogen und es funktioniert gut. Ich muss meinen Vertrag mit dem Web-Sicherheitsunternehmen bald erneuern. Daher muss ich wissen, wie viel Traffic immer noch von der alten Website weitergeleitet wird. Könnten Sie erklären, wie das geht? Ich bin kein Technikexperte, kann aber sowohl Webmaster-Tools als auch Google Analytics verwenden. Vielen Dank im Voraus!
Beste
Sudha
Moti
Hallo,
Ich möchte den Domainnamen meiner Website ändern (auf demselben Host bleiben).
In den obigen Anweisungen wird darauf hingewiesen, dass ich „sicherstellen sollte, dass das Stammverzeichnis oder das Verzeichnis, in das Sie Ihre Website kopieren möchten, vollständig leer ist.“.
In meinem Fall ist WP im Stammverzeichnis installiert (ich habe den Ordner wp-content unter public-html) – ich gehe davon aus, dass dies bedeutet, dass meine WP unter dem Stammverzeichnis installiert ist.
Welche Ordner soll ich bereinigen / löschen, bevor ich die installierte Datei aus dem Duplikator ausführe?
Danke,
Moti.
Declan
Vielen Dank für das Tutorial. Hat super und ohne Probleme funktioniert.
Ich habe natürlich eine Frage bezüglich SEO.
Meine alte Website war nicht bei den Google Webmaster-Tools registriert, daher gibt es offensichtlich keine Möglichkeit, sie über die vorgenommenen Änderungen zu informieren. Meine Frage ist: Muss ich zuerst meine alte Domain bei den Google Webmaster-Tools registrieren und dann meine zweite Domain... und sie dann über die Änderungen informieren?
Jede Hilfe wäre toll.
Nochmals vielen Dank für den Artikel, er war äußerst hilfreich.
Declan.
WPBeginner-Support
Ja, Sie müssen die Änderung in Ihrem Webmaster-Tools-Konto der alten Website melden. Dies ist jedoch nur der schnellste Weg. Wenn Sie Ihre 302-Weiterleitungen eingerichtet haben, würden Suchmaschinen dies ebenfalls erkennen.
Administrator
reza
Hallo,
das funktioniert bestens, ich leite meine alte.com, meine Hauptdomain, auf neue.com, eine Addon-Domain (im selben Hosting), um
aber als ich eine weitere neue Addon-Domain hinzufügte, konnte meine neue Addon-Domain nicht aufgerufen werden... sie leitet meine addon.com immer zu new.com/addon.com weiter...
Können Sie helfen??
Jennifer @ Delicieux
Vielen Dank für die detaillierte Erklärung. Ich habe jedoch eine Frage. Ich überlege schon seit einiger Zeit, zu einem neuen Domainnamen zu wechseln, aber ich wollte wissen, ob ich Probleme haben würde, da ich Anfang des Jahres die Permalink-Struktur auf meinem alten Blog geändert habe.
Ich habe die Anweisungen von Yoast befolgt, wie ich meine Permalink-Struktur ändern kann, und meine .htaccess-Datei bearbeitet. Ich frage mich, ob dies Probleme verursachen wird, wenn ich zu einer neuen Domain umziehe? Dies ist das Einzige, was mich zurückhält, weil ich nicht möchte, dass die Dinge schiefgehen und ich den Rang verliere und mit kaputten Links ende.
WPBeginner-Support
Sie können Ihre alte .htaccess-Datei auf Ihre neue Website übertragen. Wenn die .htaccess-Datei Verweise auf den alten Domainnamen enthält, ersetzen Sie diese durch den neuen Domainnamen und alles ist in Ordnung.
Administrator
Hrayr
Hallo,
Zuerst einmal vielen Dank für diesen Artikel – er hat bei mir ohne Probleme funktioniert!
Ich habe eine einfache Frage, die speziell für meinen Fall gilt. Ich würde Ihre Gedanken dazu sehr schätzen.
Grundsätzlich habe ich diesen Ansatz verwendet, um meine WordPress-Website von localhost auf den Host/die Domain eines Drittanbieters zu kopieren.
Wie gesagt, alles hat gut funktioniert – ich möchte nur sicherstellen, dass dieser Ansatz keine alten URLs/Links/Referenzen hinterlässt, die Google beim Crawlen dieser neuen Website „nerven“ könnten. Meine Website ist ziemlich einfach, sodass ich sie im schlimmsten Fall einfach neu erstellen kann, falls es Nachteile beim Crawling/SEO gibt, wenn die Website mit Duplicator kopiert wird.
Gibt es bekannte SEO-Probleme bei der neuen Website, von denen Sie wissen?
WPBeginner-Support
Wir sind uns keiner SEO-Probleme bewusst, aber wenn Sie auf welche stoßen, können Sie den Plugin-Autor informieren, indem Sie einen Support-Thread auf der Plugin-Seite eröffnen.
Administrator
Kevin
Ich glaube nicht, dass die Art und Weise, wie Sie den Benutzern empfehlen, ihre 301-Weiterleitung durchzuführen, die beste ist. Es ist gut dokumentiert, sogar von Google empfohlen, dass Sie Seiten-zu-Seiten-Weiterleitungen durchführen, NICHT alle Seiten Ihrer alten Website auf die Homepage der neuen Website umleiten. Der von Ihnen bereitgestellte htaccess-Code tut Letzteres. Es ist keine gute Methode, um Link Juice zu erhalten.
Vielleicht können Sie uns stattdessen auf ein gutes htaccess-Tutorial verweisen? Es gibt auch Online-htaccess-Generatoren, die die Erstellung von Weiterleitungen von Seite zu Seite erheblich beschleunigen können.
WPBeginner-Support
Kevin, du hast Recht und die Rewrite-Regeln im Artikel machen genau das. Anstatt Benutzer zur Homepage weiterzuleiten, werden sie zur einzelnen Seite gesendet. $1 am Ende des Codes hängt den Link mit der richtigen Permalink-Struktur an.
Administrator
Julian
Hallo, wenn ich das nach dem 'Deploy' mache, überspringt es den 'Update'-Abschnitt und kehrt zu einer 404-Seite unter der alten Webadresse zurück... Haben Sie eine Idee, was das verursachen könnte?
Vielen Dank!
Munna
Vielen Dank für diesen Beitrag. Ich hatte Schwierigkeiten, meine alten Website-Besucher auf die neue Website umzuleiten. Aber Ihr .htaccess-Code hat es super einfach gemacht, da beide Websites auf demselben Hosting-Server waren.
Raspal
Hallo,
Ich habe alle Schritte abgeschlossen und der Blog auf der neuen Website funktioniert einwandfrei. Aber ich kann mich nicht im Admin-Bereich anmelden. Ich habe zwei Benutzer, einer davon ist ein Admin-Benutzer. Ich erhalte diese Fehlermeldung, wenn ich versuche, mich anzumelden:
„FEHLER: Cookies sind in Ihrem Browser blockiert oder werden nicht unterstützt. Sie müssen Cookies aktivieren, um WordPress nutzen zu können.“
Ich habe verschiedene Browser ausprobiert und auch versucht, alle Cookies zu löschen. Habe auch versucht, das Passwort zu ändern. Das Passwort wurde erfolgreich geändert, aber ich erhalte immer noch die oben genannte Fehlermeldung.
Können Sie bitte schnellstmöglich helfen?
Verwende WP-Version 3.7.1
Mit freundlichen Grüßen,
Raspal
Neil Bargas
Danke, Mann! 100% funktionierend und sehr einfache Anweisungen.
Lynn
Fantastischer Artikel! Du bist mein Held des Tages.
Jahid
"Melden Sie sich mit demselben Benutzernamen und Passwort, die Sie auf der alten Website hatten, in der WordPress-Administration Ihrer neuen Website an. Gehen Sie in der WordPress-Administration Ihrer neuen Website zu Einstellungen » Permalinks und klicken Sie auf die Schaltfläche Speichern."
Nachdem ich mich angemeldet habe, wird mir die Seite mit dem ersten Schritt angezeigt: „Schritt 1: Dateien & Datenbank“ anstelle des WP-Dashboards. Hilfe!
WPBeginner-Support
Es scheint, als müssten Sie Ihre wp-config.php-Datei aktualisieren
Administrator
Chrissy
Hallo! Vielen Dank für diesen hilfreichen Artikel – ich bin gerade dabei, die Schritte durchzugehen.
Meine einzige Frage ist:
Ich habe meinen Blog auf einer Domain gehostet, nennen wir sie http://www.reallylongdomainname.com/blog, aber ich habe eine Weiterleitung, um ihn an meine andere Domain weiterzuleiten: blog.shortername.com. Jetzt möchte ich den Blog zu shortername.com/blog migrieren, da einige der Links nach der Weiterleitung nicht funktionieren.
Alle meine Beiträge und Dinge haben bereits Permalinks unter shortname.com/blog/post#, muss ich also wirklich etwas von diesem 301-Kram tun? Bin ich sicher, die Schritte 3, 4 und 5 zu überspringen, oder gibt es etwas, das ich beachten muss? Und muss ich den alten Blog löschen oder nur die Weiterleitung, sobald ich ihn unter der neuen Domain starte?
Es wäre wirklich großartig, herauszufinden, wie ich vorgehen soll, da ich diese Woche Dutzende von Dingen ausprobiert habe und keine Situation genau wie meine ist :/ Danke!
WPBeginner-Support
Der Zweck von 301-Weiterleitungen besteht nicht nur darin, Benutzer weiterzuleiten, sondern auch Suchmaschinen mitzuteilen, dass Sie an den neuen Standort umgezogen sind. Daher sind Schritt 3 und 4 ein Muss, sonst kann dies Ihre SEO-Rankings beeinträchtigen.
Administrator
Mark P
Toller Beitrag. Eine Frage jedoch.
Angenommen, jemand klickt auf einen Backlink zu meiner alten Domain. (Nennen wir sie olddomain.com/blogpost1). Wird dann stattdessen auf den entsprechenden Link der neuen Domain (newdomain.com/blogpost1) weitergeleitet, anstatt nur auf die Homepage der neuen Domain?
WPBeginner-Support
Ja, es würde Benutzer, die auf Ihren Beiträgen und Seiten auf der alten Website landen, zu den Beiträgen/Seiten auf der neuen Website umleiten.
Administrator
Mark P
Danke!
Morgan
Frage: Ich wechsle meine Website von einem Host zu einem neuen Host. Gleichzeitig ändere ich meinen Domainnamen. Ich habe meine WordPress-Website bereits erfolgreich auf meinen neuen Host mit dem neuen Domainnamen übertragen. Ich bin jetzt bei Schritt 3 und möchte 301-Weiterleitungen verwenden, um diese alten URLs auf die neuen Website-URLs zu verweisen. Die alte Website befindet sich jedoch auf dem alten Host und ich plane, diese Website abzuschaffen.
Funktionieren die 301-Weiterleitungen immer noch? Oder muss ich auch die alte Website auf meinen neuen Hoster verschieben und DANN die Weiterleitungen einrichten? Ich bin mir nicht sicher, was ich tun soll, und würde mich über jeden Rat freuen.
WPBeginner-Support
Wenn es Ihnen möglich ist, die alte Website mindestens einen Monat lang online zu halten, können Sie eine 301-Weiterleitung hinzufügen. Aktualisieren Sie danach die Informationen Ihrer Website in den Google Webmaster-Tools. Sobald Sie Ihre Suchrankings und Ihren Traffic wiederhergestellt haben, können Sie Ihr Konto beim alten Webhost kündigen.
Administrator
Nj
Vielen Dank für die hilfreichen Beiträge, aber manchmal helfen Videos bei solchen Plugins SEHR. Ich hoffe, Sie werden dies berücksichtigen
Nochmals vielen Dank
Arnold
Hallo. Könnten Sie bitte den Teil erläutern, in dem Sie sagten: „Der Installer wird Sie auffordern, Datenbankinformationen für die neue Website anzugeben und das Kontrollkästchen für die Tabellenentfernung zu aktivieren?“ Wo finde ich diese Datenbankinformationen? Sollte ich also das Kontrollkästchen für die Tabellenentfernung aktivieren? Danke!
WPBeginner-Support
Dies ist die Datenbank, in die Sie Ihre alte Website aus dem zuvor erstellten Paket importieren werden. Melden Sie sich bei Ihrem Webhosting-Dashboard an, suchen Sie phpmyadmin und erstellen Sie eine neue Datenbank. Kehren Sie zu installer.php zurück und geben Sie den neuen Datenbanknamen, Host, Benutzer und Passwort ein.
Administrator
Kara Lumsden
Sie sollten also WordPress nicht im Stammverzeichnis der neuen Domain installieren? Das Einzige, was Sie auf der neuen Domain tun müssen, ist nur die Erstellung einer neuen Datenbank, ist das richtig? Können Sie etwas mehr darüber erzählen, wie man die Datenbank in phpmyadmin erstellt?
Sehr dankbar, danke für alles, was Sie tun!
WPBeginner-Support
Nein, es ist in Ordnung, WordPress im Stammverzeichnis der neuen Domain zu installieren. Ja, Sie müssen nur eine neue Datenbank erstellen und Duplicator kümmert sich um den Rest.
Kara Lumsden
Können Sie bitte Anweisungen zur Erstellung der Datenbank geben?
Vielen Dank,
Kara
Dennis J. Smith
Wie lange sollte man warten, bevor man die alte Website löscht?
WPBeginner-Support
30 bis 90 Tage, je nachdem, wie erfolgreich Ihr Umzug war. Wenn Sie zuversichtlich sind, dass Ihre neue Domain fast den gleichen Traffic wie die alte Website gewonnen hat, können Sie sie löschen.
Administrator
Färber
Hallo, ich bin auf ein Problem gestoßen. Ich kann meine Permalinks nicht speichern, da ich die WP-Admin-Datei nicht finden kann. Ich habe versucht, die WP-Admin-Datei erneut hochzuladen, aber das hat das Problem nicht behoben. Könnten Sie mir bitte raten, ob es andere Schritte gibt, die ich unternehmen kann, um dieses Problem zu beheben?
Danke
Färber
WPBeginner-Support
@dyer Wir können Ihre Frage nicht verstehen. Wir gehen davon aus, dass Sie keinen Zugriff auf Ihren WordPress-Adminbereich haben. Verbinden Sie sich in diesem Fall mit Ihrer Website über einen FTP-Client wie Filezilla. Suchen Sie die Datei
.htaccess, laden Sie sie auf Ihre Festplatte herunter und löschen Sie sie von Ihrer Website. Wir hoffen, dass dies Ihr Problem löst.Administrator
Fakhre
Danke für den Artikel, Leute!
Ich hoste meine Website bei Bluehost und möchte nur den Domainnamen ändern, ohne SEO und Backlinks zu verlieren.
Meine Website-Inhalte sind riesig, ich habe ungefähr 8000 Beiträge. Gibt es eine Lösung, um die Domain umzubenennen??
Sanjay Patel
Hallo…
Wirklich nützliche Informationen, aber das Duplikatoren-Plugin funktioniert auf meiner Website nicht. Bitte lösen Sie mein Problem. Wie mache ich das?
Danke im Voraus.
Dinah
Funktioniert das auch beim Verschieben von einer Domain auf eine Subdomain?
Redaktion
Ja
Administrator
Dinah
Funktioniert das für den Umzug auf eine neue Subdomain? Wenn mein WordPress-Blog beispielsweise auf altesseite.com war und ich ihn auf blog.neueseite.com haben möchte, würde ich dann dasselbe tun?
Redaktion
Ja.
Administrator
Emmie
Ich habe das kürzlich gemacht und die Links und alles haben einwandfrei funktioniert, aber ich wurde gerade von Google mit einer Strafe belegt, weil ich sofort so viele Backlinks hatte – sie denken, ich hätte sie gekauft. Ist das schon jemandem passiert? Ich habe die entsprechenden Benachrichtigungen in Google Webmaster Tools vorgenommen, bevor ich umgezogen bin, und das hat nichts geholfen. Es hat mich hart getroffen, also wenn jemand Erfahrung mit der Behebung dieses Problems hat, bitte teilen Sie es mit!
Redaktion
Hallo Emmie, wo siehst du, dass du für zu viele Backlinks abgestraft wirst? Zeigt es dir diesen Fehler in deinen Webmaster Tools an? Ich versuche nur zu verstehen, wie du zu dem Schluss gekommen bist, dass du von Google abgestraft wurdest.
https://www.google.com/webmasters/tools/reconsideration << Dies ist die Seite, auf der Sie eine Übermittlungsanfrage an Google senden können.
Administrator
Lateef Adewale
Haben Sie eine Ahnung, ob das funktioniert, wenn ich eine Website von Bluehost zu Wp Engine umziehe?
Redaktion
Ja, es sollte funktionieren.
Administrator
Emily
Habe diesen ganzen Prozess gerade durchlaufen, es hat perfekt funktioniert und genau das, was ich wissen musste. Danke WPBeginner! Der einzige Fehler, auf den ich gestoßen bin, war meine eigene Schuld – ich hatte meine Sicherheit-Plugins nicht zuerst deaktiviert, also musste ich alles noch einmal machen. Jetzt bin ich ein Experte… : )
Sandra Christie
Danke für den Artikel!
Sind die Schritte für den Umzug derselben Domain zu einem neuen Hoster im Grunde dieselben? Und kann das auch zu einem Rückgang der SEO führen?
Travis Pflanz
Außerdem befindet sich die Option „Adressänderung“ in den Webmaster-Tools jetzt im Menü „Optionen“ oben rechts im Zahnradsymbol.
Zach Smith
Danke, dass Sie wieder einen großartigen Artikel für uns veröffentlicht haben. Das ist am besten für jeden technologiebezogenen Blog.
Bob
Danke – das sind großartige Informationen. Ich freue mich wirklich darauf, Duplicator kennenzulernen. Während das Verschieben einer Domain etwas ist, das ich gelegentlich tun muss, klone ich ständig Umgebungen für Entwicklungs- und Testzwecke. Der manuelle Klonprozess, den ich bisher verwendet habe, ist zeitaufwendig und fehleranfällig. Duplicator hat das Potenzial für eine erhebliche Verbesserung!
Sam
Ich habe gerade WP mit dieser Methode auf eine neue Domain und einen neuen Server verschoben. Webmaster Tools zeigt nun viele 403-Fehler auf dem neuen Server für jeden Ordner in uploads an, wie z. B. wp-content/uploads/2012/07 und einen 403-Fehler für jeden der Monate. Auf meinem alten Server hatte ich das nicht. Sollten wir beim Verschieben der Website auch die Berechtigungen ändern oder überprüfen? Was sollten sie für den Ordner wp-content/uploads sein?
Redaktion
Google sollte nicht die Ordner indizieren, sondern die Dateien darin. Wenn Sie versuchen, direkt über einen Browser auf den Ordner zuzugreifen, gibt WordPress einen 404-Fehler zurück. Sie möchten keinen Zugriff auf ein Verzeichnis zulassen, das keine Indexseite hat, was dann eine Verzeichnisauflistung erzeugt, die indiziert und durchsucht wird, einschließlich der Links zu allen Dateien.
Administrator
sam
Danke für die Antwort. Warum zeigt Google dann in den Webmaster-Tools einen 403-Fehler für die Ordner an? Bedeutet das nicht, dass etwas nicht stimmt?
Zimbrul
DAS IST DER ARTIKEL, NACH DEM ICH 1 JAHR LANG GESUCHT HABE!!
Redaktion
Besser spät als nie
Administrator
Jasim Ahmed
Duplicator ist ein großartiges Plugin, aber das Problem ist, dass es mit einigen Servern nicht funktioniert, da es eine höhere PHP-Version benötigt. Gibt es außer dem noch andere Möglichkeiten?
Redaktion
Ja, Sie können die Dateien und die Datenbank manuell herunterladen. Laden Sie sie auf die neue Domain hoch. Ersetzen Sie alle alten URL-Instanzen in der Datenbank mit einer SQL-Such- und Ersetzungsabfrage von phpMyAdmin. Die einfachere Lösung wäre, Ihren Hoster zu fragen, warum er keine höheren PHP-Versionen verwendet, oder zu einem besseren Hoster zu wechseln.
Administrator
iAn
Hallo, ich glaube, das bewahrt Ihre Social-Media-Sharing-Zähler (Anzahl der Shares und Likes) nicht. Haben Sie eine Idee, wie man diese Popularitätsmesser behält?
Redaktion
Sie können die Social-Counts nicht beibehalten, da diese auf Ihren kanonischen URLs basieren, die die neue Website sein werden (sehr wichtig für SEO). Die Zähler sind hauptsächlich für Social Proof. Alle vorhandenen Links in sozialen Medien werden ordnungsgemäß weitergeleitet, sodass Sie dort keinen Traffic verlieren.
Administrator