Quando si tratta di apportare aggiornamenti o modifiche significative al proprio sito WordPress, farlo direttamente può essere rischioso. È qui che entra in gioco un sito di staging.
Si tratta di un clone perfetto del vostro sito web live, dove potete testare in sicurezza le modifiche, risolvere i problemi e perfezionare gli aggiornamenti prima di distribuirli al sito principale. La creazione di un sito di staging può salvare da potenziali tempi di inattività, caratteristiche non funzionanti e altre complicazioni.
Noi di WPBeginner utilizziamo siti di staging per testare gli aggiornamenti del sito web prima di pubblicarli sui nostri siti live.
In questa guida passo passo, vi mostreremo come creare facilmente un ambiente di staging per il vostro sito WordPress. Verranno illustrati diversi metodi, la maggior parte dei quali richiede solo pochi clic.
Che cos’è un sito di staging?
Un sito di staging è un clone del vostro sito web live, utilizzato per testare le modifiche prima di renderle effettive. I siti di staging aiutano a individuare gli errori, in modo da non danneggiare il sito web live.
In passato era molto difficile configurare un sito di staging di WordPress, ma ora le cose sono cambiate e anche una persona non tecnica può farlo.
Molti utenti installano WordPress in locale sui loro computer Windows o Mac per testare le modifiche. Una volta terminati gli aggiornamenti, caricano semplicemente le modifiche da localhost al server live.
Il problema più grande di questo approccio è: cosa succede se qualcosa che ha funzionato sul localhost non funziona sul server live?
Spesso i siti locali e i server di hosting WordPress non sono in esecuzione nello stesso ambiente.
Dal momento che il sito di staging vive sul vostro server di web hosting, potete facilmente evitare tutti questi errori perché esegue la stessa configurazione del server del vostro sito live.
Detto questo, vediamo come impostare un sito di staging per WordPress.
Come creare facilmente un sito di staging di WordPress
Esistono diversi modi per creare un sito di staging per WordPress. Il più semplice è quello di utilizzare la funzione di sito di staging integrata del vostro provider di hosting.
Alcune delle migliori società di hosting WordPress offrono già siti di staging con un solo clic. Se il vostro sito web è ospitato presso una di esse, potete creare facilmente un sito di staging senza alcun problema.
Se non disponete di una di queste popolari soluzioni di host, abbiamo anche una soluzione per aiutarvi a creare un sito di staging di WordPress utilizzando un plugin (o anche manualmente).
Per una navigazione più rapida, è possibile utilizzare la navigazione sottostante per passare alla sezione più pertinente:
Creare un sito di prova su Bluehost
Bluehost è una delle migliori società di hosting WordPress. Offre una soluzione rapida di sito di staging in 1 clic con tutti i suoi piani.
Per prima cosa, è necessario accedere al cruscotto di Bluehost e visitare la sezione “I miei siti”.
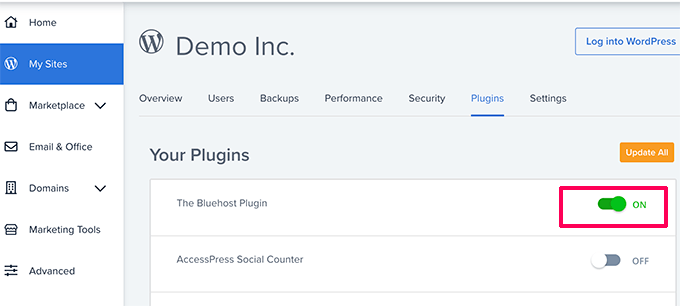
Quindi, passare alla scheda “Plugin” e attivare l’interruttore accanto all’opzione “Plugin Bluehost”.
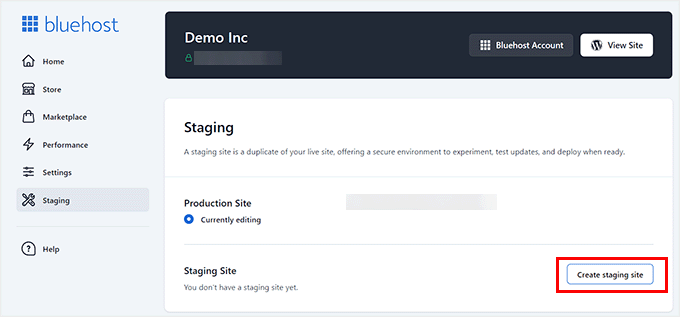
Dopodiché, accedere alla dashboard del sito WordPress e visitare la pagina Bluehost ” Staging”.
A questo punto, fare clic sul pulsante “Create Staging Site”.
Bluehost preparerà ora l’ambiente di staging per il vostro sito web.
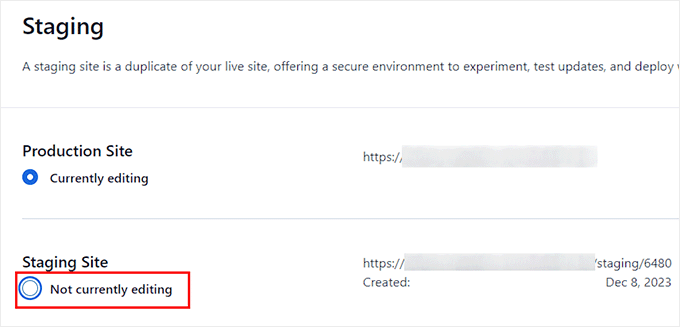
Una volta fatto ciò, verrà visualizzata la sezione “Sito di prova”, dove si dovrà selezionare la casella “Non in fase di modifica”.
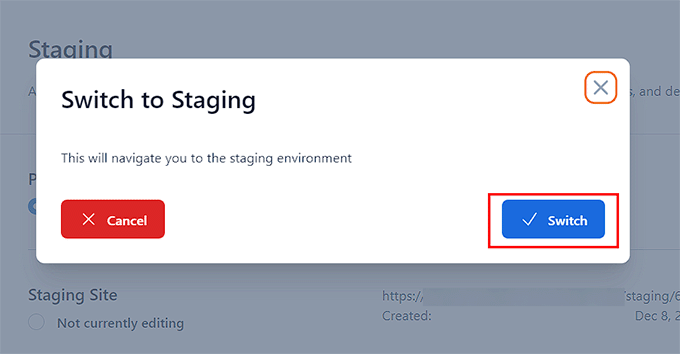
A questo punto si aprirà un prompt che chiede di passare al sito di staging.
Da qui, fare clic sul pulsante “Cambia”.
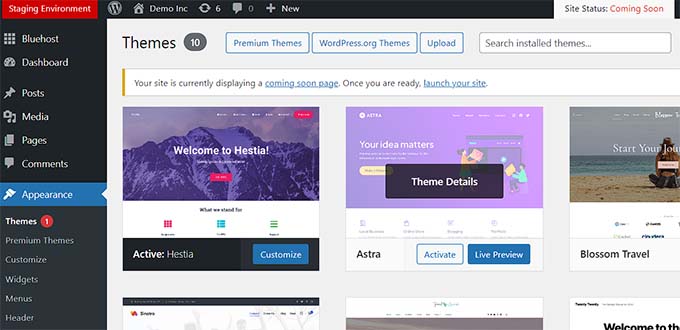
Una volta attivata, sullo schermo apparirà un pulsante che indica che si sta lavorando sul sito web di staging.
Potete continuare a lavorare sul vostro sito web senza preoccuparvi che ciò influisca sul vostro sito live.
Distribuire le modifiche da un sito in fase di allestimento a un sito live su Bluehost
Una volta pronti a trasferire le modifiche dallo staging al sito live, basta andare alla pagina Bluehost ” Staging dalla barra laterale dell’amministrazione di WordPress.
Da qui, si vedrà il menu a discesa delle opzioni di distribuzione accanto al sito web di staging. È possibile distribuire solo i file, solo il database o tutte le modifiche.
Se non si è sicuri, fare clic sul pulsante “Distribuisci tutte le modifiche” per continuare.
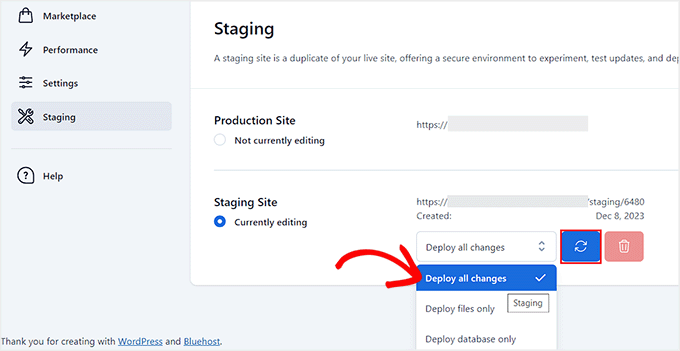
Successivamente, fare clic sul pulsante “Deploy Site” accanto al menu a discesa.
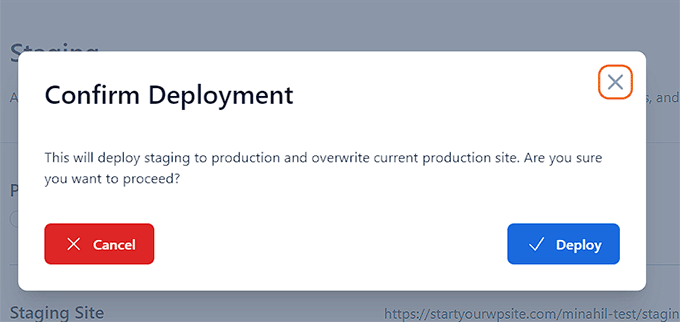
Si aprirà un popup in cui si chiederà di confermare che si vuole distribuire il sito di staging al sito di produzione. Fare clic sul pulsante “Distribuisci” per continuare.
Bluehost inizierà ora a distribuire il sito di staging al sito live. A seconda delle dimensioni del sito, questa operazione potrebbe richiedere un po’ di tempo.
Ora è possibile tornare al sito web live per vedere le modifiche in azione, facendo clic sul pulsante Radio sotto l’opzione Sito di produzione.
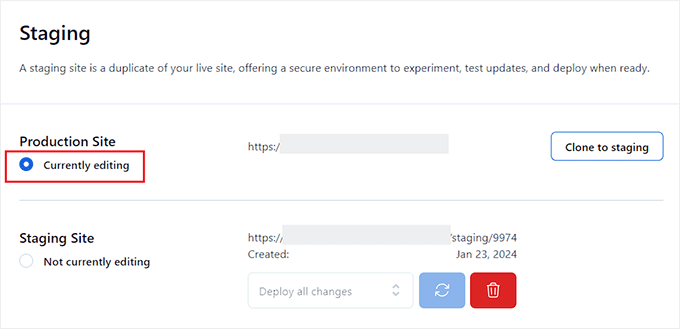
Clonazione del sito di produzione in quello di staging
Ora, quando si torna al sito di produzione, le modifiche apportate non vengono sincronizzate automaticamente con il sito di staging.
In futuro, se si desidera testare più cose sul sito di staging, sarà necessario duplicare il sito.
Per farlo, è necessario visitare la pagina Bluehost ” Staging e cliccare sul pulsante “Clona in staging”.
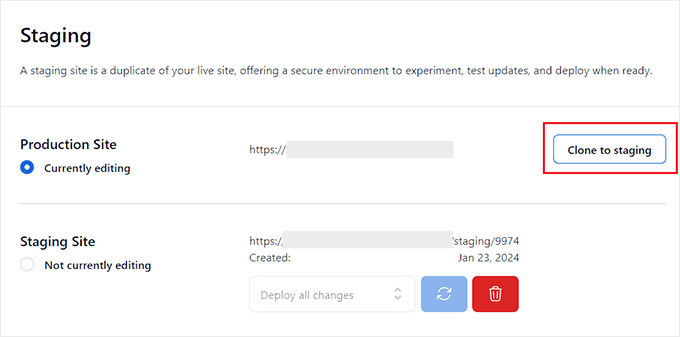
Bluehost clonerà quindi le ultime modifiche apportate al sito web live sul sito web di staging. Dopodiché, è possibile passare al sito web di staging per i test e lo sviluppo.
Creazione di un sito di prova su SiteGround
SiteGround è un’altra delle migliori società di hosting WordPress che offre una funzione di staging in un clic con i suoi piani GrowBig e GoGeek.
Se il vostro sito web è ospitato da SiteGround, allora è così che si configura un sito web di staging.
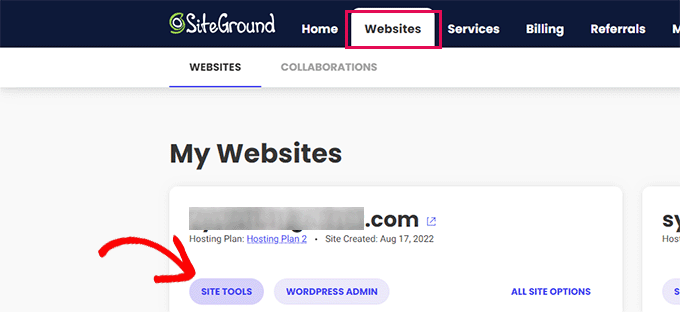
Per prima cosa, è necessario accedere alla dashboard di SiteGround e passare alla scheda Siti web. Da qui è necessario scegliere gli Strumenti del sito sotto il proprio sito web.
Nella schermata successiva, dovete fare clic sul menu WordPress ” Staging dalla colonna di sinistra.
Da qui, selezionate il vostro sito web e fornite un nome per la vostra copia di staging.
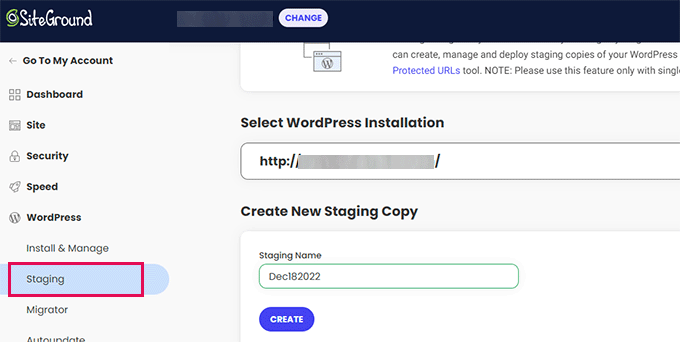
Fare clic sul pulsante “Crea” per continuare e Siteground creerà una copia di staging del sito web.
Successivamente, è necessario fare clic sul pulsante “Vai agli URL protetti” per proteggere con una password il sito di staging e mantenerlo privato.
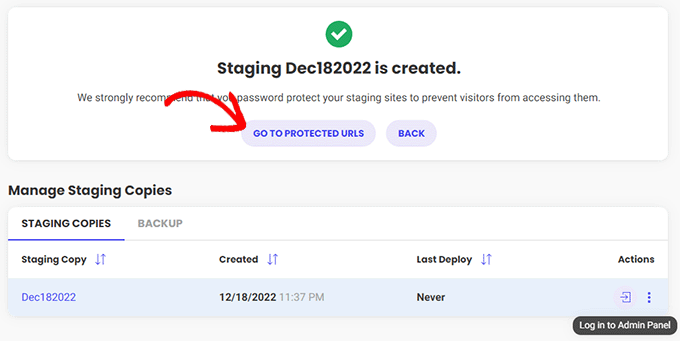
Nella schermata successiva, Siteground inserirà automaticamente l’URL e il percorso del sito di staging.
È necessario inserire il nome utente e la password che si desidera utilizzare per proteggere il sito di staging.
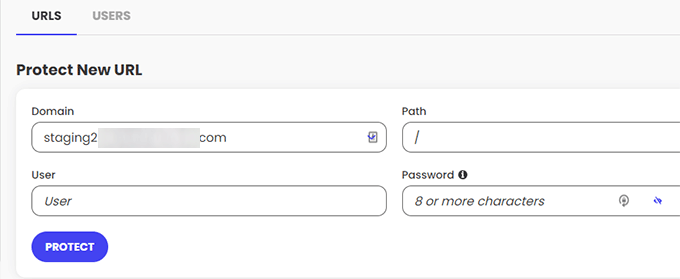
Fare clic sul pulsante “Proteggi” per salvare le impostazioni.
Ora potete tornare alla pagina WordPress ” Staging e fare clic sul pulsante “Accedi al pannello di amministrazione” accanto al vostro sito web di staging.

SiteGround aprirà ora l’area di amministrazione di WordPress del sito web di staging. È possibile testare le modifiche su questo sito web di staging.
Distribuzione delle modifiche al sito web live
Una volta provate le modifiche sul sito web di staging, è possibile unirle al sito web live.
SiteGround rende facile anche questo.
È sufficiente fare clic sul menu WordPress ” Staging dalla colonna di sinistra. Quindi fate clic sul menu a tre puntini accanto al vostro sito di staging nella sezione “Gestisci copie di staging”.

Il menu mostra due opzioni di distribuzione. È possibile scegliere l’opzione “Distribuzione completa” o “Distribuzione personalizzata”.
L’opzione “Distribuzione completa” unisce tutto dal sito web di staging al sito web live. L’opzione “Distribuzione personalizzata” consente di selezionare i file o i dati che si desidera unire.
Se non siete sicuri, scegliete l’opzione “Distribuzione completa”.
SiteGround copierà quindi il sito di staging sul vostro sito web live.
Unire il Live al vostro sito web di staging
Le modifiche apportate al sito web live non vengono copiate automaticamente sul sito web di staging.
Ogni volta che si deve lavorare sul sito web di staging, ripetere la procedura sopra descritta per creare un nuovo sito web di staging.
Creazione di un sito di prova su WP Engine
WP Engine è la migliore società di hosting gestito per WordPress al mondo. L’hosting WordPress gestito è un servizio di portineria per il vostro sito WordPress in cui il provider di hosting si occupa di aggiornamenti, backup, sicurezza e prestazioni.
WP Engine offre una soluzione di staging con un solo clic con tutti i suoi piani. Se utilizzate WP Engine per ospitare il vostro sito web, ecco come impostare un ambiente di staging per il vostro sito.
Per prima cosa, è necessario accedere al cruscotto di WP Engine. Quindi, andate alla pagina “Siti” e selezionate il vostro sito web facendo clic su di esso.
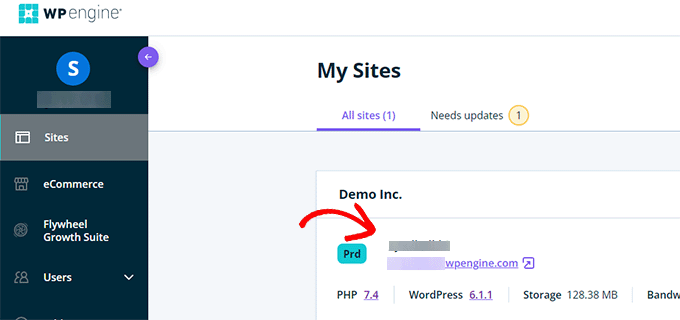
In questo modo si accede alla dashboard del sito web.
A questo punto, è necessario fare clic sul link “Add Staging” nella colonna di sinistra o selezionarlo sotto il nome del sito in alto.
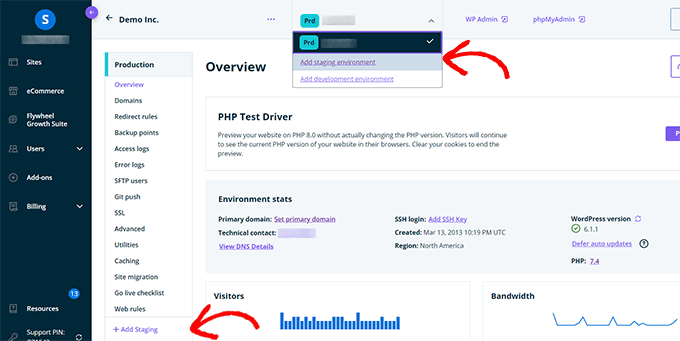
Si accede così alla schermata “Aggiungi ambiente”.
Vi verrà chiesto di scegliere come procedere con l’ambiente di staging.
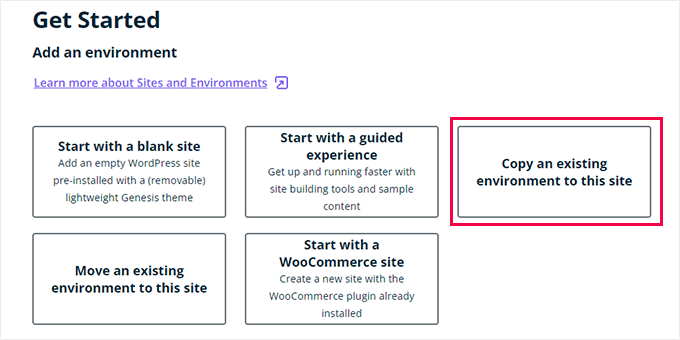
Ecco cosa fa ciascuna di queste opzioni:
- Inizia con un nuovo sito vuoto” crea un nuovo sito vuoto.
- Inizia con un’esperienza guidata” crea un nuovo sito con un’esperienza guidata e contenuti dimostrativi.
- Copia un ambiente esistente in questo sito” copia l’ambiente di produzione o di sviluppo in questo sito (ad esempio, copia il sito live in questo ambiente).
- Sposta un ambiente esistente” sposta un ambiente in questo sito (ad esempio, sposta l’ambiente di sviluppo nello Staging).
- Inizia con un sito WooCommerce” crea un nuovo sito WordPress con WooCommerce preinstallato.
Poiché si vuole creare una copia di staging del nostro sito web live, è necessario fare clic sull’opzione “Copia un ambiente esistente in questo sito”.
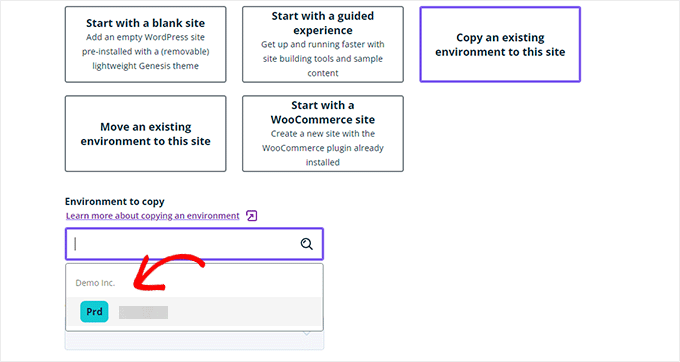
Dopo aver scelto un ambiente, selezionare l’ultimo backup da cui si desidera copiare e fare clic sul pulsante “Avanti” per continuare.
Ora è necessario fornire un nome per il sito di staging. Questo nome sarà usato nell’URL del sito di staging. Successivamente, scegliere STG (staging) come tipo di ambiente.
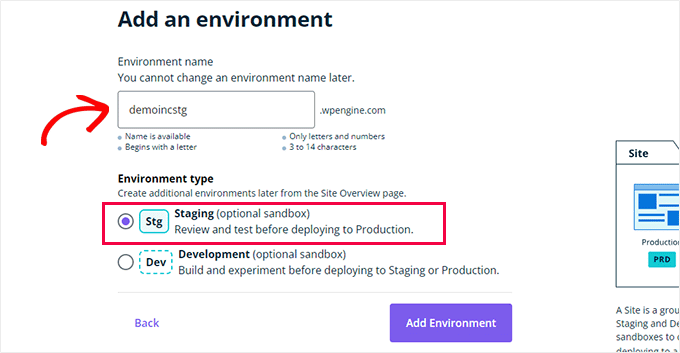
Fare clic sul pulsante “Crea ambiente” per continuare.
WP Engine creerà un sito di staging per voi. Successivamente, sarete reindirizzati alla dashboard del vostro ambiente di staging.
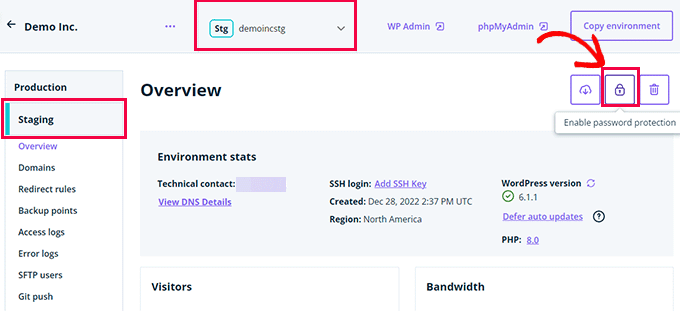
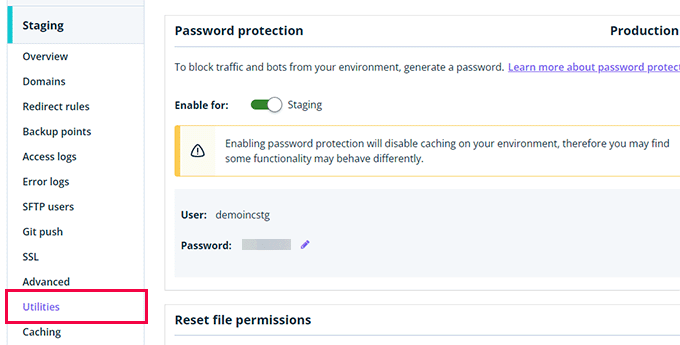
Successivamente, è necessario fare clic sul pulsante Lucchetto per attivare la protezione con password per il sito di staging.
Successivamente, è necessario passare alla scheda ‘Utilità’ per copiare il nome utente e la password del sito di staging.
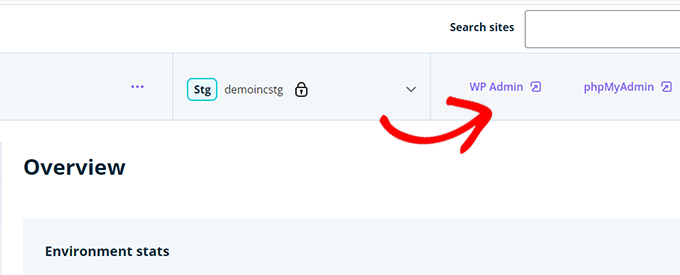
Ora è possibile fare clic sul pulsante “WP Admin” in alto per accedere al sito di staging.
Sentitevi liberi di apportare modifiche e provare le funzionalità sul sito di staging, proprio come fareste con un tipico sito WordPress che installate altrove.
Distribuire le modifiche da un sito web in fase di allestimento a un sito web live su WP Engine
Volete unire le modifiche apportate al sito web di staging al vostro sito web live?
È sufficiente fare clic sul pulsante “Copia ambiente” per iniziare la distribuzione.
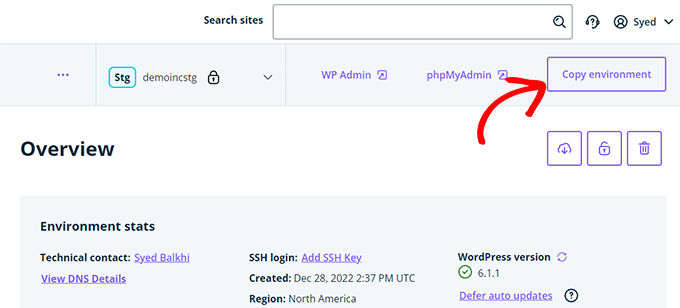
Si accede così alla pagina delle opzioni. Da qui è necessario scegliere gli ambienti di origine e di destinazione per la copia.
Qui si selezionerà il sito web di staging come ambiente di origine e il sito web di produzione o live come ambiente di destinazione.
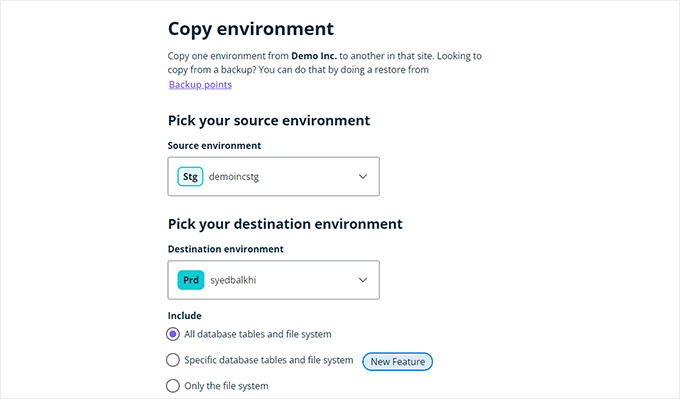
È possibile scegliere ciò che si desidera copiare. Ad esempio, è possibile copiare tutte le tabelle e i file del database, file e tabelle del database specifici o solo il file system.
Nota: se si copia tutto, si perderanno i dati memorizzati sul sito web live dopo averlo utilizzato per creare l’ambiente di staging. Ciò può includere dati importanti come nuovi post, pagine, clienti e ordini. È quindi consigliabile eseguire un backup del sito live prima di distribuirlo dall’ambiente di staging.
Quindi, fare clic sul pulsante “Rivedi e conferma” per iniziare la distribuzione. Ci vorrà un po’ di tempo per copiare tutto sul vostro sito web live.
Riceverete una notifica via e-mail quando il processo sarà completato.
Creazione di un sito di staging con il plugin di WordPress
Se la vostra società di hosting WordPress non fornisce una funzione di sito di staging, potete comunque creare un sito di staging utilizzando un plugin di WordPress.
Questo metodo presenta alcuni svantaggi.
Innanzitutto, un plugin ha un controllo limitato sul vostro server di hosting. Per questo motivo potrebbe non dare sempre i risultati migliori.
In secondo luogo, il plugin che utilizzeremo memorizzerà il vostro sito di staging sui propri server. Se siete preoccupati per la privacy e la protezione dei dati, questo potrebbe non essere l’ideale per voi.
Infine, il plugin presenta diverse incompatibilità note. Controllare la pagina delle incompatibilità per assicurarsi che il proprio sito web sia compatibile.
Detto questo, vediamo come creare un sito WordPress di staging utilizzando un plugin WordPress.
La prima cosa da fare è installare e attivare il plugin WP Stagecoach. Per maggiori dettagli, consultate la nostra guida passo passo su come installare un plugin di WordPress.
Dopo l’attivazione, il plugin aggiunge alla barra di amministrazione una nuova voce di menu denominata WP Stagecoach. Facendo clic su di essa si accede alla pagina delle impostazioni del plugin.
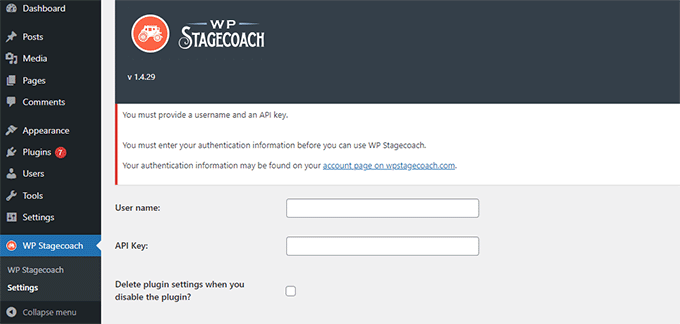
Dovrete inserire il vostro nome utente WP Stagecoach e la chiave API, che potete trovare nel vostro account sul sito web del plugin.
Successivamente, è necessario visitare la pagina WP Stagecoach ” WP Stagecoach e scegliere un nome per il sito di staging. Questo nome sarà utilizzato anche come sottodominio del vostro sito WordPress di staging.
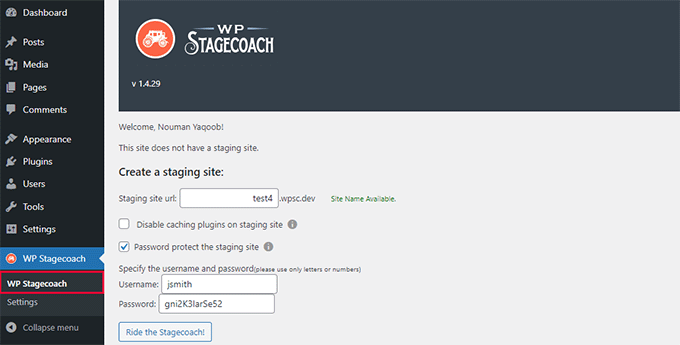
Non dimenticate di selezionare la casella accanto all’opzione “Proteggi con password il sito di staging”. Questo proteggerà il vostro sito di staging dalla vista pubblica e dai motori di ricerca.
Cliccate sul pulsante “Ride the Stagecoach” per continuare.
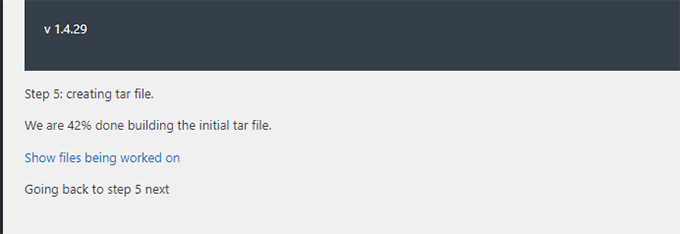
Il plugin creerà ora un backup dei file e del database di WordPress per esportarli nel sito di staging.
Potrebbe essere necessario un po’ di tempo, a seconda delle dimensioni del vostro sito WordPress.
Una volta terminato, verrà visualizzato il link al sito di staging e alla sua area di amministrazione.
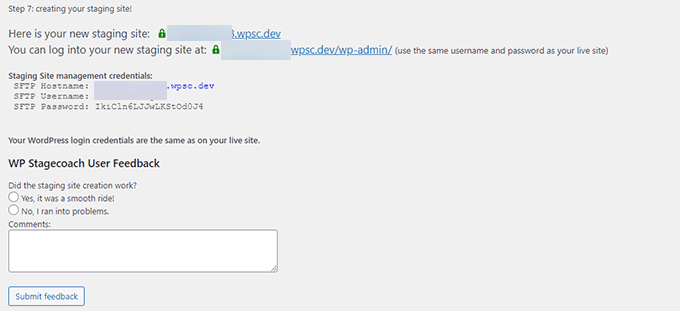
È possibile fare clic sul link per visitare il sito di staging e iniziare a lavorarci.
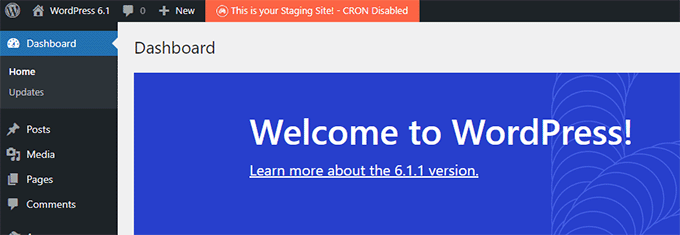
Si noterà un messaggio arancione nella barra di amministrazione in alto che indica che si sta lavorando sul sito di staging.
Distribuire il sito di staging al sito live usando WP Stagecoach
Una volta pronti a importare le modifiche nel sito live, andate alla pagina WP Stagecoach ” Importa modifiche e cliccate sul pulsante Controlla modifiche.
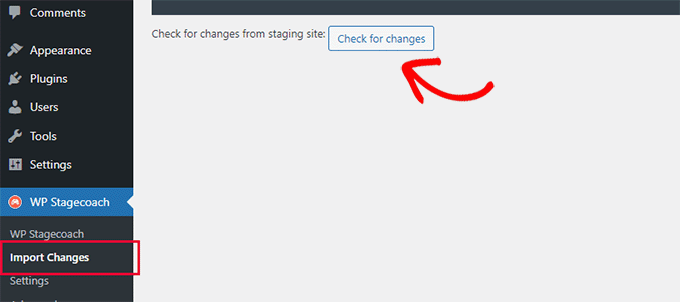
Il plugin controllerà ora le modifiche sul sito di staging e mostrerà le opzioni per importarle.
È possibile scegliere tra tutte le modifiche, le modifiche ai file o le modifiche al database.
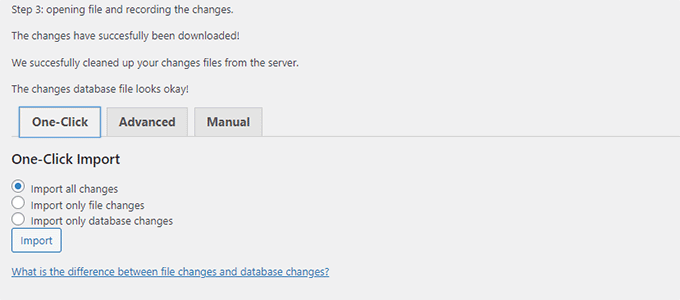
Il plugin mostra l’avanzamento dell’importazione e notifica il completamento della stessa.
Ora è possibile testare il sito live per verificare se tutte le modifiche sono state importate con successo.
Creare manualmente un sito di staging per WordPress
Questo metodo vi insegnerà a creare manualmente un sito di staging per la vostra installazione di WordPress. È destinato agli utenti avanzati e richiede più lavoro rispetto agli altri metodi descritti in precedenza.
Un altro svantaggio di questo metodo è che il sito web sarà temporaneamente indisponibile quando le modifiche vengono riportate dallo staging al server live.
Detto questo, vediamo come creare manualmente un ambiente di staging per il vostro sito WordPress.
Per prima cosa, è necessario creare un sottodominio per il sito di staging. Se utilizzate Bluehost, andate nella dashboard del vostro account di hosting e passate alla scheda “Avanzate”.
Quindi, fare clic sul pulsante “Gestisci” accanto all’opzione “cPanel”.
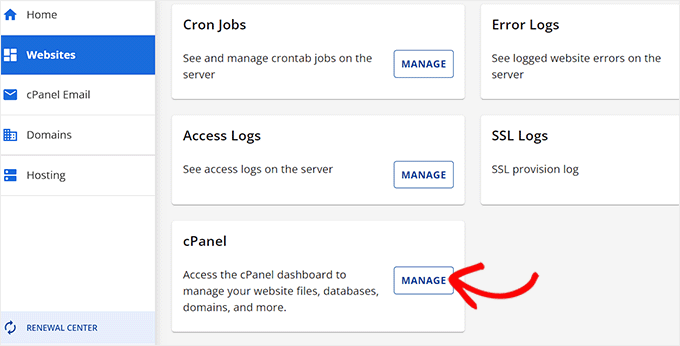
In questo modo si aprirà il cPanel in una nuova scheda, dove si dovrà scorrere fino alla sezione “Dominio”.
Da qui, fare clic sull’opzione “Domini”.
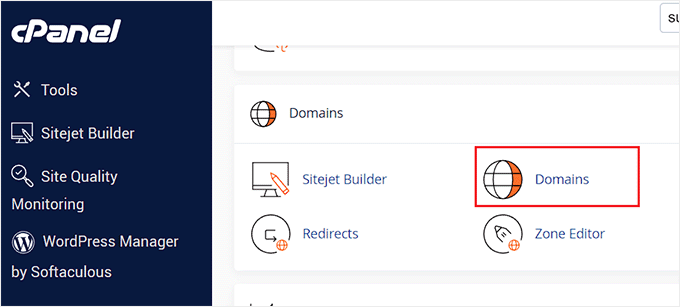
Si aprirà un elenco di tutti i domini presenti sul vostro account di hosting. Qui è necessario fare clic sul pulsante “Crea un nuovo dominio”.
Una volta fatto ciò, si aprirà una nuova pagina nella quale dovrete scrivere il vostro sottodominio seguito dal nome del dominio nel campo “Dominio”, come in questo caso:
sottodominio.example.com
A questo punto, è sufficiente fare clic sul pulsante “Invia” per memorizzare le impostazioni.
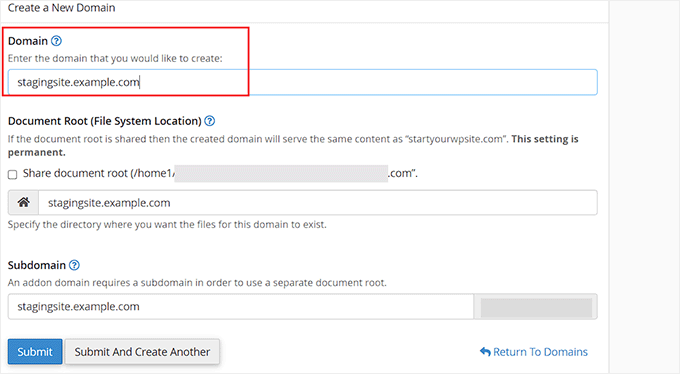
Nota: nelle nostre schermate di esempio stiamo usando Bluehost, quindi la vostra schermata potrebbe apparire diversa.
Il pannello di controllo del vostro hosting aggiungerà ora il vostro sottodominio, che potrete utilizzare per importare il vostro sito WordPress dal vivo.
Successivamente, è necessario installare e attivare il plugin gratuito Duplicator sul sito live. Se avete bisogno di funzioni complete, potete acquistare la versione premium di Duplicator qui.
Dopo l’attivazione, è necessario fare clic sul menu Duplicator nella barra laterale dell’amministrazione di WordPress e fare clic sul pulsante “Crea nuovo” sotto Backup.
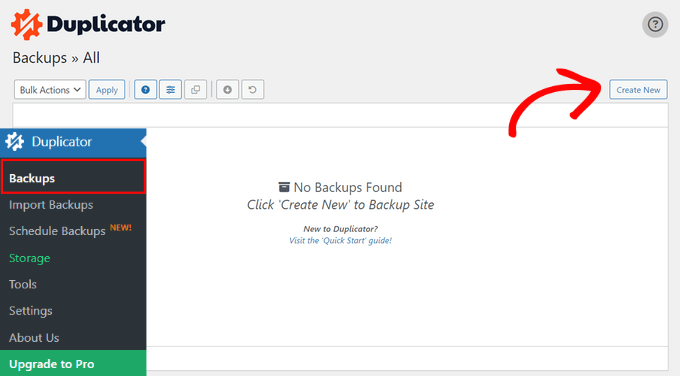
Successivamente, è possibile inserire un nome per il backup e fare clic sul pulsante “Avanti” per continuare.
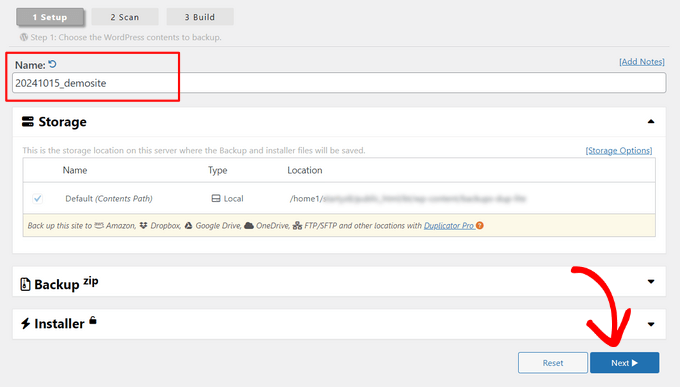
Duplicator eseguirà quindi la procedura guidata per la duplicazione del sito web.
Innanzitutto, vengono eseguiti alcuni test per verificare se tutto è in ordine. Se tutti gli elementi sono contrassegnati come “buoni”, fare clic sul pulsante “Costruisci”.
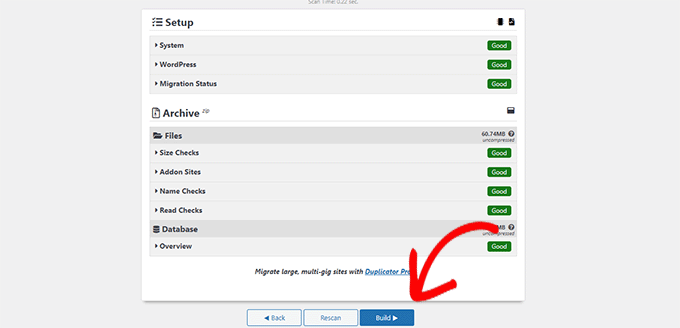
Il plugin inizierà a creare un pacchetto di backup Duplicator per il vostro sito WordPress. Questo processo potrebbe richiedere alcuni minuti, a seconda delle dimensioni del sito.
Una volta terminato, verranno visualizzate le opzioni di download per il programma di installazione e per l’archivio. È necessario fare clic sul pulsante “Scarica entrambi i file” per scaricare entrambi i file sul computer.
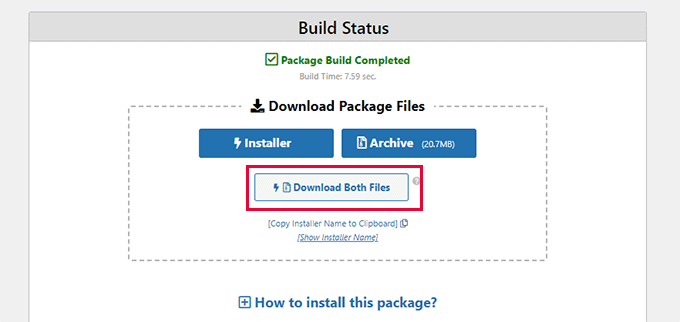
Dovrete caricare entrambi i file nella directory dei file del sottodominio appena creato. Per maggiori dettagli, consultate la nostra guida su come usare l’FTP per caricare i file sul vostro sito WordPress.
Successivamente, il nuovo sito WordPress di staging avrà bisogno di un nuovo database. Creiamone uno.
Accedete al pannello di controllo del vostro account di hosting WordPress e passate alla scheda “Avanzate”.
Successivamente, scorrere fino alla sezione “Database” e fare clic sul pulsante “Gestisci” accanto ad essa.
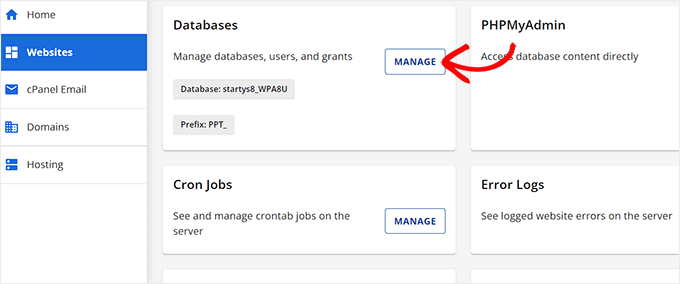
Se non utilizzate Bluehost, il vostro ambiente di hosting WordPress potrebbe apparire un po’ diverso. Non preoccupatevi e cercate la sezione Database.
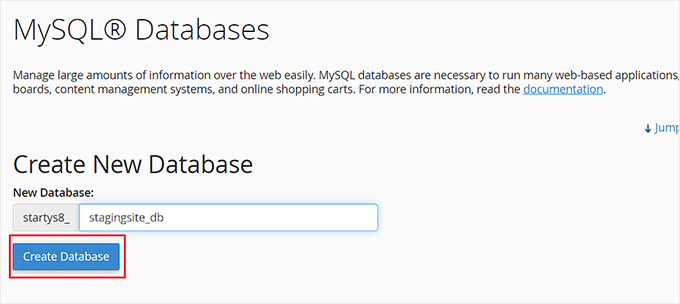
Si accede così alla pagina “Database MySQL”, dove è possibile iniziare a fornire un nome per il database.
Quindi, fare clic sul pulsante “Crea database”.
Successivamente, è necessario creare un utente MySQL per il database.
Scorrete fino alla sezione Utenti MySQL e fornite un nome utente e una password per il nuovo utente del database.
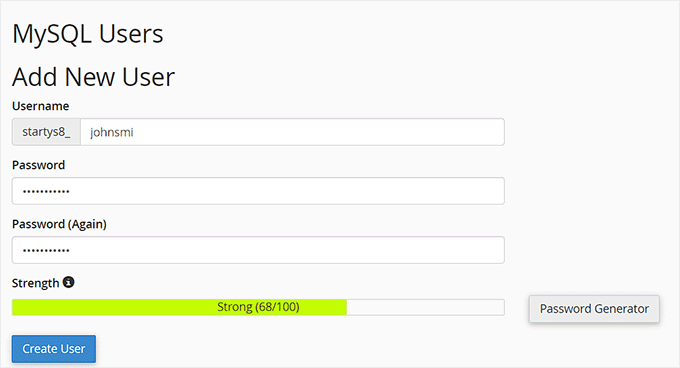
Ora bisogna dare a questo utente il permesso di accedere e modificare il database creato in precedenza.
Basta scorrere la sezione “Aggiungi utente al database” e selezionare il database e l’utente appena creato.
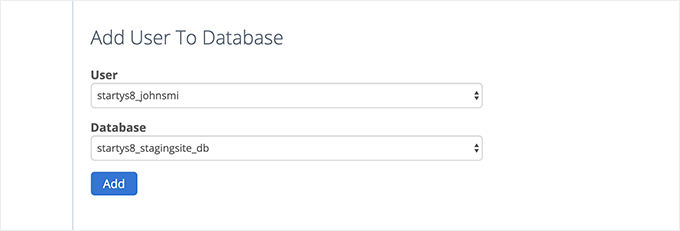
Quindi, fare clic sul pulsante “Aggiungi” per continuare.
Verrà chiesto di selezionare i privilegi per l’utente. Selezionare la casella di controllo “Tutti i privilegi” e fare clic sul pulsante “Apporta modifiche”.
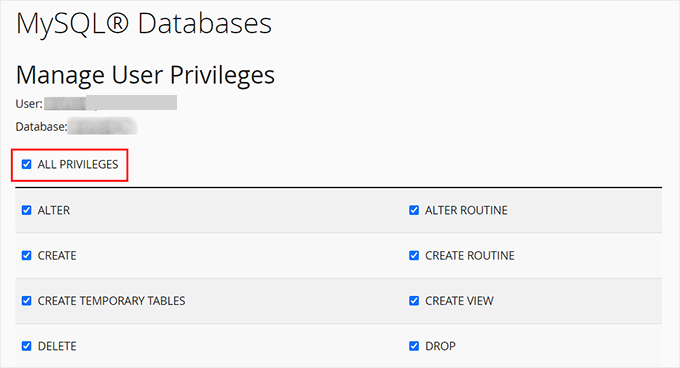
Ora il database è pronto per essere utilizzato per il sito web di staging.
Successivamente, è necessario aprire una nuova scheda del browser e inserire il sottodominio del sito di staging in questo modo:
https://yoursubdomain.example.com/installer.php
Non dimenticate di sostituire yoursubdomain con il sottodominio effettivo e example.com con il vostro nome di dominio.
In questo modo si avvia l’installazione guidata di Duplicator.
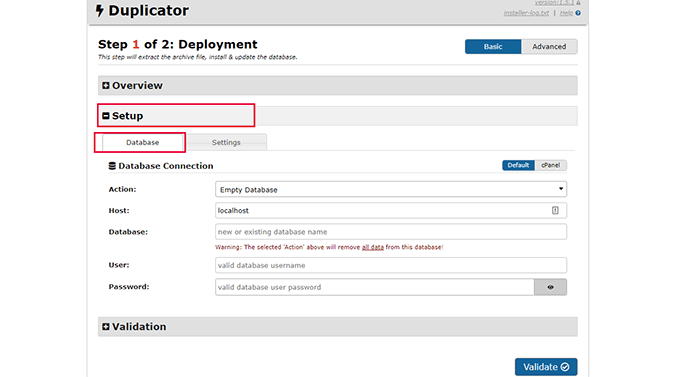
Nella sezione “Impostazione”, il programma di installazione vi chiederà di inserire le informazioni sul database di WordPress.
Il vostro host sarà probabilmente localhost. Dopodiché, si inseriranno i dettagli del database creato per il nuovo nome di dominio nel passaggio precedente.
Fare clic sul pulsante “Convalida” per assicurarsi che Duplicator possa connettersi al database.
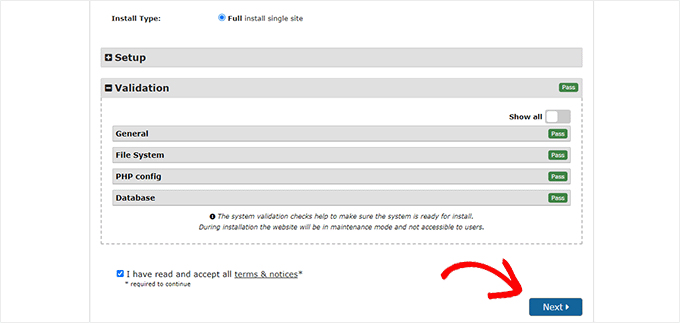
Una volta fatto, fare clic sul pulsante “Avanti” per continuare.
Duplicator scompatta il database e i file di WordPress e li importa nel sito di staging.
Al termine, verrà visualizzato un messaggio di successo.
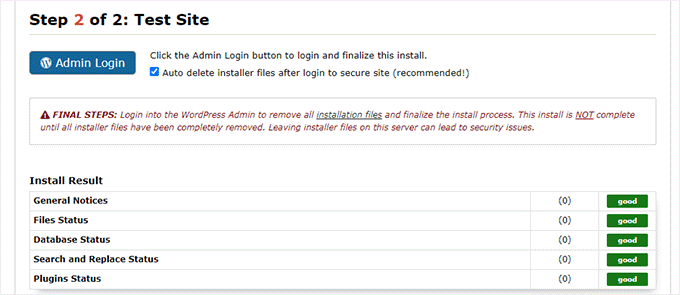
È possibile fare clic sul pulsante “Admin Login” per accedere all’area di amministrazione di WordPress del proprio sito web sul nuovo sito di staging.
Ora il sito di staging è stato configurato. È possibile proteggerlo aggiungendo una password di protezione al sottodominio.
Accedere alla dashboard del proprio account di hosting e passare alla scheda “Avanzate”.
Dopodiché, scorrere fino alla sezione “cPanel” e fare clic sul pulsante “Gestisci” accanto.
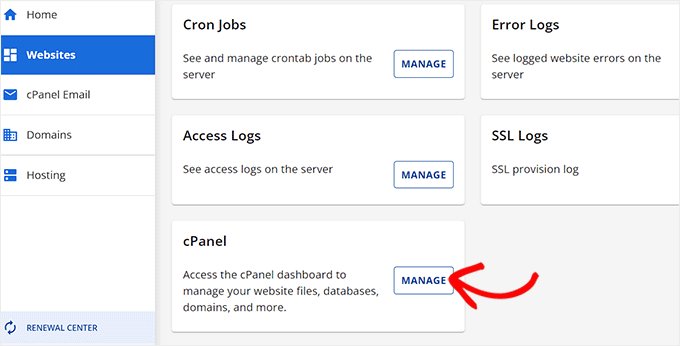
In questo modo si aprirà il cPanel in una nuova finestra, dove si dovrà scorrere fino alla sezione “File”.
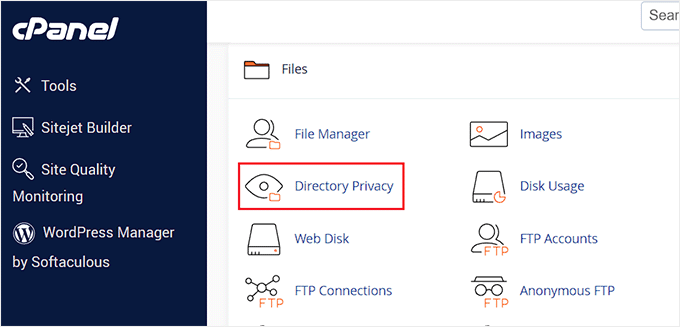
Da qui, fare clic sull’icona “Directory Privacy”.
Successivamente, è necessario selezionare la cartella del sottodominio e poi selezionare l’opzione “Protezione con password di questa directory”.
Verrà richiesto di assegnare un nome a questa impostazione e di fare clic sul pulsante “Salva”.
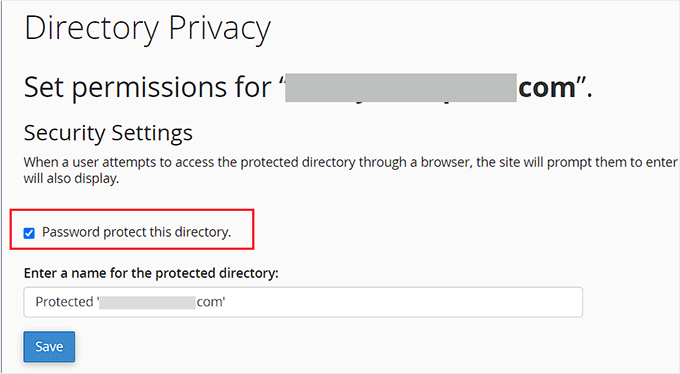
Il vostro sito di staging sarà ora nascosto dietro una password di protezione, in modo da tenerlo lontano dalle mani dei motori di ricerca e dagli occhi del pubblico.
Ora è possibile lavorare sul sito di staging e apportare qualsiasi modifica.
Distribuire manualmente il sito di staging al sito live
Una volta pronti a distribuire le modifiche dal sito di staging al server live, si seguirà la stessa procedura descritta sopra.
È sufficiente creare un nuovo pacchetto Duplicator sul sito di staging e scaricare i file dell’installatore e dell’archivio sul computer (vedere le istruzioni sopra).
Successivamente, è necessario andare sul proprio sito live e creare un backup completo di WordPress (è possibile utilizzare anche Duplicator per creare un backup completo).
Una volta terminato, dovrete eliminare tutti i file e le cartelle di WordPress dal vostro sito web live. Ciò significa che il vostro sito WordPress sarà inattivo per un po’ di tempo.
Infine, seguire le istruzioni precedenti per eseguire l’installazione guidata di Duplicator per importare il sito di staging sul server live.
Come si può notare, l’ultimo metodo non è affatto il migliore. Durante il processo ci sono molte cose che possono danneggiare il vostro sito.
Suggeriamo di evitare assolutamente questo metodo, a meno che non abbiate altra scelta. Si consiglia di utilizzare un provider di hosting affidabile come Bluehost, SiteGround o WP Engine con funzioni di sito di staging integrate.
Speriamo che questo articolo vi abbia aiutato a capire come creare facilmente un ambiente di staging per il vostro sito WordPress. Se doveste riscontrare dei problemi, date un’occhiata alla nostra guida definitiva per risolvere gli errori più comuni di WordPress. Potreste anche voler imparare a utilizzare WordPress Playground nel vostro browser per i test.
Se questo articolo vi è piaciuto, iscrivetevi al nostro canale YouTube per le esercitazioni video su WordPress. Potete trovarci anche su Twitter e Facebook.


Jiří Vaněk
I recomend WP Staging plugin. This is really awesome plugin, with all feature you need for live website and copy as staging website. I use it for this purpose all the time and I must say, it is “must have” plugin.
Moinuddin Waheed
Staging site is a must have feature for anyone who is working for clients and .asking websites and blogs for clients.
it is really helpful as there is always requirements for some tweak at the time of development of the website.
Plugin option and the other doing manually is the only option for my client as I am using hostinger and there is not showing any staging website feature there.
Does any of the hostinger plan not have built in staging feature like that of bluehost and siteground?
WPBeginner Support
You would want to check with the hosting provider’s support for what they have currently available.
Admin
Jiří Vaněk
You can use any hosting you want, becouse for staging purpose exist awesome plugin. Look on plugin with name WP Staging. This is all you need.
Moinuddin Waheed
Thank you for the suggestion, This will be very useful as it is needed very often.
I will explore this plugin and see to it for the functionality it has at its end.
Chip Bearden
There IS a downside. I followed all the steps for BlueHost and made a number of changes to my home page. Worked perfectly on the staging site.
When I pushed it to production, my home page was a disaster. A few changes made it through but most did not. Worse, much of the content on the production site was trashed or even missing.
Panicky, I put the production site into maintenance mode to prevent users from seeing it. Then BlueHost’s tech support did a great job of moving the staging site to production for me and cleaning up a bunch of other problems that resulted. It took a long, tense 90 minutes before everything was back, mostly, to what I wanted. I just had to change some internal links and menu items that still pointed to the staging site.
Start to finish I was only down a couple of hours. The BlueHost customer support rep was wonderful but didn’t have a good explanation of what went wrong. Suffice it to say I’ll NEVER use staging again!
WPBeginner Support
Thank you for your feedback, we’ll look to make it more clear in the article but unless you sync changes like posts, they will not go to your staging site and if you overwrite your live site with your staging it won’t include your new content. For your design it would heavily depend on what you’re using on your site as that should normally include any design changes.
Admin
Audra
Is this something that can be used to test out a new theme? Can I keep my current website live and work on a new theme at the same time?
WPBeginner Support
Yes that is one of the more common reasons to use a staging site.
Admin
Jiří Vaněk
It’s one of the reasons why I use staging. When there’s a request to change the website’s design, a copy of the website is created where all the necessary adjustments are fine-tuned, and then the changes are easily transferred to the live version. It’s much more practical than copying the website to a subdomain and performing subsequent migration, which can be quite complicated.
Sharlene
HI there. Is there a way to test the speed on a staging site please?
WPBeginner Support
Our guide below gives a few options for testing the speed of your WordPress site. Depending on how your staging site is set up, there is only so much that can be tested for how helpful the speed test will be.
https://www.wpbeginner.com/beginners-guide/how-to-properly-run-a-website-speed-test-best-tools/
Admin
Carol Henrichs
Should I use the staging site just for plugin updates and such? Can I update pages and posts in staging then push to live? Otherwise I have to create a new staging site prior to every plugin/update test.
WPBeginner Support
You would want to use a staging site for major plugin and design updates for your site. Updating pages and posts is normally something you would do on your primary site and you can do minor updates safely as long as you have a backup of your site from before the update.
Admin
Kevin
Do the Staging URLs (for posts and pages) automatically change once you hit deploy? I am worried that I am going to have a ton of 404 errors and ruin my SEO.
WPBeginner Support
Unless we hear otherwise, the URLs should update so they are not 404s.
Admin
Philippe
I want to create a sandbox, I’m using WordPress on Bluehost, however I don’t have the Bluehost entries on my wordpress admin menu, and I can find no sandbox wizard directly on the Bluehost site. Where do I go from here?
WPBeginner Support
You may have removed the plugin that added that, if you reach out to your host they should be able to assist.
Admin
Jana Boswell
This worked like magic. I seriously could not live without wp beginner. My hosting service does not have a staging option, so I followed the instructions for manual set-up, no problems, everything went smoothly! Thanks for the great instructions!
WPBeginner Support
Glad our guide was able to help
Admin
Desmond Sim
after creating the staging site…how do you sync data between the staging and test site….the test site is used for updates and checking…whereas….the live site has new inputs from its users….
Is there a plugin you can recommend syncing databases when each database has two different pieces of new info,
WPBeginner Support
We do not have a recommendation for that at the moment as it is very difficult for a tool to know what specifically to sync or not.
Admin
Brandon
How does a person just delete a staging site? I believe I backed up the staging site with updraftplus, but if I back up the staging site with updraftplus, does it also back up the regular website too or vice versa?
WPBeginner Support
If you used a hosting provider’s method to create it then you would want to check with the host to see if there is a built-in method first, otherwise, you can follow step 2 in our guide below:
https://www.wpbeginner.com/wp-tutorials/how-to-permanently-delete-a-wordpress-site-from-internet/
You would only be backing up your staging unless you’ve also set up your backup service for your primary site.
Admin
S
so this manual staging does not work?
so how do users target ‘installer.php’ if the subdom URL is ‘staging.blahwebsite.com’, then.
WPBeginner Support
The method should still work, you would target the installer in the staging site’s subdomain. If you are having trouble with setting up or targeting the subdomain you may want to reach out to your hosting provider for their assistance.
Admin
Brandon
I used the manual method to set up a staging site for testing out updating plugins before they break something. Well, something broke in the staging site. How do I go back to the original configuration of the staging site?
WPBeginner Support
If you did not create a backup for the staging site then you would delete the staging site and recreate it as one option.
Admin
Ben
Looks like there’s a chunk missing for the manual staging site creation. No upload of files for Duplicator.
WPBeginner Support
Thank you for sharing that, we will look into updating the article when we are able
Admin
Ankur
I use bluehost hosting and they say they don’t recommend the beta version. So, the local host is the best option for me. Isn’t it?
WPBeginner Support
If they do not recommend beta for your site, you can use local as an alternative.
Admin
Jay
If I have new blog posts on the original production site, what will happen I push the staging site to the production site later in the future?
WPBeginner Support
The new content would be removed, we would recommend importing all new content to the staging site before overwriting the live site.
Admin
KIZITO
Hello friend.
Just today, I mistakenly activated the staging mode (I’m a newbie tho) and there wasn’t any more option.
Later I came on, I couldn’t login to my wordpress. It returns an error message that I can’t login to a site that’s on staging mode.
I contacted bluehost, that did all they can, yet my site still says it’s on staging mode and I can’t login my wordpress.
What do I do please?
WPBeginner Support
It sounds like you’re using a plugin to have that page appear when viewing your site, you would want to disable the plugin using the method in our guide below:
https://www.wpbeginner.com/plugins/how-to-deactivate-all-plugins-when-not-able-to-access-wp-admin/
Admin
Alice
Hi,
Thanks for this. I have WP engine and my WordPress theme got d-registered because I am using it on the stage environment and dev.
What’s the workaround that?
thank you
WPBeginner Support
You would need to reach out to your specific theme’s support for their workaround for this situation
Admin
Jim Jones
Hi I made changes in my WP Production site but not in the staging area. I want to reset my staging area to look like my Production site, or failing that delete my Staging area and start again. How can i do this?
WPBeginner Support
It would depend on the method you used but if you made changes to the live site’s design then the simplest method would be to remove the current staging site and create it again.
Admin
Jeff
Great article. I really learned a lot.
I have a question, please, about the manual method:
Is it required to password protect the directory of the subdomain in cPanel, since the admin access to the website is already protected by a password?
Thank you very much.
WPBeginner Support
While not required, it helps prevent your users from trying to access the staging site
Admin
Mujeeb
In that staging site
I want to give someone details to do something on my staging site, but I don’t want him to know my live site password, but is the Same thing with my live site. How can I do that
WPBeginner Support
You would create a new user for them on your staging site for what it sounds like you want to do and you can remove that staging user later.
Admin
Beulah Wellington
If I download WAMP on my computer and use the localhost, couldn’t install the UpdraftPlus plugin and let that be my staging site? Isn’t this another alternative?
WPBeginner Support
Rather than UpdraftPlus, we would recommend taking a look at our guide here for using local for staging: https://www.wpbeginner.com/wp-tutorials/how-to-move-wordpress-from-local-server-to-live-site/
Admin
Jan Stetson
I’m trying to set up a staging environment on my WordPress site hosted by Bluehost. I’m stopped at step one! when I go to the WordPress admin area, I don’t see bluehost at the top of the page. The topmost option in the nav menu on the left is “Dashboard”. No sign of “Staging” anywhere. Help?
WPBeginner Support
You likely removed the BlueHost plugin, if you reach out to BlueHost’s support they should be able to let you know their current methods available
Admin
Shashank Sachan
Hello
I tried but did not succeed. Getting error ” this site can’t be reached”.
I am on Godaddy and using Cloudflare. And I have not created a separate FTP account.
WPBeginner Support
To start troubleshooting that you could try the steps in our article here: https://www.wpbeginner.com/wp-tutorials/how-to-fix-the-403-forbidden-error-in-wordpress/
or reach out to your hosting provider for them to take a look.
Admin
simona
thank you for the article. one question: If I update WordPress ONLY on the staging site, will it affect also my live-site?
thank you for your answer. regards, s.
WPBeginner Support
No, if you update one site it should not affect the other.
Admin
oshibiko
Thank you for this article.
Do you know of a way to test membership (loginlogoff ) functionality without going live on the actual site. In the staging environment or developing. TIA
WPBeginner Support
You would likely need to create a test user for you to log in with to test that.
Admin
Mark E
Great article, with one step missing for the manual instructions.
After downloading the duplicator files to your computer, you then have to upload the installer file and archive file to your newly created subdomain directory.
Otherwise when you try to run the installer you get a 404 page.
Otherwise great guide!
Thanks….
WPBeginner Support
Thank you for pointing that out
Admin
Charlene Marsh
No option to try the staging feature on Bluehost yet. Message says “Please contact support to find out how to enable staging.” I was just on the phone with Bluehost about another issue and the rep I was speaking with never heard of this new feature.
WPBeginner Support
It would depend on what rep you were talking to as it is a new feature so not all reps may be knowledgeable yet
Admin
Matt Stephen
To be able to use the staging feature provided by Bluehost, you must install and activate the Blushost plugin.
Sean
Thank you for this great info, as always. Now is this something I could use to play around with a new page builder? I want to test out Thrive Architect but want to do so without messing anything up. Or, suppose I wanted to play around with a new theme. These may be 2 different questions.
WPBeginner Support
You could certainly test those changes with a staging environment without having to worry about what people see on the site.
Admin
Vanessa
Thanks for the info. I currently use Bluehost but don’t have the staging site option I would love to test it out for a new theme I’d like to try before purchasing it. I contacted BH tech support the rep told me the feature is in development. Thanks again for the info.
WPBeginner Support
Glad we could bring this feature to your attention even if it is currently being developed
Admin
Vanessa
I was able to access the feature today. I’m excited to use it. Thanks again for the info. I’m excited to try out the staging feature.
Ani Chijioke
this is a great information, I have two websites, but I don’t feel like having both look the same.
pls, I need help.
is there any code I can add on >dashboard >customize >additional css,,, for the font color of my site to be pure black in color..
I have this theme that I am using, it gives me everything I want. but the font color of my blog posts are light black. I will like to change the color to pure black
any solution?
thank you.
WPBeginner Support
For finding the CSS you need to change, you would want to take a look at our article on how to use inspect element here: https://www.wpbeginner.com/wp-tutorials/basics-of-inspect-element-with-your-wordpress-site/
Admin
alykhan
Great article but the push back to live is a little brief. I have a WooCommerce site that needs a theme change. I used Duplicator Pro to make a copy on a staging server. I’ve made all the changes to the site including adding a couple of new plugins.
Now I want to push the site back but I can’t do the same thing as there are new orders on the live site. How do I copy the site back without affecting the orders etc..?
WPBeginner Support
Sadly, the safest method for that would be to prevent orders while updating from staging.
Admin
Jennifer Verdin
I haven’t read the comments yet, but I’ve been at this all day. The reason why is because this page does not tell you how to create a database user and assign privileges to the said user.
Thankfully, I was able to figure it out, but that’s a KEY step that is missing to connect the site and database.
WPBeginner Support
Apologies about the confusion, we will certainly look into clarifying that. If you reach out to your hosting provider they normally have a user already created.
Admin
Max
Hi guys,
Thanks for your awesome post. I like the idea that the provider has the staging, productive and a test environment out of box.
But I have two questions:
1. Can write a little bit how it works by your suggested providers?
2. Have you also providers which are located in the EU or better in Germany? And offer staging environment out of box?
Kind regard
Chris
Thank you so much for this information! And if anyone’s wondering, yes, it’s still relevant 4.5 years later.
Jess
Hi there
I am in the process of setting up a new WordPress site but I was planning to start building everything in my staging environment because I would like my live site to have a “under construction” landing page.
What I am not sure of is how to push my changes from the staging site to my live site when I am ready. Would you mind describing this process please?
Thank you
Jess
Johnny
If it’s simply a matter of wanting a “Under Construction” page while keeping the rest of the sight off limits to the public, there are plugins that will do that. Search “under construction.”
Russell
How does this process compare to using a plugin like wp-staging.
Fernando Lisboa
Hi, my question is, i created a staging environment, work there make some updates on structure of pages, layouts, new categories, new pluig-in.
Ok, but in real live, my site is growing with new posts, comments, images, videos, etc…
When i push stage back to life, i will lost thes new itens that were create in real live ??? I test this in sitegroud, and i loose ever with advanved “push to live”
tks
WPBeginner Support
Hi Fernando,
The solution described above only syncs your website files not the database.
Admin
Ravindra
Hi,
Thank you very much. This article was very helpful.
Chris
Hi, thanks for such a useful article,
I’m having a small issue when I give it a go,
I have got as far down as
“Once WordPress has connected to your staging database, it should detect that WordPress has been installed, and prompt you to login” and I am stuck – it autoredirected to the wp-login and gave me a blank page. Not a 404, just a clean white screen.
On the main page the login has been renamed so I try to navigate to that instead and again just a clean white screen.
Can anyone give me any pointers on where I’m going wrong?
WPBeginner Support
Please see our guide on how to fix white screen of death in WordPress.
Admin
Smitha
Hi,
Thanks for this article!
I followed all the steps but I think I have missed one
I created a staging environment and checked site url in wp-options and updated wp-config file but the staging site is being redirected to the primary site.
Do I need to change any other setting?
Ruth
Hi! Thanks for the useful article!
Question, is it necessary to create a new database for your subdomain? Can’t you just use your root domain’s database?
Same for the FTP account, is it necessary to create a new one? I can now access my subdomain easily through my main FTP.
Thanks!
Best,
Ruth
WPBeginner Support
Hi Ruth,
Yes, it is necessary to create a separate database and a separate FTP account.
Admin
Courtney
Hello!
Perhaps this was already covered. Do I need a child theme on my sub-domain serving as my staging site? I am adding custom code and modifications to the new theme on my subdomain with the intention of switching all of this over to the live site when finally ready. Would this complicate things when switching from the staging site to replacing what is currently the live site?
Thank You!
Lee Perry
Hi, this article is super helpful. I have encountered one problem though, when I go to visit my staging URL, I have the following message appear ‘server DNS address could not be found’. I have also cleared my cache and browser history as someone wrote this might help, but it hasn’t worked. I’m wondering what I am doing wrong. Any help would be great.
Lee
Georgia
I’m having the same problem – did you manage to resolve this issue?
Thanks, Georgia
Adrien
While I appreciate the detailed instructions (I don’t like installing plugins to accomplish such tasks), I don’t see any advice concerning keeping the staging and live sites in sync. WordPress sites are generally edited live with respect to content—posts, products, media, etc. Once you follow these directions, the two content sets will diverge as users add content to the live site while the developer’s staging version remains an old copy. I don’t see a good solution for this save a cron rsync job. Any tips?
Jason
After you create the staging subdomain and ftp account.
Skip all the other copying and database junk.
Install duplicator on your live site. Make a duplicate backup, which includes a zipped copy and an install. Php file.
Upload both to your staging area. (Maybe go in and create a database and user for the staging site in cpanel while you wait for the two fingers to upload)
Point your browser to staging.domain.com/install.php and follow the prompts.
Then go back to the rest of this tutorial for locking it down.
Gus Reyes
Hi, I followed another tutorial before I found this one and I installed WordPress BEFORE copying files over and running the SQL queries. My staging site does not populate with live site’s data. Any help you can offer about what to do at this point would be appreciated…
Martin
The staging site does not look exactly like my primary site. The default banner is there instead of my uploaded media (even though that file has transfered) and rather than a nav bar with drop down menus, I have a list of all of my site’s webpages. Is this normal? If not, could you point me where to sort it out?
Thanks for this article!
BLZ
I keep getting this error when I try to run SQL queries ” #2013 – Lost connection to MySQL server during query”
Stefan
Thank you for the great tutorial! I followed it thourgh and created a staging site. However, the staging site seems to be missing some settings from the original site (where I am working with a template), e.g. the font is different, the menu and logo is missing and some other settings are just off. Are there additional files I need to copy?
Thanks a lot!