Das WPBeginner-Team erstellt regelmäßig lokale WordPress-Websites auf ihren Computern, um Themes, Plugins und Website-Funktionen zu testen, ohne die Live-Site zu beeinträchtigen.
XAMPP ist ein kostenloses und quelloffenes Softwarepaket, das eine benutzerfreundliche Plattform für die Einrichtung einer lokalen WordPress-Instanz bietet.
In diesem Artikel zeigen wir Ihnen, wie Sie ganz einfach eine lokale WordPress Website mit XAMPP erstellen können, damit Sie mit WordPress experimentieren und Ihre Entwicklungsfähigkeiten in einer sicheren Umgebung verfeinern können.

Warum eine lokale WordPress-Website erstellen?
Die Erstellung lokaler WordPress-Websites ist eine gängige Praxis unter Entwicklern und Website-Besitzern. Damit können Sie WordPress testen, ohne eine echte Website im Internet zu erstellen.
Lokale Websites sind für Sie nur auf Ihrem Computer sichtbar. Sie können verschiedene WordPress-Themes und Plugins ausprobieren, ihre Funktionen testen und die WordPress-Grundlagen erlernen.
Wenn Sie bereits eine WordPress-Website haben, können Sie eine lokale Kopie Ihrer Website auf Ihrem Computer erstellen, um neue Plugin-Updates auszuprobieren, bevor Sie sie auf Ihrer Live-Website implementieren.
Wichtig: Eine lokale Website ist für Sie nur auf Ihrem Computer sichtbar. Wenn Sie eine Live-Website erstellen möchten, benötigen Sie einen Domainnamen und WordPress-Hosting.
Folgen Sie den Schritt-für-Schritt-Anweisungen in unserem Leitfaden zum Starten eines WordPress-Blogs, wenn Sie bereit sind, eine Live-Website zu erstellen.
Schauen wir uns nun an, wie man WordPress lokal auf Windows, Mac oder Linux mit XAMPP installiert.
Was ist XAMPP?
XAMPP ist ein Softwarepaket, das alles enthält, was Sie brauchen, um eine lokale Serverumgebung auf Ihrem Computer einzurichten.
Um eine lokale WordPress-Site zu erstellen, müssen Sie eine Webserver-Software (Apache), PHP und MySQL auf Ihrem Computer einrichten.
PHP ist eine Programmiersprache, und MySQL ist eine Datenbankverwaltungssoftware. Beide sind erforderlich, um WordPress zu betreiben.
Sie separat zu installieren, ist für Anfänger ziemlich schwierig. An dieser Stelle kommt XAMPP ins Spiel.
XAMPP macht es Ihnen leicht, WordPress-Websites lokal zu erstellen. Es ist für Windows-, Mac- und Linux-basierte Computer verfügbar.
Beginnen wir mit der Installation von XAMPP und der Einrichtung der lokalen WordPress-Site.
XAMPP auf Ihrem Computer installieren
Zuerst müssen Sie die XAMPP-Website besuchen und auf die Schaltfläche „Download“ für Ihr Betriebssystem klicken.
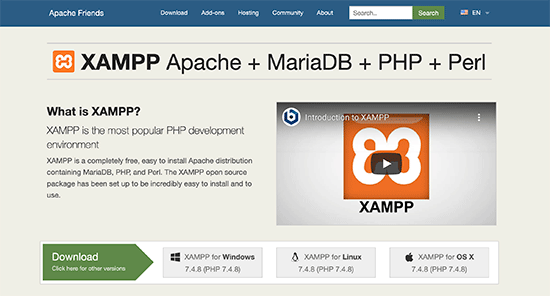
Je nach Betriebssystem können der Installationsassistent und die Benutzeroberfläche der Anwendung von den hier gezeigten Screenshots abweichen. Für diesen Artikel zeigen wir Ihnen die Windows-Version der Software.
Nachdem Sie XAMPP heruntergeladen haben, müssen Sie auf das Installationsprogramm klicken und es ausführen.
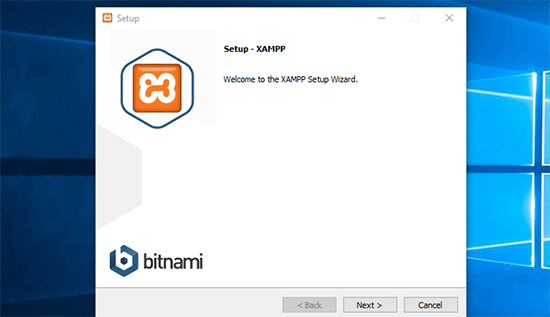
XAMPP wird Sie fragen, wo die Software installiert werden soll und welche Pakete Sie installieren möchten. Die Standardeinstellungen werden für die meisten Benutzer ausreichen. Klicken Sie weiter auf die Schaltfläche „Weiter“, um den Einrichtungsassistenten zu beenden.
Aktivieren Sie nach Abschluss des Assistenten die Option „Systemsteuerung jetzt starten“ und klicken Sie dann auf die Schaltfläche „Fertig stellen“.
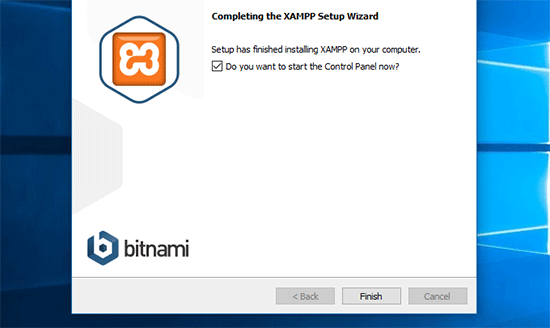
Dadurch wird die XAMPP-Kontrollfeld-App gestartet.
Mit der XAMPP-App können Sie den Apache-Webserver als lokalen Server und MySQL als Datenbankserver verwenden. Klicken Sie auf die Schaltfläche „Start“ neben Apache und MySQL.
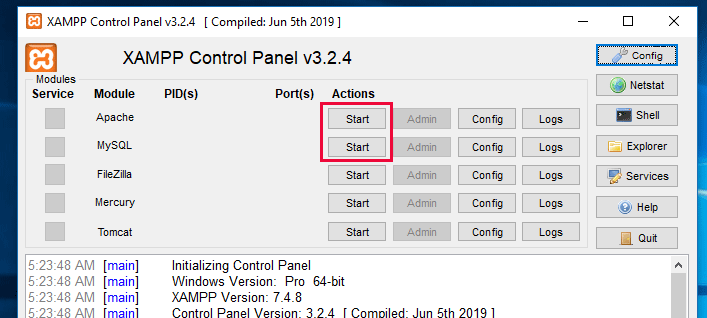
XAMPP wird nun Apache und MySQL starten.
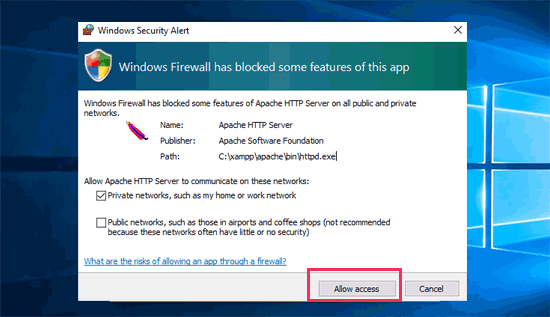
Möglicherweise sehen Sie eine Benachrichtigung der Windows-Firewall. Es ist wichtig, dass Sie auf die Schaltfläche „Zugriff zulassen“ klicken, damit beide Anwendungen auf Ihrem Computer ausgeführt werden können.
Sobald beide Anwendungen gestartet sind, werden ihre Namen grün hervorgehoben.
Nun sind Sie bereit, eine lokale Website zu erstellen und WordPress mit XAMPP zu installieren.
Erstellen einer lokalen WordPress-Site mit XAMPP
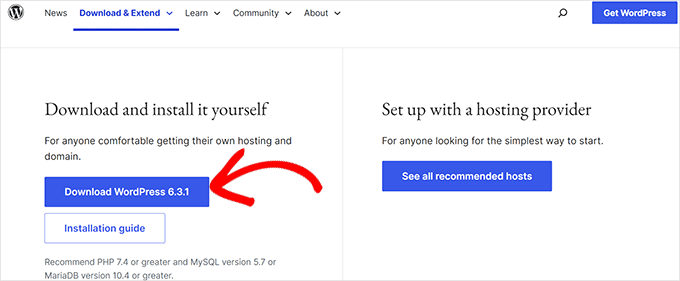
Zunächst müssen Sie WordPress herunterladen. Besuchen Sie die Website WordPress.org und klicken Sie auf die Schaltfläche „WordPress herunterladen“.
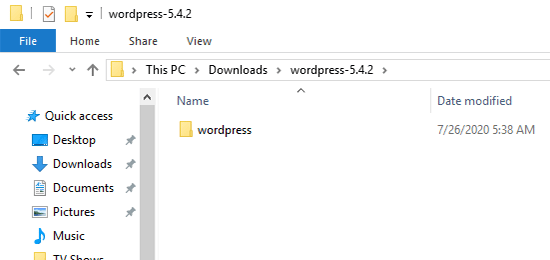
Nachdem Sie WordPress heruntergeladen haben, müssen Sie die Zip-Datei entpacken, und Sie werden einen WordPress-Ordner sehen.
Sie müssen diesen Ordner kopieren.
Als Nächstes gehen Sie zu Ihrem XAMPP-Installationsordner.
Unter Windows ist dies C:/Programme/XAMPP/htdocs oder C:/Xampp/htdocs.
Auf dem Mac ist dies /Applications/XAMPP/htdocs.
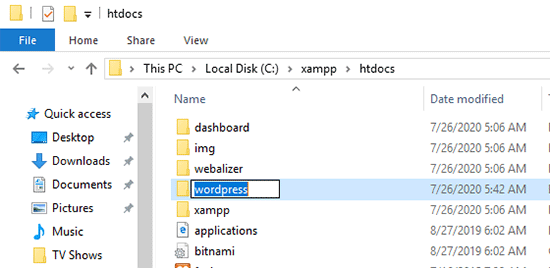
Fügen Sie den WordPress-Ordner, den Sie zuvor kopiert haben, in den Ordner „htdocs“ ein.
Wir empfehlen, den Ordner „wordpress“ in „website“ oder etwas anderes umzubenennen. So können Sie Ihre lokale Website leichter identifizieren.
Als nächstes müssen Sie Ihren bevorzugten Webbrowser öffnen.
Sie können die folgende URL in die Adresszeile Ihres Browsers eingeben:
https://localhost/website1/
Wenn Sie den WordPress-Ordner umbenannt haben, stellen Sie sicher, dass Sie „website1“ durch Ihren eigenen Ordnernamen ersetzen.
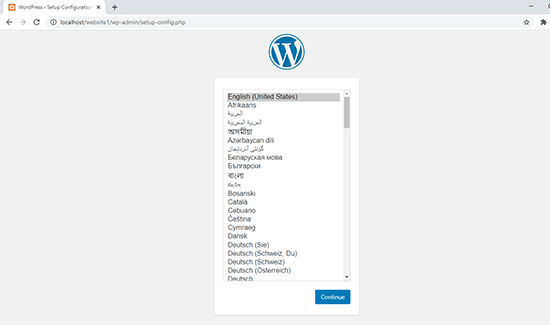
Daraufhin wird der WordPress-Installationsassistent geladen, und Sie werden aufgefordert, eine Sprache auszuwählen. Nachdem Sie eine Sprache ausgewählt haben, klicken Sie auf die Schaltfläche „Weiter“.
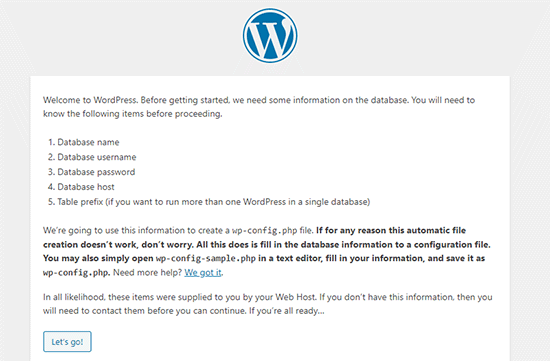
Auf dem nächsten Bildschirm sehen Sie den WordPress-Begrüßungsbildschirm.
Es enthält einen Hinweis, dass WordPress einen Datenbanknamen, einen Datenbankbenutzernamen, ein Passwort und Hostinformationen benötigt.
Lassen Sie uns eine Datenbank für Ihre WordPress-Website erstellen.
Sie müssen eine neue Browser-Registerkarte öffnen und https://localhost/phpmyadmin/ besuchen .
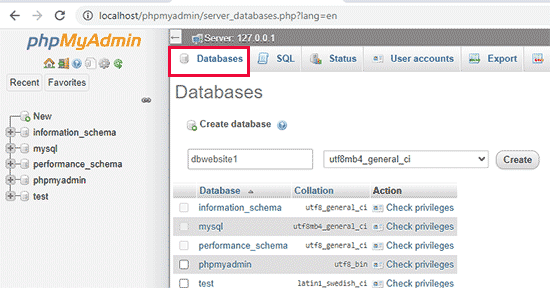
Dadurch wird die phpMyAdmin-Anwendung gestartet, die mit XAMPP vorinstalliert ist. Mit ihr können Sie Ihre Datenbanken über eine einfachere Schnittstelle verwalten.
Klicken Sie auf „Datenbanken“ und geben Sie einen Namen für Ihre neue Datenbank ein. Danach klicken Sie auf die Schaltfläche „Erstellen“, um fortzufahren.
Nachdem Sie nun eine Datenbank erstellt haben, können Sie diese für Ihre WordPress-Site verwenden.
Wechseln Sie zurück zur Browser-Registerkarte /localhost/website1/ und klicken Sie auf die Schaltfläche „Los geht’s“.
Auf dem nächsten Bildschirm werden Sie aufgefordert, Ihre WordPress-Datenbankinformationen anzugeben.
Geben Sie den Namen der Datenbank ein, die Sie zuvor erstellt haben. Ihr Benutzername ist „root“, und das Passwortfeld sollten Sie leer lassen. Für das Feld Datenbank-Host müssen Sie localhost verwenden.
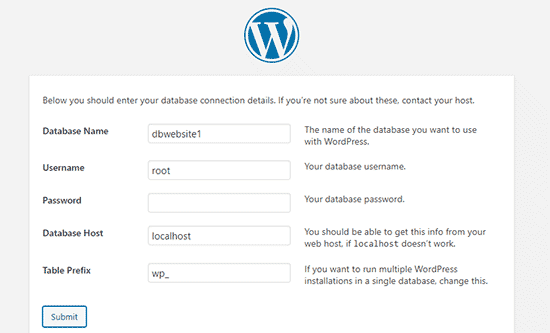
Wenn Sie fertig sind, klicken Sie auf die Schaltfläche „Absenden“, um fortzufahren.
Wenn Sie unter Windows oder Linux arbeiten, speichert WordPress diese Einstellungen nun in Ihrer WordPress-Konfigurationsdatei wp-config.php.
Wenn Sie jedoch mit einem Mac arbeiten, wird Ihnen der Inhalt der Datei angezeigt und Sie werden aufgefordert, sie zu erstellen.
Sie müssen diese Datei im Stammverzeichnis Ihrer Website erstellen.
Nachdem Sie die Datei erstellt haben, fügen Sie den zuvor kopierten Text in die Datei ein. Anschließend müssen Sie die Datei speichern und zum WordPress-Installationsprogramm zurückkehren, um fortzufahren.
Im nächsten Schritt werden Sie von WordPress aufgefordert, Informationen über Ihre Website anzugeben. Geben Sie zunächst den Titel ein, den Sie für diese Website verwenden möchten.
Danach müssen Sie einen Benutzernamen, ein Passwort und eine E-Mail-Adresse für Ihr Administratorkonto eingeben.
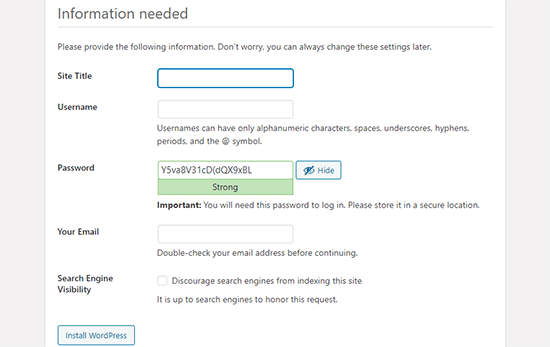
Sobald Sie alle Informationen eingegeben haben, klicken Sie auf die Schaltfläche „WordPress installieren“, um fortzufahren.
WordPress führt nun die Installation aus und fordert Sie auf, sich einzuloggen, sobald sie abgeschlossen ist.
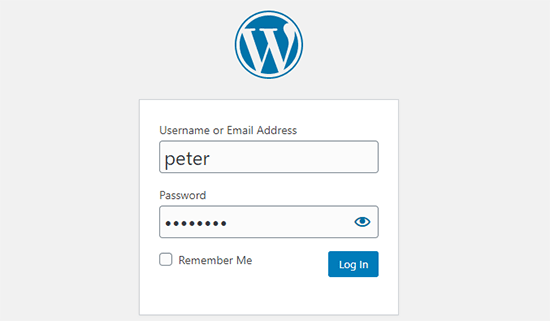
Sie können sich bei Ihrer Website anmelden, indem Sie die Seite /localhost/website1/wp-admin aufrufen und den Benutzernamen und das Passwort verwenden, die Sie bei der Installation eingegeben haben.
Was Sie nach der Erstellung einer lokalen WordPress-Website ausprobieren sollten
Jetzt, wo Sie Ihre lokale WordPress-Site mit XAMPP erstellt haben, können Sie sie wie eine Live-WordPress-Site bearbeiten.
Gehen Sie zum Menü „Erscheinungsbild“ in der Seitenleiste der WordPress-Verwaltung, um das Erscheinungsbild Ihrer Website anzupassen oder ein neues Thema zu installieren.
Hier sind einige großartige kostenlose Themen, die Sie ausprobieren können.
Als nächstes sollten Sie versuchen, einige WordPress-Plugins zu installieren.
Plugins sind wie Apps für Ihre WordPress-Website und ermöglichen es Ihnen, coole Funktionen wie ein Kontaktformular, Schaltflächen für soziale Medien, einen eCommerce-Shop und vieles mehr hinzuzufügen.
Brauchen Sie Hilfe bei der Installation von Plugins? In unserer Schritt-für-Schritt-Anleitung erfahren Sie, wie Sie ein WordPress-Plugin installieren.
Bonus: Verschieben einer lokalen WordPress-Site auf einen Live-Server
Nachdem Sie an Ihrer lokalen WordPress-Website gearbeitet haben, möchten Sie sie vielleicht auf einen Live-Server verschieben, um Ihren ersten WordPress-Blog oder Ihre erste Website zu erstellen.
Dazu benötigen Sie einen Domänennamen und ein Webhosting-Konto. Normalerweise kostet ein Domänenname 14,99 $, und das Hosting einer Website beginnt bei 7,99 $ pro Monat.
Das ist zu viel, wenn Sie gerade erst anfangen.
Glücklicherweise bietet Bluehost den WPBeginner-Benutzern einen kostenlosen Domainnamen und einen großzügigen Rabatt auf das Hosting. Im Grunde können Sie für 1,99 $ pro Monat loslegen.
Weitere Hosting-Empfehlungen finden Sie in unserem vollständigen WordPress-Hosting-Leitfaden.
Sobald Sie sich für das Hosting angemeldet haben, können Sie unserer Schritt-für-Schritt-Anleitung folgen, wie Sie WordPress von einem lokalen Server auf eine Live-Site umziehen.
Vielleicht möchten Sie sich auch über die alternativen Möglichkeiten informieren, lokale WordPress-Sites unter Windows mit Wampserver und unter Mac mit MAMP zu erstellen.
Expertenleitfäden für lokale WordPress-Seiten
Jetzt, wo Sie wissen, wie man eine lokale WordPress-Site mit XAMPP erstellt, möchten Sie vielleicht einige andere Anleitungen zu lokalen WordPress-Installationen sehen.
- Glossar: Localhost
- WordPress lokal auf dem Mac installieren (2 einfache Wege)
- So installieren Sie WordPress auf einem Windows-Computer (2 Methoden)
- WordPress von einem lokalen Server auf eine Live-Site verschieben (2 Methoden)
- Wie man eine Live-WordPress-Site auf einen lokalen Server verschiebt
- Wie man WordPress-E-Mails von Localhost mit SMTP empfängt
- WordPress Admin-Passwort auf Localhost zurücksetzen
- So erstellen Sie ganz einfach eine Staging-Site für WordPress (Schritt für Schritt)
Wir hoffen, dass dieser Artikel Ihnen geholfen hat, zu lernen, wie man eine lokale WordPress-Website mit XAMPP erstellt. Vielleicht interessiert Sie auch unser Leitfaden, warum Sie WordPress für Ihre Website verwenden sollten, oder unsere Expertenauswahl für das beste kostenlose Website-Hosting.
Wenn Ihnen dieser Artikel gefallen hat, dann abonnieren Sie bitte unseren YouTube-Kanal für WordPress-Videotutorials. Sie können uns auch auf Twitter und Facebook finden.


Syed Balkhi says
Hey WPBeginner readers,
Did you know you can win exciting prizes by commenting on WPBeginner?
Every month, our top blog commenters will win HUGE rewards, including premium WordPress plugin licenses and cash prizes.
You can get more details about the contest from here.
Start sharing your thoughts below to stand a chance to win!
Moinuddin Waheed says
I have been using xampp for a long time and first time when I installed it , it was for running php code.
I have also used it for wordpress local environment for understanding and developing websites locally.
one thing that has bother me regarding wordpress installation is username and password.
why we keep user as root and password blank?
this is not the case for live servers though?
WPBeginner Support says
It is not something that you would use for a live site but the username being root and the password being blank is the defaults for XAMPP. As your local site would only be active on your computer you do not need to change it for your local XMPP installation.
Admin
Jiří Vaněk says
Sometimes I use XAMPP. The only problem I sometimes encounter is shared hosting, to which the website is migrated from localhost. The problem is that the PHP limits are not always set in the same way on the shared server, or even the PHP version does not match (on the local 8.x and on the server, for example, the old version 7.x). This can often cause a problem in the functionality of the website, which was debugged on a different PHP than the one on the server. That’s probably the only flaw.
Donatas says
Hi, I have used these Xampp instructions to create a server on a PC (Windows 10 Education N). Everything worked perfectly fine and it’s a very useful article. I stuck in one place because I thought the database credentials folder had to be manualy created on Windows the same way it has to be on a Mac but these steps were exclusively for Mac. Thanks a lot!
WPBeginner Support says
You’re welcome, glad our guide was helpful!
Admin
Paul says
After having created the database and entered the database connection details, hitting submit gets me this message „There has been a critical error on this website“. Checked everything twice, what should I do?
Thank you for your attention.
WPBeginner Support says
For a fresh install, you would want to check the error log for XAMP to help narrow down the specific reason.
Admin
John says
Error logs didn’t help. But, as it turns out, for some reason, the most recent version of Xampp caused the same „critical error“ response to happen for me too. I ended up uninstalling that version and went with the previous version of Xampp and presto! It works.
lee kent says
Hello. If I were to follow these steps and then decide i wanted to make another site, How would you create a new website locally?
WPBeginner Support says
You would create a new folder and database and install the site in the new folder.
Admin
Smita says
Thanks for detailed steps. Very useful.
WPBeginner Support says
Glad our guide was helpful
Admin
Tife says
Can I use local Host to develop my custom wordpress theme also.
WPBeginner Support says
You can if you would like.
Admin
priyanka says
I’m getting this error
Your server is running PHP version 5.6.3 but WordPress 5.5.3 requires at least 5.6.20.
p/lease help
WPBeginner Support says
It is saying you want to upgrade the PHP you are using for your site to remove that error.
Admin
tarun says
I get the following error, when I run http://localhost/mysite/wp-admin/setup-config.php
One or more database tables are unavailable. The database may need to be repaired.
I tried to do global search for „WP-config“ file in my xampp folder but just found „wp-config-sample“. though I added the below line in
„wp-config-sample.php“ file
// define(‚WP_ALLOW_REPAIR‘, true);
not really sure what to do after that.
WPBeginner Support says
You would want to open phpMyAdmin and run the repair on all of your tables and if that does not work you would need to reach out to XAMPP’s support
Admin
tarun says
I am not able to figure out why I am getting this strange error, though I tried to reinstall and connect several times, all I did was I tried to drop my existing database and tried to create a new wrodpress login but All I can see is the following error
One or more database tables are unavailable. The database may need to be repaired.
WPBeginner Support says
You would want to try to repair your database, you can also use method 3 in our article below:
https://www.wpbeginner.com/wp-tutorials/how-to-fix-the-error-establishing-a-database-connection-in-wordpress/
Admin
Mohsin Zubair says
Hi Sir, I hope you are doing well. I am facing this error while creating data base.
Error
MySQL said: Documentation
Cannot connect: invalid settings.
phpMyAdmin tried to connect to the MySQL server, and the server rejected the connection. You should check the host, username and password in your configuration and make sure that they correspond to the information given by the administrator of the MySQL server.
WPBeginner Support says
You would want to check your configuration settings to see if it is set incorrectly.
Admin
David says
This is exactly what I have been looking for: a local testing server to develop a website without signing up to a plan/paid service first.
The explanations are brilliant and easy to follow. It’s genius! Many thanks.
WPBeginner Support says
You’re welcome, glad our guide was helpful
Admin
Ray Silva says
I installed wordpress. Then I put the wordpress folder in xampp’s htdocs folder. When I go to localhost on my browser, I get sent to the xampp dashboard and welcome to xampp page.
WPBeginner Support says
You may want to try localhost/foldername where foldername is the name of the folder where you placed WordPress to see if that is how it is currently set up.
Admin
Hussain Abbas says
Hi
My url to login to WordPress dashboard is coming as „/localhost/sitename/wordpress/wp-admin“ whereas as per the above instructions it should be „/localhost/sitename/wp-admin“ .
Would request your help to know how can I remove „wordpess“ from the link.
Thanks
WPBeginner Support says
For that, you installed the site in a folder named WordPress, if you are just starting out you can reinstall the site without the WordPress folder.
Admin
muhammad waqar says
easy and good tutorial for beginners
WPBeginner Support says
Glad you found our guide helpful
Admin
Darren Howes says
Hi,
Great instructions, complete novice, everything is working apart from when I try to add/upload images I get the the message
Unable to create directory wp-content/uploads/2020/09. Is its parent directory writable by the server?
I am working on a mac, any ideas on how to solve this?
Regards
Darren
WPBeginner Support says
You would need to navigate to your XAMPP folder, right-click, and modify your sharing for that folder so that it can be updated.
Admin
marni says
When setting up WordPress I used „admin“ as the user name and changed the password supplied by WordPress. As a precaution I copied the supplied password. I cannot log in with either password (no typing errors).
WPBeginner Support says
You should be able to force reset the password using the database method in our guide below:
https://www.wpbeginner.com/beginners-guide/how-to-change-your-password-in-wordpress/
Admin
gaurav sachan says
everything is done but database is not created so please me that why are not creting database in my php
WPBeginner Support says
You would need to manually create the database in the phpMyAdmin interface
Admin
Dimitris says
Hello after following the procedure after the following step:
Next, you need to open your favorite web browser and visit localhost/website1. You will see a page like this:
I get this message on the screen.
Warning: require_once: failed to open stream: No such file or directory
WPBeginner Support says
You may need to try unzipping the WordPress files again, the most common reason for this issue is covered in our article below:
https://www.wpbeginner.com/wp-tutorials/how-to-fix-the-wordpress-failed-to-open-stream-error
You can follow our guide for manually updating your site and you wouldn’t need to use FTP to readd the files, our guide on this can be found below:
https://www.wpbeginner.com/beginners-guide/ultimate-guide-to-upgrade-wordpress-for-beginners-infograph
Admin
Muhammad Kamran Khan says
after all these setting localhost/website1 started working. after shut down and restarted my laptop now when i go to localhost/website1/wp-admin/ error message came : This site cant be reached. localhost refused to connect.
WPBeginner Support says
You would want to ensure XAMPP is running to be able to see your site
Admin
dilshan says
This is really helpful because sometimes I want test some plugins but i dont want to install them to my website. I can try them in this local host site thanks to you
WPBeginner Support says
Glad our guide was helpful
Admin
Osazuwa says
A very helpful tutorial.
I have implemented them
But on loading
Localhost/website1
it displays
Parse error: syntax error, unexpected‘.‘ expecting ‚&‘ or variable (T_VARIABLE) in C:\xampp\htcdocs\website1\wp-includes\functions.php on line 1081
Thanks
WPBeginner Support says
You would want to ensure the PHP you are using is up to date for the most common reason for that error.
Admin
Julio Talaverano says
Hi,
Yesterday I installed XAMPP and WordPress and I worked a bit on a new page using localhost/wordpress.
I also installed some Plugins in WordPress.
But today when put into the browser localhost/wordpress I just get the Page I created yesterday.
Could you please tell me how I can continue editing my page with WordPress?
Thanks
WPBeginner Support says
If we’re understanding your question correctly, you would want to ensure XAMPP is running for your site to be visible when visiting the page.
Admin
Ronny says
Hello,
As always your tutorials are great. One question though. How do I make multiple localhosts using Xampp.
Think of me as a noob the this. I’ve read a few other tutorials on the subject, but it seems they assume one would have some deeper understanding of processes.
WPBeginner Support says
You would create a folder with a different name in the htdocs folder and follow the steps under the ‚Creating a Local WordPress Site with XAMPP‘ section and navigate to the new site’s folder when you want to see the other site rather than your first site.
Admin
Calvin Mutashu says
Thanks 4 a clear step by step guide. Keep the good work.
WPBeginner Support says
You’re welcome, glad you liked our guide
Admin
Anjuli says
Hello! My browser cannot open to localhost after putting the WordPress folder to htdocs and renaming it to website1. What should I do? Thank you.
WPBeginner Support says
If you’re returning to the site after a day, please ensure XAMPP is running on your computer for it to load porperly.
Admin
SANTOS says
Hi, how do I take my local wordpress site to a live wordpress site with a domain name?
WPBeginner Support says
Once you purchase hosting with a domain name, you would follow our guide here:
https://www.wpbeginner.com/wp-tutorials/how-to-move-wordpress-from-local-server-to-live-site/
Admin
Zaid says
I have a question if i am customizing my localhost wordpress site and my pc turned off. I will loss my site..?
WPBeginner Support says
No, as long as you save your changes those saved changes will remain the next time you pull up your local installation
Admin
Carla says
Guys, Just wanted to say thank you for this post! I successfully implemented a localhost on my computer thanks to your clear, step-by-step process outlined in the post! So excited to get practising my wp skills on this new installation!
WPBeginner Support says
Awesome, glad our guide could help get you set up
Admin
Victor says
Great job!! Is there a way, or a tutorial to transfer an existing website to this service ? This one deals with a brand new one. I have a website, and I’d love to add it to XAMPP! Thanks !
WPBeginner Support says
For that, you would want to take a look at our article here:
https://www.wpbeginner.com/wp-tutorials/how-to-move-live-wordpress-site-to-local-server/
Admin
Blessings Chibisa says
Guys I installed WordPress on a local machine. Am using xamp server I created a database but they is a problem in connection of WordPress and the database…. What should I do ?
Help me pliz
WPBeginner Support says
For an error with your database connection, you would want to take a look at our article here: https://www.wpbeginner.com/wp-tutorials/how-to-fix-the-error-establishing-a-database-connection-in-wordpress/
Admin
Vikas says
Great artice. It worked perfectly. I am a new learner. Sir could you guide me about How I could run multiple local sites using xampp.
Any help will be aporeciated.
WPBeginner Support says
You would want to create a new folder for the next site and then you should be able to follow the directions in the article to create a new database and site.
Admin
AASIMA says
SIR.
I successfully followed your instructions to make a website on the localhost. but the next day it doesn’t open and showing some error?
WPBeginner Support says
You would want to be sure XAMPP is running to see your local site
Admin
Mate says
Good guys
I have my website running on local xampp server on windows 10 system I want to move to my new Mac pro computer how do I do it? thanks.
WPBeginner Support says
You would follow the steps in our article here: https://www.wpbeginner.com/wp-tutorials/how-to-move-live-wordpress-site-to-local-server/
Admin
Keith says
I followed your directions and it was great, thanks.
I am trying to upload the AVADA theme that I have install previously on Hostgator and it worked.
It is 6mb and a zip file.
When I try to add this theme I get this message: „The uploaded file exceeds the upload_max_filesize directive in php.ini“.
Where am I going wrong? Thank You,
WPBeginner Support says
You may want to ensure that there isn’t the theme files in what you’re uploading. If it’s only the theme’s files then you can update your upload size on your XAMPP site using the methods in our article here: https://www.wpbeginner.com/wp-tutorials/how-to-increase-the-maximum-file-upload-size-in-wordpress/
Admin
Deepak Singh says
Very helpful post, thanks for this..
WPBeginner Support says
You’re welcome
Admin
Mary says
Good evening, thanks for the great work done here. I have followed these steps and I am unable to log in to my website. All I am getting is this. I am feed up already. Connection for controluser as defined in your configuration failed.
WPBeginner Support says
You would want to reach out to XAMPP’s support as there are multiple possible reasons from mysql not running to needing to reinstall xampp
Admin
Sam Arora says
Your site is so much helpful, had a great lesson here
WPBeginner Support says
You’re welcome, glad our site could be helpful
Admin
Kashif Ch says
Assalam o Alikum Sir!
Currently, I am learning WordPress and want to build different websites like membership website, LMS, e-commerce store for learning best practices.
Can we create two different websites using localhost or any other free hosting?
WPBeginner Support says
For a local installation, you should only need to create a new database and folder for the second site, for free hosting you may want to first take a look at our page and the warning at the beginning here: https://www.wpbeginner.com/showcase/best-free-website-hosting-compared/
Admin
Xander says
I followed the steps and it worked perfectly yesterday.
This morning, trying to connect to the localhost I received the following error:
„This site can’t be reached localhost refused to connect.
Search Google for localhost wordpress jack admin
ERR_CONNECTION_REFUSED“
WPBeginner Support says
Is your XAMPP running when you try to connect to your localhost?
Admin
Samar Jamil says
Thanks for sharing!
WPBeginner Support says
Glad you liked the article
Admin
Daniyal says
Hello there,
I’ve followed all the steps given in the article but stuck when I click „Install WordPress“, it gives me an error > „The site is experiencing technical difficulties“
after setting Site Title, username, password, email.
Can you help me, please
WPBeginner Support says
There are a few possible reasons for that error message. To start resolving it you would want to go through the options in our article here: https://www.wpbeginner.com/wp-tutorials/how-to-fix-the-wordpress-white-screen-of-death/
Admin
haley says
Thank you for this article. I am on the step where I need to open up the local site in a web browser but when I do, I get an error page saying „the local host has refused to connect.“ I’m guessing I messed up on one of the former steps but I don’t know which one. I’m working on a Mac.
Any guidance would be appreciated!
WPBeginner Support says
If you are returning to the site you would want to ensure xampp is running when trying to view your local site
Admin
Charlie McCormack says
Hi
Thanks for this. Installation went 100%
I am trying to test Divi which has to be loaded from a zip file
I get this when I try to install it from aperance/upload theme
The uploaded file exceeds the upload_max_filesize directive in php.ini.
Any solutions would be great
Charlie
WPBeginner Support says
You could increase the maximum upload size using:
https://www.wpbeginner.com/wp-tutorials/how-to-increase-the-maximum-file-upload-size-in-wordpress/
Another option would be to add the unziped theme folder where your themes are:
https://www.wpbeginner.com/beginners-guide/how-to-install-a-wordpress-theme/
Admin
Charlie McCormack says
Thanks for your reply
I cannot log in on the FTP maybe because its on a local drive
I am trying to load the theme the way you say
and still get the error.I
I bought a new domain name so will try to load it live and work on it like that
Thanks again
Charlie
WPBeginner Support says
On a local site, you can use your built-in file manager rather than FTP to add the folder to your WordPress site
YINGLI says
Hi, thanks for writing this article!
I have a question though:
I am at the step where I have to fill in a site title, username, password and email address for my admin account for WordPress. May I know whether the information that I use here should be the same as the information that I would use for my actual online WordPress account? I have an existing unlaunched WordPress site through Bluehost.
Thanks so much!
WPBeginner Support says
It is not required but if you’re creating a local site to test then it may be a good idea to set that as the same.
Admin
Pooja says
Thanks for help , best artical
WPBeginner Support says
You’re welcome
Admin
Karen says
thanks for the great video. question. am i understanding the process correctly? 1) set up a test site (mysite1) But should i also set up a database/wp install for each client website that I build (and maintain)? I’m guessing yes.
WPBeginner Support says
Yes, you would want a different install and database for each local site
Admin
Miso says
Great job, simple, straightforward. That’s exactly what a beginner, like me needs.
WPBeginner Support says
Thank you, glad our tutorial was helpful
Admin
God's Son says
Hi,i am very glad and grateful to you for this article. It was very simple and comprehensive,the photo illustrations helped me a lot. You are a great teacher,i hope i will be able to learn and share my knowlege with others like you soon,thanks.
WPBeginner Support says
Happy our articles can simplify this process for you
Admin
Aftab Hussain says
Thanks for such a nice guideline. I have successfully install wordpress on my local computer by the help of this post.
WPBeginner Support says
Glad our article could help
Admin