Wenn Sie WordPress auf Ihrem Mac installieren, können Sie seine Funktionen erkunden, ohne einen Web-Host zu benötigen.
Sie lernen die Funktionsweise von WordPress kennen und sehen, ob es für Ihr Projekt geeignet ist. Es ist auch ideal, um Themes und Plugins zu testen, bevor Sie Ihre Website live schalten. Außerdem gibt Ihnen das Experimentieren vor Ort die Freiheit, Fehler zu machen und zu lernen.
Wir haben viel mit lokalen Websites herumgespielt, sowohl auf Mac- als auch auf Windows-Computern. In diesem Tutorial zeigen wir Ihnen 2 einfache Methoden zur Einrichtung von WordPress auf Ihrem Mac.
Hinweis: Sie verwenden keinen Mac? Wir haben auch eine Anleitung, wie man WordPress lokal unter Windows installiert.
Warum WordPress lokal auf dem Mac installieren?
Normalerweise benötigen Sie für eine WordPress-Website ein Webhosting-Konto und einen Domainnamen.
Die Kernsoftware von WordPress kann jedoch kostenlos heruntergeladen und lokal auf Ihrem Computer ausgeführt werden. Diese lokale WordPress Website wird im Allgemeinen nicht im Internet verfügbar sein und kann nur auf Ihrem Computer angezeigt werden.
Der Vorteil dieses Ansatzes ist, dass Sie privat mit WordPress üben können, es ausprobieren und sehen können, welche Art von Websites Sie erstellen können.
Sie können diese lokale Installation auch verwenden, um verschiedene WordPress Themes und Plugins zu testen, bevor Sie sie auf Ihrer Live-Website installieren.
Was brauchen Sie, um WordPress lokal auf dem Mac zu installieren?
WordPress ist hauptsächlich in PHP geschrieben, einer serverseitigen Programmiersprache. Um PHP auszuführen, benötigen Sie eine Webserver-Software und ein installiertes MySQL-Datenbankmanagementsystem.
Nun, all diese Software unabhängig voneinander zu installieren und sie miteinander arbeiten zu lassen, klingt nach einer entmutigenden Aufgabe.
Glücklicherweise gibt es kostenlose Werkzeuge, mit denen die Installation auch für weniger technisch versierte Benutzer sehr einfach ist. In diesem Sinne finden Sie hier 2 Methoden zur einfachen lokalen Installation von WordPress auf einem Mac ohne spezielle Kenntnisse in der Server-Administration:
Sind Sie bereit? Bringen wir WordPress auf Ihrem Computer zum Laufen.
1. WordPress lokal auf dem Mac mit Local WP installieren (empfohlen)
Local WP ist ein WordPress-Entwicklungstool, mit dem Sie ganz einfach einen lokalen Server auf Ihrem Mac-Computer einrichten können. Sie können Local WP auch unter Windows und Linux verwenden, um WordPress einzurichten.
Zunächst müssen Sie die lokale Website besuchen und auf den Button „Herunterladen“ in der oberen rechten Ecke der Ansicht klicken.
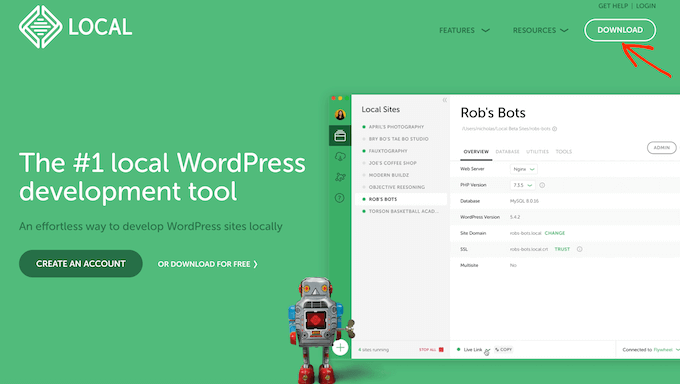
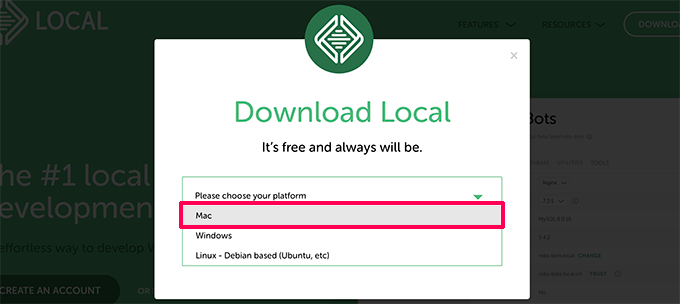
Daraufhin öffnet sich ein Popup-Fenster zum Herunterladen von lokalen Dateien.
Hier wählen wir Mac als Plattform.
Vor Ort werden Sie dann gebeten, ein kurzes Formular auszufüllen.
Nachdem Sie Ihren Namen, Ihre E-Mail-Adresse und Ihre Telefonnummer eingegeben haben, können Sie auf den Button „Jetzt anfordern“ klicken.
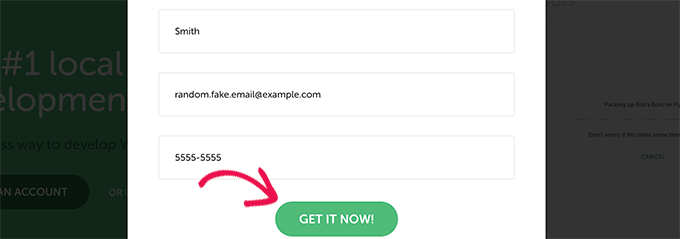
Dadurch wird die lokale Installationsdatei auf Ihren Computer heruntergeladen. Sie können die heruntergeladene Datei mit einem Doppelklick öffnen, sobald sie heruntergeladen ist.
Daraufhin wird ein Einrichtungsassistent angezeigt, der Sie durch den Installationsprozess von Local auf Ihrem Computer führt.
Mac Benutzer müssen die lokale Anwendung einfach in ihren Ordner „Programme“ ziehen.
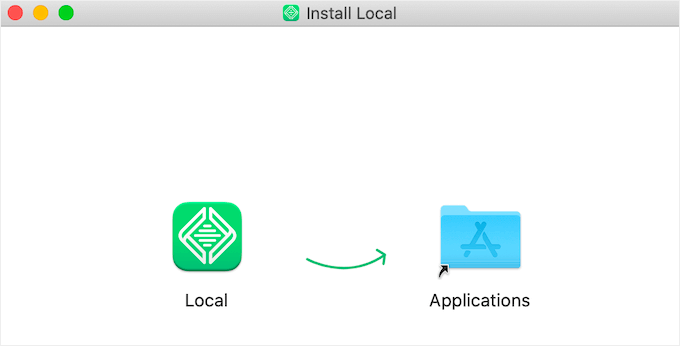
Sobald die Installation abgeschlossen ist, können Sie die lokale Anwendung aus dem Ordner „Programme“ starten.
Beim ersten Start werden Sie möglicherweise aufgefordert, einige Fragen zu stellen und ein kostenloses lokales Konto zu erstellen. Diese Schritte sind optional und Sie können sie überspringen, wenn Sie möchten.
Erstellen einer WordPress-Website in Local
Local macht es sehr einfach, eine lokale Website zu erstellen und WordPress schnell zu installieren.
Klicken Sie einfach auf den Button ‚Neue Website erstellen‘, um fortzufahren.

In der nächsten Ansicht müssen Sie den Namen Ihrer Website eingeben.
Klicken Sie anschließend auf den Button „Weiter“.

Als nächstes werden Sie aufgefordert, Ihre Plattform auszuwählen.
Local ermöglicht es Ihnen, die Version von PHP, Apache und MySQL auszuwählen, die Sie verwenden möchten.
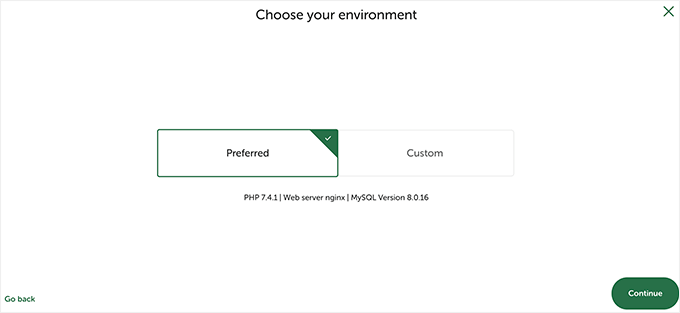
Wenn Sie unsicher sind, wählen Sie die „bevorzugten“ Einstellungen und klicken Sie auf den Button „Weiter“.
Schließlich müssen Sie einen WordPress-Benutzernamen und ein Passwort eingeben. Dann können Sie auf den Button „Website hinzufügen“ klicken.
Local wird nun WordPress herunterladen und installieren, um Ihre Website zu erstellen. Möglicherweise werden Sie aufgefordert, Ihren Mac-Benutzernamen und Ihr Passwort einzugeben, um Änderungen vorzunehmen.
Sobald Sie fertig sind, sehen Sie Informationen über Ihre neu erstellte Website mit Buttons, um den WordPress-Verwaltungsbereich zu besuchen oder Ihre lokale Website anzuzeigen.
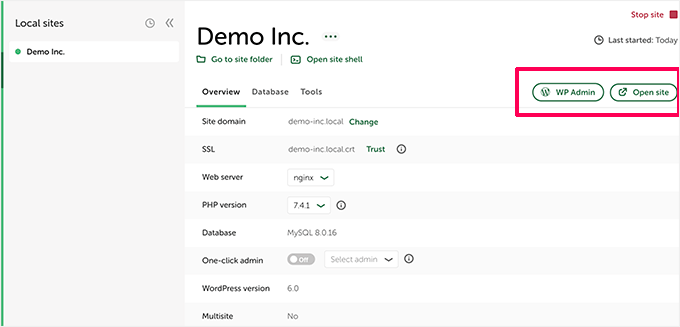
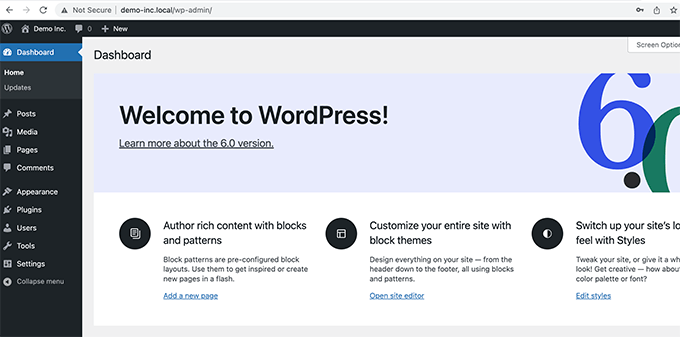
Sie können nun Ihre Website besuchen oder sich im WordPress-Verwaltungsbereich anmelden.
Von hier aus können Sie Ihre lokal gehostete WordPress Website genau so nutzen, wie Sie es von einer Live-Website gewohnt sind.
Sie können Plugins und Themes installieren und Ihre Website so gestalten, wie Sie es für richtig halten.
2. WordPress lokal auf dem Mac mit MAMP installieren
MAMP ist ein beliebtes Programm, mit dem Sie WordPress auf Ihrem Mac-Computer ausführen können.
Besuchen wir zunächst die MAMP-Website. Hier sollten Sie die neueste Version von MAMP & MAMP Pro sehen.
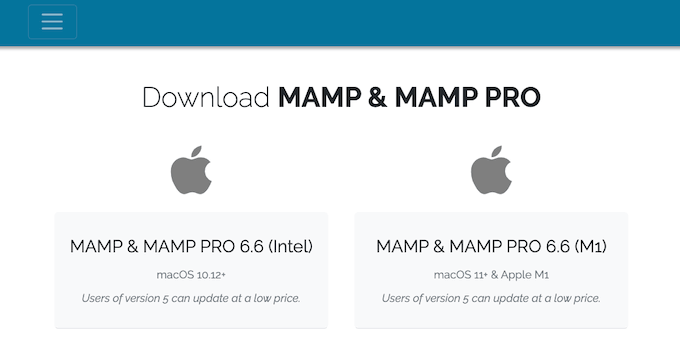
MAMP hat separate Downloads für verschiedene Versionen des macOS-Betriebssystems.
Sie sind sich nicht sicher, welche Version von macOS auf Ihrem Computer installiert ist? Um das herauszufinden, klicken Sie einfach auf das Apple-Symbol in der Werkzeugleiste Ihres Computers.
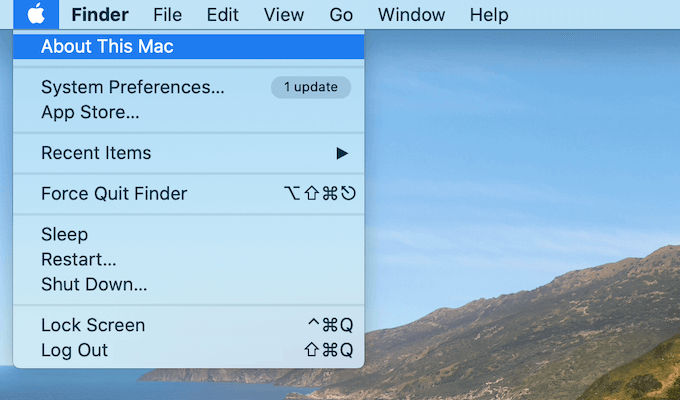
Klicken Sie dann auf die Option „Über diesen Mac“.
Daraufhin wird ein Popup-Fenster geöffnet, das viele Informationen über Ihren Computer anzeigt, darunter auch die Version von macOS.
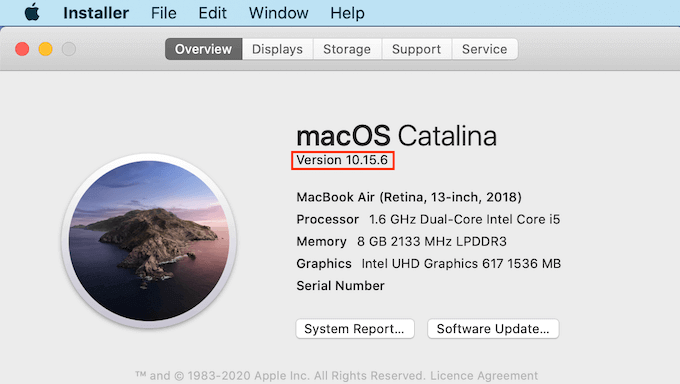
Sie können nun die richtige Version von MAMP für Ihr Betriebssystem herunterladen.
Sobald der Download abgeschlossen ist, doppelklicken Sie auf die MAMP-.pkg-Datei. Dadurch wird das MAMP-Installationsprogramm gestartet.

Folgen Sie nun einfach den Anweisungen auf dem Bildschirm, um MAMP zu installieren.
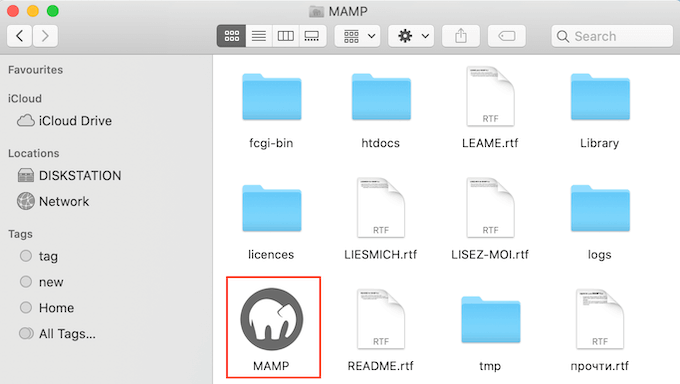
Nach der Installation dieses Programms starten Sie MAMP, indem Sie den Ordner „Anwendungen“ Ihres Computers öffnen.
Hier finden Sie 2 Versionen von MAMP. MAMP Pro ist die kostenpflichtige Version, also stellen Sie sicher, dass Sie die kostenlose Version wählen.
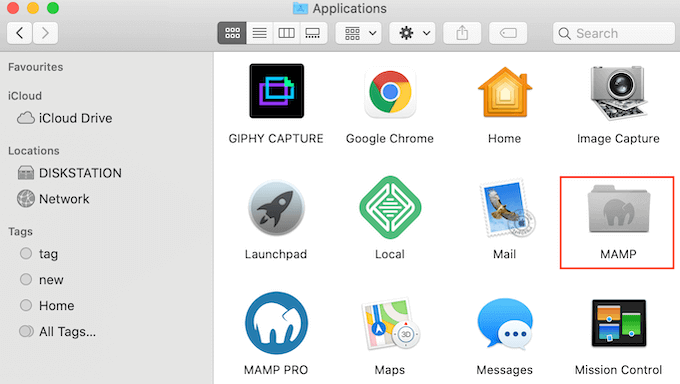
In diesem MAMP-Ordner finden Sie verschiedene Dateien und eine MAMP-Anwendung.
Ein Doppelklick genügt, um die MAMP-App zu starten.
Bevor Sie loslegen, empfehlen wir Ihnen, einige Einstellungen vorzunehmen, um Ihr MAMP-Erlebnis zu verbessern.
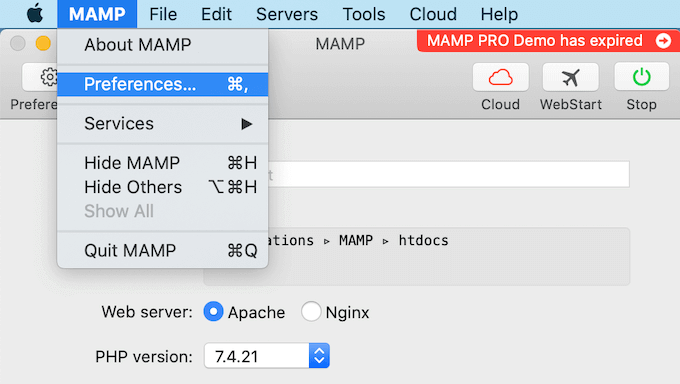
Um diese Änderungen vorzunehmen, klicken Sie in Ihrer Werkzeugleiste auf ‚MAMP‘ und wählen Sie dann ‚Preferences….‘.
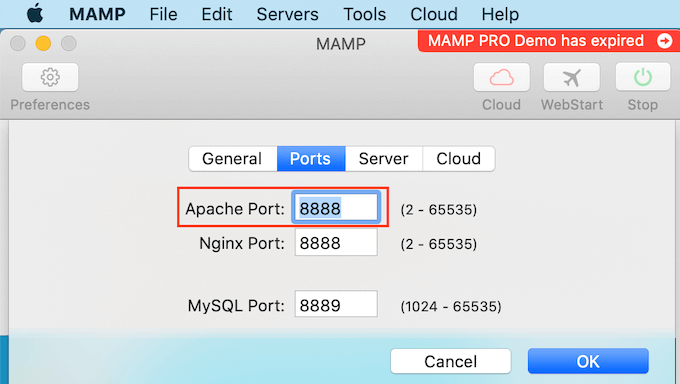
Wechseln Sie in dem Popup-Fenster auf den Tab „Ports“.
Sie können nun überprüfen, welchen Apache Port MAMP verwendet. Wir empfehlen, auf Apache Port 8888 zu wechseln, wenn MAMP diesen Port nicht bereits verwendet.
Der nächste Schritt ist die Einrichtung des Stammordners für Ihre Dokumente. Hier werden Sie alle Ihre lokalen WordPress-Websites erstellen und speichern.
Standardmäßig verwendet MAMP den Ordner /Applications/MAMP/htdocs/, aber Sie können diese Position beliebig ändern.
Klicken Sie in der Box „Einstellungen…“ auf den Tab „Server“. Ihr Dokumentenstamm sollte jetzt sichtbar sein.
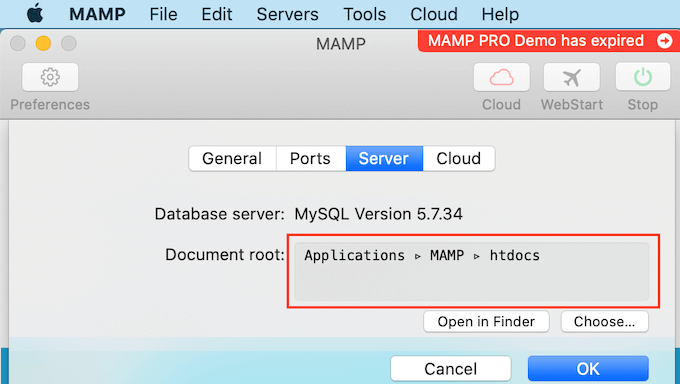
Wenn Sie Ihre Websites in einem anderen Ordner speichern möchten, klicken Sie auf den Button ‚Auswählen…‘.
Daraufhin öffnet sich ein Popup, in dem Sie eine neue Position auswählen können. Vielleicht möchten Sie auch einen neuen Ordner erstellen, in dem Sie alle Ihre WordPress-Websites speichern.
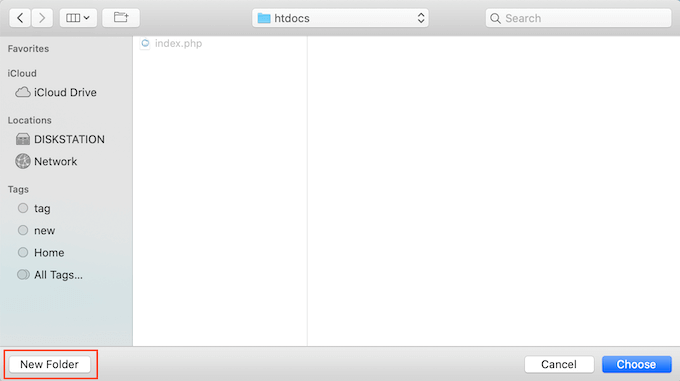
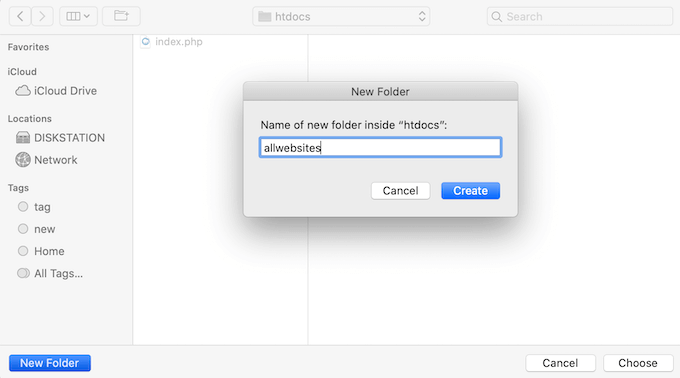
Sie können diesen Ordner nach Belieben benennen.
Für diesen Artikel werden wir unsere Websites in einem Ordner namens „allwebsites“ speichern.
Installation von WordPress auf MAMP
Nachdem Sie MAMP eingerichtet haben, ist es nun an der Zeit, WordPress auf Ihrem Mac Computer zu installieren.
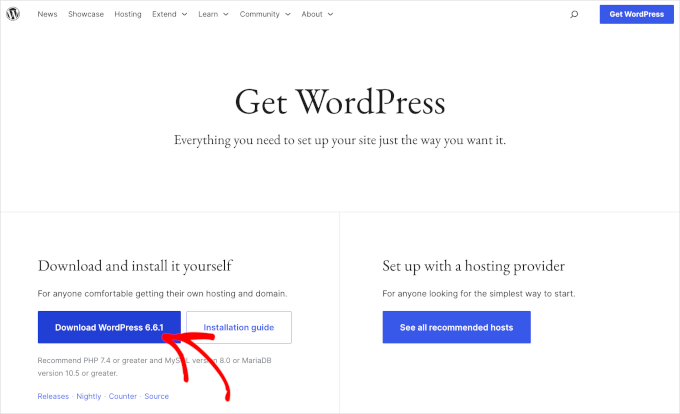
Zunächst müssen Sie die Website WordPress.org besuchen und die neueste Version von WordPress Core herunterladen.
HINWEIS: Es gibt zwei Versionen von WordPress. Weitere Einzelheiten finden Sie in unserem Artikel zum Vergleich von WordPress.com und WordPress.org.
Nachdem Sie die Datei von WordPress.org heruntergeladen haben, müssen Sie sie nur noch entpacken. Dadurch wird ein entpackter „wordpress“-Ordner erstellt.
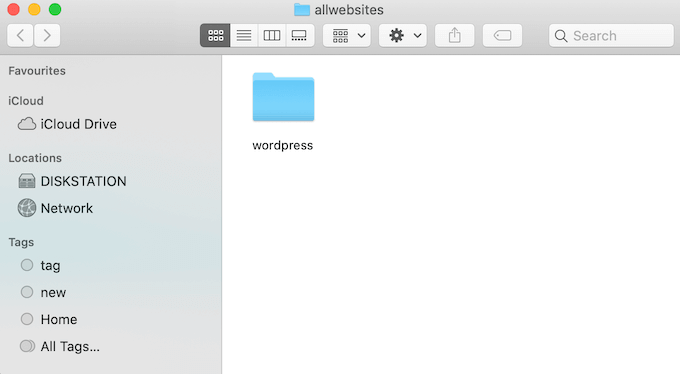
Kopieren Sie diesen Ordner nun einfach in Ihren MAMP-Dokumentenstammordner.
Da wir den Stammordner des Dokuments geändert haben, müssen wir „wordpress“ in applications/MAMP/htdocs/allwebsites kopieren.
WordPress benötigt eine Datenbank, um alle Inhalte und Daten zu speichern. Sie müssen diese Datenbank erstellen, bevor Sie eine lokale Website erstellen können.
Keine Sorge – es ist nicht so schwer, wie es klingt.
Klicken Sie im MAMP-Fenster ‚Preferences…‘ einfach auf den Button ‚OK‘. Dies sollte die MAMP-Anwendung in einem neuen Browser Tab starten.
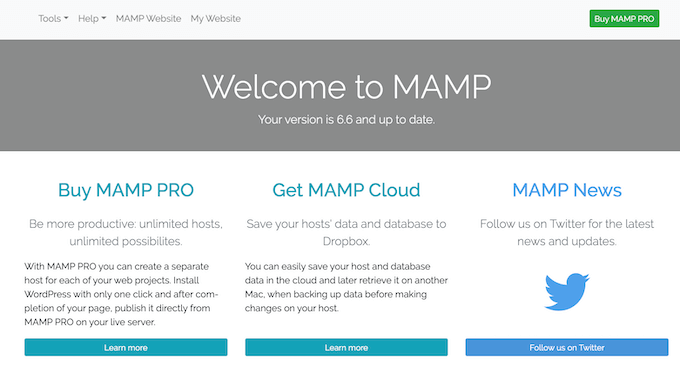
Als nächstes müssen Sie phpMyAdmin starten. Dies ist eine webbasierte Anwendung zur Verwaltung der MySQL-Datenbank Ihrer Website.
In der Werkzeugleiste navigieren wir zu Werkzeuge “ phpMyAdmin.
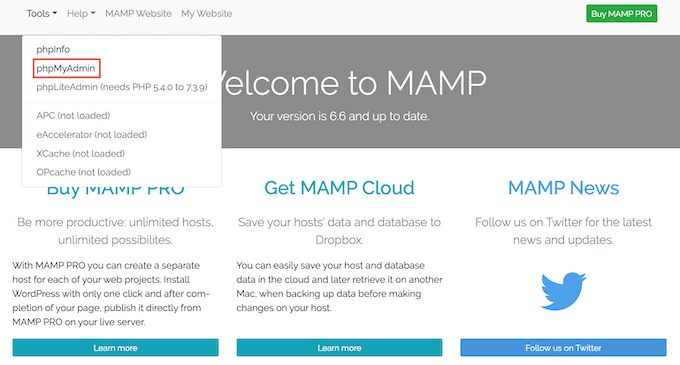
Dadurch wird phpMyAdmin in einem neuen Tab geöffnet.
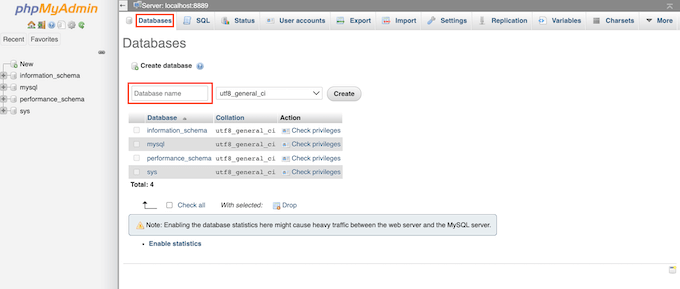
Gehen Sie im Dashboard von phpMyAdmin auf den Tab „Datenbanken“.
Sie können nun einen beliebigen Namen für Ihre Datenbank in das Feld „Datenbankname“ eingeben. Merken Sie sich den Namen gut, denn wir werden ihn im nächsten Schritt verwenden.
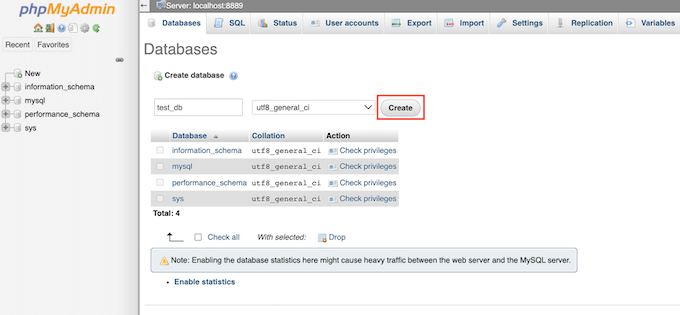
In diesem Lernprogramm nennen wir unsere Datenbank „test_db“.
Nachdem Sie den Namen Ihrer Datenbank eingegeben haben, können Sie auf den Button „Erstellen“ klicken.
PhpMyAdmin erstellt dann Ihre Datenbank.
Jetzt ist es an der Zeit, WordPress zu installieren.
Rufen Sie in einem neuen Tab des Browsers die Seite http://localhost:8888/ auf. Wenn Sie einen anderen Port als 8888 verwenden, ändern Sie einfach diese URL, um Ihren Port anzugeben.
Sie sollten nun einen Link zu dem Ordner „WordPress“ sehen, den Sie in Ihren Stammordner kopiert haben. Klicken Sie auf diesen Link. Dadurch wird der WordPress-Installationsassistent geöffnet.
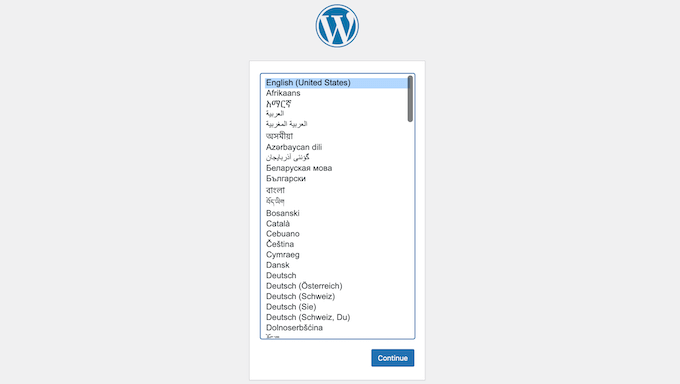
Der WordPress-Installationsassistent fordert Sie zunächst auf, eine Sprache auszuwählen. Nachdem Sie Ihre Wahl getroffen haben, können Sie auf den Button „Weiter“ klicken.
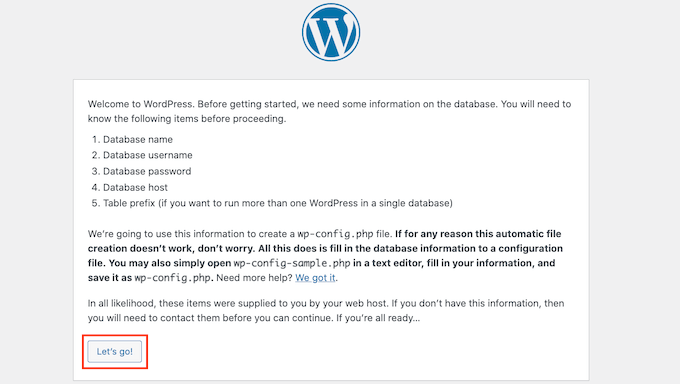
In der nächsten Ansicht zeigt WordPress eine Liste aller Informationen an, die es für die Installation benötigt.
Nachdem Sie diese Ansicht gelesen haben, klicken Sie auf den Button „Los geht’s“, um weiterzugehen.
Der Einrichtungsassistent fragt nun nach den Daten Ihrer WordPress-Datenbank. Geben Sie für den Datenbanknamen einfach den Namen ein, den Sie im vorherigen Schritt erstellt haben.
Für „Benutzername“ und „Passwort“ geben Sie einfach „root“ ein.
Sie können dann „localhost“ in das Feld „Database Host“ eingeben. Localhost bedeutet, dass die Datenbank und die Website auf demselben Server gehostet werden, der in diesem Fall Ihr Mac Computer ist.
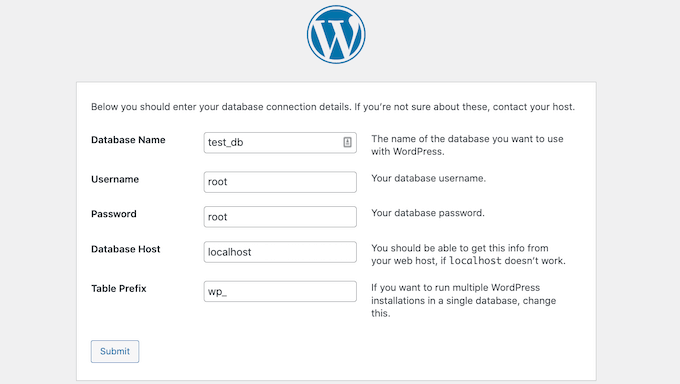
Nachdem Sie all diese Informationen eingegeben haben, klicken Sie einfach auf den Button „Absenden“.
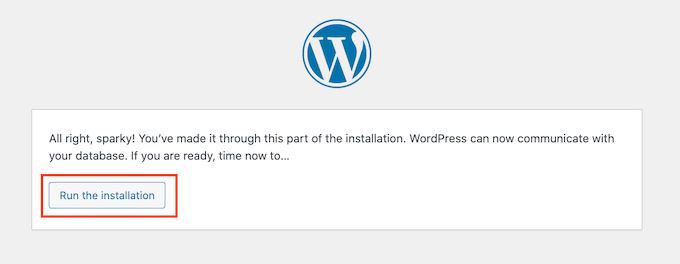
WordPress wird nun eine Verbindung zu Ihrer Datenbank herstellen und eine Konfigurationsdatei für Sie erstellen. Sobald der Vorgang abgeschlossen ist, erhalten Sie eine Erfolgsmeldung.
Um mit dem nächsten Schritt fortzufahren, können Sie auf den Button „Installation ausführen“ klicken.
In der nächsten Ansicht fordert WordPress Sie auf, einen Titel für die Website anzugeben. Sie können zum Beispiel den Namen Ihres Unternehmens verwenden. Die meisten WordPress Themes zeigen diesen Titel ganz oben auf Ihrer Website an.
Wenn Sie sich über den Titel Ihrer Website unsicher sind, besteht kein Grund zur Panik. Sie können den Titel in Ihrem WordPress-Dashboard jederzeit ändern.
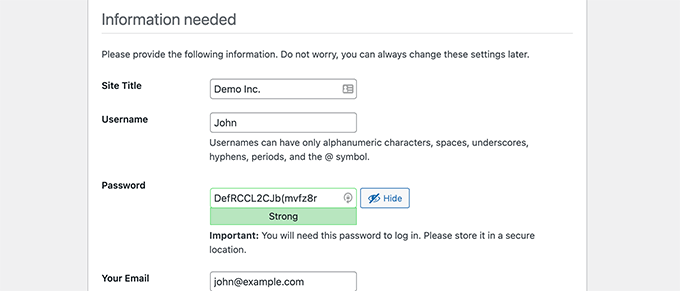
Anschließend müssen Sie einen Benutzernamen und ein Passwort erstellen. Dies sind die Anmeldedaten, die Sie für den Zugriff auf Ihr WordPress-Dashboard verwenden werden.
Sie können auch Ihre E-Mail-Adresse in das Feld „Ihre E-Mail“ eingeben. An diese E-Mail-Adresse sendet WordPress alle E-Mails an seine Administratoren.
Nachdem Sie dieses Formular ausgefüllt haben, klicken Sie auf den Button „WordPress installieren“.

WordPress führt nun die Installation durch.
Nach ein paar Augenblicken sollten Sie die Meldung „Erfolg“ sehen.

Um direkt zu Ihrer WordPress-Anmeldung zu gelangen, klicken Sie auf den Button „Anmelden“.
Sie können sich auch über die folgende URL bei Ihrer lokalen WordPress-Website anmelden: http: //localhost:8888/wordpress/wp-login.php
Hinweis: Wenn Sie einen anderen Apache-Port verwenden, müssen Sie den Teil „8888“ in dieser URL ändern.
Sie können sich nun bei Ihrer WordPress Website anmelden, indem Sie den Benutzernamen und das Passwort eingeben, die Sie im vorherigen Schritt erstellt haben.
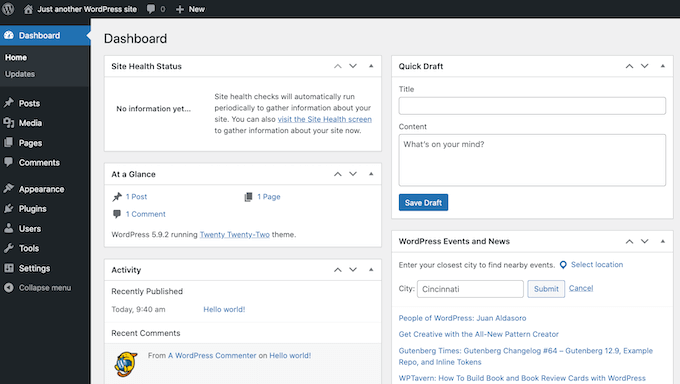
Dadurch gelangen Sie zum WordPress-Dashboard.
WordPress lokal auf dem Mac ausprobieren
Eine lokale Installation ist ideal, um WordPress auszuprobieren oder Websites auf Ihrem Computer zu entwickeln. Jetzt, wo WordPress lokal auf Ihrem Mac läuft, gibt es ein paar Dinge, die Sie vielleicht ausprobieren möchten:
- Experimentieren Sie mit den besten WordPress Themes.
- Versuchen Sie, Ihr perfektes WordPress Theme zu finden.
- Testen Sie wichtige WordPress Plugins lokal.
- Lernen Sie WordPress zu programmieren, indem Sie Ihre eigenen Plugins und individuellen Themes erstellen.
Verschieben Ihrer lokalen WordPress-Installation auf die Live-Website
Sobald Sie lokal mit WordPress gespielt haben, sollten Sie Ihre WordPress-Installation auf eine Live-Website übertragen. Dies ist die einzige Möglichkeit, wie andere Ihre Website sehen können.
Dazu müssen Sie einen Domänennamen und ein Webhosting kaufen.
Ein Domänenname ist die Adresse Ihrer Website im Internet, und Webhosting ist der Ort, an dem die Dateien Ihrer Website gespeichert sind. Sie können sich das Webhosting als das Zuhause Ihrer Website im Internet vorstellen.
Für das Webhosting empfehlen wir Bluehost. Sie sind einer der größten Hosts der Welt und werden auch offiziell von WordPress.org empfohlen.
Zum Glück bietet Bluehost den Benutzern von WPBeginner einen Rabatt auf das Hosting, ein kostenloses SSL-Zertifikat und einen kostenlosen Domainnamen. Im Grunde können Sie Ihre lokale WordPress-Installation für 1,99 $ pro Monat in eine Live-Website verwandeln.
Wenn Sie ein Hosting erworben haben, sollten Sie sich unseren Artikel darüber ansehen , wie man WordPress von einem lokalen Server auf eine Live-Website umzieht.
Wir hoffen, dieser Artikel hat Ihnen geholfen, WordPress lokal auf dem Mac zu installieren. Als Nächstes möchten Sie vielleicht auch unseren Leitfaden lesen, wie man eine Website mit WordPress erstellt, oder unseren Vergleich der besten Managed WordPress Hosts ansehen.
Wenn Ihnen dieser Artikel gefallen hat, dann abonnieren Sie bitte unseren YouTube-Kanal für WordPress-Videotutorials. Sie können uns auch auf Twitter und Facebook finden.


Jiří Vaněk
Is it possible to change PHP versions in MAMP or modify the PHP.ini so that it is already optimized for the server from the first launch, to which the website will eventually be moved?
WPBeginner Support
MAMP does have options in its settings to change your PHP version if you wanted a different version
Admin
Jiří Vaněk
This sounds great, because sometimes one needs to test a website on different versions of PHP to find out the best behavior for a certain version. Great and thanks for the advice.
Denis Gradel
Thanks a lot! Localwp is much much easier than MAMP, I’ve tried both.
WPBeginner Support
Glad you found our recommendation helpful!
Admin
Kate
I get to
„WordPress needs a database to store all of its content and data. You’ll need to create this database before you can create a local website.
Don’t worry, it’s not as hard as it sounds!
In the MAMP ‘Preferences…’ window, simply click on the OK button. This should launch the MAMP application in a new browser tab.“
Then I don’t have an OK button and I can’t launch MAMP!
WPBeginner Support
You would want to ensure you have the latest version of MAMP installed and you have not disabled the Webstart page in the preferences section of MAMP for the most common reasons.
Admin
Mari
Hi there,
First, thank you for creating this guide, it was quite helpful. In fact, Ive been using my local site since march. But a few days ago when I went to log in to work on it I received this message on blank white screen,
„There has been a critical error on this website. Please check your site admin email inbox for instructions.
Learn more about troubleshooting WordPress.“
Im not quite sure what this means or where to actually go to rectify the error. Any instruction or an arrow on which way to turn would be humbly accepted. Thank you.
WPBeginner Support
For troubleshooting errors in general you would want to take a look at our guide below:
https://www.wpbeginner.com/beginners-guide/beginners-guide-to-troubleshooting-wordpress-errors-step-by-step/
Admin
RG
I’ve tried to install the wp locally.
But I’m stuck when I have to go to localhost/mywebsite
When I type this in the browser, I get an empty white page and when I click on the MAMP webstart / my website I get ‚forbidden you don’t have permission to access this ressource…
WPBeginner Support
You would want to ensure you are an admin on your mac and for the mywebsite URL you would want to ensure that is the name of the folder your WordPress site is installed in.
Admin
Robin
Hello,
I tried to follow this tutorial but got stuck when I had to go to the localhost
I changed to root in MAMP… my browser returns an empty white page
I don’t understand what the localhost stands for (is it the root on my MacBook or is it the root that I set during the setup of MAMP ?
WPBeginner Support
It is the URL that MAMP sets up to go to the folder on your site and properly load your site. If you changed the address for MAMP then you would need to go to that updated address.
Admin
Henry Barnett
I pop the URL Desktop/Wp_docs/vh_website into a new browser tab and ‚This site can’t be reached‘. Can you please help?
WPBeginner Support
You would want to try reaching it using http://localhost
Admin
Sop
Thank you for this tutorial! I have successfully installed MAMP and have WordPress running locally. I’ve played around with it but would like to delete it now because I won’t be using WordPress anymore. What is the best way to do this?
WPBeginner Support
You could uninstall MAMP and delete the folder with your site information.
Admin
Lola
If localhost/mysite didnt work for you, check that you MAMP is running then click Webstart > My Webiste > Language and so on.
Thank you for the post,
WPBeginner Support
Thank you for sharing what helped you ensure the site was active
Admin
Russell
Having set up on my desktop (thank you so much!) and begun to build, I was trying to transfer everything to my laptop by copying the MAMP folder and the Mysite folder with all the WordPress files to the exact same places as my desktop. But I am unable to get it to work after a good few hours trying to figure a way through.
WPBeginner Support
For transferring your local installation, you would want to follow the steps in our guide below for properly transferring your content:
https://www.wpbeginner.com/wp-tutorials/how-to-move-live-wordpress-site-to-local-server/
Admin
Simon Miles
Nope, doesn’t work if you don’t understand computer science. This bit here – Go to localhost/mysite in a new browser tab. If you re-named the wordpress folder to something else, then use that name here – requires more explanation. I have no idea what to type in the browser.
WPBeginner Support
If you did not name the folder where you placed the WordPress files ‚mysite‘ then you would replace the mysite in the URL with the name of the folder you decided to use.
Admin
kpatterson
I am running into an issue with the WordPress Installation Wizard on my browser, nothing is loading its just a blank screen, there are no errors displayed. Any advice?
WPBeginner Support
You would want to ensure MAMP is running and if it is to then use the debug option from our article below:
https://www.wpbeginner.com/wp-tutorials/how-to-fix-the-wordpress-white-screen-of-death/
Admin
jeania
I am having the same problem, how do you make sure that MAMP is running?
WPBeginner Support
You would open the MAMP program and if it gives the option to turn off your server then MAMP is running.
Admin
Geoff
wow, after 3 days messing around with other instructions I followed these and bingo I have wordpress running on de mac. Thank you.
WPBeginner Support
Glad our guide was helpful
Admin
Jennifer
Success! Thank you for these instructions. It took a little trial and error a few times, but I ultimately figured it out. One thing that tripped me up for a while was that apparently I needed to click on „start servers“ in MAMP before the „Open web start page“ would allow me to click on it. I didn’t see that anywhere in the instructions, so maybe that will help someone else. Thanks again! Onward with playing around with WordPress
WPBeginner Support
Thanks for sharing what helped you
Admin
nandhini
Thanks it helped me
Imran
The wordpress page was not opening on my Mac… then i changed localhost port setting back to 8888… and then it worked
WPBeginner Support
Glad you were able to find a solution that worked for you
Admin
Mel
Thank you for the very helpful article! Other articles were not up to date and the links to other articles at the end are useful
WPBeginner Support
Glad our article was helpful
Admin
sumeet
can we monetize the wordpress blog if we are hosting through MAMP
?
WPBeginner Support
Normally no as MAMP is for creating a local installation
Admin
Wendy
I managed to install wordpress finally and logged in, but once everything is closed and I want to get back to my local wordpress site, how do I access it? I feel like a total ditz right now…lol
WPBeginner Support
You would visit the localhost address you visited before and ensure MAMP is running before you try to visit the address
Admin
Elliott
How do you fix this issue? I see this when trying to access wordpress admin area
This page isn’t workinglocalhost is currently unable to handle this request.
HTTP ERROR 500
WPBeginner Support
There are a few different reasons, you may want to start with following our guide below:
https://www.wpbeginner.com/wp-tutorials/how-to-fix-the-internal-server-error-in-wordpress/
Admin
jane
i got half way then when it said to type in http localhost/mywebsite it didnt work
WPBeginner Support
You would want to ensure MAMP is running for the most common reason for that issue.
Admin
John
Thanks for the tutorial. Just one thing I’d like to mention… changing the default location of htdocs to one in my documents folder meant MAMP didn’t work. Changed it back to applications > MAMP > htdocs and it worked.
WPBeginner Support
Thanks for sharing this in case others ran into this issue or this is a change to MAMP since the last update of this article
Admin
Marianne
Thanks for sharing. I had the same problem.
Jen Harrigan
Thanks for the help, you are a lifesaver!
WPBeginner Support
You’re welcome, glad our guide could be helpful
Admin
Willy
When I put localhost/mysite in browser, I changed the folder´s name to wordpress_beginner so I put
localhost/wordpress_beginner in browser, but get error can´t find it??
WPBeginner Support
You may want to start by trying localhost and if that is not displaying correctly then you would want to ensure MAMP is running and does not have any errors.
Admin
Anjana
I copy the worpress folder to mamp folder and rename that folder with mysites name. When I try to run localhost:8888/mysites it gives
The requested URL /mysites/index.php was not found on this server.
Please help me
WPBeginner Support
Just in case, you would want to ensure MAMP is running when you try to visit the local installation
Admin
A
I get to the point of „Simply click on the Open Web Start Page button in MAMP application window“, but this option is greyed out and unclickable.. any thoughts on why this might be?
WPBeginner Support
One of the services may not be running correctly, in the tip right of the MAMP window there should be icons for each service with a green dot, if one of those isn’t green then that service could be the root of the issue.
Admin
Joanna Ma
I followed all the steps up until the installment, but I can’t open my http:localhost page, it just says error or unable to open on my screen. I’m not sure where I’m going wrong here, please let me know what else I should try!
WPBeginner Support
If you’ve come back after restarting your computer you would want to ensure MAMP is running so the local install can be found
Admin
Eva Giddings
Hey there, I have downloaded WordPress and created a database, but when I type localhost/mysite into the address bar it gives me a 404 not found error.
I just kept /Applications/MAMP/htdocs/ as my root folder, and I renamed the wordpress file to mysite. right now the wordpress folder is in htdocs, is that where it’s supposed to be?
WPBeginner Support
That all looks correct, are you certain MAMP is running before you tried to visit that address?
Admin
Dan
How do I restart WP on my mac to continue working on my site, I can’t find any info on how to do that.
Thanks,
Dan
WPBeginner Support
You would need to run MAMP again for the site to be findable at the address if that is what you mean.
Admin
Andrew
Wow. SUPER COOL and kind of you to take the time to post. This website is fantastic. THANK THANK THANK YOU!
WPBeginner Support
Thank you, glad you like our guide
Admin
Rick Karlson
I got to the point where you instructed to copy the WordPress to the MAMP Document root folder, AND you gave not a clue as to just where that might be found on my mac mini.
I dug through the MAMP files and folders (post install) and can find nothing like you reference. My opinion is your instructions are, without this small piece of info, useless.
WPBeginner Support
Some users may have changed where it is installed but normally you should see your MAMP folder in your Applications folder.
Admin
Joan Houston
So the „MAMP Document root folder“ refers to the MAMP folder that got installed in the Applications folder? I, too, am confused by this.
WPBeginner Support
Correct
Peter Fritz Walter
Thanks for this comprehensive tutorial, it was very useful to me.
Peter
WPBeginner Support
Glad our guide could be helpful
Admin
Carrie
Oops! Looks like MAMP isn’t free anymore. I get as far as „Open WebStart Page“ only to be directed to the website to purchase.
WPBeginner Support
From taking a look, they bundled the pro and free versions together. You should still be able to run MAMP for free
Admin
Tabish Hyyat
Hey! Kindly update the article….can’t work out which thing is which……
anurag
thanks , it is really helpful
Oleg
Thanks! Worked well.
Andrea
Hi, thanks for the great post! I have MAMP installed since a WordPress training I took suggested it. Does having MAMP serve as a localhost for testing my site serve the same purpose as using a subdomain as a staging site? I’ve read your articles on the latter, and am trying to understand. I guess one difference would be that if I used the MAMP method, I would always have to use my Mac; if I used a subdomain and just made it private, I could test from any computer. Am I thinking of this correctly? Basically, I am a beginner planning to start a blog, and want to make sure I have a testing environment. Thanks!
WPBeginner Support
Hi Andrea,
Yes, using MAMP you can create websites on localhost. These websites will only be accessible only on your computer. A staging website is on a live server that can be accessed using any computer.
Admin
Stan
Be aware that with MAMP 4.1.1 and PHP 7.1.1, you will see phpMyAdmin grayed out. The solution is to go into MAMP click the PHP tab and change PHP to 7.0.15. Presto !
By default MAMP shows only two versions of PHP , so if you don’t see 7.0.15 on list then rename folders with PHP versions you don’t want to use in the Applications/MAMP/bin/php folder.
Tara
I have changed the database charset in creating database tables, now I can not view my wepage or even in wp-admin. How do you find the database names from MAMP on a mac to change the database name back? Thanks
Fannie
When I’m in „phpMyAdmin“, I don’t see the tab „databases“, neither all the other options in the menu. I just see a table (grey and purple)… Someone know what I did wrong ?
Laura
Is there a newer version of this tutorial to go along with the current version of MAMP? The screenshots here are very different. Also, the instructions to create the document root aren’t very clear – first you advise putting it in a new folder in the Documents folder (which I did), but then you make it seem like it’s supposed to be in the MAMP folder in the Applications folder! I can’t get my localhost page to come up… This is my folder tree thingy…
Macintosh HD\Applications\MAMP\htdocs\WEBSITES\name\wordpress
What should my localhost address be?
I’ve also tried putting the WordPress folder here…
Macintosh HD\users\me\documents\WEBSITES\name\wordpress
I’m very confused.
BP
From the MAMP webpage click „my website“, 2nd from the left on the menu.
That will take you to the localhost site.
lisa
were you able to find a new tutorial?
Apoorv
This is so helpful..!! Worked like a Charm.
Charles Bewlay
I installed everything – brilliant – and was working on installing a template from template vendor. It asked to select a Cherryframework zip file. I did and then everything went blank. I’ve not been able to see anything since. I realised I had selected the wrong Cherryframework file – not the one in the template folder but one from outside that I had downloaded earlier and just had in my „new website‘ folder.
I don’t really want to have to start from scratch. when I look at all my previous history I just get blank white pages.
Help!
Charles Bewlay
Many thanks guys, couldn’t have gone anywhere without you
Ed
I’m developing WordPress sites locally and then move it to a live server when i’m done. But when i start new projects locally I don’t really know how to handle the old files from previous work and databases?? Shall I just delete database, files and everything and start again??
Michael
Okay, so I setup my wordpress page using MAMP on my mac a few weeks ago and it was working and I was able to use edit the content. But going back to it now, I can’t seem to edit, just view my page. I start MAMP, go to the ‚WebStart Page‘, click ‚My Website‘ from the menu bar and choose my page. It loads, but I don’t see how I get to the WordPress editor??
Please help…
WPBeginner Support
We hope you have tried accessing your website’s admin area by visiting the URL:
http://localhost/wp-admin
This URL may differ depending on how you installed WordPress. Let’s suppose you installed it in a folder mysite, then your login URL would be.
http://localhost/mysite/wp-admin
Also check our guide on how to find your WordPress login URL.
Admin
Carolyn
It is unclear where to create the file below. I did not see this in MAMP or in the new window. If you are going to take people step by step in doing something, you need to be CLEAR!
Open a new browser window and type http://localhost/mysite. If you re-named the wordpress folder to something else, then use that name here. WordPress will notify you that it was unable to find wp-config.php file.
Click on Create a Configuration File button.
Create a Configuration file for WordPress in MAMP on Mac
M L Williams
I have everything installed and working, only I followed other instructions and didn’t use port 80. Plus I ended up using the default site htdocs inside Applications.
Is there a way I can have a do over, and reinstall everything the way you say to. I cannot may my site multisite, which was the whole reason I went down this rabbit hole.
Thanks so much for the article. It is well written and very helpful, just what I was looking for. Just wish I had found it first.
WPBeginner Support
Yes you can uninstall MAMP by simply visiting the Applications in Finder and then deleting MAMP.
Admin
Dee
Just wondering – what is the whole point of installing this on a MAC if we can work through the WordPress website? I’m trying to understand if I should bother downloading this onto my MAC or if it’s ok to just work through the regular website. Thanks.
Elisabeth Howlett
Very Helpful Article, from grateful person thinking that I would NOT be able to pull off MAMP then WordPress install. I actually did it!!!