Möchten Sie WordPress lokal auf Ihrem Windows-Computer installieren?
Die Arbeit mit WordPress auf Ihrem Computer ermöglicht es Ihnen, neue WordPress-Funktionen zu testen, zu lernen, wie man mit WordPress entwickelt, und Websites zu erstellen, bevor Sie sie auf den Live-Server migrieren.
In diesem Artikel zeigen wir Ihnen, wie Sie WordPress auf einem Windows-Computer mit zwei verschiedenen Methoden richtig installieren. Dies funktioniert unter Windows 8, Windows 10 und anderen Versionen von Windows.
Warum sollten Sie WordPress unter Windows installieren?
Die lokale Installation von WordPress auf Ihrem Computer bietet Ihnen eine Testumgebung, die sich nicht auf Ihre Live-Website oder Ihren Blog auswirkt. Eine WordPress-Installation auf Ihrem Computer wird auch als lokaler Server oder localhost bezeichnet.
Normalerweise verwenden WordPress-Entwickler eine lokale WordPress-Installation, um ihre WordPress-Plugins und -Themes zu entwickeln.
Anfänger können WordPress auch auf ihren Computern installieren, um WordPress zu erlernen, neue WordPress-Themes und Plugins zu testen und zu experimentieren, ohne dass eine Live-Website beeinträchtigt wird.
Hinweis: Wenn Sie WordPress lokal unter Windows installieren, sind Sie die einzige Person, die diese Website sehen kann.
Wenn Sie eine öffentlich zugängliche Website erstellen möchten, benötigen Sie einen Domainnamen und ein Webhosting. Wir empfehlen Ihnen, dieser Anleitung zu folgen, um einen WordPress-Blog zu erstellen.
Werfen wir also einen Blick darauf, wie man WordPress auf einem Windows-Computer richtig installiert. Wir zeigen Ihnen 2 einfache Wege. Klicken Sie auf den Link unten, um zu dem Abschnitt zu springen, der Sie interessiert:
- Methode 1: Installieren von WordPress auf Windows mit Local WP
- Methode 2: Installieren von WordPress unter Windows mit WampServer
WordPress unter Windows mit Local WP installieren
Local WP, früher bekannt als Local by Flywheel, ist eine lokale Websoftware, mit der Sie eine Website auf Ihrem Computer hosten können, anstatt auf einem Staging- oder Live-Server.
Zunächst müssen Sie die Local WP-Software herunterladen und auf Ihrem Windows-Computer installieren. Gehen Sie einfach auf die Local WP-Website und klicken Sie auf die Schaltfläche „Download for Free“.
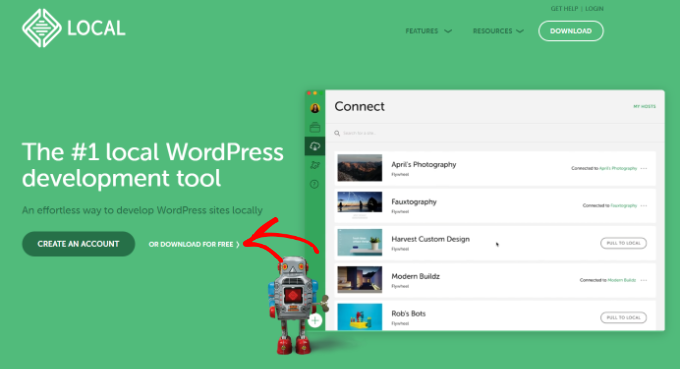
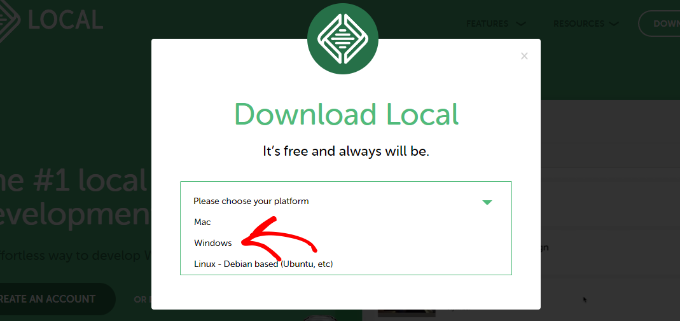
Daraufhin erscheint ein Popup-Fenster, in dem Sie Ihre Plattform auswählen müssen.
Wählen Sie aus dem Dropdown-Menü „Windows“ aus.
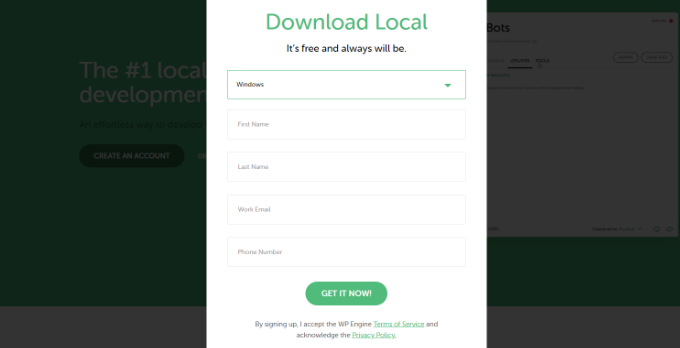
Als Nächstes können Sie Ihre Daten wie Vor- und Nachname, Arbeits-E-Mail-Adresse und Telefonnummer eingeben, um die Software herunterzuladen.
Nach Eingabe der Daten klicken Sie einfach auf die Schaltfläche „Jetzt anfordern“.
Danach können Sie die Software auf Ihren Computer herunterladen. Sobald sie heruntergeladen ist, starten Sie den Einrichtungsassistenten.
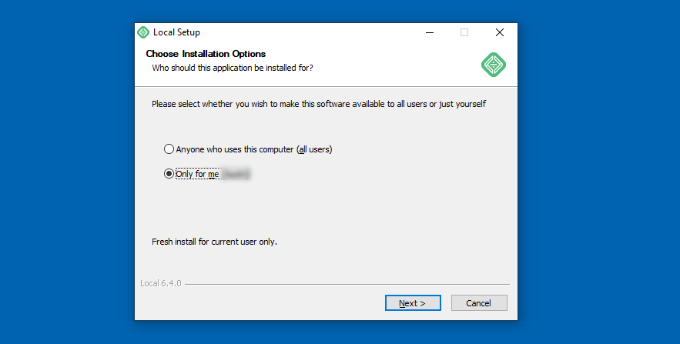
Nun müssen Sie auswählen, ob Sie die Software für alle Benutzer oder nur für sich selbst installieren möchten. Sobald Sie eine Option ausgewählt haben, klicken Sie auf die Schaltfläche „Weiter“.
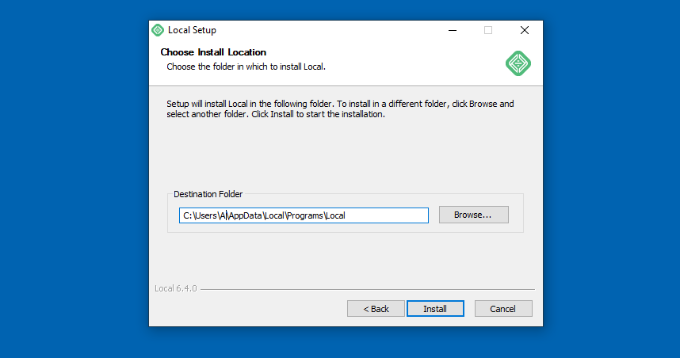
Im nächsten Schritt können Sie den „Zielordner“ auswählen, in dem die Software installiert werden soll.
Klicken Sie einfach auf die Schaltfläche „Durchsuchen“, um den Pfad festzulegen, und klicken Sie dann auf die Schaltfläche „Installieren“.
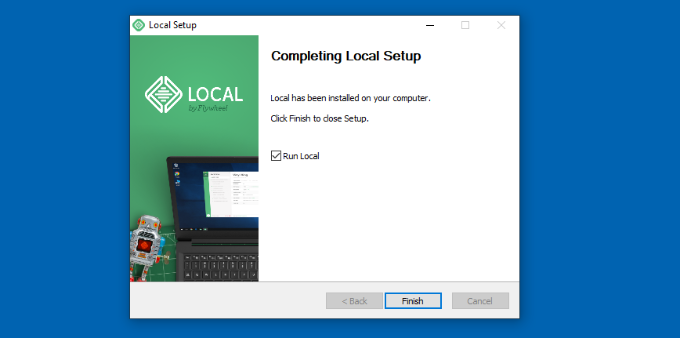
Die Local WP-Software wird nun auf Ihrem Windows-Computer installiert.
Anschließend können Sie das Kontrollkästchen „Lokal ausführen“ aktivieren und im Einrichtungsassistenten auf die Schaltfläche „Fertig stellen“ klicken.
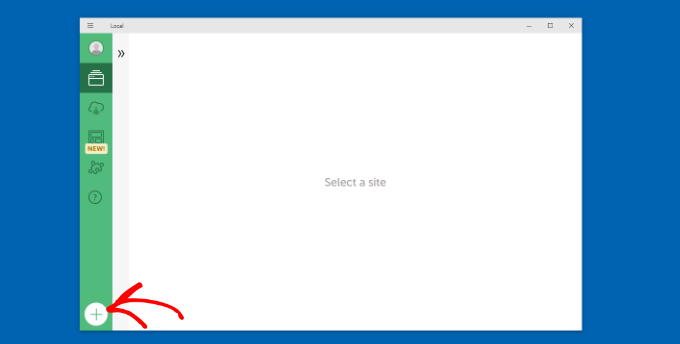
Die Software wird nun auf Ihrem Windows-Gerät gestartet.
Der nächste Schritt besteht darin, eine neue lokale Website hinzuzufügen. Klicken Sie dazu einfach auf das Pluszeichen (+) am unteren Rand.
Danach können Sie eine Website in der lokalen Software erstellen.
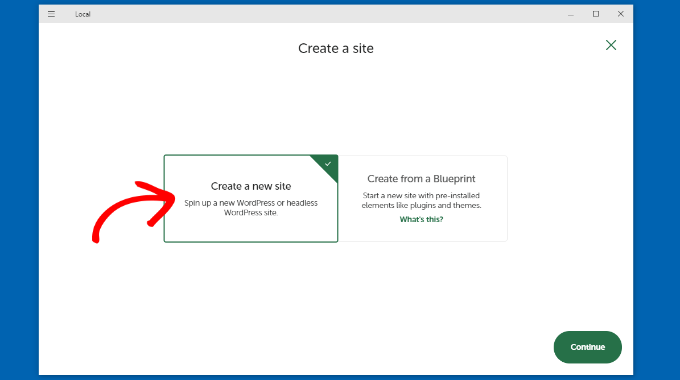
Wählen Sie die Option „Neue Website erstellen“ und klicken Sie auf die Schaltfläche „Weiter“.
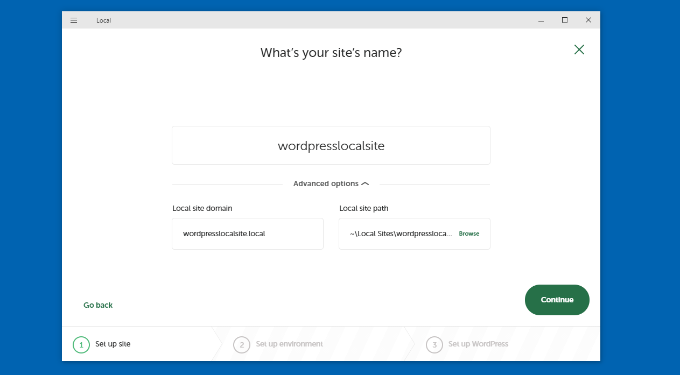
Als nächstes können Sie einen Namen für Ihre lokale Website eingeben, z. B. wordpresslocalsite.
Es gibt auch erweiterte Optionen, bei denen Sie die lokale Site-Domäne und den lokalen Site-Pfad eingeben können. Wenn Sie gerade erst anfangen, empfehlen wir Ihnen, die Standardeinstellungen beizubehalten.
Wenn Sie fertig sind, klicken Sie einfach auf die Schaltfläche „Weiter“.
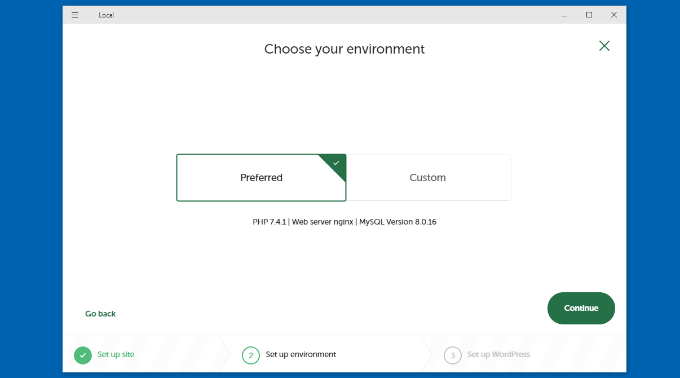
Danach müssen Sie eine Umgebung für Ihre lokale Website auswählen.
Sie können die „bevorzugte“ Umgebung verwenden, in der die Software automatisch die PHP-Version, den Webserver und die MySQL-Version auswählt. Andererseits können Sie auch „Benutzerdefiniert“ wählen und die Umgebungsdetails eingeben.
Für dieses Lernprogramm verwenden wir die bevorzugten Einstellungen und klicken auf die Schaltfläche „Weiter“.
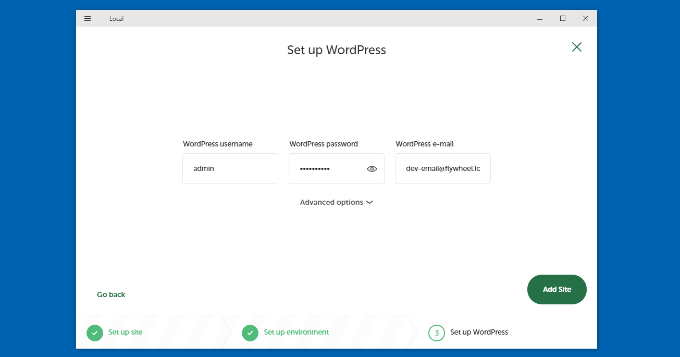
Als nächstes können Sie einen WordPress-Benutzernamen und ein Passwort für Ihre lokale Website eingeben. Außerdem haben Sie die Möglichkeit, eine WordPress-E-Mail-Adresse auszuwählen, an die Sie alle E-Mail-Benachrichtigungen erhalten werden.
Es gibt auch eine erweiterte Option, bei der die Software fragt, ob Sie ein WordPress-Multisite-Netzwerk haben.
Nachdem Sie diese Angaben eingegeben haben, klicken Sie einfach auf die Schaltfläche „Website hinzufügen“.
Die Software wird nun WordPress installieren und Ihre Website einrichten.
Um die lokale Website zu starten, klicken Sie in der Software auf die Schaltfläche „WP Admin“.
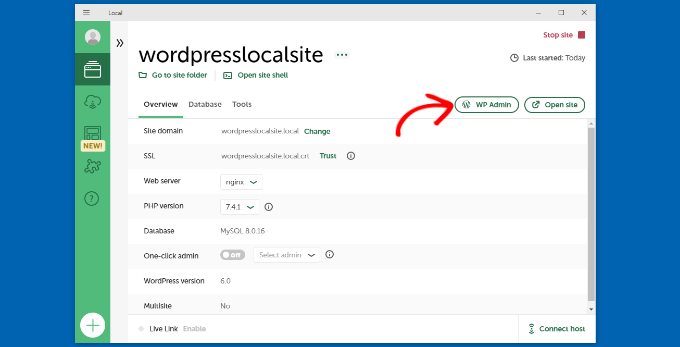
Als nächstes sehen Sie die Anmeldeseite für den WordPress-Admin.
Geben Sie einfach den Benutzernamen und das Kennwort ein, die Sie zuvor bei der Einrichtung der lokalen Website eingegeben haben, und klicken Sie dann auf die Schaltfläche „Anmelden“.
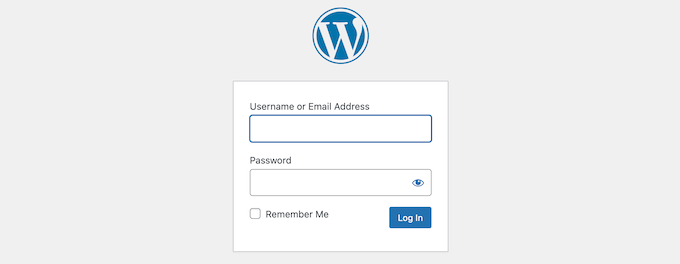
Sie können nun Ihre lokale Website auf Ihrem Windows-Computer bearbeiten.
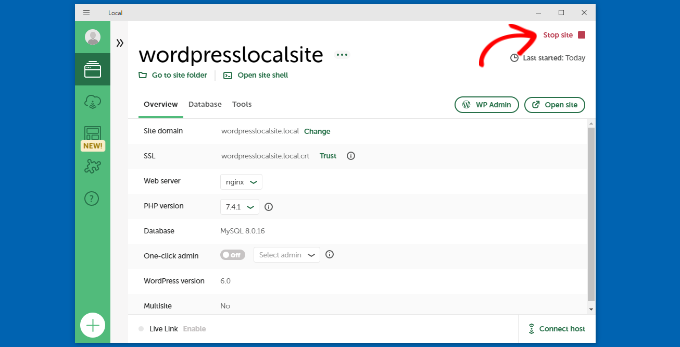
Wenn Sie fertig sind, vergessen Sie nicht, die Website von der Local WP Software zu stoppen, indem Sie auf die Schaltfläche „Stop site“ klicken.
WordPress auf Windows mit WampServer installieren
WampServer oder WAMP ist eine Zusammenstellung von Apache-Webserver, PHP und MySQL, die für Windows-Computer gebündelt ist.
Bei allen handelt es sich um separate Open-Source-Software. Sie separat zu installieren ist jedoch selbst für erfahrene Benutzer nicht ganz einfach. Mit einer Software wie WampServer können Sie sie einfach installieren und haben innerhalb von Minuten eine funktionierende lokale Umgebung.
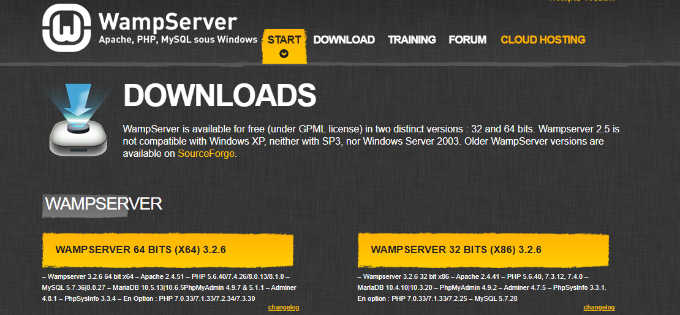
Zunächst müssen Sie die WAMP-Software herunterladen und auf Ihrem Computer installieren. Gehen Sie einfach auf die WampServer-Website und klicken Sie auf die Schaltfläche „Start Using WampServer“.
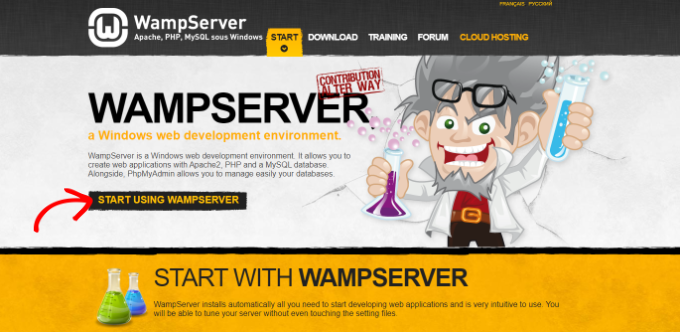
Sie gelangen dann in den Download-Bereich. Hier sehen Sie zwei Versionen: WampServer 32 bits und WampServer 64 bits.
Sie müssen die WampServer-Version auswählen, die dem Betriebssystemtyp Ihres Windows-Computers entspricht.
Um herauszufinden, ob Sie ein 32- oder 64-Bit-Betriebssystem verwenden, suchen Sie einfach nach „Systemsteuerung“ in der Suchleiste in der Start-Taskleiste.
Danach können Sie auf Ihrem Computer zu System und Sicherheit “ System gehen. Dort können Sie Ihren Systemtyp sehen.
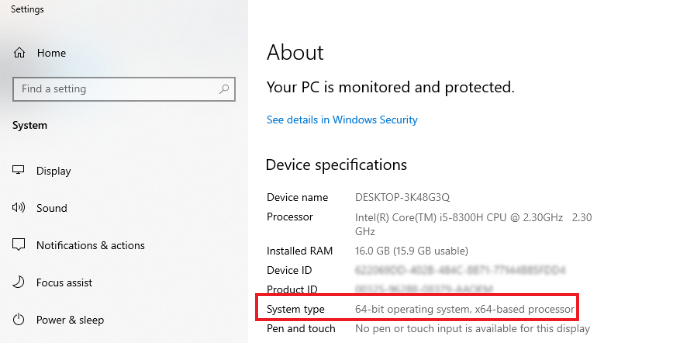
Da Sie nun den Typ Ihres Windows-Betriebssystems kennen, wählen Sie einfach die richtige WampServer-Softwareversion aus.
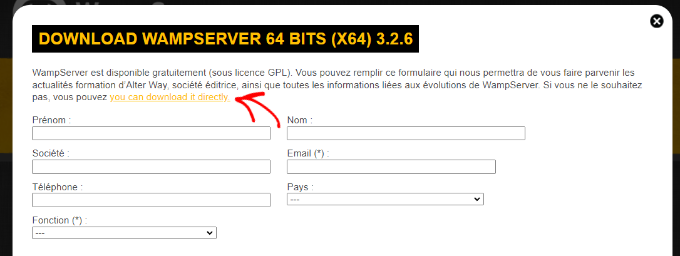
Wenn Sie auf die Schaltfläche „Herunterladen“ klicken, wird ein Formular geöffnet, in dem Sie nach Ihren persönlichen Daten gefragt werden. Wenn Sie diese Informationen nicht angeben möchten, klicken Sie einfach auf den Link „Sie können es direkt herunterladen“.
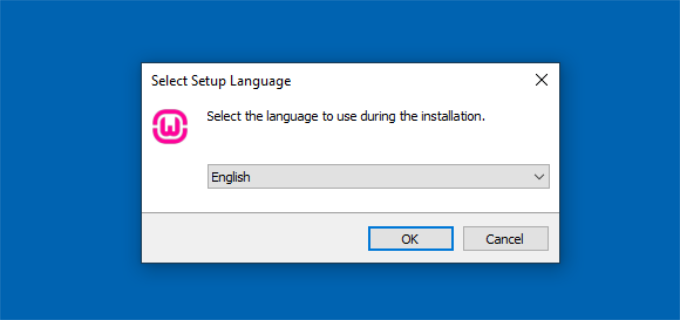
Nach dem Download können Sie auf die Ausführungsdatei von WampServer klicken, um die Installation zu starten.
Wählen Sie nun eine Sprache aus dem Dropdown-Menü und klicken Sie auf die Schaltfläche „OK“.
Im nächsten Schritt wird Ihnen die Lizenzvereinbarung angezeigt.
Wählen Sie die Option „Ich akzeptiere die Vereinbarung“ und klicken Sie auf die Schaltfläche „Weiter“.
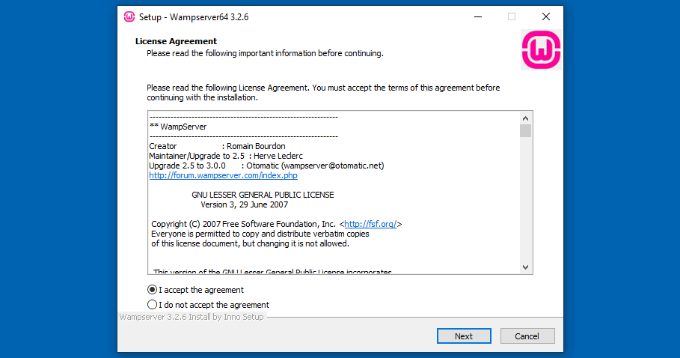
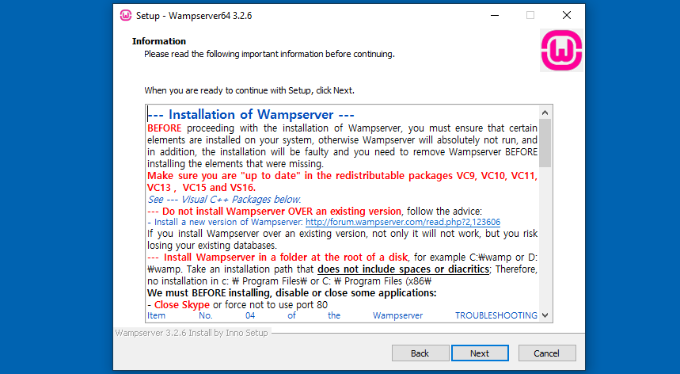
Danach zeigt der Setup-Assistent Informationen über die WampServer-Installation an.
Sie können einfach auf die Schaltfläche „Weiter“ klicken, um fortzufahren.
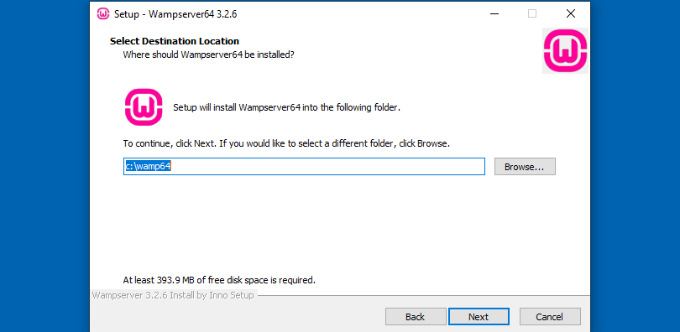
Als Nächstes können Sie den Speicherort auswählen, an dem die Software installiert werden soll.
Um den Standardspeicherort zu ändern, klicken Sie auf die Schaltfläche „Durchsuchen“ und wählen Sie den gewünschten Ordner. Wenn Sie fertig sind, klicken Sie auf die Schaltfläche „Weiter“.
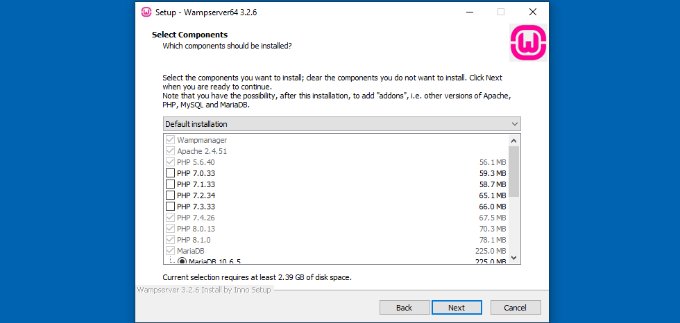
Der Setup-Assistent fordert Sie auf, verschiedene Komponenten auszuwählen, die Sie installieren möchten. Dazu gehören die PHP-Versionen, MySQL-Versionen und mehr.
Sie können auch die Standardoptionen beibehalten und auf die Schaltfläche „Weiter“ klicken, um fortzufahren.
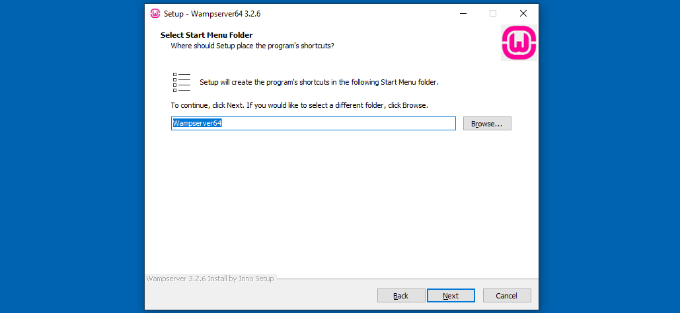
Als nächstes können Sie einen Startmenü-Ordner auswählen. Klicken Sie auf die Schaltfläche „Durchsuchen“, um einen anderen Ordner auszuwählen.
Sobald Sie einen Ordner ausgewählt haben, klicken Sie auf die Schaltfläche „Weiter“, um fortzufahren.
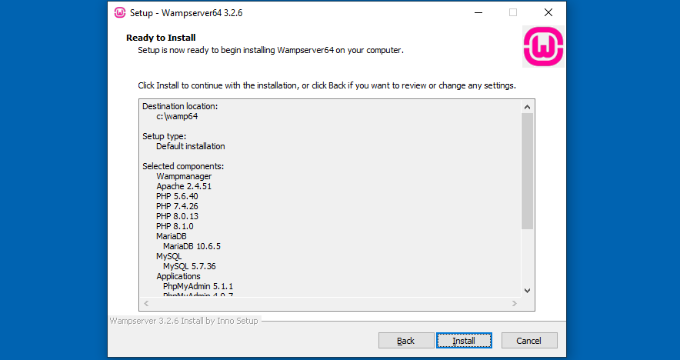
Die Software ist nun bereit für die Installation. Sie können eine Zusammenfassung des Zielorts, des Installationstyps, der ausgewählten Komponenten und mehr sehen.
Klicken Sie nun auf die Schaltfläche „Installieren“.
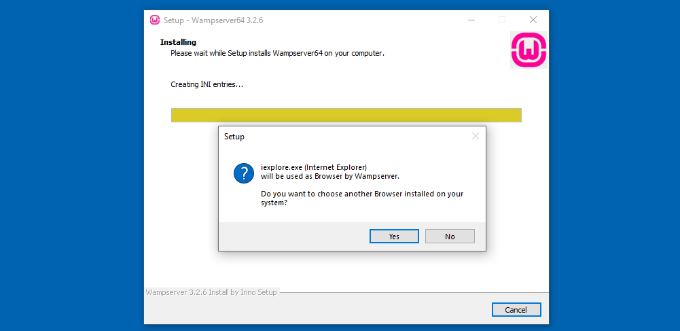
Während des Installationsvorgangs müssen Sie den Speicherort des Webbrowsers festlegen. Standardmäßig ist dies der Internet Explorer.
Sie können ihn in Google Chrome oder einen anderen Webbrowser ändern, indem Sie ihn in den Programmdateien Ihres Computers suchen.
Ebenso werden Sie gefragt, ob Sie Notepad verwenden möchten, wenn Sie WampServer benutzen.
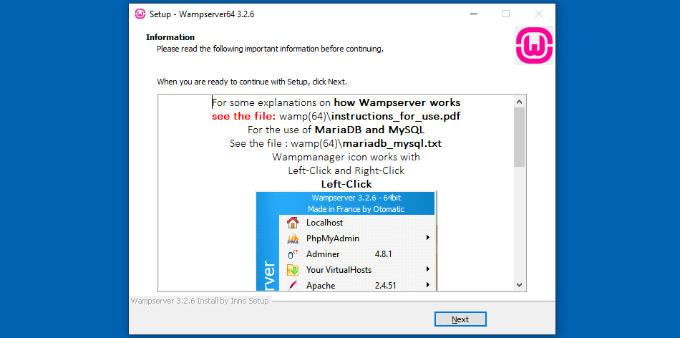
Danach zeigt der Einrichtungsassistent Informationen über die Funktionsweise von WampServer an.
Klicken Sie nun auf die Schaltfläche „Weiter“.
Sie haben nun WampServer erfolgreich auf Ihrem Windows-Gerät installiert.
Klicken Sie einfach auf die Schaltfläche „Fertig stellen“, um den Einrichtungsassistenten zu beenden.
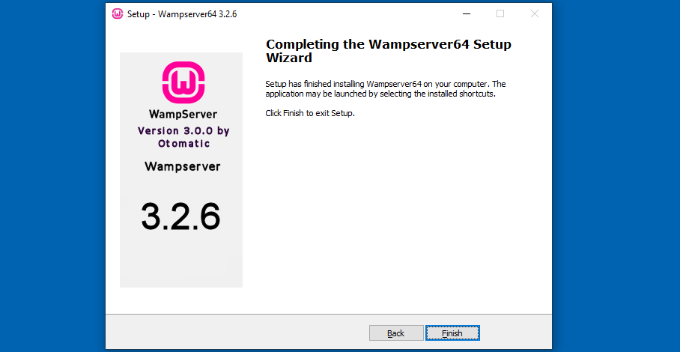
Nach der Installation können Sie den WampServer über Ihre Desktop-Verknüpfung oder über das Zielverzeichnis, in das Sie die Software installiert haben, starten.
Als nächstes müssen Sie eine leere MySQL-Datenbank erstellen.
Wenn Sie WampServer starten, sehen Sie ein grünes Symbol in der unteren rechten Ecke Ihres Bildschirms zusammen mit anderen Symbolen. Klicken Sie einfach mit der linken Maustaste darauf und dann auf phpMyAdmin (eine webbasierte Anwendung zur Verwaltung von MySQL-Datenbanken).
Hinweis: Wenn das WampServer-Symbol rot oder gelb ist, dann bedeutet dies, dass die Dienste (Apache, MySQL, PHP) nicht laufen. Sie müssen die Dienste starten, indem Sie auf das Symbol klicken, bevor Sie die Datenbank einrichten.
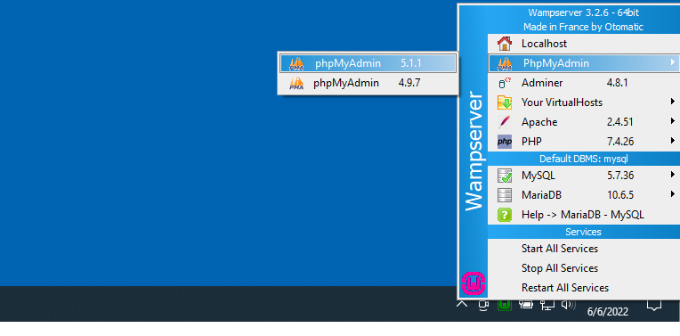
Sie gelangen dann zum phpMyAdmin-Anmeldebildschirm in Ihrem Webbrowser.
Geben Sie einfach den Benutzernamen: root ein und lassen Sie das Passwortfeld leer. Dies sind die Standard-Anmeldedaten für die Anmeldung bei Ihrem localhost phpMyAdmin.
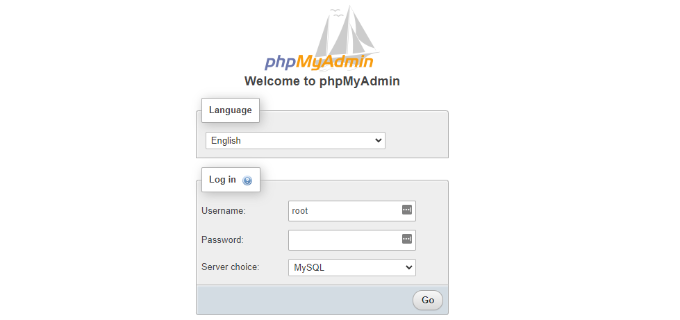
Klicken Sie auf die Schaltfläche „Go“, um fortzufahren.
Sobald Sie eingeloggt sind, müssen Sie in phpmMyAdmin auf Datenbanken klicken, um eine neue Datenbank für WordPress zu erstellen.
Sie werden aufgefordert, einen Namen für Ihre neue Datenbank zu wählen (wir nannten unsere test_db). Klicken Sie anschließend auf die Schaltfläche „Erstellen“.
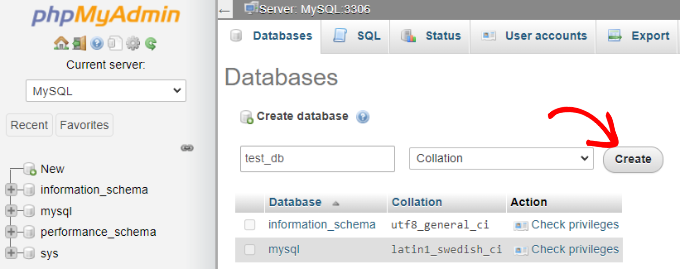
Ihre Datenbank ist fertig, d.h. Sie können WordPress jetzt auf dem lokalen Rechner installieren.
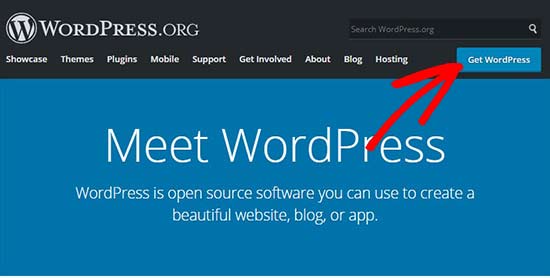
Als Nächstes müssen Sie die neueste Version von WordPress von der Website WordPress.org herunterladen. Sie wird als Zip-Datei heruntergeladen.
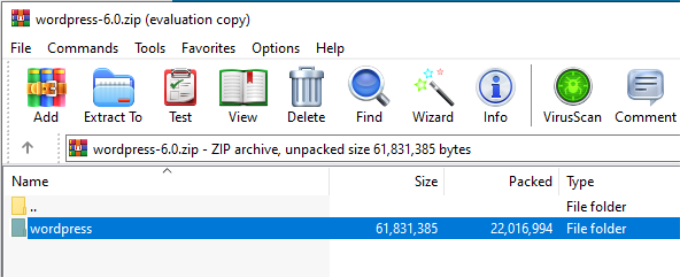
Als Nächstes müssen Sie die Zip-Datei entpacken und den Ordner „wordpress“ kopieren.
In diesem Tutorial verwenden wir WinRAR zum Entpacken der Datei. Klicken Sie einfach oben auf die Option „Entpacken nach“.
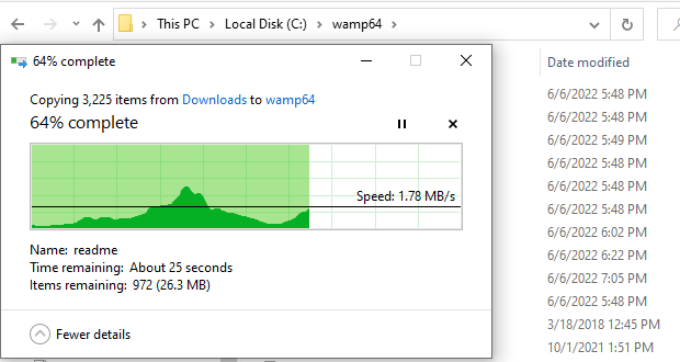
Nun müssen Sie zu dem Ordner navigieren, in dem Sie WAMP installiert haben.
In diesem Lernprogramm haben wir WAMP unter C:\wamp64 installiert, daher werden wir uns im Folgenden auf diesen Ordner beziehen. Beachten Sie jedoch, dass dies bei Ihnen anders sein kann, je nachdem, wo Sie das Programm installiert haben.
Fügen Sie den Ordner „wordpress“ in den Ordner C:\wamp64\www ein.
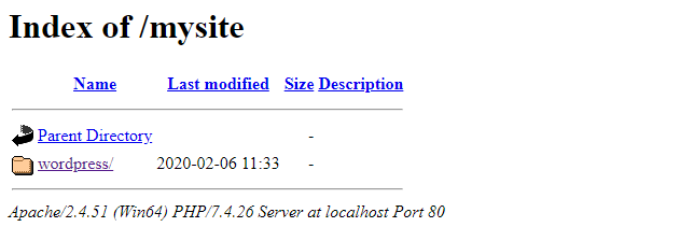
Sie können den Ordner „wordpress“ nach Belieben umbenennen, z. B. mysite, testsite usw. Dies wird die URL Ihrer lokalen WordPress-Site sein. Wählen Sie also eine Adresse, die Sie sich leicht merken können.
Für die Zwecke dieses Tutorials haben wir den Ordner von wordpress in mysite umbenannt.
Als Nächstes können Sie den Webbrowser öffnen, zu http://localhost/mysite/ gehen und auf den Ordner „wordpress“ klicken.
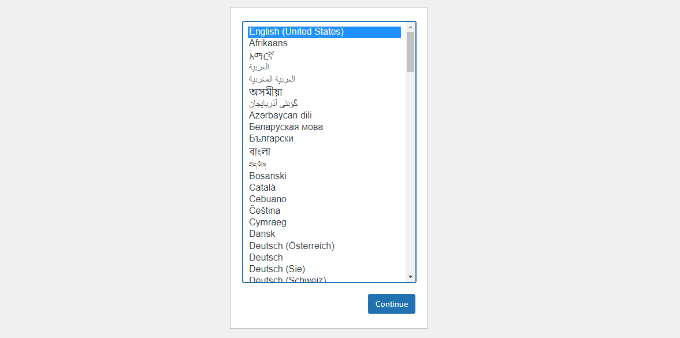
Zunächst werden Sie aufgefordert, eine Sprache auszuwählen, und dann werden Ihnen die Informationen zur Einrichtung der Datenbank angezeigt.
Nachdem Sie eine Sprache ausgewählt haben, klicken Sie auf die Schaltfläche „Weiter“.
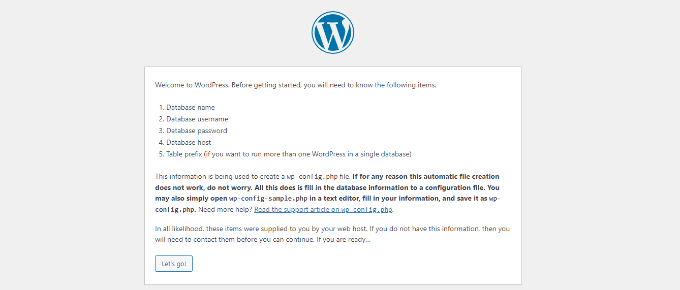
Als Nächstes sehen Sie einen Willkommens-Hinweis für WordPress.
Wenn Sie sie sorgfältig gelesen haben, klicken Sie auf die Schaltfläche „Los geht’s“, um fortzufahren.
Danach müssen Sie Ihre Datenbankdetails wie Datenbankname, Benutzername, Passwort, Host und Tabellenpräfix eingeben.
Der Name der Datenbank ist der, den Sie im vorherigen Schritt eingegeben haben. In unserem Fall haben wir sie „test_db“ genannt. Der Benutzername ist „root“, und das Passwortfeld können Sie leer lassen. Sie können auch den Datenbank-Host und das Tabellenpräfix unverändert lassen.
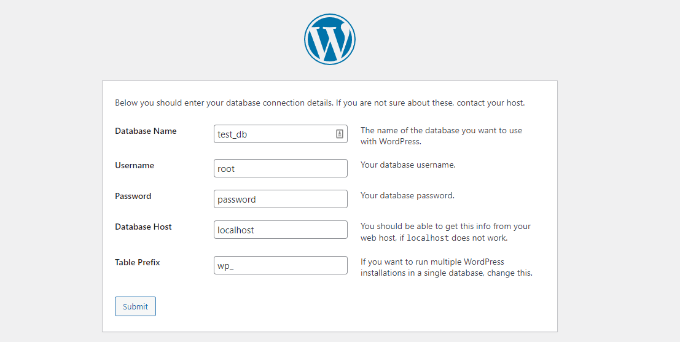
Klicken Sie anschließend auf die Schaltfläche „Absenden“, und WordPress wird im Backend eine Konfigurationsdatei für Sie erstellen.
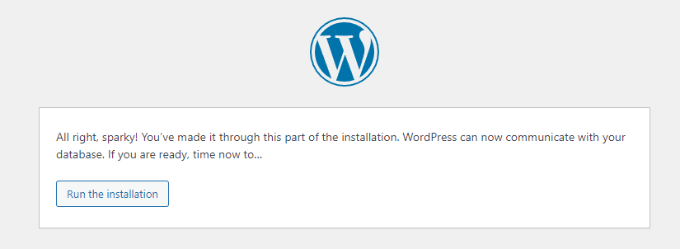
Auf dem nächsten Bildschirm sehen Sie eine Erfolgsmeldung, die besagt, dass WordPress mit Ihrer Datenbank verbunden ist, und Sie können mit der Installation fortfahren.
Klicken Sie auf die Schaltfläche „Installation ausführen“, um fortzufahren.
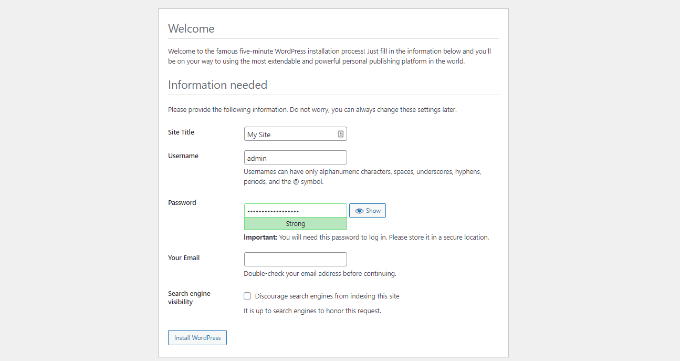
Sie werden zum Willkommensbildschirm für WordPress weitergeleitet. Sie müssen einen Titel für Ihre neue WordPress-Website hinzufügen, einen Administrator-Benutzernamen wählen, ein sicheres Passwort eingeben und eine Administrator-E-Mail-Adresse angeben.
Sobald Sie bereit sind, klicken Sie auf die Schaltfläche „WordPress installieren“.
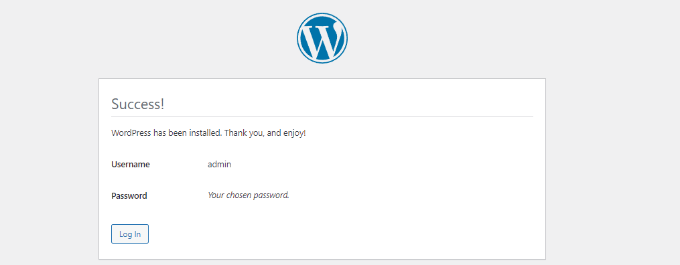
Nachdem der Installationsvorgang abgeschlossen ist, wird eine Erfolgsmeldung angezeigt. Im Hintergrund hat WordPress neue Tabellen in Ihrer Datenbank erstellt und ist nun einsatzbereit.
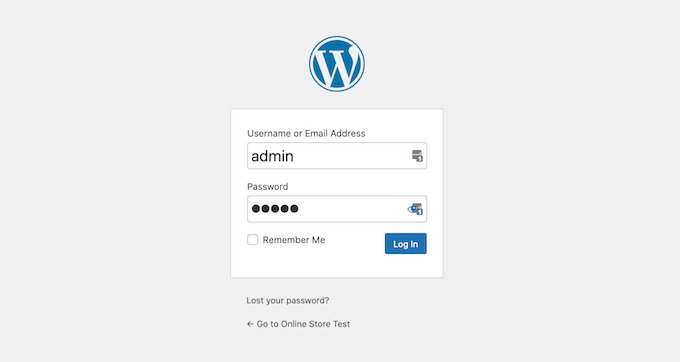
Sie können dann zu Ihrem WordPress-Dashboard gehen, indem Sie auf die Schaltfläche „Anmelden“ klicken.
Herzlichen Glückwunsch, Sie haben WordPress mit WampServer erfolgreich auf einem Windows-Computer installiert.
Loggen Sie sich einfach in Ihr WordPress-Administrationspanel ein und beginnen Sie mit der Bearbeitung Ihrer Website in einer lokalen Umgebung.
Aktivieren von Pretty Permalinks in WAMP
Die neue Version von WordPress macht Ihre lokale Website nicht kaputt, indem sie die Permalinks-Einstellung ändert.
Wenn Sie jedoch immer noch die Fehlermeldung „Seite nicht gefunden“ auf Ihren Seiten sehen, nachdem Sie die Permalinks unter Einstellungen “ Permalinks in WordPress geändert haben, dann folgen Sie einfach unserer Anleitung, wie Sie benutzerdefinierte Permalinks in WAMP aktivieren.
Bonus: WordPress von lokal nach live migrieren
Wir haben auch einen separaten Leitfaden für den Umzug von WordPress vom lokalen Server auf eine Live-Site geschrieben. Hoffentlich finden Sie ihn hilfreich, wenn Sie bereit sind, Ihre lokale Website in die Produktion zu überführen.
Eine lokale Serverumgebung ist für Lern- und Testzwecke ideal. Wenn Sie jedoch einen WordPress-Blog starten möchten, den andere Leute sehen können, dann müssen Sie WordPress nicht auf Ihrem Computer installieren. Sie müssen WordPress bei einem WordPress-Hosting-Anbieter installieren.
Wir hoffen, dass dieser Artikel Ihnen geholfen hat, WordPress auf einem Windows-Computer zu installieren. Vielleicht interessiert Sie auch unser Leitfaden zu WordPress-SEO und wie man einen Online-Shop eröffnet.
Wenn Ihnen dieser Artikel gefallen hat, dann abonnieren Sie bitte unseren YouTube-Kanal für WordPress-Videotutorials. Sie können uns auch auf Twitter und Facebook finden.


Syed Balkhi says
Hey WPBeginner readers,
Did you know you can win exciting prizes by commenting on WPBeginner?
Every month, our top blog commenters will win HUGE rewards, including premium WordPress plugin licenses and cash prizes.
You can get more details about the contest from here.
Start sharing your thoughts below to stand a chance to win!
Moinuddin Waheed says
This is the best method for anyone who just want to learn and gets hands dirty before actually making a big debut in the WordPress industry.
I have used both the methods local by flywheel and wampserver for local installation of WordPress.
I have also used xampp server for wordpress installation and have experimented with many themes and plugins.
Konrad says
Everything went smoothly, no issues with installation, thanks to the simple yet effective guide. Much appreciated!
WPBeginner Support says
Glad to hear it worked for you
Admin
saajina says
Hi. i am new to WordPress and i am trying to install WampServer. i downloaded WampServer from the link you mentioned above. and i tried to install after download , i choose english language after that i accepted the agreement. after that when i click on the next button to install a pop come by saying this installation can only work if the above vc++ package is installed ……. and please cancel the installation . i don’t know what to do next. please help me
WPBeginner Support says
It would depend on which VC++ package is missing but you should be able to go to the Microsoft website and search for the Visual C++ library that WAMP needs to download and install it.
Admin
Jiří Vaněk says
Thank you for the guide. Usually, I’ve always tested WordPress, for instance, on services like instawp.com, or I’ve set up everything myself in some virtualization tool on a Linux distribution. This looks quite simple.
WPBeginner Support says
Glad you found this a helpful option
Admin
sieutonghop says
Is Local WP website data guaranteed?
WPBeginner Support says
I don’t think I understand what you’re asking, the files and your content are stored on your computer.
Admin
kiemtienspeed says
If using Local WP, where will the website data be saved? Can you explain more clearly?
WPBeginner Support says
The data would be stored in the database and the files would be saved in the site’s folder.
Admin
Jiří Vaněk says
It’s practically the same as with WordPress on shared hosting. The database can then be exported via PHPMyAdmin, and data via an FTP client (FTP data is stored in a folder locally on the computer). Alternatively, a migration plugin can be used, just like on the server.
Koweh says
Hi, please is the a video explainable for the above steps to install Install WordPress on Windows Using WampServer?
WPBeginner Support says
Not at the moment but we will consider that for future videos!
Admin
M Sohail says
this article is very helpful to me.
Thanks to all Team
WPBeginner Support says
Glad to hear our post was helpful!
Admin
Danielle says
Hi, very helpful article. How would you do this for an existing WordPress site? (I’m hosting on Hostinger and selected WordPress to construct my site). I already have a domain name and login for WordPress as well.
WPBeginner Support says
To move a currently active site to a locally installed WordPress site, you would want to take a look at our guide below!
https://www.wpbeginner.com/wp-tutorials/how-to-move-live-wordpress-site-to-local-server/
Admin
Joseph Lewinski says
Fabulous instruction set. I installed WAMP Server simply and without a hitch. There was only one very minor „glitch“ in your instructions, which were easy enough to figure out. When the instructions explain the installation of WordPress proper, it says, „Paste the ‚wordpress‘ folder into the C:\wamp64\www folder.“, but the IMAGE shows you installing it into the C:\wamp64 folder. Like I said, easy enough to figure out (I used your WORDS, NOT the IMAGE).
THANK YOU for this! I’m subscribing NOW!
WPBeginner Support says
Glad our guide was helpful and thank you for pointing that out!
Admin
Duncan Philps-Tate says
Hi useful article. The only thing I’m aware of not seeing is anything about when to use Local WP and when to use WAMP. Now I’ve got a choice and I don’t know which is better for me.
Local WP sounds more straightforward and with less to do – but the test doesn’t say whether it also installs Apache, PHP, MySQL (which the WAMP text does say).
On the other hand, WAMP sounds like you have to do more getting it going (just compare the number of paragraphs it needs) but apart from (possibly) adding choice over Apache, PHP, MySQL, what does it give you that Local WP doesn’t?
Hope you can answer this easily.
WPBeginner Support says
WAMP has been around longer and was our original recommendation, Local WP was created to make it easier for those just starting out and both will install what is needed to run a WordPress site on your computer.
Admin
Duncan Philps-Tate says
Thanks – useful
Seyi says
Thanks for this… really helpful
WPBeginner Support says
Glad our article was helpful!
Admin
Kylie says
I have installed wampserver and have a green light. When I right click I can not find any button called phpadmin. And when I type localhost/phpadmin in my browser I am getting this message.
The requested URL was not found on this server.
Apache/2.4.51 (Win64) PHP/7.4.26 Server at localhost Port 80
WPBeginner Support says
You would want to left-click on WAMP’s icon for phpmyadmin, when you go through that route it should show what your URL is set to if it is not properly set under localhost.
Admin
Layla says
I’ve done this and started work on one pc but this now needs to go for repair and will be away a while. If I am to install this on a second pc, what files do I need to transfer over so I can continue working on the same website on the other pc? Feeling a bit dumb here that I can’t figure it out myself.
WPBeginner Support says
We would recommend following our guide below for transferring your site to a different computer to continue working on it. While the article is for live sites, the method should still work for your local installation.
https://www.wpbeginner.com/wp-tutorials/how-to-move-live-wordpress-site-to-local-server/
Admin
Layla says
Thank you so much! That worked perfectly and was so simple!
WPBeginner Support says
Glad we could help!
Renata says
I installed Wamp Server and C++ Redistributable 2012, 2013 and 2015 but when I try to open it it opens 4 black windows and then it shuts down. What should I do
WPBeginner Support says
You would want to check in the bottom right with your hidden icons, WAMP does not have a window pop up by default but would add an icon there for your options with WAMP
Admin
Hosea says
Straightforward and to the point guide. Followed it and achieved exactly what I wanted. Great and helpful write-up.
WPBeginner Support says
Glad you found our guide helpful
Admin
Ibrahim Yusuff says
Thanks for this invaluable guide. The issue of having is with the wamp download. The language is in French and each time i try to change it it goes back to french which i do not understand. i filled all the necessary information but to click on download it changes back to french. pls help me out on this
WPBeginner Support says
They currently have a popup that is French when selecting the file to download but at the end of the first paragraph you should see a link to download directly without having to deal with the popup
Admin
prilla kobugabe says
hello, i need some help. when i put this localhost/mysite/ in my web browser it responds negatively saying
„The requested URL was not found on this server.
Apache/2.4.41 (Win64) PHP/7.3.12 Server at localhost Port 80“
WPBeginner Support says
If you have restarted your computer since installing WAMP you would want to ensure that WAMP is running as that is the most common cause of that specific error.
Admin
Ronnie Ferrer says
You are legend guys! Thanks.
Francis Guchie says
Thank you so much for this very nice article for beginners
prakoo says
api-ms-win-crt-string-l1-1-0.dll is missing from your computer it shows error?
WPBeginner Support says
You would want to ensure you install Visual C++ Pro for the most common solution to that error.
Admin
Melissa says
Hi – I have WAMP installed locally on my Windows 10 machine running PHP version: 7.3.12. I want to upgrade to PHP 7.4 – do I need to reinstall WAMP or can I update PHP separately?
WPBeginner Support says
You would want to click on the WAMP icon, and check under PHP, Version and depending on when you installed WAMP there should be the option to change versions by clicking on the version you want to use.
Admin
melissa says
thanks – this was perfect advice!
Holly says
Thanks for this article! It is the best and most straight-forward one I’ve come across, it’s very helpful and detailed. Keep up the great work! As a beginner, I really appreciate it.
WPBeginner Support says
Glad you found our guide helpful
Admin
Jules Ivan says
This is awesome! Thank you for making this article!
WPBeginner Support says
Glad you found our guide helpful
Admin
Ben says
While installing, I got a System error that says “The code execution cannot proceed because MSVCR120.dll was not found. Reinstalling the program may fix this problem'“
How can I get this done please
WPBeginner Support says
You need to install Visual C++ Redistributable that we link to in the article
Admin
Diya says
I have installed wordpress in wamp and completed my first website. I have got another project now. So for the second website how should I start?Should I install wordpress again in a second „mysite2“ folder?
WPBeginner Support says
You can certainly do that for the most common method for creating a new site.
Admin
saheed says
im receiving myssqld.exe- system error. how do i fix it
WPBeginner Support says
You would want to ensure you installed Visual C++ Redistributable
Admin
Tom Bauer says
WAMP64 will not install on a win7 64 machine.
WPBeginner Support says
Unless we hear otherwise, you can install it on Windows 7 still, depending on the error you are running into, you may need to reach out to WAMP’s support.
Admin
Paul says
Great instructions, thanks.
Everything installed fine, just have a problem this morning in trying to log into the browser. Every setting I have tried hasn’t worked.
I know I am being thick but could you confirm what I should be typing in the browser to access the program.
Thanks
WPBeginner Support says
As we state in the article, it should be something similar to localhost/mysite. You would also want to ensure WAMP is running for the most common reason for that issue.
Admin
Peter says
I was having similar issue as others. All went well until I got to the point with Apache not running. The issue was with Port 80 it was used by something else (not skype) so I went to Tools > Use other port than 80 I added the port 8080. Then it all worked however then when you want to access your website you can’t use localhost/mysite/ but localhost:8080/mysite/ since you changed the default port.
I didn’t find this in the comments. Maybe it will help someone.
WPBeginner Support says
Thanks for sharing what helped you with this issue
Admin
Bas says
Hi, thanks for the tutorial. I completed it, and it works like a charm. But now my question is: how do I get my „real“ live website data in the local test environment? Is there some way to export that and import it into the local test environment?
WPBeginner Support says
For that, you would want to take a look at our article below:
https://www.wpbeginner.com/wp-tutorials/how-to-move-live-wordpress-site-to-local-server/
Admin
Mahima Pandey says
here i have downloaded the wordpress file and done everything according to the given instruction . but lastly stuck in the localhost address bar
localhost/servername in the internet explore has to be typed to get to wordpress. but what to be type for google ,firefox. pls lhelp me with this its really urgent.
WPBeginner Support says
You should be able to type that same address on any internet browser to see the site on your local computer. If you wanted to have your site found online, you would want to look into a domain and hosting provider.
Admin
Konstantinos Paturas says
Thank you so much.
WPBeginner Support says
You’re welcome
Admin
Armel says
Thanks for this useful article. I successfully installed WordPress using Wamp. But, I get this message. „Installation failed: there has been a critical error on your website. Please check your site admin email inbox for instructions. Learn more about debugging in WordPress.“
Please, how can i fix it ?
WPBeginner Support says
For that error, you would want to take a look at our article below:
https://www.wpbeginner.com/wp-tutorials/how-to-fix-the-wordpress-white-screen-of-death/
Admin
Hoat Le says
Dear WPBeginner Support;
I read your tut very carefully, and didn’t see you mention about VirtualHost in WampServer, so I don’t know if I have to create a Virtual Host for my test site.
WPBeginner Support says
It can make URLs closer to what you would expect from a site but it is not a requirement and can be difficult for beginners to set up.
Admin
Shani says
Hello,
Thank you so much for this article!
You’ve really helped me!
I’m interested to know now how to login to my site when I go on wordpress.
WPBeginner Support says
If you can navigate to your WordPress site then you would add /wp-admin to the end, we cover a few more options in our article below that you can also try:
https://www.wpbeginner.com/beginners-guide/how-to-find-your-wordpress-login-url/
Admin
mimi says
I followed the process accordingly but when i click on the green WAMP icon in order to create a blank MySQL database nothing pops up
WPBeginner Support says
The most common reason for that would be if you didn’t install the C++ redistributable if you have not done that.
Admin
Aminat says
Thanks a lot, really helpful
WPBeginner Support says
You’re welcome
Admin
Dav says
Hi,
I have installed as per instructions but I am getting an error trying to log into
ERROR: Failed to set session cookie. Maybe you are using HTTP instead of HTTPS to access phpMyAdmin.
What am I doing wrong?
WPBeginner Support says
That is likely a hiccup with either your browser cache or a browser addon, we would recommend clearing your cache or trying to use an incognito browser to see if that helps resolve the issue.
Admin
Dav says
Thanks, that works
Nathan Zindikilani says
Hi, thank you for the article. when i try to open my local host site i get the following error; There has been a critical error on your website.this is after pasting ‚wordpress‘ to www folder. how may i solve this
WPBeginner Support says
You would want to ensure the file is unzipped, if it is you may want to try reading a fresh WordPress download to the folder to see if there was a hiccup with your download.
Admin
Spyros says
Hi, i need your help please, i follow all the steps in your detailed article but i saw a message „can’t select database We were able to connect to the database server (which means your username and password is okay) but not able to select the test_db database and some other that i believe you know“.
Thanks in advance!
WPBeginner Support says
You may want to ensure there are no typos in the database name you set, it looks like it is not able to find a database with the name given.
Admin
Raheel says
I am getting „Error establishing a database connection“
Any help here please
WPBeginner Support says
For common solutions to that error, you would want to take a look at our article below:
https://www.wpbeginner.com/wp-tutorials/how-to-fix-the-error-establishing-a-database-connection-in-wordpress/
Admin
Steve says
Hi,
I have installed WAMP and created a WordPress site on my computer – thanks for your excellent guide. I used „mysite“ as in your example to stay consistent with you as I built my software kingdom. Now that things are looking good, is it possible to simply rename the „mysite“ folder (which is inside „www“ to my preferred name, or is it more complicated than that? I’m trying to avoid starting over. Thanks
WPBeginner Support says
We would recommend staying with the format you’ve set up already if possible and once you have hosting ready we would recommend taking a look at our guide below:
https://www.wpbeginner.com/wp-tutorials/how-to-move-wordpress-from-local-server-to-live-site/
Admin
Francesco says
Hi,
Can I use this system to test a previous back up I did via the server control panel?
I have a zip file which is a mirror of my directory on the server, including database and WP-admin file.
I would line to test if the backup I have works fine and possible run it on a precioys version of the WP
WPBeginner Support says
You would want to check with the tool you are using for the specifics but it should allow you to do what you’re wanting.
Admin
Melissa T says
Installed WAMP and WordPress – thanks for the wonderfully detailed instructions! So now it’s time to create the web site — is there a guide on wpbeginner for that?
thank you!
WPBeginner Support says
There are many different types of sites so there is no complete guide but for a starting point you may want to take a look at our article below. Step 3 and beyond in the guide should help.
https://www.wpbeginner.com/guides/
Admin
kwestyon says
First, thank you so much for the guide! It’s working. Second, is there a way wherein after you create the website, would there a way to view the site after you clicked the published button. Sorry for the dumb question.
WPBeginner Support says
If you are logged in, in the top right you should be able to open the dropdown that has your site title, and there you should find a link to view your site.
Admin
Yomi says
Hello,
If I install WordPress on a localhost based on the content of this blog, will I be able to use plugins like woocommerce, elementor, astra & kadence?
Thank you.
WPBeginner Support says
Yes, installing locally you would be able to use plugins and page builders like those on your site
Admin
Lisa says
Hi,
I am at the point where I would put localhost/mysite/ in the browser. I am getting the „404 not found error“.
I named the copy of wordpress to wamp the same and have double checked the address to see if it’s typed in correctly. This still happens, what am I doing wrong?
Thanks!
WPBeginner Support says
You would want to ensure you’re not running into the Skype error where it is trying to use port 80 while WAMP is.
Admin
WPBeginner Support says
Currently, the WAMP website is down which is why we’ve added a different link and included a note above and are working on updating this article as quickly as we are able
Admin
mark says
WAMP link redirects to a different site.