


Do you want to merge two WordPress sites without losing your search rankings?
The process is simple. You export the content from your secondary site, import it into your primary site, and then set up 301 redirects so every old URL points to its new home.
Done correctly, a merge protects your SEO and often improves it, because your content consolidates onto one stronger domain.
In this guide, we will show you how to merge two WordPress sites together, step by step, without losing SEO.
Note: This tutorial is for combining two sites into one. If you want to keep your sites separate but manage them from a single dashboard, you need WordPress multisite instead. See our guide on how to install and set up a WordPress multisite network.
- 1. Preparing for the Migration
- 2. Exporting Content From the Secondary WordPress Site
- 3. Merging Content Into the Primary WordPress Site
- 4. Fixing WordPress Migration Issues After Importing
- 5. Importing External Images
- 6. Setting Up Redirects
- 7. Going Live and Validating Your Redirects
- 8. Troubleshooting After Merging Two WordPress Sites
- Frequently Asked Questions About Merging WordPress Sites
1. Preparing for the Migration
Merging two WordPress sites can be useful when you’re consolidating brands or bringing a smaller website under your main domain. For the sake of this tutorial, we will say that you have a secondary WordPress site at https://secondarysite.com and you want to merge it into your primary website at https://primarysite.com.
Below are a few things you need to do before starting the migration.
Make a Redirect Plan
Before moving any content, you need to decide and document where each page from your secondary site should go on the primary site. SEO experts often call this a redirect map, but it’s simply a spreadsheet that helps you decide what to do with each page.
For each old URL, note whether you want to keep, redirect, or delete the page, and if it’s being kept or redirected, specify its new URL.
- Keep – The page ranks well or has backlinks, and your primary site has nothing like it. Move it over and add a 301 redirect from the old URL to the new one.
- Redirect – The page is not worth keeping, but it has gained backlinks. Delete the page and redirect it to the closest related page on your primary site, not the homepage. Sending many pages to the homepage looks like a soft 404 error to Google, and you will lose the SEO value of those backlinks.
- Remove – The page provides no value and no backlinks. Delete it, and let it return a ‘410 Gone’ code so search engines know you removed it on purpose.
You can get insights into how your pages are performing by looking at your Google Search Console data.
Pick a Winner for Duplicate Topics
If both sites cover the same topic, do not import the version from your secondary site. Otherwise, the two copies will compete against each other in Google for rankings.
Instead, choose the stronger article to keep on the primary site and redirect the weaker URL to it. If the weaker article contains important information that the stronger one lacks, add that information to the version you’re keeping before setting up the redirect.
Categories and tags can clash the same way. For example, if both sites have a ‘Desserts’ category, the import quietly creates /desserts-2/ next to your existing /desserts/, so you’ll have to merge it with the category in the primary site.
Check Your WordPress Media Settings
Before importing your secondary site’s content, make sure your primary site is ready to handle the media files. First, check the maximum upload file size on both sites. Visit the Media » Add New Media File page and look for the ‘Maximum upload file size’ text below the upload box.
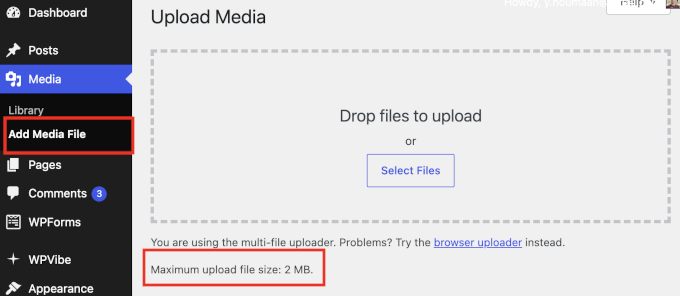
The primary site’s limit must be the same or higher than the secondary site’s, or some images will fail to import. You can learn how to change this in our guide on how to increase the maximum file upload size in WordPress.
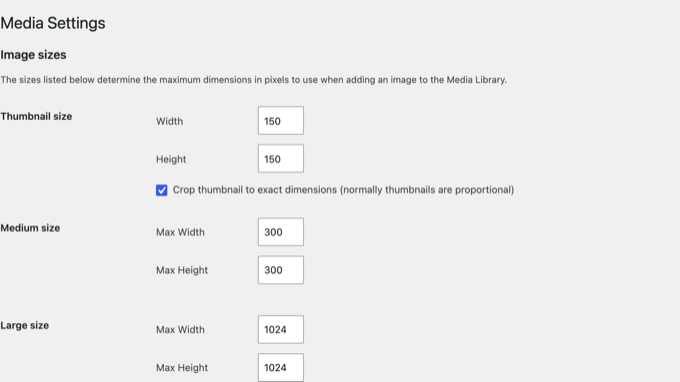
Next, compare the image sizes on the Settings » Media page of both sites. Again, the primary site’s limits must be equal or larger. If they are smaller, some images will fail with no error message.
Review the Plugins on Your Secondary Site
Before merging the sites, make a list of the plugins used on your secondary site and decide which ones you want to keep, replace, or remove.
Pay special attention to plugins that store their own data, such as eCommerce plugins, membership plugins, and custom field plugins. You’ll need to make sure their data can be transferred to the primary site.
Custom fields need extra attention here. If your secondary site uses a plugin like Advanced Custom Fields (ACF), create the same field groups on the primary site before you import. Otherwise, WordPress will silently drop those values during the import.
You also don’t need to install every plugin from the secondary site. For example, if it uses Yoast SEO while your primary site uses All in One SEO, you can use All in One SEO’s SEO data importer to transfer your SEO data instead of running both plugins.
Check whether any plugins you plan to replace have their own migration or conversion tools before you begin the merge.
Take a Complete Backup of Both Sites
Create a complete WordPress backup of both websites using a free plugin like Duplicator. This will come in handy if anything goes wrong and you need to revert the changes.
We also strongly recommend practicing the whole merge on a staging copy of your primary site. A staging site is a private copy of your website where mistakes cannot hurt anything.
Run the full merge there and note anything that breaks. Then repeat it on your live site once you know everything works.
2. Exporting Content From the Secondary WordPress Site
Once your redirect plan and backups are ready, you can export the content from your secondary site. There are two ways to do this, and most sites only need the first one.
Option 1 – The Built-In WordPress Exporter
Visit the admin area of your secondary WordPress site and go to the Tools » Export page. Select the ‘All content’ option and click the ‘Download Export File’ button.
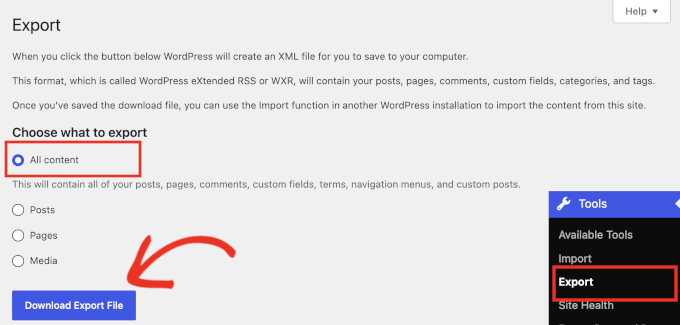
WordPress will prepare an XML file and download it to your computer. This file contains all your posts and pages, custom post types, and categories and tags.
It does not contain plugin settings or custom database tables. WooCommerce orders and customers, membership records, and forum data all need a dedicated migration tool, no matter which export method you choose.
Option 2 – WP All Export and WP All Import
The built-in tools are free and fine for small sites. However, if you run a WooCommerce store, which relies heavily on custom fields, or have thousands of posts, you may need the WP All Export and WP All Import plugins.
They let you map fields during import, handle large imports without timing out, and download images directly to your media library as the import runs.
Both plugins are paid. You will also need their Pro versions and add-ons for ACF and WooCommerce support.
3. Merging Content Into the Primary WordPress Site
Now that you have your export file, head over to the admin area of your primary site and visit the Tools » Import page. Scroll down to the bottom and click the ‘Install Now’ link under WordPress.
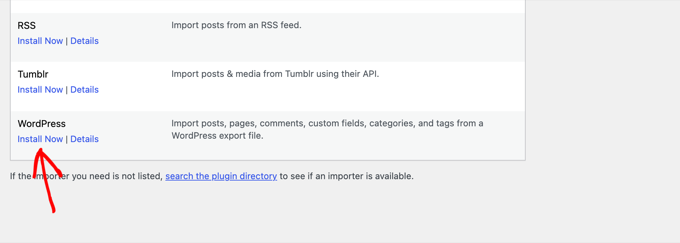
Once the importer is installed, the link changes to ‘Run Importer’. Click it to continue.
Next, click the ‘Choose File’ button, select the XML file you downloaded earlier, and click ‘Upload file and import’.
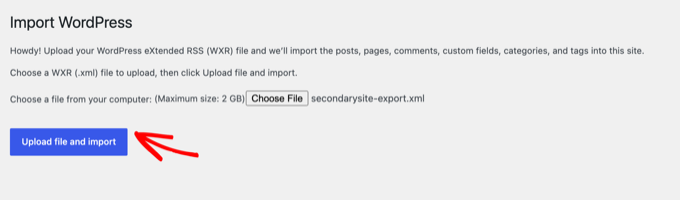
WordPress will analyze the file and show you the import settings page. Pay close attention to these three options, as they determine how your content and its associated data are imported.
First, take your time with the author settings instead of clicking through them. You can keep the original author as a new user, or assign their posts to an existing user on the primary site.
If the same person wrote on both sites under different accounts, map them to one user now. Fixing authorship later is much harder.
Second, check the box in the ‘Import Attachments’ section so WordPress downloads the images and media files from the secondary site.
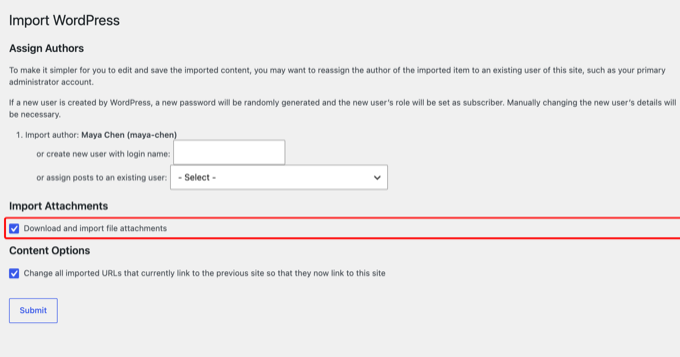
Third, check the box under ‘Content Options’. This option automatically updates links in the imported content, replacing URLs from the secondary site with their corresponding URLs on your primary site.
In our tests, internal links in imported posts already pointed to the new domain. That saves you a lot of cleanup work in the next step.
Click ‘Submit’ to run the import. When it finishes, you will see a success message.
On very large sites, the native WordPress importer may time out, especially on shared hosting. If that happens, split your export into separate files by post type from the Tools » Export page, or use the WP All Import method instead.
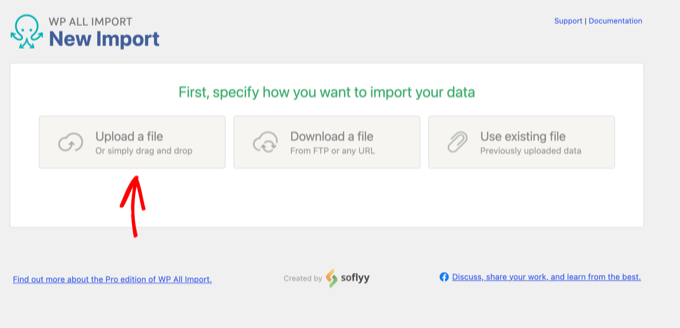
With WP All Import, you can upload the same XML file, and the plugin processes the content in smaller batches, making it less likely that server time limits will interrupt the import.
4. Fixing WordPress Migration Issues After Importing
Now that the import is complete, let’s make sure everything came over correctly before setting up your redirects. A few things need checking first, in the following order.
Check for Slug Collisions
If a post on the secondary site has the same URL slug as on the primary site, WordPress does not warn you. It silently imports the post and appends -2 to the slug. Your redirect map now points at a URL that doesn’t exist.
Open Posts » All Posts, use Quick Edit on any imported post whose title you recognize from both sites, and look at the Slug field.
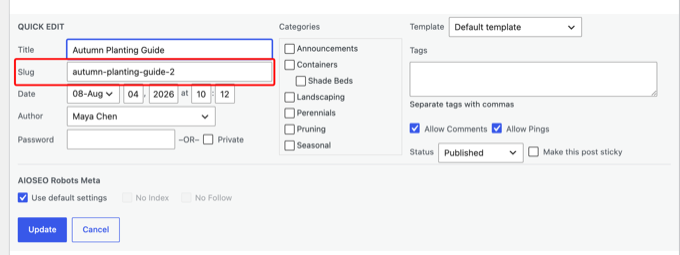
For each duplicate URL, decide whether to merge the two posts or keep them separate, then update your redirect spreadsheet with the final URL. Ideally, you caught these duplicate topics during the initial review in Step 1.
Also, confirm that the authors were imported as intended, and review the import screen for any items that failed to import.
Failed items usually have one of three causes. If the image dimension limits were too small, fix the Settings » Media values and re-import the file.
If a plugin table was missing, install the plugin on the primary site and re-import, and if the import timed out, split the export or use WP All Import.
Update Remaining Old URLs
The importer’s Content Options checkbox updates links within the content you imported. However, it doesn’t necessarily catch every reference to your old domain. Old URLs may still be stored in widgets, theme settings, plugin settings, or content that was already on your primary site.
The safe way to fix them is the free Search & Replace Everything plugin.
Go to Tools » WP Search & Replace, enter your secondary site’s URL in the ‘Search for’ field and your primary site’s URL in ‘Replace with’, and always click ‘Preview Search & Replace’ first. The preview shows you exactly what will change before anything is written to the database.
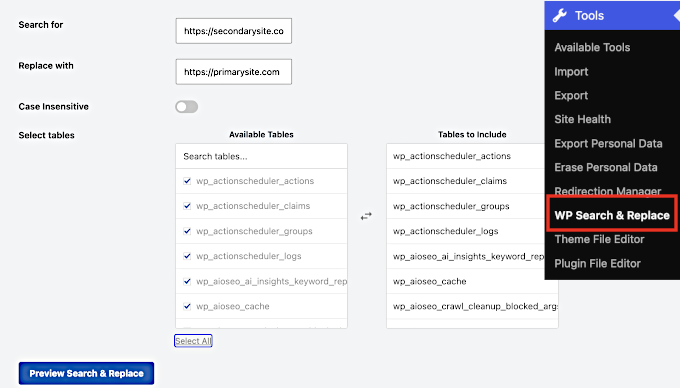
If you are comfortable with the command line, wp search-replace 'secondarysite.com' 'primarysite.com' --all-tables --dry-run does the same job using WP-CLI, the WordPress command line tool. Run it with --dry-run first, then again without it.
Warning: Never run a raw SQL find-and-replace on your database for this. WordPress stores some data in a serialized format that breaks when its text length changes, and the damage shows up weeks later as broken plugin settings. Both tools above handle serialized data correctly.
5. Importing External Images
Now that you have imported your content successfully, the next step is to ensure all your images are correctly imported.
If you used the default WordPress importer, some images may not have been downloaded during the import. Instead, those posts may still be loading their images from the secondary website.
These ‘external images’ slow down your pages, and they will disappear when you take the old site offline.
If you used WP All Import, you can skip this step, because it pulls images into the media library during the import itself.
Otherwise, install and activate the free Smart Auto Upload Images plugin. For details, see our guide on how to install a WordPress plugin.
The default settings on the Settings » Smart Auto Upload Images page work for most sites. Whenever you save a post, the plugin detects its external images, downloads them to your media library, and updates the image URLs in the post.
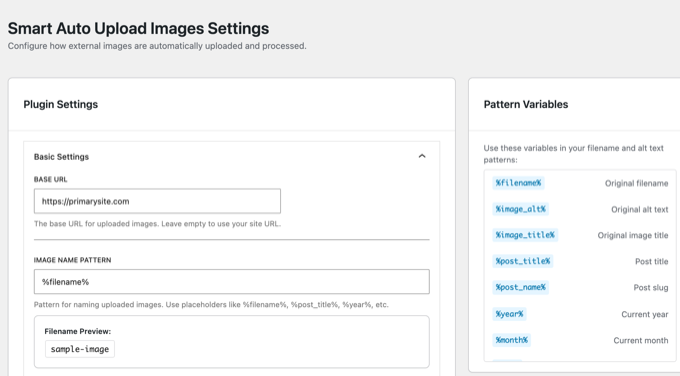
To trigger it across all your imported posts at once, go to Posts » All Posts page.
From here, you need to select the imported posts, choose ‘Edit’ from the Bulk actions menu, and click ‘Apply’.
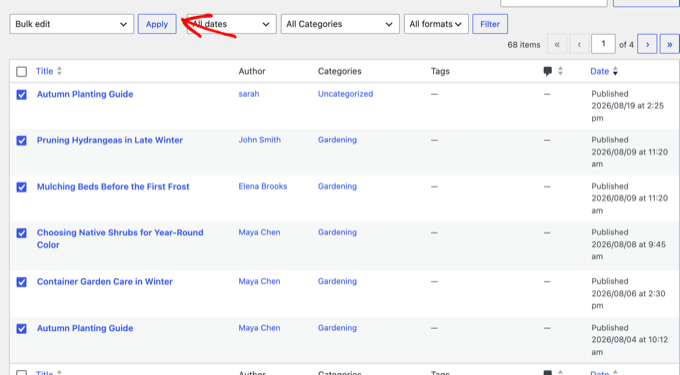
Then, without changing any settings in the Bulk Edit box, click ‘Update’.
This saves the posts in WordPress and triggers the plugin to automatically import the external images into your media library.
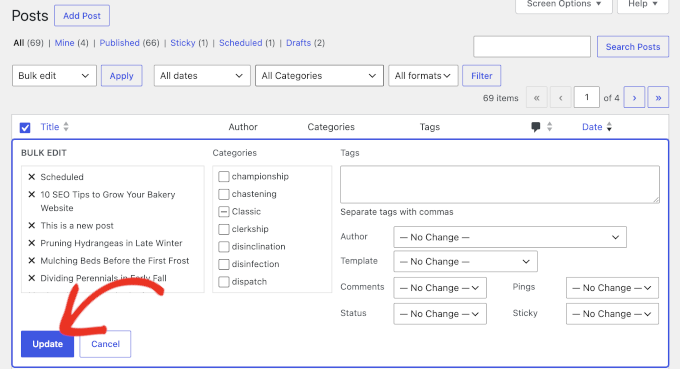
In our tests, the plugin reliably imported images that used direct URLs but skipped images whose URLs went through a redirect.
This can happen with older posts that still use http:// or www image URLs that now redirect to the secure version. Check a few imported posts and re-save any that still contain external image URLs.
6. Setting Up Redirects
Once you’ve confirmed that everything imported correctly, it’s time to redirect visitors from your old site to the right pages on your primary site.
You might be tempted to simply redirect every URL on secondarysite.com to the same URL path on primarysite.com. However, this only works when the page paths are exactly the same on both sites.
That’s not the case for pages you’ve deleted, merged, renamed, or that received a -2 slug during the import. Anyone who visits those old URLs will land on a 404 page, and you will lose the SEO value of their backlinks.
The right approach that you will need works on two levels. First, a URL-level redirect map for pages that moved or changed, and then a domain-level redirect to catch whatever is left.
URL-Level Redirects
This is where the spreadsheet from step 1 becomes useful. The old site stays online to serve these redirects, so you will set them up there.
Easiest way to do this is by using the free 404 to 301 plugin. Install and activate it on the old site, then go to the 404 to 301 » Redirects page and click the ‘Add redirect’ button.
For each row in your redirect plan, enter the old path in the ‘Source URL’ field and the full new address in the ‘Target URL’ field.
Leave the status on the default 301 option, which tells search engines the move is permanent and transfers the rankings, and click ‘Create redirect’.
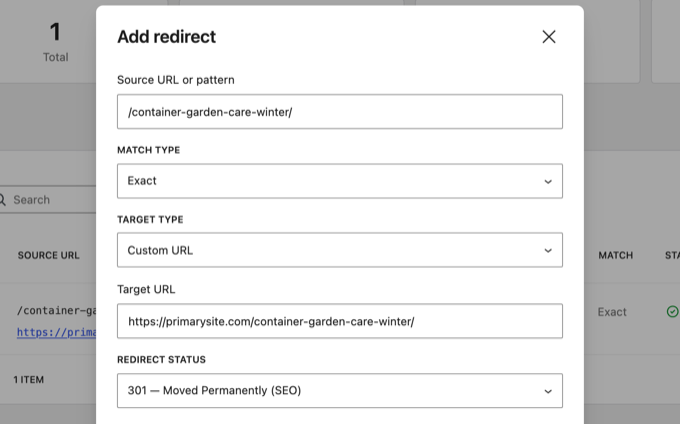
This plugin can also handle pages you decided to remove.
For those URLs, select the ‘410 – Gone’ status instead of entering a target URL. This tells search engines that the page has been permanently removed and has no replacement.
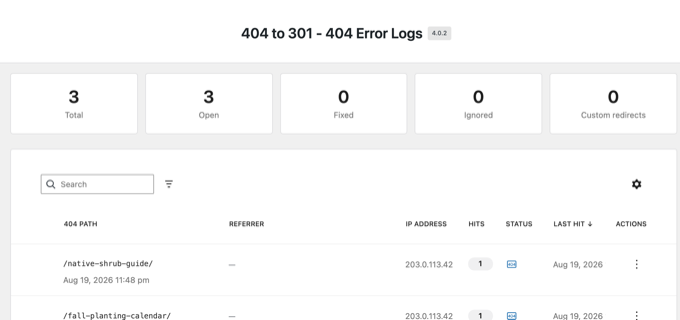
Now, the best part is that the plugin logs every 404 error that real visitors hit. You need to check its 404 Logs page during the first few weeks after the merge, and use the ‘Custom redirect’ action on any URL you missed.
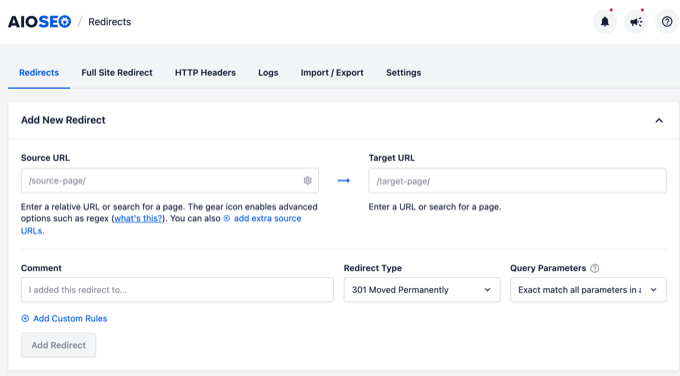
We use All in One SEO for this on our own sites. Its Pro redirect manager can set up individual redirects and full-site redirects, and it can even bulk-import your whole redirect map spreadsheet as a CSV.
Pro versions of other popular SEO plugins like Yoast and Rank Math include a redirect manager too.
Domain-Level Redirect
For every URL not covered by your map, add a domain-level rule so the whole old domain forwards to the primary site.
The easiest place to do this is your WordPress hosting control panel, since most hosts have a redirect tool that works no matter what server software they run.
If you manage your own Apache server, the classic .htaccess rule below does the same job.
#Options +FollowSymLinks
RewriteEngine on
RewriteRule ^(.*)$ https://primarysite.com/$1 [R=301,L]
This rule tells your server to permanently redirect all incoming traffic to primarysite.com while keeping the same path.
For instance, a visitor opening https://secondarysite.com/category/news/ will be sent to https://primarysite.com/category/news/.
7. Going Live and Validating Your Redirects
If your site merge worked smoothly on your staging site, then you are ready to go live!
To make sure your launch is safe and you don’t lose any of your hard-earned SEO rankings, we recommend taking a few extra precautions:
- Lower your DNS TTL to 300 seconds at least 24 hours ahead. You can do this in your domain registrar account. TTL (time to live) controls how long DNS servers cache your settings. Lowering it ensures cached DNS records expire quickly, so visitors are directed to your new website more quickly after the launch.
- Submit the primary site’s sitemap in Google Search Console. Keep the old site’s sitemap accessible and submitted to help Google discover the old URLs and follow your 301 redirects.
- Use the Change of Address tool only for a full domain move. If the entire secondary domain now redirects to your primary domain, open Google Search Console for the old domain and submit the ‘Change of Address’ request there. If you are only merging part of a site, or moving a subdomain into your main domain, skip this tool. Your 301 redirects already tell Google everything it needs to know.
- Keep the old domain registered permanently. To ensure all backlinks pointing to secondary domain keep working, you’ll need to ensure that domain name doesn’t expire.
After completing these steps, you can now test the URLs in your redirect plan. Test some of your highest-traffic old URLs from each group.
8. Troubleshooting After Merging Two WordPress Sites
Now that your merge is live, there are a few things you need to fix and watch in the weeks after launch. We will go through them in order.
Point internal links at their final URLs. For example, if a link points to secondarysite.com/recipe/ and that page now lives at primarysite.com/recipe/, update the link to point directly to the new URL. This avoids the unnecessary redirect, and Search & Replace Everything can handle most of these updates.
For the weeks after launch, All in One SEO’s Broken Link Checker is worth running too. It converts a broken link into a redirect in one click.
Verify canonicals point to themselves. A canonical URL tells search engines which version of a page is the main one. After the merge, each page on your primary site should have a canonical that matches its own address.
If a page’s canonical still points at the old domain, Google will treat the moved page as a copy instead of the real one. To check a page, right-click anywhere on it, select ‘View Page Source’, and search for the word ‘canonical’. The URL in that tag should match the address of the page you are viewing.
The fix is to open the post’s SEO settings and clear the canonical URL field. Your SEO plugin will then generate the correct one automatically.
Google Search Console also catches these automatically over time. In the ‘Pages’ indexing report, look for the ‘Duplicate, Google chose different canonical than user’ issue.
Clean up merged categories and tags. Deal with any -2 archive duplicates now. Our tutorial on how to merge and bulk edit categories and tags in WordPress walks through it.
Monitor your rankings. Record your rankings in Google Search Console before launch so you have something to compare against. Then expect 2 to 8 weeks of ranking ups and downs while Google reprocesses everything.
What you want to see is SEO ranking consolidation, meaning the merged URLs hold or gain the rankings the old URLs had.
A traffic dip after the merge can come from those changes in search results rather than from your merge. Use the ‘Positions’ and ‘Impressions’ filters in Google Search Console to get more details.
If rankings have not substantially recovered by week 8 to 12, something is broken. Follow these steps to locate the issue.
- Check for redirect chains, or temporary 302 redirects sitting where a 301 should be.
- Look for canonical URLs still pointing at the old domain.
- Look for a robots.txt rule or a noindex tag that is blocking the new pages.
- Test your redirect destinations to make sure none of them quietly became 404 pages.
Frequently Asked Questions About Merging WordPress Sites
We have helped many users combine their websites over the years. Here are answers to some of the most common questions we get about the process.
1. Can I merge a WordPress.com site with a WordPress.org site?
Yes, you can. The process is very similar. You will export your content from the WordPress.com dashboard and import it into your self-hosted WordPress site. You can follow our guide on how to move from WordPress.com to WordPress.org for more specific details.
2. Do I need to keep paying for the old hosting account?
You need to keep your old hosting account active for at least a few months. This ensures your 301 redirects continue to work while Google updates its index. After that, you can potentially switch to domain-level forwarding through your registrar, but keeping the redirects active is the safest option for SEO.
3. Can I run multiple websites on one WordPress installation?
Yes. WordPress multisite lets you run many separate websites from a single WordPress installation, with one dashboard, one set of plugins, and shared users. It is the better choice when you want central management but do not want to combine the sites’ content. See our guide on how to install and set up WordPress multisite.
We hope this article helped you merge your WordPress sites without losing SEO. You may also want to see our guide on how to change your WordPress site URLs or our ultimate WordPress SEO guide for beginners.
If you liked this article, then please subscribe to our YouTube Channel for WordPress video tutorials. You can also find us on Twitter and Facebook.


Melody
Would this be the same as copying the posts and products to the new website?
WPBeginner Support
Similar, this would also tell search engines to go to the new post on your site instead of the old post on the old sites
Admin
micibama
Thanks for sharing this important guide. I have followed the guide accordingly however, my old site contents are not showing on my new site. They are saying page not found. Do i need to replace all the codes in the .htaccess with the one given above? Please help
WPBeginner Support
You shouldn’t need to replace your entire htaccess unless you have code that would conflict with our recommendation. You would likely want to resave your permalinks to help with the most likely reasons.
Admin
Keval Padia
Excellent content. We used to maintain two separate blogs for individual niche and were looking to merge both together without hampering our SEO. These steps are detailed and easy to follow, thanks for writing!!
WPBeginner Support
You’re welcome, glad our guide was helpful
Admin
Monique Martens
Hi there,
Thanks for this interesting and helpful guide!
Can you tel us what will happen with pages and posts that have the same name and/or ID number? For example, each website has a home, blog and contact page. Will these be separate pages with the same name?
Best regards,
Monique
WPBeginner Support
The posts will have the same name but the slug will be modified to be unique unless they are an exact copy of what you have currently on your site.
Admin
Keir Briscoe
I get a 405 error when I try to import. I am the creator and admin for both sites. I am also logged into both sites. I doubt anyone will reply to this message. but though I would leave it anyway
Romona
Hello,
If I have a new theme at my new site and new host, where will the pages go and will they automatically adjust to the new theme? By pages I mean (diy, recipes, life, etc). Will I need those exact page headings for it to fall into the correct category or will they all fall together into one category?
THANK YOU for your help!
Paul
Hello,
Very good article! Exactly what I was looking for in terms of merging two WordPress sites. I was curious though if this could be applied on sites with WooCommerce for example?
Thank you for this well written procedure.
Steve
I have oldsite.org which has a blog in the root and 2 more blogs at /nytips/ and /nynews/ and a community at /nyforum/ and want to make /nytips/ and /nynews/ a category of the blog in the root so the search box will work for the entire site plus giving me the chance to maintain one blog and one forum. Will this article help or will I have to use oldsite.net first then move it back to oldsite.org?
Each folder was a domain which I consolidated 5+ years as I did not want to buy SSL certs for each domain and their aliases.
Edmond Chan
Hi team, thanks very much for this info. I edited my .htaaccess file in my old wordpress site to redirect to the new site. I used the code in the article above. However, I’m not able to access oldsite.com/wp-admin anymore as it redirects to newsite.com/wp-admin! Is there anyway to still access the old site’s admin dashboard to update plugins, wordpress itself or for any other reasons? Many thanks, Ed
WPBeginner Support
Hi Edmond,
You will need to remove the .htaccess redirect to access old site admin area.
Admin
Edmond Chan
Hi Team,
Thanks very much for your reply. The problem is that because the old site admin area immediately redirects to the new site’s admin area, I literally can’t access the old site’s .htaccess file in order to edit/remove the redirect. It’s chicken and egg! Is there any way to fix this?? Many thanks, Ed
WPBeginner Support
Hi Edmond,
You can use FTP to edit .htaccess file.
ranga
Hi!
We moved our content from siteA to siteB both of which use wordpress CMS. After merging the content do we need to change the address in google websmaster tools.? Thanks.
Ilyas
I have merged my websites and all of the posts are on my new website.
But When I search an article, still the url and name of my old website my old website appear on the search engine.
What if I delete my old website or if it expires?
Alan
The best thing is to set redirects up from your old website to your new website and never let it expire.
John
Thanks for an interesting and useful article.
I am in process of merging three websites with my older and larger main site. I’ve been doing this manually and it’s taking ages. I didn’t realise it was possible to do it automatically. HOWEVER, one issue I’m facing doesn’t seem to be covered in your article. If I choose “all content” when I export from one site, will that include the comments the posts have attracted? If not, how to export/import comments?
Many thanks,
John
WPBeginner Support
Hi John,
Yes, comments will included in the export file.
Admin
Jack
Would it be ok to redirect single blog posts one by one over a time periode of one year.
E.g. Every week two blog posts from one blog (the one fizzling out) are republished to the main focus blog. And 2 redirects are done every week for a year.
This process goes on until all are moved to main blog (say 100 posts over a year). Would that be a bad idea in teems of SEO?
Chris
Hi Folks,
With a merge, what’s the situation about page/post IDs? If we are dealing with bigish sites surely there is a chance the page ID will be duplicated on import? Will that cause problems, and if so how to avoid/fix it?
Cheers,
Chris
Jack
Would it be ok to redirect single blog posts one by one over a time periode of one year.
E.g. Every week two blog posts from one blog (the one fizzling out) are republished to the main focus blog. And 2 redirects are done every week for a year.
This process goes on until all are moved to main blog (say 100 posts over a year). Would that be a bad idea in teems of SEO?
Gemma
Hi,
I’m curious to know, when importing the OLD site into the NEW, will it adopt the theme settings of the NEW site automatically?
How can I make sure they match?
Thanks
Melissa
How long before you could delete the original WP site?
WPBeginner Support
Once you are satisfied that the old site is no longer getting any traffic, you can delete it. However, if the original site is still getting significant traffic from sources other than search engines, then you may want to keep the domain up as long as possible.
Admin
Karakaplan
How long should keep Redirect htaccess file in old server?
Alan
I’d like to import one websites posts into a particular category or custom post type. Then a different redirect will be needed. Can you make a tutorial fo that?
Valentine
Thanks for this information. I’ve successfully merged my two sites and they are working properly from one dashboard. Nice Job
WPBeginner Support
Glad you found it helpful don’t forget to follow us on Facebook for more WordPress tips and tutorials.
Admin
Georgina Moon
This is interesting and helpful. But I have the opposite question – I want to start a new Wordpress blog, and export only certain posts to the new blog (e.g., all my posts with certain tags or categories, such as Greece, sailing etc). I have laboriously been copying and pasting, but I have to add the photos again, plus tags and categories. Is there a quicker way, please?
WPBeginner Support
Hi Georgina,
Yes, you can do this here is how.
First create a new category in WordPress, you can all it anything you want.
Next, you need to go to Posts -> All Posts screen. Click on screen options button at the top right corner. Under ‘Number of items to show per page’ enter a number larger than total number of posts on your site then click on Apply button.
WordPress will now load all your posts on the same page. Check the box next to the posts you want to move. Then select ‘Edit’ from ‘Bulk Options’ drop down menu and click on the Apply button.
A box will appear with a number of options. Simply select the category you created earlier to file all selected posts under that category. Click on update button to save your changes.
Now you can go to Tools -> Export page. Select posts and then under export settings select the category that has all the posts you want to move.
Admin