When we get requests to move our clients’ sites, one of the issues we often face is dealing with external images.
You see, when a website is moved from one platform or host to another, there’s a good chance that some images might still be loading from the old location. This can lead to broken image links, slower loading times, and even SEO issues.
That’s why we’ve put together this guide. We’ll walk you through the process of importing those external images into your WordPress site, ensuring everything loads properly from your new location.

Why Import External Images in WordPress?
External images are images embedded in your content that load from another website or external URLs different from your main WordPress website.
Most commonly, WordPress.org users come across external image issues after migrating their website from other platforms like Blogger, Weebly, Joomla, or WordPress.com. These issues include broken image links, which can be bad for search engine optimization (SEO).
By default, if you use one of the WordPress importers, then it will try to import images, including featured images or thumbnails. You can see the imported images by visiting the Media » Library page in your WordPress admin area.
If you see that all your images are already in the Media Library, but the image URLs in your posts still point to your old website, then you don’t need this article. Instead, you should follow our guide on how to easily update URLs when moving your WordPress site.
However, if you don’t see images imported to your WordPress media library, then continue reading. We will show you how to import those external images without needing to download images and re-upload them.
Importing External Images in WordPress With Auto Upload Images
The first thing you need to do is to install and activate the Auto Upload Images plugin. For more details, see our step-by-step guide on how to install a WordPress plugin.
Note: You may notice that this plugin has not been tested with the latest WordPress releases. However, we’ve tested the plugin, and it works fine for this purpose.
You can read our article on whether to use untested WordPress plugins if you’re not sure. If you come across a better plugin alternative that does the same job, then feel free to leave a comment down below.
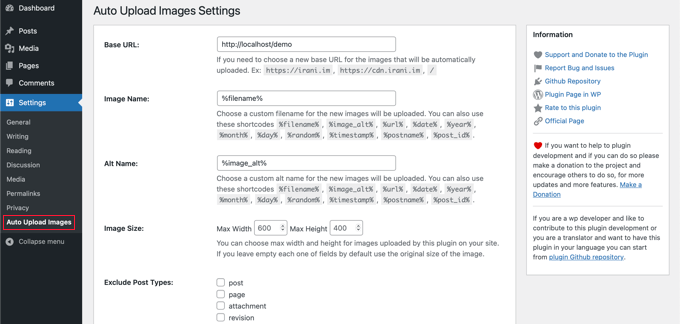
Upon activation, you need to visit the Settings » Auto Upload Images page to configure the image import plugin settings.

The default settings will work for most users, but you can change them as needed.
For example, the plugin will import images to your default WordPress media uploads folder. You can change that by providing a different base URL. Other than that, it also allows you to set the image file name, image alt tag, and image size, and exclude post types.
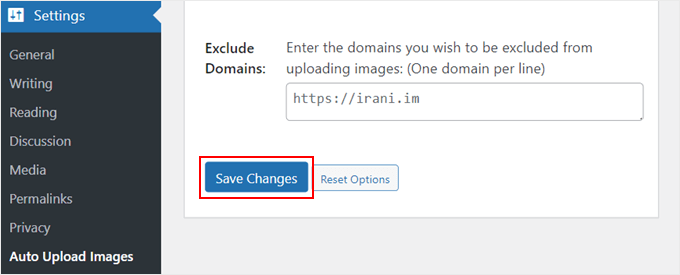
If you do make some changes, then don’t forget to click on the ‘Save Changes’ button at the bottom of the page to store the new settings.

Next, you will need to update the posts or pages containing the external images. Since this is a manual process, it can be time-consuming if you have a lot of content.
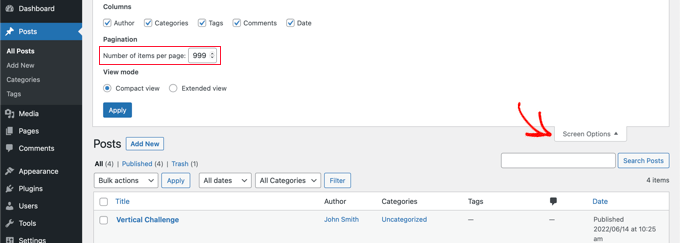
Luckily, there’s a quick way to update all posts with external images. Simply go to the Posts » All Posts page and then click on the Screen Options button at the top.

You need to increase the number in the ‘Number of items per page field’ field to ‘999’ and click the ‘Apply’ button.
WordPress will reload the page, and this time it will show up to 999 posts at a time.
Note: If you have slow web hosting, your server may not be able to handle updating so many posts at once. In that case, you will want to do smaller batches of posts at a time or consider switching to a better WordPress hosting provider.
Next, you can select all of your posts on this page by clicking the checkbox next to ‘Title’.
After that, you should select ‘Edit’ from the Bulk actions menu and click the ‘Apply’ button.

WordPress will now show you a ‘Bulk Edit’ box with all selected posts.
You just need to click on the ‘Update’ button, and WordPress will update all the posts on your WordPress blog.

Remember, don’t change any of the settings in the bulk edit settings that you see. You just need to click the ‘Update’ button.
This will trigger the plugin to check all selected posts and import external images as it finds them.
If you have more than 999 posts, then you will need to visit the next page to select the remaining posts.
FAQs About Importing External Images in WordPress
Hopefully, this tutorial will have taught you how to import external images in WordPress. If you still have any questions, then we will answer them here.
How do I import the media library into WordPress?
First, you will need to go to Tools » Export on the website where you want to get the media library from. Here, you need to choose ‘Media’ and download the media library as a file.
You can then use a plugin like WordPress Importer to upload the media library to your new website. For more details, you can see our guide on how to download your entire WordPress media library.
Why is my WordPress media library not showing all the images?
If your WordPress media library isn’t showing all the images, then you are likely dealing with the WordPress image upload issue. You can fix this problem by changing file permissions.
For more details, you can see our guide on how to fix the image upload issue in WordPress.
I’ve Imported My Images to WordPress, What Now?
Now that you have successfully imported your external images to WordPress, you can start optimizing them to improve your site’s visual appeal and performance.
Here are some ideas to help you make the most of your newly imported images:
- How to Add Text on Top of an Image in WordPress
- How to Add Captions to Featured Images in WordPress
- How to Easily Lazy Load Images in WordPress
- How to Easily Create Responsive WordPress Image Galleries with Envira
- How to Add a Border Around an Image in WordPress
- How to Organize WordPress Files in Media Library Folders
We hope this tutorial helped you learn how to import external images in WordPress. You may also want to see our list of the best sources for free public domain and CC0-licensed images and our guide on how to upload photos from Adobe Lightroom to WordPress.
If you liked this article, then please subscribe to our YouTube Channel for WordPress video tutorials. You can also find us on Twitter and Facebook.


Scott T
This plugin doesn’t seem to work anymore. I imported the content/xml from a typepad site into Wordpress and saving/updating the page doesn’t do anything as far as importing images. The image doesn’t download to the media library and the link to it in the post doesn’t change. I don’t get any errors. It just doesn’t … do anything. Any ideas or alternatives? I am desperately trying to import/transfer the images and media from a typepad site to Wordpress.
WPBeginner Support
Thank you for letting us know, we will look into the plugin as well as alternatives we would recommend but for the moment we do not have a recommended alternative.
Admin
Mrteesurez
Please, I want to ask a question.
I heard images hosted on another servers have impact on the hosted website as there might be too much request or unnecessary request from this site linking to my images in their site. Therefore, is there any way to avoid external site linking or using my hosted images on there websites ?? thanks.
WPBeginner Support
For what you’re wanting we would recommend looking at our guide below for preventing hotlinking of your images.
https://www.wpbeginner.com/beginners-guide/4-ways-to-prevent-image-theft-in-wordpress/
Admin
Robin
I am moving a site from blogger to wordpress and used the auto upload plugin which worked great until i realized it imported all images into the current month and year – March 2022.
Is there a fix for this?
Thanks in advance.
Robin
WPBeginner Support
That is not an option on the plugin at the moment but if you reach out to the plugin’s author they may look into adding that feature in the future.
Admin
Robin
Will do. Thank you!
Robin
Laxmikant S Bhumkar
It saves my lots of hours. Thanks
WPBeginner Support
You’re welcome
Admin
Silvi
Hi,
when I try to bulk edit, I get an “HTTP ERROR 500”.
Any ideas why?
Thanks
WPBeginner Support
There are a few reasons for that error, you would want to take a look at our article here: https://www.wpbeginner.com/wp-tutorials/how-to-fix-the-internal-server-error-in-wordpress/
Admin
Sergio
The plugin is necessary, but for me it could not process images from the https site. As well as SVG pictures ignored.
WPBeginner Support
Thank you for letting us know, if you reach out to the plugin’s support they should be able to take a look at what would be causing the problem
Admin
Ali Irani
Hi guys,
I’m developer of this plugin, thanks for introducing this plugin.
I released v3.2 “Auto upload images” plugin and fixed some reported problems with new versions of Wordpress.
Thank you
WPBeginner Support
You’re welcome and thanks for creating this plugin
Admin
Melissa
Unfortunately this plugin converted my attachments to a .php extension instead of keeping their original extensions. They show up as gibberish.
WPBeginner Support
Thank you for letting us know, you would also want to reach out to the plugin’s support and let them know you ran into that issue.
Admin
emre
I get the the 500 internal server error, refreshing the page ı was able to get images to my media library. The only problem I guess is connecting these images again to posts, any idea ??
WPBeginner Support
When adding an image block or similar, one option should be to add the image from your media library, you may want to try increasing your memory for what it sounds like you’re running into: https://www.wpbeginner.com/wp-tutorials/fix-wordpress-memory-exhausted-error-increase-php-memory/
Admin
Daniel
I’ve been spending days getting my media from a .com – managed blog to a self hosted one. This is the best. One note: The process would time out every few minutes (blank page). Just refreshing the page would continue the download until you were redirected back to wp-admin. Then the process was done.
Mark
Hi,
when I try to bulk edit, I get an “HTTP ERROR 500”.
Any ideas why?
Thanks
Richard
Getting the same error
emre
Hi,
I would like to ask you that can I import posts with images from localhost to live website?
I used Import/Export tool of wordpress but I always get the “failed media upload” errors.
I look for your valuable answer, thanks
Nicolas Le Pape
Hi WPB Team,
I have a directory of images stored on a website and “considered” as a CDN. I need these images to be displayed on an online standalone WP website.
**Without importing them in the WP Media library.**
Let’s say one image or more by post. I’ll add an extra field to tell the post the path of its image(s). Custom height and width fields as well.
Which plugin would you advise me to activate pls?
BRgds, NLE
PS: love your articles. Pls keep on the good job!
WPBeginner Support
Hi Nicolas,
You can manually link to the images like this:
1-click Use in WordPress
Admin
Nicolas Le Pape
Thx for your reply. That’s easy. I thought there were specific settings to tell WP before doing so. Gathered within a plugin. But ok. Many thanks.