Have you ever wished your WordPress menu could be smarter? Maybe you want to show different navigation options to logged-in members, or display specific menu items only on certain pages.
By default, WordPress shows the same static menu to everyone, which can make your site feel generic and unhelpful. We’ve worked with many different website owners who faced this exact challenge.
Luckily, conditional menus can completely transform your user experience.
When your WordPress navigation adapts to different visitors and contexts, people find what they need faster. And you can guide them toward the actions that matter most for your business.
In this guide, we’ll share how to add conditional logic to your WordPress menus. You’ll learn how to create dynamic navigation that changes based on user roles, specific pages, or any other criteria you choose.
Why Add Conditional Logic to Menus in WordPress?
Navigation menus give your website structure and help visitors find what they’re looking for.
By default, your WordPress website will display the same navigation menu to all users and on all posts and pages.
However, there may be times when you wish to display different menus to different users or on different pages on your website.
With conditional logic, you can go a step further by creating customized menus for logged-in users. Here are a few use case examples on different types of sites:
- Online store – Highlight products or special offers based on a customer’s browsing or purchase history.
- WordPress membership site – Show exclusive pages and resources only to logged-in members.
- Online learning platform – Display different course categories or lessons depending on a student’s progress.
You can think of it as WordPress menu access control. 💡
With that in mind, we will show you how to add conditional logic to WordPress menus. Here are the topics we will cover in this tutorial:
- Creating New Navigation Menus in WordPress
- Showing a Different Menu to Logged-In Users in WordPress
- Showing a Different Menu to Logged-In Users Using FSE
- Showing a Different WordPress Menu Depending on User Role
- Showing a Different Menu for Different Pages in WordPress
- Hiding the Navigation Menu on Landing Pages in WordPress
- Frequently Asked Questions About Conditional Menus
- Further Reading: Doing More With WordPress Navigation Menus
Ready? Let’s get started.
Creating New Navigation Menus in WordPress
The first step is to create the additional navigation menus you wish to display in WordPress. After that, you can use conditional logic to decide when each menu will be displayed.
From here on out, we will show you how to add conditional menus to WordPress for both classic and block editors.
Creating New Navigation Menus in WordPress Using the Classic Editor
This method works for classic theme users.
To create new navigation menus, simply head over to the Appearance » Menus page in the WordPress dashboard. If you already have a navigation menu that you use on your website for all users, then this can be your default menu.
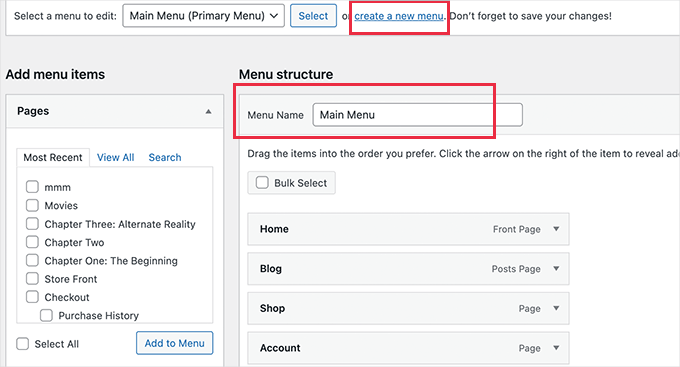
Next, you’ll need to click the ‘create a new menu’ link to make a new menu item. For example, you could create one menu to show to logged-in users and another to display on a certain WordPress page or category.
On the left-hand side of the screen, you can see a list of your website pages. Simply check the box next to any page you want to add to your menu and click the ‘Add to Menu’ button.
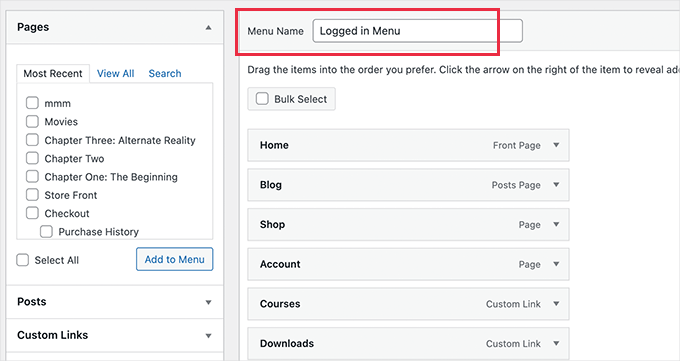
You can also drag and drop the menu items on the right side of the screen to rearrange them.
Further down the page, you can choose a location to display your menu. But you don’t need to assign a location to this menu now. We’ll do that in the next step.
Don’t forget to click on the ‘Save Menu’ button to store your changes.
For more details on creating menus, you can take a look at our beginner’s guide on how to add a navigation menu in WordPress.
Creating New Navigation Menus in WordPress Using FSE
To create new navigation menus in a block theme with Full Site Editing (FSE), you will need to navigate to Appearance » Editor from your WordPress dashboard first.
Once you’re inside, you can click the ‘Navigation’ tab to expand it. If you’re wondering, we’re using the Twenty-Twenty Three theme for this guide.
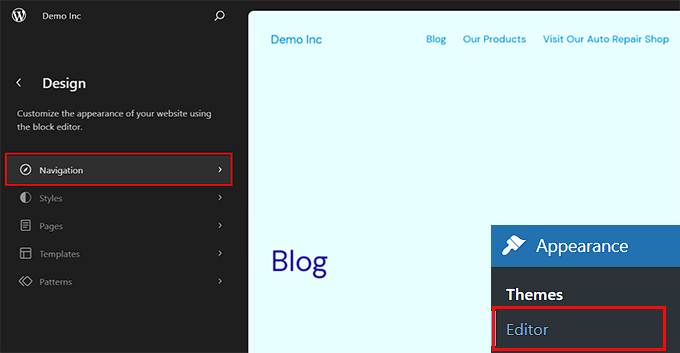
Next, let’s click ‘Edit’ next to the ‘Navigation’ label.
This will open the full site editor on your screen.
From here, all that’s left to do is click the ‘+’ icon to add a navigation menu item. You’ll then see a prompt showing a dropdown menu where you can select an option.
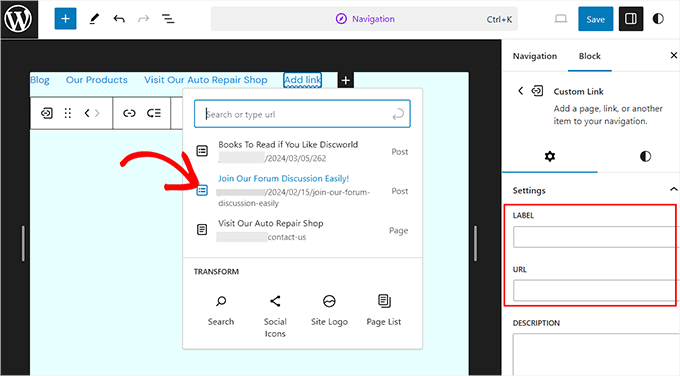
For more detailed instructions, you can see our guide on how to add a navigation menu in WordPress.
Showing a Different Menu to Logged-In Users in WordPress
It’s often useful to display different navigation menus to users depending on whether they have logged in to your site or not.
For example, you can include login and registration links for logged-out users and add a logout link to your menu for logged-in users.
If you are running a WooCommerce store, then you could include items for your customers that are hidden from the general public.
Showing a Different Menu to Logged-In Users Using the Classic Editor
To get started, you need to install and activate the Conditional Menus plugin. For more details, see our step-by-step guide on how to install a WordPress plugin.
Upon activation, you’ll want to navigate to Appearance » Menus and switch to the ‘Manage Locations’ tab.
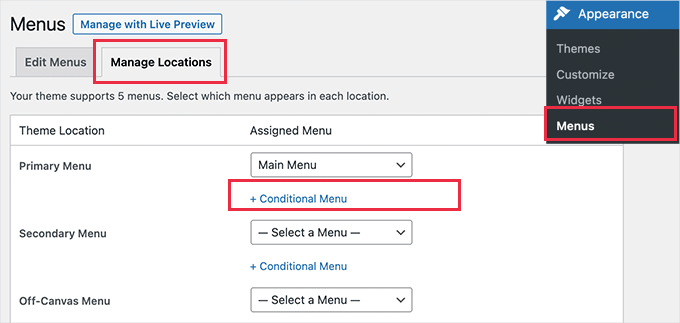
From here, you will see the list of available menu locations and the menus that are currently displayed. These will vary depending on the WordPress theme you are using.
For example, on our demo website, it is showing that our ‘Primary Menu’ location is showing a navigation menu titled ‘Main Menu’.
We can tell the plugin to show a different menu when a certain condition is matched by clicking on the ‘+ Conditional Menu’ link and selecting another menu from the dropdown menu.
For this tutorial, we will select ‘Logged in Menu’.

Next, you need to click on the ‘+ Conditions’ link.
This will bring up a popup where you’ll see a bunch of conditions to choose from.
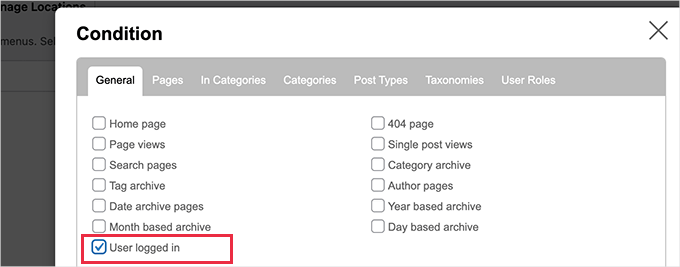
Simply check the box next to the ‘User logged in’ option, and then click on the ‘Save’ button.
You can now visit your website to see the logged-in user menu in action. You can log out of your website to see the navigation menu that is shown to all other users.
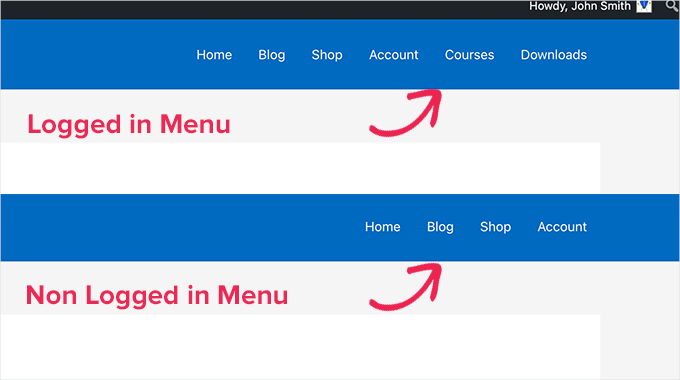
For more detailed instructions and to learn how to do this using code, take a look at our guide on how to show different menus for logged-in users in WordPress.
Showing a Different Menu to Logged-In Users Using FSE
If you’re using a block theme, then you’ll need the Conditional Blocks plugin. So, let’s install and activate the plugin first. If you need help, then you can see our guide on how to install a WordPress plugin.
Upon activating it, you can open the FSE feature by navigating to Appearance » Editor. Then, you’ll want to click ‘Patterns’ and then ‘All template parts.’
You should now see all of your template parts, which might include a footer, header, and comments. Let’s click the three dots in the ‘Header’ section and then select ‘Edit.’
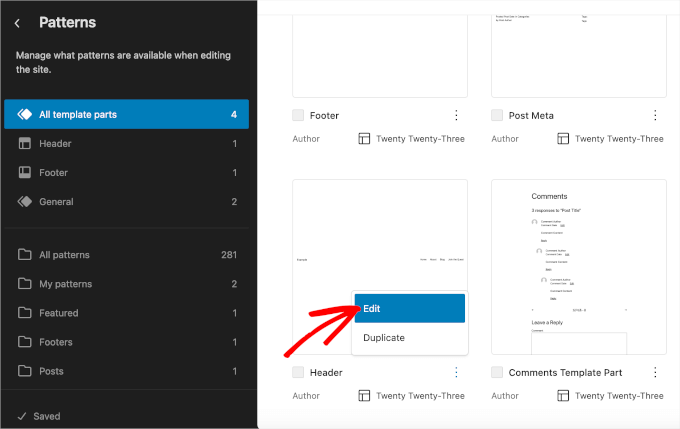
This will redirect you to the block editor.
Now, you’ll need to click on the navigation menu block to add conditionals.
After that, simply switch to the ‘Block’ tab on the right-hand side panel to start customizing.
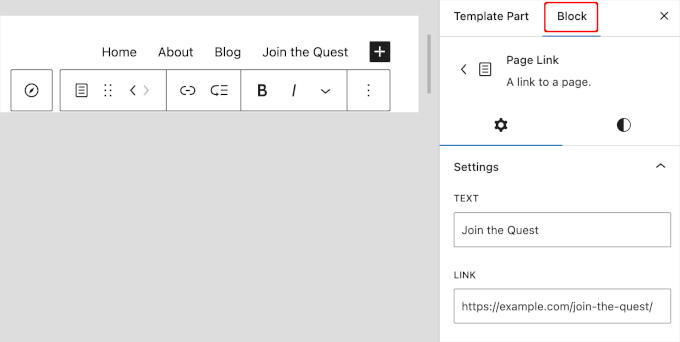
If you scroll down the ‘Block’ tab, you’ll see the ‘Conditional Blocks’ section. Simply give it a click to open the customization options.
Then, go ahead and click the ‘Edit Visibility’ button.
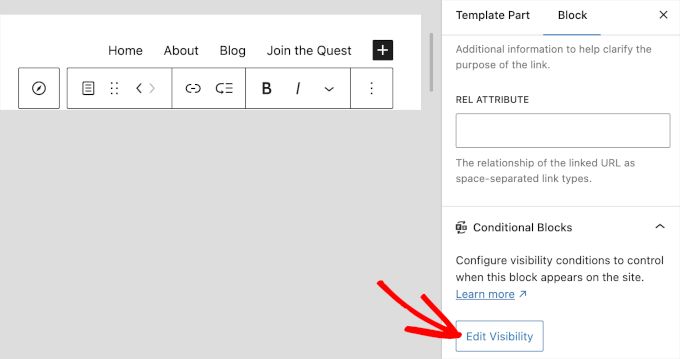
A pop-up window where you can set conditions for your chosen navigation menu will appear.
Here, you can open the ‘CONDITION’ dropdown and select the ‘User Logged In’ option.
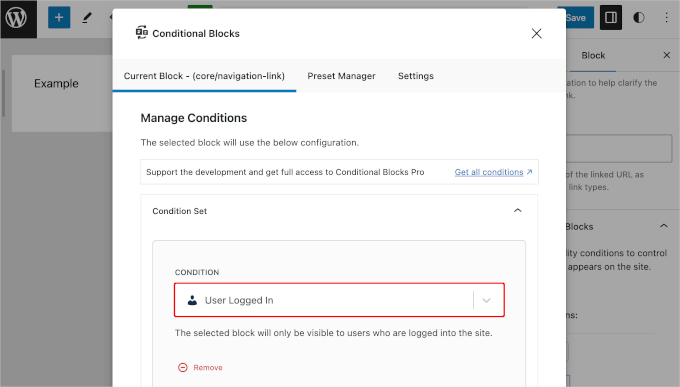
Simply close the window by clicking on the ‘X’ button at the top right corner.
You should then see a condition added to the ‘Conditional Blocks’ section. Go ahead and click ‘Save’ to update your navigation menus.
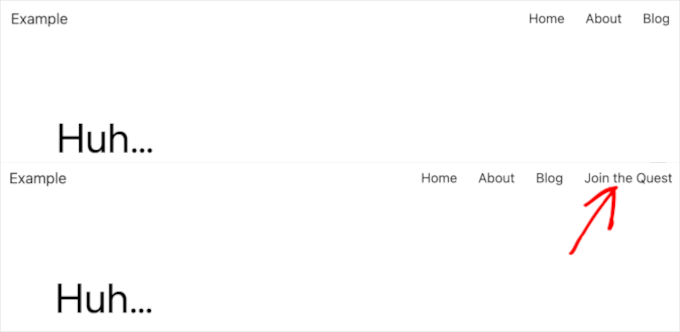
Now, if you visit your website, here’s what it might look like for logged-out and logged-in users:
Showing a Different WordPress Menu Depending on User Role
Once a user has logged in, you can also display a different navigation menu depending on the user role you have assigned to them.
For example, you could include extra menu items for an administrator and more limited items for a contributor. On a membership site, you could grant different levels of access to different membership levels.
Showing a Different WordPress Menu Depending on User Role Using the Classic Editor
As in the previous section, you’ll need to install and activate the Conditional Menus plugin.
Then, you can go to the Appearance » Menus page and switch to the ‘Manage Locations’ tab.
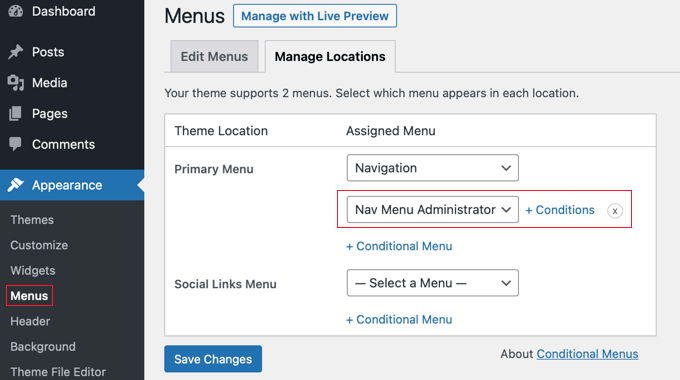
You should add the appropriate conditional menu for your selected user role. For this tutorial, we’ll select the ‘Nav Menu Administrator’ menu.
After that, you can click the ‘+ Conditions’ link to choose the user role.
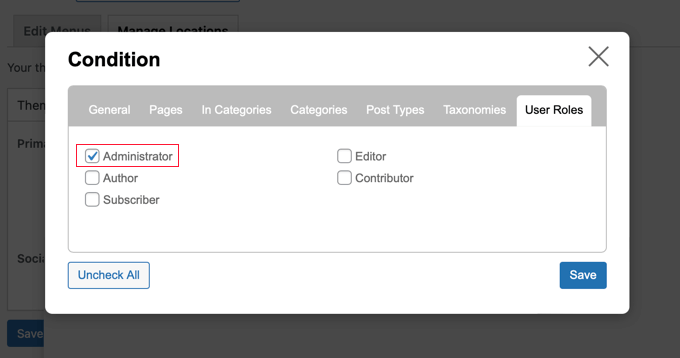
You will need to click on the ‘User Roles’ tab to see checkboxes for each user role on your website. Simply click the user roles that will see this menu, and then click the ‘Save’ button to store your changes.
Showing a Different WordPress Menu Depending on User Role Using FSE
To show a different menu depending on user roles in FSE, you’ll be using the Content Control plugin. If you need help installing and activating it, please refer to our guide on how to install a WordPress plugin.
Upon activation, you can navigate to Appearance » Editor » Patterns » All template parts. Then, simply click the three dots in the ‘Header’ section and then select ‘Edit.’

In the editor, you can select a navigation menu to add conditionals to.
For example, we’re going to make our ‘Blog’ page exclusive to our subscribers only. So, we’ll click ‘Blog’ to open its customization options.
From here, let’s head over to the right-hand panel and toggle the ‘Enable Controls’ switch in the ‘Block Controls’ section.
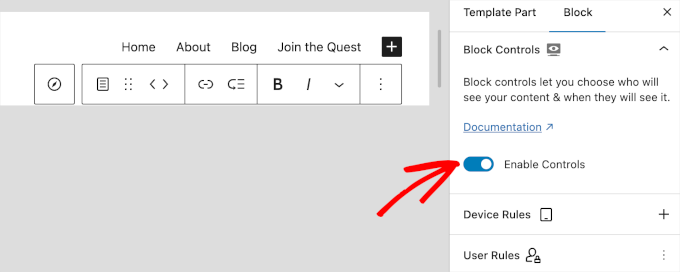
Then, you’ll want to scroll down to the ‘User Rules’ section to set up the conditions.
First, simply open the ‘WHO CAN SEE THIS CONTENT’ dropdown menu and choose ‘Logged In User.’
Then, for the ‘USER ROLE’ dropdown, you can choose ‘Matching.’ And in the ‘CHOSEN ROLES,’ let’s select ‘subscriber.’
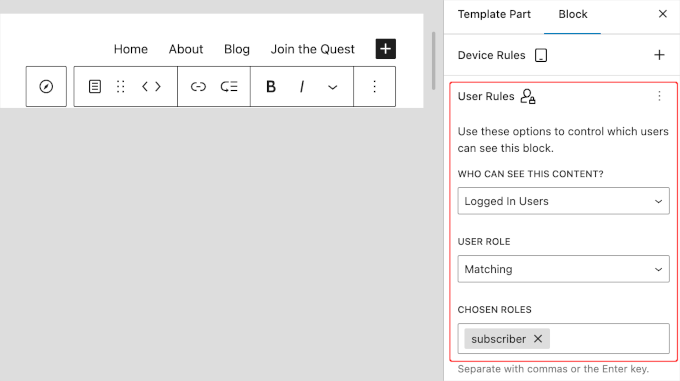
Once done, you can go ahead and click the ‘Save’ button.
Showing a Different Menu for Different Pages in WordPress
You can display a different menu for different pages in WordPress.
For example, you could display extra menu items on your privacy policy page, such as a link to your cookie notice.
Showing a Different Menu for Different Pages in WordPress Using the Classic Editor
To do this, you need to install and activate the Conditional Menus plugin. Then, you’ll want to navigate to Appearance » Menus » Manage Locations.
After choosing the appropriate navigation menu, you can click the ‘+ Conditions’ link. This time, you should click the ‘Pages’ tab. You will see a list of every page on your website.
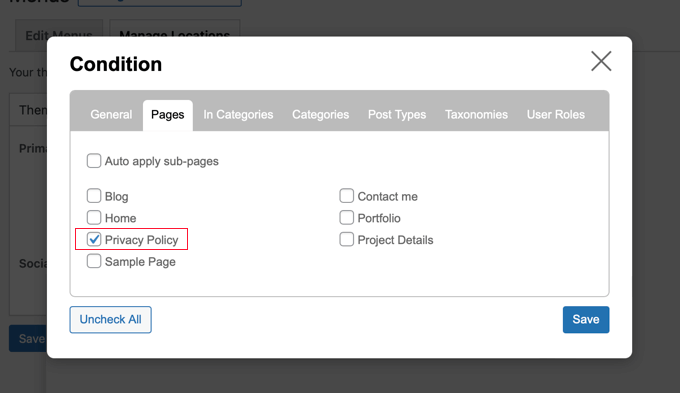
You’ll then need to place a checkmark next to each page where you wish to display the navigation menu. Once done, go ahead and click the ‘Save’ button.
Showing a Different Menu for Different Pages in WordPress Using FSE
Block theme users can use the Block Visibility plugin. If you need help with installation, please see our guide on how to install a WordPress plugin.
Once activated, let’s navigate to Appearance » Editor » Patterns » All template parts. And after opening the Header’s editor, you can head over to the ‘Visibility’ section.
From here, you can open the dropdown and select ‘URL Path.’
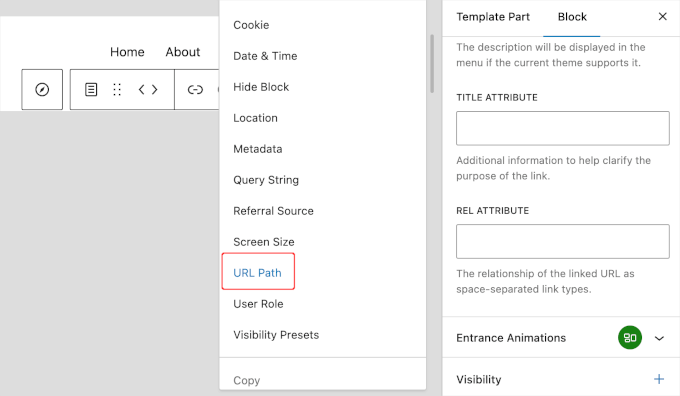
Then, you can add the Privacy Policy page’s URL path to the ‘URL PATH (CONTAIN)’ area.
A URL path is the part of a web address that comes after the main website name and shows a specific page or item.
For example, in the address https://example.com/about, the /about part is the URL path.
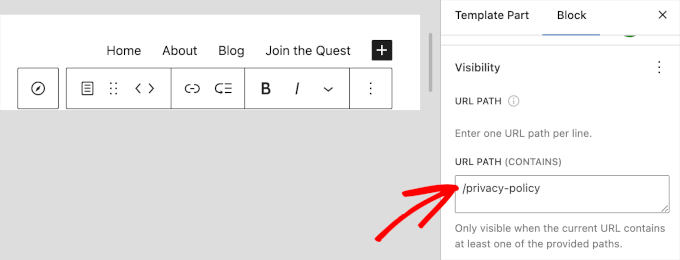
If you don’t know what your Privacy Policy page’s URL path is, you can go to Pages » All Pages. Then, you’ll want to find the Privacy Policy page and hover over it.
Simply click the ‘Quick Edit’ button, and you’ll want to see the ‘Slug’ section. The URL path should be the ‘/’ symbol followed by the page’s slug.
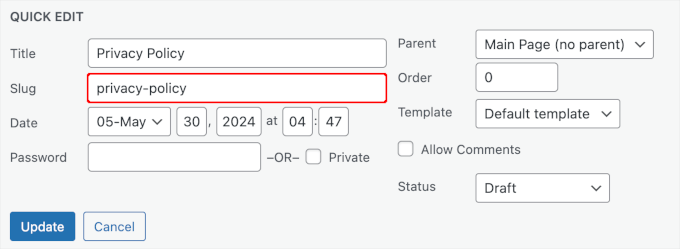
Or simply visit the page and copy and paste the bit after the domain name.
That’s it! Go ahead and click ‘Save’ to store the changes.
Hiding the Navigation Menu on Landing Pages in WordPress
There may be pages on your website where you don’t want to display a navigation menu at all, such as your landing pages.
A landing page is designed to increase sales or generate leads for a business. On these pages, you’ll want to minimize distractions and provide users with all the information they need to take a specific action.
In our guide on how to increase your landing page conversions by 300%, we suggest that you minimize distractions by removing navigation menus and other links from the page.
Hiding the Navigation Menu on Landing Pages in WordPress Using the Classic Editor
You can do that using the Conditional Menus plugin. This time, you’ll choose ‘Disable Menu’ from the dropdown when selecting the conditional menu.
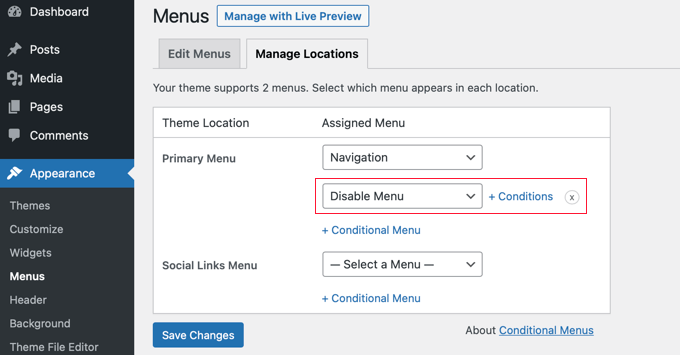
Next, let’s click the ‘+ Conditions’ link to choose when to display the menu.
You should click on the ‘Pages’ tab and place a checkmark next to the ‘My Landing Page’ item.
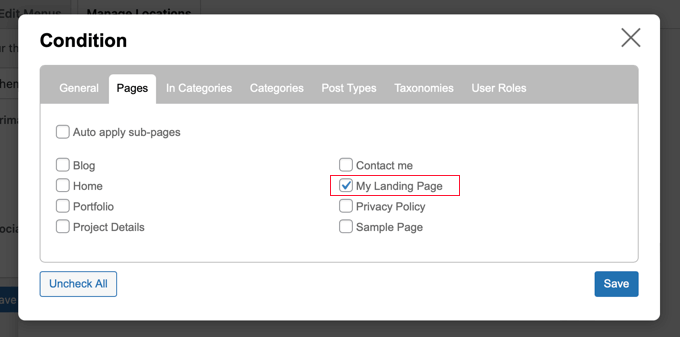
Don’t forget to click the ‘Save’ button to store and apply your settings.
Hiding the Navigation Menu on Landing Pages in WordPress Using FSE
Now, for block theme users, you can use the Block Visibility plugin, but this time, you’ll enter the URL path to the ‘URL Path (Does Not Contain)’ field.
So, let’s install and activate the plugin. If you need help, then feel free to see our guide on how to install a WordPress plugin.
Upon activation, you can head over to Appearance » Editor » Patterns » All template parts. Once inside the Header editor, let’s find the ‘Visibility’ section.
From here, you can choose ‘URL Path’ and enter the path of your landing page into the ‘URL Path (Does Not Contain)’ field.
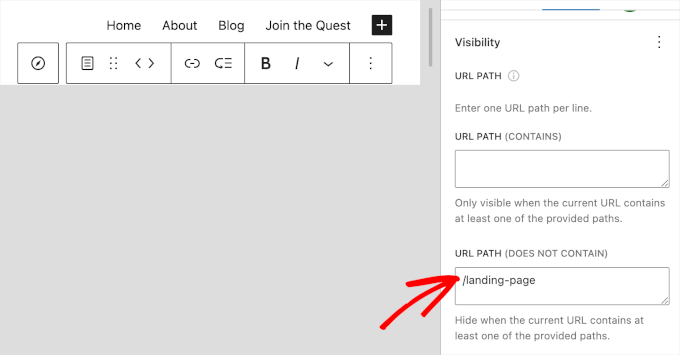
Once done, simply click the ‘Save’ button.
Frequently Asked Questions About Conditional Menus
Got questions about setting up or customizing conditional menus in WordPress? Here are some quick answers to help you get started.
What is the best conditional menu plugin for WordPress?
If you’re using a classic theme, the Conditional Menus plugin is a simple and reliable choice. For block themes, tools like Conditional Blocks or Block Visibility give you powerful control right inside the editor.
Can I add conditional logic to menus without a plugin?
Yes, but it involves adding custom code to your theme’s files, which is best left to advanced users since a small mistake can break your site.
For most people, a plugin like WPCode is a much safer and easier way to add and manage code snippets. You can find out everything about it in our full WPCode review.
Can I apply conditions to a single menu item instead of the entire menu?
Absolutely. Many modern WordPress themes and menu plugins allow this. In the classic menu editor (Appearance » Menus), you can often set visibility rules for individual items. In the block editor, you can apply conditions to specific navigation link blocks.
Further Reading: Doing More With WordPress Navigation Menus
Navigation menus are powerful web design tools. They allow you to direct users to the most important sections of your WordPress blog or website.
Now that you are showing different navigation menus on different pages and for various user roles, you may wonder how to customize them further.
To improve the functionality of your navigation menus, be sure to check out these tutorials:
- How to Add Custom Items to Specific WordPress Menus
- How to Add Custom Navigation Menus in WordPress Themes
- How to Add a Fullscreen Responsive Menu in WordPress
- How to Create a Vertical Navigation Menu in WordPress
- How to Add a Mega Menu to Your WordPress Site
- How to Style WordPress Navigation Menus
- How to Display Breadcrumb Navigation Links in WordPress
If you liked this article, then please subscribe to our YouTube Channel for WordPress video tutorials. You can also find us on Twitter and Facebook.


Jiří Vaněk
I started using MemberPress and realized that I also needed to add menu items for logged-in users that shouldn’t be visible to others because they’re not meant for them. Thanks to this article, I was finally able to create two menus, each for a different type of user. It works like magic, and it’s perfect.
Bet Hannon
Be VERY careful with making menus different across your site. It’s not a problem to show different menus to logged in/out users, but to meet WCAG 2.0+ accessibility standards, main menus should be consistent page to page.
WPBeginner Support
Thank you for sharing that for those attempting to have those standards for their site.
Admin
Kevin
I don’t see the “Enable conditional logic” under Appearance -> Menu. I’m using WordPress 5.7 as of March 16, 2021.
WPBeginner Support
The wording may have changed since this article but there should still be a checkbox for changing the visibility.
Admin
Laurentiu
A small feature, but very missed when a programmer is asked to work in wordpress.
WPBeginner Support
Glad you found this recommendation helpful
Admin
Richard Spatts
Thanks for this, it really helped
WPBeginner Support
You’re welcome, glad our guide helped
Admin
Richard S.
BIG Thank you for this article, it’s awesome.
Your snippet of code was perfect for a project I was working on, as was this plugin which I’m now using.
Even in 2019 this is a handy page, it’s working well on WordPress 5.2.3 (Astra Pro theme) so still very applicable.
WPBeginner Support
You’re welcome, glad our recommendation is helpful
Admin
Vasim Shaikh
I would like to ask I have added role for user Author and subscriber both then its should be display to author not subscriber. how to handle this?
WPBeginner Support
You could set it to show if the user is the role of Author
Admin
Rudolf
Really simple and easy to use plugin. Fantastic! It did not only save me a lot of time but also an organizational advantage because instead of using widget logic with different menu widgets, I create now one 1 menu with conditions per item.
Jonathan P
Thank you,
I have only used this plugin for conditions for users that are logged in or not logged in, but it works great, it really has saved me hours of messing around with code.
Kiva
Could I set up this plugin so that I can set up different menu options for each different category?
Sphelele
There is no conditional logic feature on my menu.
David
Thank you guys for sharing this. However it will display a PHP Notice on conditioned menu items and the custom condition won’t be displayed among condition options, if you don’t specify the id parameter.
Paul
Hi, I added conditions (if a string matches the server name, a menu is hidden). Great! But I would like to add even more custom conditions. Could you show an example of the code you would use to add more than on name/condition pair the custom option?
name = “If the site is not www.”
condition = www is not in SERVER_NAME
name = “Paul site.”
condition = “paul is in SERVER_NAME”
etc.
Thanks!
Isuru
This Conflicts the WP User Manager Pro, and then user manager Pro plugin functions not working due to the confliction.
as an ex: Show password tick in user registration page doesn’t work, as well as login page also not functioning well.
can you please fix this
Mo
Yep, definitely broken.
Works great for the built in conditions, but when coding custom conditions it works once and then stops working.
jban
YES!!! After 90 minutes of trying to figure this out, this article made it work for me. THANK YOU!!!
Jesus Flores
Works great!!! Thank you
Mohi
Hello
I installed this plugin, but I am getting an warning as follows :
Warning: Missing argument 2 for custom_nav_edit_walker() in /var/www/equest/wp-content/themes/wp-questrian/framework/megamenu/mega-menu.php on line 42
How to solve this warning ? Please guide me.
WPBeginner Support
Seems like the plugin is not compatible with your theme’s mega menu functionality. Please contact your theme’s support.
Admin
JMD
I have not used the If Menu plugn, but I tried the Nav Menu Roles plugin
It works but then conflicts with the Mega menu functionality of my theme.
I am hesitant to try the If Menu plugin mainly because it has not been updated in so long. It will be a matter of time before I have to remove it for sure.
Peter
Could not get this plugin to work. Not showing up i menu-items. Using: WP 4.3 / Nimwa theme.
Any suggestions on similar working plugin? Just want to hide some menu items while working on them…
Shafiq
Seems to work ok under WP 4.3.
Chuks Eke
Hi,
Could this be achieved with this plugin,
I want to have different menu for different pages or post. for example,
Home | About Us | Service | Contact
About Us [ History | Team | Career ]
Services [ Web Development | Window Application | Corporate ID ]
Is it possible with this plugin to show sub menu on side menu for About Us
Mike J
I found this plugin does not work with some themes
WPBeginner Support
Please report the themes to plugin using the support tab on the plugin page. May be they can help you with this.
Admin
Dieter
Seems to be broken under WP 4.2.2.
WPBeginner Support
What seems to be the problem? Working fine at our end.
Admin
Dieter
I stopped installation after reading WP Org PlugIn Page, there is the comment “1 person says it is broken” and in the support section is an open report which is not solved.
If I read something like this I don’t even try to install such plug in.
Jagabandhu
The plugin is not working. It’s not showing “enable conditional logic” and the plugin author is not responding from last 7 months.
Tried with disabling other plugins. But no result.
Is there any other plugin to do so!?
I need it.
WPBeginner Support
We just tested the plugin and it is working fine at our demo site. Can you test it by switching to a default theme with no other plugins activated?