Do you want to add custom items to specific WordPress menus?
WordPress menus are navigational menus that are displayed at the top of most websites. Sometimes you may want to display custom items other than plain links in navigation menus.
In this article, we’ll show you how to easily add custom items to specific WordPress menus.
Why Add Custom Items to WordPress Menus
WordPress menus are navigational links usually displayed at the top of a website. On mobile devices, they are often displayed when you tap a menu icon.
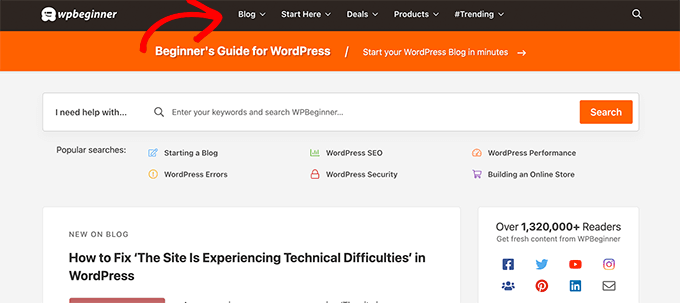
Since this is a prominent location in a typical WordPress website layout, it’s smart to take advantage of it by placing custom items other than plain links in the menu.
For instance, some users may want to display the search form like we do at WPBeginner. A membership website may want to show login and logout links, or you may want to add icons or images to your menu.
By default, navigation menus are designed to display plain text links. However, you can still place custom items in WordPress menus.
That being said, let’s take a look at how you can add custom items to specific menus in WordPress while keeping the rest of your navigation menu intact.
Adding Custom Items to Specific Navigation Menus in WordPress
There are different ways to add custom items to a navigation menu in WordPress. It depends on what type of custom item you are trying to add.
We’ll show you some of the most common examples. You’ll need to use plugins for some of them, while others will require you to add some code.
If you want to skip ahead to a certain section, you can use this table of contents:
- Add a search popup to your WordPress menu
- Add icons or images to your menu
- Add login/logout links to your menu
- Add custom text to a WordPress menu
- Add the current date to the menu
- Display usernames in your menu
- Show different menus on different pages
Let’s get started.
1. Adding a Search Popup in WordPress Menu
Normally, you can add a search form to your WordPress sidebar by using the default Search widget or block. However, there is no way to add search to the navigation menu by default.
Some WordPress themes have an option to add a search box to your main menu area. But if yours doesn’t, you can use the method below.
For this, you need to install and activate the SearchWP Modal Search Form plugin. For more details, see our step by step guide on how to install a WordPress plugin.
This plugin is an addon for SearchWP, which is the best WordPress search plugin on the market.
The addon is free and will work with default WordPress search as well. However, we recommend using it with SearchWP if you want to improve your WordPress search.
After installing the addon, simply head over to the Appearance » Menus page. Under the ‘Add menu items’ column, click on the ‘SearchWP Modal Search Forms’ tab to expand it.
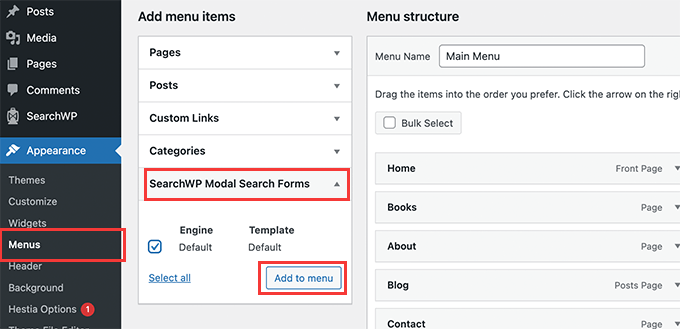
Select your search engine and then click on the Add to menu button.
The plugin will add the search to your navigation menu. Click on the ‘Modal search form’ under your menu items to expand it and change the label to Search or anything else you want.
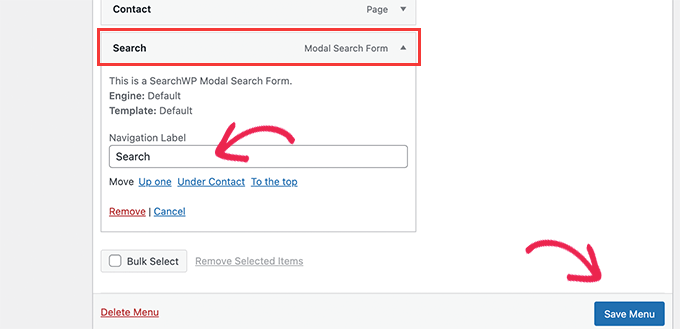
Don’t forget to click on the Save Menu button to store your changes.
You can now visit your website to see Search added to your navigation menu. Clicking on it will open the search form in a lightbox popup.

For more details, see our guide on how to add a search button to a WordPress menu.
2. Add Icons and Custom Images to Specific Menus
Another popular custom item that users often want to add to a specific menu is an image or an icon.
For that, you’ll need to install and activate the Menu Image Icon plugin. For more details, see our step by step guide on how to install a WordPress plugin.
Upon activation, go to the Appearance » Menus page and move your mouse over the menu item where you want to display an icon or image.
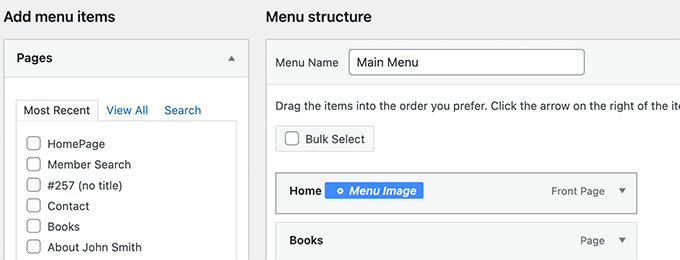
Click on the blue Menu Image button to continue.
This will bring up a popup. From here, you can choose an image or icon to be displayed with that menu item.
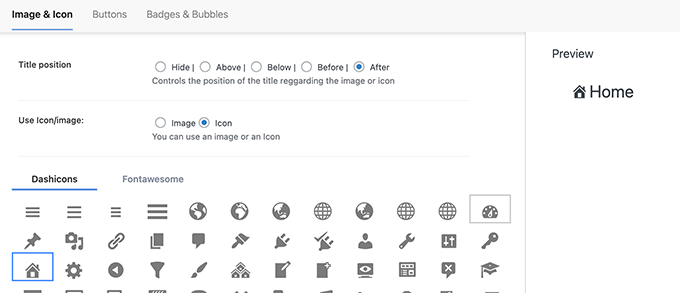
You can also choose the position of the image or icon with respect to the menu item. For example, you can display the icon right before the menu item like in our example below, or even hide the menu title so only the icon shows.
Don’t forget to click on the Save changes button to store your settings. Repeat the process if you need to add icons or images to other menu items.
After that, you can visit your website to see the custom image or icon in specific menu items.

For more detailed instructions, see our tutorial on how to add images in WordPress menus.
3. Add Login / Logout Links to Specific WordPress Menu
If you are using a WordPress membership plugin or running an online store, then you may want to allow users to easily log in to their accounts.
By default, WordPress doesn’t come with an easy way to display login and logout links in navigation menus.
We’ll show you how to add them by using a plugin or by using code snippet.
1. Add Login / Logout Links to Menus using a Plugin
This method is easier and recommended for all users.
First, you need to install and activate the Login or Logout Menu Item plugin. After that, you need to visit the Appearance » Menu page and click on the Login/Logout tab to expand it.
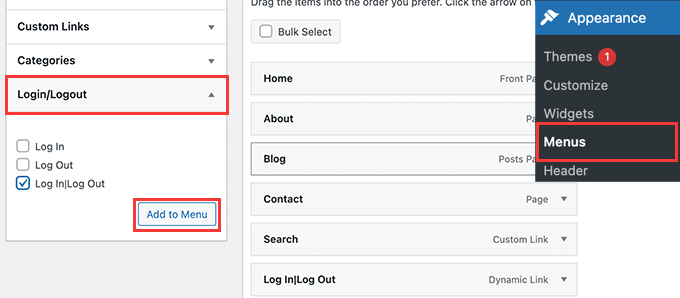
From here, you need to select ‘Log in|Log Out’ item and click on the Add to Menu button.
Don’t forget to click on the Save Menu button to store your changes. You can now visit your website to see your custom login logout link in action.

The link will dynamically change to login or log out depending on a user’s login status.
Learn more in our tutorial on how to add login and logout links in WordPress menus.
2. Add Login / Logout Links using Custom Code
This method requires you to add code to your WordPress website. If you haven’t done this before, then take a look at our guide on how to add custom code in WordPress.
First, you need to find out the name that your WordPress theme uses for the specific navigation menu location.
The easiest way to find this is by visiting the Appearance » Menus page and taking your mouse over to the menu locations area.
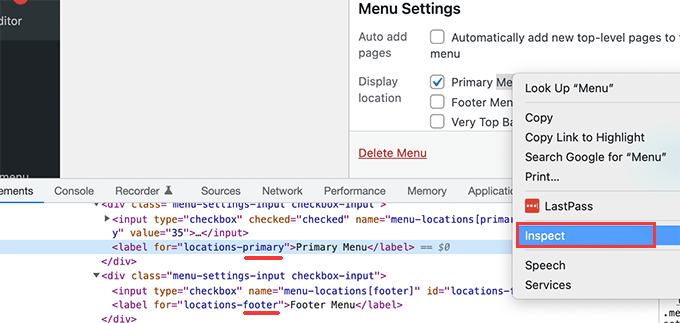
Right-click to select Inspect tool and then you’ll see the location name in the source code below. For instance, our demo theme uses primary, footer, and top-bar-menu.
Note the name used for your target location where you want to display the login / logout link.
Next, you need to add the following code to your theme’s functions.php file or a site-specific plugin.
add_filter( 'wp_nav_menu_items', 'add_loginout_link', 10, 2 );
function add_loginout_link( $items, $args ) {
    if (is_user_logged_in() && $args->theme_location == 'primary') {
        $items .= '<li><a href="'. wp_logout_url() .'">Log Out</a></li>';
    }
    elseif (!is_user_logged_in() && $args->theme_location == 'primary') {
        $items .= '<li><a href="'. site_url('wp-login.php') .'">Log In</a></li>';
    }
    return $items;
}
After that, you can visit your website and you’ll see the login our log out link in your navigation menu.

This dynamic link will automatically switch to login or logout based on user’s login status.
4. Adding Custom Text to Your WordPress Navigation Menu
What if you just wanted to add text and not a link to your navigation menu?
There are two ways you can do that.
1. Add Custom Text to a Specific Menu (Easy Way)
Simply go to the Appearance » Menus page and add a custom link with # sign as the URL, and the text you want to display as your Link Text.
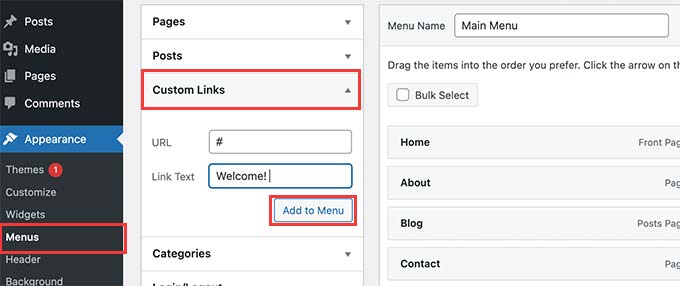
Click on the Add to Menu button to continue.
WordPress will add your custom text as a menu item in the left column. Now, click to expand it and delete the # sign.
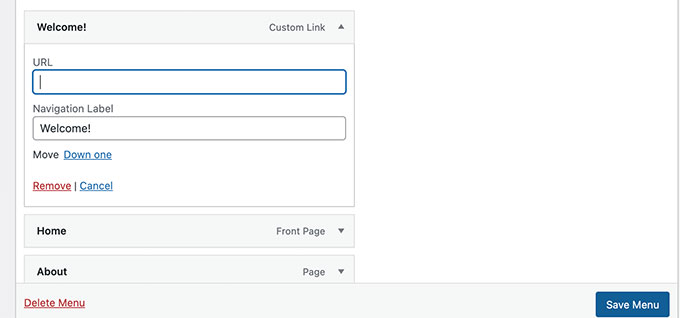
Don’t forget to click on the Save Menu button and preview your website. You’ll notice your custom text appear in the navigation menu.
It is still a link, but clicking on it doesn’t do anything for the user.

2. Add Custom Text to a Navigation Menu Using Code
For this method, you’ll add a code snippet to your website. First, you’ll need to find out the name of your theme location as described above in the login/logout link section.
After that, you need to add the following code to theme’s functions.php file or a site-specific plugin.
add_filter( 'wp_nav_menu_items', 'your_custom_menu_item', 10, 2 );
function your_custom_menu_item ( $items, $args ) {
    if ( $args->theme_location == 'primary') {
        $items .= '<li><a title="">Custom Text</a></li>';
    }
    return $items;
}
Simply replace where it says ‘Custom Text’ with your own text.
You can now save your changes and visit your website to see your custom text added at the end of your navigation menu.
This code method may come in handy if you want to programmatically add dynamic elements to specific WordPress menu.
5. Add Current Date in WordPress Menu
Do you want to display the current date inside a navigation menu in WordPress? This trick comes in handy if you run a frequently updated blog or a news website.
Simply add the following code to your theme’s functions.php file or a site-specific plugin.
add_filter('wp_nav_menu_items','add_todaysdate_in_menu', 10, 2);
function add_todaysdate_in_menu( $items, $args ) {
    if( $args->theme_location == 'primary')  {

        $todaysdate = date('l jS F Y');
        $items .=  '<li><a>' . $todaysdate .  '</a></li>';

    }
    return $items;
}
Don’t forget to replace ‘primary’ with your menu’s location.
You can now visit your website to see the current date in your WordPress menu.

You can also change the date format to your own liking. See our tutorial on how to change the date and time format in WordPress.
6. Display User Name in WordPress Menu
Want to add a little more personalization to your navigation menu? You can greet logged in users by their name in your navigation menu.
First, you’ll need to add the following code to your theme’s functions.php file or a site-specific plugin.
add_filter( 'wp_nav_menu_objects', 'username_in_menu_items' );
function username_in_menu_items( $menu_items ) {
    foreach ( $menu_items as $menu_item ) {
        if ( strpos($menu_item->title, '#profile_name#') !== false) {
			 if ( is_user_logged_in() )     {
				$current_user = wp_get_current_user();
				 $user_public_name = $current_user->display_name;
                $menu_item->title =  str_replace("#profile_name#",  " Hey, ". $user_public_name, $menu_item->title . "!");
			 } else {
			 $menu_item->title =  str_replace("#profile_name#",  " Welcome!", $menu_item->title . "!");
			 }
        }
    }

    return $menu_items;
}
This code first checks if you have added a menu item with #profile_name# as link text. After that, it replaces that menu item with logged in user’s name or a generic greeting for non-logged in users.
Next, you need to go to Appearance » Menus page and add a new custom link with the #profile_name# as Link text.
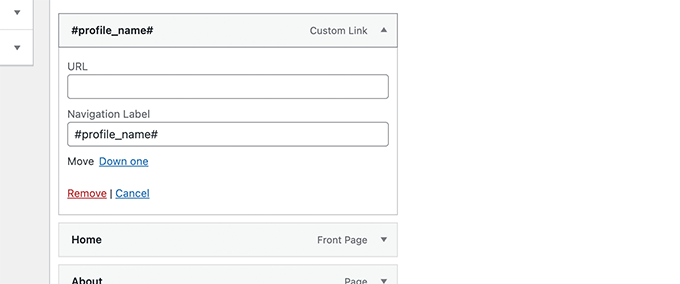
Don’t forget to click on Save Menu button to store your changes. After that, you can visit your website to see the logged-in user’s name in the WordPress menu.

7. Dynamically Display Conditional Menus in WordPress
So far we have shown you how to add different types of custom items to specific WordPress menus. However, sometimes you may need to dynamically show different menu items to users.
For instance, you may want to show a menu only to logged in users. Another scenario is when you want the menu to change based on what page the user is viewing.
This method allows you to create several menus and only display them when certain conditions are matched.
First, you need to install and activate the Conditional Menus plugin. For more details, see our step by step guide on how to install a WordPress plugin.
Upon activation, you need to visit Appearance » Menus page. From here you need to create a new menu that you want to display. For instance, in this example we created a new menu for logged in users only.
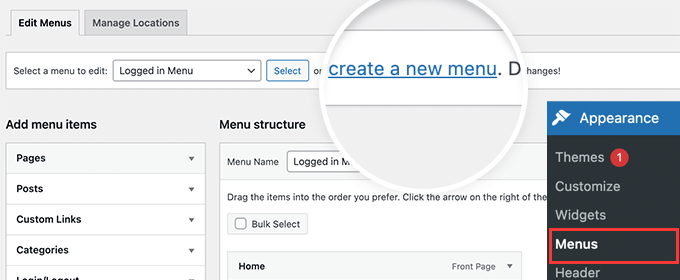
After you have created the menu, switch to the Manage Locations tab.
From here, you need to click on the Conditional Menus link next to the menu location.
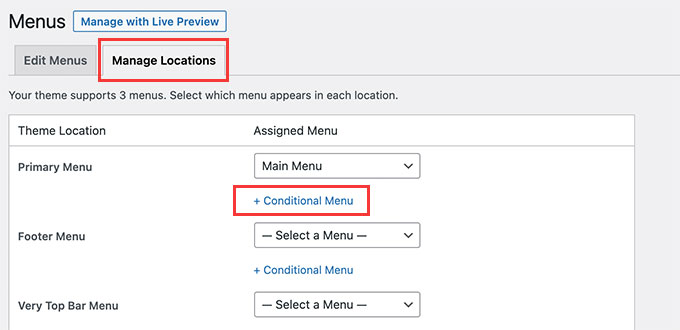
After that, you need to select the menu you created earlier from the drop down menu.
Then, click on the ‘+ Conditions’ button to continue.

This will bring up a popup window.
From here, you can select the conditions that need to be met in order to display this menu.
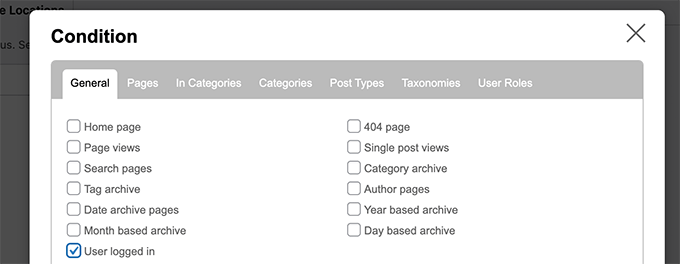
The plugin offers a bunch of conditions to choose from. For instance you can show the menu based on specific page, category, post type, taxonomy, and more.
You can also show different menus based on user roles and logged in status. For instance, you can show a different menu to existing members on a membership website.
We hope this article helped you learn how to add custom items to specific WordPress menus. You may also want to see our guide on how to choose the best web design software, or our expert comparison of the best live chat software for small business.
If you liked this article, then please subscribe to our YouTube Channel for WordPress video tutorials. You can also find us on Twitter and Facebook.


Syed Balkhi says
Hey WPBeginner readers,
Did you know you can win exciting prizes by commenting on WPBeginner?
Every month, our top blog commenters will win HUGE rewards, including premium WordPress plugin licenses and cash prizes.
You can get more details about the contest from here.
Start sharing your thoughts below to stand a chance to win!
Jiří Vaněk says
I like the implementation of the search, where instead of the classic empty field, there is a popup window. It looks like a nice solution. I was also interested in the date and personalization of the logged in user. Thanks for the inspiration.
reza says
very helpful and simple
thanks thanks thanks
WPBeginner Support says
Glad our guide was helpful
Admin
Denis says
Hello,
thanks a lot for that code. Is there a way to reorder the MENU? For example I want to have the Log in Log out button at first in the MENU. Just for an example.
Cheers,
Denis
WPBeginner Support says
For the moment with this code, we do not have a simple method for reordering where the additions are placed compared to the menu items at the moment.
Admin
Ben Short says
I’m sure this is too late for Denis! But in case anyone else wants their menu item to come FIRST in the list of menu items, rather than LAST, here’s an example of code I’ve used for this purpose:
add_filter( ‘wp_nav_menu_items’, ‘your_custom_menu_item’, 10, 2 );
function your_custom_menu_item ( $items, $args ) {
if (is_single() && $args->theme_location == ‘primary’) {
$oldItems = $items;
$items = ‘Show whatever’;
$items .= $oldItems;
}
return $items;
}
Karen says
Is there a way to have an entry on your menu bar set to appear at a certain time and another item set to expire?
WPBeginner Support says
Unless I hear otherwise, we do not have a recommended time based conditional display that we would recommend.
Admin
Mary says
How to add in my secondary menu footer class li items in functions.php…?
Saurabh Saneja says
Hi,
How can I add a search form at the beginning of the menu items list?
Thanks,
Saurabh
PS: big fan of your tuts
Igor says
This is great. But would it be possible to add a menu within a menu?
I want to append a language menu to my primary menu.
I get the language menu on the page but not in the desired place.
instead of
Annemarie says
Thank you for this! Just what I needed in a project.
Tasneem says
I used the code for teh search box it works perfect.
Anuj says
Nice article, Help me alot.
Garratt says
Does this code still work? Not seeing anything on my menu, even just using the basic function with text. Not using any special type of menu, just ‘X’ & child theme.
Garratt says
never-mind, sorry just read this: “Obviously, you need to have custom menu enabled in your themes before you can proceed any further.”
Garratt says
OK so I was still having the problem even though my menu was custom, and messed around until I removed the condition. (IF), once I did that it displayed on all pages including homepage.
`add_filter( ‘wp_nav_menu_items’, ‘your_custom_menu_item’, 10, 2 );
function your_custom_menu_item ( $items, $args ) {
$items .= ‘Show whatever’;
return $items;
}
sahar says
It worked but it destroyed responsivity…I had to remove code
Gerson says
How add this menu item in first position ?
Gwen says
Awesome, Thanks you just saved me hours.
Dilip says
What is use of 10,2 in the code
WPBeginner Support says
10 specifies the order in which the functions associated with a particular action are executed. Lower numbers correspond with earlier execution, and functions with the same priority are executed in the order in which they were added to the action.
2 is for the number of arguments the function accepts.
Admin
Pat says
This is so useful and just what I needed! Thank you very much for sharing.
Matt says
The Log-in link won’t show up, just the log out link. What could cause this?
Ritchie Pettauer says
This is an awesome, straight-to-the point tutorial. I want an item with today’s date (“headlines | DATE”) in one of my menus.
I didn’t expect the first posting I found to solve my problem thx guys.
Bill Gram-Reefer says
works but (lol) for my situation I want to add “Search” to the primary header as if it were just another item that got checked in
appearance/menus/add-to-menu
Everything I’ve seen creates a whole new…what is it a div…(?)
that adds a whole new row to the header instead of p[lacing the form in the same row as ABOUT, etc. items in the primary navigation edit window.
AND take the css assigned to the navigation bar.
Josalone Wordsworth says
I really liked the post, so useful. However lets say I want to add a login and logout link in the footer with and if condition
Hugo Callens says
Related question: how to add a menu item based on a specific user role?
Say I have a custom user role called “Student” and I would like to add an item to the menu only when the user has the role of “Student”?
Monilal says
Its works but current menu item not select
james says
is there a way to add it on certain submenu instead of top ul?
Jonathan says
I’d like to know the same thing. Anyone have an answer on how to add it in a certain submenu?
Gerrit says
Thank you for the How To!
To be honest I don’t understand how you call the function.
Especially I am missing a mention what arguments you call the functions with i.e. what wp variables to hand over as $items and $args.
Could you please detail for a wp-beginner?
Thank you,
Gerrit
samuel says
hey how if i want to add it to sub menu ?
lokitoki says
hm any ideas how i could add html tags to just one wordpress menu item.
from this:
Contact
to this:
Contact
it should be only for one menu item. not to all
amit says
the option is available on wp admin panel
lokitoki says
hm any ideas how i could edit the tag for one wordpress menu item.
from this:
Contact
to this:
Contact
it should be only for one menu item. not to all
gonzela2006 says
Hello,
How can I add the following classes active and current-menu-item and the id menu-item-id ?
Lại Đình Cường says
How about add new custom menu to specific position?
Guillermo says
I want put a little image beside left to the menu home, how can put it?
please help me
Pierre Laflamme says
In your examples, you add items to the primary menu (theme_location == ‘primary’).
How would I add an item in a specific menu in widget area? Where do I get the theme_location?
WPBeginner Support says
theme locations are usually defined by your theme, check your theme’s functions.php file or the template where a menu is displayed.
Admin
Brad Trivers says
If you want to target a specific menu (not a theme location) then use $args->menu->slug == ‘the_menu_slug’ instead of $args->theme_location == ‘primary’.
Xúlio Zé says
Really useful!
Thank you vary much Brad
^-^
Peter Lalor says
Hi Brad,
Would you be able to tell me how I find out what the value of ‘the_menu_slug’ is?
Thanks,
Peter
razvan says
Hi! I used your tutorial to put a picture as a logo overlapping the menu bar. All is fine but this specific menu has a hover option that makes the color white… So when i hover the mouse on the logo, it also hovers the link which kind of ruins the aspect of the page.
This is my code:
if( $args->theme_location == ‘primary’ )
return ““.$items;
How can I hide the a href on the page and just display the image with link?
Thanks in advance
Kathy says
Hi, I think your code is close to what I’m looking for, but I’m trying to figure out how i can customize it to do what I’m trying to do!
What I am trying to do is create a menu item with dropdown list of authors? any idea how i can accomplish that?
Thanks so much!
Erik Mitjans says
Hi Kathy!
I was working on this since days and I finally got it working.
Take a look at: http://wordpress.org/support/topic/creating-a-dropdown-in-menu-that-lists-authors/page/2?replies=45#post-5103035
Also, take into consideration I’m adding extra classes and attributes cause the theme is Bootstrap based. You might not need all that.
Cheers!
Eric
sachi says
awesome i was searching these codes
Brad says
Thanks this was very helpfull,
However, out of curiosity, I can’t find this valuable filter hook: “‘wp_nav_menu_items” , I mean where in WP core files is this being called ??
Thanks much !!
WPBeginner Support says
It is located in wp-includes/nav-menu.php, however it is not recommended to modify core files. It is a filter and you can call it in your theme’s
functions.phpfile or a site specific plugin.Admin
Lavinia says
This isn’t work for me
Andor Nagy says
How can I place it in front of the first menu item? Otherwise great tutorial!
Regards,
Andor Nagy
Editorial Staff says
Use the return example of the search bar and move the items towards the end?
Admin
Cameron Jones says
add_filter( ‘wp_nav_menu_items’, ‘your_custom_menu_item’, 10, 2 );
function your_custom_menu_item ( $items, $args ) {
$custom = ‘Show whatever’;
$items = $custom.$items;
return $items;
}
Murugu says
Pardon my ignorance but which php file would I be editing?
Editorial Staff says
This would go in your functions.php file.
Admin
Murugu says
I added the following to my theme’s functions.php but the search box doesn’t show up like I would expect. Any suggestions?
add_filter(‘wp_nav_menu_items’,’add_search_box_to_menu’, 10, 2);
function add_search_box_to_menu( $items, $args ) {
if( $args->theme_location == ‘header_extras_inner’ )
return $items.””;
return $items;
}
Elliott Wall says
Sorry to be coming into this discussion so late
I’ve tried the search form part and it works great— thank you! I’m having problems styling it though, for some reason. No matter what I do the placeholder text in the field is gray. I’ve looked at the cascading of the styles and messed with so many things— I can change the background color for example, but no luck in making the text black, so the design continuity of the menu is somewhat compromised. My site is http://elliottwall.com if you care to have a look. Cheers
Editorial Staff says
For placeholder text, you have to do something like this:
::-webkit-input-placeholder { color: red; } :-moz-placeholder { /* Firefox 18- */ color: red; } ::-moz-placeholder { /* Firefox 19+ */ color: red; } :-ms-input-placeholder { color: red; }1-click Use in WordPress
Admin
Elliott Wall says
This worked perfectly— thank you again!
Sam says
Can we add custom link before the first item instead of at the end?
xafar Ali says
Yes , just concatenate first instead of last.
$items = “MENU ITEM ” . $items;
piomat says
beer!
SAcha says
Hi,
very interesting!
I added a custom link, but is it possible to add it in a certain position inside the menu? Like “after the first menu item”.
Thanks
Editorial Staff says
Not sure if that is possible.
Admin