Do you want to protect your WordPress site from brute-force attacks?
A brute force attack can slow down your website, make it inaccessible, and even crack your passwords to install malware on your website.
In this article, we will show you how to protect your WordPress site from brute-force attacks.
What Is a Brute Force Attack?
A brute force attack is a hacking method that uses trial and error to break into a website, a network, or a computer system.
The most common type of brute force attack is password guessing. Hackers use automated software to keep guessing your login information so they can gain access to your website.
These automated hacking tools can also disguise themselves by using different IP addresses and locations, which makes it harder to identify and block suspicious activities.
A successful brute force attack can give hackers access to your website’s admin area. They can install malware, steal user information, and delete everything on your site.
Even unsuccessful brute force attacks can wreak havoc by sending too many requests to your WordPress hosting servers, slowing down or even completely crashing your website.
That being said, let’s take a look at how to protect your WordPress website from brute-force attacks. Here are the steps we will follow:
1. Install a WordPress Firewall Plugin
Brute force attacks put a lot of load on your servers. Even the unsuccessful ones can slow down your website or completely crash the server. This is why it’s important to block them before they get to your server.
To do that, you’ll need a website firewall solution. A firewall filters out bad traffic and blocks it from accessing your site.
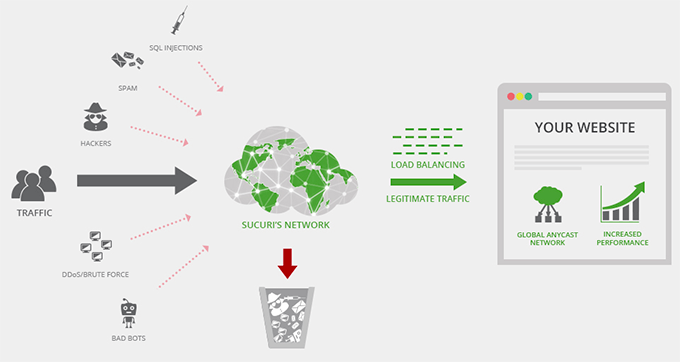
There are two types of website firewalls that you can use:
- Application Level Firewalls examine the traffic once it reaches your server but before loading most WordPress scripts. This method is not as efficient because a brute-force attack can still affect your server load.
- DNS Level Website Firewalls route your website traffic through their cloud proxy servers. This allows them to only send genuine traffic to your main web hosting server while giving a boost to your WordPress speed and performance.
We recommend using Sucuri. They are the industry leader in website security and the best WordPress firewall in the market. Since they have a DNS-level website firewall, this means all your website traffic goes through their proxy, where bad traffic is filtered out.
We use Sucuri on our website, and you can read our complete Sucuri review to learn more.
2. Install WordPress Updates
Some common brute force attacks actively target known vulnerabilities in older versions of WordPress, popular WordPress plugins, or themes.
WordPress core and most popular WordPress plugins are open source, and vulnerabilities are often fixed very quickly with an update. However, if you fail to install updates, then you leave your website vulnerable to those old threats.
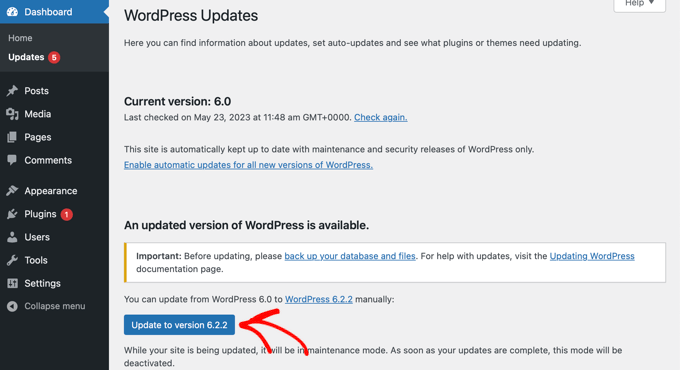
Simply go to the Dashboard » Updates page in the WordPress admin area to check for available updates. This page will show all updates for your WordPress core, plugins, and themes.
For more details, see our guides on how to safely update WordPress and properly update WordPress plugins.
3. Protect WordPress Admin Directory
Most brute force attacks on a WordPress site are trying to get access to the WordPress admin area. You can add password protection on your WordPress admin directory on a server level. This will block unauthorized access to your WordPress admin area.
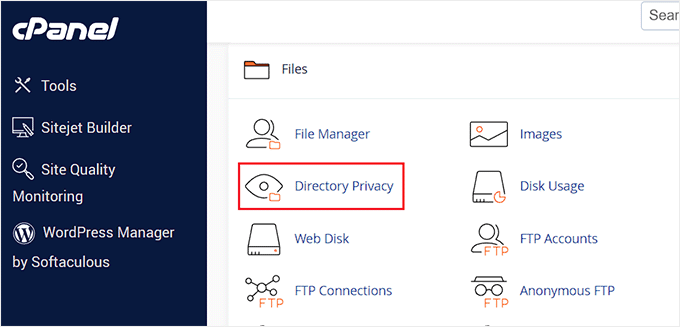
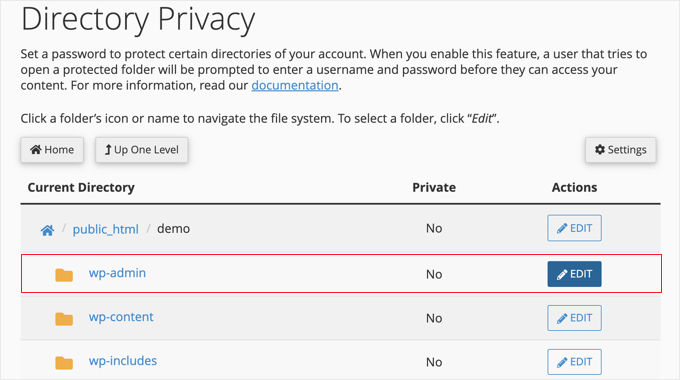
Simply log in to your WordPress hosting control panel (cPanel) and click on the ‘Directory Privacy’ icon under the Files section.
Note: We are using Bluehost in our screenshot, but similar settings are available on other top hosting companies like HostGator as well.
Next, you need to locate the wp-admin folder.
Once you find it, you should click its ‘Edit’ button.
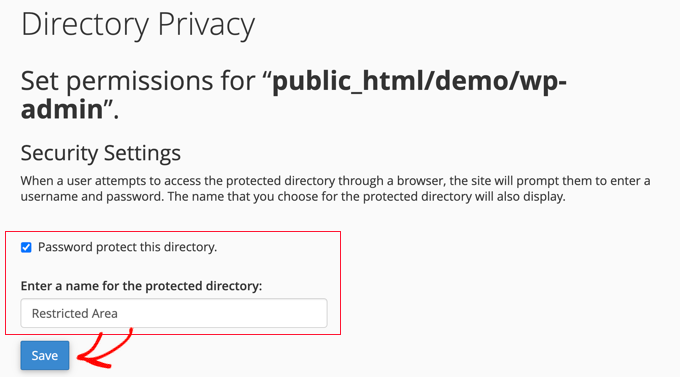
On the next page you can set the security settings for the folder.
First, you need to check the box for ‘Password protect this directory’. Next, you can enter a name for the protected directory.
Next, you will be asked to provide a username and password.
You will be asked for this information whenever you try to access this directory.
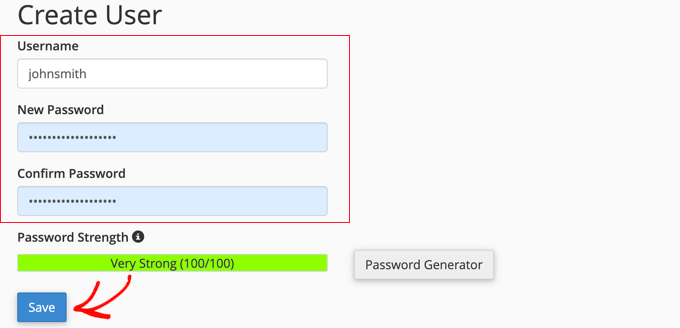
After entering this information, click on the ‘Save’ button to store your settings.
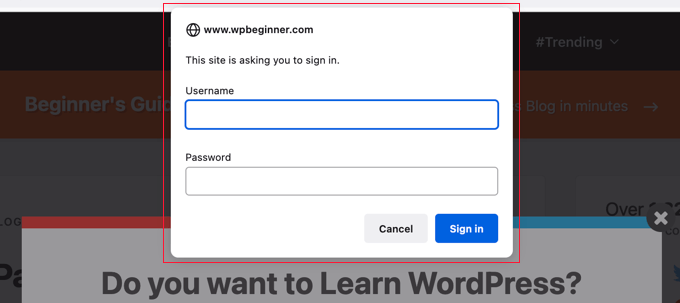
Your WordPress admin directory is now password-protected.
You will see a new login prompt when you visit your WordPress admin area.
If you run into a 404 error or error too many redirects message, then you need to add the following line to your WordPress .htaccess file:
ErrorDocument 401 default
For more details, see our article on how to password-protect the WordPress admin directory.
4. Add Two-Factor Authentication in WordPress
Two-factor authentication adds an additional security layer to your WordPress login screen. Users will need their phones to generate a one-time passcode along with their login credentials to access the WordPress admin area.
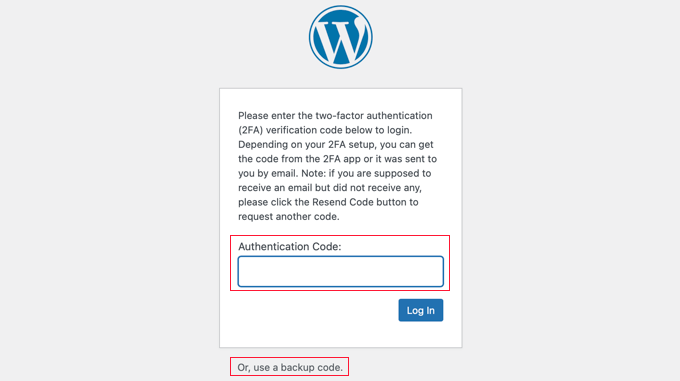
Adding two-factor authentication will make it harder for hackers to gain access even if they are able to crack your WordPress password.
For detailed step-by-step instructions, see our guide on how to add two-factor authentication in WordPress.
5. Use Unique and Strong Passwords
Passwords are the keys to gaining access to your WordPress site or eCommerce store. You need to use unique, strong passwords for all your accounts. A strong password is a combination of numbers, letters, and special characters.
It’s important that you use strong passwords for not just your WordPress user accounts but also for your FTP client, web hosting control panel, and your WordPress database.
Many beginners ask us how to remember all these unique passwords. Well, you don’t need to. There are excellent password manager apps available that will securely store your passwords and automatically fill them in for you.
To learn more, see our beginner’s guide on the best ways to manage passwords for WordPress.
6. Disable Directory Browsing
By default, when your web server can’t find an index file (such as index.php or index.html), it automatically displays an index page showing the contents of the directory.
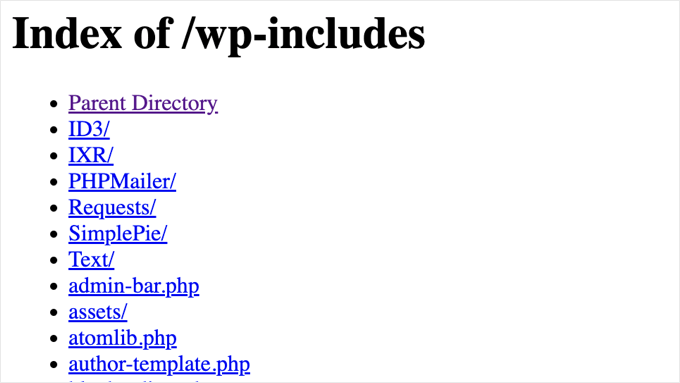
During a brute force attack, hackers can use directory browsing like this to look for vulnerable files. To fix this, you need to add the following line at the bottom of your WordPress .htaccess file using an FTP service:
Options -Indexes
For more details, see our article on how to disable directory browsing in WordPress.
7. Disable PHP File Execution in Specific WordPress Folders
Hackers may want to install and execute a PHP script in your WordPress folders. WordPress is written mainly in PHP, which means you cannot disable that in all WordPress folders.
However, there are some folders that don’t need any PHP scripts, such as your WordPress uploads folder located at /wp-content/uploads.
You can safely disable PHP execution in the uploads folder, which is a common place that hackers use to hide backdoor files.
First, you need to open a text editor like Notepad on your computer and paste the following code:
<Files *.php>
deny from all
</Files>
Now, save this file as .htaccess and upload it to the /wp-content/uploads/ folders on your website using an FTP client.
8. Install and Set Up a WordPress Backup Plugin
Backups are the most important tool in your WordPress security arsenal. If all else fails, then backups will allow you to easily restore your website.
Most WordPress hosting companies offer limited backup options. However, these backups are not guaranteed, and you are solely responsible for making your own backups.
There are several great WordPress backup plugins that allow you to schedule automatic backups.
We recommend using Duplicator. It is beginner friendly and allows you to quickly set up automatic backups and store them on remote locations like Google Drive, Dropbox, Amazon S3, One Drive, and more.

There’s also a free version of Duplicator that you can use to get started.
For step-by-step instructions, you can follow this guide on how to back up your WordPress site with Duplicator.
All the above-mentioned tips will help you protect your WordPress site against brute-force attacks. For a more comprehensive security setup, you should follow the instructions in our ultimate WordPress security guide for beginners.
We hope this article helped you learn how to protect your WordPress site from brute-force attacks. You may also want to see our guide on how to fix a hacked WordPress site and our expert picks for the best WordPress drag-and-drop page builders.
If you liked this article, then please subscribe to our YouTube Channel for WordPress video tutorials. You can also find us on Twitter and Facebook.


Syed Balkhi says
Hey WPBeginner readers,
Did you know you can win exciting prizes by commenting on WPBeginner?
Every month, our top blog commenters will win HUGE rewards, including premium WordPress plugin licenses and cash prizes.
You can get more details about the contest from here.
Start sharing your thoughts below to stand a chance to win!
Dayo Olobayo says
This is a great guide on securing your WordPress site! One additional tip I’d recommend is to regularly monitor your login attempts. Many security plugins offer detailed logs where you can track login attempts, including origin IP addresses. This can help you identify suspicious activity and potentially block malicious IPs.
Mrteesurez says
Thanks for your recommendation.
I used to check the logs details do as to identify the IP address of the login attempts. But is there any way to receive a notification for login attempts directly to email ?
Do you know any plugin doing that ?
Dayo Olobayo says
I believe Limit Login Attempts Reloaded plugin can send email notifications for login attempts. You can check it out.
Mrteesurez says
Ok, Thanks for your reply, Dayo. It’s difficult and takes time to be logging in frequently to check error log attempts across multiple website, that’s why I preferred receiving emails on any attempt. Thanks.
Jiří Vaněk says
I noticed that you didn’t include the option to change the URL of the WordPress administration in the list. Is there a reason for that? It’s also one of the very good methods to prevent attacks, as attackers won’t know the URL of the website’s administration.
WPBeginner Support says
We do not recommend that as that can cause problems with plugins and debugging and does not add greatly to the security of a site.
Admin
Jiří Vaněk says
Well, you probably have experience with this. I use it on my blog and have never had a problem on all sites. I assumed that changing the URL might make the administration more secure by not knowing the URL for the attacker, but I’ll take your advice.
Moinuddin Waheed says
This is very common problem for wordpress users. most of the times we give little to no concern to protect our website or blog and then complain when something of this kind happens.
I have been a victim of this brute force attack back in 2017 and since then I have ensured to use backup of my full website and two factor authentication to log in.
Is there a way we can identify if any malicious software has been installed or our dashboard has been compromised?
WPBeginner Support says
You can use some of the scanner options that we recommend in our article below!
https://www.wpbeginner.com/plugins/how-to-scan-your-wordpress-site-for-potentially-malicious-code/
Admin
Moinuddin Waheed says
Thanks for the reply and tutorial recommendation.
I am exploring these guides so as to make a successful wordpress websites agency.
I want to make sure that the websites that I make for my clients should be foolproof of security.
Renuga says
HI,
For step-3 admin protection, we need to show the login in WP-admin only but its showing in site also. So, please help us how to show only in WP-admin.
WPBeginner Support says
If you mean it is in your widget area you may want to check for a meta widget under Appearance>Widgets
Admin
Dreamandu says
I am under the brute force attack right now from different IPs. What can I do to protect my site right now?
WPBeginner Support says
You can use any of the methods in this article to start combating the brute force attack
Admin
Chidubem Ezenwa says
Yet another helpful guide. Thanks guys.