Are you wondering how to set up SAML single sign-on (SSO) on your WordPress website?
SAML SSO lets users log in to your site using their existing credentials from another service, like Google Apps or Microsoft Azure AD. This saves them time and hassle and makes it easier for you to manage user access, especially if you have a team that uses multiple logins.
In this article, we will show you how to set up SAML single sign-on in WordPress, step by step.
What Is SAML Single Sign-On?
SAML stands for Security Assertion Markup Language. It’s a secure way for your WordPress site to talk to other services, like Google and Office 365.
By contrast, SSO means single sign-on. This means that users can use one password for multiple services.
With SAML SSO, users can log in to your site using their existing credentials from those services. This means no more remembering extra usernames and passwords – just a single login for everything.
It’s especially handy for organizations and enterprises where people use a lot of different online platforms. For example, at WPBeginner, we use SSO to let our team members easily access their tools with just a single login.
With all that in mind, let’s see how you can easily set up SAML SSO in WordPress. You can use these quick links to navigate through the tutorial:
Step 1: Install miniOrange SAML Single Sign On
The easiest way to enable SAML SSO on your WordPress website is with the miniOrange SAML Single Sign On plugin.
It’s free and lets you connect your site to various identity providers, such as Google Apps, Okta, OneLogin, Salesforce, Azure B2C, Keycloak, ADFS, Shibboleth 2, Auth0, and Sharepoint.
Furthermore, this plugin allows users to access multiple sites and applications using a single login. That being said, you can repeat the same steps below with the rest of the sites that your team should be able to access.
That said, if you run a WordPress multisite network, you only need to do the steps once on your main network site, and the SSO will automatically work on all of your sites.
First, you’ll need to install the plugin. If you’re new to WordPress plugins, we’ve got a handy guide that walks you through installing a WordPress plugin step-by-step.
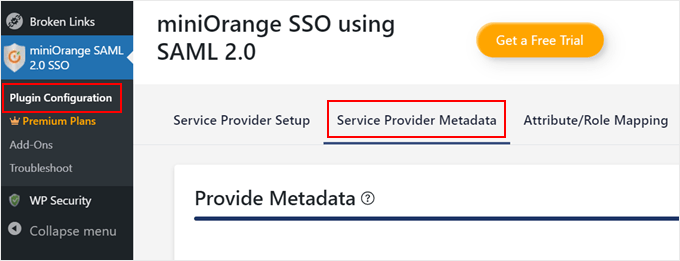
Once the plugin is installed, head over to your WordPress dashboard and navigate to miniOrange SAML 2.0 SSO » Plugin Configuration.
Then, switch to the ‘Service Provider Metadata’ tab. Keep this page open, as we’ll need the information here in the next step.
Step 2: Connect Your Site With an Identity Provider
Now that the plugin is installed in WordPress, it’s time to connect your website with a SAML identity provider (SAML IdP).
A SAML IdP is a service that manages user accounts and authenticates users. Think of it like a central hub where users log in once, and that login grants them access to various applications, including your WordPress site.
For this example, we will be using Google Apps as our SAML IdP. However, to use Google Apps as an SAML IdP, you’ll need a Google Admin account, which is different from your regular Gmail account.
A Google Admin account manages users and settings for your organization’s Google Workspace. It also usually doesn’t end in a @gmail.com extension.
Alternative: Want to set up Google SSO but don’t have a Google Admin account? Read our guide on how to set up a one-click Google login instead.
First, head over to the Google Admin Console page.
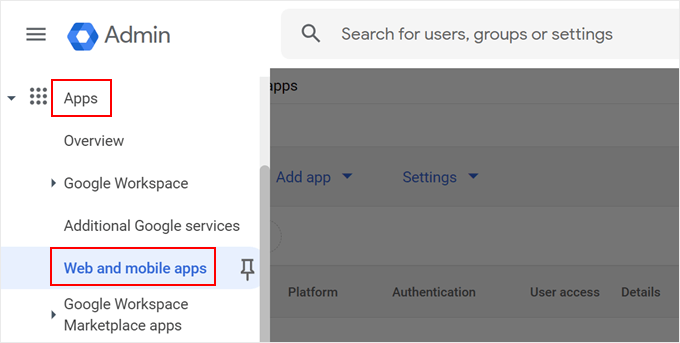
In the sidebar menu, navigate to the ‘Apps’ section and click on ‘Web and mobile apps.’
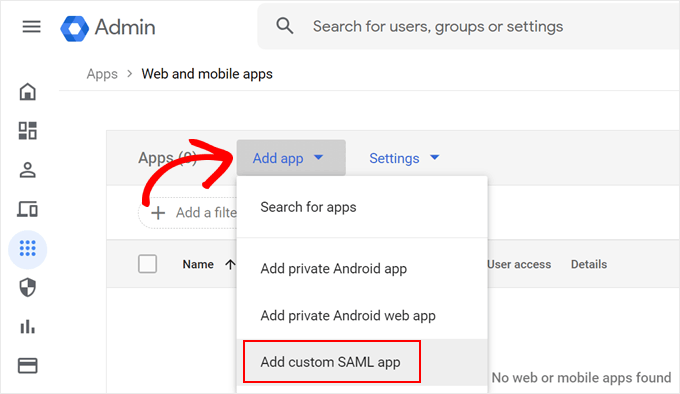
From here, open the ‘Add app’ dropdown menu.
Then, select ‘Add custom SAML app.’
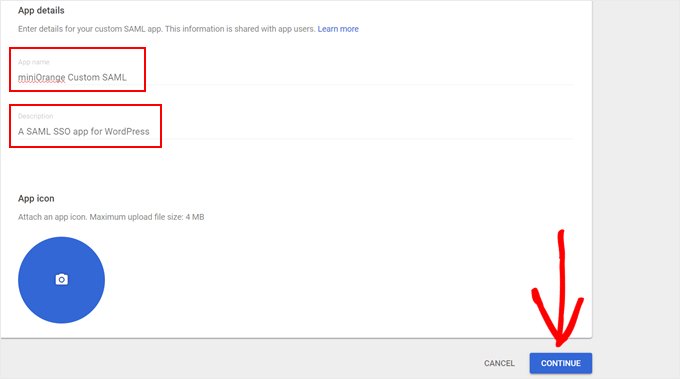
Now, give your custom SAML app a name (something like ‘miniOrange Custom SAML’) and a brief description (like ‘A SAML SSO app for WordPress’).
Once you’re happy, click ‘Continue.’
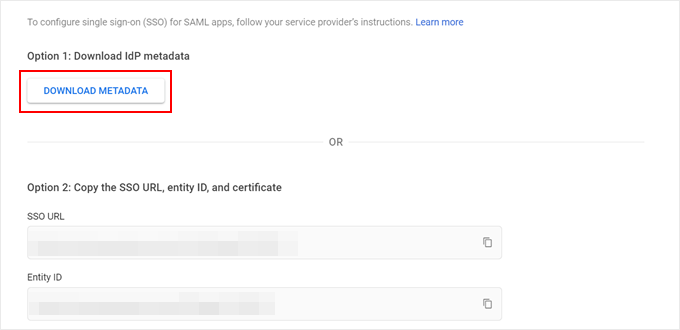
Here, you’ll see two options to configure WordPress SSO.
We’ll go with the easier option (option 1) which involves downloading IdP metadata. This method is much faster, as you won’t have to enter your IdP metadata manually and copy-paste your x509 certificate later on.
Click on ‘Download Metadata’ to start.
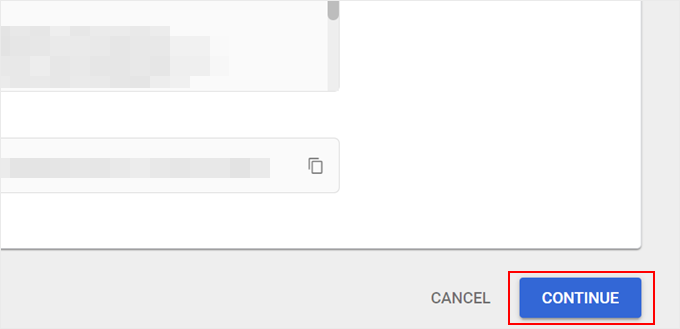
Then, scroll all the way down.
Click ‘Continue.’
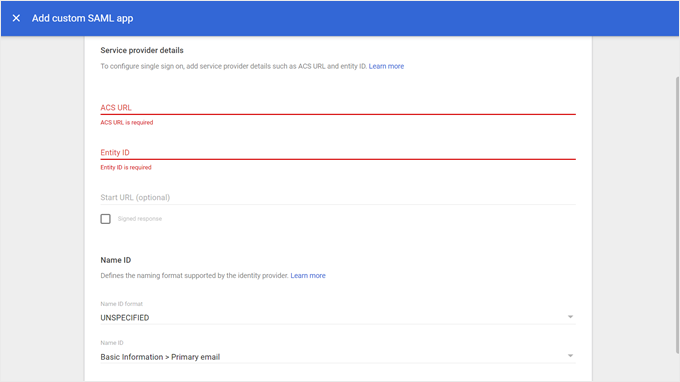
On the next page, you’ll see a form for your service provider details.
In our case, that is our WordPress website with the help of miniOrange.
Now, switch back to your WordPress dashboard, where you left the miniOrange plugin page open on the ‘Service Provider Metadata’ tab.
Scroll down to find your service provider information (ACS URL and Entity ID). Keep this page open, as you will need to switch back and forth between this page and Google Admin Console.
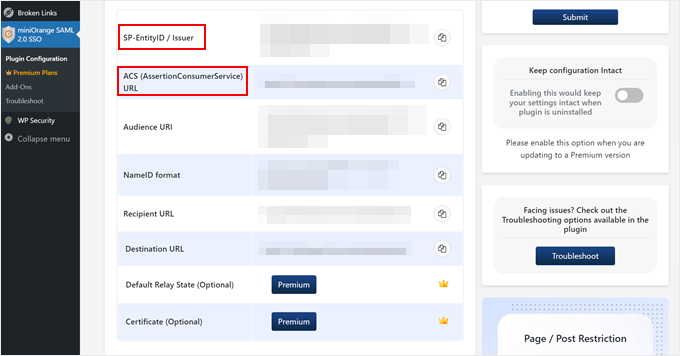
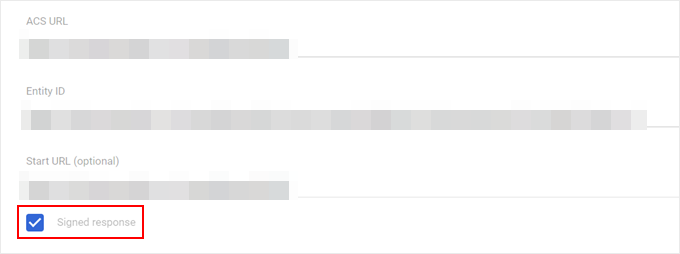
Now, head back to the Google Admin Console and copy-paste this information into the corresponding fields.
Make sure to tick the ‘Signed response’ box as well.
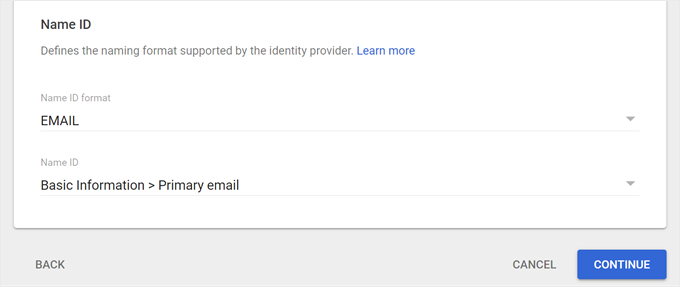
Moving down the page, select ‘EMAIL’ for the Name ID format and choose ‘Basic Information > Primary email’ for the Name ID.
Then, click ‘Continue.’
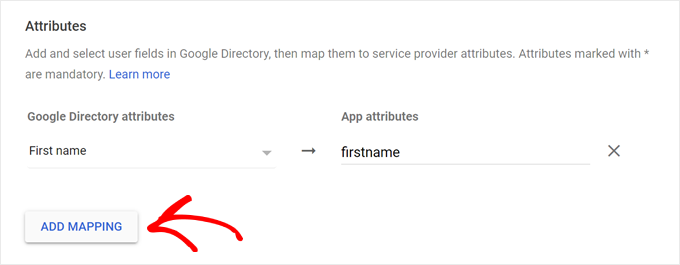
The next step involves adding user fields and mapping them between Google Directory and your WordPress site (miniOrange plugin).
This is essentially like picking which information from Google accounts gets transferred to your WordPress site.
Click on ‘Add Mapping’ to star. Then, let’s add the ‘First Name’ field from Google and map it to the ‘firstname’ attribute.
Once you’re done mapping the desired fields, scroll down.
Then, click ‘Finish.’
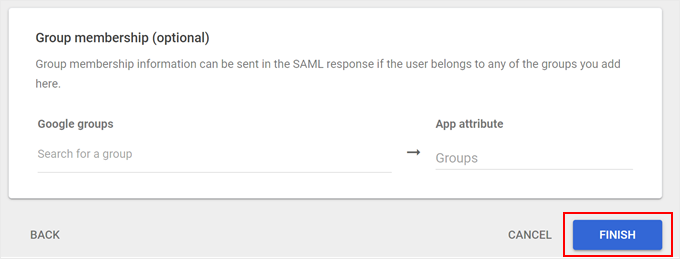
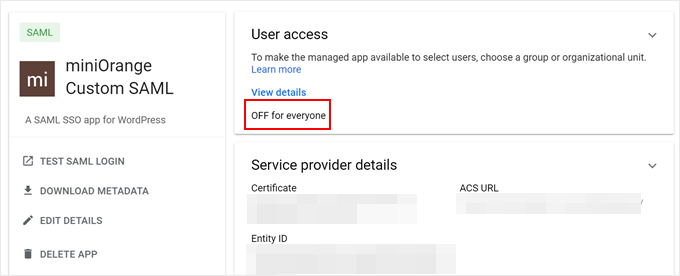
You’ll now land on the custom SAML app page in your Google Admin Console.
The last step is to activate the app for your users. So go ahead and click on ‘OFF for everyone.’
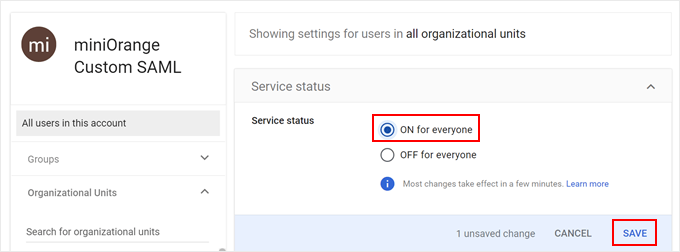
Now, just switch it to ‘ON for everyone.’
Finally, hit ‘Save’ to finalize the configuration.
Step 3: Configure WordPress SAML SSO Settings
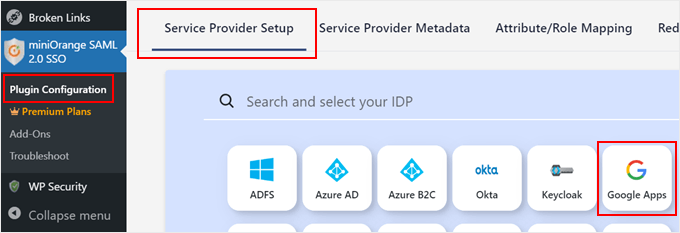
Let’s head back to the miniOrange SSO plugin page in your WordPress admin area.
Now, switch to the ‘Service Provider Setup’ tab and select ‘Google Apps.’
Scroll down and navigate to the ‘Upload IDP Metadata’ tab.
Here, you’ll need to input the identity provider name (likely something like ‘GoogleApps’) and upload the XML file you downloaded earlier from the Google Admin Console.
Once everything is filled in, click ‘Upload.’
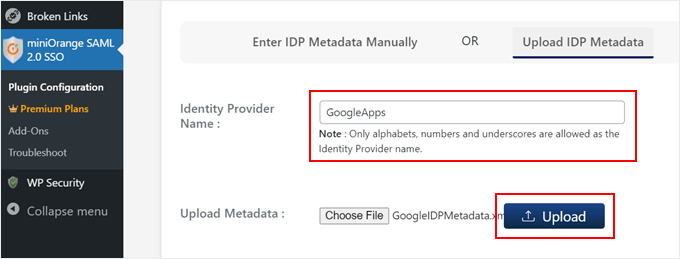
Congratulations! You’ve successfully connected your WordPress blog with your Google Apps SAML IdP. Now, let’s configure some additional settings.
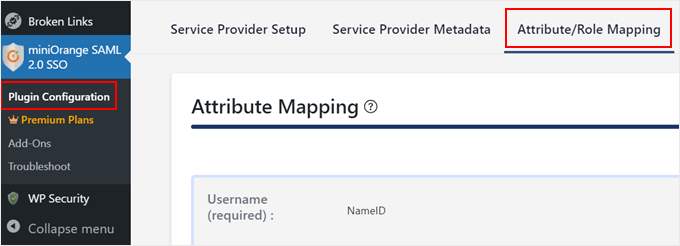
First, switch to the ‘Attribute/Role Mapping’ tab.
Here, you can define how user information from Google Apps gets mapped to user accounts in WordPress.
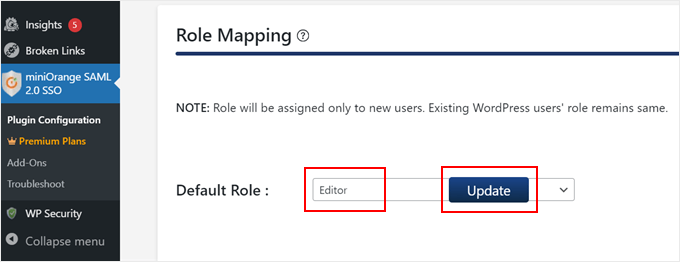
Scroll down to the ‘Role Mapping’ section and select the default user role you want to assign to new users who sign in using the SAML SSO.
In this example, we’ve selected ‘Editor.’ Go ahead and click ‘Update’ once you’ve made your choice.
Next, switch to the ‘Redirection & SSO Links’ tab.
This is where you can add a handy single sign-on button to your WordPress login page for user convenience.
Just make sure the option titled ‘Add a Single Sign-On button on the WordPress login page’ is enabled.

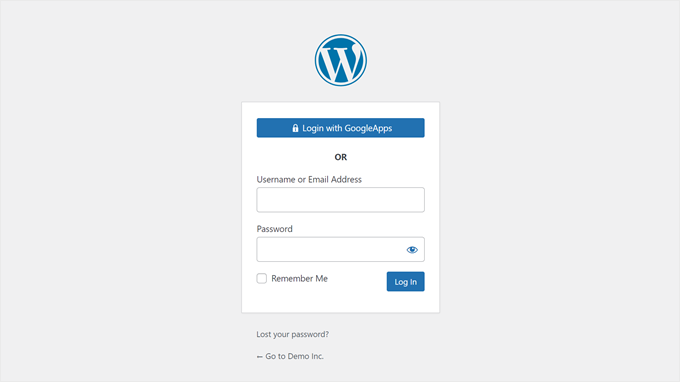
This small change will add a ‘Login With [identity provider name’ button to your WordPress login screen, making it easier for users to log in with their existing Google Apps credentials.
Here’s what ours looks like:
WordPress SAML Single Sign-On: Frequently Asked Questions
We’ve covered the steps to configure WordPress SAML SSO, but you might still have some questions. Let’s take a look at some common ones:
Are SAML and SSO the same?
No, SAML and SSO are not the same. SAML (Security Assertion Markup Language) is a specific protocol used to implement SSO.
There are other ways to achieve SSO besides using SAML. However, SAML is a popular and secure option for implementing SSO in a variety of applications, including WordPress.
What is the difference between SAML SSO and a one-click login with a plugin?
Yes, there are WordPress login plugins that offer one-click functionality, which is a much simpler option compared to SAML SSO.
The key difference lies in how they work. SAML SSO requires creating a custom app in your Google Admin console for secure communication. It requires more configuration but offers more security and centralized user management.
On the other hand, one-click login plugins use existing protocols like OAuth to connect with services like Google. You don’t need Google Admin privileges, but it might not offer the same level of security as SAML SSO.
Are SSO and social login the same?
Social login is a type of SSO that allows users to log in to your WordPress site using their existing social media credentials (like Facebook). SAML SSO, on the other hand, is a more secure and flexible option that can be used with a wider range of identity providers, not just social media platforms.
For more information on adding social login options to your WordPress site, you can refer to our guide on how to add social login in WordPress.
WordPress Security Tips to Make Login More Secure
While the SAML SSO login is pretty secure, here are some additional tips you can implement to further tighten your WordPress security:
- Enforce strong passwords for your WordPress users.
- Enable two-factor authentication (2FA) for an extra layer of protection.
- Restrict the number of login attempts to prevent brute-force attacks.
- Keep an eye out for suspicious login attempts by monitoring your login logs.
- Restrict access to your WordPress admin area by IP address.
- Regularly back up your WordPress site in case of any security breaches.
- Keep your WordPress core, plugins, and themes updated to address any security vulnerabilities.
- Force logout on all users and have them change passwords in WordPress from time to time.
We hope this article helped you learn how to set up SAML SSO in WordPress. You may also want to check out our guide on how to get a free SSL certificate for your website and our expert pick of the must-have WordPress plugins to grow your website.
If you liked this article, then please subscribe to our YouTube Channel for WordPress video tutorials. You can also find us on Twitter and Facebook.


Syed Balkhi says
Hey WPBeginner readers,
Did you know you can win exciting prizes by commenting on WPBeginner?
Every month, our top blog commenters will win HUGE rewards, including premium WordPress plugin licenses and cash prizes.
You can get more details about the contest from here.
Start sharing your thoughts below to stand a chance to win!
Richard Krone says
Is it possible to use the Google saml SSO on a WordPress multi-site environment to lock down specific sites in the multi-site?
WPBeginner Support says
The second plugin in this article has the option to work with multisite, if you reach out to their support they can let you know how to set up what you are looking for
Admin
Alex Hanks says
Does your SSO work for admins / editors as well?
WPBeginner Support says
Yes, the SSO would work for those roles as well.
Admin