Do you need to edit the footer area of your WordPress website? The footer area appears at the bottom of each page on your WordPress site.
There are several different ways website owners can use this space and make it more useful for their website visitors.
In this article, we will show you how to edit the footer in WordPress, step by step.
What is the Footer in WordPress?
The footer in WordPress is the bottom part of your website that appears after the main content area. It’s generally on every page of your WordPress website.
Many beginners overlook this area, but there are several ways you can make it more helpful for your visitors. You can even use your footer to boost your WordPress SEO and your business.
Here’s an example of our footer on WPBeginner that millions of readers see every month.
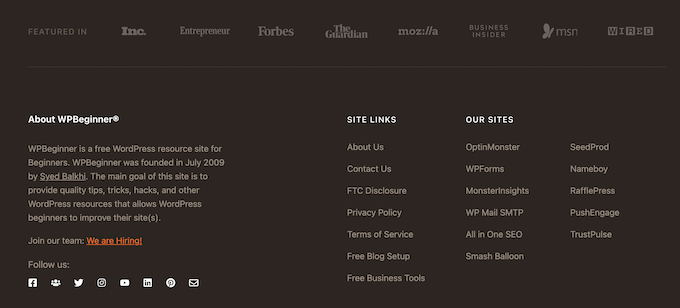
All top WordPress themes come with a footer widget area that’s easy to edit. You can improve this area by adding widgets, removing links, adding code, and even creating fully custom footers for different pages.
That being said, let’s take a look at how to easily edit the footer in WordPress. You can use the following links to jump to the section you want to read.
1. Adding Widgets in Your Footer in WordPress
Many of the best WordPress themes have widget areas in the footer.
You can use these widget areas to add text, images, or links to your privacy policy, legal disclaimers, and other important pages.
Adding text and images is quite simple. To do this, navigate to Appearance » Widgets and then click the ‘Plus’ add block icon in your ‘Footer Sidebar’ section.
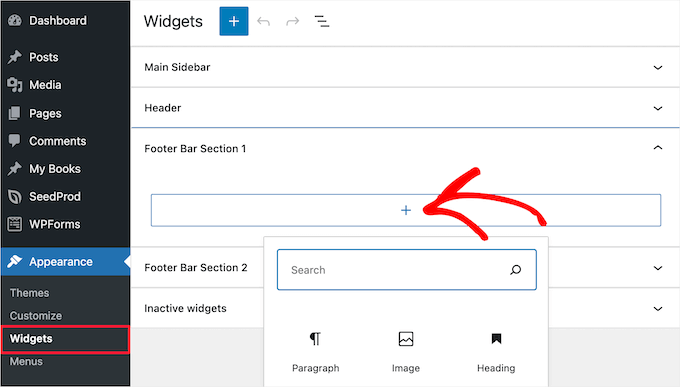
To add a widget, simply click the block, and it will automatically display. If you need more help, then see our guide on how to add and use widgets in WordPress.
Note that many themes will have multiple footer widget areas, and they may use them differently. After adding widgets, you can preview your website to make sure they appear where you want them to be.
Adding Links in WordPress Footer Widget Area
You may also want to add links to different pages, posts, and categories in your website footer area.
WordPress comes with an easy way to manage those links using navigation menus. Simply head over to the Appearance » Menus page and click on the ‘Create new menu’ link.
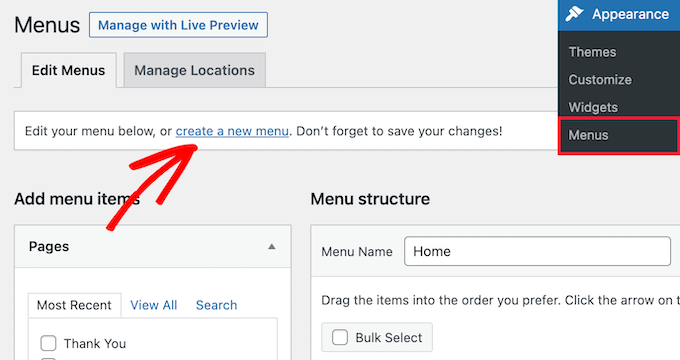
WordPress will ask you to provide a name for your new menu.
Enter a name that helps you easily identify this menu, then select the relevant footer location, and click on the ‘Create Menu’ button.
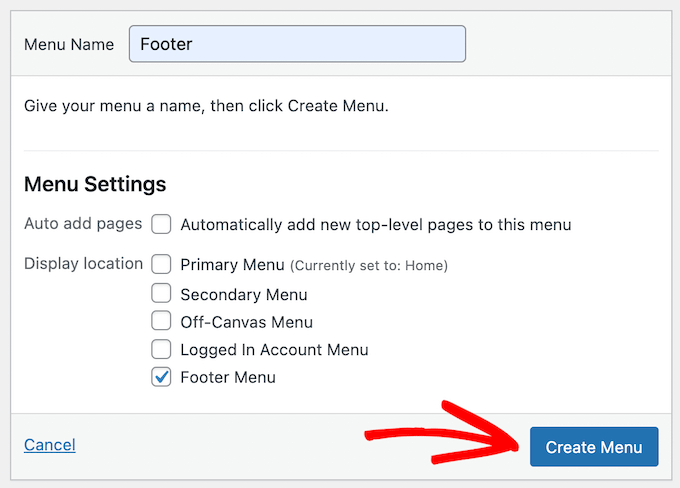
Your menu is now ready, and you can start adding links to it.
Simply select the pages, posts, or categories from the left-hand column to add them to your menu.
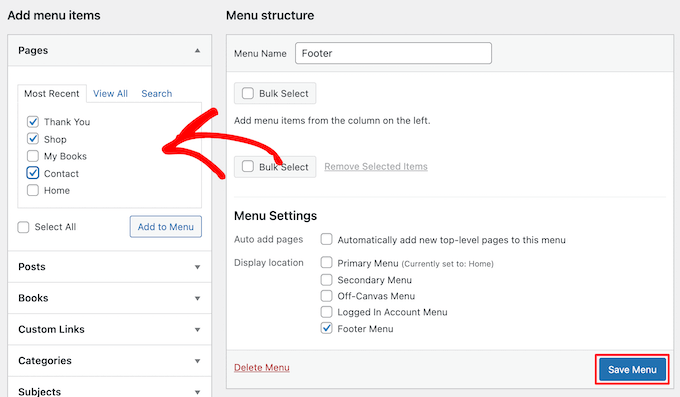
Once you are finished customizing your menu, click on the ‘Save Menu’ button to store your changes. For more details, see our guide on how to add a navigation menu in WordPress.
Your menu is now ready to be added to the WordPress footer widget area. Simply visit the Appearance » Widgets page in your WordPress admin panel.
Next, click the ‘Plus’ icon, search for ‘Menu’, then click the ‘Navigation Menu’ block.
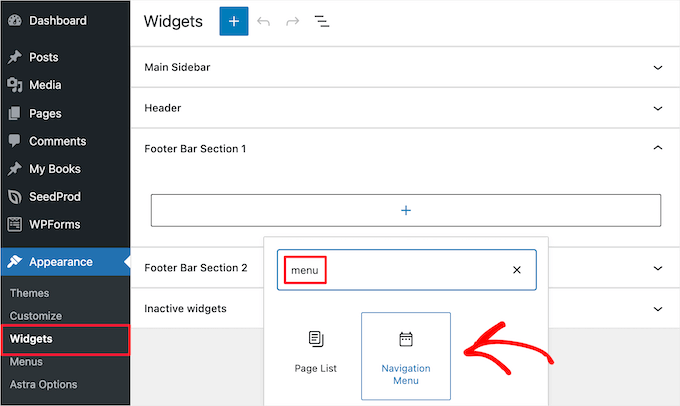
After that, select your footer navigation menu from the ‘Select Menu’ drop-down, and give your widget a title if you like. The title will appear above the menu in your footer.
Then, click the ‘Update’ button to save your changes.
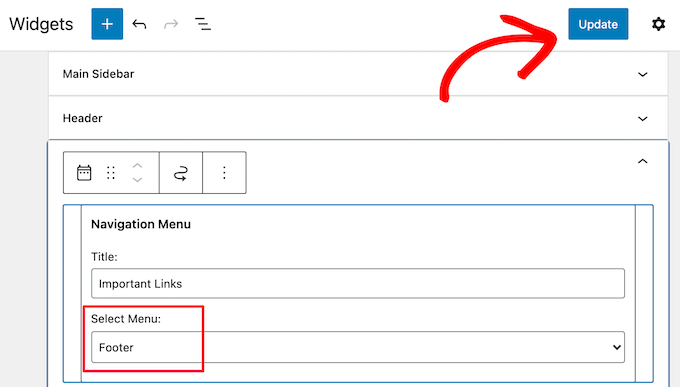
You can now visit your website to see your footer links in action. If you need another set of links, then simply repeat the same steps again.
2. Removing ‘Powered by WordPress’ Text from Your Footer
When you first install WordPress, your site may have a ‘Powered by WordPress’ link in a footer bar at the bottom of your site. This isn’t a widget, so it’s often not clear how to change it.

Some themes will alter this to their own text and links. If so, then you can normally change this text using the WordPress theme customizer. Simply go to Appearance » Customize in your WordPress admin panel.
Then, look for a heading called ‘Footer’, or something similar.
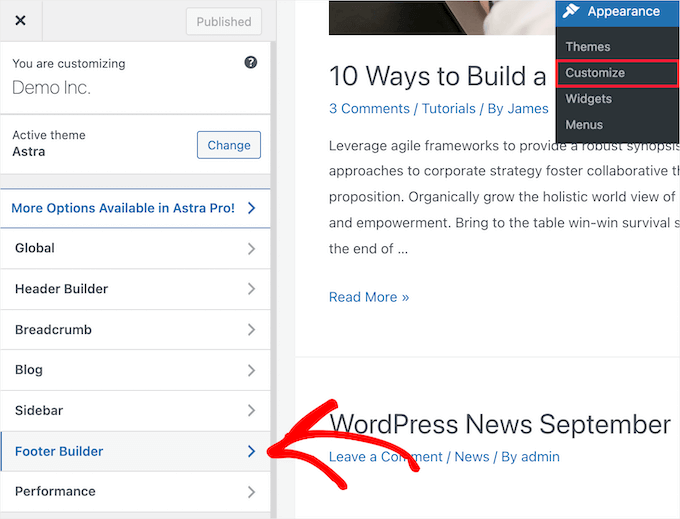
We’re using the Astra theme for this example. With Astra, you need to click on ‘Footer Builder’ in the theme customizer.
This brings you to a screen with customization options to change the footer text, add social media links, and more.
Simply click the ‘Copyright’ button to replace the footer text.
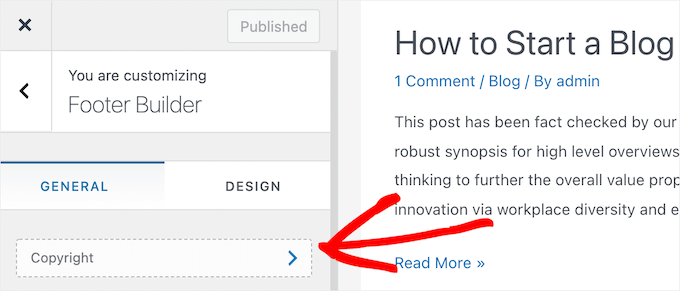
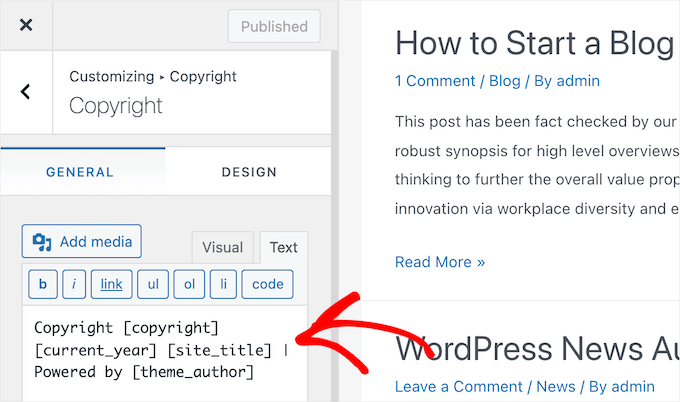
Then, you can delete the existing text and add your own message.
Once you’ve finished editing the footer, don’t forget to click the ‘Update’ or ‘Publish’ button at the top of the screen to make your changes live.
For more details, take a look at our in-depth guide on how to use the WordPress theme customizer.
Editing the Footer Text Manually
What if your theme doesn’t have the option to edit the footer text using the customizer?
In this case, you need to edit the footer.php file directly. It’s a template file in your WordPress theme folder and is responsible for displaying the footer area for that particular theme.
Editing the footer manually is an advanced option, and you’ll need to know PHP code in order to make changes to the file.
The easiest way to edit this file is by using an FTP client to connect with your WordPress hosting account. For more details, see our guide on how to use FTP to upload files to WordPress.
First, download yourfooter.phpfile, which can be found in your theme folder.
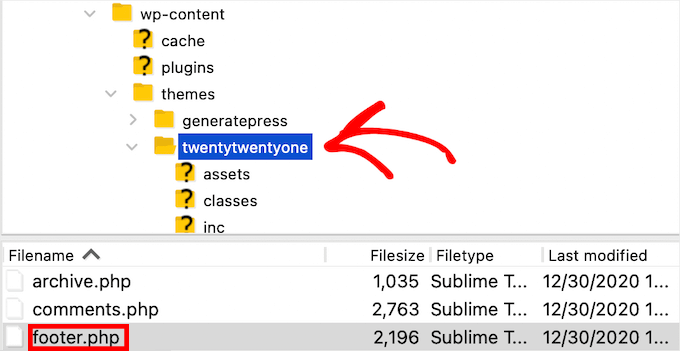
Then, you need to find the line of code in the file with the ‘Powered by WordPress’ text.
Next, simply delete or change that text, and upload your newfooter.phpfile.
It’s a good idea to make a copy of the file before making changes. That way, if you accidentally break anything, then you can easily upload the original file.
For more details, see our guide on how to remove the ‘Powered by WordPress’ footer links.
3. Creating a Custom Footer for Different WordPress Pages
Many small business websites use landing pages to drive leads, make sales, and grow their email list.
Landing pages are slightly different than regular web pages since they have a single goal. See our guide on the difference between websites and landing pages to find out more.
You can create different WordPress footers to suit these individual pages, like your checkout page, thank you page, 404 page, home page, and more.
The best way to do this is with the SeedProd plugin. It’s the best drag and drop WordPress page builder used by over 1 million websites.
SeedProd makes it easy to create high-converting pages without having to write any code.
The first thing you need to do is install and activate the SeedProd plugin. For more details, see our guide on how to install a WordPress plugin.
Note: There is a free version of SeedProd available that you can use, but for this tutorial, we’ll show the Pro version since it can be used to create a variety of WordPress pages.
Upon activation, you need to go to SeedProd » Settings and enter your license key.
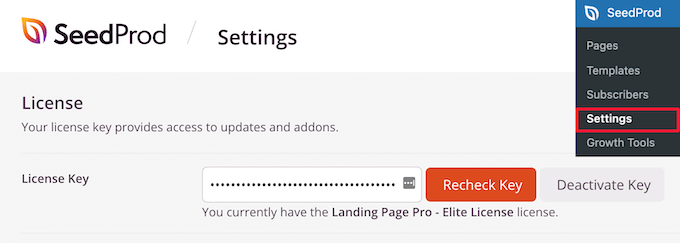
You can find this information under your account on the SeedProd website.
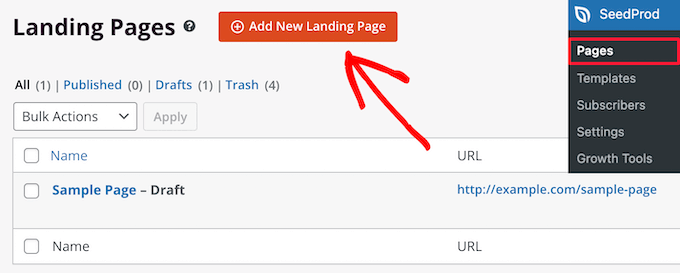
Next, you need to visit SeedProd » Pages and then click on ‘Add New Landing Page’ to build your first page.
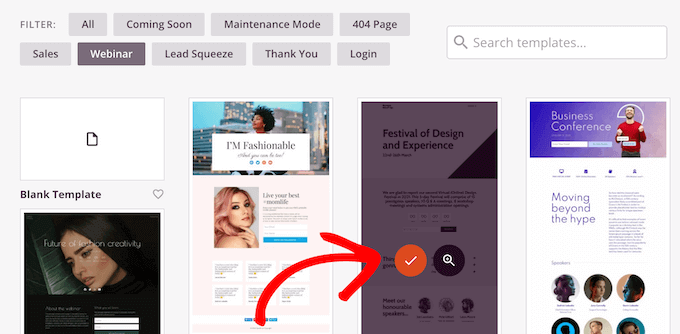
On the next screen, you need to choose a template. SeedProd has over 300+ professionally designed templates to choose from.
To select a template, simply over it and click the ‘Checkmark’ icon.
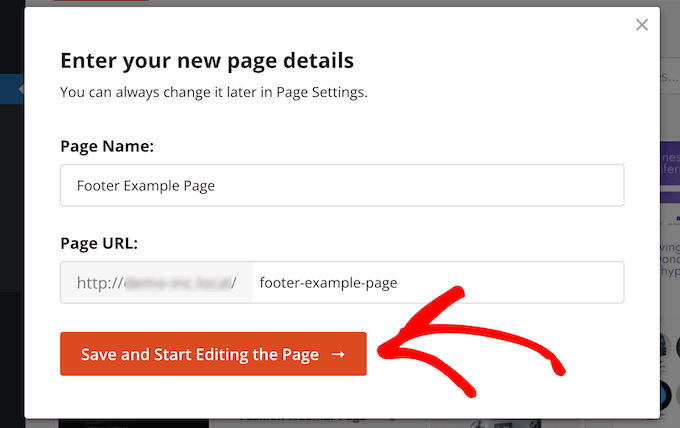
After that, you’ll be asked to give your page a name and URL.
Then, click the ‘Save and Start Editing the Page’ button.
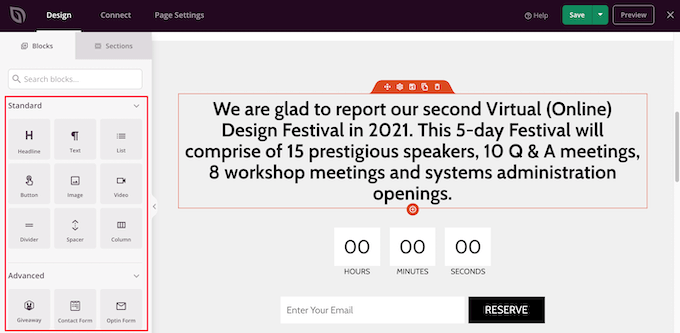
This launches the drag and drop builder interface. You’ll see a live preview of the template you selected.
To change different elements, you can point and click to select any item on the page. Then, use the left-hand column to add new blocks, sections, and make changes.
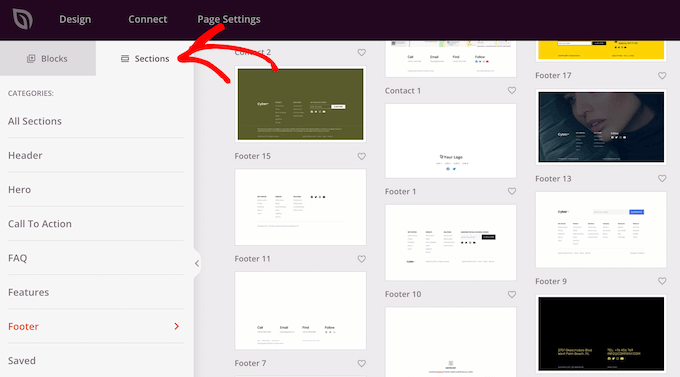
Next, click on the ‘Sections’ tab in the left hand panel.
This brings up a menu of pre-made sections you can use to build your page.
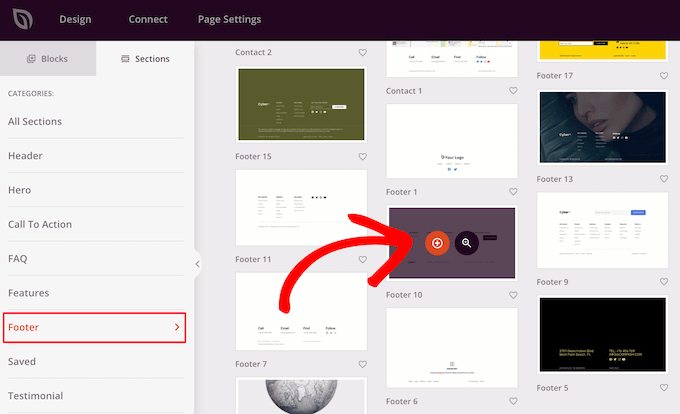
Then, click the ‘Footer’ option.
This takes you to a section of different pre-made footer layouts. You can preview the footer section by clicking on the magnifying glass icon.
To add it to your page, click the ‘Plus’ icon.
After that, you can fully customize your footer with the drag and drop editor. For example, you can change the background color, add images, links, and more.
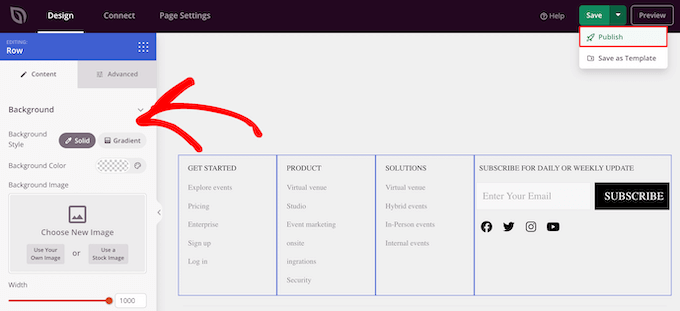
Once you’re done customizing your page, make sure to click the ‘Save’ drop-down arrow, and then the ‘Publish’ button to make your page live.
For more details on page customization, see our guide on how to create a custom page in WordPress.
Update: SeedProd is now a complete theme builder, which means you can easily design a custom WordPress theme without editing any code.
This also gives you the ability to redesign your WordPress footer across your entire website.
First, install and activate the SeedProd Pro plugin on your WordPress site. Then, go to SeedProd » Theme Builder from your WordPress dashboard. On this page, click the ‘Themes’ button.
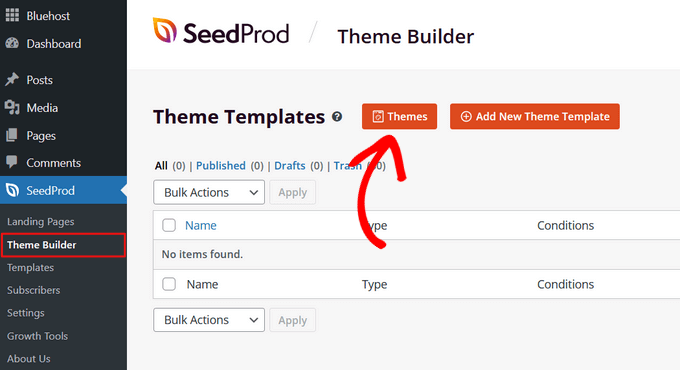
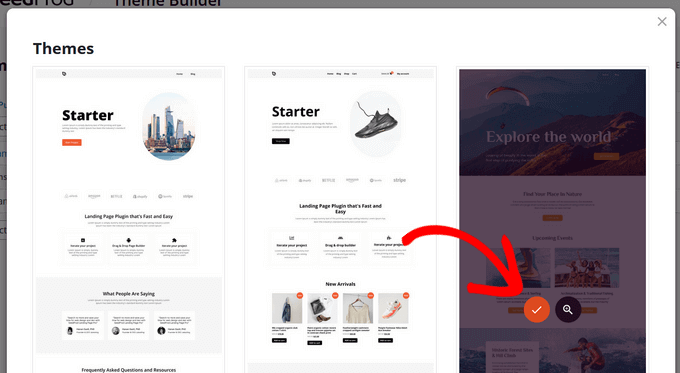
This will open a window where you can select one of SeedProd’s 100+ pre-built themes that you can customize.
To select a theme, simply hover over it and click the checkmark button.
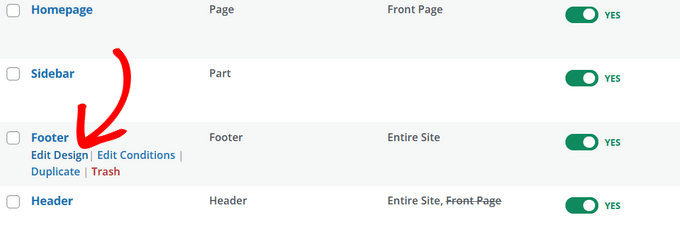
Once you choose a theme, SeedProd will automatically create all of the parts that make up your theme, including the header, footer, homepage, sidebar, and more.
To edit the footer, click on the ‘Edit Design’ link.
Now you’ll be taken to SeedProd’s drag and drop theme builder, where you can customize your footer.
You can delete any of the existing footer design by hovering over a block and clicking the trash icon. We’ll delete all of the existing blocks for this tutorial.
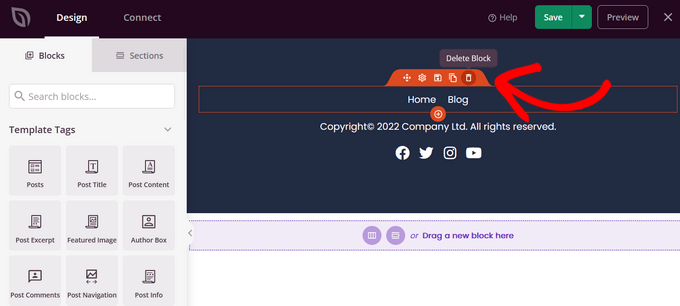
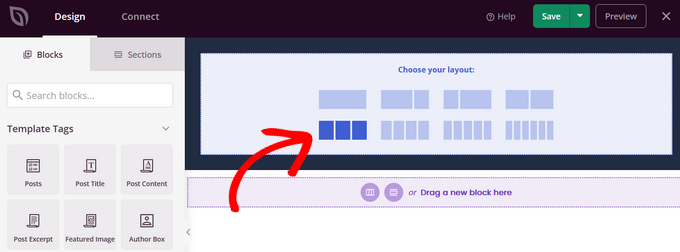
After deleting all of the blocks, you can pick a layout for your footer. We’ll choose the 3 columns.
Now you can start adding content to your footer by dragging blocks from the left side and dropping them into your footer.
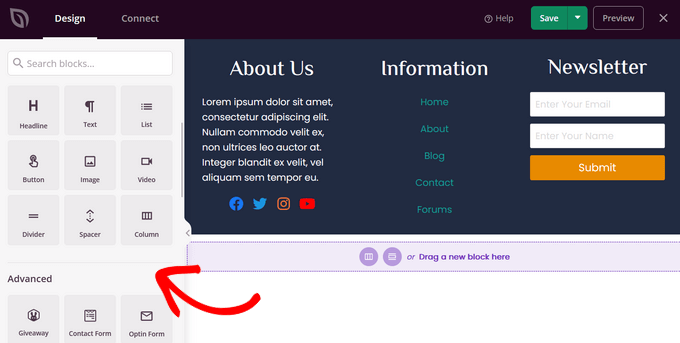
In this example, we’ve added headings, text, social profiles, a navigation menu, and a newsletter optin form.
Once you’re happy with the footer design, click the ‘Save’ button and then click the drop-down arrow, and hit the ‘Publish’ button.
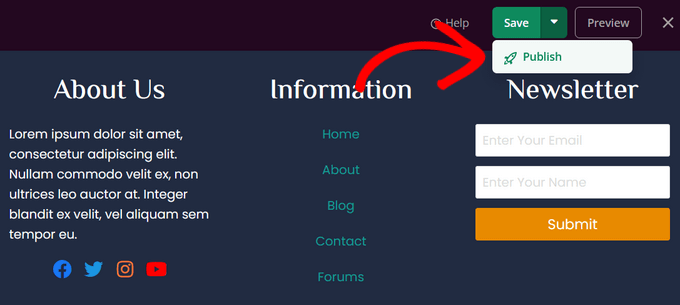
You can then exit the visual editor and return to the theme builder dashboard.
After that, you can finish customizing the rest of your custom WordPress theme with SeedProd. For step-by-step instructions, you can follow our tutorial on how to easily create a custom WordPress theme.
4. Adding Code to Your WordPress Footer
Sometimes, you may need to add code snippets to your WordPress footer. This is often done to connect your site with external apps or plugins.
For example, you’ll need to add a script to your WordPress header or footer to add analytics tracking to your website. For more details, see our beginner’s guide on how to install Google Analytics in WordPress.
If you need to add additional code to your WordPress footer, then the easiest way to do this is by using the WPCode plugin.

The first thing you need to do is activate and install the free WPCode plugin. For more details, see our step by step guide on how to install a WordPress plugin.
Note: The free version of WPCode has everything you need to add custom code in WordPress. If you want advanced features like conversion pixels, eCommerce tracking, code revisions, and more, you can upgrade to WPCode Pro.
Upon activation, go to Code Snippets » Header & Footer in your WordPress admin panel. Then, you can add your code into the ‘Footer’ box.
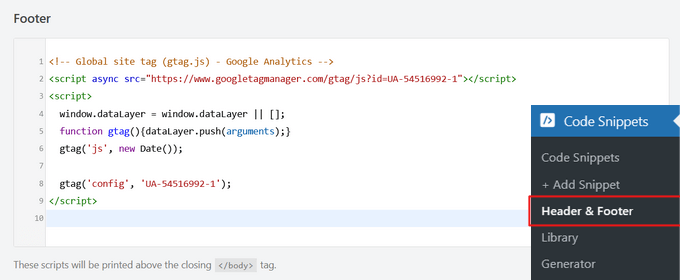
After that, click the ‘Save Changes’ button in the top-right corner of the screen before moving on.

For more help, take a look at our guide on how to add header and footer code in WordPress.
We hope this article helped you learn how to edit the footer in WordPress. You may also want to see our guide on how to get a free email domain and our picks on the best virtual business phone number apps.
If you liked this article, then please subscribe to our YouTube Channel for WordPress video tutorials. You can also find us on Twitter and Facebook.


Syed Balkhi says
Hey WPBeginner readers,
Did you know you can win exciting prizes by commenting on WPBeginner?
Every month, our top blog commenters will win HUGE rewards, including premium WordPress plugin licenses and cash prizes.
You can get more details about the contest from here.
Start sharing your thoughts below to stand a chance to win!
Jiří Vaněk says
Great article. I’ve always done footer using Elementor. Now I’m trying to learn the same things with the Gutenberg editor and these tutorials are helping me a lot.
Ronald Braun says
I have a widget in a footer that contains an email address for the admin of the site. How is that email address linked to the email account?
WPBeginner Support says
To link to an email address, we would recommend taking a look at our article below:
https://www.wpbeginner.com/beginners-guide/how-to-link-to-an-email-address-in-wordpress
Admin
Jiří Vaněk says
This is done using a special HTML tag mailto, thanks to which the system understands that the link should not be opened in a browser but with a mail client. It’s the same for the phone, where the HTML tag is tel:.
Lawrence Calderon says
Thanks for the reference on editing the footer. Finding content in the footer.php was a new option to me. I searched through WordPress but could not find the info I needed to edit. What do you know? It was in the footer.php.
Thanks so much for the articles.
WPBeginner Support says
Glad our guide was helpful!
Admin
Mark Gailmor says
I have a custom, html widget that I would like to add to the footer. Alas, the theme I have is using the footer so I have to work around this. When I add the code, it alters the existing footer. So, I think I need to find a way to post after the current footer information. Is there an easy way to do this?
WPBeginner Support says
We would first recommend checking with your theme’s support and they can normally assist with how to add or modify the design, otherwise, you would need to edit your theme’s files which are different based on the specific theme you’re using.
Admin
Laura B. says
Thanks! I used the plug in you recommended and did what I wanted.
WPBeginner Support says
Glad our guide was helpful
Admin
lara says
How do I change the colour of the background in my footer? I’ve looked, and tried some the examples but nothing works.
WPBeginner Support says
If the examples in our guides are not working for you, we would recommend reaching out to the support for your specific theme to see if they have a recommended customization
Admin
Kevin says
If I was using free Templatem, can I edit footer of the Template as I want
WPBeginner Support says
It would depend on the specific theme you are using for if there are built-in editing options or not.
Admin