WP Rocket is widely considered the most powerful performance plugin for WordPress, and it can deliver lightning-fast speeds on your site. However, it has a lot of features, many beginners find it difficult to decide which settings they should use to speed up their website.
We use WP Rocket to boost page load speed on WPBeginner and appreciate how it can handle a lot of different tasks, which saves us from needing to install multiple plugins.
This step-by-step guide will show you how to easily install and set up WP Rocket in WordPress. We will also walk you through all its settings so you can get the maximum performance benefits.
Why Use WP Rocket?
No one likes slow websites. In fact, a performance study found that a one-second delay in page load time can result in 7% fewer conversions, 11% fewer page views, and a 16% decrease in customer satisfaction.

And it’s not just users, either. Search engines like Google also don’t like slow websites. They give priority to faster websites in search rankings.
That’s where WP Rocket comes in.
It is the best WordPress caching plugin on the market. It also offers many other performance features to let you quickly improve your WordPress website’s speed and performance.
Here’s how it works.
WordPress is a dynamic content management system. Every time a user visits your website, WordPress fetches the content from your database, generates a page on the fly, and sends it back to the user.
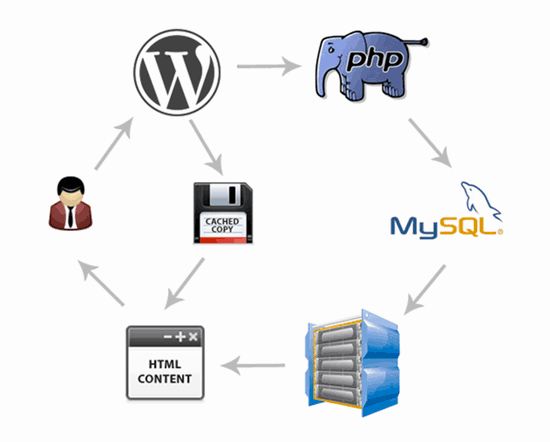
This process takes up WordPress hosting server resources. If a lot of people visit your website at once, then this would slow down your website.
WP Rocket makes WordPress bypass all this.
It crawls and saves a static copy of your pages in the cache and allows WordPress to show the cached page to the user instead of generating a page on the fly.
This frees up server resources on your website and improves overall page load time throughout your website. That’s why we use WP Rocket on many of our own websites.
That being said, let’s take a look at how to easily install and set up WP Rocket on your WordPress website. Here’s what we will cover in this tutorial:
- Installing WP Rocket Plugin in WordPress
- Setting Up Caching Options in WP Rocket
- Minifying Files Using WP Rocket
- Using Lazy Load Media to Improve Page Load Speed
- Fine Tuning Preloading in WP Rocket
- Setting Up Advanced Caching Rules
- Performing Database Cleanup Using WP Rocket
- Configuring Your CDN to Work With WP Rocket
- Reducing Heartbeat Activity in WordPress With WP Rocket
- Using WP Rocket Add-ons
- Managing Your WP Rocket Cache
- WP Rocket Frequently Asked Questions (FAQ)
- Expert Guides on WordPress Caching
Video Tutorial
If you prefer written instructions, then continue reading.
Step 1: Installing WP Rocket Plugin in WordPress
The first thing you need to do is install and activate the WP Rocket plugin. For more details, see our step-by-step guide on how to install a WordPress plugin.
WP Rocket is a premium plugin, but the best part is that all features are included in their lowest plan.
Once installed and activated, the WP Rocket plugin works out of the box, and it will turn on caching and other performance features with optimal settings for your website.
We ran speed tests on our demo site before and after installing WP Rocket. The performance improvements were incredible using just the out-of-the-box settings.
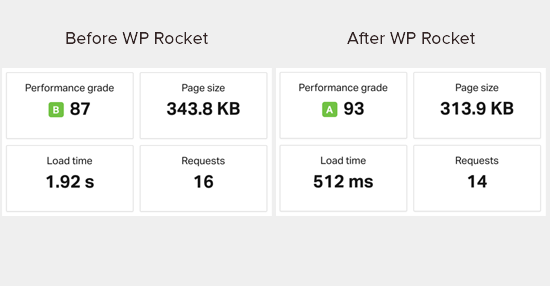
The performance improvement is instantly noticeable because WP Rocket doesn’t wait for user requests to start caching pages. It proactively starts to crawl your website and preloads pages in the cache.
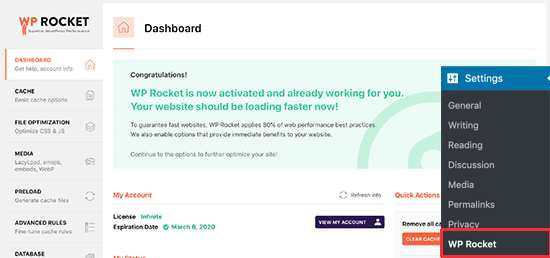
You can see the caching status by visiting the WP Rocket dashboard located on the Settings » WP Rocket page.
Now that you have installed WP Rocket, let’s take a look at other WP Rocket options and how to set them up to further improve your website speed.
Step 2: Setting Up Caching Options in WP Rocket
First, you need to visit the Settings » WP Rocket page and click on the ‘Cache’ tab.
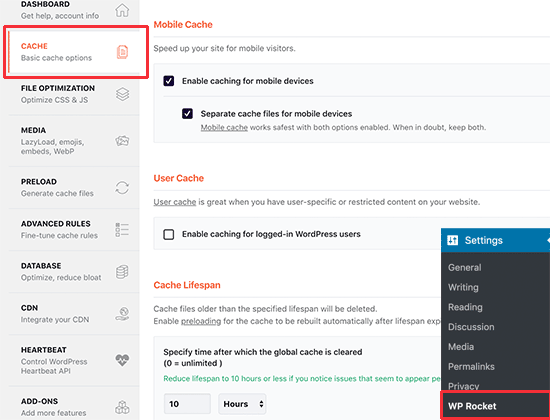
WP Rocket has already enabled page caching by default, but you can tweak the settings to further improve your website speed.
1. Mobile Cache
You will notice that mobile caching is turned on by default here. However, we recommend you check the ‘Separate cache files for mobile devices’ option as well.
This option allows WP Rocket to create separate cache files for mobile users. Checking this option ensures that mobile users get the full cached mobile experience.
2. User Cache
If you run a website where users need to log in to your website to access certain features, then you need to check this option.
For example, if you run a WooCommerce store or a membership website, then the ‘User Cache’ option will improve the user experience for all logged-in users.
3. Cache Lifespan
Cache lifespan is the time you want to store the cached files on your website. The default limit is set to 10 hours, which will work for most websites.
However, you can set it to a lower value if you run a very busy site or a higher value if you don’t update your website frequently.
After the lifespan time has passed, WP Rocket will delete the cached files. It will also immediately start preloading the cache with updated content.
Don’t forget to click on the ‘Save Changes’ button to store your settings.
Step 3: Minifying Files Using WP Rocket
WP Rocket enables you to minify static files such as JavaScript and CSS stylesheets. You can simply switch to the ‘File Optimization’ tab and check the boxes for the file types that you want to be minified.
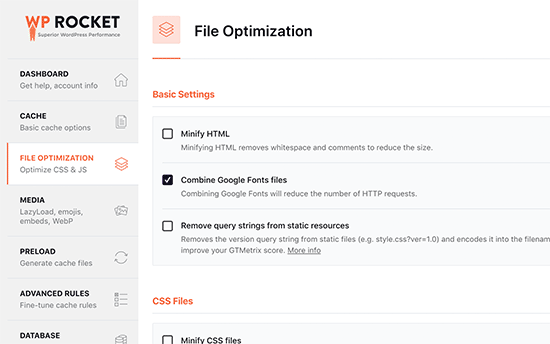
Minifying static content makes those file sizes smaller. In most cases, this difference is too small to make any noticeable impact on your website’s performance.
However, if you run a large traffic site, then this can definitely have a big impact on reducing your overall bandwidth usage and saving on hosting costs.
The one caveat is that minifying files can also have unexpected consequences, such as files not loading or not working as intended.
If you turn this setting on, then please make sure to thoroughly review your website pages to make sure everything is working as intended.
Step 4: Using Lazy Load Media to Improve Page Load Speed
Images are often the second heaviest item on a page after videos. Images take more time to load than text and increase the overall page download size.
Most popular websites now use a technique called lazy loading to delay image downloads.
Instead of loading all your images at once, lazy loading downloads only the images that will be visible on the user’s screen. This not only makes your pages load fast, but it also feels faster to the user.
WP Rocket comes with a built-in lazy loading feature. You can enable lady loading for images by simply switching to the ‘Media’ tab on the plugin’s settings page. You can also enable lazy loading for embeds like YouTube videos and iframes.
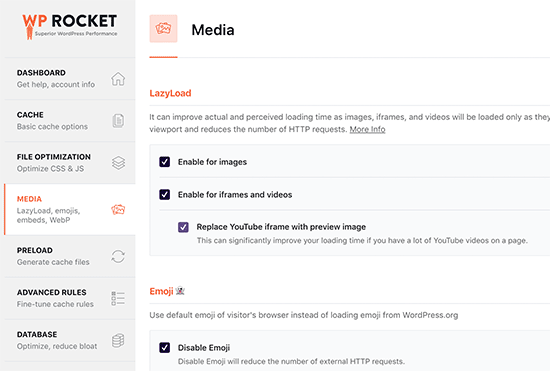
Note: While lazy loading images will help improve perceived website speed, you should always save and optimize images for the web to get maximum results. To learn more, see our step-by-step guide on how to optimize images for web performance.
Step 5: Fine Tuning Preloading in WP Rocket
Next, you can review the preloading settings in WP Rocket by switching to the ‘Preload’ tab. By default, the plugin starts to crawl your homepage and follow the links it finds there to preload the cache.
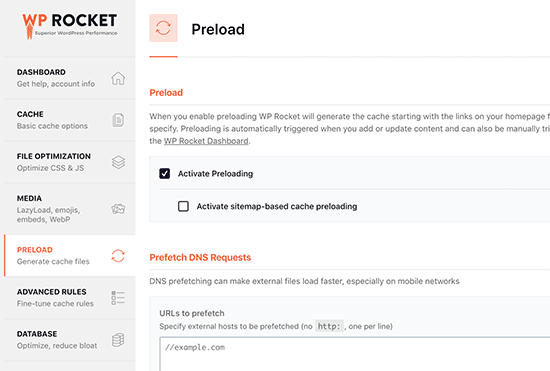
Alternatively, you can tell the plugin to use your XML sitemap to build a cache.
You can turn off the preloading feature as well, but we do not recommend that.
Turning off preloading will tell WordPress to only cache pages when they are requested by a user. This means the first user to load that specific page will always see a slow website.
Editors note: We strongly recommend that you keep preloading activated to get the maximum performance results on your WordPress website.
Step 6: Setting Up Advanced Caching Rules
WP Rocket gives you full control over caching. For example, you can switch to the ‘Advanced Rules’ tab on the settings page to exclude pages that you don’t want to be cached.
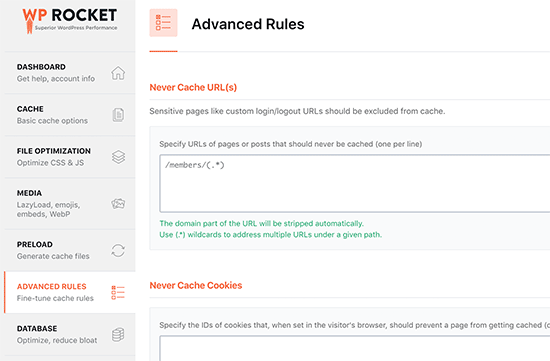
You can also exclude cookies and user agents (browser and device types), and automatically rebuild the cache when you update specific pages or posts.
These settings are for developers and power users who have a complex setup and need custom settings. If you are not sure about these options, then the default settings will work for most websites.
Step 7: Performing Database Cleanup Using WP Rocket
WP Rocket also makes it easy to clean up the WordPress database. This has very little effect on your website performance, but you can still review these options if you want to.
You need to switch to the ‘Database’ tab on the plugin settings page. From here, you can delete post revisions, drafts, spam, and trash comments.
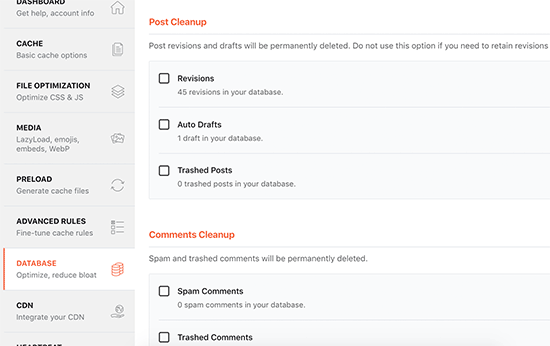
We don’t recommend deleting post revisions because they can be really useful in undoing changes to your WordPress posts and pages in the future. You also don’t need to delete spam and trashed comments, as WordPress automatically cleans them up after 30 days.
Step 8: Configuring Your CDN to Work With WP Rocket
If you are using a CDN service for your WordPress site, then you can set it up to work with WP Rocket. To do that, you need to switch to the ‘CDN’ tab.
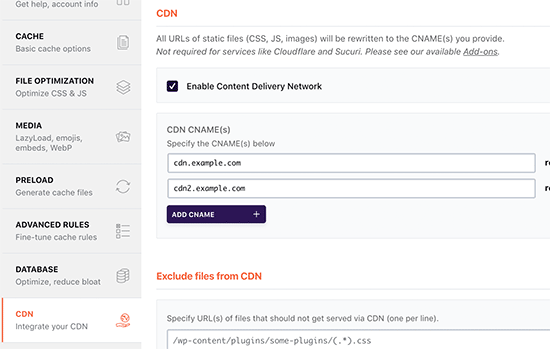
A CDN is a content delivery network that enables you to serve static files from a network of servers spread across the globe.
This speeds up your website because it allows the user’s browser to download files from the server closest to their location. It also reduces your hosting server load and makes your website more responsive.
For more information, see our guide on why you need a CDN service for your WordPress site.
For many years, we used Sucuri on WPBeginner. It is one of the best CDN services for WordPress beginners. Sucuri’s cloud-based firewall gives you a powerful CDN service to serve your static files.
We switched to Cloudflare because its larger CDN lets us deliver content to our worldwide audience faster. We explain our reasons in detail in our guide on why WPBeginner switched from Sucuri to Cloudflare.
However, Cloudflare’s free CDN offers limited protection against DDoS attacks and has fewer features.
WP Rocket has separate add-ons to easily set up Sucuri and Cloudflare on your website. More on this later.
Step 9: Reducing Heartbeat Activity in WordPress With WP Rocket
The Heartbeat API allows WordPress to send a periodic request to the hosting server in the background. This allows your website to perform scheduled tasks.
For example, when writing blog posts, the editor uses the Heartbeat API to check connectivity and post changes.
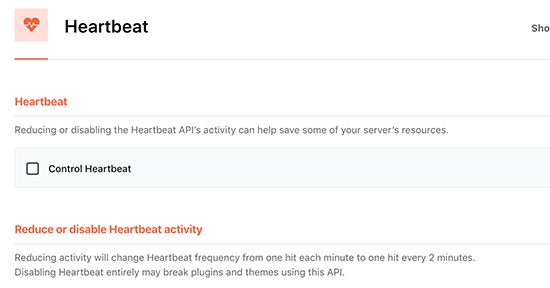
You can click on the ‘Heartbeat API’ tab in WP Rocket to control this feature and reduce the heartbeat API frequency.
We don’t recommend deactivating the Heartbeat API because it offers some very useful features. However, reducing its frequency will improve performance, especially on larger sites.
Step 10: Using WP Rocket Add-ons
WP Rocket also comes with some ready-to-deploy features that are available as add-ons. Let’s take a look at the currently available add-ons on this list.
1. Google Analytics Add-on
The Google Analytics add-on for WP Rocket allows you to host Google Analytics code on your own server. This does not have any significant performance improvement, but some users do this to get a 100% page speed score.
This feature is compatible with popular Google Analytics plugins like MonsterInsights and ExactMetrics.
2. Facebook Pixel
If you are using the Facebook pixel for user tracking, then this add-on will host the pixels locally on your server. Again, this will improve your page speed score but may not have any actual impact on website speed.
3. Varnish Add-on
If your WordPress hosting company uses the Varnish cache, then you need to enable this add-on. This will ensure that the Varnish cache is cleared when WP Rocket clears its cache.
4. Cloudflare
If you are using the Cloudflare CDN, then you need this add-on to make it work alongside WP Rocket. Simply enable the add-on and click on the ‘Modify options’ button.
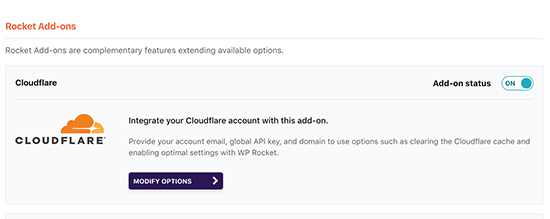
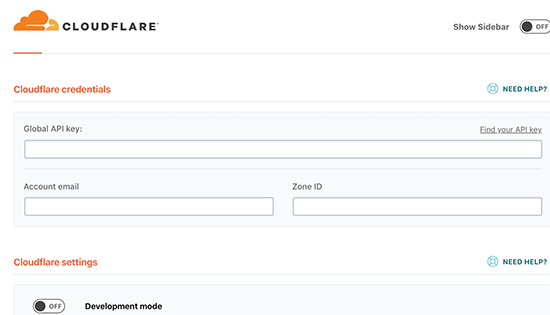
After that, you need to enter your Cloudflare account credentials.
Doing this will connect WP Rocket to your Cloudflare account.
5. Sucuri
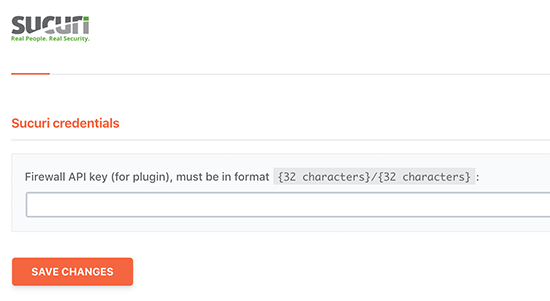
If you are using Sucuri, then you need to enable this add-on and click on the ‘Modify options’ button. After that, enter your Sucuri account’s API key to connect your account.
Step 11: Managing Your WP Rocket Cache
WP Rocket also makes it easy for admins to manage and clear the WordPress cache. Simply go to the plugin’s settings page, and you’ll find the option to clear the WP Rocket cache on the ‘Dashboard’ tab.
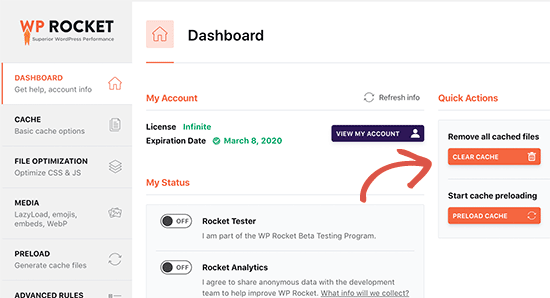
You can also start a preloading sequence to rebuild the cache on demand.
The plugin also makes it easier to import and export plugin settings. You can switch to the tools to easily export and import plugin settings. This is helpful when moving WordPress from a local server to a live website and when moving WordPress to a new domain.
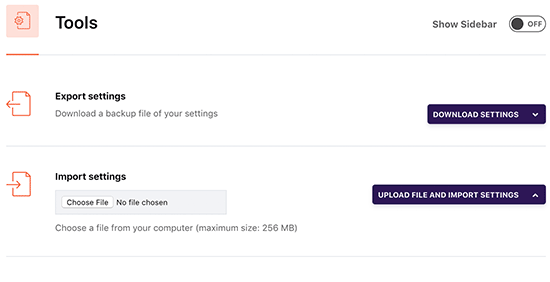
Below that, you’ll find the option to Rollback the plugin to an earlier version. This comes in handy if a WP Rocket update didn’t work as expected.
If you want to have the same rollback feature for all your plugins, then see our guide on how to rollback plugins to an older version in WordPress.
WP Rocket Frequently Asked Questions (FAQ)
As WP Rocket has grown in popularity, we have answered many questions related to the WP Rocket WordPress performance plugin. Here are some of the top WP Rocket questions:
1. Is there a free version of WP Rocket?
No, WP Rocket is a premium WordPress performance plugin. There is no free version or free trial available. They do offer a 14-day money-back guarantee.
You may find a nulled version of WP Rocket for free, but we strongly recommend against using it because sometimes hackers use nulled versions as bait to hack your website.
To learn more, see our guide on avoiding nulled versions of WordPress themes and plugins.
2. Is WP Rocket worth the price?
Yes, it is worth every penny. We are paying customers of WP Rocket and use it successfully on many of our websites, including WPForms and OptinMonster.
We also recently switched to WP Rocket on WPBeginner. You can learn more about this in our behind-the-scenes look at our new site design.
You might also be interested in reading a case study on how we made WordPress faster than static site generators.
3. Can I use WP Rocket with a managed WordPress hosting platform?
The short answer is yes. You can and should use WP Rocket in combination with built-in caching offered by your managed hosting company to unlock additional performance improvements.
A lot of managed WordPress hosting companies, including WP Engine, SiteGround, and Bluehost, have their own caching plugins built in.
WP Rocket plays nicely along those built-in caching options provided by your managed hosting provider while helping you get additional performance benefits with features like CDN, minifying files, lazy loading, smart cache preloading, and more.
4. How can I check whether WP Rocket is working and caching pages?
To check whether WP Rocket is working properly, you need to log out of your site or open it in an incognito window.
Next, you need to open the browser’s source view of the page and scroll to the bottom. At the very end, you should see the text, “This website is like a rocket …”
If those words are there, then you know WP Rocket is working properly and caching pages.
5. What makes WP Rocket better than other performance and caching plugins?
In our opinion, WP Rocket is better than other WordPress caching plugins like W3 Total Cache and WP Super Cache because it offers the most comprehensive set of features, and it is regularly updated to keep up with modern browser standards.
This is the #1 reason why we are switching all of our sites to use WP Rocket.
Expert Guides on WordPress Caching
We hope this guide helped you learn how to install and set up the WP Rocket plugin in WordPress. You may also want to see some of our other guides related to WordPress caching:
- Best WordPress Caching Plugins to Speed Up Your Website
- How to Install and Setup W3 Total Cache for Beginners
- How to Install and Setup WP Super Cache for Beginners
- How to Clear Your Cache in WordPress (Step by Step)
- How to Add Expires Headers in WordPress
- The Ultimate Guide to Boost WordPress Speed & Performance
- How to Properly Run a Website Speed Test
If you liked this article, then please subscribe to our YouTube Channel for WordPress video tutorials. You can also find us on Twitter and Facebook.


Dennis Muthomi
After implementing WP Rocket across dozens of sites, I’ve found that starting with the default settings and then customizing based on each site’s specific needs works best.
For example, e-commerce sites benefit from additional user cache settings, while content-heavy blogs do better with aggressive image lazy loading.
The step-by-step approach in this guide makes it much easier to identify which optimizations will have the biggest impact for different types of websites.
Dayo Olobayo
WP Rocket is a great caching plugin but it’s important to remember that it’s just one piece of the puzzle when it comes to website speed. There are other factors that can also affect performance such as image optimization and server configuration. However, WP Rocket is a great place to start and it can make a significant improvement in your website’s speed.
Jiří Vaněk
Yes, as you mentioned, a cache plugin is not a cure-all and won’t solve every issue, but it’s a great and, in my opinion, one of the most important elements in the whole puzzle. I had my own server, optimized everything possible, and still kept hitting orange numbers. Only after I replaced my original cache plugin with WP Rocket did I start reaching green numbers. So, while a cache plugin is just one of many components, it is extremely important, and in my experience, WP Rocket is the best. I’ve tried many, but this one helped me the most in terms of performance. So, in my opinion, choosing a quality cache plugin plays a huge role in speed.
Syed Shan Shah
Thanks for the guide. I have applied the File Optimization and Applied all the options but it breaks some part of my site and now i am unable to deactivate it. Any solution will be highly appreciated ? Thanks
WPBeginner Support
It would depend on the specific error you are running into but for a starting point you can disable the plugin following the steps in our guide below:
https://www.wpbeginner.com/plugins/how-to-deactivate-all-plugins-when-not-able-to-access-wp-admin/
Admin
Moinuddin Waheed
I have used wp rocket and it has boost my website speed and loads faster than without wp rocket .
I have played with these options quite but the most important one is to configuration of wp rocket for CDN to work.
I have seen my posts not getting visible because it was not properly configured and the website was loading the previous pages and posts.
Setting time to delete the cache and create new one is also an important factor for the new update to take effect.
Is there any ideal time to set for wp rocket cache duration for a blog which posts two to three posts a week ?
WPBeginner Support
We do not have a specific time we would recommend. If you know when most users visit your site in your analytics it cam help you find a good time to clear your caching without affecting users.
Admin
Moinuddin Waheed
Thanks wpbeginner for the clarification.
I think the default time and lifespan of the cache is an appropriate and that is around ten hours.
I didn’t know earlier and got anxious about the posts not showing but yes, we should know all these tactics to make the website faster to load.
Jiří Vaněk
I personally do it at least once a day, for example at night when traffic is very low. I do it daily because of the comments, so the cache gets cleared and new comments are visible. If you only clear the cache and generate a new one every few days, you risk that new comments won’t be visible, and people will engage less in conversations.
Jiří Vaněk
The best thing that helped me in WP Rocket was the URL preload and also integrating the CDN Cloudflare. On the contrary, for example, deactivating heartbeat broke some things for me. Otherwise, I personally recommend keeping a record of the changes made in some text editor. Some problems may appear later, and then it’s good to know what changes were made to the cache.
WPBeginner Support
Taking notes on changes made to the site can certainly help with troubleshooting later
Admin
Maddy Kin
This was so helpful and straight forward! It didn’t get my website speed to be great, but I’ll keep working on it. Mostly, I’m just thanking you for the great tutorial!!
WPBeginner Support
You’re welcome, we hope your speed improves as you tweak your site!
Admin
MIke
At what point am I “overcaching”. So I have WP Rocket and the Servers have Varnish Set up and I am configured for a CDN and DIVI is using Static pages… on and on. When does it end. What is the point where I am doing too much for too little incremental gain?
WPBeginner Support
That would depend on your site, the best way to check would be to do a speed test. We have our guide below that should help show what it takes and how to run a speed test!
https://www.wpbeginner.com/beginners-guide/how-to-properly-run-a-website-speed-test-best-tools/
Admin
Noel Tard
I am trying to install WP ROCKET on a second website and i get this message
Destination folder already exists.
WPBeginner Support
For that error message, you would want to take a look at our article here:
https://www.wpbeginner.com/wp-tutorials/how-to-fix-destination-folder-already-exists-error-in-wordpress/
Admin
Carol Parker
Complained earlier that WP Rocket broke my Dashboard. Tech support sent an automated response that diagnosed the problem and told me how to fix it (conflict with WP Super Cache) and all is well now!
WPBeginner Support
Glad you were able to have the issue solved
Admin
John Chapman
Could not find this plugin. There are 2 similar in name, but not doing this feature. is it available to import from elsewhere?
John
WPBeginner Support
To install the WP Rocket plugin, you could take a look at our article here: https://www.wpbeginner.com/beginners-guide/step-by-step-guide-to-install-a-wordpress-plugin-for-beginners/
Admin
Varun
Very useful Content thanks for sharing
WPBeginner Support
You’re welcome
Admin