A speedy website is essential for happy visitors and top search engine rankings. That’s because search engines like Google now consider site speed to be an important ranking factor.
WP Super Cache is a popular plugin that creates static HTML files of your web pages. This means your server doesn’t have to work as hard, making your site load faster for visitors.
We use performance plugins like Cloudflare and WP Rocket to improve WPBeginner’s speed. WP Super Cache is a free alternative that can significantly improve performance, boost SEO, and improve the user experience for website visitors.
In this article, we’ll guide you through installing and setting up WP Super Cache on your WordPress site. We’ll explain each step clearly, so even if you’re not tech-savvy, you can follow along. By the end, you’ll have a faster website that visitors and search engines will appreciate.
What Is WP Super Cache and Why You Should Use It?
WP Super Cache is one of the most popular and best WordPress caching plugins. It’s a free tool and has over a million active installs.
WP Super Cache makes a cached copy of each page on your site in the form of a static HTML file. This way, whenever someone visits your site, they’re served the copied version quickly instead of generating the entire website from scratch.
As a result, your WordPress site’s speed and performance improve dramatically. The cache plugin skips a lot of steps behind the scenes to ensure that your visitors don’t have to wait for the page to open.
This will improve the experience of your website visitors. A site that loads quickly encourages people to visit it more often, leading to more engagement and conversions as users spend more time on your posts and pages.
Besides that, with a fast-loading website, you can also see a boost in your WordPress SEO and search engine rankings. That’s because Google gives a significant advantage to faster websites, as it uses website speed as a ranking factor.
Now, are you ready to set up WP Super Cache on your website? Let’s get to it!
Setting Up WP Super Cache – the Easy Way
The first thing you need to do is install and activate the WP Super Cache plugin on your website. For more details, you can follow our guide on how to install a WordPress plugin.
Upon activation, WP Super Cache will notify you that caching is not enabled on your website at the moment.
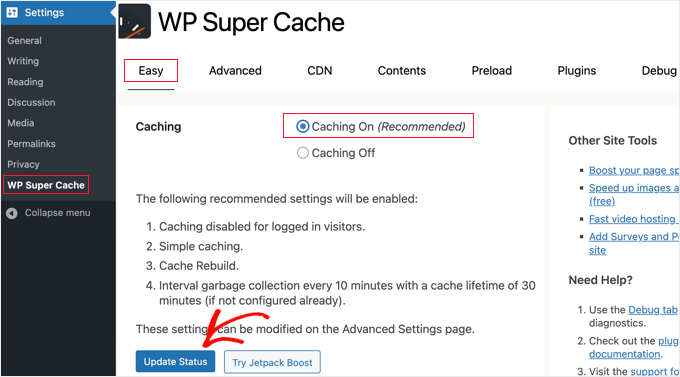
To enable cache, go to Settings » WP Super Cache. Then, under the ‘Easy’ tab, go ahead and click on the ‘Caching On’ option. Once you’ve done that, click the ‘Update Status’ button.
After turning on the cache, you’ll need to scroll down to the ‘Cache Tester’ section.
Once there, you should click on the ‘Test Cache’ button to check if it is working.
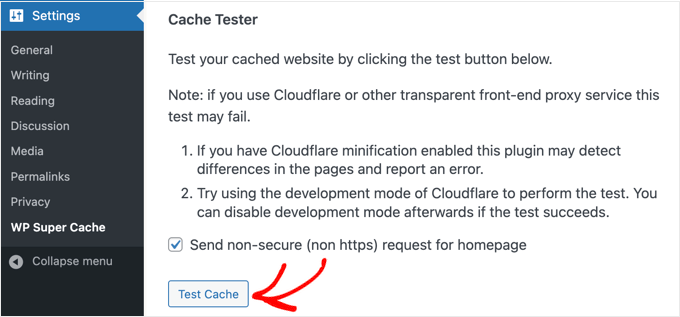
WP Super Cache will fetch your WordPress site twice and compare the timestamps of both pages. If both timestamps match, that means caching is working on your site now.
WP Super Cache Advanced Setup
WP Super Cache is a powerful WordPress plugin that comes with tons of advanced options. These options can further improve your site’s performance and give you more control over how the plugin will cache your site.
Enable Caching
To set up WP Super Cache with advanced options, go to the ‘Advanced’ tab in the WP Super Cache plugin settings. Next, click the checkbox for ‘Enable Caching.’
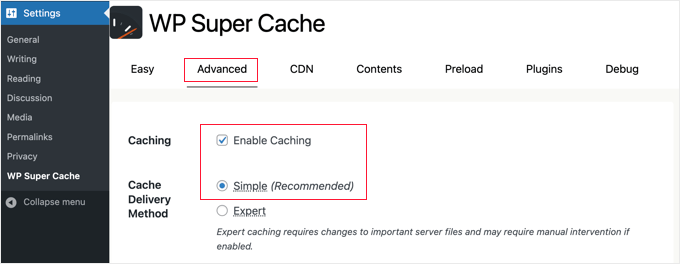
Below caching, you’ll see options for the ‘Cache Delivery Method.’ We recommend using the ‘Simple’ option if you’re a beginner and unfamiliar with editing your server files.
After you’ve chosen your caching option, make sure to click the ‘Update Status’ button.
Enable Compression in WP Super Cache
Compression allows WP Super Cache to serve cached files as compressed files, which improves load time. These files are smaller and can be downloaded by browsers more quickly.
To enable compression, scroll down to the ‘Miscellaneous’ section in the ‘Advanced’ settings tab and check the box that says ‘Compress pages so they’re served more quickly to visitors.’

Once again, click on the ‘Update Status’ button to save your changes.
Enable Dynamic Caching
If you want to keep certain parts of a webpage dynamic during caching, then WP Super Cache offers an option for it.
Enabling dynamic caching is useful in certain situations, especially if you have pages that contain frequently changing content. For example, you can speed up pages that contain ads by allowing dynamic caching.
To enable this option, you can head over to the ‘Advanced’ section and click the checkbox for ‘Enable dynamic caching.’

Make sure to save your changes when you’re finished.
Set Up Expiry Time & Garbage Collection
WP Super Cache also lets you set up the expiry time and frequency for deleting cached pages from your server.
To start, simply scroll down to the ‘Expiry Time & Garbage Collection’ section under the ‘Advanced’ tab to configure it.
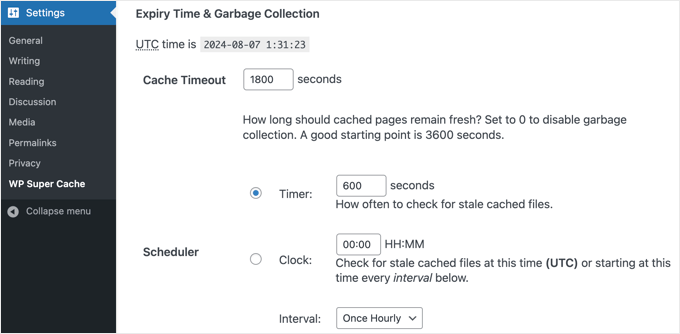
The ‘Cache Timeout’ tells the plugin to remove the cached page and perform a fresh cache. The plugin will set it to 1800 seconds by default, which is great for a high-traffic website.
However, if you have a new website that doesn’t get a lot of traffic, then 3600 seconds is a good starting point.
Other than that, you can schedule a time for the plugin to check for stale cached files and remove them.
When you’re finished making your selections, you’ll need to click on the ‘Change Expiration’ button to save your changes.
Specify Pages You Don’t Want to be Cached
By default, the plugin will cache all the pages on your site. This can increase the size of your cache files and use more resources. However, WP Super Cache allows you to choose pages that you don’t want to be cached.
You can scroll down to the ‘Rejected URL Strings’ section in the ‘Advanced’ tab to use this feature. In the text box, go ahead and enter the URL string of the pages that you don’t want the plugin to cache.
For example, if you have an eCommerce store, then you can exclude pages that visitors don’t often visit and save server resources. These can be the checkout page, account page, and thank you page.
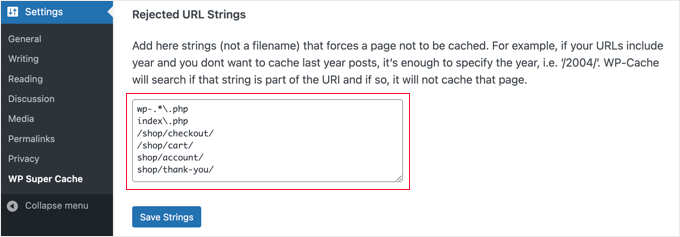
When you’re done, don’t forget to click the ‘Save Strings’ button.
Setting Up WP Super Cache to Work With Your CDN
If you are also using a Content Delivery Network (CDN) service to speed up your website, then you can configure WP Super Cache to work with it. Otherwise, you can safely skip this section.
A CDN is a network of servers distributed across different geographic locations, which helps quickly deliver content to your visitors. For more details, take a look at our infographic on why you need a CDN.
Tip: We recommend using Cloudflare because it is a free CDN provider that’s easy to set up. See our tutorial on how to set up Cloudflare’s free CDN on your WordPress site.
To set up WP Super Cache to work with your CDN, go ahead and click on the CDN tab in your settings. Then, check the box next to the ‘Enable CDN Support’ option.
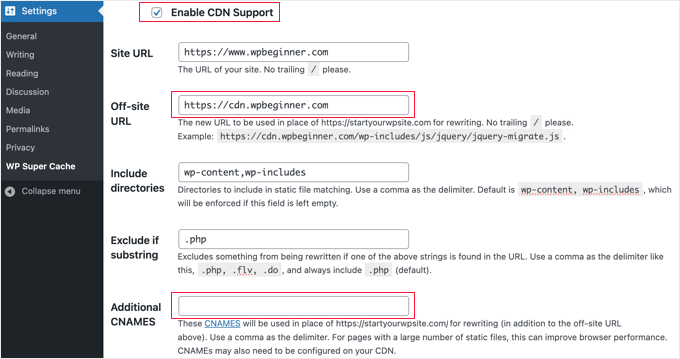
Next, you need to enter your ‘Off-site URL’. This is your CDN’s ‘pull zone’, which is the URL where your files are stored on the CDN.
The setting here depends on your CDN service, but here are some tips:
- If you are using Cloudflare, then you should leave this field blank. WP Super Cache will automatically detect and work with Cloudflare.
- If you are using a different CDN service, then you should enter something like:
https://cdn.wpbeginner.com. Make sure you replace ‘wpbeginner.com’ with your website’s domain name. - If in doubt, you can log in to your CDN service and check your account dashboard setting for ‘domain’, ‘CDN domain’ or ‘CDN URL’.
If you know that your CDN has multiple URLs, then you can enter them in the ‘Additional CNAMES’ field like: http://cdn1.wpbeginner.com, http://cdn2.wpbeginner.com, http://cdn3.wpbeginner.com. Otherwise, you should leave this field blank.
You can leave the other settings to default. Lastly, check the box that says ‘Skip https URLs to avoid “mixed content” errors’ and then click the ‘Save Changes’ button.
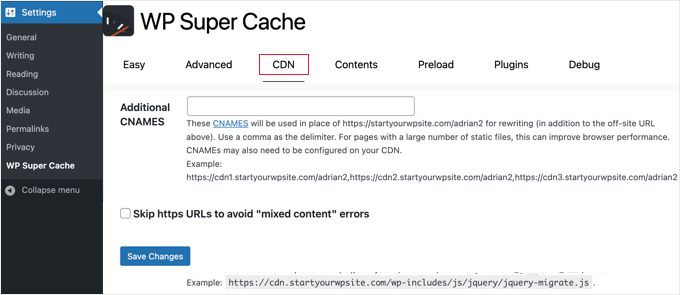
Now, your website is ready to serve static content from a CDN.
Serve a Static Site With WP Super Cache
The preload mode in WP Super Cache allows you to create super cache static files for all your posts and pages and serve a static website. This way, your content will load quickly whenever someone visits your site.
A super cache static file helps conserve server resources, serve an old site that is not being updated anymore, and improve site speed by serving static content only.
To start, head over to the ‘Preload’ tab in the WP Super Cache plugin. Next, you can set the time for refreshing the preloaded cache files.
By default, the plugin will set it to 600 minutes, but you can decrease the time if you publish multiple articles every day.
Remember that pre-loading your entire WordPress site takes some time and consumes a lot of your server’s resources. You can leave it to 0 if you don’t want your static files to expire ever, unless you manually refresh the cache.
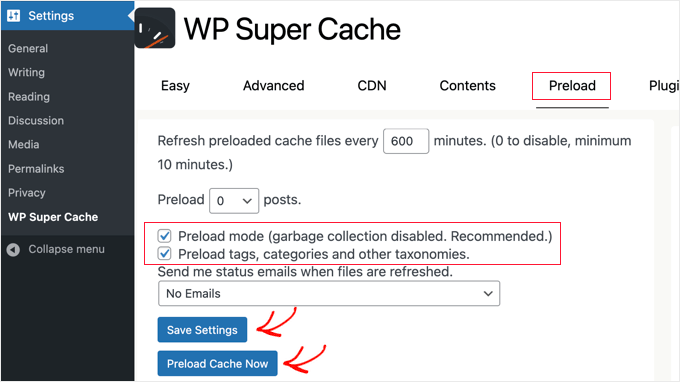
After that, make sure to check the boxes for ‘Preload mode (garbage collection disabled. Recommended).’ You can also enable preloads for different tags, categories, and other taxonomies on your website.
The plugin also offers an option to get email alerts whenever your files are refreshed. By default, it will use the ‘No Email’ setting, but you can change it by choosing an option from the dropdown menu.
When you’re done, go ahead and save your settings and then click the ‘Preload Cache Now’ button.
Expert Guides on WordPress Caching
We hope this guide helped you set up WP Super Cache on your WordPress blog. You may like to see some other articles related to WordPress caching:
- How to Easily Fix Leverage Browser Caching Warning in WordPress
- How to Clear Your Cache in WordPress (Step by Step)
- Best WordPress Caching Plugins to Speed Up Your Website
- LiteSpeed Cache vs. WP Rocket – Which One is Better?
- How to Properly Install and Setup WP Rocket in WordPress
- How to Install and Setup W3 Total Cache for Beginners
- The Ultimate Guide to Boost WordPress Speed & Performance
- How to Speed up WooCommerce Performance
If you liked this article, then please subscribe to our YouTube Channel for WordPress video tutorials. You can also find us on Twitter and Facebook.


Anze
Hey; I have a question – so preload mode enabled does not deletes old cached files – but does that means then when preloaded files are refreshed, the old ones are deleted and replaced, or does it just adding files, which would mean space on server would eventually run out?
WPBeginner Support
When the page is preloaded a new time, the old preloaded version would be deleted and replaced.
Admin
James Omeke
Thanks so much . This was very helpful.
I got my website up and running now
WPBeginner Support
You’re welcome, glad our guide was helpful!
Admin
Mike Royden
Plug in installed, but can’t get past this;
Permalink Structure Error
A custom url or permalink structure is required for this plugin to work correctly. Please go to the Permalinks Options Page to configure your permalinks.
I have gone to the Permalinks Options Page to configure your permalinks, but can’t see where I’m going wrong. Going round in circles, please help. Thanks
WPBeginner Support
You would want to ensure your permalinks are not set to plain for that error. We recommend using the Post name structure.
Admin
Mike Royden
Sorted! Many thanks for your advice and taking the time to reply. Cheers.
Katherine
I’m trying to set up this plug in to get the best results, and I’m not tech-savvy at all. Your Wp advanced cache set up section is not the same as the current plugin advanced options.
WPBeginner Support
Thank you for letting us know, we will be sure to take a look into this and update our article when able.
Admin
Simon
I was able to speed up my homepage significantly but unfortunately it only worked for the homepage. The subpages like i.e. ‘Services’ are still really slow.
What could be the problem?
WPBeginner Support
You would want to run a speed test for that using our guide below to figure that out:
https://www.wpbeginner.com/beginners-guide/how-to-properly-run-a-website-speed-test-best-tools/
Admin
Rainey
Unable to activate the plugin. I get a warning message that a .php file already exists and I should manually delete it before using the plugin. Since I am not a techie I do not know where to go to delete the file. If you could put language in your update to the tutorial to guide us would be really helpful.
WPBeginner Support
For that error, you may want to follow our guide below:
https://www.wpbeginner.com/wp-tutorials/how-to-fix-destination-folder-already-exists-error-in-wordpress/
Admin
Paul
This post is dated. When will this post be updated? Would like to know the current status of WP Super Cache?
WPBeginner Support
Thank you for letting us know, we do not have a specific date that content will be updated but we will take a look into updating this article
Admin
Nic
Is there a way to export settings once you get done?
WPBeginner Support
At the moment WP Super Cache does not have a built-in option to export settings.
Admin
ShoaiB
Thank you for this Awesome Guide.
I’m using WP Super Cache (Version 1.7.0 ). In the above tutorial, many features are not included. plz, Update Post.
WPBeginner Support
Thank you for your request, we will look into updating the post
Admin
Christopher
not as easy as described…
A custom url or permalink structure is required for this plugin to work correctly. Please go to the Permalinks Options Page to configure your permalinks.
WPBeginner Support
Thank you for reminding us of that, we’ll be sure to look into updating the article for clarification.
Admin
Ana
Hello Support!
Thank you for all your work, I’m a complete newbie and without you, I don’t know how I’d manage.
I’m confused as regards what off-site URLs and CNames are, so I’m unable to fill in that in the form. Do I have to refer to somewhere on my page to find out or do I just create it my indicating something?
Just in case it affects somehow I’d like to inform that I run a multisite.
Thank you so much & hope you can help me,
Ana
WPBeginner Support
Hi Ana,
The off site URL is the URL of your CDN location and CNames are different pullzones you have created on your CDN server. If you are not using a CDN, then you don’t need to make any changes to these settings.
Admin
krishna
can i use this plugin for testing in localhost ??
i installed this plugin in localhost and in “Cache Contents” nothing cached
displaying this …
WP-Cache (0KB)
0 Cached Pages
0 Expired Pages
WP-Super-Cache (0KB)
0 Cached Pages
0 Expired Pages
is it because i can’t use cache plugin in localhost or some other issue ?
Hardik
There is nothing called MOD_REWRITE. Everything from that step seems completely different. Please update the tutorial.
Mike
No matter what settings I use Pingdom still gives me an F and says “The following cacheable resources have a short freshness lifetime. Specify an expiration at least one week in the future for the following resources:” and I see and “expiration not specified” message in the details. Am I missing a setting?
Akshay
Hi Team ,
Thanks for the amazing article .
I have installed WP Super Cache with cloudflare (newbie blogger).
Can you please help me, how can I integrate cloudflare with WP super cache .
I did not found any articles or vidoes for the same .
I thought of installing WP Total , but it has not releasedthe update for recent wordpress version 4.8.1
Thank You
Sumaiya
Hi, I wanted to speed up my site. I used this guide and customized the settings as you shown. But before installing this plugin I tested my site speed it was 4.20 sec. But after installing I check it was 6.78 sec. Why is it like this? please guide me well.
WPBeginner Support
Hi Sumaiya,
Please test it again. If the result persists, then deactivate the plugin.
Admin
Rajeev jaiswal
hello sir, I’m trying to integrate js and CSS code elements in twenty-seventeen WordPress theme. I use enqueue methods but it does not work, so suggest me to all about.
Sara
I just downloaded WP Super Cache and the “Advanced” Page doesn’t have the same setup (or some of the same options!) as your screenshot and instructions. Are those dates, or did I somehow end up with an older version of the plugin?
Carrie
Same here, my settings are different.
Abner
Hi guys – Thanks for sharing this. I am using wp super cache and my wordpress is 4.0.1. At first, i don’t have any problem. Until recently, having a problem. My post did not appear on my website. I tried to put the caching off and my post appear. After that, I put the caching on again. My workaround was after posting article to my website, I will put my caching off to appear the post in my website, then after a few minutes, I will put the caching to on.
Few weeks doing that, and now, when I put the caching on, my post will disappear again to my website. As of now, my caching is still off.
Thanks and hope you can help me.
WPBeginner Support
Hi Abner,
Seems like WP Super Cache is not clearing the cache when you publish new content. Please see our article on how to clear cache in WordPress.
Admin
Mark Layton
Hello Support,
Thank You for your help with this issue while trying to install WP Super Cache.
Here is a copy of issue :
Warning! Could not update /var/www/website/wp-config.php! WPCACHEHOME must be set in config file.
Warning! /var/www/website/wp-content/advanced-cache.php does not exist or cannot be updated.
1. If it already exists, please delete the file first.
2. Make /var/www/website/wp-content writable using the chmod command through your ftp or server software. (chmod 777 /var/www/website/wp-content) and refresh this page. This is only a temporary measure and you’ll have to make it read only afterwards again. (Change 777 to 755 in the previous command)
3. Refresh this page to update /var/www/website/wp-content/advanced-cache.php
If that doesn’t work, make sure the file /var/www/website/wp-content/advanced-cache.php doesn’t exist:
1. Open /var/www/website/wp-content/plugins/wp-super-cache/advanced-cache.php$wp_cache_file in a text editor.
2. Change the text CACHEHOME to /var/www/website/wp-content/plugins/wp-super-cache/
3. Save the file and copy it to /var/www/website/wp-content/advanced-cache.php and refresh this page.
Cannot continue… fix previous problems and retry.
Already use your Envira Gallery and WP Forms and those are fantastic.
Should I just use W3 Total Cache instead?
Thank You so much for your help.
Mark Layton
WPBeginner Support
Hey Mark,
You can try following the instructions shown in WP Super Cache. If you find them too complicated, then you can try W3 Total Cache. Good luck
Admin
sheikave Jhurreea
Initially my website was loading for under 8 seconds which is pretty bad. But using your tutorial I was able get 90/100 for desktop performance.
But the mobile platform it remained 74/100. Could you suggest some resources where I could look up too or what is your suggestion.
WPBeginner Support
Hey Sheikave,
Congrats! That’s impressive. You may also want to see our guide on how to fix render-blocking JavaScript and CSS in WordPress.
Admin
Greg
Hi, I’d like to know whether your guidance to choose mod_rewrite to serve cache files still stands as opposed to using PHP or Legacy Caching. I notice since you published your article, WP Super Cache have changed their own recommendation from mod_rewrite to PHP.
Thanks in advance!
Greg
Dillon
Hi there. I’ve followed this tutorial to a T, and for the most part, everything works correctly, but I’m having two problems. First, when I make changes, they don’t appear on the site if I’m logged in. If I log out, they appear just fine. Second, I’m working on a WPMU network, and I only have the plugin installed on one site. But it’s caching the other sites on the network as well. How do I stop it from doing that? Thanks!
Belayet Hossain
This is an awesome guideline for new users.
It helped me a lot.
Thanks from the core of heart.
Sarah
Hi,
I followed your steps because my site was taking over 5s to load but after setting up the WP Super Cache my site wouldn’t load. At all. It was basic HTML – no content, no pictures, just the header…
So, I guess I’m wondering if there’s a laymen’s guide to literally all the terms you use cause I don’t understand websites or programming and I have a website for a start-up NGO so can’t really pay for any help at this point.
Or maybe you could direct me somewhere that will help me understand all this better? I’m a complete novice and confused easily!
Help!
Pedro Moreira
Hello,
I have a “conceptual doubt” about WP Super Cache, that I didn´t see answered neither in your site neither in other sites.
The question is: the structure of my site is finished. In basic terms, it is mainly a site of videos of football, which means that from this day on I will gradually add posts (that include the videos that I refered) and pages (of the teams).
Since that this will be a long and permanent process, I need right now to speed up my site because nowadays is very slow.
My doubt is: when I install and configue this plugin, what does that mean in terms of the updates that I will do in my site (post and pages that I add)?
I mean, if I cache the site today and tomorrow I add a new page or post, what do I have to do in order that these pages or posts will be also cached? – do I just have to require an update of the plugin? If so, how do I do that, is it possible to define that the plugin will update the cache for example once a week?
Thank you!
Best regards.
Bogdan
If i don„t use set up the CDN ,the wp super cache will be work properly ?
WPBeginner Support
Yes, it will work even without CDN.
Admin
Herman
I’m getting an error on the first step where you need to click on caching on and update. You mentioned the following in your article:
“WP Super Cache will fetch your WordPress site twice and will compare the time stamps of both pages. If the both time stamps match then this means that caching is working on your site now.”
This is the place where I get the error. I get a message that says:
Fetching to prime cache: OK
Fetching first copy of FAILED
Fetching second copy of : FAILED
I would be glad if you could help me out.
Sofor
Thank you so much, It works great for me.
Teddy
My site is a coupon site, so code is included on the coupon so it prints out by itself without lots of other junk that is on the page. If I use WP Super Cache, will that code be lost because it’s now a static page? Will people still be able to click on the coupon to print just the coupon?
WPBeginner Support
Hi Teddy,
You will have to test it out first on your computer or in a staging environment.
Admin
Alex
Thanks so much for the the help. Do i have to create a cname record to use the CDN service in WP super cache. Thanks
Stefan Andonov
Hi,
How to preload for several languages, I am using qtranslate, that seems impossible, right?
10x
Stefan
John Johnson
This is an ecommerce site using Exchange from iThemes. With WP Super Cache activated certain pages that need to be refreshed don’t get refreshed i.e. Empty Cart. When you Empty Cart it comes back with the same content or in other words it appears unemptied.
When I deactivate WP Super Cache the problem disappears. It was suggested that I Whitelist the pages that shouldn’t be cached. I am uncertain about how to do that. Any help would be appreciated.
Regards,
John
Dajuan
WP Beginner Staff, when a theme update is applied, or when other plugin updates are made, is WP Super Cache alerted to create new cached versions? Or does the plugin wait until “Expiry Time & Garbage Collection” or a manual cache deletion?
Iosif
Hello,
I am using WP Super Cache, but it seems that my images don’t get cached. Any ideas on how to configure this?
I did have a lazy load plug-in, but it conflicted with my theme, so I deactivated it…
shubhendu
I have just install wp super cache plugin by reading your article but nor js,css and image is not loading at my blog…plz help my site address is
If you dont want to publish is comment because i include my site link PLEASE reply to my email id.
Thanks.
WPBeginner Support
Seems like you have already resolved the issue.
Admin
madhavi jha
hi , i am regular reader of your site , i have setup WP Super Cache plugin as you guide in your blog , but its not working its show only 20/100
please guide me ,i have been tried to solve this problem since last 2 days , please guide me .
nitai roy
Hi,
I followed as you mentioned here. Everything has done perfectly but I could not find this option: “Enable Compression in WP Super Cache:”
Where is it please?
Also, Now how can I know whether it is working perfectly or not?
Thank you very much.
Patel Shoeb
How to Install and Setup WP Super Cache with CloudFlare CDN?
kurakaniz
after updating the plugin it says “.htaccess file may need to be moved” and this error too
A difference between the rules in your .htaccess file and the plugin rewrite rules has been found. This could be simple whitespace differences but you should compare the rules in the file with those below as soon as possible. Click the ’Update Mod_Rewrite Rules’ button to update the rules.
what to do please help
Ron
Same problem here.Anyone help
stephen
I installed everything just as you said but I am still getting 52sec load time and if I tried using gtmetrix I get an error saying the URL does not appear to be an HTML.home page . please help site is
Megan Good
This article was very helpful, and I was able to troubleshoot my issues based on your suggested settings. Thank you for the info!
Omprakash Jaiswal
wp super cache does not work
Permlink Structure Error
A custom url or permalink structure is required for this plugin to work correctly. Please go to the Permalinks Options Page to configure your permalinks.
Hammad
Thank you for your suggestions, I’m trying to apply these settings on my website now. Can you please advise if wp super cache supports minify settings.
I had wp3 total cache and had a score of 97/81 on gtmetrix, after installing wp super cache my score decreased to 82/68.
Imran
Was looking for some great guide for super cache plugin. Now I will try it on my test site.
Thanks for such a nice tutorial
Robert Connor
Some great tips-now i need to go back and fix my site
User
How do I get it to work for Mobile without changing the theme?
cezars
Any info for Rejected User Agents list from the plugin ?
herb
Installed it and got a lower grade E/D on Gtmetrix…switched to W3TC and it gave me and A/B grade.
efiga
Hi
i have a little question , when using this plugin to cashe pages , the google adsense ads will be cashed too ? ,it will show the same ads ?
thank you in advance
WPBeginner Staff
No your Google Ads will not be cached.