We’ve often been asked how to install WordPress on Amazon Web Services (AWS).
Amazon Web Services is a powerful cloud platform usually used for bigger projects. It’s popular because it combines Amazon’s strong infrastructure with flexible pay-as-you-go pricing.
At WPBeginner, we’ve worked with AWS on various projects. It requires a more hands-on approach and some technical expertise, but it’s still a great option if you’re looking for more control and scalability.
In this guide, we will walk you through installing WordPress on Amazon Web Services step by step. No special skills are needed, just follow our instructions.
Note: If you are just starting a website, we recommend using one of the easier solutions from our how to install WordPress guide.
We have split this article into two methods. The first method is a manual process that is very technical and complicated. The second method is easier for beginners because it allows you to use AWS infrastructure through a preferred managed WordPress hosting solution.
You can use the quick links below to jump to the method you want to use:
Method 1: Creating a Custom WordPress Install on AWS
The first thing you need to do is visit the Amazon Web Services website. You can create a free account, but you will need to enter your credit card information. Amazon will verify your identity by charging you $1 for your card.
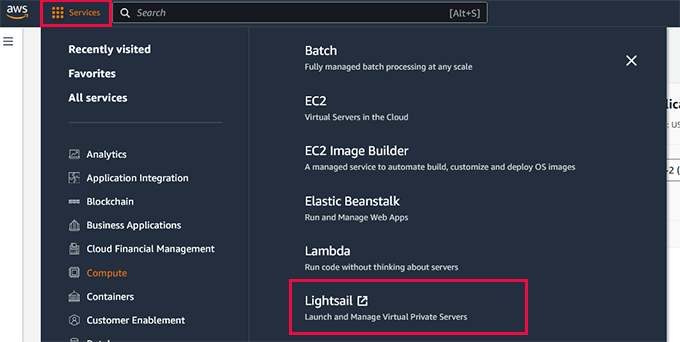
Once your account is verified, log in to your AWS console and click on the ‘Services’ menu. Under the compute section, select Lightsail to continue.
What is Lightsail?
Lightsail is one of the many services provided by Amazon Web Services. It is designed to make it easy for users to launch their own VPS hosting instances, which come pre-installed with popular web hosting software.
Step 1: Create a VPS Instance with WordPress Installed
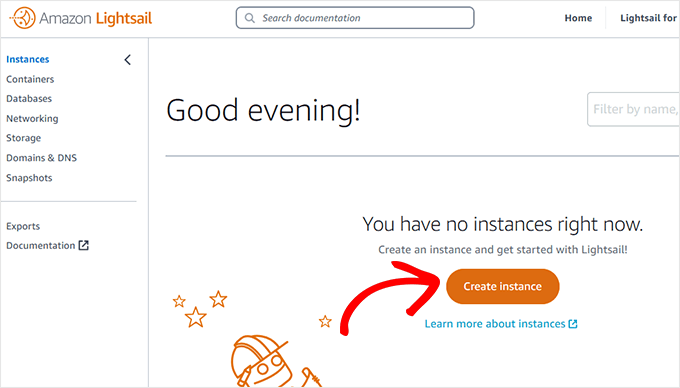
Next, click the ‘Create instance’ button to launch and configure your instance settings.
Now, you will be asked to choose a region for your VPS instance. You will see several geographical locations to choose from.
Tip 💡: We recommend choosing a location where your target audience is located. This reduces server latency and will boost your WordPress website speed and performance.
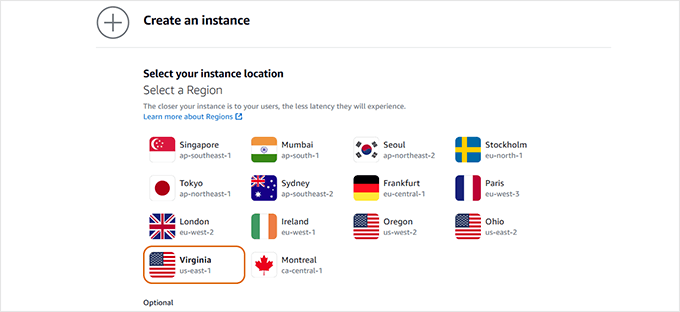
Click to select your region and scroll down a little to configure the instance image.
First, you need to select Linux/Unix as your platform, and then under the ‘Select a blueprint’ option, click on WordPress.
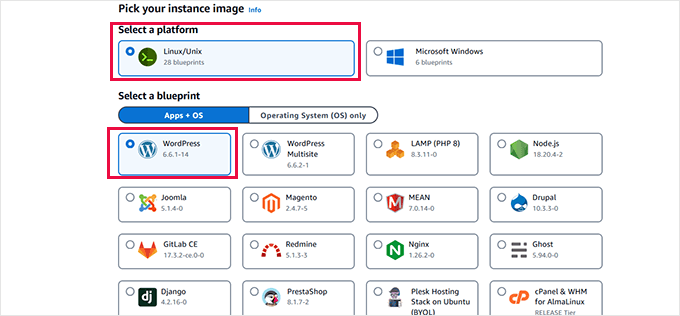
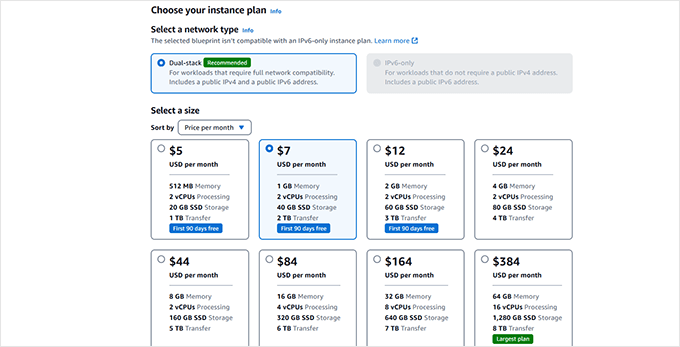
After that, you need to scroll further down to the ‘Choose your instance plan’ section.
From here, you need to select the size of your server. We recommend starting with at least 1GB of memory. This gives WordPress plenty of resources to perform even under peak traffic.
Finally, you need to enter a name for the AWS VPS instance. This could be anything that helps you identify what this VPS server does.
After that, click on the ‘Create instance’ button to continue.
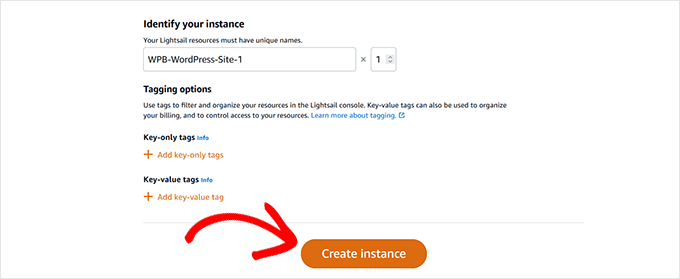
AWS will now create a VPS server instance with WordPress and all the software you need to run it.
Once your instance is ready, click on the three-dot menu and select ‘Manage.’
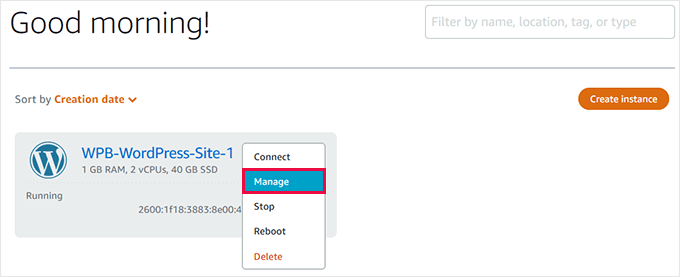
This will bring you to the VPS instance management area.
Step 2: Retrieve WordPress Admin Username and Password
Your VPS instance management area is the control center of your virtual server hosted on the Amazon cloud. From here, you can reboot, stop, and even delete the server. More importantly, this is where you will set up your WordPress website.
On the management page, you will see a button for ‘Access WordPress Admin’, but before you do that, you need to find out your website’s default user name and password.
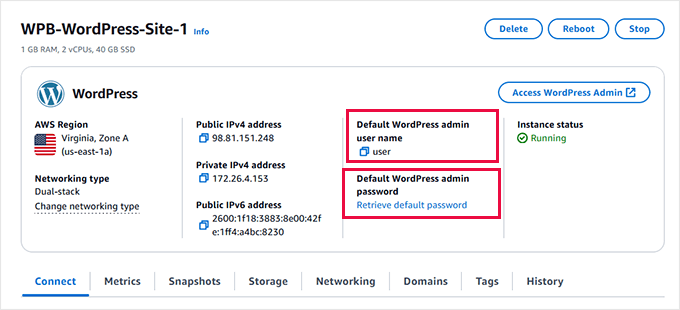
You will see your username under the ‘Default WordPress admin username. Click to copy it, and then paste it into a plain text editor like Notepad.
Below that, you need to click the ‘Retrieve default password’ link under the ‘Default WordPress admin password’ option.
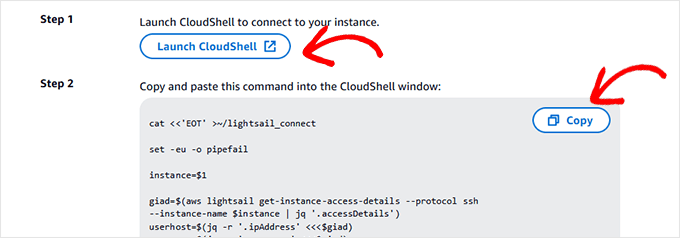
This will show you two steps you need to complete to get your WordPress admin password.
For the first step, click the ‘Launch Cloudshell’ button to open a command-line window. Your browser screen will split, and you will see a command-line interface at the bottom.
Step 2 is to copy the above code and paste it into the CloudShell command line window.
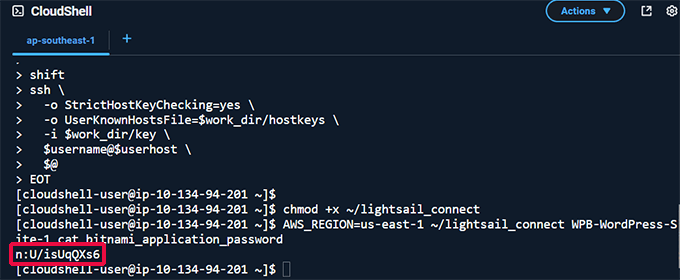
The script will run and display your WordPress password at the end right after the bitnami_application_password text.
You can now copy the password and save it in a text editor. Then, you can safely click on the close button to exit the CloudShell window.
Now that you have the admin username and password, you can log in to your WordPress website’s admin area.
Step 3: Log in to The WordPress Admin Area on AWS
Scroll back to the top of your instance management dashboard and click the ‘Access WordPress Admin’ button.
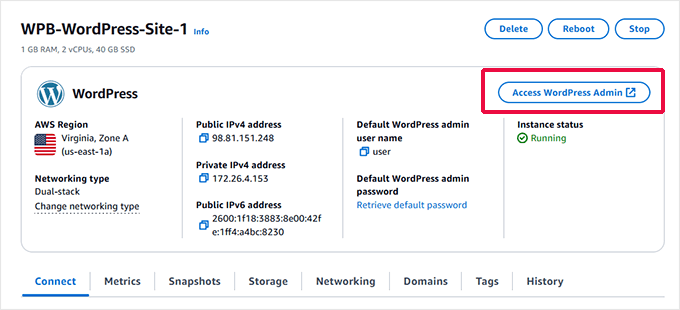
This will bring up a popup showing the login URL for your WordPress admin area.
Since your website does not currently have a domain name, you will need to access it using its public IP address.
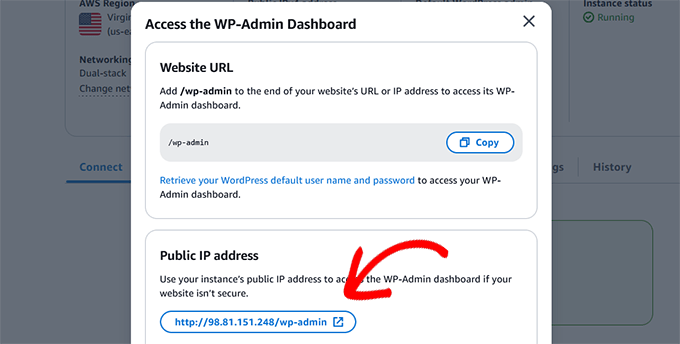
This will open the WordPress admin area in a new browser tab.
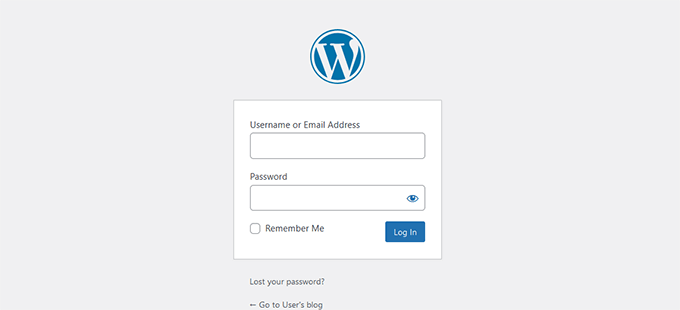
You will now see the WordPress login screen. Fill in using the default admin username and password you retrieved earlier.
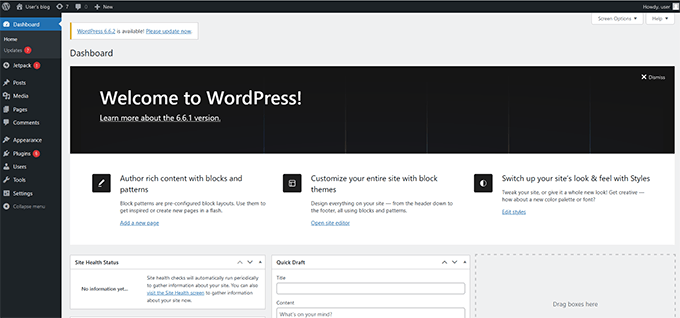
Once logged in, you will see the familiar WordPress admin dashboard.
Note: We noticed that AWS does not automatically update WordPress or plugins, so you may need to install some updates. Here is a quick guide on how to install WordPress updates.
Step 4: Adding a Domain Name to Your AWS VPS
As you have noticed, your AWS VPS instance uses a public IP address. You will need to add a domain name to your VPS instance so that you can start working on your WordPress website and make it publicly available.
You can use your existing domain name or register a new one. Amazon doesn’t sell domain names, so you will need to buy one from a third-party domain registrar.
We recommend Domain.com. They offer competitive prices, and we like their easy domain management tools. You can use our Domain.com coupon to get an additional 25% off.
Once your domain name is ready, switch to the ‘Connect’ tab under your VPS instance management area and click the ‘Set up your website’ button.
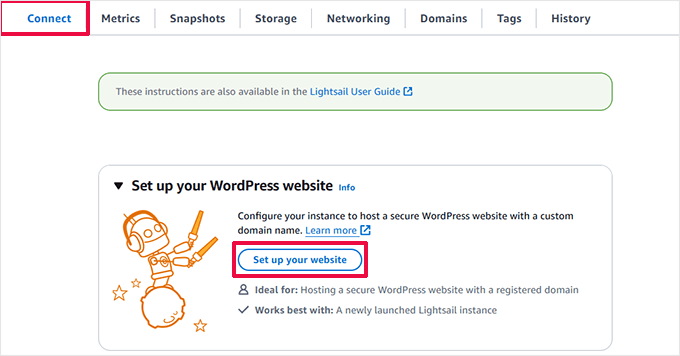
This will launch a setup wizard.
First, you need to select a third-party domain and then enter your custom domain name.
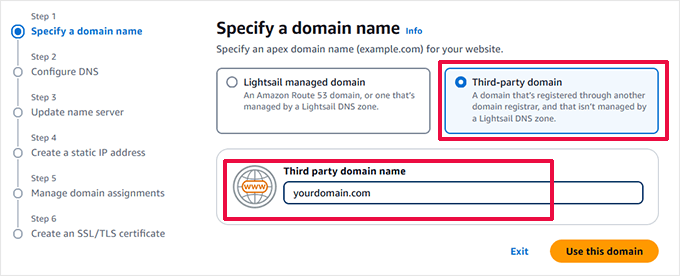
Click ‘Use this domain’ to continue.
On the next screen, you will be asked how you would like to manage your domain name. Choose ‘Lightsail DNS Zone’ as it will be more convenient.
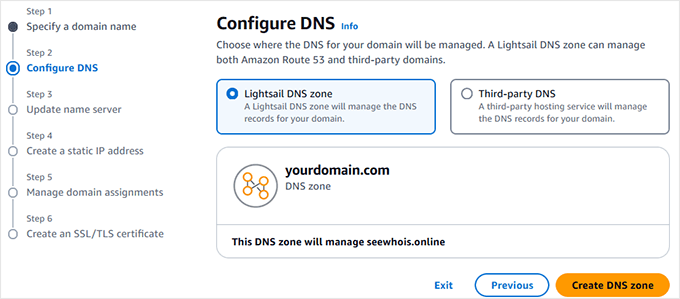
Simply click on ‘Create DNS zone’ to continue.
The setup wizard will now show you DNS nameserver values.
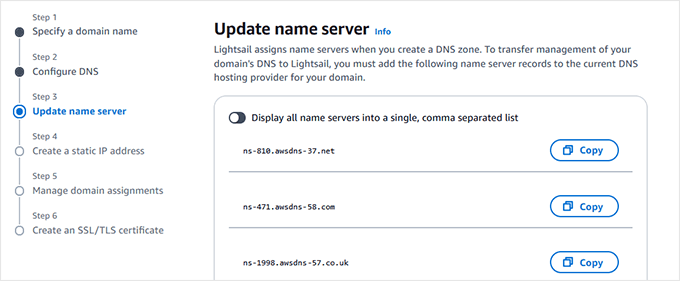
You need to log in to your domain registrar account to update name servers there. We have a handy guide on updating DNS nameservers covering popular hosting and domain registration platforms.
Once you have updated the nameserver information, return to the setup wizard and click ‘Continue’.
Note ⏲️: Nameserver changes can take up to 24 hours to be updated across the internet.
In the next step, you will be asked to enter a name for your static IP. You can enter any name that helps you easily identify what this IP does.
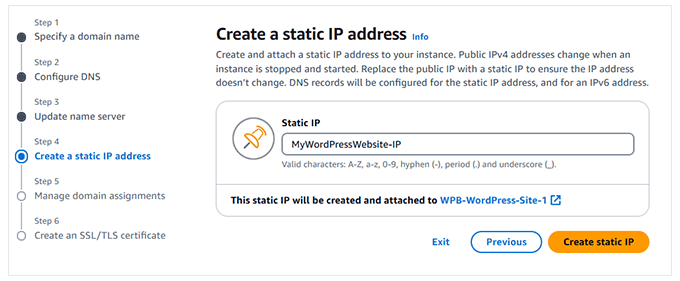
Click ‘Create static IP’ to continue.
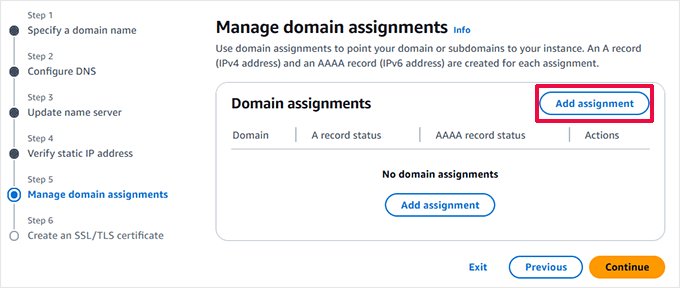
On the next screen, you will be asked to assign your domain to your VPS instance. Click on the ‘Add assignment’ button.
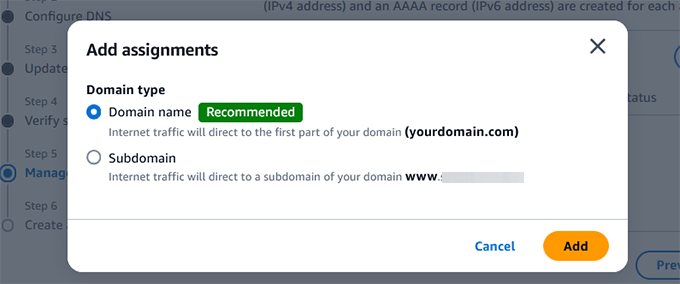
This will bring up a popup.
It will show your root domain name as the recommended option. Just click to select it and then click ‘Add’.
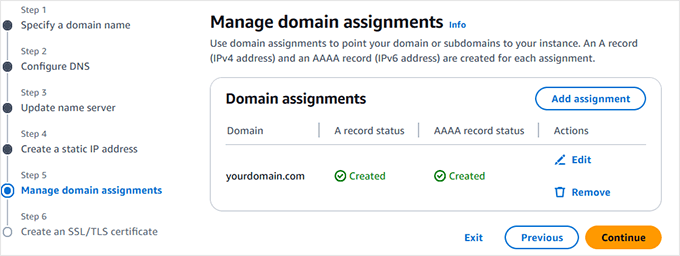
The setup wizard will now add your root domain to the DNS settings and point it to your VPS instance.
Click ‘Continue’ to go to the next step.
In the final step, you will be asked to select your domain to install a free SSL certificate.
Below, you will be asked to enter your email address to confirm that you agree with Let’s Encrypt’s (free SSL service provider) privacy policy.
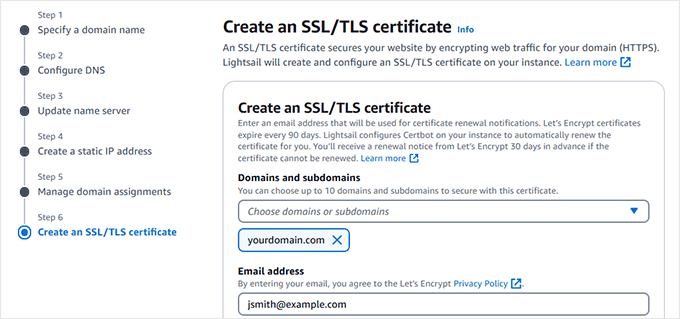
After that, you will be asked to authorize Lightsail to install an SSL certificate for you.
Click ‘Create certificate’ to move forward.
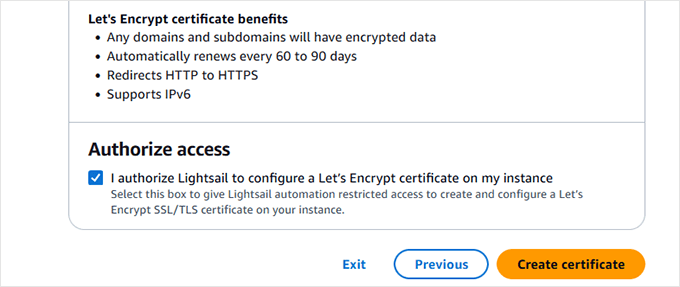
The setup wizard will now add an SSL certificate to your website.
You will now return to the manage instance page, where you will see your website’s setup status.
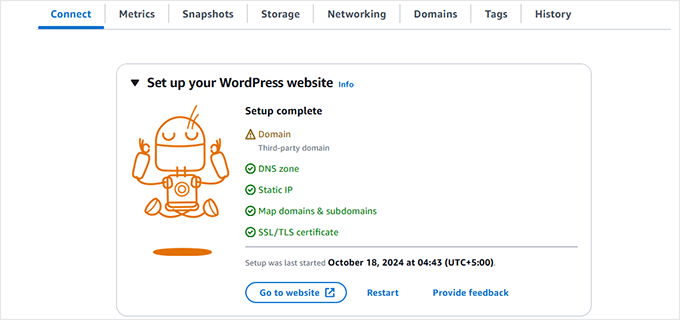
Note: SSL Certificate and Domain nameserver settings can take a while to take effect.
You can now log in to your WordPress site using your custom domain name:
https://yourdomain.com/wp-admin
Don’t forget to replace yourdomain.com with your own domain name.
Congratulations, you have successfully installed WordPress on Amazon Web Services.
Method 2: Using Amazon Web Services via Managed WordPress Hosting
As you may have noticed, setting up a custom WordPress site on Amazon Web Services is both technical and complicated.
The cloud computing infrastructure provided by Amazon Web Services is a pay-as-you-go solution. This means that traffic spikes will increase your hosting bill significantly. You will also still be responsible for managing your own services, which is just extra work.
An easier way to use WordPress on cloud platforms without any hassle is by using a managed WordPress hosting provider.
We recommend using SiteGround. It is a managed WordPress hosting provider that uses Google Cloud Platform instead of Amazon Web Services. And when it comes to performance, Google Cloud and Amazon AWS are neck and neck.
However, we found that SiteGround’s additional tweaks to their Google Cloud servers gave much better performance. It was one of the reasons we switched WPBeginner to Siteground.
Many of our other partner companies are also hosted on SiteGround. For more details, please see our complete SiteGround review.
Other alternatives you may want to consider include Bluehost Cloud and WordPress.com (Business and Commerce plans).
We hope this article helped you learn how to install WordPress on Amazon Web Services. You may also want to see our ultimate guide on improving WordPress speed and performance with step-by-step instructions or our expert picks of the fastest WordPress hosting.
If you liked this article, then please subscribe to our YouTube Channel for WordPress video tutorials. You can also find us on Twitter and Facebook.


sanskruti
Is it possible to link a pre-existing website(created on wordpress) with AWS?
WPBeginner Support
You would use this method to install WordPress and transfer your content over. You can see our guide on how to transfer your content below:
https://www.wpbeginner.com/wp-tutorials/how-to-move-wordpress-to-a-new-host-or-server-with-no-downtime/
Admin
Nancy Melucci
Just a head’s up – the new interface for EC2 makes it a lot harder to find the system log to recover the password. Fortunately, there’s a toggle button. So I toggled to the old interface.
WPBeginner Support
Thank you for sharing that information for those looking for that
Admin
Gordon Taylor
Thank you so much for this excellent guide. I now have my first Wordpress site up on AWS.
WPBeginner Support
Glad our guide was helpful
Admin
Rahul Veerwal
This was amazing. Thank you so much for the detailed guidance. I was able to setup in under 10 mins.
WPBeginner Support
You’re welcome, glad our guide could help
Admin
AJ
Hello thank you for the article. I currently have AWS subscription and services. I also have a website that is already being hosted and it is not WP.
I now want to install a WP website to replace the current site.
Do I just use the same installation instructions above? Or is there a different process.
Another question: if I want the designer to install for me, should I create a different AWS log in for them to use? Or
WPBeginner Support
You would need to remove the old site and then you can follow this guide. It may be a good idea to give your designer their own login information should access need to be removed at a later date.
Admin
kenny
WOW!! What an excellent article. Very thorough, painless and easy to follow.
I also wanted to let you know that your Pagely link in (Method 2. Using Amazon Web Services via Managed WordPress Hosting) goes to the Pagely website but it pops up with a 404. Just wanted to let you guys know that so you can possibly fix that if you’d like.
WPBeginner Support
Thanks for letting us know, we’ll be sure to look into that
Admin
Majed Ahmed
Thank you so much but i have one important question
When i installed my wordpress site
I already have theme ok ? from where can i upload the theme please ?
Sorry for my bad english
WPBeginner Support
For installing a theme, if that is what you’re looking to do, you would want to take a look at our guide here: https://www.wpbeginner.com/beginners-guide/how-to-install-a-wordpress-theme/
Admin
Yaya JATTA
What a well documented step by step process laid out simply for any lay man to follow and get the same result as an expert will.
Thank you!, I landed on the right page will be sure to join your youtube channel.
WPBeginner Support
Glad our article was helpful
Admin
Nigel
Incredibly useful page. Thanks for posting this. Took me 15 minutes to set up 2 Wordpress sites. Brilliant.
WPBeginner Support
Glad our guide could help
Admin
Vikas Goyal
I installed wordpress as guided in the step by step process in this article.
Everything is working fine except for the backend login page.
The password that is given in instance log is not working.
Kindly help
WPBeginner Support
Don’t forget to exclude the quotes in the password when entering it and it is case sensitive. Otherwise, you would need to use the command line and reset your password using the Bitnami documentation method.
Admin
Kevin
One of the best walkt hroughs of this complex setup i have seen. Thanks!
WPBeginner Support
Hey Kevin,
We are glad you found it helpful. Don’t forget to join us on Twitter for more WordPress tips and tutorials.
Admin
Jay
Great article and instructions. I did this about a year ago and have been very happy with the service. I have a small personal website that was free for the first year and now $10 per month.
“As you may have noticed that setting up a custom WordPress install on Amazon web services is a very technical and complicated process.”
You should at least state that ‘very technical’ is subjective. You should also at least mention the advantages of having a VPS versus a managed hosting service.
Mahesh
Really Thanks a lot
Ahmed
Thanks for the explanation. Well explained
Andy
Great article. Thanks a lot for detail explination.