Shopify is a popular eCommerce platform for setting up an online store. It has a user-friendly interface and a wide range of tools for managing your business, but it might not be the best standalone option for your online business.
That is why we recommend using Shopify with WordPress. It allows you to combine the eCommerce features of Shopify with the most powerful website builder on the planet, giving you more flexibility to grow your business.
We’ve used WordPress for our online stores and have seen firsthand how scalable it is. We’ve also tested Shopify many times. This has allowed us to compare their strengths and weaknesses, and we’ve found that in many cases using them together may be your best option.
In this article, we will show you how to easily connect Shopify with WordPress to grow your business.
Why Use Shopify with WordPress?
WordPress is the best website builder in the world, powering more than 43% of all websites on the internet.
It is incredibly easy to use and gives you access to thousands of free and paid WordPress themes and plugins (apps for your website).
On the other hand, Shopify is a popular eCommerce platform that helps you sell products online.
You can use WordPress with WooCommerce to create your online store, but some users may want to use Shopify for their store and WordPress for their website.
For more details, see our comparison of Shopify vs. WooCommerce with the pros and cons of both tools.
Combining Shopify and WordPress gives you the advantages of both platforms. You can sell products with Shopify while enjoying the flexibility and freedom of WordPress to manage your website.
This gives you full control over your website design, enhances your market reach, and allows you to manage both platforms from a single dashboard.
That being said, let’s take a look at how to easily use Shopify with WordPress. You can use the quick links below to navigate through this tutorial:
- Step 1: Set Up Your Shopify Store and WordPress Website
- Step 2: Connect WordPress to Your Shopify Store
- Step 3: Display Shopify Products in WordPress
- Step 4: Customize Your WordPress Website
- Step 5: Add a Contact Form to Your WordPress Site
- Step 6: Add Customer Reviews to Your Online Store
- Step 7: Grow Your WordPress Website and Shopify Store
Step 1: Set Up Your Shopify Store and WordPress Website
If you haven’t already done so, then you need to first go and create your Shopify store.
After that, add some products and then come back here.

Next, you must set up your WordPress website. Keep in mind that there are two types of WordPress.
First, there is WordPress.com, which is a website hosting service. Then, you have WordPress.org, also called self-hosted WordPress.
You’ll need WordPress.org because it gives you instant access to all WordPress features out of the box. For more details, see our comparison of WordPress.com vs. WordPress.org.
To make a WordPress.org website, you’ll need a domain name, which will be your site’s name on the internet, and a web hosting account where your website will store all its data.
A domain name costs around $14.99 per year, and WordPress hosting plans usually start at $7.99 per month (usually paid yearly).
Our friends at Bluehost have agreed to offer WPBeginner users a free domain name with a generous discount on hosting. Basically, you can get started for as little as $1.99 per month.
All you need to do is click our Bluehost link above and click the ‘Get Started Now’ button on the next screen.

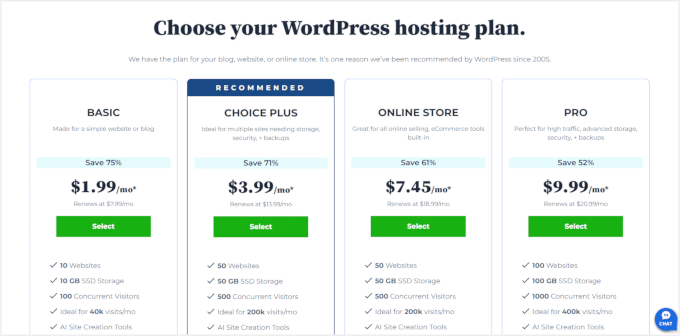
After that, you will now arrive at Bluehost’s pricing page.
For online businesses, it’s recommended to go with the ‘Online Store’ plan, but you can pick whichever you like. You can always upgrade to a higher plan when needed.
Click ‘Select’ on the plan of your choice.
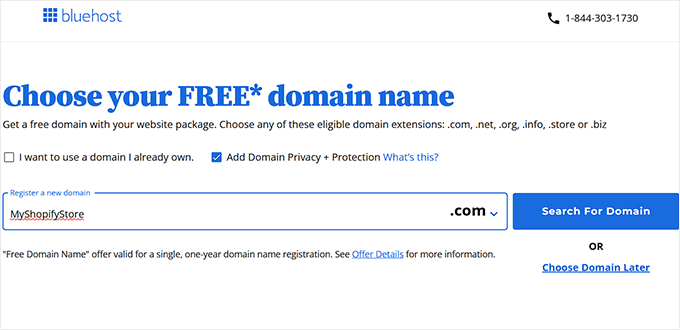
Next, you will have to choose a domain name or connect an existing one to your WordPress website.
You can also skip this step by clicking the ‘Choose domain later’ link.
💡 Tip: We recommend choosing a name related to your business that is easy to pronounce, spell, and remember.
However, if you don’t have any ideas, then you can use WPBeginner’s Free Business Name Generator to come up with an interesting name for your store.
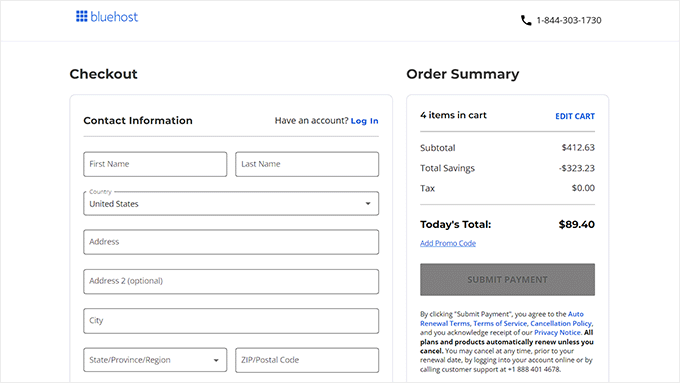
After that, go ahead and enter your payment information to complete the purchase.
You will be asked to provide your account information, including your business email address, name, country, phone number, and more.
Bluehost will then email you instructions on how to log in to the hosting dashboard.
Once logged in, go to the ‘Websites’ tab. You’ll see that Bluehost has installed a new WordPress site for you.
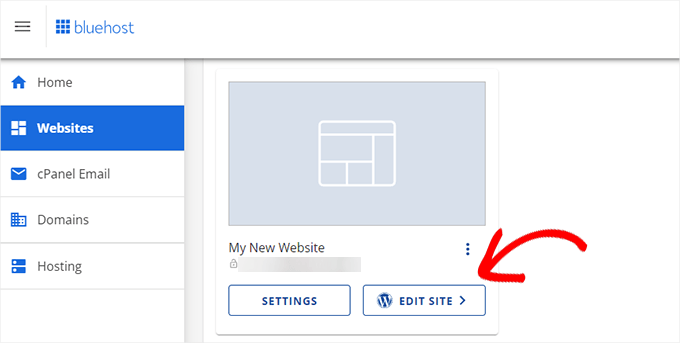
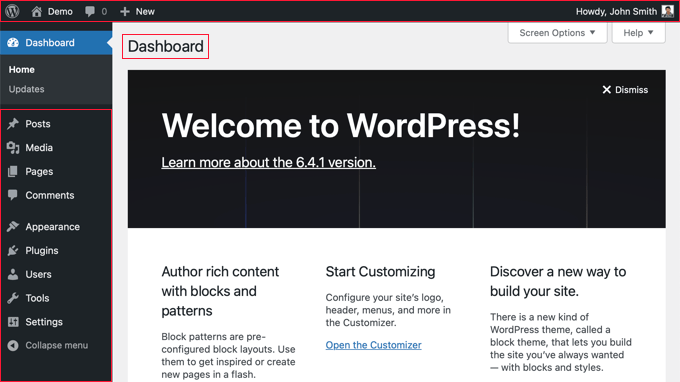
Simply click on the ‘Edit Site’ button to access your WordPress admin dashboard.
This is how it will look like:
However, if all of this feels like too much work to you, then you can opt for WPBeginner’s Website Setup And Design Service.
Our experts have 16+ years of experience and have helped 100,000 people get started with WordPress. We can handle everything from website setup and design to SEO optimization, contact forms, and analytics integrations. Plus, we can even provide comprehensive WordPress training to ensure your success.

We also offer affordable pricing, making this an ideal option if you are just starting your business on WordPress. For details, see our WPBeginner Pro Services page.
Step 2: Connect WordPress to Your Shopify Store
Now, the next step is to connect your WordPress website to your Shopify store.
For that, you’ll need ShopWP. It is a Shopify plugin for WordPress that allows you to easily connect WordPress to your Shopify account.
First, you need to install and activate the ShopWP plugin. For more details, see our step-by-step guide on how to install a WordPress plugin.
Upon activation, visit the ShopWP Pro » Connect page and click on the ‘Begin the connection process’ button.
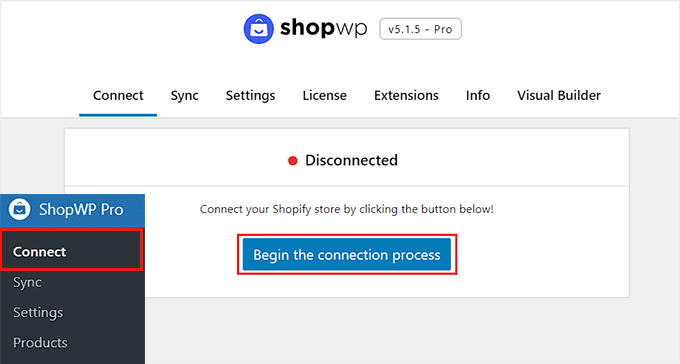
This will launch the connection wizard.
You will be asked to enter your myshopify.com domain name here. After that, just click the ‘Connect your Shopify store’ button to continue.
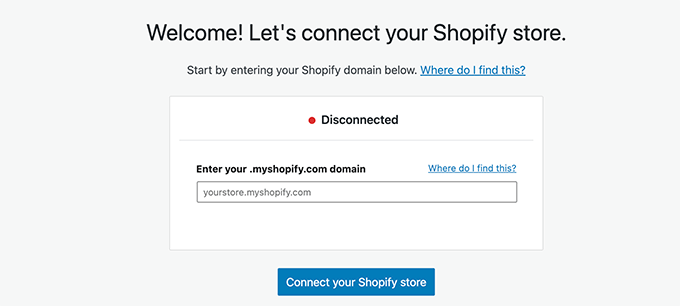
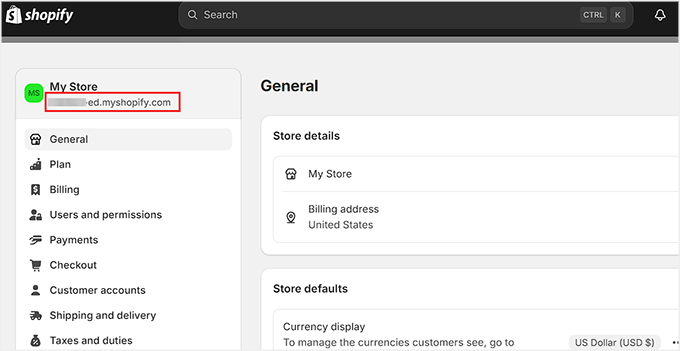
To find your Shopify domain, you need to visit your online store’s dashboard and switch to the ‘Settings’ tab from the left column.
This will open a new page on the screen, where you can see your domain name under your store’s name in the top left corner.
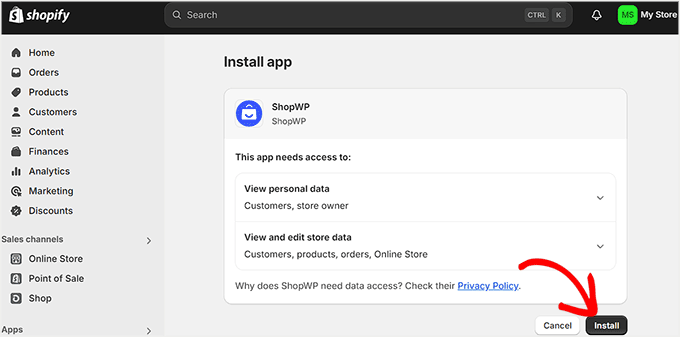
Upon entering your domain in the setup wizard, you will be taken to the ‘My Store’ page, where ShopWP will ask for access to view your personal data.
Here, just click the ‘Install’ button.
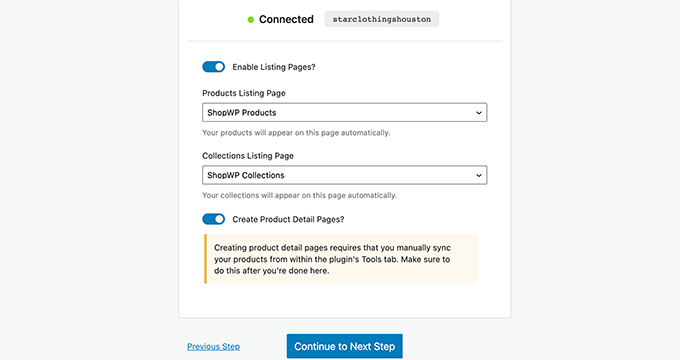
You will then be redirected to your WordPress dashboard. Here, the ‘Connected’ message will be shown on the screen if the process is successful.
Go ahead and click the ‘Continue to Next Step’ button.

Now, you’ll be asked to configure different settings for your store, starting with the pages you want to use for your Shopify products.
You can turn on listing pages and then choose a WordPress page or use the default ShopWP Products page.
Similarly, you can turn on collection pages and individual product detail pages.
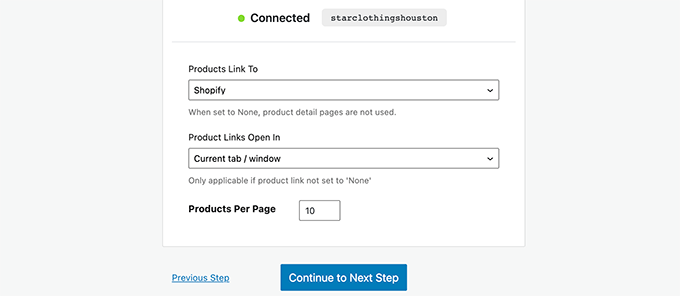
In the next step, you can select what happens when users click on the products.
For instance, you can show the product in a modal or redirect users to Shopify or the WordPress product detail page.
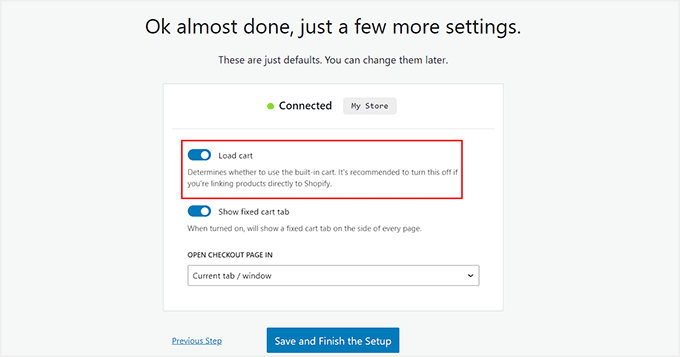
After that, toggle the ‘Load cart’ switch if you want to use the built-in shopping cart feature. This option won’t be applicable if you have linked products directly to Shopify and will only work with WordPress.
Finally, click the ‘Save and Finish the Setup’ button.
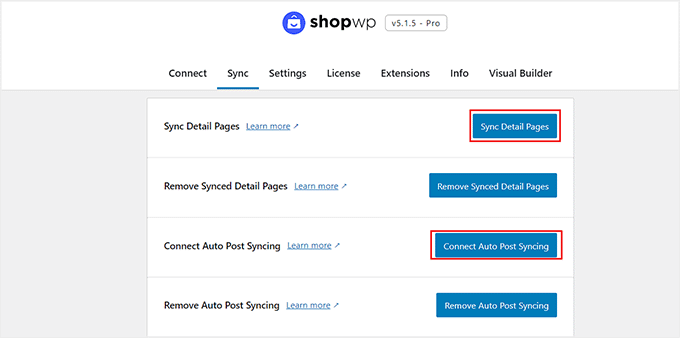
You will now be taken to your WordPress dashboard. From here, head over to the ShopWP Pro » Sync page.
Once there, click on the ‘Sync Detail Pages’ and ‘Connect Auto Post Syncing’ buttons. This will allow the plugin to fetch any product details as you add new products to your Shopify store.
You have now successfully connected your Shopify store to WordPress.
Step 3: Display Shopify Products in WordPress
ShopWP allows you to easily display your Shopify products anywhere on your WordPress site.
If you are using the default settings, then the plugin will create a ShopWP Products page for you, which will display your Shopify products.
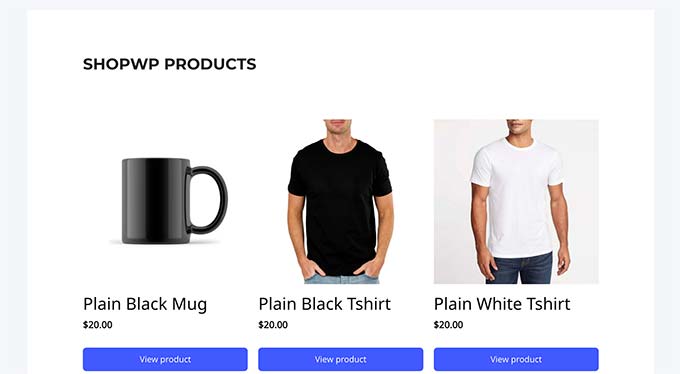
You can also display products on any WordPress post or page by simply editing it and adding the Products block.
For more details, you can see our guide on how to use the WordPress block editor.
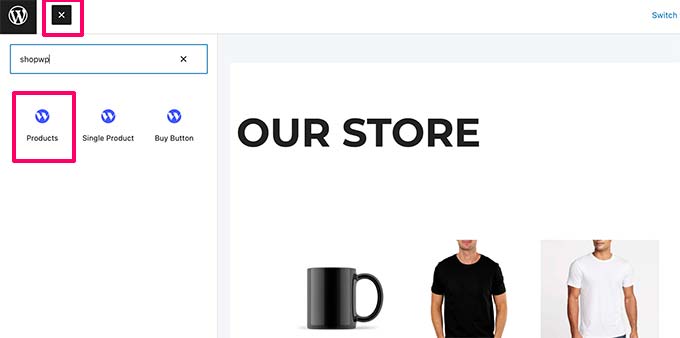
The block comes with a bunch of settings that you can configure to change the appearance of products.
The settings include the layout, colors, product details to display, and more. You can also change the product’s pricing, description, title, and image from here.
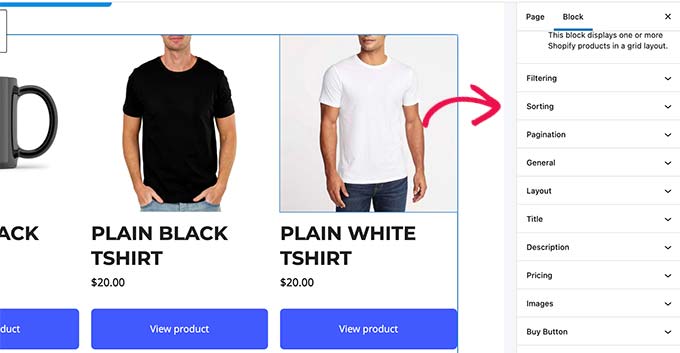
Similarly, you can also add a Single product block to display a single product.
You’ll be able to find the product you want to display by typing the product title in the block settings.
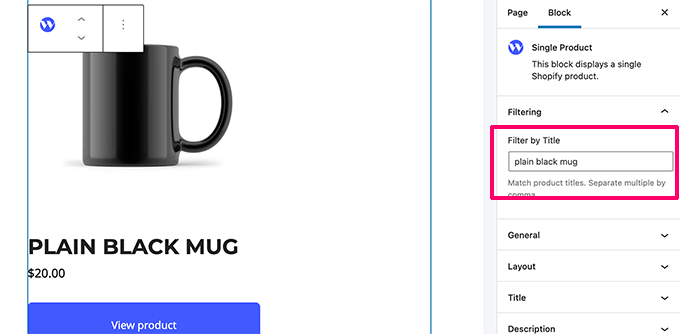
The plugin has powerful display options that you can control in the block panel or on the plugin’s settings page.
Now if you are using the free version of the tool, these are all the blocks that will be available for you. However, on upgrading to the pro version, you can add the cart, description, collection, title, and search blocks to your page.
These blocks are more suited for creating separate pages for each product where you want to add a cart button, title, description, and image using different blocks.
You can also use the ‘Collection’ block to show your Shopify products that are part of a specific group.
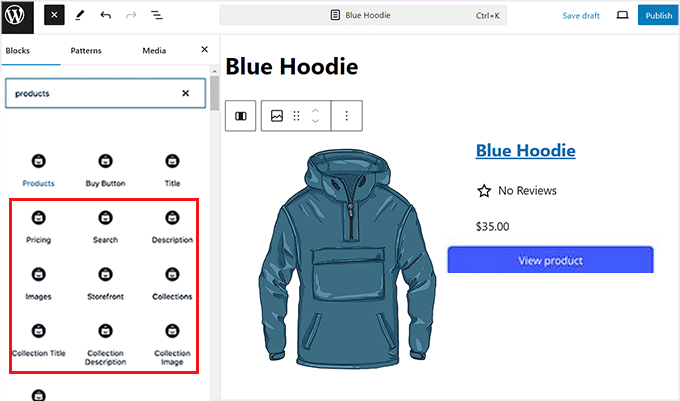
On the other hand, if you plan to create a store like WooCommerce where all the products are displayed on the same page, then the ‘Products’ block will work just fine for you.
Once you are done, don’t forget to click the ‘Update’ or ‘Publish’ button to store your settings.
Step 4: Customize Your WordPress Website
Now that you have connected your Shopify store to your website, the next step is to customize your WordPress site properly.
First, you will want to choose a visually appealing theme for your store. This theme will control your site’s overall design and layout.
There are thousands of premium and free WordPress themes to choose from. To get started, you can take a look at our roundup of the most popular WordPress themes. We’ve also hand-picked a list of the best clothing store themes.
However, you can also design your own custom theme with SeedProd. It’s a drag-and-drop theme builder that allows you to create your own custom theme without writing any code.

Next, you will want to create content for your WordPress website.
You can use pages to create your website structure by adding home, blog, shop, contact, and about pages. See our list of important pages to create in WordPress.
After that, go ahead and add pages to the navigation menu in WordPress.
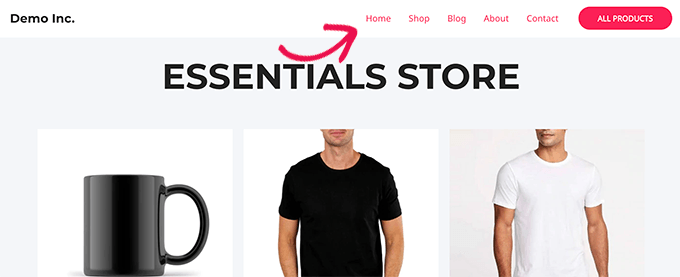
For more details, you can see our tutorial on how to customize your WordPress theme.
Step 5: Add a Contact Form to Your WordPress Site
Once the site customization is complete, it is a good idea to add a contact form to your website. This will enable customers to reach out to you in case they have questions or want to report an error.
For this, we recommend WPForms. It is the best WordPress contact form plugin on the market that comes with a drag-and-drop builder, over 2000+ premade templates, and complete spam protection.
We have been using it at WPBeginner to create a contact form and annual surveys. For details, see our detailed WPForms review.
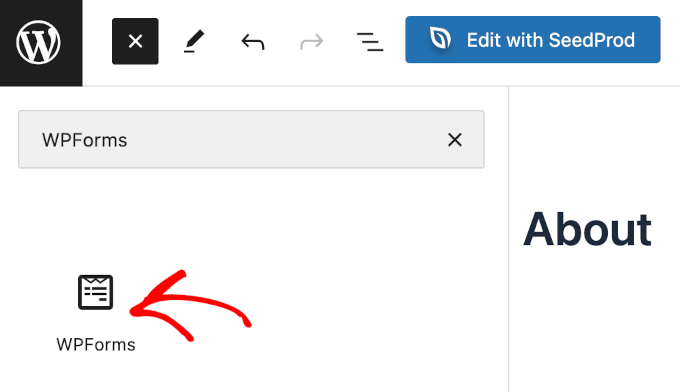
Upon activation, just use the WPForms ‘Simple Contact Form’ template and then add it to any page or post with the WPForms block.
For details, see our tutorial on how to create a contact form in WordPress.
After that, you can also add VoIP phone service so that users can directly contact you over phone calls.
For this, you can use Nextiva, which is the best VoIP phone service for small businesses. Plus, it has other features like online faxing, live chat, online surveys, CRM, call analytics, and more.

For details, see our tutorial on how to set up an auto-attendant phone system for your website.
Step 6: Add Customer Reviews to Your Online Store
Next, you should showcase customer reviews on your online store to build trust among users and encourage them to make a purchase.
For instance, if you already have reviews on Yelp, Facebook, or Google, then you can add them to your website using the Smash Balloon Reviews Feed Pro plugin.
It is the best WordPress customer reviews plugin on the market that lets you add reviews in a visually pleasing layout.
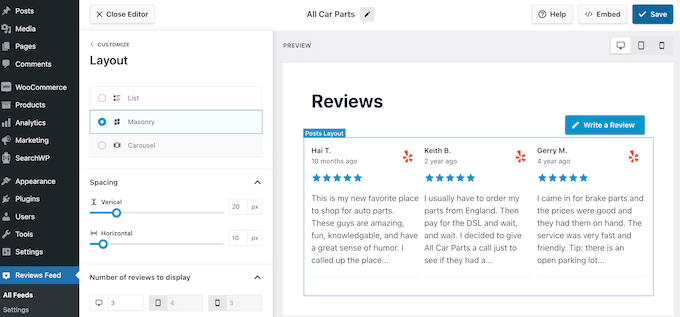
For more in depth instructions, see our tutorial on how to show Google, Facebook, and Yelp reviews in WordPress.
Step 7: Grow Your WordPress Website and Shopify Store
The best part about using WordPress is that it comes with thousands of plugins and works with all the marketing tools that you’ll need to grow your business.
The following are a few essential tools and plugins that you may want to install right away:
- OptinMonster – The best conversion optimization software, OptinMonster allows you to convert website visitors into customers. It comes with tools like sticky banners, countdown timers, lightbox popups, and more.
- All in One SEO – The best WordPress SEO plugin on the market. It allows you to easily optimize your website for search engines and bring more traffic to your website.
- MonsterInsights – Want to see where your traffic is coming from? MonsterInsights helps you install Google Analytics and easily set up enhanced eCommerce tracking.
- TrustPulse – Adds social proof to your eCommerce store by displaying targeted messages to users with real-time user actions on your website. TrustPulse works with both WordPress and Shopify.
- PushEngage – The best web push notification software that helps you connect with visitors after they leave your site through push notifications.
- FunnelKit – One of the best WooCommerce sales funnel plugins to easily create high-converting checkouts, slide-out carts, one-click upsells, order bump pages, and more.
For more recommendations, see our list of essential WordPress plugins for business websites.
We hope this article helped you learn how to easily integrate Shopify with WordPress. You may also want to see our beginner’s guide on how to properly move from Shopify to WooCommerce and our top picks for the best Shopify alternatives.
If you liked this article, then please subscribe to our YouTube Channel for WordPress video tutorials. You can also find us on Twitter and Facebook.


Dennis Muthomi
since Shopify offers valuable KPI metrics like customer lifetime value, acquisition costs, net promoter score, and inventory tracking, is it possible to display those metrics on the WordPress dashboard too? or maybe some similar performance indicator metrics similar to Shopify’s?
WPBeginner Support
For that you would use an analytics plugin like MonsterInsights and that would generate that information for you
Admin
Richard
Hi, I have a small question about this blog (integrating Shopify products into your WordPress website).
What happens when you click the “add to cart” button when the hHopify products are integrated into a WP page? Do you go to the Shopify platform and finish your purchase on the Shopify platform? Or do you stay on your WordPress website and handle purchae on that website?
Reason to ask this is also your shopping cart. icon in the header. Can you see this on your WordPress website when adding a product? Or is everything handled by Shopify?
WPBeginner Support
You would add the products on your WordPress site and checkout on Shopify.
Admin
Linda Klink Crawford
We are having a website built with wordpress. We will be selling products. Can we use Shopify as our credit card and check out processor
WPBeginner Support
This guide would allow you to have Shopify handle your checkout for you to achieve that.
Admin