Do you want to offer shipping discounts on your WooCommerce store?
Shipping discounts are a great way to boost sales on your online store. They can keep your customers happy and encourage them to buy more products and services.
In this article, we will show you how to offer a shipping discount in WooCommerce.
Why Offer Shipping Discounts in WooCommerce?
One of the best ways to get more sales on your online store is by offering shipping discounts. Free shipping gives people a reason to buy from your store rather than a competitor.
In fact, according to eCommerce statistics, free shipping is the top driver of online purchases.
Shipping discounts can also help recover abandoned cart sales. For example, if a customer tries to leave your site without completing the checkout process, then you can show an exit-intent popup offering free shipping.
As well as free shipping, there are other types of shipping discounts you can offer.
For example, you might provide a fixed or percentage-based shipping discount based on the total order amount or offer exclusive shipping deals to people who register with your membership site.
That said, let’s look at how you can offer shipping discounts in WooCommerce.
Offering Shipping Discounts in WooCommerce
The easiest way to create shipping discounts in WooCommerce is by using the Advanced Coupons plugin. It’s one of the best WooCommerce plugins that allows you to create all kinds of shipping discounts.
You can also offer buy one get one (BOGO) deals, create a loyalty program, automatically apply discount coupons, and more.
Note: We will be using the Advanced Coupons premium version for this guide because it comes with advanced features like shipping override. However, there is also a free version of Advanced Coupons that’s perfect if you are just starting out or have a smaller budget.
First, you’ll need to install and activate both the premium Advanced Coupons plugin and the free version. If you need help, then see our guide on how to install a WordPress plugin.
After activating both plugins, go to Coupons » License in your WordPress dashboard.
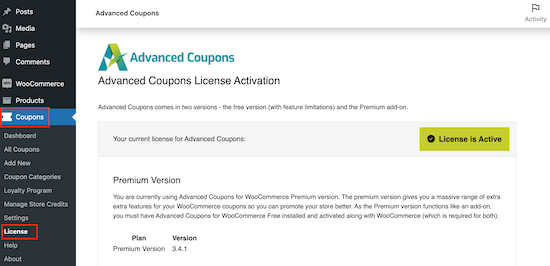
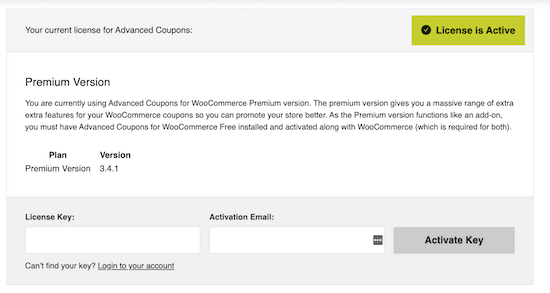
Then, enter your license key into the ‘License Key’ field. You can find this key in your account on the Advanced Coupons website.
You’ll also need to enter your ‘Activation Email’, which is the email address you used to purchase Advanced Coupons. After that, click on ‘Activate Key.’
Set Up Shipping Zones in WooCommerce
Next, you’ll need to create shipping zones in WooCommerce and configure the regions where you want to offer shipping discounts.
To start, head over to WooCommerce » Settings.
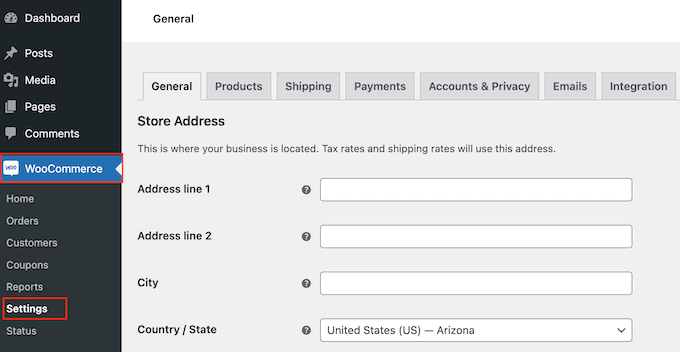
Here, select the ‘Shipping’ tab.
You can now go ahead and click the ‘Add shipping zone’ button.
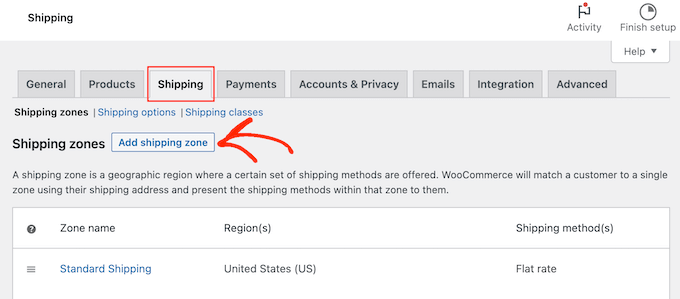
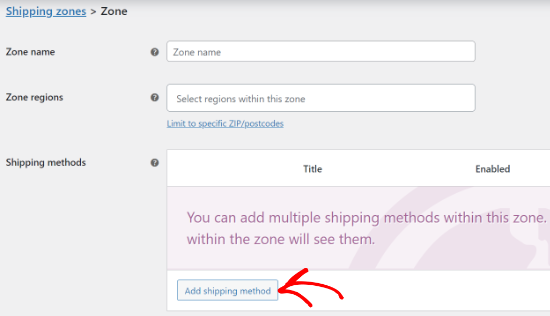
On the next screen, type in a name for the zone and select one or more regions from the dropdown menu.
Once you’ve done that, click on the ‘Add shipping method’ button.
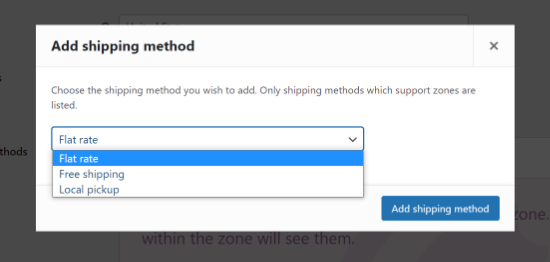
Now, you’ll see different shipping methods in the dropdown menu. You can choose between flat rate, free shipping, or even offer local pickup.
If you want to offer free shipping to all customers within this shipping zone, then go ahead and click on ‘Free shipping.’
However, if you want to create a shipping discount, then you’ll typically want to select ‘Flat rate.’ You can then create a discount code that shoppers will use to get a discount on the flat rate. This gives you more control over how shoppers use the discount and lets you create lots of different free shipping promotions.
Simply select your preferred shipping method and then click ‘Add shipping method.’
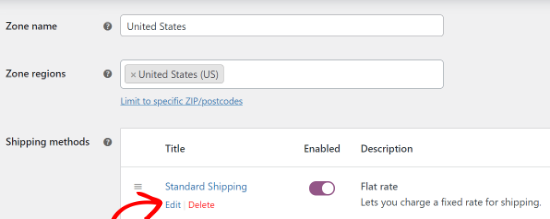
WooCommerce will now add your chosen shipping method to the shipping zone.
To configure the shipping method, simply hover over it and then click the ‘Edit’ button.
You’ll see a popup window with more settings you can use. In our example, we’re using the ‘Flat rate’ method to create standard and express shipping options for an online store.
The settings will vary depending on the shipping method you choose. For example, if you select ‘Flat rate’, then you can change the method title, add a tax status, and type in the total shipping cost.
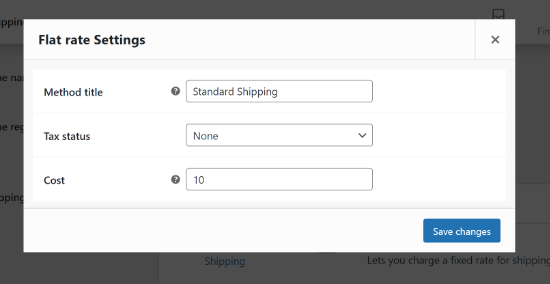
After entering this information, simply click the ‘Save changes’ button. Then, go ahead and select the ‘Shipping zone’ tab.
Here, you can see that you’ve successfully added a shipping zone to your online marketplace or store.
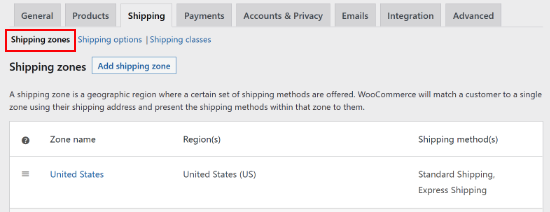
You can create as many shipping zones as you want by repeating these steps.
Creating a Shipping Discount Coupon
After creating a shipping zone, you are ready to create a coupon code that will give customers access to free or discounted shipping.
To start, go to Marketing » Coupons.
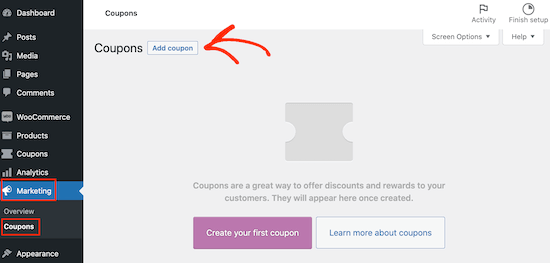
You can now create a title for your shipping coupon
This will also become the actual coupon that customers will type in, so it’s a good idea to use something that’s easy for shoppers to remember and type. It can also reflect the offer you’re creating, such as ‘FREESHIPPING’ or ‘SHIPPING20%OFF.’
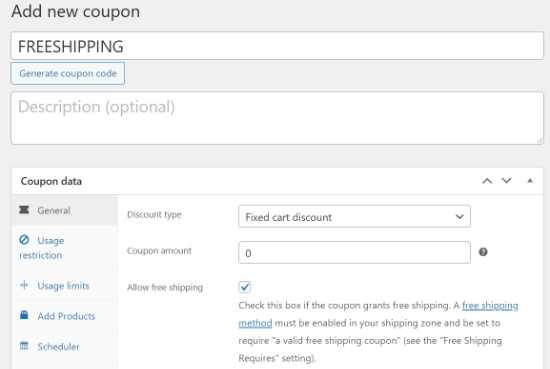
Another option is to use the ‘Generate coupon code’ button to generate a random string of letters and numbers. However, this can make the coupon complicated and difficult to remember, so it isn’t recommended.
Once you’ve done that, scroll to the ‘Coupon data’ box. Here, open the ‘Discount type’ dropdown and choose the kind of offer you want to create.
You can create all kinds of offers, including percentage coupons, buy one get one free offers, free gift coupons, and more. You can also type in the discount amount.
To create a shipping discount, select ‘Fixed cart discount’ from the dropdown menu. Then, enter ‘0’ into the ‘Coupon amount’ field.

Once you’ve done that, select the ‘Shipping Overrides’ tab.
Here, click on the ‘+ Add Shipping Override’ option.
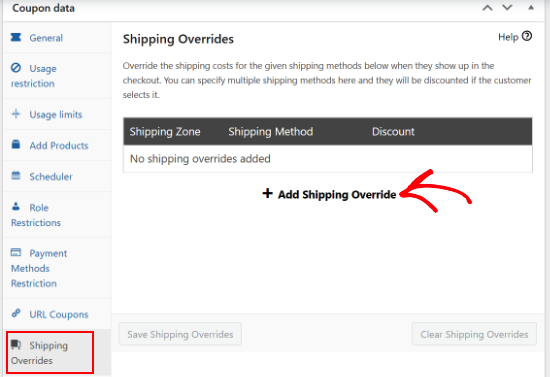
Next, you can open the ‘Shipping Zone’ dropdown and choose the zone where shoppers will be able to use this coupon.
If the zone has multiple shipping methods, then you can open the ‘Shipping Methods’ dropdown and choose the method where shoppers can use this coupon.
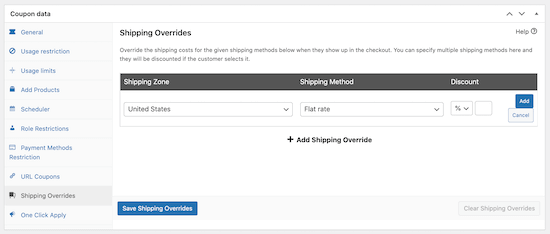
Next, you can choose between three types of discounts using the dropdown under the ‘Discount’ heading.
Advanced Coupons has a percentage discount that removes a percentage from the total shipping cost, such as 50% off.
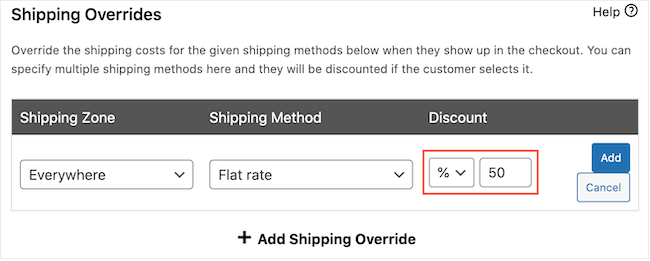
You can also create a fixed discount, such as $5 off shipping.
The last option is ‘Override price,’ which will apply a different pricing when the coupon is used. If you want to offer free shipping, then you can select ‘Override price’ from the dropdown and then type ‘0’ into the box next to it.

In the following image, we are offering 50% off the Express Shipping option.
Once you are happy with the information you’ve entered, simply click the ‘Add’ button.
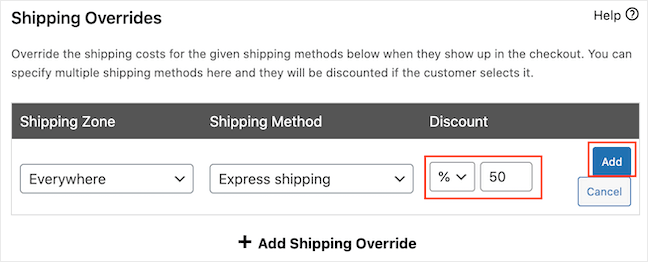
After entering this information, don’t forget to click on ‘Save Shipping Overrides.’
There are more to customize the shipping discount coupon. For example, you can select the ‘Usage restriction’ tab and then enter a minimum amount that the customer must spend in order to use the shipping coupon.

You can also stop customers from using the shipping coupon when other product coupons are applied.
Similarly, you can limit the number of times a shopper can use the coupon, schedule the coupon in advance, enable role restrictions, and more.
By default, shoppers will need to type in the coupon code in order to get discounted shipping.
However, you may want to apply the coupon automatically when the customer qualifies for discounted shipping, so they don’t have to type in the code. In this way, you can improve the shopping experience by helping customers take advantage of your free shipping discounts.
To apply the coupon automatically, find the ‘Auto Apply Coupon’ section and check its ‘Enable auto apply for this coupon’ box.
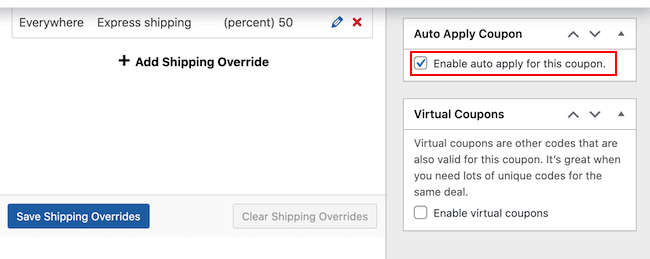
Once you’re happy with how the shipping coupon code is set up, go ahead and click the ‘Publish’ button.
After that, you can check if your shipping discounts are working by visiting your WooCommerce store. Simply add one or more products to the cart and then head over to your cart page.
If you enabled auto apply, then Advanced Coupons should apply the discount automatically, assuming you met any restrictions such as minimum spend.
If you didn’t enable auto apply, then type the shipping discount code in the ‘Coupon code’ field and then click ‘Apply coupon.’
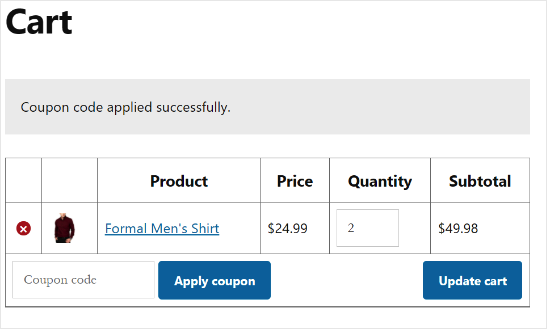
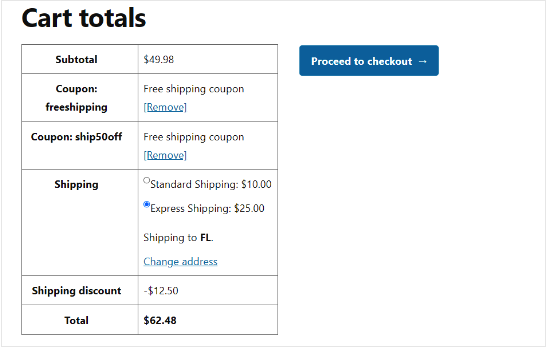
You should now see a shipping discount in the cart total.
The following image shows a 50% discount on Express Shipping.
How to Promote Your WooCommerce Free Shipping Discount
Now you’ve created a free shipping coupon, the next step is to promote that coupon across your online store so shoppers can find it and use it.
The easiest way to do this is by using OptinMonster. It is the best lead generation tool on the market that allows you to easily convert website visitors into paying customers.
It comes with beautiful lightbox popups where you can show your coupon codes. You can even use OptinMonster’s advanced display rules to promote different shipping discount coupons based on the shopper’s location or the time of year.
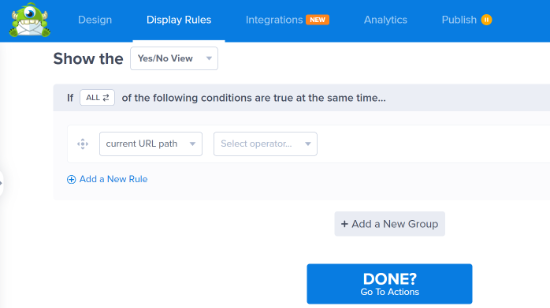
For details, please see our tutorial on how to create a coupon popup in WordPress.
It’s also a good idea to monitor how visitors are using your WooCommerce free shipping discount coupons so you can see what’s working and what isn’t.
You can then use this insight to fine-tune all your future coupon codes and marketing to get even better results. For example, you may get more sales by offering customers free shipping when they exceed a minimum order, compared to offering 50% off shipping on all orders.
For more details, see our guide on how to set up WooCommerce conversion tracking.
We hope this article helped you learn how to offer a shipping discount in WooCommerce. You may also want to go through our guide on how to create a WooCommerce popup to increase sales and the best email marketinwog services for small businesses.
If you liked this article, then please subscribe to our YouTube Channel for WordPress video tutorials. You can also find us on Twitter and Facebook.


Syed Balkhi says
Hey WPBeginner readers,
Did you know you can win exciting prizes by commenting on WPBeginner?
Every month, our top blog commenters will win HUGE rewards, including premium WordPress plugin licenses and cash prizes.
You can get more details about the contest from here.
Start sharing your thoughts below to stand a chance to win!