From our experience running different businesses, the real value of an online store comes from repeat customers, not one-time shoppers. The good news is that starting a loyalty program can help you easily get more recurring customers.
A well-designed loyalty program can encourage repeat purchases, increase customer retention, and boost overall sales.
Plus, if you’re using WooCommerce, setting up a loyalty program is easier than you might think.
In this article, we will guide you through the process of creating a loyalty program in WooCommerce. From picking the right WordPress loyalty plugin to setting up the program, you’ll have everything you need to start rewarding your customers and growing your business.
What Are Loyalty Programs, and Why Create One in WooCommerce?
A loyalty program is one of the best ways to encourage customers to return and shop with a business repeatedly.
Typically, loyalty programs reward customers for their repeat business by offering various incentives, such as:
- Points system. Customers earn points for every purchase or specific action, like referring friends or writing reviews, which they can later redeem for rewards.
- Tiered benefits. These can be different rewards based on customer activity to encourage more engagement and higher spending.
- Exclusive offers. For example, special deals and discounts might be available only to loyalty program members.
- Cashback. A percentage of the customer’s spending is returned as credit or money that can be used for future purchases.
- Personalized rewards. Tailored rewards based on individual customer preferences and shopping behavior.
A loyalty program can encourage customers to keep coming back to your online store. Besides boosting sales, it can even increase the average spending per shopper by giving them a reason to add more items to their basket.
Most loyalty programs give customers points for buying products and services. However, you might also reward customers for taking other positive actions like creating an account, placing their first order, signing up for your email newsletter, or spending over a certain account.
You might even give customers extra points to return to an abandoned shopping cart and complete their purchases. In this way, a loyalty program can help you recover WooCommerce abandoned cart sales.
With that in mind, we will show you how to add a loyalty program in WooCommerce. Here is a quick overview of the steps we will cover in this article:
Ready? Let’s get started.
Expert Tip: Need help to get your WooCommerce store up and running? You might want to see our Ultimate WooCommerce Guide.
Setting Up Your WooCommerce Loyalty Program
The easiest way to create a loyalty program is to use Advanced Coupons. It is the best WordPress coupon plugin for creating all kinds of coupons, programs, buy-one-get-one free offers, and other rewards.
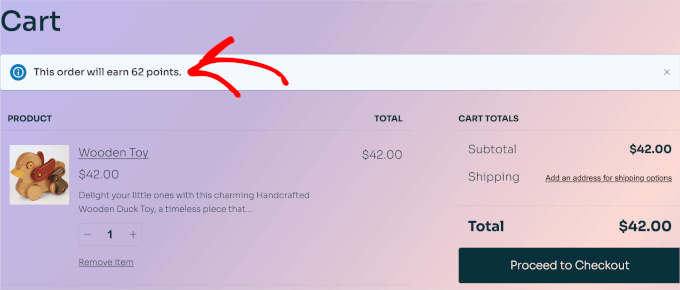
Advanced Coupons encourages customers to take action by showing how many points they’ll get for each action, including buying a specific product.
First, you’ll need to install and activate both the free Advanced Coupons plugin and the premium Advanced Coupons Loyalty Program addon. You can purchase these plugins together by getting the ‘All-In-One Bundle.’
For more details on installing a plugin, please see our step-by-step guide on how to install a WordPress plugin.
Once you have installed the plugins and downloaded the .zip file for the premium version, you can go to Plugins » Add New Plugins » Upload Plugin in your WordPress admin dashboard.
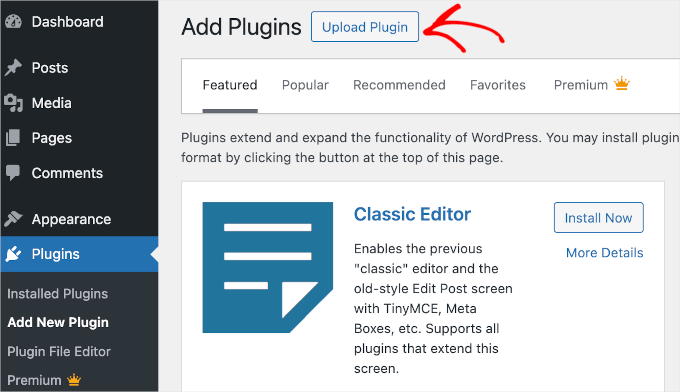
You can now upload your Advanced Coupons Pro .zip file.
Simply click the ‘Choose File’ button and select the .zip file from your computer. Then, you can click the ‘Install Now’ button.
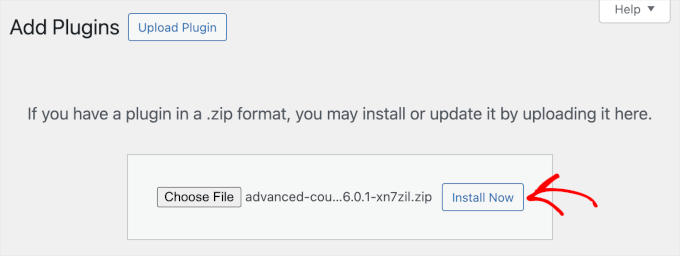
Once you’ve completed the process, your Advanced Coupons Pro version should be active.
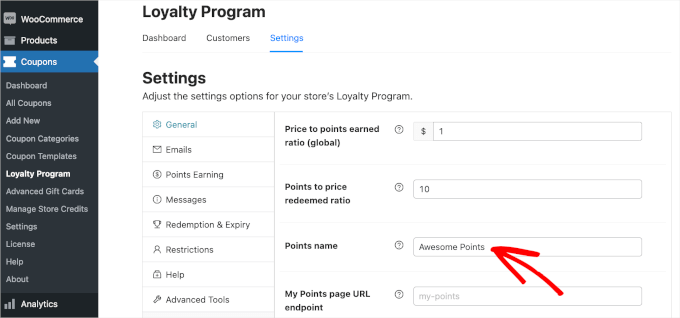
Now, go ahead and navigate to Coupons » Loyalty Program» Settings from your WordPress dashboard. This will bring you to a screen where you can build the loyalty program.
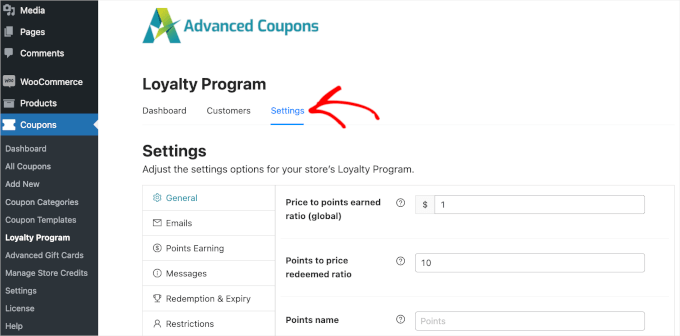
To start, you’ll want to give customers points when they take certain actions on your online store. This might be leaving a product review, posting a comment, buying a product, or some similar action.
In the ‘Price to points earned ratio’ from the above image, you can see that customers get 1 point for every $1 spent.
If you want your WooCommerce loyalty program to look more impressive, then you can give customers more points. For example, members might earn 2 or 10 points for every $1 spent.
The ‘Points to price redeemed ratio’ is the number of points it takes to earn a dollar in your loyalty program.
By default, customers earn $1 for every 10 points. That means the customer needs to redeem 10 points to get a $1 discount coupon. You can change these values to anything you want.
You can also change the name of your loyalty scheme by typing into the ‘Points name’ field.
For example, we are using ‘Awesome Points,’ but you can use anything you want. You can even use something representing your brand, as Starbucks does with its ‘Stars.’
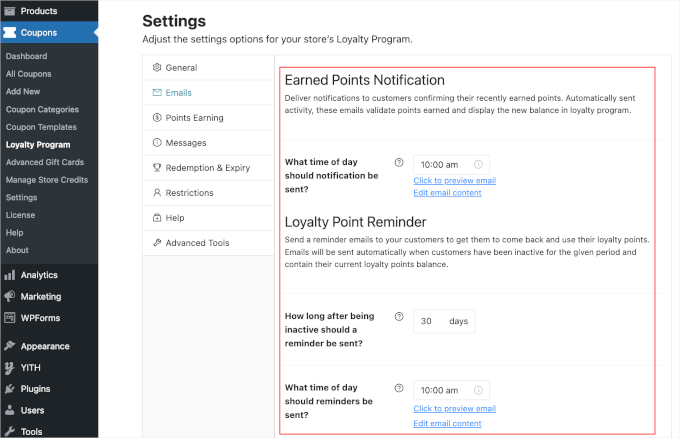
Next, you’ll want to move to the ‘Email’ section to set up notifications for customers confirming their recently earned points. In this section, you can also set reminders for customers to use their points.
You might notice that Advanced Coupons has a default setup for both emails. That said, you can definitely adjust it if you want to.
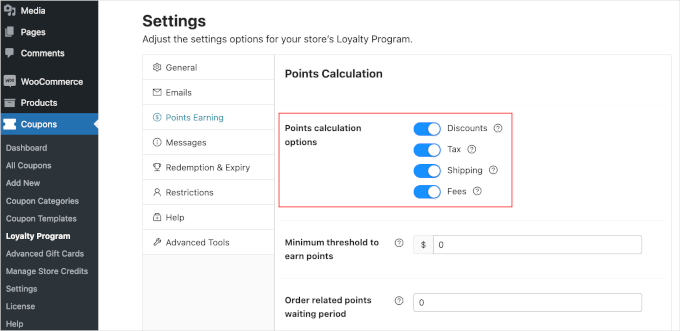
The next step is to decide how your points are calculated. To do this, go to the ‘Points Earning’ section.
Let’s say you want to give a customer fewer points if they use a coupon code compared to a customer who didn’t use a coupon. In this case, you can give the best rewards to your best customers.
In the ‘Points Earning’ tab, you can adjust the settings to include discounts, taxes, shipping costs, and any additional fees when awarding points. Simply switch the toggle on to add these factors to the calculation.
Many online marketplaces and digital stores only reward customers for spending money.
However, other actions can benefit your business, so it’s a good idea to reward customers for doing other things.
For example, you might reward visitors for registering on your membership site, posting a product review, or commenting on a blog post.
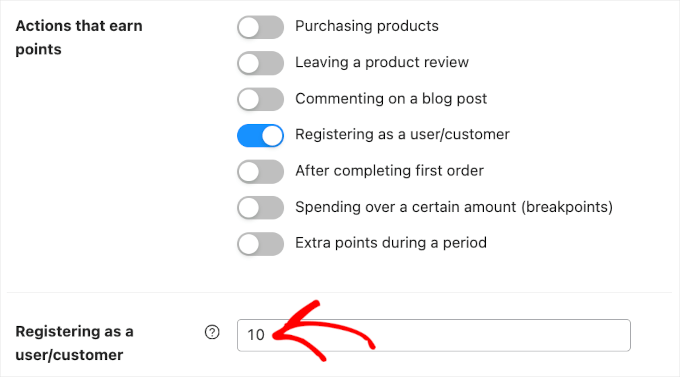
Simply scroll to the ‘Point Amounts’ section and turn on the switch for any relevant action.
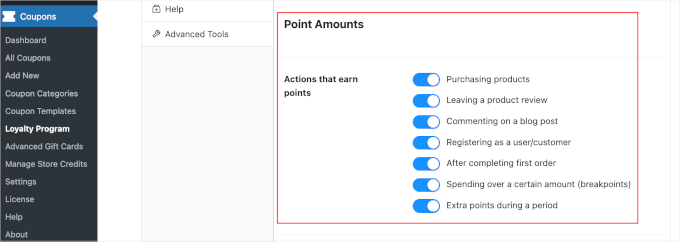
After activating these toggles, check whether there are any new settings to configure.
For example, if you enable ‘Registering as a user/customer,’ you’ll need to type in the number of points customers get for performing this action.
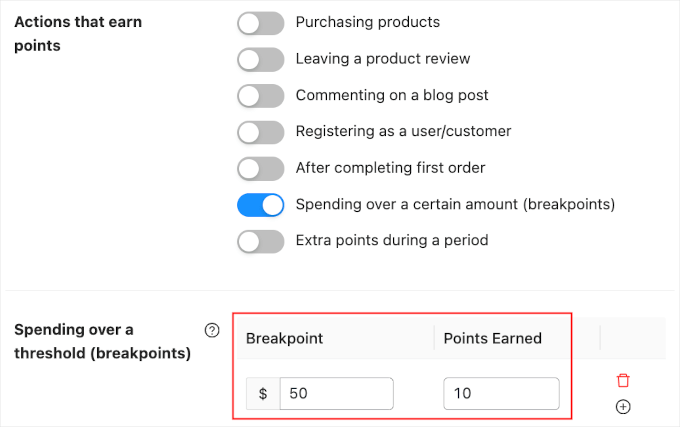
You can also encourage shoppers to spend more by awarding extra points for orders over a certain amount. This can increase the average order value, similar to cross-selling and upselling products in WooCommerce.
To do this, enable the ‘Spending over a certain amount’ switch and then type a value into the ‘Spending over a threshold’ field.
During busy shopping periods, you may want to give customers an extra reason to buy from your store.
For example, you might award extra points during Black Friday so customers aren’t tempted to shop with a competitor.
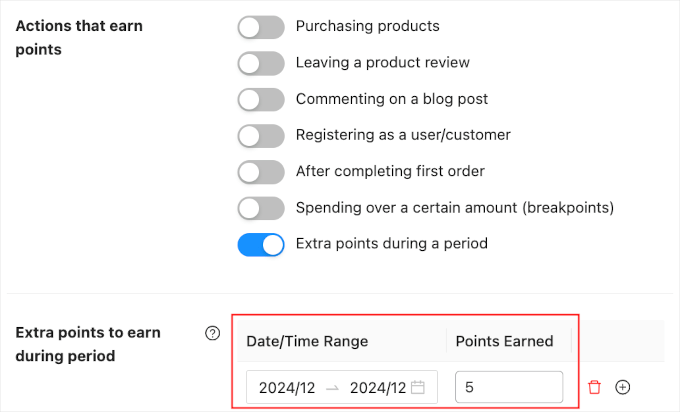
Enabling the ‘Extra points during a period’ toggle allows you to give customers extra points during a specific period.
Then, simply enter a date and time range into the ‘Extra points to earn during period’ section. You can also type in how many points customers will earn.
There are some more settings you may want to look at, but this is enough to create a loyalty program in WooCommerce.
When you are happy with how the program is set up, you can scroll to the bottom of the page and click the ‘Save changes’ button.
Your new WooCommerce loyalty program is now live.
Automatically Creating Accounts for Your Customers
Your customers will need to create an account in order to collect loyalty points.
This already encourages people to sign up for your online store. However, you can also automatically create an account when a visitor makes their first purchase. This can improve the shopping experience and may attract additional members.
To automatically create an account for a new customer, go to WooCommerce » Settings. Then, click on the ‘Accounts and Privacy’ tab.
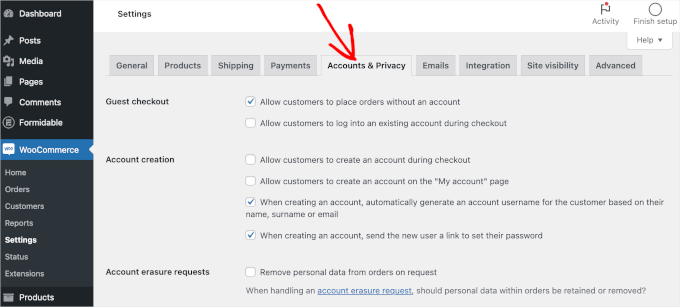
To start, you may want to uncheck ‘Allow customers to place orders without an account’ so that customers can’t check out as guests.
This will encourage more people to register with your site but may cause more shoppers to give up on a purchase and abandon their shopping carts.
So, it’s a good idea to set up WooCommerce conversion tracking and track visitors to your WordPress website. You can then see whether this change hurts your conversion rates.
Next, check the ‘Allow customers to log into an existing account during checkout’ box. Once you’ve done that, you’ll want to make it as easy as possible for customers to create an account.
With that in mind, we recommend checking all the boxes in the ‘Account creation’ section, as you can see in the following image:
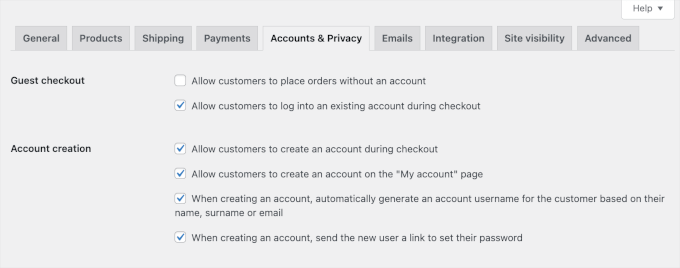
Now, WooCommerce will automatically send emails to first-time customers with information on how to access their new accounts.
Here, you may encounter a problem with WordPress not sending emails properly, which can be a big problem. If customers don’t get their login information, then they won’t be able to access their new account.
To prevent this issue, you may want to use an SMTP plugin such as WP Mail SMTP to make sure customers receive all your emails.
The WooCommerce Loyalty Program in Action
Congratulations! Your loyalty program should be up and running by now.
Once customers have earned loyalty points, they can turn them into store credits by going to My Account » My Awesome Points.
In this area, customers can see how many points they have and how much they are worth.
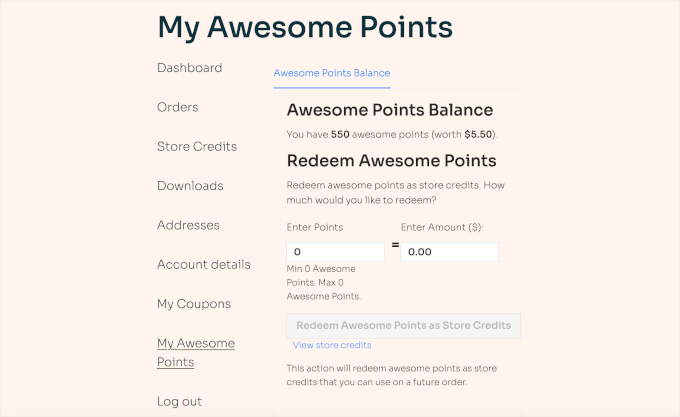
To redeem points, customers must enter a value in the ‘Enter Points’ field. Your program will then automatically convert this value into the equivalent amount.
Bonus Tip: Creating a WooCommerce Contest to Boost Loyalty and Engagement
Now that you’ve set up a WooCommerce loyalty program, it’s time to create some buzz to boost its engagement. One of the best ways is to run a contest.
Running a WooCommerce contest can be effective for several reasons. It can drive repeat visits by giving customers a fun reason to return, help build your email list by collecting valuable addresses, and boost customer engagement.
Overall, it can increase the chances of turning one-time shoppers into loyal customers.
Moreover, you can easily set up a WooCommerce contest with RafflePress, the best and most user-friendly tool designed to create engaging contests and giveaways.
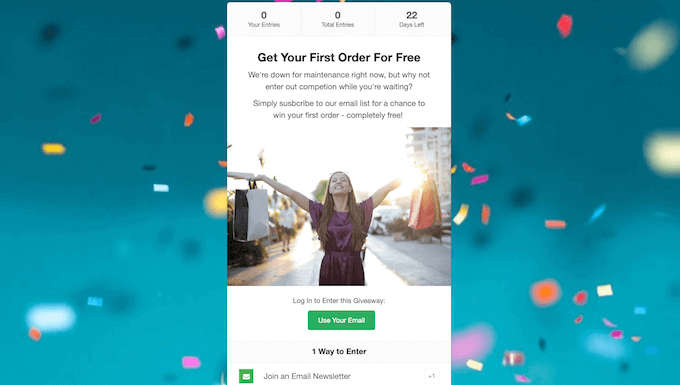
For more details, you can read our guide on how to create a WooCommerce contest to boost loyalty and engagement.
We hope this tutorial helped you learn how to create a loyalty program in WooCommerce. You may also want to check out our guide on how to create a WooCommerce popup and how to add a wishlist to your WooCommerce store.
If you liked this article, then please subscribe to our YouTube Channel for WordPress video tutorials. You can also find us on Twitter and Facebook.


Syed Balkhi says
Hey WPBeginner readers,
Did you know you can win exciting prizes by commenting on WPBeginner?
Every month, our top blog commenters will win HUGE rewards, including premium WordPress plugin licenses and cash prizes.
You can get more details about the contest from here.
Start sharing your thoughts below to stand a chance to win!
kzain says
Loyalty programs are the best!
They really do encourage customers to come back for more, and I totally fall for them myself. Knowing I can earn points towards a discount definitely sways me towards a store.
That’s why I’m so happy WooCommerce has this functionality, and thanks for mentioning the plugin! Now I can implement a similar system in my store.
Mrteesurez says
I love a loyalty program. It is a form of incentivising buyers to make them return and make more sales.
I am happy that Woocomerce is capable of this with the help of the plugin you shared. Loyalty program has worked on me over and over so I know it’s effectiveness.
Jiří Vaněk says
A loyalty program is a great thing. The ability to convert points into a discount often decides whether or not the customer will definitely return. In the past, this is how I returned to the exact stores where this system worked. Thank you for the instructions on how to operate the same system using Woocommerce.