Do you want to add a WordPress login popup modal on your site?
A modal login popup allows users to quickly log in to your website without leaving the page they are currently viewing. This improves user experience and engagement on your website.
In this article, we will show you how to easily create a WordPress login popup modal.
Why Create a WordPress Login Popup Modal?
If you run an online store, membership website, or sell online courses, then you likely allow users to register and log in to your website.
Usually, when users click the login link, they are taken to the default WordPress login page or another custom login page on your website. Once users are logged in, they are redirected again to another page.
A modal login popup lets you display the form without sending users to a different page. Once logged in, you can redirect users to any page you want.
A modal login popup is faster and improves user experience on your website. A quicker and more polished user experience can boost your sales and conversions.
That being said, let’s take a look at how to easily create a modal login popup in WordPress. We will show you two methods to do that, using a free plugin and premium plugins.
Simply click the links below to jump ahead to your preferred method:
Method 1: Create a Modal Login Popup Using Login/Signup Popup
For the first method, we will be using the Login/Signup Popup plugin. It is a free plugin that lets your users easily log in or register on your site.
First, you’ll need to install and activate the Login/Signup Popup plugin. If you need help, then please see our guide on how to install a WordPress plugin.
Upon activation, you can go to Login/Signup Popup » Settings from the WordPress admin panel.
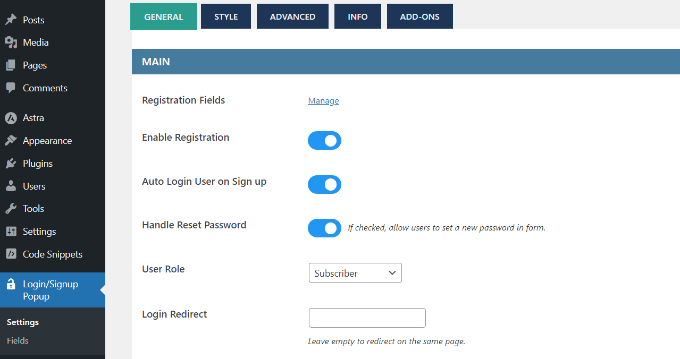
Under the General settings, you can enable registration, auto login user or sign up, and handle password resets.
Besides that, the plugin also lets you select the WordPress user role that will be assigned to newly registered users. By default, it will assign the ‘Subscriber’ role.
If you scroll down, you’ll see more settings. For instance, you can add a redirect URL when a user logs in or registers.
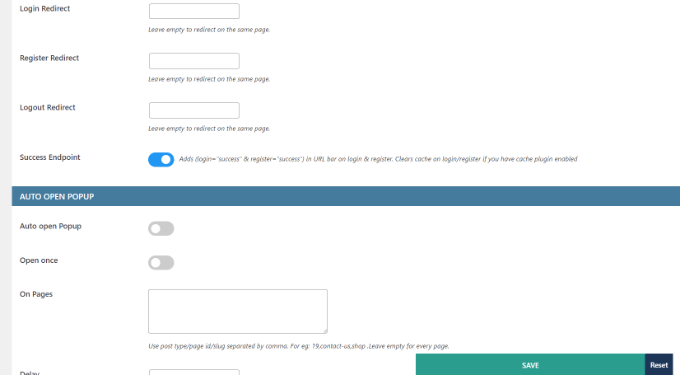
When you’ve made the changes, don’t forget to click the ‘Save’ button.
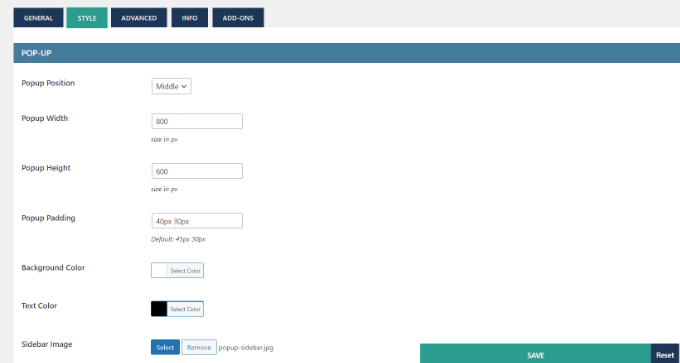
Next, you can switch to the ‘Style’ tab and edit your login/signup popup modal. The plugin lets you change the popup position, width, height, background color, text color, and more.
After that, you can also customize the form fields in the popup modal.
Simply go to Login/Signup Popup » Fields from your WordPress dashboard. Here, you can activate different form fields, edit their labels, make them required fields, and more.
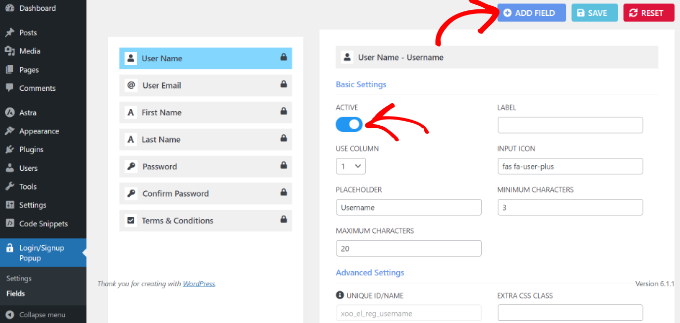
Besides that, there is also an option to add more fields to your login/signup popup.
Simply click the ‘+ Add Field’ button at the top and select additional form fields to add to your login modal popup.
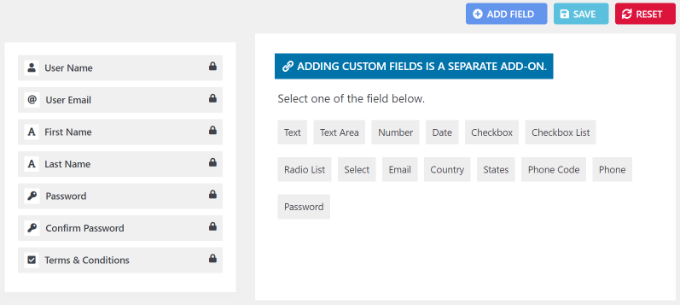
After you’ve customized the form fields, you can now add the modal login popup to your website. The plugin offers different ways of adding the popup to your site.
1. Add Login Popup Modal to Menus
First, you can head to Appearance » Menus from your WordPress dashboard.
After that, you can see the Login/Signup Popup menu items. Simply select the items you wish to show and click the ‘Add to menu’ button.
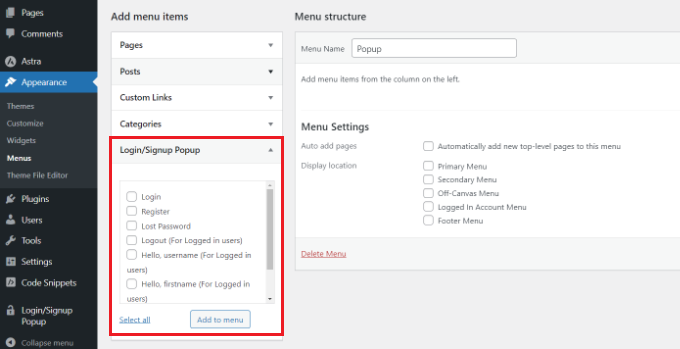
For more details, please see our guide on how to add a navigation menu in WordPress.
2. Add Login Popup Modal as Anchor Links
Next, you can add #login or #register at the end of your website URL and place the login popup as an internal link.
For example, your URL will look like this:
<a href="www.mywebsite.com#login">Login</a>
To do this, you can edit a post or a page.
Once you are in the content editor, click the 3 dots and select the ‘Edit as HTML’ option.

After that, you can add the internal link to the login anchor text.
You can learn more by following our guide on how to add anchor links in WordPress.
3. Use Shortcodes to Add Login Popup Modal
Another way of adding the login/signup popup is by using shortcodes.
You can simply enter the [xoo_el_action] shortcode anywhere on your site to create a link/button to open the popup.
For instance, head to Appearance » Widgets and add a shortcode widget block to show the login popup in the sidebar of your website.
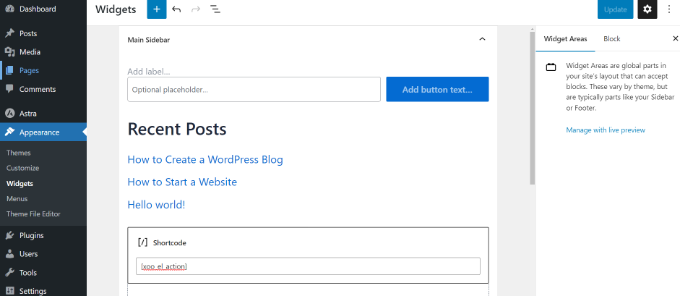
When you are done, simply click the ‘Update’ button.
After that, you can visit your website to see the login popup in action.
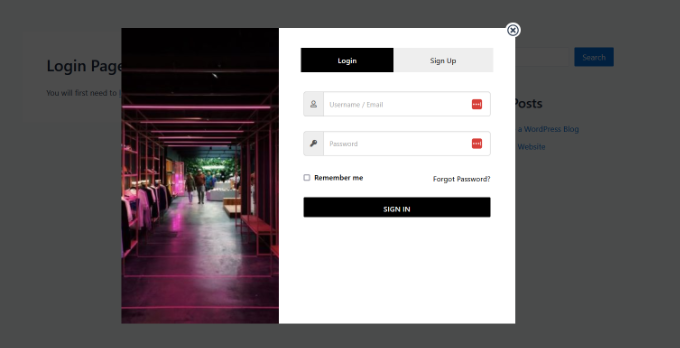
Method 2: Create a Modal Login Popup Using WPForms & OptinMonster
For this method, you will need the WPForms and OptinMonster plugins.
WPForms is the best WordPress contact form plugin. You will need at least their Pro plan to access the User registration addon.
OptinMonster is the best WordPress popup plugin and lead generation software on the market. It helps you convert website visitors into subscribers and customers. You will need at least the Pro plan to access the MonsterLinks feature used in this article.
For more details, see our complete OptinMonster review.
Using WPForms to Create a User Login Form
First, you need to install and activate the WPForms plugin. For more details, see our step-by-step guide on how to install a WordPress plugin.
Upon activation, you’ll need to head to WPForms » Settings from your WordPress dashboard and enter the license.
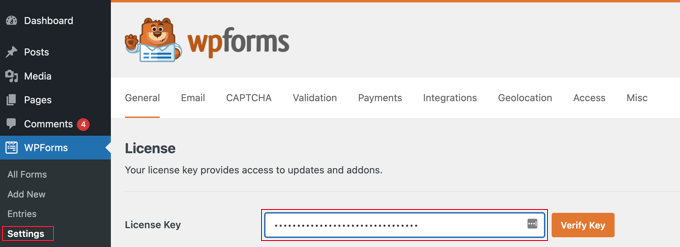
You can find the key in your WPForms account area.
Next, you need to go to the WPForms » Addons page to install and activate the User Registration Addon.
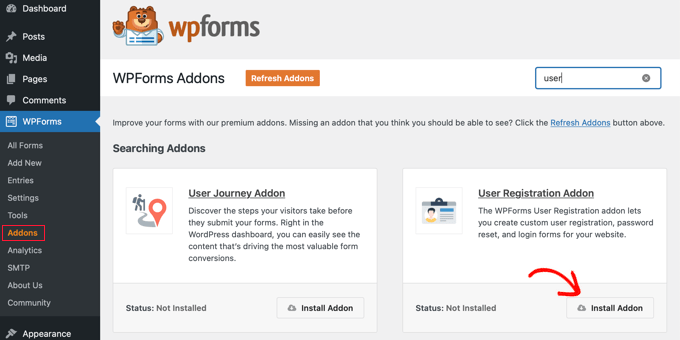
After activating the addon, you need to go to WPForms » Add New page to create a new form.
WPForms offers multiple prebuilt form templates to choose from. First, enter a name for your form and then select the ‘User Login Form’ template. Then, you can click on the ‘Use Template’ button.
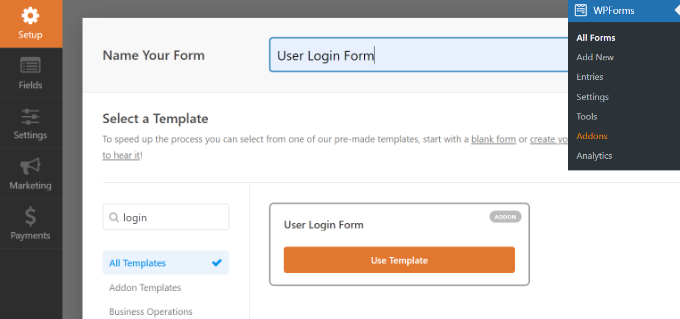
This login form template has email and password fields that will work similarly to the default WordPress login form.
You can drag and drop any additional fields from the left side of the screen as needed.
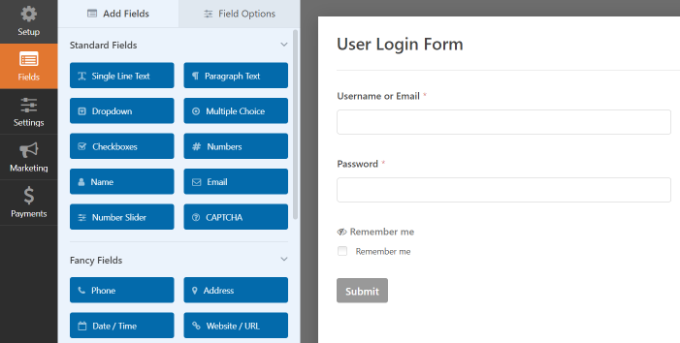
Next, click on the Password field, and it will show the field options on the left side.
You can add the code given below in the description box of the Password field to display options like forget password and user registration.
Can't remember your password? <a href="{url_lost_password}">Click here</a>. Don't have an account? <a href="{url_register}">Register here</a>.
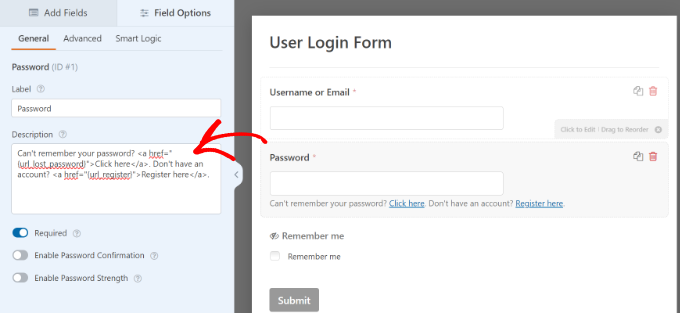
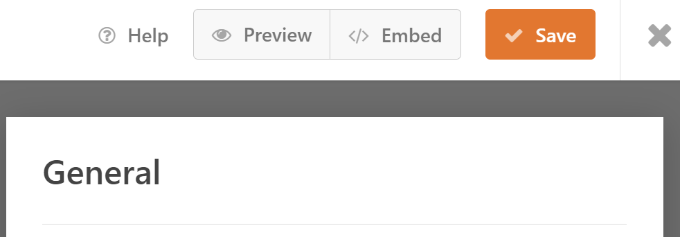
After that, you need to click on the ‘Save’ button to store your changes.
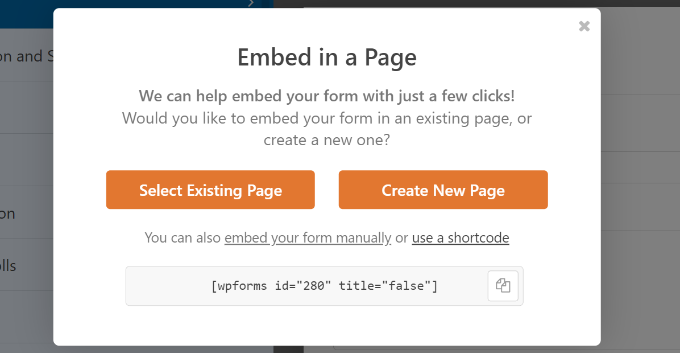
Next, simply click on the ‘Embed’ button.
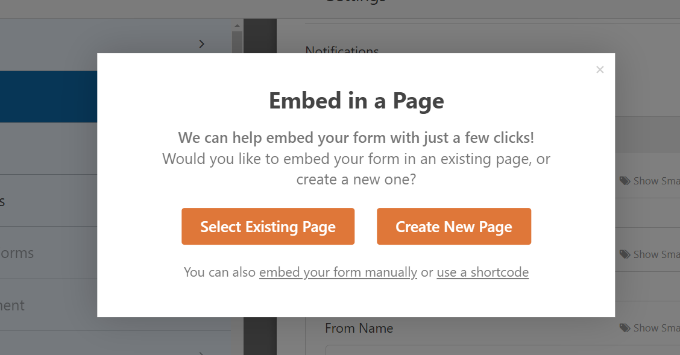
A popup window will open with options to add your login form.
Go ahead and select the ‘use a shortcode’ option. It will appear as a link in the window, not a button.
You should now see an embed code for your form.
Now, copy this shortcode and save it to use later.
Your login form is ready. Now, you can go ahead and create the modal popup using OptinMonster.
Using OptinMonster to Create a Modal Popup
First, you’ll need to visit the OptinMonster website and sign up for an account.
Next, you will need to install and activate the OptinMonster plugin. For more details, see our step-by-step guide on how to install a WordPress plugin.
The plugin acts as a connector between your WordPress site and OptinMonster.
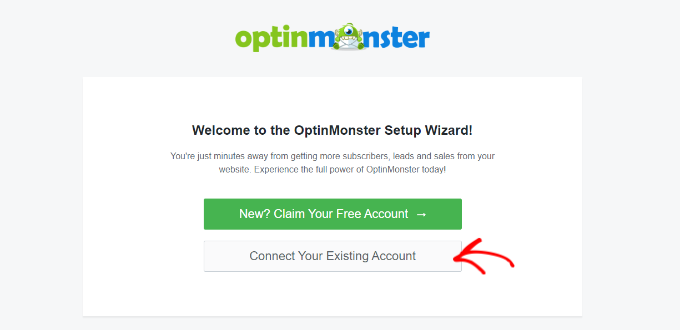
Upon activation, you should see the welcome screen. Go ahead and click the ‘Connect Your Existing Account’ button.
A new window will now open.
Go ahead and click the ‘Connect to WordPress’ button.

You are now ready to create a login popup modal.
Simply go to OptinMonster in the WordPress admin area and click on the ‘Create Your First Campaign’ button.

Your OptinMonster dashboard will open on a new web page.
Once inside, you need to select ‘Popup’ as the campaign type to add your login form to the popup.
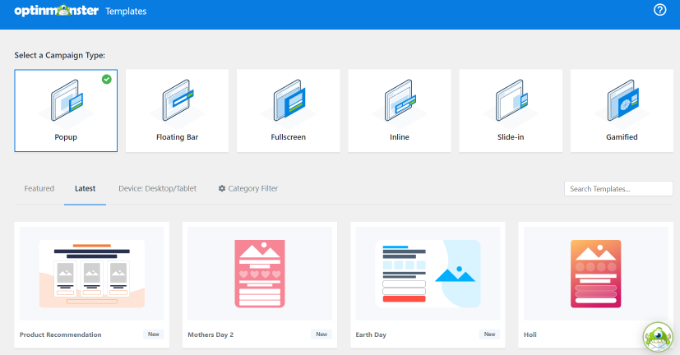
Next, you need to select a campaign template.
OptinMonster offers prebuilt templates so you can quickly choose and edit one.
Once you’ve selected a template, a popup window will now open. It will ask you to add a name to your campaign.
After entering a name, click the ‘Start Building’ button.

Once you click on the button, you will be redirected to the OptinMonster campaign builder.
You can add different blocks to your template from the menu on your left. Go ahead and add the WPForms block.

After that, you should see WPForms block options in the menu on your left.
You can select the login form that you just created from the ‘Form Selection’ dropdown menu.
If you don’t see your form, then simply select the ‘Add Shortcode Manually’ option and enter the shortcode you copied earlier when creating the form in WPForms.
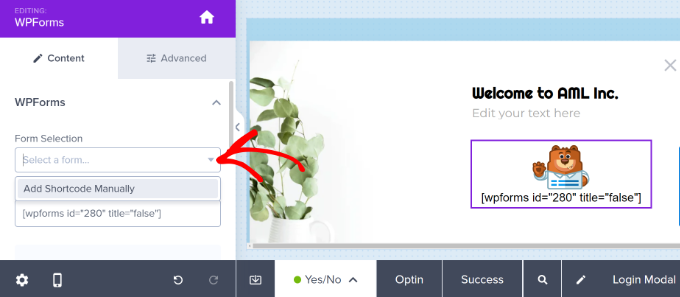
Don’t worry if you can’t preview your form in the campaign builder. The form will appear when you publish the campaign.
Next, you can head to the ‘Display Rules’ tab. OptinMonster offers powerful targeting options.
From here, select the ‘MonsterLink™’ (On Click)’ display rule.
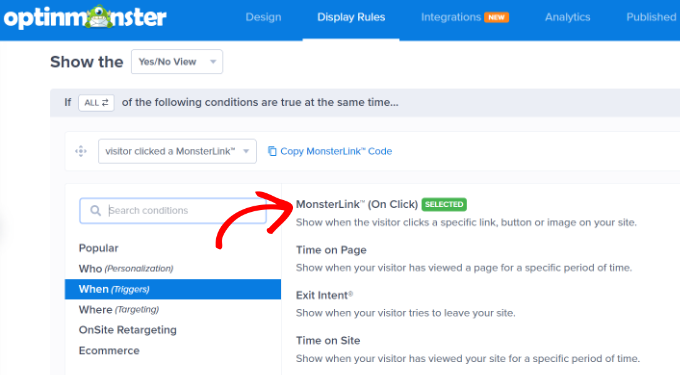
After that, you will see MonsterLink as the display rule.
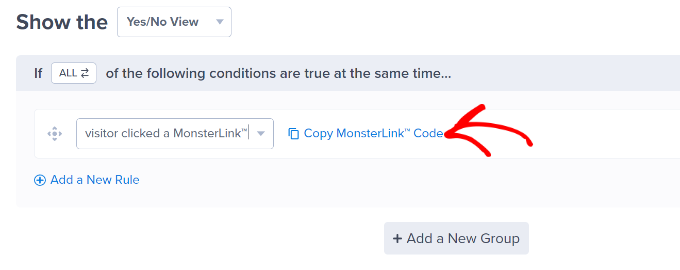
Go ahead and click the ‘Copy MonsterLink Code’ button. You will need this link later.
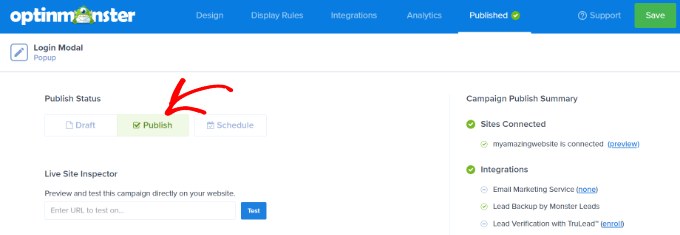
You can now head to the ‘Publish’ tab at the top.
Simply change the Publish Status from ‘Draft’ to ‘Publish.’
Don’t forget to click the ‘Save’ button at the top and exit the campaign builder.
Next, you’ll see the WordPress Output Settings for your campaign. Just ensure that the Status is set to ‘Published’ under the ‘Visibility & Status’ section.
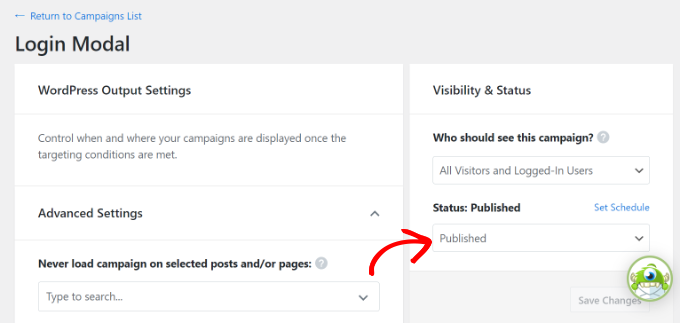
Make sure to click the ‘Save’ button at the top right corner and go to the ‘Publish’ section to make the status active.
Adding Modal Login in WordPress
Next, you can create a new WordPress page or edit an existing one.
Once you are in the content editor, click the ‘+’ button and add a Custom HTML block.
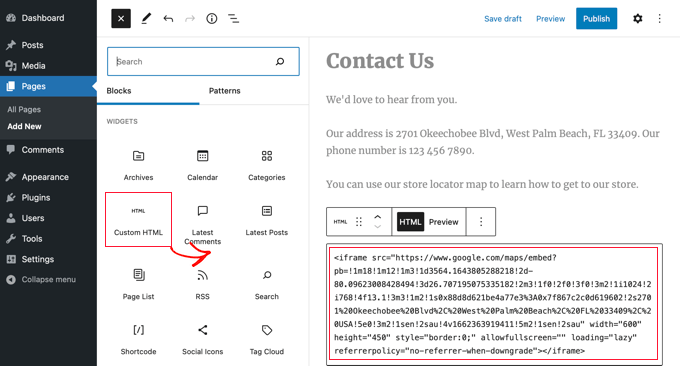
After that, you must paste the MonsterLink in the custom HTML block. It should look something like this:
<a href="https://app.monstercampaigns.com/c/pimhy1fgvnqqqtormzmw/" target="_blank" rel="noopener noreferrer">log in or register</a>
Since this is a login form and not an email optin, you will want to change the link text in the code that says ‘Subscribe Now’ to anything you want. For this tutorial, we changed it to ‘log in or register,’ as you can see in the code snippet above.
You can also add the code above to your WordPress menus, sidebar, or any other area on your site.
Make sure to save the changes to the WordPress page and visit your site to see the modal login in action.
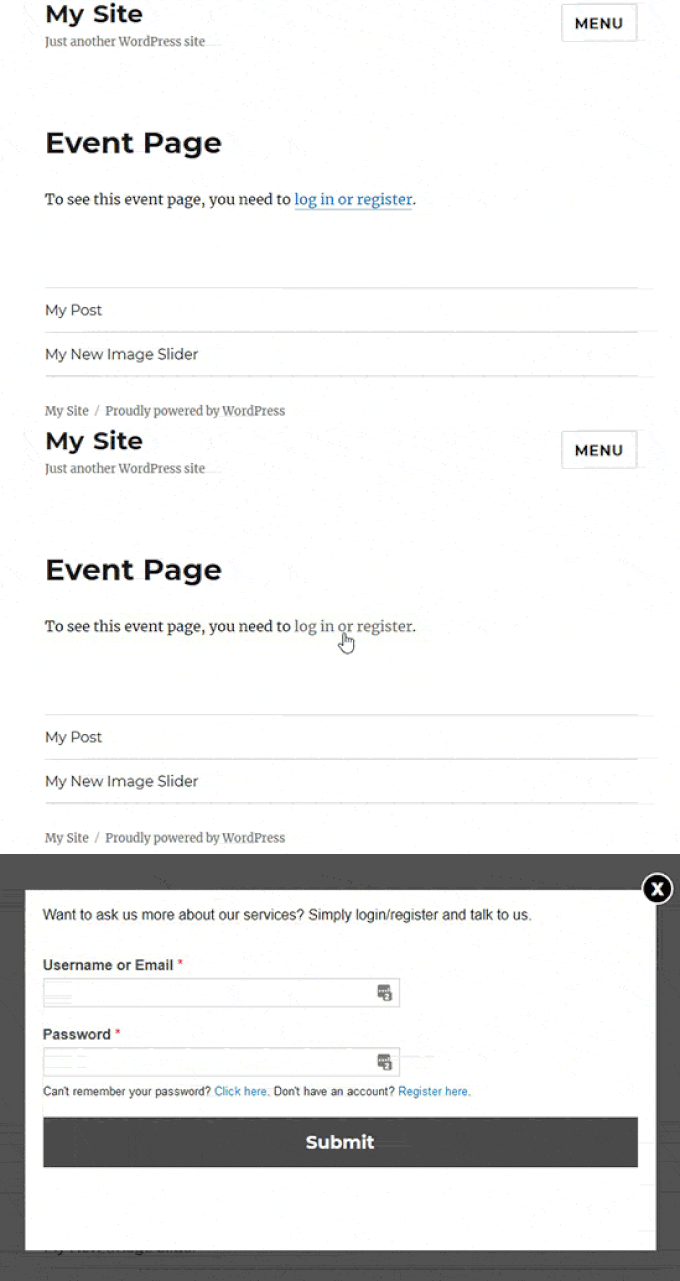
We hope this article helped you learn how to create a login popup modal in WordPress. You can also check out our complete list of the best WordPress login page plugins and our guide on how to create a landing page with WordPress.
If you liked this article, then please subscribe to our YouTube Channel for WordPress video tutorials. You can also find us on Twitter and Facebook.


Syed Balkhi says
Hey WPBeginner readers,
Did you know you can win exciting prizes by commenting on WPBeginner?
Every month, our top blog commenters will win HUGE rewards, including premium WordPress plugin licenses and cash prizes.
You can get more details about the contest from here.
Start sharing your thoughts below to stand a chance to win!
Jiří Vaněk says
This looks great. It usually annoys me on the web if I have to log in and the original page I was on disappears. This is a very elegant solution to prevent this. I have both Optin Monster and WP Forms and I’m definitely going to try this process. Thank you for the very detailed instructions.
Ahmed Omar says
wonderful explanation
I am using optinmonster which is convenient for me
Thank you
WPBeginner Support says
You’re welcome
Admin
Ibrahim Garba says
Using WPforms is the easiest. At least for me. Thanks.
WPBeginner Support says
You’re welcome
Admin
Danny says
Thanks for the tutorial.
When you say “Add the shortcode to a new page” do you mean we should create a new page and paste the shortcode?
Does it mean this page will now become our Login/Registration page?
WPBeginner Support says
If you wanted a login/registration page you would place it on a new page which means that page would be the login/registration page your visitors could use.
Admin
Danny says
Thanks for the info,
I guess they have removed Popup from the selection options. I only saw Dropdown and LinktoDefault.
Am I the only one?
WPBeginner Support says
Currently, it does not appear to be available with CSH Login, thanks for letting us know
Admin
Laura says
Sometimes y’all have great info. But sometimes, it’s really frustrating when you only give instructions that require more plugins. I tell my clients that it’s better to keep plugins to a minimum, and when I’m trying to code something from scratch, looking for some snippets that’ll make the work easier, I feel let down when I come here. This is one of those cases. If you want to provide instructions using plugins, fine. But it would be awesome if you’d include an additional option showing how to do it from the ground up.
Thanks, though, for the many things you DO help with a lot.
WPBeginner Support says
Glad you find our articles helpful. In this case, it would have taken far more than just a snippet to set this up which is why our article for beginners is showing only plugin options
Admin
Bob says
From the end user perspective these things are horrible. They may look nice but password managers like Lastpass have a hard time with them. Some work, others don’t.