Adding a reading progress bar to WordPress posts is a great way to enhance your reader’s experience.
Long blog posts can sometimes feel intimidating, and a progress bar offers a visual cue that shows readers exactly how far they’ve come and how much is left.
We have written over 3000 blog posts at WPBeginner, so we know the importance of keeping your readers engaged. That’s why we are here to share our top tips for improving your blog.
In this article, we will show you how to easily add a reading progress bar to your WordPress posts.
When to Add a Reading Progress Bar to Your WordPress Blog Posts
For longer blog posts, adding a reading progress bar can be a valuable tool to make people stay on your WordPress website. It can let readers know how much they’ve read and how much is left.
Readers are more likely to keep scrolling if they see they’re nearing the end of the article. A progress bar can motivate them to finish reading.
Plus, having a read meter adds a touch of interactivity to your content. It can make reading feel more like a journey with a clear destination.
However, it’s important to consider your content. A progress bar might be unnecessary if you primarily write short, scannable articles. Similarly, some readers might find it distracting.
Note: Do you want to add a generic progress bar instead? We recommend using SeedProd and its built-in progress bar block.
For more information on how to use SeedProd, just check out our guide on how to create a custom WordPress theme.
With that in mind, let’s see how to easily add a reading progress bar to your WordPress posts. You can use the quick links below to skip to your preferred method:
Method 1: Design a Custom Theme With Reading Progress Indicators
One way to add a reading progress bar in WordPress posts is to use a theme builder with a progress bar feature. This way, the progress bar design will integrate seamlessly with the rest of your theme, making it more pleasing to the eye.
Keep in mind that this method will involve changing your theme, so we don’t recommend it if you are already happy with your theme and aren’t looking to switch it any time soon. If that’s the case, then you should go with method 2 instead.
For this method, we will use the Thrive Theme Builder. Besides having a reading progress bar, the Thrive Theme Builder has dozens of theme templates for various purposes, from blogs to corporate websites.
Best of all, the drag-and-drop builder is easy to use, making it great for complete beginners.
You can learn more about the platform in our Thrive Themes review.
One downside of Thrive Themes is there is no free version. That being said, you can use our Thrive Themes coupon code to get up to 50% off of your first purchase.
Step 1: Install the Thrive Theme Builder
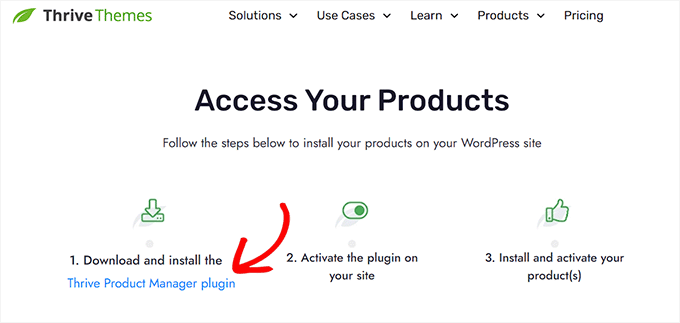
The first step is to set up the Thrive Theme Builder. You can get access to this plugin by logging in to your account on the Thrive Themes website.
Then, download and install the Thrive Product Manager plugin. For more information, check out our beginner’s guide on how to install a WordPress plugin.
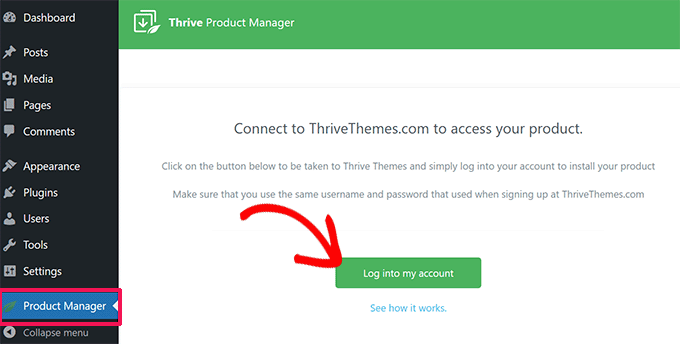
Once the plugin is active, click Product Manager in your WordPress admin area.
Then, click the ‘Log into my account’ button to connect your WordPress website with your Thrive Themes account.
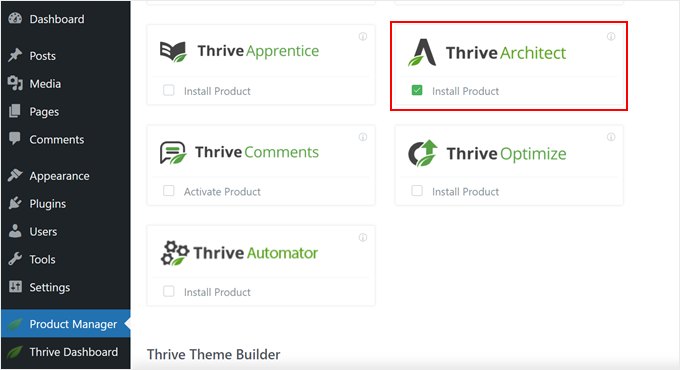
After that, you should now see a list of all the available Thrive Themes products inside your account.
Here, go ahead and select ‘Thrive Architect‘ and check the ‘Install Product’ box.
This page builder plugin works together with the theme builder, so that’s why we need to activate it.
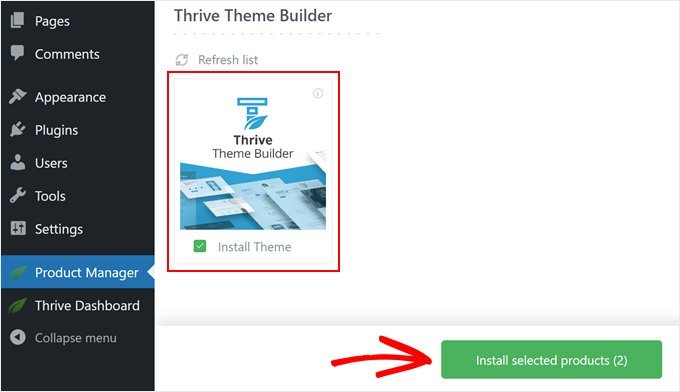
Next, scroll down to the ‘Thrive Theme Builder’ section and tick the ‘Install Theme’ box.
Now, simply click ‘Install selected products.’
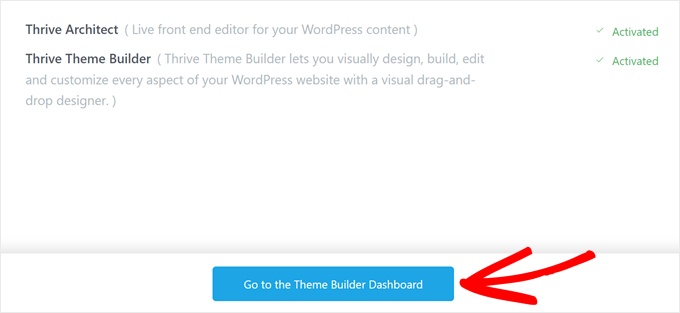
On the next page, you will see that Thrive Product Manager is installing and activating the Thrive Theme Builder.
Once the process is done, click ‘Go to the Theme Builder Dashboard.’
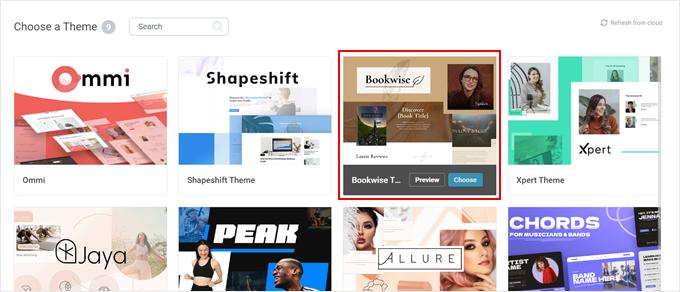
Now, go ahead and choose a WordPress theme.
If you are not sure which one to pick, just click the ‘Preview’ button to see what the theme looks like first. Then, click ‘Choose’ once you have made your decision.
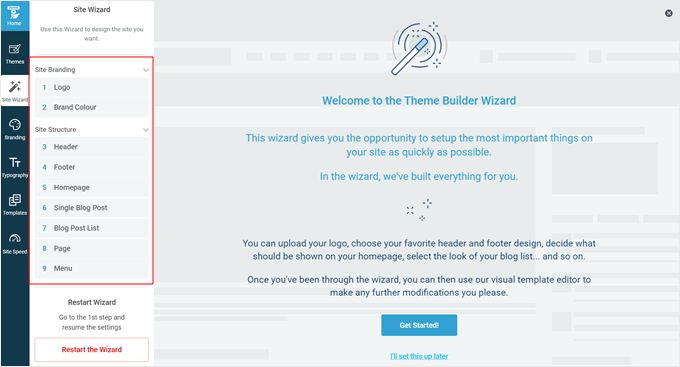
You should now arrive at the Theme Builder Wizard.
This setup wizard will walk you through uploading your own logo, choosing brand colors to add to your theme, and setting up the different structures and templates of your theme.
Go ahead and complete the setup wizard before moving on to the next step.
Step 2: Add a Reading Progress Bar to Your Single Post Template
With your theme set up, let’s now add a reading progress bar to your theme template. Since we just want to display the read meter bar in WordPress posts, then we will just need to edit the single post template.
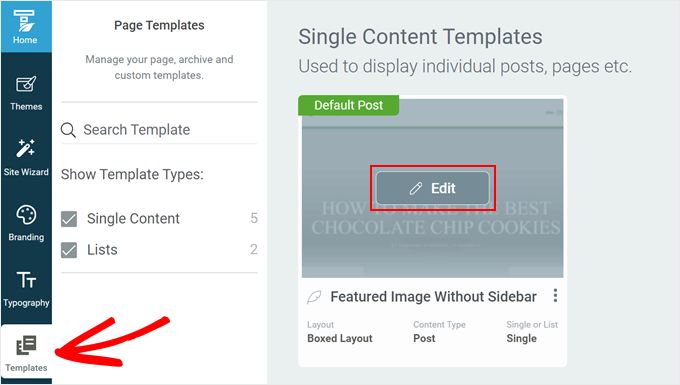
To do this, switch to the ‘Templates’ tab in the Thrive Theme Builder. Then, find the ‘Default Post’ template and click ‘Edit.’
You should now be inside the theme builder. There should be a left sidebar for editing your template, a preview of the template itself, and a small toolbar on the right side for adding more blocks or changing the template’s style.
To add the read meter, scroll down the left sidebar and find the ‘Reading progress indicator’ setting. Simply click on the toggle to activate it.
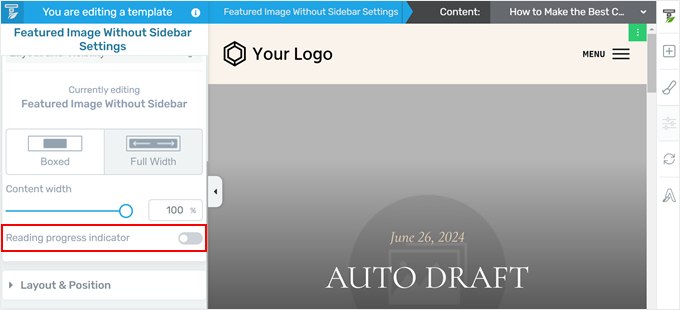
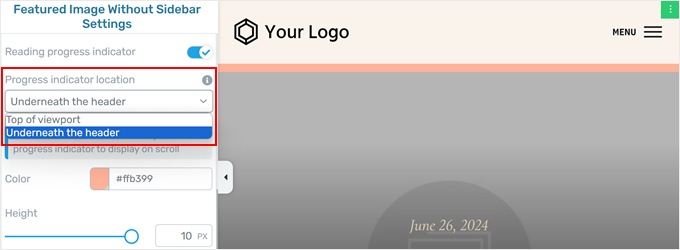
There should now be some more settings for you to edit the reading position indicator.
First, you can choose to add the progress bar underneath the header or on top of the viewport (right above the header). If you pick the first option, then you will have to make sure the header is set to sticky, which we will show you how to do later.
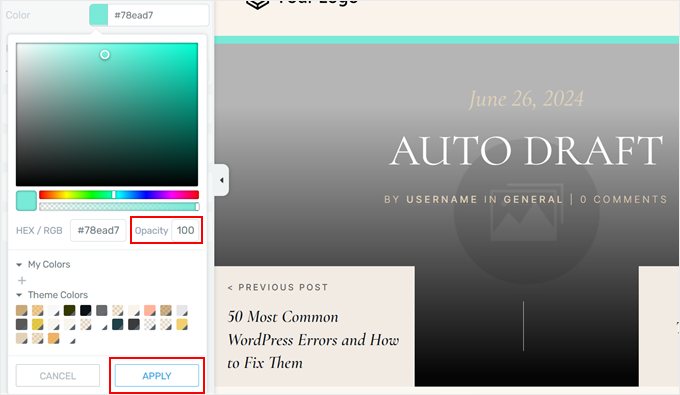
Next, you can change the color of the progress bar. Simply click on the color picker to do that.
Now, you can either choose one of the theme colors, which is your theme’s pre-defined color scheme. Or, you can click ‘Unlink from theme color’ to pick an entirely different color that is not a part of your theme.
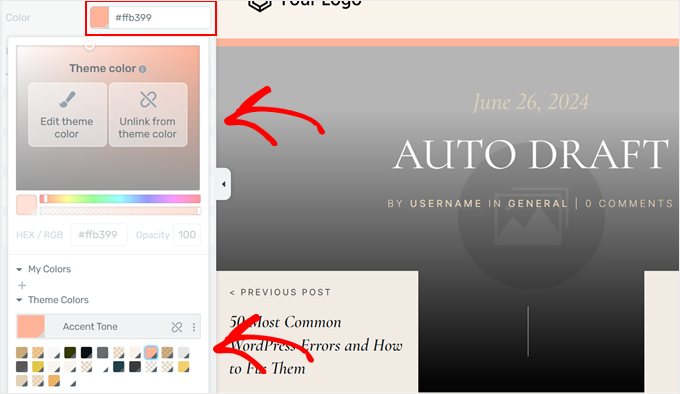
If you choose the ‘Unlink from theme color’ option, then you can also adjust the color’s opacity.
This way, you can adjust how opaque the progress bar looks against its background. That being said, it’s best to make the color of the progress bar not so vibrant that it distracts users from reading.
Once you’re happy with the color, just click ‘Apply.’
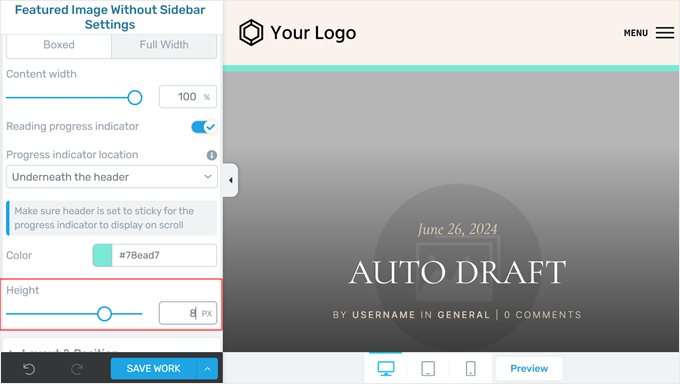
Finally, you can adjust the height of the progress bar.
The theme builder lets you resize the bar to up to 10 pixels. This ensures the progress bar doesn’t look too big. With that in mind, we recommend going for a size between 5 and 10 so that the progress bar is clearly visible.
When you are happy with how the bar looks, just click ‘Save Work’ to keep your changes.
Step 3: Make Your Header Sticky (Optional)
If you choose to display your reading progress bar underneath the header, then you will have to follow this step. Otherwise, you can skip it.
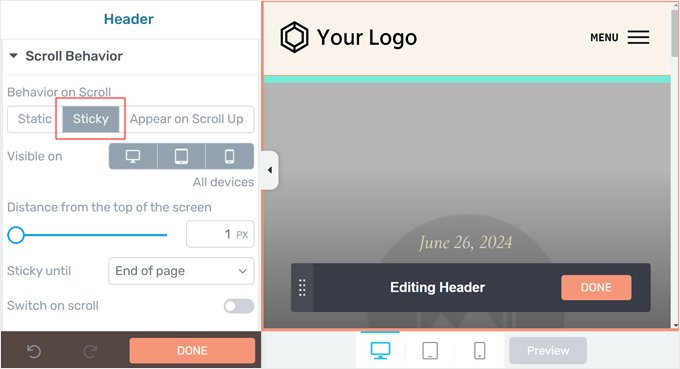
First, scroll up the left sidebar and click ‘Header.’
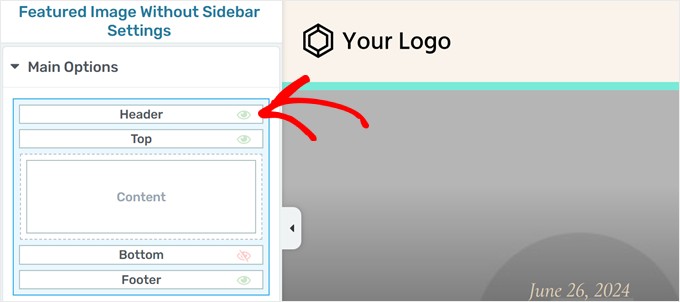
A different set of settings to customize the header should now appear on the sidebar.
Go ahead and scroll down to the Header Section and click ‘Edit.’
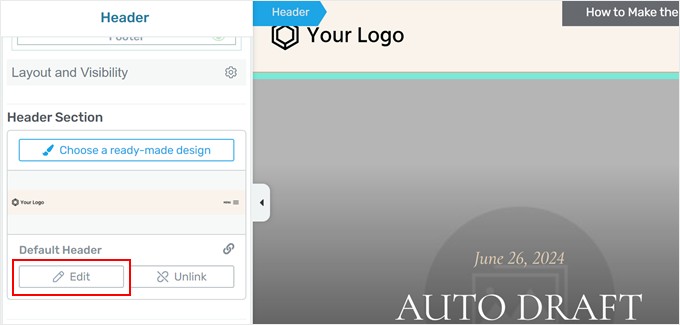
Now, open the Scroll Behavior tab.
Then, you need to select ‘Sticky.’ Depending on your theme, you may also need to change the distance from the top of the screen to 1 px so that the progress bar appears.
You can leave the rest of the settings as they are and click ‘Done’ at the bottom.
Step 4: Add a Reading Time Indicator (Optional)
Another thing you can do with Thrive Theme Builder is show the estimated reading time to go through a post from start to finish. This helps users see how long it will take to read an article, letting them choose content that fits their available time.
First, click on the block that is responsible for showing your post meta data.
This is the part of your single post template that displays information like the blog post’s author, categories, tags, and so on.
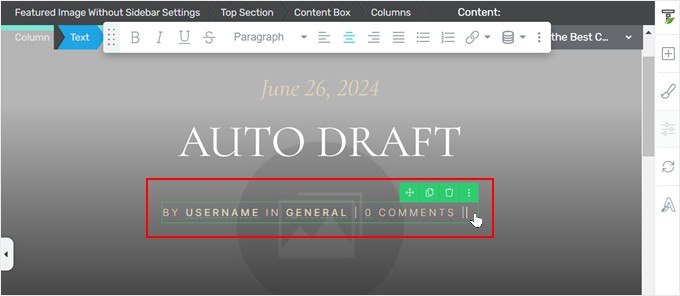
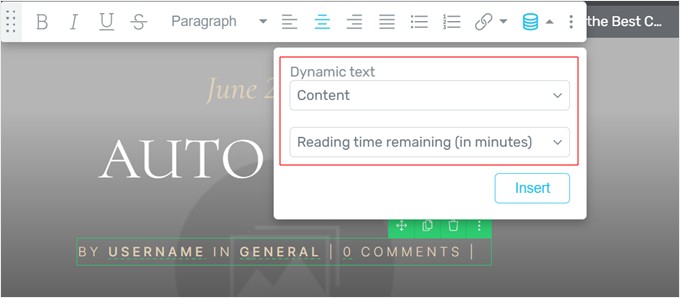
Then, click on the ‘Dynamic text‘ icon in the toolbar.
Here, you must select ‘Content’ in the first dropdown menu and ‘Reading time remaining (in minutes)’ in the second one.
After that, click ‘Insert.’
You should now see new text that says, ‘0 minutes remaining’ in the post meta. You can go ahead and adjust this text to your liking.
In our case, we decided to remove the word ‘remaining.’
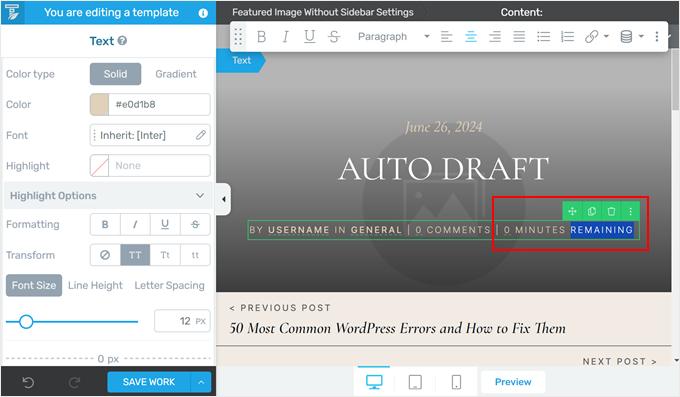
When you are done, don’t forget to click ‘Save Work.’
Step 5: Preview Your Reading Progress Indicators
Now that you have configured your progress bar settings, you can visit your blog post to see the bar in action.
If you want to do a preview instead of seeing the bar live on your site, then you can just click the ‘Preview’ button at the bottom. Thrive Theme Builder lets you preview your website on desktop, tablet, and mobile.
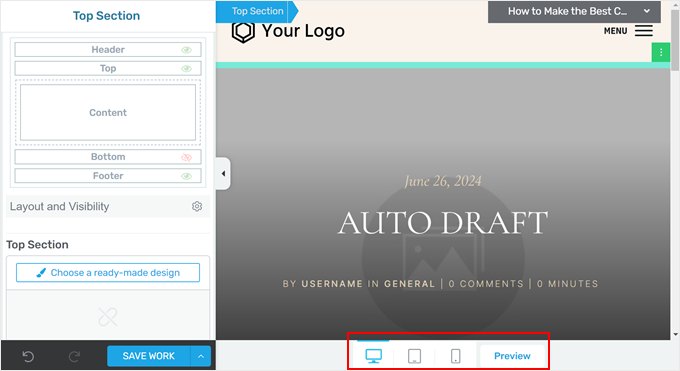
Feel free to make as many changes as necessary.
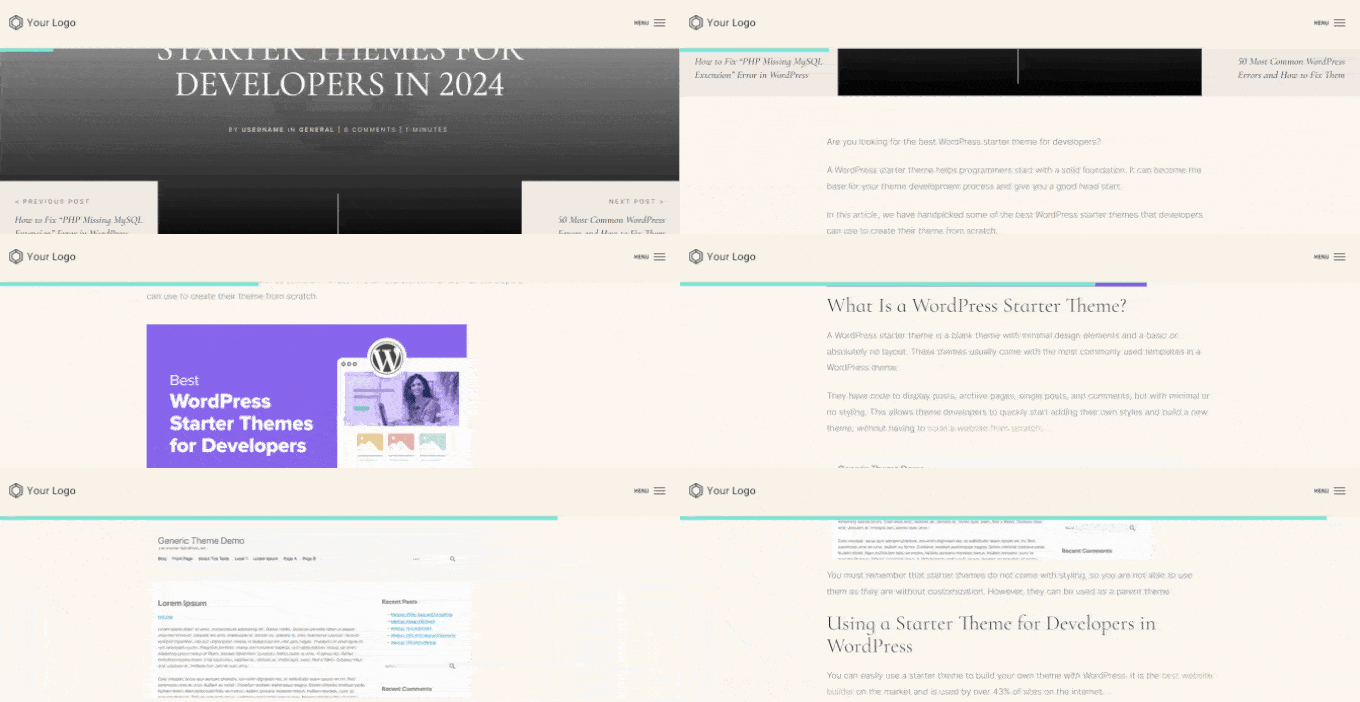
Here’s what our reading progress bar looks like:
Method 2: Add a Reading Progress Bar With a Free Plugin
If you just want to add a simple reading progress bar to your WordPress posts for free, then you can use the Catch Scroll Progress Bar plugin.
This reading progress bar plugin will automatically show a read meter on your pages and posts, and you can easily customize it to your preferences.
First, install the plugin in your WordPress admin area. For more information, read our beginner’s guide on how to install a WordPress plugin.
Once that’s done, go to Catch Scroll Progress Bar on your WordPress dashboard. You will now see some progress bar settings to set up.
With this plugin, you can change the progress bar position from the top to the bottom. That said, you can just leave it as it is if you prefer the normal top position.
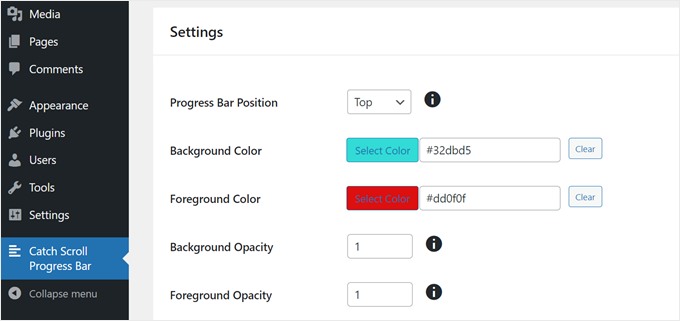
Another thing you can customize is the background color and the foreground color.
The background color refers to the progress bar’s default color when the reader has not scrolled through the page. Meanwhile, the foreground color is the color that will appear as the reader scrolls down the page.
Next is opacity, which controls the transparency of the background and foreground colors. The range is between 0 and 1, with 1 being opaque and 0 being transparent or invisible.
Feel free to play around with the numbers until you find the opacity level you like.
Next, you can adjust the progress bar’s height and border radius.
For the height, we’ve found that the best number is between 1 and 8, but not more than that. Otherwise, the progress bar may look too big.
The border radius controls how rounded the corners of your progress bar look. If you don’t like how that looks, then you can just enter ‘0.’
Now, this plugin also lets you decide which templates to display the progress bar in: on your homepage, blog page, archives and categories, and/or single posts or pages.
Typically, you only need to add a reading progress bar on your WordPress blog posts. In this case, we only chose ‘Single page/post’ in the ‘Select the Template Condition to progress bar’ setting.
We also checked the ‘Posts’ option in the ‘Select the Post type to apply progress bar’ because we only want the bar to appear in blog posts.
That said, feel free to check the conditions that suit your website best.
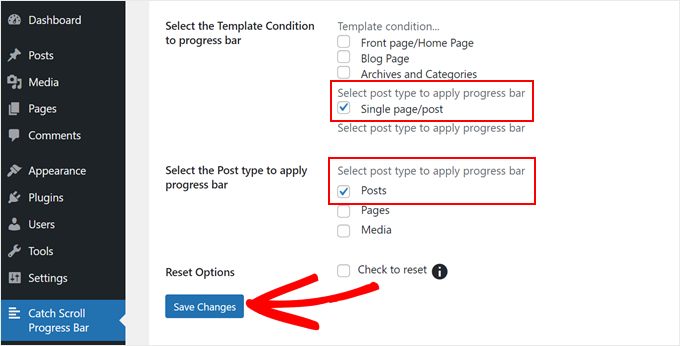
Once you are happy with your progress bar settings, go ahead and click ‘Save Changes.’
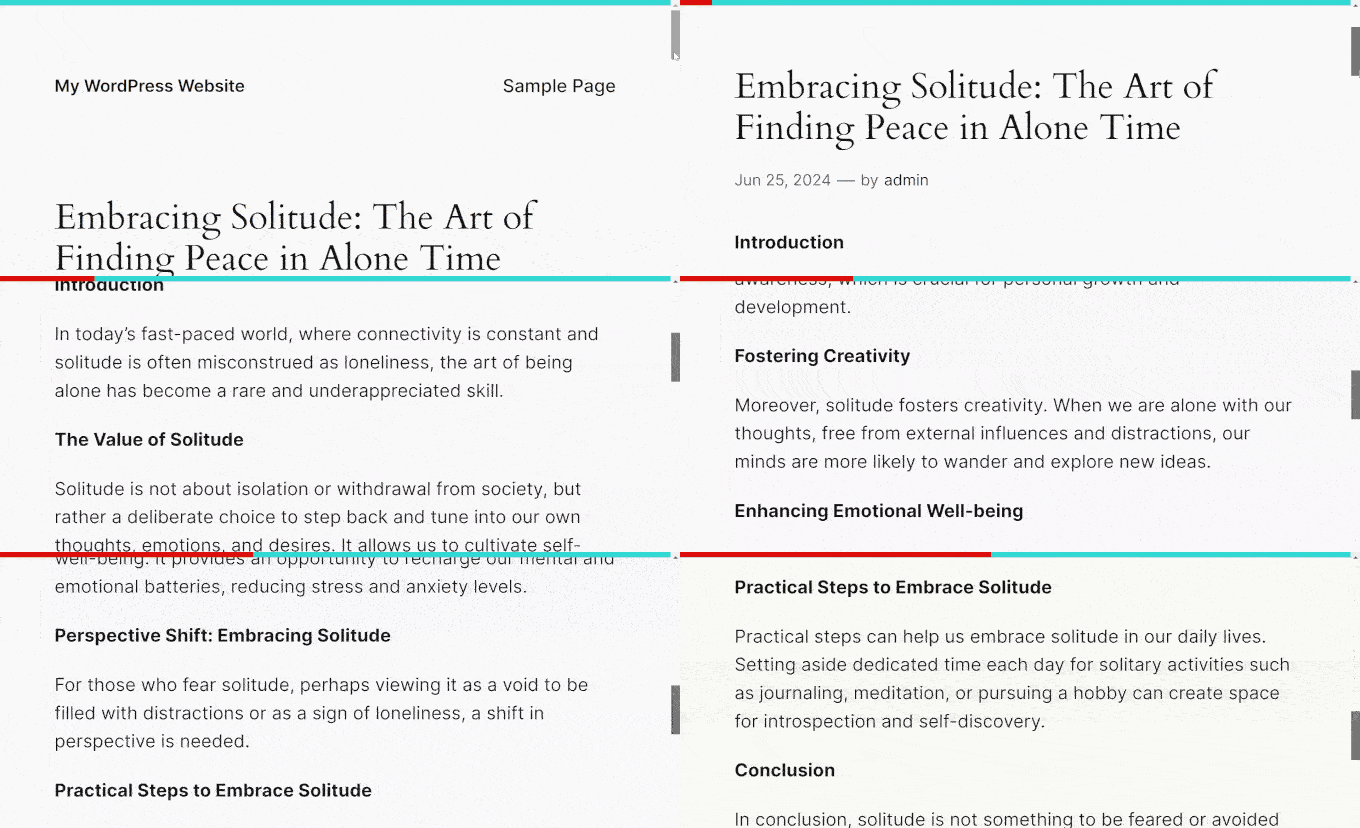
Now, if you preview your blog post on mobile or desktop, you should see a progress bar.
Bonus Tips to Keep Your WordPress Blog Readers Engaged
Want to turn casual visitors into loyal readers? We’ve got you covered!
Check out these expert WordPress tutorials packed with tips to keep your audience hooked:
- Style each WordPress post differently to make your content visually engaging.
- Create custom shape dividers to break up your text and guide readers through your content.
- Add emojis to embrace your personality and a touch of fun to your blog.
- Highlight new posts for returning visitors and keep them coming back for more.
- Highlight text in your WordPress posts and emphasize key points for your readers.
- Add simple and elegant footnotes to your blog posts to showcase your research.
- Impress your visitors by showing rotating testimonials in your WordPress site.
- Add a font resizer to your WordPress site to ensure your content is accessible to everyone.
We hope this article helped you add a reading progress bar in WordPress. You may also want to see our complete guide on how to edit a WordPress website and our expert picks of the best Canva alternatives for website design graphics.
If you liked this article, then please subscribe to our YouTube Channel for WordPress video tutorials. You can also find us on Twitter and Facebook.


Syed Balkhi says
Hey WPBeginner readers,
Did you know you can win exciting prizes by commenting on WPBeginner?
Every month, our top blog commenters will win HUGE rewards, including premium WordPress plugin licenses and cash prizes.
You can get more details about the contest from here.
Start sharing your thoughts below to stand a chance to win!
Jiří Vaněk says
For websites where the articles are longer than, for example, 1000 words, this is really useful so that the user knows what part of the content he is already in and how much is left. I assume that it can also very well reduce the bounce rate and it helps to “force” people to read the article to the end.
Vikash Pareek says
How to Add a Reading Progress Bar in WordPress Posts without plugin, Because more plugins affect page speed, plugins cannot be installed for every task.
WPBeginner Support says
Plugins and code affect your WordPress site the same. Poor quality code or a poor quality plugin would affect your site’s speed the same. We would recommend taking a look at our article below that goes more in-depth on the number of plugins a site should have.
https://wpbeginner.com/opinion/how-many-wordpress-plugins-should-you-install-on-your-site/
Admin
Durga Thiyagarajan says
I was looking for this one ! Thank you so much and it worked out. Will this affect the page speed?
WPBeginner Support says
For how plugins affect page speed, you would want to take a look at our article below:
https://www.wpbeginner.com/opinion/how-many-wordpress-plugins-should-you-install-on-your-site/
Admin
AmiF says
Hi, thanks for sharing this awesome plugin, in the horizontal way, how to make it fill starting from right to the left? Which part should I change to make it “rtl”? Please someone help me…
Abhijeet says
Plugin ‘worth the read’ has changed its settings…Please update this post
Jonathan Nabais says
Hello there,
It works on my site but it’s invisible because it’s under the background.
How make it visible on the page and not under the page ?
Nirmal Kumar says
Thanks for sharing this awesome plugin. This worked out. Cheers!
Stanley says
It worked, very awesome.
Thanks
K T Bowes says
Works on my pages but not on my blog posts – which is where I really wanted it. Looks good on my pages though.
Tony Abbott says
I followed every step but my posts do not display the progress bar. Also the article states that this plugin does not support pages but the plugin screen does offer you the option to use the plugin on posts and pages.
I received this tutorial by email from yourselves on 6/9//16 so I am assuming you should have checked the validity of the article before you sent it out.
Tim Coe says
Didn’t work for me. The enable box has been replaced by posts and pages boxces but after trying it 3 times I’m giving up.
Marcus says
This is pretty neat. I have a site that primarily works through a Custom Post Type, so I’ll look for another resource for that as many of my articles are long-for reading!
Thanks for sharing!