¿Quieres crear taxonomías personalizadas en WordPress?
Por defecto, WordPress te permite organizar tu contenido con categorías y etiquetas. Pero con las taxonomías personalizadas, puedes personalizar aún más la forma de ordenar tu contenido.
En este artículo, le mostraremos cómo crear fácilmente taxonomías personalizadas en WordPress con o sin usar un plugin.
¿Qué es una taxonomía de WordPress?
Una taxonomía de WordPress es una forma de organizar grupos de entradas y tipos de contenido personalizados.
Por defecto, WordPress viene con dos taxonomías llamadas categorías y etiquetas. Puede utilizarlas para organizar las entradas de su blog.
Sin embargo, si utiliza un tipo de contenido personalizado, es posible que las categorías y etiquetas no se adapten a todo el contenido.
Por ejemplo, puede crear un tipo de contenido personalizado llamado “Libros” y ordenarlo utilizando una taxonomía personalizada llamada “debates”.
Puede añadir términos de debate como Aventura, Romance, Terror y otros temas de libros que desee. Esto te permitirá a ti y a tus lectores clasificar y filtrar fácilmente los libros por temas.
Las taxonomías también pueden ser jerárquicas, lo que significa que puede haber temas principales, o padres, como Ficción y No ficción. A continuación, habría subtemas, o hijos, dentro de cada categoría.
Por ejemplo, la categoría principal Ficción podría tener como hijos Aventura, Romance y Terror.
Ahora que ya sabe lo que es una taxonomía personalizada, aprendamos a crear taxonomías personalizadas en WordPress.
Aunque crear taxonomías personalizadas es potente, hay mucho que cubrir. Para ayudarle a establecer esto correctamente, hemos creado una tabla de contenido fácil a continuación:
Crear taxonomías personalizadas en WordPress (Video Tutorial)
Si prefiere las instrucciones escritas, siga leyendo.
Creación de taxonomías personalizadas con un plugin (de forma sencilla)
Lo primero que tienes que hacer es instalar y activar el plugin Custom Post Type UI. Para más detalles, consulta nuestra guía sobre cómo instalar un plugin de WordPress.
En este tutorial, ya hemos creado un tipo de contenido personalizado y lo hemos llamado ‘Libros’. Así que asegúrese de que tiene un tipo de contenido personalizado creado antes de empezar a crear sus taxonomías.
A continuación, vaya a CPT UI ” Añadir / Editar Taxonomías elemento de menú en el área de administrador de WordPress para crear su primera taxonomía.
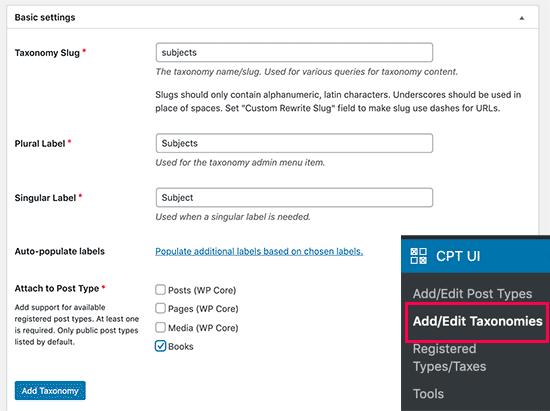
En esta pantalla, tendrá que hacer lo siguiente:
- Cree su slug de taxonomía (esto irá en su URL)
- Crear la etiqueta plural
- Crear la etiqueta singular
- Autocompletar etiquetas
El primer paso es crear un slug para la taxonomía. Este slug se utiliza en la URL y en las consultas de búsqueda de WordPress.
Solo puede contener letras y números, y se convertirá automáticamente a minúsculas.
A continuación, rellene los nombres en plural y singular de su taxonomía personalizada.
Desde ahí, tienes la opción de hacer clic en el enlace ‘Rellenar etiquetas adicionales basadas en las etiquetas elegidas’. Si lo hace, el complemento rellenará automáticamente el resto de los campos de las etiquetas.
Ahora, desplácese hasta la sección “Etiquetas adicionales”. En esta área, puede proporcionar una descripción de su tipo de contenido.
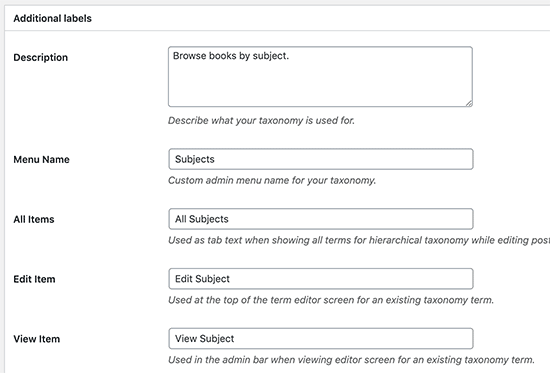
Estas etiquetas se utilizan en su escritorio de WordPress cuando está editando y gestionando contenido para esa taxonomía personalizada en particular.
A continuación, tenemos la opción de ajustes. En esta área, puede establecer diferentes atributos para cada taxonomía que cree. Cada opción tiene una descripción que detalla lo que hace.
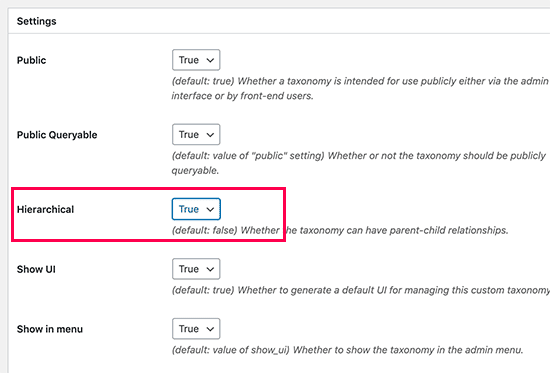
En la captura de pantalla anterior, verá que hemos elegido jerarquizar esta taxonomía. Esto significa que nuestra taxonomía “Temas” puede tener subtemas. Por ejemplo, un tema llamado Ficción puede tener subtemas como Fantasía, Suspense, Misterio y más.
Hay muchos otros ajustes más abajo en la pantalla de su escritorio de WordPress, pero puede dejarlos como están para este tutorial.
Ahora puede hacer clic en el botón “Añadir taxonomía” de la parte inferior para guardar su taxonomía personalizada.
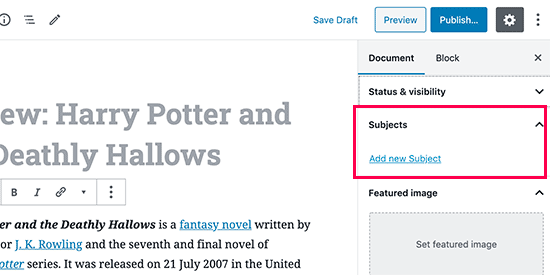
Después de eso, siga adelante y edite el tipo de entrada asociada a esta taxonomía en el editor de contenido de WordPress para empezar a utilizarla.
Creación manual de taxonomías personalizadas (con código)
Este método requiere que añadas código a tu sitio web WordPress. Si no lo ha hecho antes, le recomendamos que lea nuestra guía sobre cómo añadir fácilmente fragmentos de código en WordPress.
No recomendamos editar directamente los archivos de WordPress porque cualquier pequeño error puede romper todo el sitio. Por eso recomendamos a todo el mundo que utilice WPCode, el plugin de fragmentos de código más fácil y seguro que existe.
Para empezar, tendrás que instalar y activar el plugin gratuito WPCode. Para obtener instrucciones detalladas, consulte nuestra guía paso a paso sobre cómo instalar un plugin de WordPress.
1. Creación de una taxonomía jerárquica
Empecemos con una taxonomía jerárquica que funciona como categorías y puede tener términos padres e hijos.
Una vez que haya instalado y activado WPCode, puede navegar a Fragmentos de código ” Añadir fragmento en su escritorio de WordPress.
Pase el cursor por encima de “Añada su código personalizado (nuevo fragmento de código)” y haga clic en “Usar fragmento de código”.
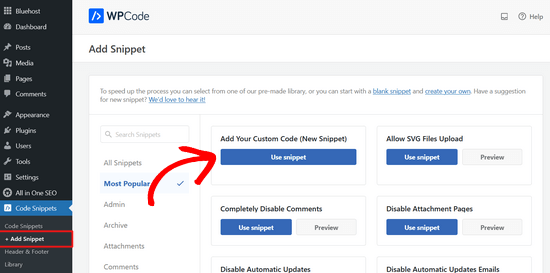
A continuación, accederá a la página “Crear fragmento de código personalizado”. Simplemente asigne un nombre a su nuevo fragmento de código y pegue el siguiente código en el área de texto.
//hook into the init action and call create_book_taxonomies when it fires

add_action( 'init', 'create_subjects_hierarchical_taxonomy', 0 );

//create a custom taxonomy name it subjects for your posts

function create_subjects_hierarchical_taxonomy() {

// Add new taxonomy, make it hierarchical like categories
//first do the translations part for GUI

  $labels = array(
    'name' => _x( 'Subjects', 'taxonomy general name' ),
    'singular_name' => _x( 'Subject', 'taxonomy singular name' ),
    'search_items' =>  __( 'Search Subjects' ),
    'all_items' => __( 'All Subjects' ),
    'parent_item' => __( 'Parent Subject' ),
    'parent_item_colon' => __( 'Parent Subject:' ),
    'edit_item' => __( 'Edit Subject' ),
    'update_item' => __( 'Update Subject' ),
    'add_new_item' => __( 'Add New Subject' ),
    'new_item_name' => __( 'New Subject Name' ),
    'menu_name' => __( 'Subjects' ),
  );

// Now register the taxonomy
  register_taxonomy('subjects',array('books'), array(
    'hierarchical' => true,
    'labels' => $labels,
    'show_ui' => true,
    'show_in_rest' => true,
    'show_admin_column' => true,
    'query_var' => true,
    'rewrite' => array( 'slug' => 'subject' ),
  ));

}
Asegúrese de cambiar el Tipo de código a ‘Fragmento de código PHP’ y de activar el conmutador a ‘Activo’.
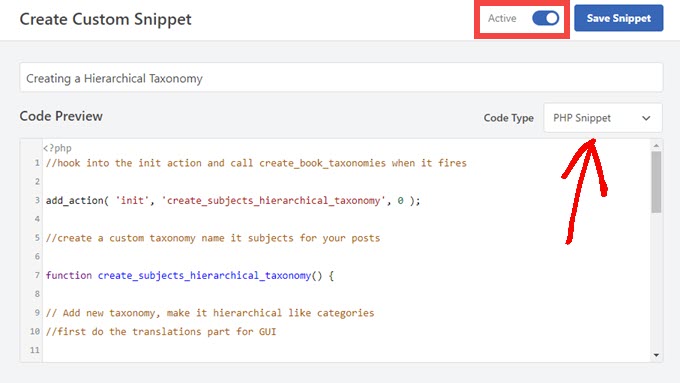
No olvide reemplazar el nombre de la taxonomía y las etiquetas en el fragmento de código con sus propias etiquetas de taxonomía. También se dará cuenta de que esta taxonomía está asociada con el tipo de entrada Libros, tendrá que cambiar eso a cualquier tipo de contenido que desea utilizar con.
A continuación, desplácese hacia abajo y asegúrese de que las opciones “Insertar automáticamente” y “Ejecutar en todas partes” están seleccionadas en el cuadro Inserción.
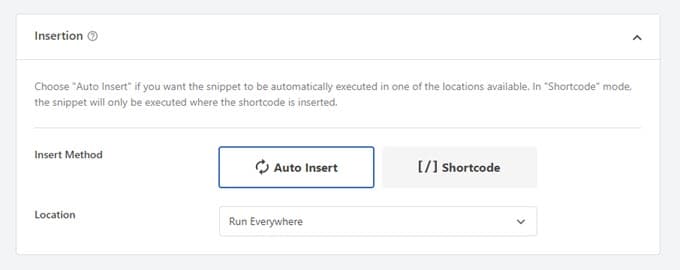
Una vez hecho esto, puede desplazarse a la parte superior y hacer clic en el botón “Actualizar” para aplicar los cambios.
2. Creación de una taxonomía no jerárquica
Para crear una taxonomía personalizada no jerárquica como Etiquetas, usará WPCode y seguirá exactamente los mismos pasos que arriba, solo que usará este código en su lugar:
//hook into the init action and call create_topics_nonhierarchical_taxonomy when it fires

add_action( 'init', 'create_topics_nonhierarchical_taxonomy', 0 );

function create_topics_nonhierarchical_taxonomy() {

// Labels part for the GUI

  $labels = array(
    'name' => _x( 'Topics', 'taxonomy general name' ),
    'singular_name' => _x( 'Topic', 'taxonomy singular name' ),
    'search_items' =>  __( 'Search Topics' ),
    'popular_items' => __( 'Popular Topics' ),
    'all_items' => __( 'All Topics' ),
    'parent_item' => null,
    'parent_item_colon' => null,
    'edit_item' => __( 'Edit Topic' ),
    'update_item' => __( 'Update Topic' ),
    'add_new_item' => __( 'Add New Topic' ),
    'new_item_name' => __( 'New Topic Name' ),
    'separate_items_with_commas' => __( 'Separate topics with commas' ),
    'add_or_remove_items' => __( 'Add or remove topics' ),
    'choose_from_most_used' => __( 'Choose from the most used topics' ),
    'menu_name' => __( 'Topics' ),
  );

// Now register the non-hierarchical taxonomy like tag

  register_taxonomy('topics','books',array(
    'hierarchical' => false,
    'labels' => $labels,
    'show_ui' => true,
    'show_in_rest' => true,
    'show_admin_column' => true,
    'update_count_callback' => '_update_post_term_count',
    'query_var' => true,
    'rewrite' => array( 'slug' => 'topic' ),
  ));
}
Observe la diferencia entre los dos fragmentos de código. En la función register_taxonomy( ), el valor del argumento jerárquico se establece en true para la taxonomía tipo categoría y en false para las taxonomías tipo etiqueta.
Además, en el array de etiquetas para taxonomías no jerárquicas, hemos añadido null para los argumentos parent_item y parent_item_colon lo que significa que no se mostrará nada en la IU para crear un elemento / artículo padre, o taxonomía que pueda tener subtemas.
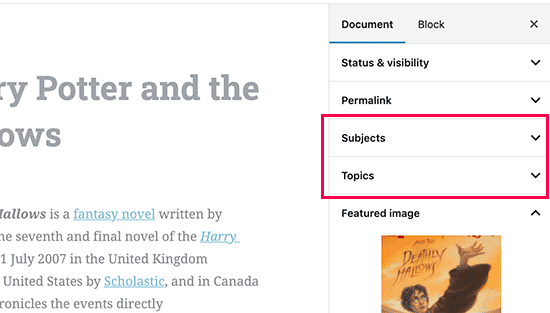
De nuevo, asegúrese de editar el código para incluir sus propias etiquetas de taxonomía personalizadas.
Visualización de taxonomías personalizadas
Ahora que hemos creado taxonomías personalizadas y hemos añadido algunos términos, su tema de WordPress seguirá sin mostrarlos.
Para mostrarlos, tendrá que añadir algún código a su tema de WordPress o tema hijo.
Este código deberá añadirse a los archivos de plantilla en los que desee mostrar los términos.
Puedes añadir manualmente este fragmento de código a los archivos de tu tema, como single.php, content.php, archive.php o index.php. Para saber qué archivo debes editar, consulta nuestra guía sobre la jerarquía de plantillas de WordPress.
Sin embargo, eso puede romper su sitio si no se hace correctamente, por lo que una vez más recomendamos utilizar el plugin gratuito WPCode.
Tendrás que añadir el siguiente código donde quieras que aparezcan los términos.
<?php the_terms( $post->ID, 'topics', 'Topics: ', ', ', ' ' ); ?>
Siga los pasos anteriores para pegar el fragmento de código en WPCode.
Pero en Inserción, debe hacer clic en el menú desplegable junto a “Ubicación” y seleccionar dónde desea mostrar la taxonomía, como antes de la entrada, después de ella, o incluso entre párrafos.
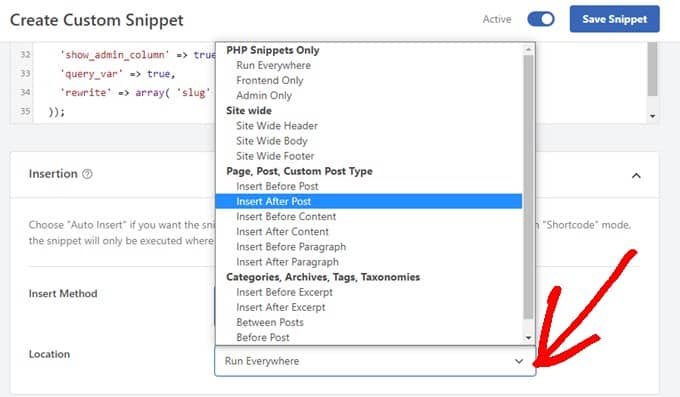
Para este tutorial, seleccionaremos ‘Insertar después de la entrada’.
En la siguiente imagen puede ver cómo aparecerá en su sitio activo.

Añadir taxonomías para entradas personalizadas
Ahora que ya sabe cómo crear taxonomías personalizadas, pongámoslas en práctica con un ejemplo.
Vamos a crear una taxonomía y llamarla No ficción.
Como tenemos un tipo de contenido personalizado llamado “Libros”, es similar a cómo se crea una entrada de blog normal.
En su escritorio de WordPress, vaya a Libros ” Temas para añadir un término o tema.
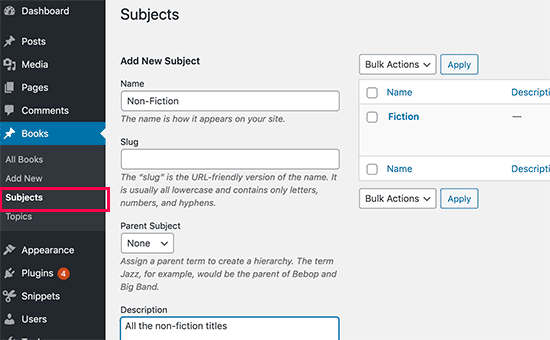
En esta pantalla, verás 4 áreas:
- Nombre
- Babosa
- Padres
- Descripción
En el nombre, escribirás el término que quieres añadir. Puede omitir la parte del slug y proporcionar una descripción para este término en particular (opcional).
Por último, haga clic en el botón “Añadir nuevo tema” para crear su nueva taxonomía.
El término recién añadido aparecerá en la columna de la derecha.
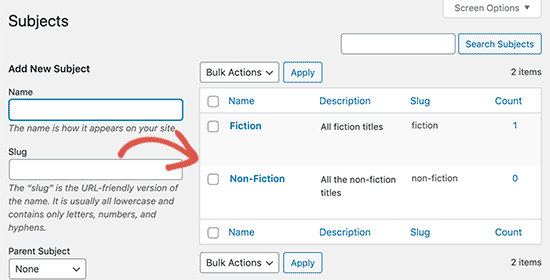
Ahora ya tienes un nuevo término que puedes utilizar en las entradas de tu blog.
También puede añadir términos directamente mientras edita o escribe contenido bajo ese tipo de entrada en particular.
Sólo tienes que ir a la página Libros ” Añadir nuevo para crear una entrada. En el editor de entradas, encontrará la opción de seleccionar o crear nuevos términos en la columna de la derecha.

Después de añadir los términos, puede seguir adelante y publicar ese contenido.
Todas sus entradas archivadas bajo ese término serán accesibles en su sitio web en su propia URL. Por ejemplo, las entradas archivadas bajo el tema Ficción aparecerían en la siguiente URL:
https://example.com/subject/fiction/

Añadir taxonomías personalizadas al menú de navegación
Ahora que ha creado taxonomías personalizadas, es posible que desee mostrarlas en el menú de navegación de su sitio web.
Vaya a Apariencia ” Menús y seleccione los términos que desea añadir en la pestaña de taxonomía personalizada que aparece a la izquierda de la pantalla.
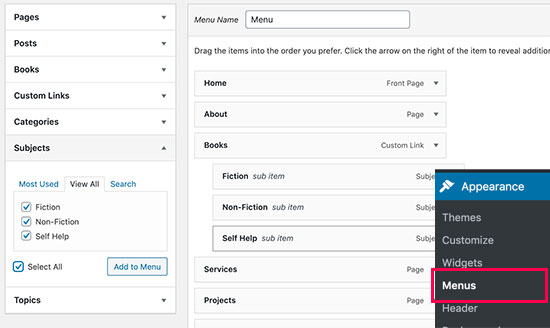
No olvides hacer clic en el botón “Guardar menú” para guardar tus ajustes.
Ahora puede visitar su sitio web para ver su menú en acción.

Para más detalles, consulte nuestra guía paso a paso sobre cómo crear un menú desplegable en WordPress.
Profundizar en las taxonomías de WordPress
Hay un montón de cosas que puedes hacer con las taxonomías personalizadas. Por ejemplo, puedes mostrarlas en un widget de la barra lateral o añadir iconos de imagen para cada término.
También puede añadir activar el feed RSS para taxonomías personalizadas en WordPress y permitir que los usuarios se suscriban a términos individuales. De este modo, sus lectores solo recibirán actualizaciones acerca del contenido específico que les interese.
Si quieres personalizar la estructura / disposición / diseño / plantilla de tus páginas de taxonomía personalizadas, entonces puedes comprobar SeedProd. Es un editor de arrastrar y soltar página de WordPress y constructor tema que le permite crear disposiciones personalizadas sin ningún código.
Esperamos que este artículo te haya ayudado a aprender cómo crear taxonomías personalizadas en WordPress. Puede que también quieras ver nuestra guía sobre cómo hacer un seguimiento de los visitantes de un sitio web y cómo crear un tema de WordPress personalizado sin escribir ningún código.
If you liked this article, then please subscribe to our YouTube Channel for WordPress video tutorials. You can also find us on Twitter and Facebook.


Syed Balkhi says
Hey WPBeginner readers,
Did you know you can win exciting prizes by commenting on WPBeginner?
Every month, our top blog commenters will win HUGE rewards, including premium WordPress plugin licenses and cash prizes.
You can get more details about the contest from here.
Start sharing your thoughts below to stand a chance to win!
Jiří Vaněk says
Thank you for the clear instructions. I would like to make my own taxonomy for tutorials on the site. This tutorial is great and clear, thanks.
WPBeginner Support says
Glad it was helpful
Administrador
Kira says
Hello.
I don’t understand this part:
ID, ‘topics’, ‘Topics: ‘, ‘, ‘, ‘ ‘ ); ?>
I mean, should I paste exactly that part into my loop-single.php?
I’m using a taxonomy called “writer”
WPBeginner Support says
It would depend on where you want to display the terms, normally it would be added to the single.php.
Administrador
Wolfgang says
Hi,
I used your article to create a CPT with a hierarchical and a non-hierarchical taxonomy attached to it. I created a few entries and it all seems to be working fine. Both taxonomies display fine in their respective archive pages. One thing I noticed though when I tried to add the taxonomies to the menu was that the non-hierarchical taxonomy was available in the “Add menu item” column but the hierarchical taxonomy was NOT.
Is that an expected behavior? If not what could be going wrong?
Thanks
WPBeginner Support says
The most common issues you could check would be that you have published content in the taxonomy and you may want to test adding a different content type to test if it is an issue with the taxonomy or something else.
Administrador
mb says
what does this line do
‘menu_name’ => __( ‘Subjects’ ),
is this in order to add taxonomies to the menu
aditya says
hii i try everything but i taxonomy not showing in product. please help me.
WPBeginner Support says
You would want to check under your preferences to ensure it is not hidden for your user.
Administrador
Gina Wilson says
This tutorial and specifically the part of how to display the custom taxonomy was a lifesaver! I’m very much a beginner and this was very helpful in understanding where I went wrong in my coding.
Thank you!!!
WPBeginner Support says
Glad our guide was helpful
Administrador
fengquanli says
this is very confident with the custom post ui, thanks very much ,it’s very useful for get them.
WPBeginner Support says
Glad our guide was helpful
Administrador
Bruno Oliveira says
Awesome tutorial! i have one question. how do i use my new taxonomy slug as permalink like category (/%category%/%year%/%monthnum%/%day%/%postname%/)
I want something like /%custom_taxonomy%/%year%/%monthnum%/%day%/%postname%/
i keep getting 404 error
WPBeginner Support says
That is not something WordPress would allow by default and would require some custom coding to set up.
Administrador
vikas says
i tried the plugin method , it sucessfully created a new category in custom post type but it is not showing on my posts like tags and other categoties. can you help me with that?
WPBeginner Support says
You would want to reach out to the support for your specific theme for customizing the display to include your taxonomy.
Administrador
Richard says
I am creating a podcast network where I have multiple podcasts on a single site with episodes under each individual podcast. Would something like this work for that? I really don’t want to go the multi site route.
WPBeginner Support says
You can certainly use this should you want or another option would be to create a custom post type depending on your preference.
Administrador
Maria says
Hello is possible add the custom taxonomies to a custom product type?
I create a custom product call drinks and i have several taxonomies like country, material and etc
I want when the user click in drinks then only apperas those taxonomies, is this posiible?
WPBeginner Support says
You should be able to using the plugin method.
Administrador
Parveen Kaushik says
Hi,
Thanks for this article, I am getting 404 page after using this code, can you help me
WPBeginner Support says
If you haven’t done so yet, resave your permalinks for the most common solution
Administrador
Mike Smith says
this code works great on my site for work. Can you tell me how to add the custom taxonomy into the site’s rss feed?
WPBeginner Support says
It would depend on what you are looking for, for a starting point you would want to take a look at our article below:
https://www.wpbeginner.com/wp-tutorials/how-to-make-a-separate-rss-feed-for-each-custom-post-type-in-wordpress/
Administrador
angela says
thank you for taking the time to post this, this was the first site that actually explained this and it made sense, haha. im a happy camper now
WPBeginner Support says
You’re welcome, glad our guide could help simplify the process
Administrador
Jem says
How to show custom taxonomy (checkbox list) in Post editor page like category and tag?
WPBeginner Support says
It would depend on which method you used to create the custom taxonomy, if you’re using the plugin you would want to reach out to the plugin’s support to make sure they have show_in_rest set to true for seeing it in the block editor.
Administrador
Jem says
No, I am not using any plugin. I have just copy paste your snippet. Its create new taxonomy. But it is not display in post editor page like category, tags display on rightside panel.
Can you please guide me how can I show custom taxonomy in post editor page?
WPBeginner Support says
In the register_taxonomy array, you would want to first try adding a new line with the code below:
‘show_in_rest’ => true,
Jim Gersetich says
The first half of this post is completely useless. the Simple Taxonomy plugin doesn’t work with the current WordPress version, and it hasn’t been updated in four years.
Please try to find another plugin and change that section to go with the new one.
WPBeginner Support says
Thank you for letting us know, we’ll certainly take a look at updating this article.
Administrador
joe barrett says
Don’t forget to add ‘show_in_rest’ => true,
if you want to use your custom items in rest api to $args
WPBeginner Support says
Thanks for sharing this for those wanting to add this functionality.
Administrador
Michael Morad-McCoy says
I tried putting this in a site-specfic plug-in and get the following in a box at the top:
y() expects parameter 1 to be a valid callback, function ‘create_topics_hierarchical_taxonomy’ not found or invalid function name in /home2/kaibabpr/public_html/wp-includes/class-wp-hook.php on line 286
Warning: Cannot modify header information – headers already sent by (output started at /home2/kaibabpr/public_html/wp-includes/class-wp-hook.php:286) in /home2/kaibabpr/public_html/wp-admin/includes/misc.php on line 1198
as this is the first time I tried this, I’m at a loss.
WPBeginner Support says
You may want to ensure your site-specific plugin is a php file after you added the code as sometimes your operating system can try to edit the file type.
Administrador
Naji Boutros says
Do you have a different plugin to recommend?
Ajeet singh says
this is very helpful tutorial …..thnks a lot.
Suresh says
Thanks for sharing this code. I used non-hierarchy code, and admin part is working fine. I have created a separate template as well like taxonomy-[taxoName]-.php But while trying to access the URL, giving HTTP error 500. I have tried multiple things, like new cache starts, permalink re-save, new .htaccess and memory increase. even then page is not working. kindly help
Rabby says
WOW, Amazing and helpful details. I’ve created my custom taxonomy using manual rules. Thanks
Joseph Peter says
Hi,
than you for this useful information, iam new to wordpress and i wanted to know the meaning thats i landed here, it was actually helpful.
Best Regards
Joseph Peter
Cindi Gay says
I used the code for adding a tag to a custom post type. Luckily Topics is exactly the label I needed so all I needed to change was post to lesson (I am modifying the LifterLMS lesson post type).
Now I want to display the tags. I tried using the default WordPress Tag Cloud but it does not change to the newly added tag. It continues to show all my post tags even when I choose Topics
Is there a step I am missing? How do I display the new tag: Topics?
Ero says
Taxonomies don’t behave exactly like default posts’ categories. They don’t appear in the URL (especially for nested taxonomies). Is there any way to set a custom taxonomy associated to a custom post type to behave like posts’ categories ?
Rangan Roy says
I have used this code in my gallery custom post type for category support. It shows the name of the category but when i click on the category name it shows 404:error not found. Please help me to solve it. I want the category posts to show on my archive.php page.
Utshab Roy says
I got this same problem that you are facing. The way I solved it is very easy. Go to your permalink settings and click the save button. Refresh the page. This simple step will save the issue.
Carol says
This worked! Thank you so much.
Russell says
Hi, I created custom meta box with new category. I can also show it to the post page. But when I click to the newly created category item it gives a 404 page. I wan it to work like tags, default category or author. So that If I click it shows all the post under that category.
Olivier says
Hello,
I am new to WordPress and coding in general. This tutorial is very well explained, thank you.
However I don’t understand how to display the terms of my taxonomy on my pages.
Where do I have to go to “Add this single line of code in your single.php file within the loop” ?
Thank you for your help
Best,
Olivier
Azamat says
Thank you so much for this great tutorial!
I created custom taxanomy on my website dedicated to books and now I’m able to filter books by authors!
James Angel says
The trouble with some plugins is that they may not be compatible with all themes. I have found that it pays to have a qualified developer do his/her part and test and troubleshoot any Web site alteration after adding a plugin or updating WordPress to a newer version to ensure everything works as it should.
paul says
Man you are a legend,
i struggled 3 days to get this, which i found in many websites, but not as clear as this.
Thanks!
WPBeginner Support says
Hey Paul, glad you found it helpful. Don’t forget to follow us on Facebook for more WordPress tips and tutorials.
Administrador
Rangan Roy says
I have used this code in my gallery custom post type for category support. It shows the name of the category but when i click on the category name it shows 404.php page. Please help me to solve it. I want the category posts to show on my archive.php page.
Ayla says
I’ve created a custom post type and a taxonomy to go with it, but when I create a custom post and add tags to it they don’t show up like normal tags do on normal posts. How do I get them to display at the bottom of the post like normal so people can click on them and find more like it?
Thank you!
-Ayla
WPBeginner Support says
You will need to create a new template to display your custom post type and edit that template to show your custom taxonomy.
Administrador
Giulia says
Hi everybody! First of all thank you for this article!
I’ve found that “Simple Taxonomies” plugin is kind of out of date, since it hasn’t been updated since 2 years…. do you have any other plugin to suggest to create custom taxonomies?
thanks
Giulia
Mario says
I’m not the author of this post, but I use “Custom Post Type UI” to create custom taxonomies. With 300k installs, I’m pretty sure this plugin is as close as you can get to industry standard.
Hope this helps!
Ryan Hall says
Amazing. thank you!
Ryan says
How do you disassociate the posts with the “regular” categories?
WPBeginner Support says
Please see our guide on how to merge and bulk edit categories and tags in WordPress.
Administrador
Sunny says
Hello,
The description is not prominent by default; however, some themes may show it. But still show on front.
How to hide taxonomy description from front ?
I want to add description on taxonomy but i don’t want they show on front .
Please tell me about what i can do.
Thank You
ajax says
How do one automate the population of the taxonomy value with the value in a custom field.
Charles Hall says
The article is OK, but the video is very poor. The sound quality is bad, she talks way too fast, obvious things are elaborated on but the explanation of what you’re doing and why is missing, as is the other content in the lower portion of the article.
Jennifer says
I am working on a WordPress website. I created categories using a plugin called “Categories Images”. One of the categories is named “Videos” so there is one folder/category that is supposed to show videos but images. The problem is, because the plugin is designed to upload images only, the YouTube videos do not show up. How can I edit the PHP files (create a custom taxonomy, edit single.php, edit taxonomy-{taxonomy-slug}.php, etc.) so that the post can show and play YouTube videos??
Jamie Wallace says
If you want more control over how things are pulled from the backend to the frontend look into using the Advanced Custom Fields plugin. This is a plugin for developers (so some code is involved) but its very powerful for things like what you ask
Muhammad says
Hi I have followed the manual way of creating custom taxonomy and i just used Ads/Ad instead of Topics/Topic . But i don’t see any custom taxonomy in post editor though i checked the custom taxonomy form Screen Options.
though the custom taxonomy(Ads) is showing in admin submenu under Posts.
Muhammad says
Here is my code snipped in functions.php file
_x( ‘Ads’, ‘taxonomy general name’ ),
‘singular_name’ => _x( ‘Ad’, ‘taxonomy singular name’ ),
‘search_items’ => __( ‘Search Ads’ ),
‘all_items’ => __( ‘All Ads’ ),
‘parent_item’ => __( ‘Parent Ad’ ),
‘parent_item_colon’ => __( ‘Parent Ad:’ ),
‘edit_item’ => __( ‘Edit Ad’ ),
‘update_item’ => __( ‘Update Ad’ ),
‘add_new_item’ => __( ‘Add New Ad’ ),
‘new_item_name’ => __( ‘New Ad Name’ ),
‘menu_name’ => __( ‘Ads’ ),
);
// Now register the taxonomy
register_taxonomy(‘ads’,array(‘post’), array(
‘hierarchical’ => true,
‘labels’ => $labels,
‘show_ui’ => true,
‘show_admin_column’ => true,
‘query_var’ => true,
‘rewrite’ => array( ‘slug’ => ‘ad’ ),
));
}
?>
Robert Herold says
How to show the number of posts on taxonomy-{taxonomy-slug}.php?
Robert Herold says
How can I display my custom taxonomies list like the category list
WPBeginner Support says
Please see our guide How to display custom taxonomy terms in WordPress sidebar widgets.
Administrador
Robert Herold says
Wow! Thanx! Superb!!!!!! :))
Abdul Rauf Bhatti says
Hy Dear WPBEGINNER SUPPORT,
I have learned many things in this tutorial next time will you please elaborate functions parameter which you have used some time i got in trouble or confused with parameters.
Thanks a lot Nice tutorial 5 rating
WPBeginner Support says
Thanks for the feedback, we will try to improve our code explanation in the future.
Administrador
lee says
Is there a way to get multiple custom taxonomy to use the same slug or same url? Please show us how if you or anyone knows.
pdepmcp says
It may sound obvious, but…remember to refresh the permalink cache or you can waste some hours trying to figure out why archive pages don’t work…
Ilya says
Thank you very much!!!
I wasted hours in debug mode, but cannot determine why my permalink redirects to 404 page! But after flushing “permalink cache” all works fine.
Thank you again!
winson says
Hello.
How can I get a different Posts Link? I mean I want to get 2 different links after I published a New Post.
E.G:
Category Name – > Facebook (theme template A)
Topic Name – > Twitter (theme template B)
Then I submit a post to these 2 Categories. I want get 1 link for “Facebook” and 1 Link for “Twitter”.
Best Regards
foolish coder says
how to create single pages / templates for taxonomies?
I mean like single.php not like category.php
Alex says
Try taxonomy.php ()
WPBeginner Staff says
Yes, you can do that.
fatima says
what if we want to create more than 2 taxonomies, categories style (hierarchy true)
Aalaap Ghag says
I’m building a site which has multiple item thumbnails, each of which leads to a page with multiple images for that item (i.e. product). Are taxonomies the way to go or should I be looking at something else?