¿Quieres cambiar el estilo del formulario de comentarios de WordPress en tu sitio web? En WPBeginner llevamos años experimentando con diferentes formas de aumentar la participación de los usuarios, y hemos descubierto que un formulario de comentarios atractivo y fácil de usar puede marcar una gran diferencia.
Los comentarios desempeñan un perfil importante en la participación de los usuarios en un sitio web. Si los usuarios pueden dejar comentarios de forma fácil y visualmente atractiva, se fomenta el debate y la interacción en el sitio web.
En este artículo, le mostraremos cómo diseñar fácilmente el formulario de comentarios de WordPress para aumentar la participación en su sitio web.

Antes de empezar
Los temas de WordPress controlan la apariencia de su sitio web. Cada tema de WordPress viene con varios archivos, incluyendo archivos de plantilla, archivo de funciones, JavaScripts y hojas de estilos.
Las hojas de estilos contienen las reglas CSS para todos los elementos usados por tu tema de WordPress. Puedes añadir tu propio CSS personalizado para anular las reglas de estilo de tu tema.
Si no lo ha hecho antes, consulte nuestro artículo sobre cómo añadir CSS personalizado en WordPress para principiantes.
Aparte de CSS, puede que también necesites añadir algunas funciones para modificar la apariencia por defecto de tu formulario de comentarios de WordPress. Si no lo has hecho antes, consulta nuestro artículo sobre cómo copiar y pegar código en WordPress.
Dicho esto, veamos cómo dar estilo al formulario de comentarios de WordPress.
Dado que se trata de una guía bastante completa, hemos creado una tabla de contenidos para facilitar la navegación:
- Styling WordPress Comment Form Using SeedProd Theme Builder
- Change WordPress Comments with Default CSS Classes
- Adding Social Login to WordPress Comments
- Adding Comment Policy Text in WordPress Comment Form
- Move Comment Text Field to Bottom
- Remove Website (URL) Field from WordPress Comment Form
- Add a Subscribe to Comments Checkbox in WordPress
- Add Custom Fields to WordPress Comment Form
Estilo de WordPress Formulario de comentarios utilizando SeedProd Theme Builder
Este método requiere SeedProd que es la mejor página de WordPress y tema constructor plugin en el mercado.
Se recomienda para principiantes sin experiencia en código. Sin embargo, la desventaja de este método es que reemplazará su tema de WordPress existente con un tema personalizado.
Primero, necesitas instalar y activar el plugin SeedProd. Para más detalles, consulte nuestra guía paso a paso sobre cómo instalar un plugin de WordPress.
Nota: Necesitarás al menos el plan PRO para acceder a la característica de maquetador de temas.
Una vez activado, tendrá que crear plantillas para su tema personalizado de WordPress. SeedProd le permite generar fácilmente estas plantillas utilizando uno de sus temas incorporados.
Para obtener instrucciones detalladas, consulte nuestro tutorial sobre cómo crear un tema de WordPress personalizado sin código.
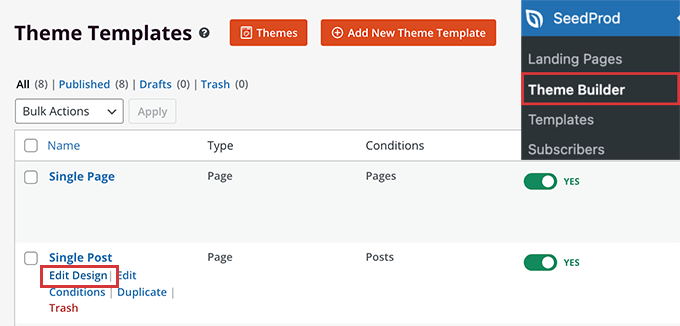
Una vez que haya generado sus plantillas de temas, deberá enlazar el enlace “Editar diseño” bajo la plantilla de entrada única.
Esto cargará la vista previa de una sola entrada en la interfaz del maquetador de temas de SeedProd. Usted notará el bloque de formulario de comentarios en la parte inferior de la vista previa.
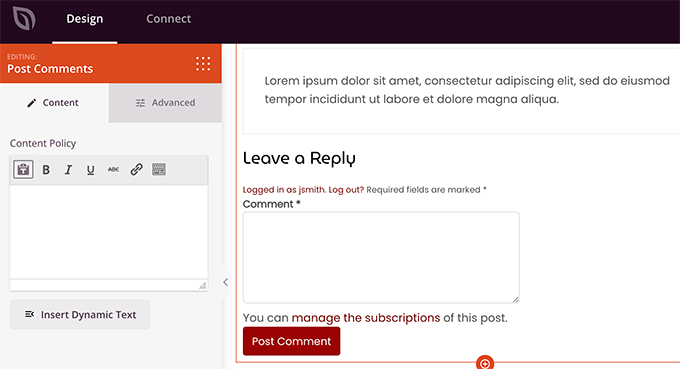
Simplemente haga clic en el formulario de comentarios y verá sus propiedades en el panel izquierdo.
Desde aquí, puedes añadir una nota de comentario o una política de privacidad, también puedes cambiar a la pestaña “Avanzado” para editar el estilo del formulario de comentarios sin escribir ningún código CSS.
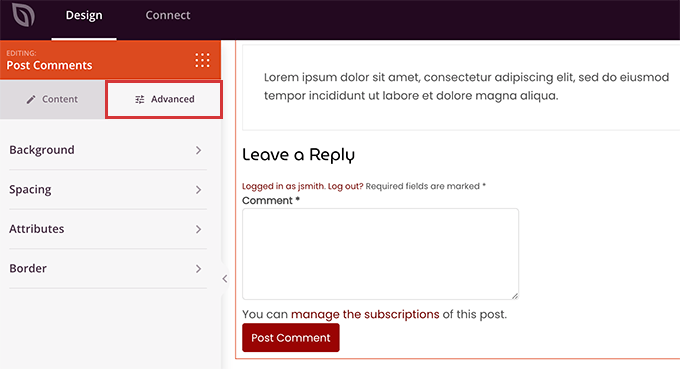
Cuando hayas terminado, no olvides hacer clic en el botón “Guardar” para publicar los cambios.
SeedProd hace que sea super fácil cambiar el estilo de cualquier elemento en su sitio web sin escribir código.
Sin embargo, es un maquetador de temas y puede que ya estés usando un tema de WordPress que te guste. En ese caso, los siguientes consejos te ayudarán a cambiar manualmente los estilos de los formularios de comentarios en WordPress.
Cambiar el estilo del formulario de comentarios en WordPress
Dentro de la mayoría de los temas de WordPress hay una plantilla llamada comments.php. Este archivo se utiliza para mostrar comentarios y formularios de comentarios en las entradas de su blog. El formulario de comentarios de WordPress se genera utilizando la función: <?php comment_form(); ?>.
Por defecto, esta función genera su formulario de comentarios con tres campos de texto (Nombre, correo electrónico y sitio web), un campo de área de texto para el texto del comentario, una casilla de verificación para el cumplimiento del RGPD y el botón de envío.
Puede modificar fácilmente cada uno de estos campos simplemente retocando las clases CSS por defecto. A continuación se muestra una lista de las clases CSS por defecto que WordPress añade a cada formulario de comentarios.
#respond { }
#reply-title { }
#cancel-comment-reply-link { }
#commentform { }
#author { }
#email { }
#url { }
#comment
#submit
.comment-notes { }
.required { }
.comment-form-author { }
.comment-form-email { }
.comment-form-url { }
.comment-form-comment { }
.comment-form-cookies-consent { }
.form-allowed-tags { }
.form-submit
Simplemente retocando estas clases CSS, puedes cambiar completamente el aspecto de tu formulario de comentarios de WordPress.
Vamos a intentar cambiar algunas cosas para que te hagas una idea de cómo funciona.
En primer lugar, empezaremos resaltando el campo activo del formulario. Resaltar el campo activo hace que el formulario sea más accesible para las personas con necesidades especiales, y también hace que el formulario de comentarios se vea mejor en los dispositivos más pequeños.
#respond {
background: #fbfbfb;
padding:0 10px 0 10px;
}

/* Highlight active form field */

#respond input[type=text], textarea {
  -webkit-transition: all 0.30s ease-in-out;
  -moz-transition: all 0.30s ease-in-out;
  -ms-transition: all 0.30s ease-in-out;
  -o-transition: all 0.30s ease-in-out;
  outline: none;
  padding: 3px 0px 3px 3px;
  margin: 5px 1px 3px 0px;
  border: 1px solid #DDDDDD;
}

#respond input[type=text]:focus,
input[type=email]:focus,
input[type=url]:focus,
textarea:focus {
box-shadow: 0 0 5px rgba(81, 203, 238, 1);
margin: 5px 1px 3px 0px;
border: 2px solid rgba(81, 203, 238, 1);
}
Este es el aspecto de nuestro formulario en el tema Twenty Sixteen de WordPress después de los cambios:
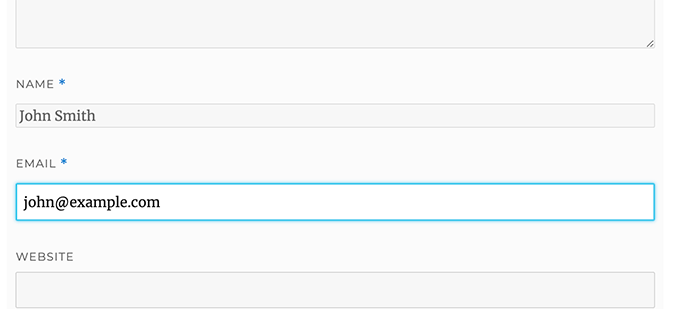
Usando estas clases, puedes cambiar el comportamiento de cómo aparece el texto dentro de los cuadros de entrada. Vamos a seguir adelante y cambiar el estilo de texto del nombre del autor y los campos URL.
#author, #email {
font-family: "Open Sans", "Droid Sans", Arial;
font-style:italic;
color:#1d1d1d;
letter-spacing:.1em;
}

#url  {
color: #1d1d1d;
font-family: "Luicida Console", "Courier New", "Courier", monospace;
}
Si se fija bien en la captura de pantalla siguiente, el nombre y la fuente del campo de correo electrónico son diferentes de la URL del sitio web.
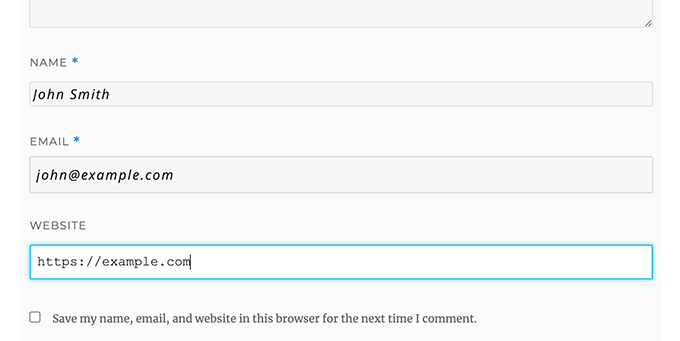
También puedes cambiar el estilo del botón de envío del formulario de comentarios de WordPress. En lugar de utilizar el botón de envío por defecto, vamos a darle un poco de gradiente CSS3 y box-shadow.
#submit {
background:-moz-linear-gradient(top, #44c767 5%, #5cbf2a 100%);
background:-webkit-linear-gradient(top, #44c767 5%, #5cbf2a 100%);
background:-o-linear-gradient(top, #44c767 5%, #5cbf2a 100%);
background:-ms-linear-gradient(top, #44c767 5%, #5cbf2a 100%);
background:linear-gradient(to bottom, #44c767 5%, #5cbf2a 100%);
background-color:#44c767;
-moz-border-radius:28px;
-webkit-border-radius:28px;
border-radius:28px;
border:1px solid #18ab29;
display:inline-block;
cursor:pointer;
color:#ffffff;
font-family:Arial;
font-size:17px;
padding:16px 31px;
text-decoration:none;
text-shadow:0px 1px 0px #2f6627;
}

#submit:hover {
background:-webkit-gradient(linear, left top, left bottom, color-stop(0.05, #5cbf2a), color-stop(1, #44c767));
background:-moz-linear-gradient(top, #5cbf2a 5%, #44c767 100%);
background:-webkit-linear-gradient(top, #5cbf2a 5%, #44c767 100%);
background:-o-linear-gradient(top, #5cbf2a 5%, #44c767 100%);
background:-ms-linear-gradient(top, #5cbf2a 5%, #44c767 100%);
background:linear-gradient(to bottom, #5cbf2a 5%, #44c767 100%);
background-color:#5cbf2a;
}
#submit:active {
position:relative;
top:1px;
}
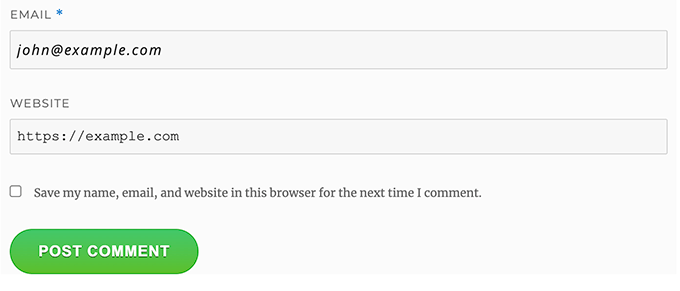
Llevar los formularios de comentarios de WordPress al siguiente nivel
Quizá pienses que es demasiado básico. Bueno, tenemos que empezar por ahí para que todo el mundo pueda seguirnos.
Sin embargo, puedes llevar tu formulario de comentarios de WordPress al siguiente nivel reorganizando los campos del formulario, añadiendo acceso / acceso social, suscripciones a comentarios, directrices para comentarios, etiquetas rápidas y mucho más.
Añadir Social Login a los comentarios de WordPress
Empecemos por añadir accesos / accesos sociales a los comentarios de WordPress.
Lo primero que tienes que hacer es instalar y activar el plugin Super Socializer. Para más detalles, consulte nuestra guía paso a paso sobre cómo instalar un plugin de WordPress.
Una vez activado, debe visitar Super Socializer ” Social Login y, a continuación, marcar / comprobar la casilla “Activar Social Login”.

Aparecerá el panel de opciones de acceso social. En primer lugar, haga clic en la pestaña “Configuración avanzada”.
A continuación, compruebe que la casilla “Activar en el formulario de comentarios” está marcada.
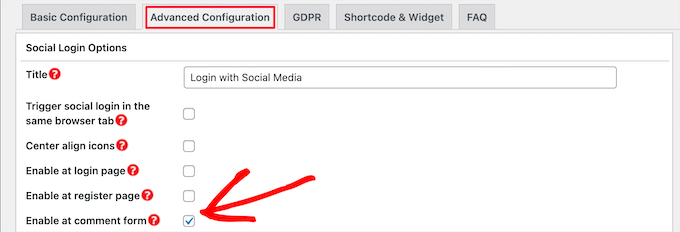
A continuación, haz clic en la pestaña “Configuración básica”. Aquí puede elegir las redes sociales que desea añadir marcando las casillas de la sección “Seleccionar redes sociales”.

Debajo de esto, el plugin requerirá claves API para conectarse con las plataformas sociales. Basta con hacer clic en el icono con el signo de interrogación para que aparezcan las instrucciones sobre cómo obtenerlas para cada plataforma.

Una vez que haya terminado, haga clic en el botón “Guardar cambios” para guardar los ajustes de acceso / acceso social.
Ahora puedes visitar tu sitio web para ver los botones de acceso social encima de tu formulario de comentarios.

Añadir texto de política de comentarios antes o después del formulario de comentarios
Nos encantan todos nuestros usuarios y apreciamos mucho que se tomen unos minutos para dejar un comentario en nuestro sitio. Sin embargo, para crear un entorno de debate saludable es importante moderar los comentarios.
Para tener total transparencia, hemos creado una página de política de comentarios, pero no basta con enlazarla en el pie de página.
Queríamos que nuestra política de comentarios fuera destacada y visible para todos los usuarios que dejaran un comentario. Por eso decidimos añadir la política de comentarios en nuestro formulario de comentarios de WordPress.
Si quieres añadir una página de política de comentarios, lo primero que tienes que hacer es crear una página en WordPress y definir tu política de comentarios (puedes robar la nuestra y modificarla para adaptarla a tus necesidades).
A continuación, puede añadir el siguiente código en el archivo functions. php de su tema o en un plugin de fragmentos de código.
function wpbeginner_comment_text_before($arg) {
    $arg['comment_notes_before'] .= '<p class="comment-policy"">We are glad you have chosen to leave a comment. Please keep in mind that comments are moderated according to our <a href="http://www.example.com/comment-policy-page/">comment policy</a>.</p>';
    return $arg;
}

add_filter('comment_form_defaults', 'wpbeginner_comment_text_before');
El código anterior reemplazará el formulario de comentarios por defecto antes de las notas con este texto. También hemos añadido una clase CSS en el código, para que podamos resaltar el aviso usando CSS. Aquí está el ejemplo de CSS que hemos utilizado:
p.comment-policy {
    border: 1px solid #ffd499;
    background-color: #fff4e5;
    border-radius: 5px;
    padding: 10px;
    margin: 10px 0px 10px 0px;
    font-size: small;
    font-style: italic;
}
Así se ve en nuestro sitio de prueba:
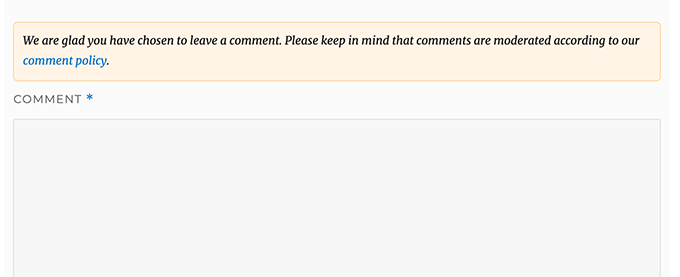
Si desea enlazar con la zona de texto del comentario, utilice el siguiente código.
function wpbeginner_comment_text_after($arg) {
    $arg['comment_notes_after'] .= '<p class="comment-policy"">We are glad you have chosen to leave a comment. Please keep in mind that comments are moderated according to our <a href="http://www.example.com/comment-policy-page/">comment policy</a>.</p>';
    return $arg;
}

add_filter('comment_form_defaults', 'wpbeginner_comment_text_after');
No olvides cambiar la URL en consecuencia, para que vaya a tu página de política de comentarios en lugar de a example.com.
Mover el campo de texto de comentario a la parte inferior
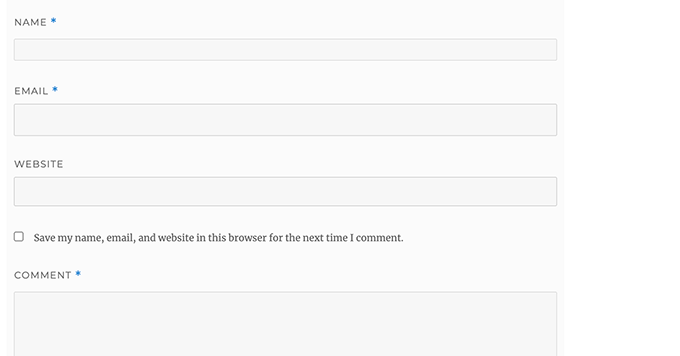
Por defecto, el formulario de comentarios de WordPress muestra primero el área de texto del comentario y después los campos de nombre, correo electrónico y sitio web. Este cambio se introdujo en WordPress 4.4.
Antes, los sitios web de WordPress mostraban primero los campos de nombre, correo electrónico y sitio web, y después el cuadro de texto del comentario. Pensamos que nuestros usuarios están acostumbrados a ver el formulario de comentarios en ese orden, por lo que seguimos utilizando el antiguo orden de los campos en WPBeginner.
Si quieres hacerlo, todo lo que tienes que hacer es añadir el siguiente código al archivo functions. php de tu tema o a un plugin de fragmentos de código.
function wpb_move_comment_field_to_bottom( $fields ) {
$comment_field = $fields['comment'];
unset( $fields['comment'] );
$fields['comment'] = $comment_field;
return $fields;
}

add_filter( 'comment_form_fields', 'wpb_move_comment_field_to_bottom');
Siempre recomendamos añadir código en WordPress usando un plugin de fragmentos de código como WPCode. Esto hace que sea fácil de añadir código personalizado sin necesidad de editar el archivo functions.php, por lo que no tiene que preocuparse acerca de romper su sitio.
Para empezar, necesitas instalar y activar el plugin gratuito WPCode. Para obtener instrucciones, consulte esta guía sobre cómo instalar un plugin de WordPress.
Una vez activado, vaya a Fragmentos de código ” + Añadir fragmento desde el escritorio de WordPress.
Desde allí, busque la opción “Añadir su código personalizado (nuevo fragmento)” y haga clic en el botón “Usar fragmento” situado debajo.

A continuación, añada un título para su fragmento de código en la parte superior de la página, puede ser cualquier cosa que le ayude a recordar para qué es el código.
A continuación, pegue el código anterior en el cuadro “Vista previa del código” y seleccione “Fragmento de código PHP” como tipo de código en la lista desplegable de la derecha.
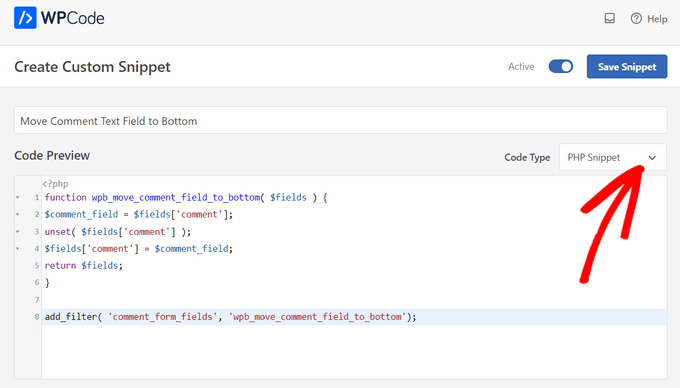
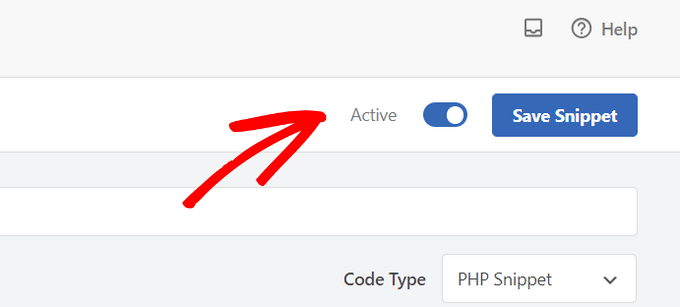
Después, basta con cambiar el conmutador de “Inactivo” a “Activo” y hacer clic en el botón “Guardar fragmento de código”.
Este código simplemente mueve el campo del área de texto de comentarios a la parte inferior.
Quitar Sitio web (URL) Campo de WordPress Formulario de comentarios
El campo del sitio web en el formulario de comentarios atrae a muchos spammers. Aunque quitarlo no detendrá a los spammers ni reducirá el spam en los comentarios, sin duda te guardará de aprobar accidentalmente un comentario con un mal enlazado al sitio web del autor.
También reducirá un campo del formulario de comentarios, haciéndolo más sencillo y fácil de usar. Para más información sobre este debate, consulte nuestro artículo sobre la eliminación del campo URL del sitio web del formulario de comentarios de WordPress.
Para eliminar el campo URL del formulario de comentarios, simplemente añade el siguiente código a tu archivo functions. php o a un plugin de fragmentos de código.
function wpbeginner_remove_comment_url($arg) {
    $arg['url'] = '';
    return $arg;
}
add_filter('comment_form_default_fields', 'wpbeginner_remove_comment_url');
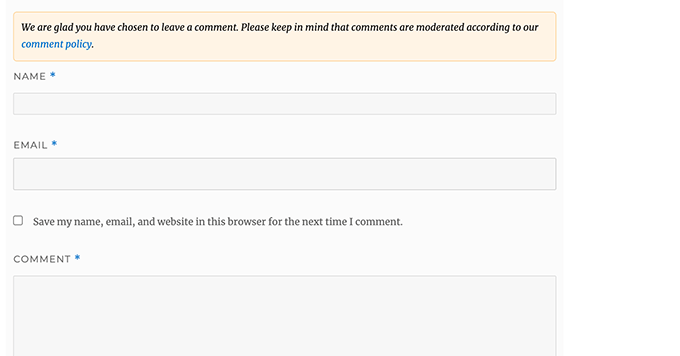
Puede seguir los mismos pasos de la sección anterior para añadir este código de forma segura en WordPress utilizando el plugin WPCode.
Añadir una casilla de verificación para suscribirse a los comentarios en WordPress
Cuando los usuarios dejan un comentario en su sitio web, es posible que quieran seguir ese hilo para ver si alguien ha respondido a su comentario. Si añade una casilla de verificación de suscripción a comentarios, activará la recepción de avisos instantáneos cada vez que aparezca un nuevo comentario en la entrada.
Para añadir esta casilla de verificación, lo primero que debe hacer es instalar y activar el plugin Subscribe to Comments Reloaded. Una vez activado, debe visitar la página StCR ” Formulario de comentarios para establecer los ajustes del plugin.

Para obtener instrucciones detalladas paso a paso, consulte nuestro artículo sobre cómo permitir que los usuarios se suscriban a los comentarios en WordPress.
Añadir campos adicionales al formulario de comentarios de WordPress
¿Quieres añadir campos adicionales a tu formulario de comentarios de WordPress? Por ejemplo, ¿un campo opcional en el que los usuarios puedan añadir su dirección de Twitter?
Simplemente instale y active el plugin WordPress Comments Fields. Una vez activado, vaya a la página “Campos de comentarios” y cambie a la pestaña “Campos de comentarios”.
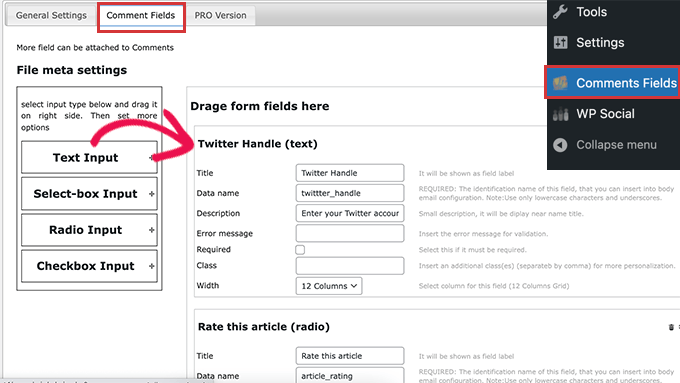
Basta con arrastrar y soltar un campo personalizado y darle un título, una descripción y un nombre de datos.
Cuando haya terminado de añadir los campos, no olvide hacer clic en el botón “Guardar todos los cambios”.
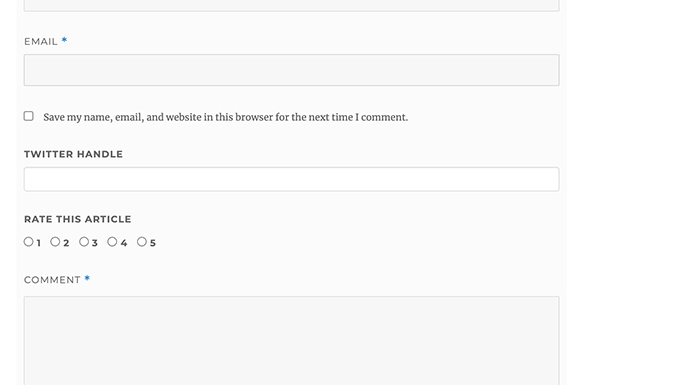
Ahora puede ver su formulario de comentarios para ver los campos personalizados en acciones.
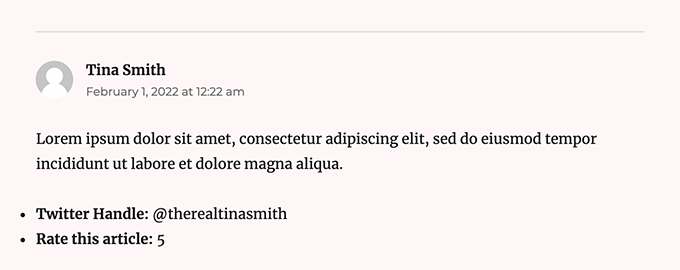
Los campos personalizados se muestran en la moderación de comentarios y debajo del contenido de los comentarios.
Para más detalles, consulte nuestro tutorial sobre cómo añadir campos personalizados al formulario de comentarios en WordPress.
Esperamos que este artículo te haya ayudado a aprender cómo dar estilo al formulario de comentarios de WordPress para hacerlo más divertido para tus usuarios. Puede que también quieras ver nuestros consejos para conseguir más comentarios en las entradas de tu blog de WordPress y nuestra selección de los mejores plugins de medios sociales para WordPress.
If you liked this article, then please subscribe to our YouTube Channel for WordPress video tutorials. You can also find us on Twitter and Facebook.


Moinuddin Waheed
I have seen many different comments section on websites and wondered why do they differed on appearance although all are using the same wordpress comments.
having a good looking comments section is necessary for making good user experience while commenting.
I have a query regarding disqus platform for wordpress comments which I have used for two years.
is it good idea to continue to use it or is there a better alternative?
also just curious to know what does wpbeginner uses for comments?
WPBeginner Support
You can find our opinion on disqus in our article below. For our comments we are currently using the built-in WordPress comment system.
https://www.wpbeginner.com/wp-tutorials/how-to-disable-disqus-on-custom-post-types-in-wordpress/
Admin
Vera Kofyan
Thank you for a great tutorial.
One thing did not work for me: moving the text area to bottom. I added the script in Code snippets, but nothing changed. Has anything changed since you wrote that?
Thank you,
Vera
WPBeginner Support
The snippet should still work correctly, the theme you are using may have added styling to the comment form that could be changing some things, if you check with the support for your specific theme they can help check and confirm this.
Admin
Arischvaran Puvanesvaran
Thank you for sharing
WPBeginner Support
You’re welcome, we hope you found our guide helpful!
Admin
Ali Kaleem
This Blog Is very imformative.
WPBeginner Support
Glad you found our site helpful!
Admin
Asutosh sahoo
really full of knowledge. please keep updating. thanks..
WPBeginner Support
Glad you found our guide helpful!
Admin
saikul
good tutorial . i like this
WPBeginner Support
Thank you, glad you liked it!
Admin
Samyak sharma
Thanks, This is very good article.
WPBeginner Support
Glad you found it helpful
Admin
Vincent Nyagaka
Thank you for guiding us on how to style WordPress form. However I have tried to use almost all the codes, on how to remove the URL field from the comment form but unfortunately, none is working code. Kindly can you give me another code to use
WPBeginner Support
If none of our recommendations were able to assist, we would recommend reaching out to the support for your specific theme and they should be able to assist with targeting their specific target for your comments.
Admin
amr
Hi
How can I delete the url from the author name and date?
Thanks
WPBeginner Support
IF you mean from your comments then you would want to take a look at our article below:
https://www.wpbeginner.com/plugins/how-to-remove-website-url-field-from-wordpress-comment-form/
Admin
lal
good tutorial, loved it
WPBeginner Support
Glad you liked our tutorial
Admin
Adam Rees
Thanks, it helped me a lot in customizing the comment section.
WPBeginner Support
You’re welcome
Admin
fred
Hi, nice tutorial ! but i have a problem to find the location of the right .php to modify the post comments, i’m using oceanwp theme with elementor pro, when i go to the functions.php or comments.php i can’t find any of the command lines, i’v tryed to add your code and nothing happens. so i guess it’s somewhere else but where ?
WPBeginner Support
If you are using a page builder you would need to reach out to that page builder’s support for how to edit the comment form and what tools are available.
Admin
Muhammad Shahzad
how to show to comment box to the top of all comments and after post.
WPBeginner Support
If your theme is not set up that way you would sadly need to modify the theme’s code to do that. As each theme’s code can be very different we do not have a specific guide on how to do that yet.
Admin
HieuBui
Thank you very much
WPBeginner Support
You’re welcome
Admin
tom
Great Article! thanks a lot
WPBeginner Support
You’re welcome
Admin
mobileninja
Thank you so much. It is very helpful article.
WPBeginner Support
Glad it could be helpful
Admin
Emma
Hi. Great tutorial. I wanted to refrain my users from adding their website url to the comment section, because it causes crashes for some users (no idea why). I succeeded, but now it still says the usual “remember my name, e-mail adres and website for the next time I leave a comment”. Do you know how to fix that?
WPBeginner Support
You may want to check with your theme’s support and let them know about the crashing and editing that message.
Admin
WPBeginner Support
Glad our guide could help
Admin
Deepak Bharti
Thanks for sharing this type of article. it is helpful for me and my website.
WPBeginner Support
Glad our article could be helpful
Admin
Rubel Ahmed
Hello
Nice article and I have used some of your suggestions but I found a code error that needs fixing under ‘Adding Comment Policy Text Before or After Comment Form’.
You have placed the add filter within the function or otherwise it won’t get executed, it needs to be moved outside of the function.
Rubel
WPBeginner Support
Both filters should be outside the function but we will certainly take another look and update if we can see the error
Admin
suvo
obviously like your web-site Post Thanks for Shearing. i Read your Blog every day.it very bothersome to tell the reality then again I’ll definitely come back again.Please write more about this topics.
WPBeginner Support
Glad you like our articles
Admin
ARPIT
The Information you’ve provided here is very good. Nice Tutorial. Thanks for sharing. I was looking for a long time for this.It’s really helping me get more familiar with WordPress!
WPBeginner Support
Hi Arpit,
We are glad you found the tutorial helpful.
Admin
Hồ Ngọc Thanh
I can’t find #respond { }
#reply-title { }
#cancel-comment-reply-link { }
#commentform { }
#author { }
#email { }
#url { }
#comment
#submit
in my wordpress theme?
WPBeginner Support
Your theme may have styled it differently, for finding what they are you would want to take a look at our article: https://www.wpbeginner.com/wp-tutorials/basics-of-inspect-element-with-your-wordpress-site/
The # would be for the ID of the object so if something had the ID of button then it would be #button
Admin
Chintan
How to add real-time comment preview?
Paulina
Hello, thank you for this very useful article. I am interested in adding a text before the button “submit”. In the code that you are providing here: would I need to change the words ‘wpbeginner’ to anything else that is connected to my own site?
Akramul Hasan
Hello Paulina,
You can add text or anything before Submit button by using a simple filter hook that works for comments form fields.
Hena
wow!! It’s very good
Woolker Cherenfant
Hi! Great article as usual. But I am wondering how can I change the word “says” in the comment section. I want to translate it into Haitian Creole “di”. Any help with that?
Thanks in advance.
—Woolker
Tisha
Is it possible to copy the code to blogger?. Because I want to make WordPress style comment in my Blogger blog. Thanks for your help.
Mate Hodi
Hey!
Great article! I was looking for a solution to change the “Leave a Reply” part. Do you have any idea how I may change it?
Neeraj
This is a helpful guide which gave thorough guidance to me about Comments Section Optimization.
Kevin Byrnes
Excellent article. I will be facing some of these issues as well..
JP
Hi
I love your tutorials! I still have a question though; is it popular to change the greyish background color of the entire comment form to some thing else? Perhaps even to an image instead of a solid color?
Mahesh
I’m Loving Your Tuts It is very Easy to Understand and More Useful any Where.
Thanks For Sharing Sir.
Lisa Marten
Can I put the comment box to be fill in above the list of posted comments instead of below?
WPBeginner Support
Yes you can.
Admin
SiRetu
Is there any complete tutorial? I mean start from scratch including creating comments.php file from the first time. Thanks, great tutorial as always
Luis Izquierdo
I am customizing my wp themes child theme and I was able to place the policy text above the comment form. But it only shows to logged out users. How do I get it to show to Logged in users?
Luca Morelli
Hello great tutorial: thanks!
I keep improving my knowledge about WordPress thanks to your lessons. I have a question (I don’t know much about php): I managed to add the comment policy text before the submit button, but I noticed that if I click “reply” and see your codes, the php output is inside the paragraph tag together with a class named “commentpolicy”. How did you achieve that (e.g. how to style the php output on an HTML webpage with a tag and a class, which can then be styled with CSS)?
Hopefully I explained it correctly and my question makes sense.
Again many thanks for all your tutorials.
Luca
WPBeginner Support
We are not sure what you are trying to ask. Can you please explain bit more? Thanks.
Admin
Jayanta
I have the same question. Trying to clarify a bit.
I have added your snippet to get the comment policy text before comment field. But This is only some text, no special div class is added for that text. So, I am not able to style it using css (I would like to make the text smaller, or may be put a border-box to it). Please guide us. Hope it makes sense now. Thank you so much.
Erick
How do you make comments look like this website?
gift charles
Thank you very much for this,i was looking for a long time for a way to make the built in comments look better because i prefer them to other services like facebook comments or disqus
Adnan Bashir
As you have noticed, the newest version of WP (4.4) is displaying Name and Email form below Text box, do you have any idea how to revert it to old style (Name and Email box above the Text box) ?
Thanks
WPBeginner Support
Please take a look at How to move comment text field to bottom in WordPress 4.4
Admin
Adnan Bashir
Thank you, now the Comment form is looking better
mario
Hello, great tutorial !
But I’d like to know one more thing: is it possible to add a checkbox for the privacy policy? Since wordpress system collect the ip, I want my users to check teh box before sending the message. Any suggestion ? Thank you !
WPBeginner Support
Please see our article on how to add custom fields to comments form in WordPress.
Admin
Ramon
I would like to have the input comments fields above the comments them self so my customers can leave a comment without the need to scroll all the way down the page.
Is there an easy way to accomplish this?
Thank you.
dragons
Is there any way to ad an EDIT button for the commenters? So they can fix typos and such? Also what if the site wants to allow commenters the ability to upload images in the comments? Is there a way to do that?
Rick Hellewell
Good tutorial. Used it to develop my own customized contact form
plugin, where I re-define the $args for the comment form fields.
But it turns out, while testing, that some themes create their own
‘textarea’ field, which adds to my ‘textarea’ field, resulting in two
comment text fields. Not good.
I have set my add_filter( ‘comment_form_default_fields’…. with a
higher priority (99) so that it happens later in the ‘page build’ (after
the theme does it’s comment_form_default_fields), but the duplicates
comment text boxes are still there. Also tried a priority of 8, and that
didn’t do it either.
So, can you think of a generic (works for any theme) that can
determine if the comment field has already been defined? And, if the
duplicate is found, remove the one in the theme, so I can replace it
with mine?
I understand that the problem is caused by bad coding practices on the theme, but would like to find a workaround.
Thanks….Rick…
Larisa Frolova
Thank you!
I’ve searched the forums and Google for this, but I’m still a little confused as to what to do. If I just want to change the LOCATION of the comment/reply link that appears on posts, how do I do that? It’s not that I want to make it invisible, or change the wording – I just want it to be at the bottom of a post, not at the top.
How do I go about doing that for the Twenty-Twelve theme?
Mikael
I like this layout!
lflier
Very helpful!
I’m really liking the Disqus comment system you’re now using. It’s slick and very inviting. I find myself leaving more comments on sites using Disqus.
But I’m discouraged from using it on my own site by the lack of integration with BuddyPress activity stream. So the more I can do to streamline the native WordPress comment system and make it as inviting as Disqus, the better. Thanks again for your tutorial.
Therese
Thank you so much for all this! It’s really helping me get more familiar with WordPress!
I’ve got the social media logins, I’ve got the border sorted, but now I am totally stuck in trying to find *where* to edit the font for the comment box’s individual boxes.
I can’t figure it out.
Can you please tell me where exactly to find that? You don’t specify this clearly enough in the tutorial.
WPBeginner Support
Please see how we changed fonts for #author and #url input fields in the article. To change font in the comment box you can use something like this:
#comment { font-family: arial, verdana, sans-serif; font-size: 16px; }1-click Use in WordPress
Admin
JG
how do I add a required checkbox people have to tick before the form gets submitted? I have tried adding the field in via adding a field under add_filter(‘comment_form_default_fields,) while the field shows the form can still be submitted without ticking the box.
Jewel
Thank you a lot…
Bhushan
I’m trying
Ann
I read through your tutorial… and was wondering if it can be applied to a WordPress site that has a Genesis Framework and Child theme. I am using the Epic Child theme by the way. Thanks for your help.
WPBeginner Support
Yes some parts of the tutorial can be directly applied to your child theme. For CSS styling you need to over ride your childtheme’s CSS.
Admin