Are you looking for the best way to gather useful feedback about your WooCommerce store from your active customers?
User surveys can help you get valuable information so you can use it to make data-driven decisions. For example, they can help you find out how to improve your sales funnel or why your customers bought a particular product.
In this article, we will show you how to easily create post-purchase surveys in WooCommerce.
Why Use Post Purchase Surveys in WooCommerce?
If you have a WooCommerce store, then you may be wondering what your customers think of your products and online store. There’s no easy way to find out without actually asking them.
Luckily, you can use a WordPress survey plugin to collect real user feedback quickly and remove the guesswork. This feedback will help you discover the ‘why’ behind every website visitor’s action. This is something you can’t learn from Google Analytics alone.
That way, you can leverage the insights gained from these curves to fix and improve website usability, product defects, shipping issues, and conversion rates. When you make improvements based on feedback, you build trust and customer loyalty.
When creating your customer survey, make sure you don’t add any unnecessary questions. The questions you ask should get you the most valuable information and insights.
Here are some examples of questions you can ask your customers after checkout:
- How long have you been a customer?
- How did you discover us?
- Was our pricing page easy to understand?
- Which of our products have you used?
- How satisfied are you with our products?
- Have you needed to contact customer service?
- Do you have any additional comments or suggestions?
- How likely are you to recommend our products to friends or family members?
By asking for user feedback after each WooCommerce purchase, you will learn ways you can improve your sales funnel to boost user experience and increase sales.
When you know the why or the intent behind users’ actions, you can easily figure out why your visitors buy or do not buy your products.
With that being said, let’s take a look at how to easily create post-purchase surveys in WooCommerce. We will cover two different methods:
Method 1: Creating Post Purchase Surveys Using UserFeedback
UserFeedback is an easy-to-use survey plugin by the MonsterInsights team. It lets you ask your website visitors questions and collect their feedback in real-time. It also makes it easy to add the survey to specific WooCommerce pages, such as the order confirmation page.
UserFeedback includes a Post Purchase Review template to give you a head start in creating your survey. Plus, you can customize how your popup surveys look so that they completely match your brand and site design.
First, you need to install and activate the UserFeedback plugin. For step-by-step instructions, you can follow our tutorial on how to install a WordPress plugin.
Note: There is a free version of UserFeedback that you can use to get started. However, you will need the features of the Pro version to create a post-purchase survey.
Setting Up the UserFeedback Plugin
Once the plugin is activated, the setup wizard will automatically launch. Click the ‘Start’ button to begin the setup.
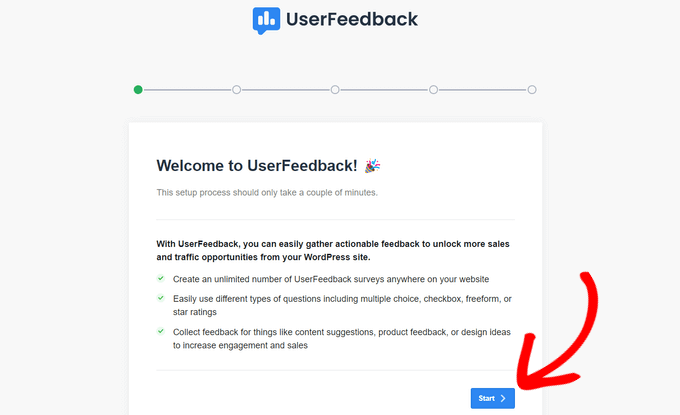
Next, you will be prompted to create your first survey to show you what the plugin is capable of.
We won’t be using this example survey, so you can go ahead and use the default answers.
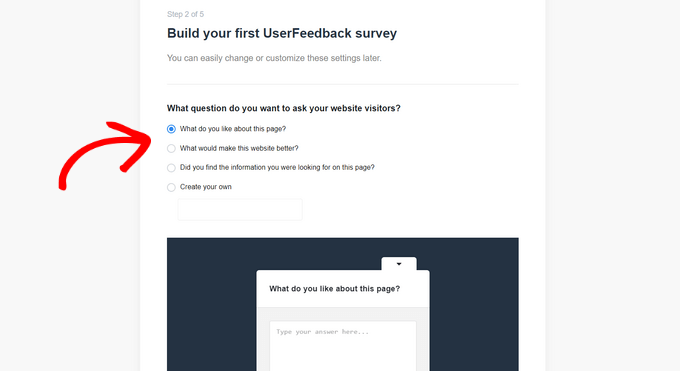
You can choose from a few pre-written questions or create your own question. You will also be able to change your questions at any time.
For this tutorial, you should simply click the ‘Next Step’ button to continue.

Next up, you will see the option to enable specific UserFeedback features, depending on your license level.
Go ahead and enable the features you want or that your license level allows.
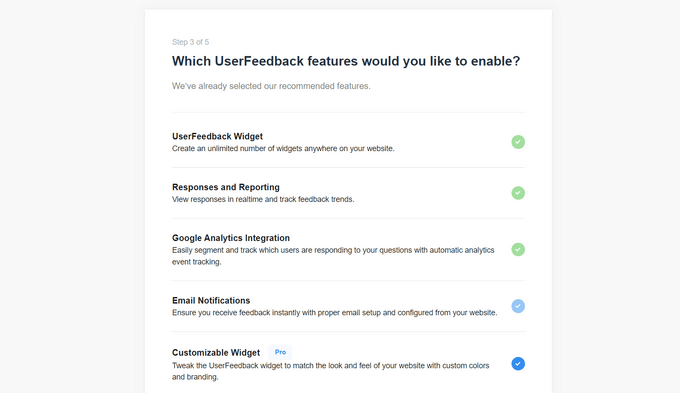
Once you have done that, you need to click the ‘Next Step’ button at the bottom of the page.
Now, you can enter the email address to which you want the survey responses to be sent.
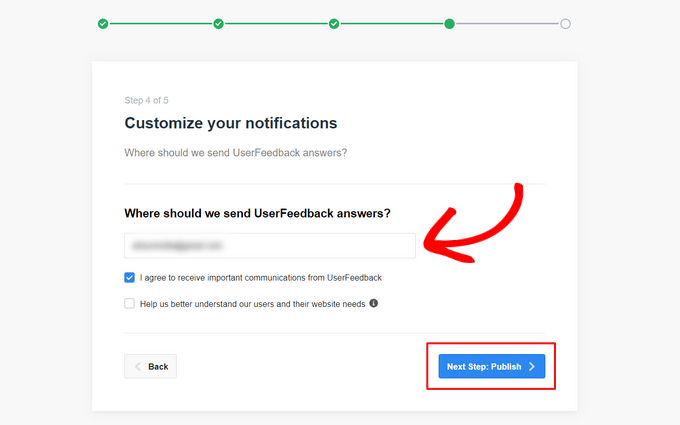
Since we won’t be using this survey, you don’t need to make any changes; you can simply click the ‘Next Step: Publish’ button.
In the final step of the setup wizard, the features and add-ons you enable will be installed.
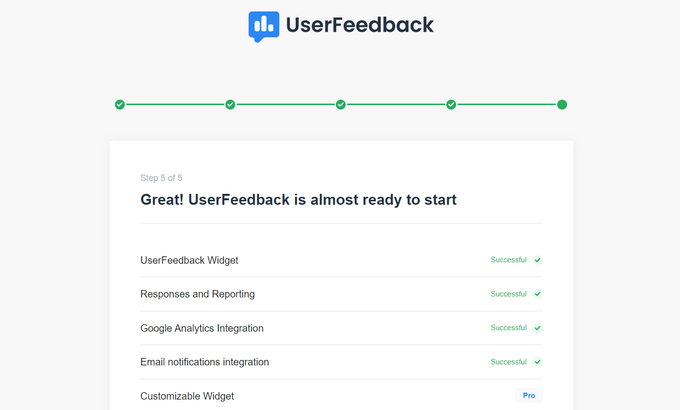
Then, you can click on the ‘Exit to dashboard’ button at the bottom of the page.
You will see the sample ‘First Survey’ that you created with the wizard.

Now, you can unlock the plugin’s Pro features. You need to enter the license key that was emailed to you when you purchased a UserFeedback plan.
You will need to navigate to UserFeedback » Settings in the WordPress admin area. Once there, simply paste your license key into the field and click the ‘Verify’ button.
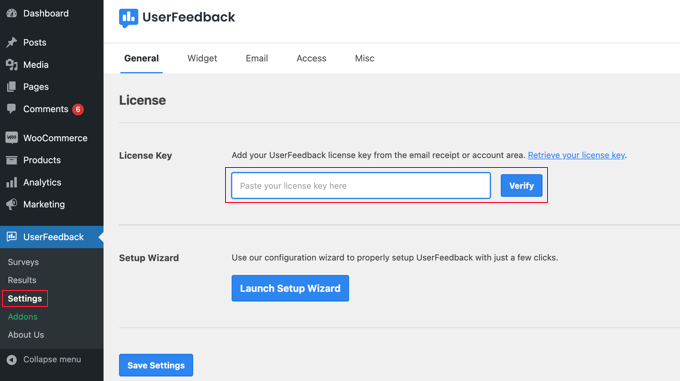
Make sure you click the ‘Save Settings’ button once you have done this.
After that, you can enable the Pro features by going to the UserFeedback » Addons page.
For each addon, you will need to click the ‘Install Addon’ button, followed by the ‘Activate’ button that appears.
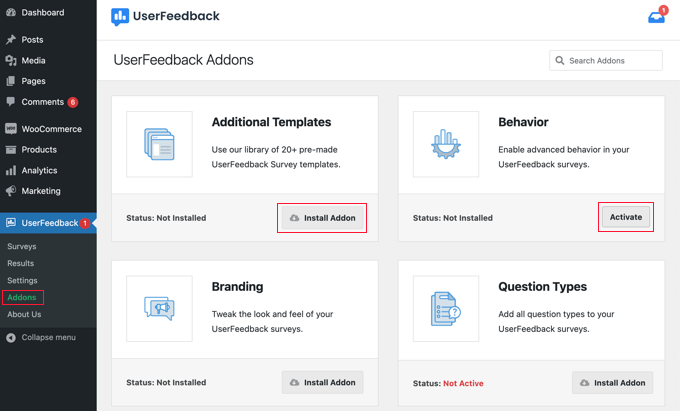
This is important since the Additional Templates addon includes a Post Purchase Review template, and the Question Types addon allows you to add star ratings and more. Other add-ons allow you to customize your survey form further.
Now that you have successfully installed the UserFeedback plugin and its add-ons, you are ready to create your post-purchase survey.
Creating a Post Post-Purchase Survey Using UserFeedback
To create a new survey, you need to return to the UserFeedback » Surveys page and click the ‘Create New’ button.
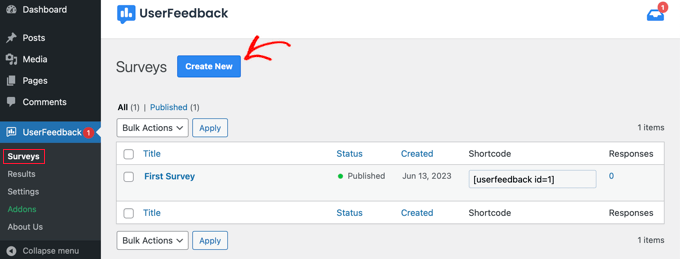
This will show you dozens of survey templates that you can use as a starting point.
You need to scroll down until you find the Post Purchase Review template and then click it.

A new survey will be created for you. Some helpful questions have already been added.
You can change any question’s type and title by simply pointing and clicking.
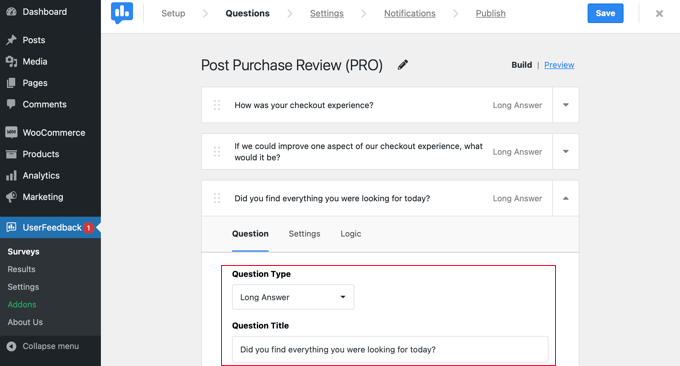
Each question has a Settings tab where you can set the question as ‘Required.’ The Logic tab lets you show or hide the question based on the customer’s previous answers.
With UserFeedback, you can ask unlimited questions and receive unlimited responses. You can ask all types of questions, including multiple-choice and free-form questions, and even capture emails and collect star ratings.
You might like to add some of the questions we listed at the beginning of this article. To add a question to your survey, simply click the ‘Add Question’ button after the last question.
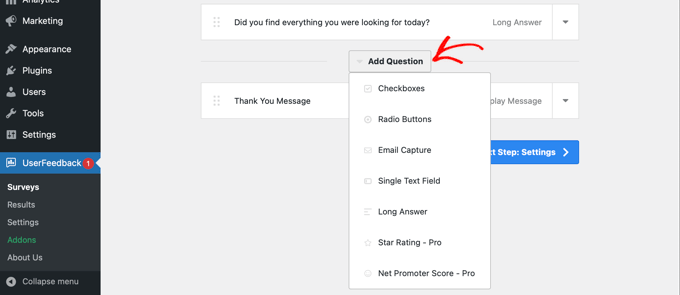
When you choose a question type from the dropdown menu, a new question will be added.
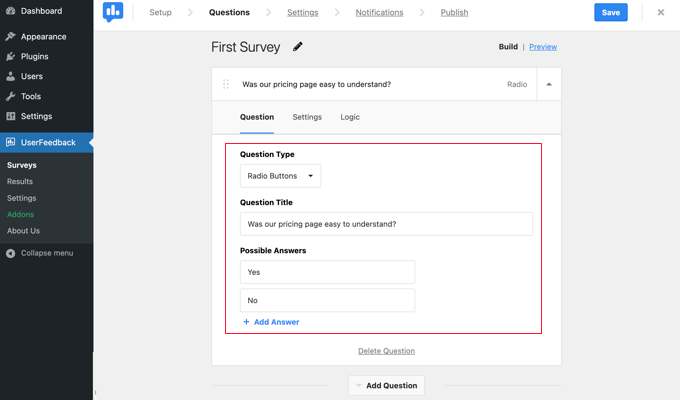
After that, you will be able to add a question title. Depending on the question type, you can then customize the question in other ways, such as labeling checkboxes or radio buttons.
Pro Tip: The ‘Preview’ link at the top of the page doesn’t just preview the form but also allows you to customize its colors.
You can also create a custom thank you message and redirect users after their submissions.
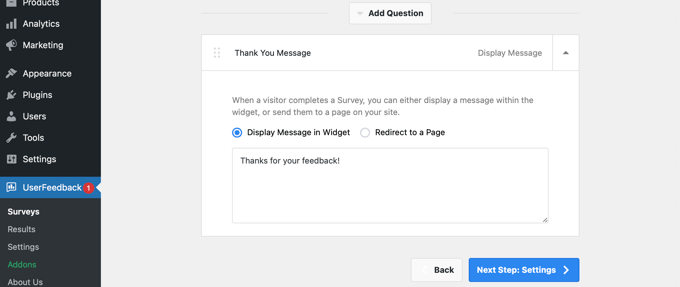
When you have finished editing your survey questions, just hit the ‘Next Step: Settings’ button. This will open the Settings page, where you can customize your survey even more.
In the ‘Tracking’ section, you can enable or disable Google Analytics tracking if you have MonsterInsights installed.
Next, in the ‘Targeting’ section, you can select what types of devices and pages you want your survey to appear on. You can display the survey on all device types or create different surveys that target desktop and mobile users.
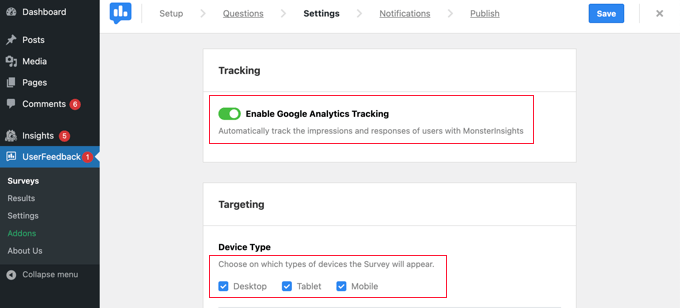
Next, you can scroll down to the Pages setting area. This is important because it allows you to choose where the survey will be displayed.
The default setting is ‘All Pages’. This will display the survey on every page of your online store. However, we only want to survey customers after they have made a purchase.
In this case, we should display the survey on the order confirmation page after checkout. This page is also known as the WooCommerce thank you page.
To target this page, you will need to select ‘Page URL is’ from the dropdown menu. After that, you should type ‘order-received’ in the next field.
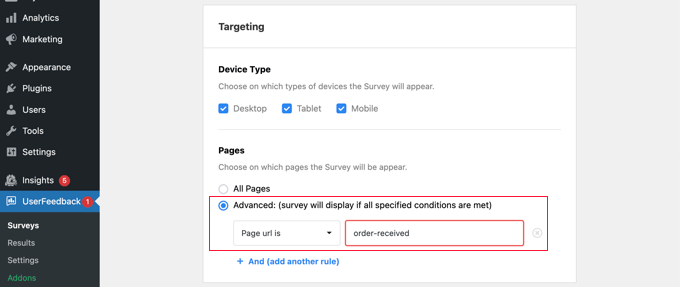
This works because the setting matches partial URLs. The full URL will change with each transaction but will always contain the characters ‘order-received.’
You can also scroll down to the ‘Behavior’ section. Here, you can configure settings like:
- Display Timing – When the survey will appear on the page.
- Display Length – How often will the survey appear to website visitors?
- Survey Run Time – How long will the survey appear on the designated pages?
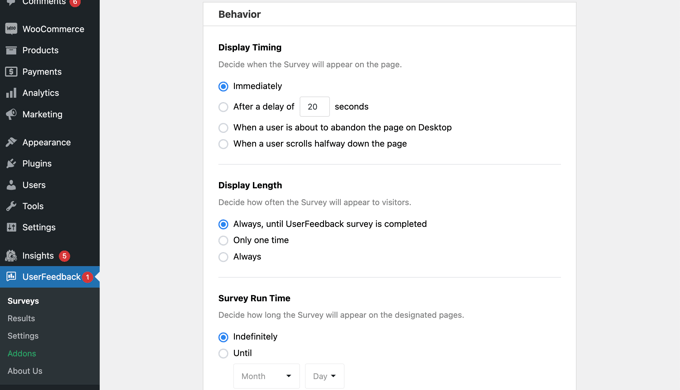
In addition, you can enable or disable the ‘Start Survey Minimized’ option.
This displays a less visible version of your survey instead of automatically opening the first question.

Once you are done changing the settings, you can click the ‘Next Step: Notifications’ button.
This will take you to the Notifications page, where you can choose to send yourself an email with each new response to the survey. Simply leave the ‘Send Email’ toggle switched on and then enter one or more email addresses.
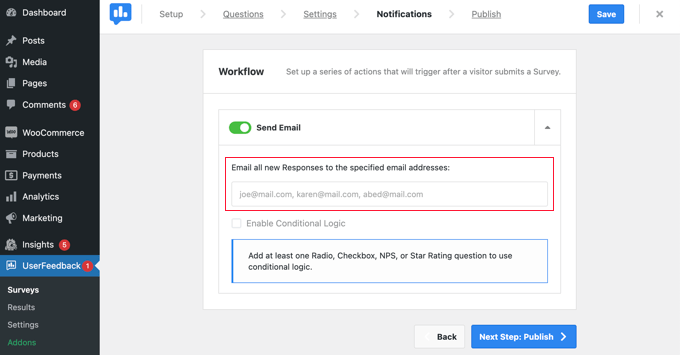
You can also enable conditional logic to trigger email notifications when visitors respond to your questions in a certain way.
For example, you might only want to receive an email if the user checks a box labeled ‘Do you want a callback?’
For this to work, your survey needs to contain at least one question with a radio, checkbox, NPS, or star rating question.
An NPS survey is a good way to get a rating score, which can be used as a metric to measure customer satisfaction.
After that, click on the ‘Next Step: Publish’ button to continue.
Publish Your Survey
Lastly, there’s an option to schedule the survey for a later date and time.
If you are ready to publish your survey immediately, then go ahead and click the ‘Save and Publish’ button.
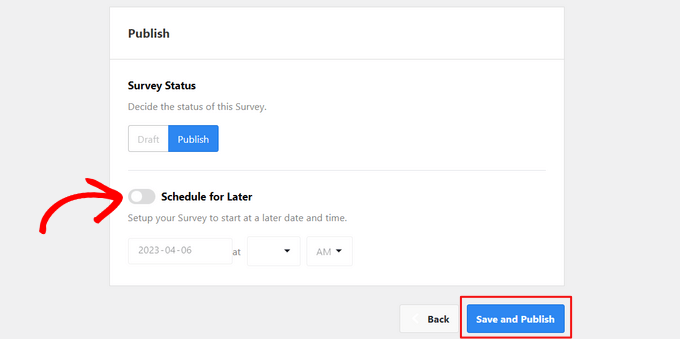
That’s it! You’ve successfully created a survey form.
Now, when your customers purchase items from your store, your survey will pop up on the order confirmation page.
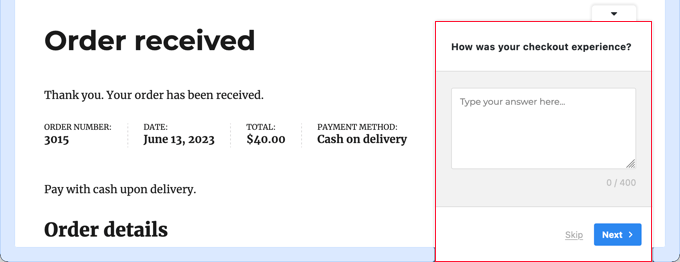
Pro Tip: You may not see the customer survey when you are logged into WooCommerce. You will need to open your online store in a new incognito window or a different web browser.
Viewing Your Survey Form Results
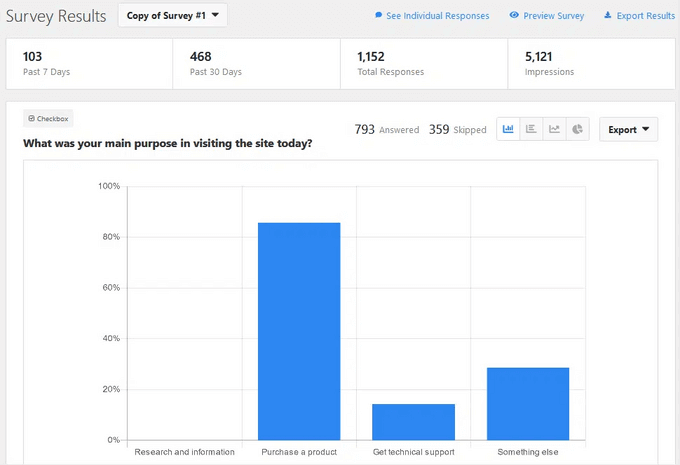
Once you start getting responses, you can analyze them right from your WordPress admin dashboard using easy-to-read reports.
Simply navigate to UserFeedback » Results to see the total responses, impressions, and more details.
Method 2: Creating Post Purchase Surveys Using WPForms
WPForms is the best WordPress contact form plugin on the market. It comes with a powerful surveys and polls addon, which allows you to quickly create highly engaging survey forms.
It lets you combine the Surveys and Polls addon with powerful WPForms features like conditional logic, multi-page forms, custom notifications, email integrations, and more.
Note: You will need the Pro plan because it includes the WPForms Surveys and Polls addon. WPBeginner users can use our WPForms coupon to get 50% OFF on all WPForms licenses.
Setting Up the WPForms Plugin
The first thing you need to do is install and activate the WPForms plugin. For more details, see our step-by-step guide on how to install a WordPress plugin.
Once the plugin is activated, you need to go to the WPForms » Settings page and enter your license key. You will find this information in your account on the WPForms website.
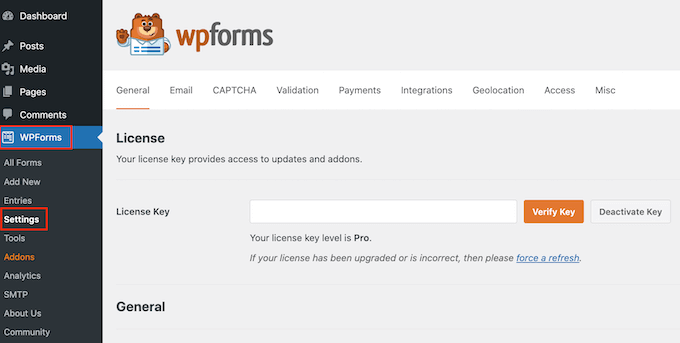
Don’t forget to click the ‘Verify Key’ button.
Once you have done that, you should head over to the WPForms » Addons page and scroll down to the Surveys and Polls addon.
Go ahead and click on the ‘Install’ addon button to install and activate the addon.
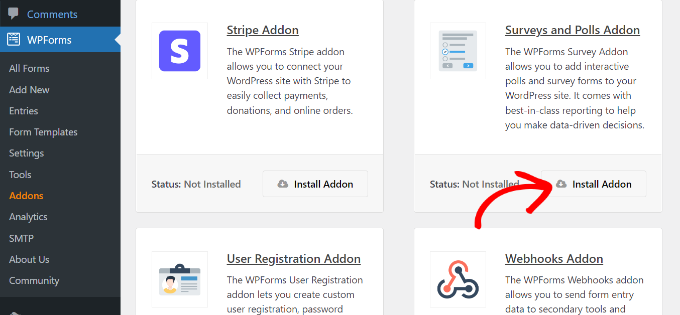
Now, you are ready to create the post-purchase survey form.
Creating a Post-Purchase Survey Using WPForms
You need to visit the WPForms » Add New page to create a new form. This will launch the WPForms form builder interface, and you can choose from different pre-built form templates.
First, you should provide a title for your survey form at the top of the page.
After that, you need to choose a template. Start by clicking on ‘Addon Templates’ to list templates that are compatible with the Surveys and Polls addon.
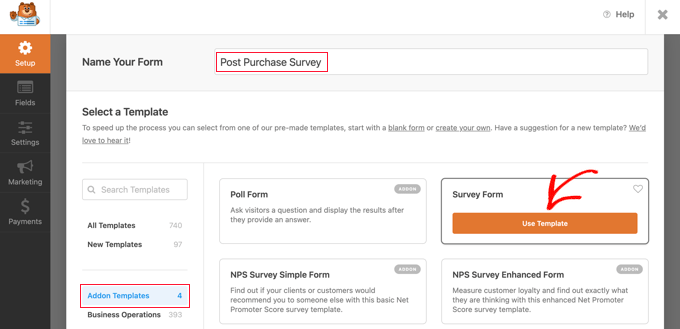
Then, you need to click the ‘Use Template’ button on the Survey Form template. This will load a sample customer feedback form template with several fields already added to it.
You can just point and click to edit the fields, rearrange them with drag and drop, or remove them from the form. You can also add new form fields from the left column.
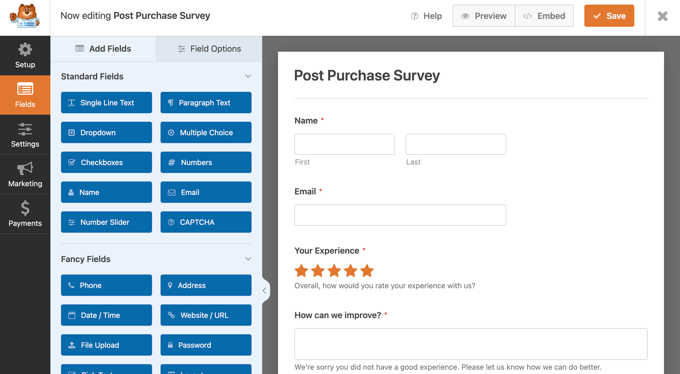
WPForms supports all commonly used form fields, including dropdowns, radio buttons, checkboxes, Likert scale, text input, rating scale, and many more. This makes it super easy for you to build highly interactive survey forms.
There is some conditional logic already built into the form. For example, the ‘How can we improve?’ field will only appear if a user selects 1 or 2 stars in the ‘Your Experience’ field.
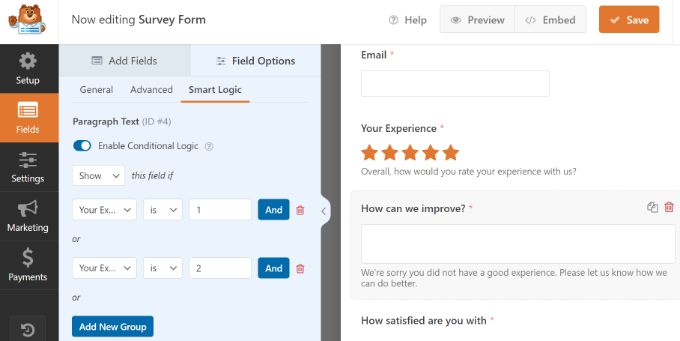
You can see this by selecting the ‘How can we improve?’ field and then clicking the ‘Field Options’ tab on the left, as seen in the image above.
If some of your customers log in to your online store, then you can make their lives easier by auto-filling some of their information from their user profiles.
For example, to auto-fill their email address, you need to click on the Email field and then click the ‘Field Options’ tab on the left. Once there, just click on the ‘Advanced’ tab to show the advanced field options.
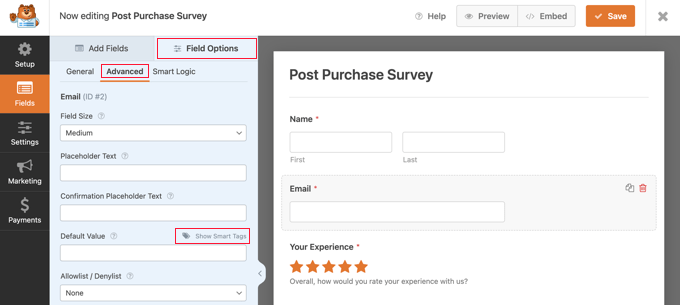
You will notice a field where you can set a Default Value for the email field.
You can enter information from their profile automatically by clicking on ‘Show Smart Tags.’
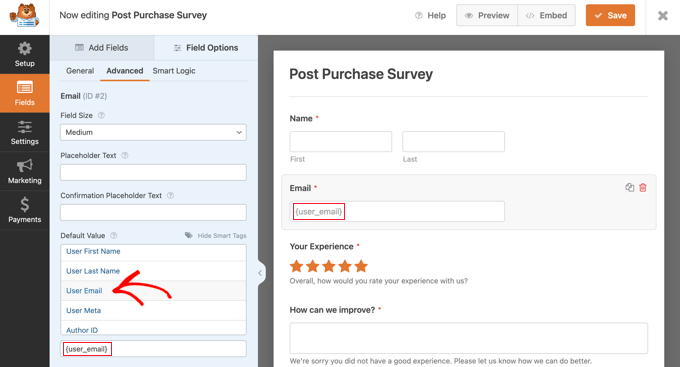
Now, you simply click the ‘User Email List’ option, and the {user_email} smart tag will be entered into the field. This will automatically add the email address for logged-in users.
You can also easily remove any fields that you don’t need on the form.
For example, if you would like to remove the ‘Name’ field, then you should point at that field with your mouse and then click the red Trash icon that appears at the top right of the field.
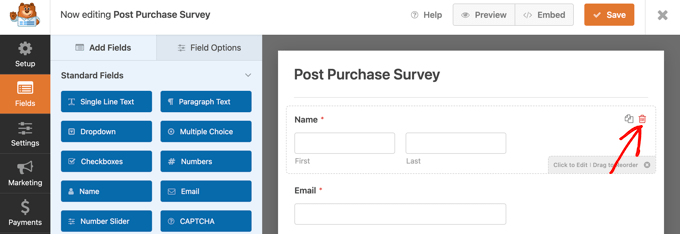
If you would like to add more questions, such as the ones we listed at the beginning of this article, simply drag a new field onto the page and then customize it.
Once you have created the form, you need to click the orange ‘Save’ button at the top of the page to store your form settings.
Next, you can go to the Settings tab and select ‘Confirmations’ in the WPForms form builder.
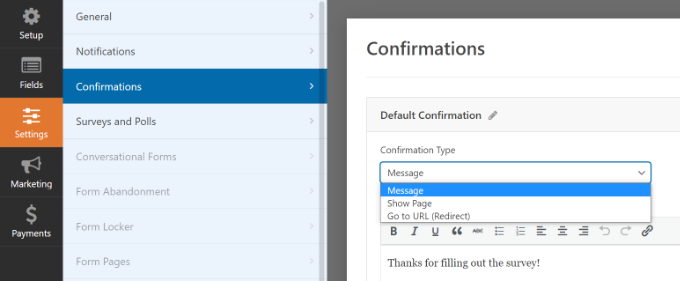
Here, you can choose whether to show a message or a page or even redirect users to a URL when they submit the survey form.
Besides that, the WPForms Notifications tab lets you edit the notification settings so that you get email alerts when a user fills out your survey.
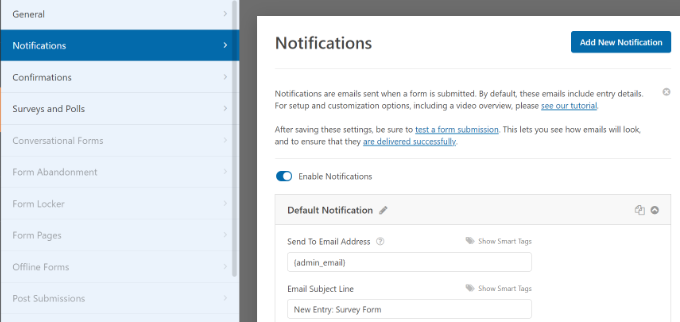
You can now click on the close button to exit the form builder.
Adding the Survey Form to a Custom Thank You Page
If you have gone through the trouble of creating a custom WooCommerce thank you page, then you can easily add your post-purchase survey to it using a shortcode or a block.
Note: Whether you are using the default thank you page or a custom one, you can also display the survey as a popup using a plugin. See the next section for details.
You will find the shortcode you need by visiting the WPForms » All Forms page.
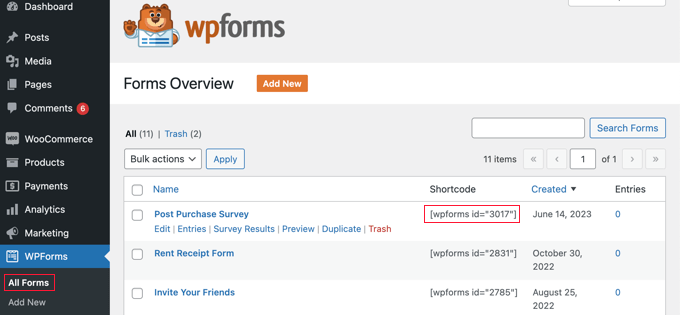
You can then use the shortcode to add the form to your custom thank you page by following our guide on how to add a shortcode in WordPress.
Alternatively, if you created your custom thank you page using the block editor or a page builder plugin like SeedProd, then all you need to do is drag the WPForms widget onto the page and then pick the survey form you just created from a dropdown menu.
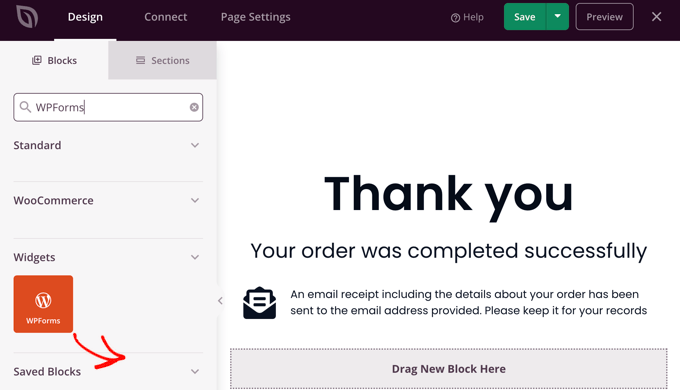
Once you have saved your custom thank you page, your customers will see the survey after checking out.
Automatically Showing a Survey Popup Using OptinMonster
You might prefer to have the survey pop up automatically over the order confirmation page, similar to what happens with the UserFeedback plugin in Method 1.
The first thing you need to do is install the free OptinMonster plugin. For more details, see our step-by-step guide on how to install a WordPress plugin.
Note: In this tutorial, we will use the free OptinMonster plugin because it does everything we need. However, with a Growth subscription, the premium version of OptinMonster has much stronger integration with WooCommerce.
Upon activation, the OptinMonster setup wizard will start.
Simply follow the onscreen instructions to set up OptinMonster on your website and create a free account.
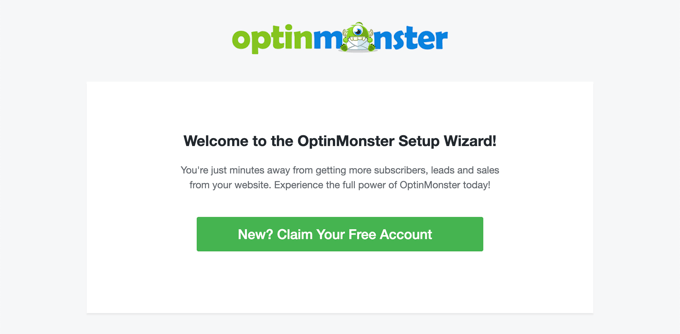
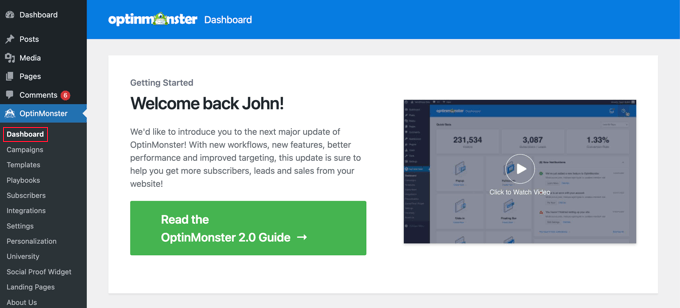
Once you complete the setup, you will find yourself on the OptinMonster dashboard.
You will see a welcome message, a link to the OptinMonster user guide, and a video to help you get started.
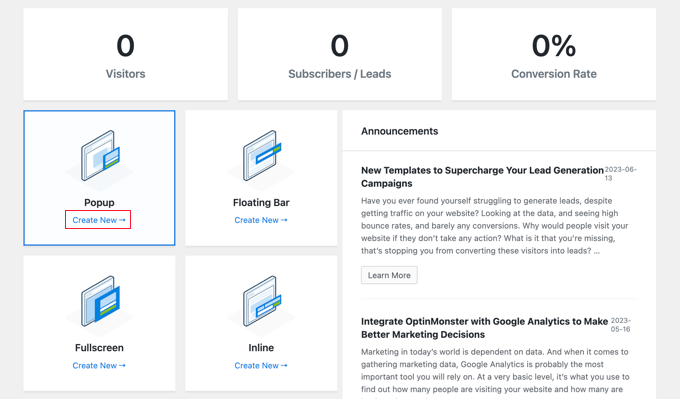
Now, you will need to scroll down until you find a box where you can create a new popup.
Simply click the ‘Create New’ link.
You will now see a collection of popup templates. Since our popup will just contain our post-purchase survey, we will use the minimal Canvas template.
You can find this template by typing ‘canvas’ into the search field.
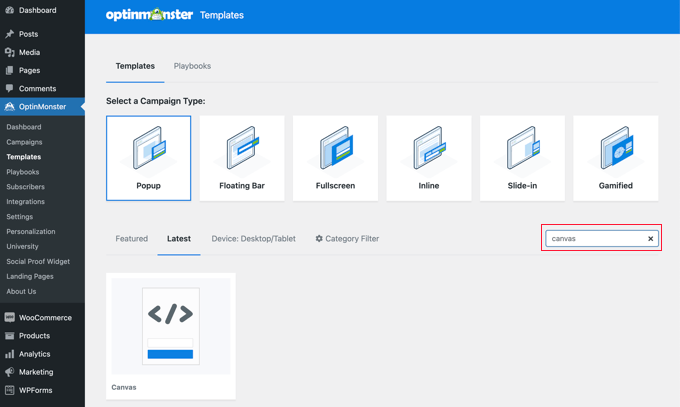
When you point your mouse over the Canvas template, two buttons will appear.
You can create your popup by clicking the ‘Use Template’ button.

You will see a popup asking you to give the campaign a name.
You can type in ‘Post Purchase Survey’ and then click the ‘Start Building’ button.

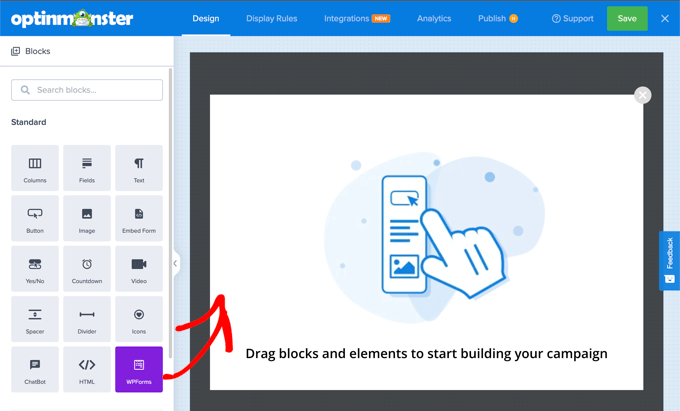
The OptinMonster builder will open with your selected template. You can see a preview of the popup on the right, and there are blocks on the left that you can add to the popup.
You need to find the WPForms block and drag it onto the page.
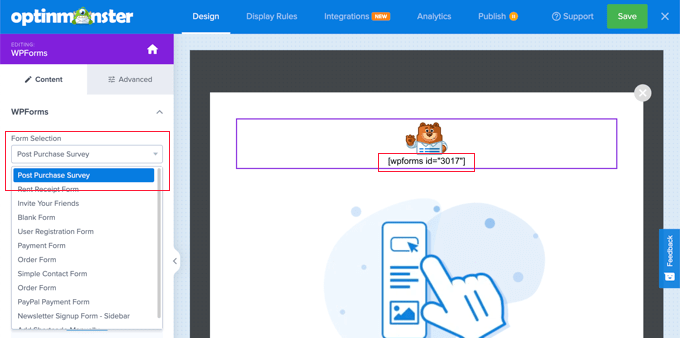
You can now select the survey you want to add.
Simply click on the name of the WPForms post-purchase survey that you created earlier. The WPForms shortcode will be added to your popup.
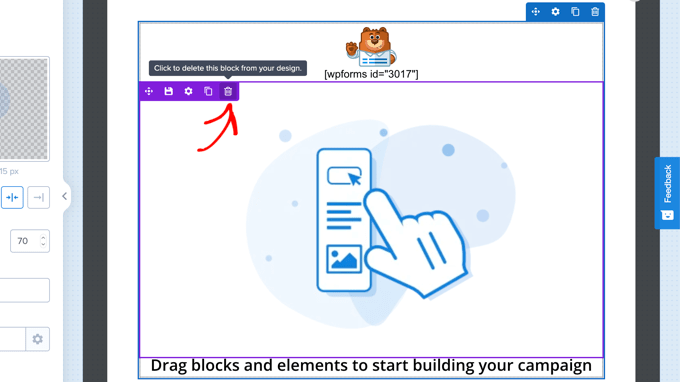
There is still a placeholder image and text block on the page. These can be safely deleted.
When you hover your mouse over the image, a purple toolbar will appear. You can delete the image by clicking the Trash icon. You will be asked to confirm the deletion.
You can delete the text block that says ‘Drag blocks and elements to start building your campaign’ in the same way.
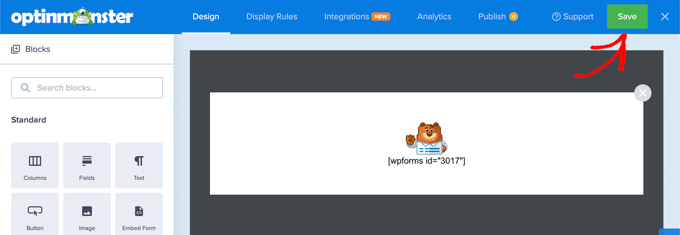
Your finished popup should include just the WPForms shortcode. This is a good time to save your work by clicking the ‘Save’ button at the top of the screen.
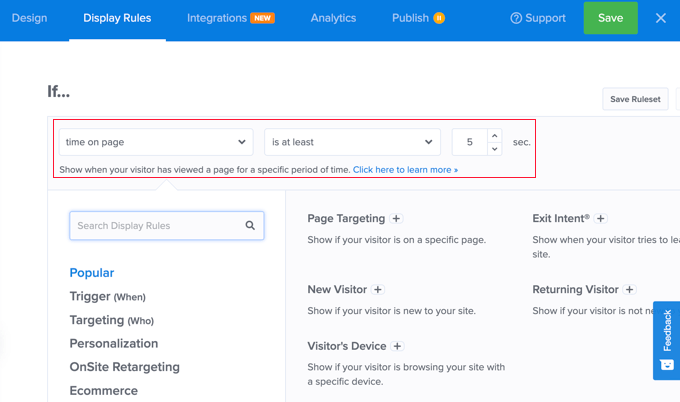
Your next job is to click the ‘Display Rules’ tab and set how and where the popup will be displayed.
The first rule determines when the popup will be shown. The default value is after you have been on the page for 5 seconds. This will work for most online stores, but you can change the value if you like.
Now, you need to scroll down to the second rule, which you will find just below the ‘AND’ label.
The default value is to display the popup on every page of your WordPress website. You need to change this so that it only displays the post-purchase survey on the order confirmation page.
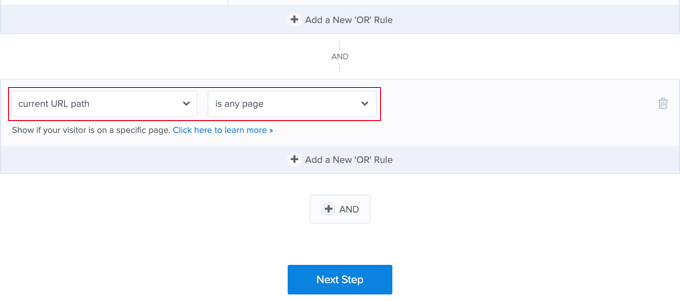
To do this, you need to click the dropdown menu for ‘is any page’ and select ‘contains’ instead.
Another field will appear, and you need to type ‘order-received’ here.
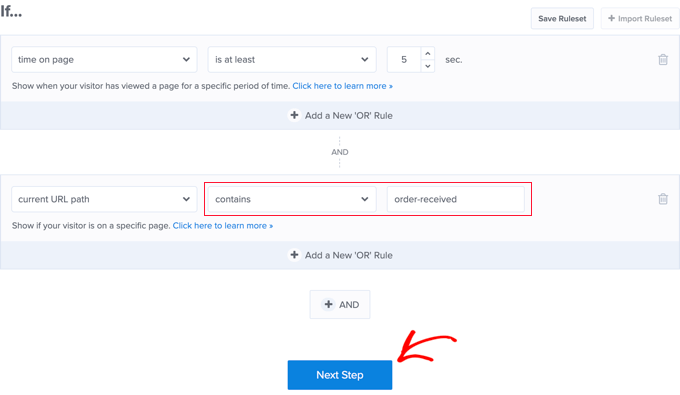
This rule will match the confirmation page URL. Although the URL changes with every transaction, it will always contain the characters ‘order-received’.
Now, you can click the ‘Next Step’ button to determine what happens when the conditions in those two rules are met.
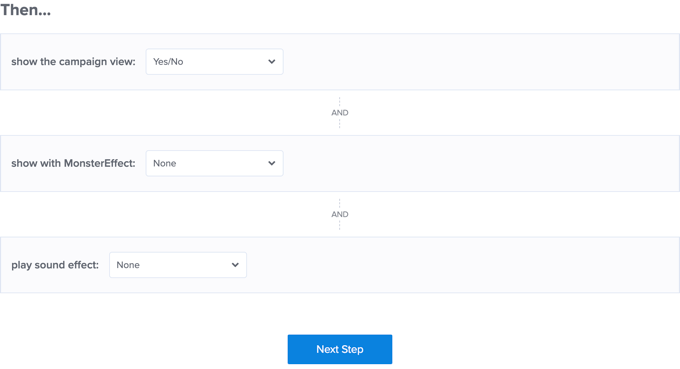
The default settings here will display the popup without any effects or sound. If you would like to add an effect or sound, just use the dropdown menus.
Once you are finished, you need to click on the ‘Next Step’ button. You will see a summary of the display rules you just created.
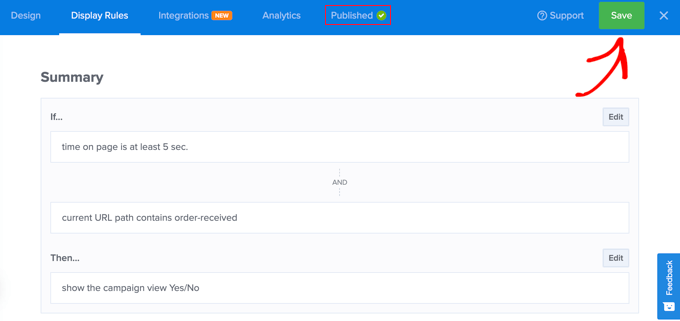
Make sure you click the ‘Save’ button to store your settings.
Finally, you can click the ‘Publish’ tab at the top of the screen and then click the ‘Publish’ button under ‘Publish Status’. This will push the popup live on your online store.
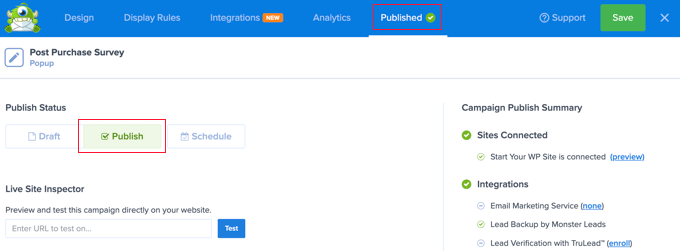
You can now close the OptinMonster builder by clicking the ‘X’ icon in the top right corner.
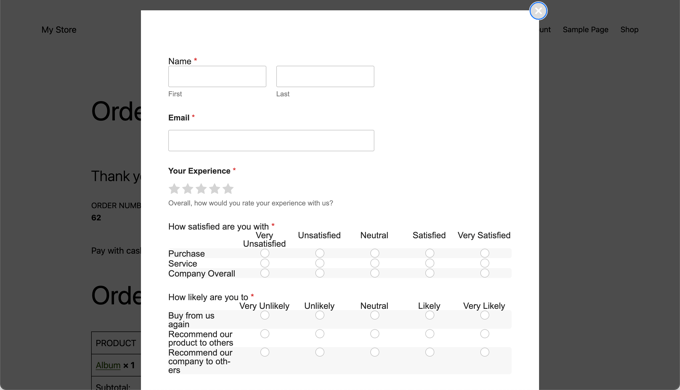
Your customers will now see the post-purchase survey whenever they finish checking out. Here’s how it looks in our demo store.
You can see our complete OptinMonster review for more details.
Viewing Your Survey Form Results
WPForms shows survey results in beautiful charts and graphs. You can also print survey results and export them to your favorite spreadsheet software.
To view your survey results, you need to visit the WPForms » All Forms page and click on the ‘Survey Results’ link below your survey form.
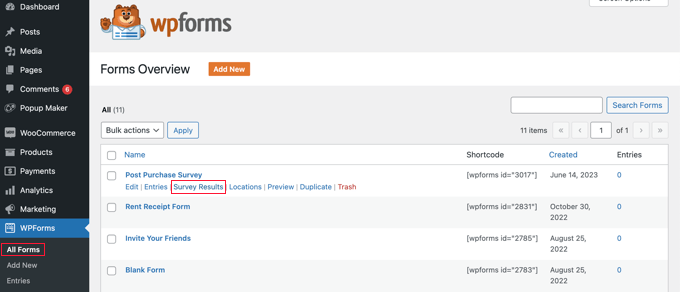
On the results page, you will see your survey responses displayed in an interactive chart and tables.
You can export responses to a single question and the entire survey.
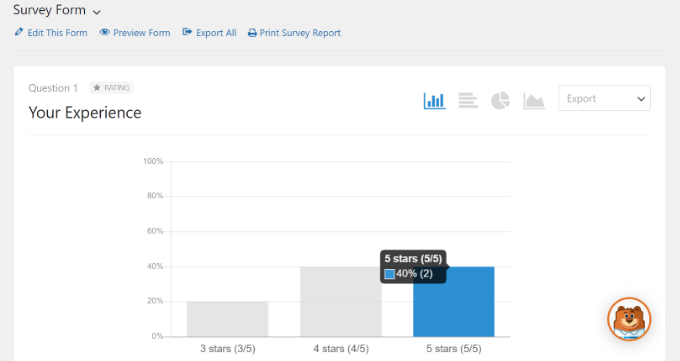
On the top, you will see options to switch to different chart types and export options.
You can save individual survey results in JPEG, PDF, and Print formats to easily share them on presentation slides, blog posts, or social media.
Besides collecting user feedback based on surveys, you can also make judgments based on actions.
That’s why you may want to consider adding a heatmap tool like CrazyEgg to your WooCommerce store. That way, you can track the clicks, scrolls, and mouse movements of your traffic visitors.
From there, you’ll know if you need to tweak the design of your product and checkout pages and whether there are any errors on your site causing confusion. To learn more about heatmaps, check out our guide on the best heatmap tools and plugins for your WordPress site.
We hope this tutorial helped you learn how to create post-purchase surveys in WooCommerce. You may also want to see our guide on how to create smart coupons in WooCommerce or our expert picks for the best WooCommerce plugins for your store.
If you liked this article, then please subscribe to our YouTube Channel for WordPress video tutorials. You can also find us on Twitter and Facebook.


Syed Balkhi says
Hey WPBeginner readers,
Did you know you can win exciting prizes by commenting on WPBeginner?
Every month, our top blog commenters will win HUGE rewards, including premium WordPress plugin licenses and cash prizes.
You can get more details about the contest from here.
Start sharing your thoughts below to stand a chance to win!
Ralph says
Fantastic article! Creating post-purchase surveys in WooCommerce is indeed a powerful strategy to gain insights into customer satisfaction and enhance the overall shopping experience.
Using right questions like “how did you discover us” can give us really good tips about what works the best and what we should focus on more to achieve even better results.
Bharat Sharma says
thankyou for sharing with us
WPBeginner Support says
You’re welcome!
Admin