Looking to boost your organization’s recurring donations? We often hear from nonprofits that increasing consistent support is a top priority. Adding a recurring donation form to your WordPress website is a fantastic way to achieve this.
By creating a recurring donation form, you can provide donors with a convenient way to support your cause on an ongoing basis. That way, your organization can gain consistent funding to help with budget planning and executing long-term projects.
In this article, we’ll show you how to create a recurring donation form in WordPress.
Why Create a Recurring Donation Form in WordPress?
Recurring donations are contributions made by donors on a regular basis to support a non-profit or cause.
Instead of a one-time donation, supporters opt to set up automatic payments at specific intervals, like weekly, monthly, quarterly, or annually.
When running a non-profit organization, your donors are the heart and soul of your cause. One-time contributions are great, but they might not give you the predictable funding source you need.
Recurring payments provide a reliable income stream so that you can better budget and allocate financial resources. For example, you can better plan where your marketing efforts will go or how you could use that money to help those in need.
Plus, it also adds convenience. Donors can make automatic payments without manually initiating each payment. Most contributors may forget to submit a donation, so a recurring form lets them opt-in, and the payment processor will charge their card automatically.
It’s a good way to gamify contributions as well. For example, you could create a membership site using a plugin like MemberPress. The more donors contribute, the better rewards they can earn. You could add a leaderboard, and the top contributors become your VIP guests at events and receive extra recognition or other perks.
With all that said, we’ll dive into three different ways to create a recurring donation form in WordPress. Feel free to use the links below to jump to each method.
Creating a Recurring Donation Form in WordPress with Charitable
The best way to start accepting recurring donations is with Charitable. It is one of the most trusted plugins for non-profits to grow through online fundraising.
Besides building your donation form, they offer a wide range of features. For example, they include addons like Newsletter Connect so you can keep donors up to date using your email marketing service.
You can also leverage peer-to-peer fundraising, which is great if you have multiple projects or causes to support. This will allow users to choose which opportunities they want to donate to.
Plus, they offer $0 in transaction fees, meaning all of your donor’s generous donations won’t be taxed by the software.
To get started, you’ll need to download the Charitable plugin. For more details, check out our tutorial on how to install a WordPress plugin.
Note: There is a free version of Charitable that you can get started with. However, you need to upgrade to the Charitable Plus plan to access the recurring donations feature.
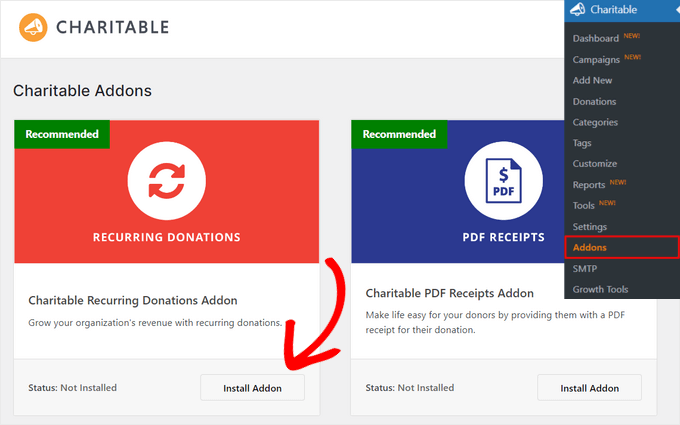
Once activated, you’ll need to go to the Charitable » Addons page. Then go ahead and click on ‘Install Addon’ next to the ‘Charitable Recurring Donations Addon.’ Then, click on ‘Activate.’
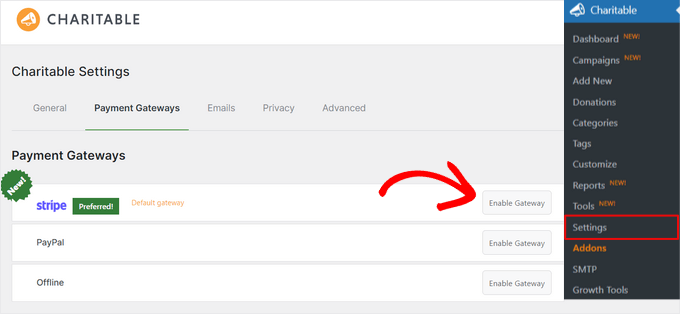
In addition, you’ll need to go to the Charitable » Settings page.
Under the Payment Gateways tab, click on ‘Enable Gateway’ next to the Stripe option.
From there, you need to click on the ‘Connect with Stripe’ button.
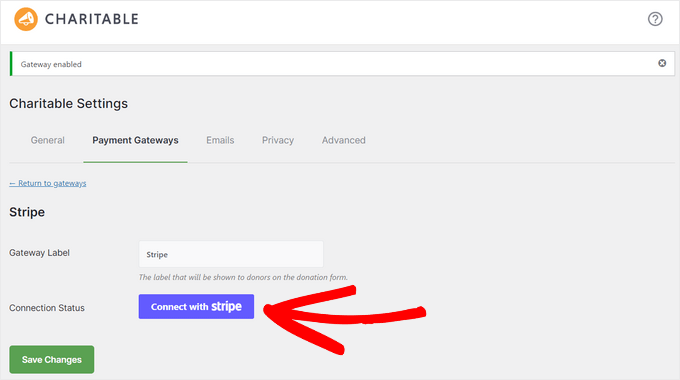
Next, you’ll be taken to a setup wizard. Simply follow the walkthrough process by entering the email that is connected to your Stripe Account.
If you don’t have one, you’ll need to create one to start accepting donations.

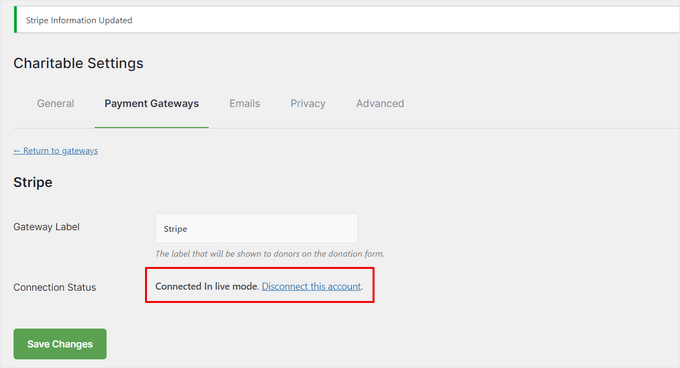
Once you’ve connected your Stripe account to Charitable, you’ll be redirected back to the settings page.
Under Connection Status, it should say that your Stripe is ‘Connect In live mode.’ Click the ‘Save Changes’ button to store your settings.
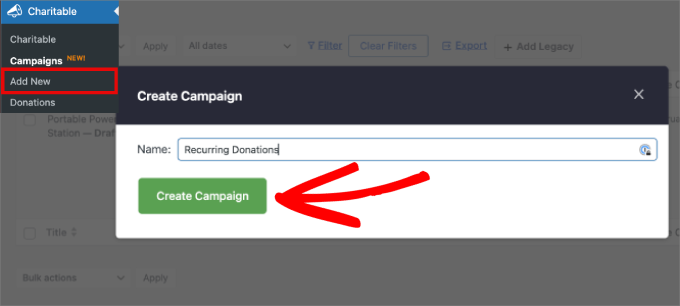
Next, we can move on to creating your donation form. Go to Charitable » Add New.
Then, a pop-up will appear, asking you to name your campaign. Give it a name and then hit ‘Create Campaign.’
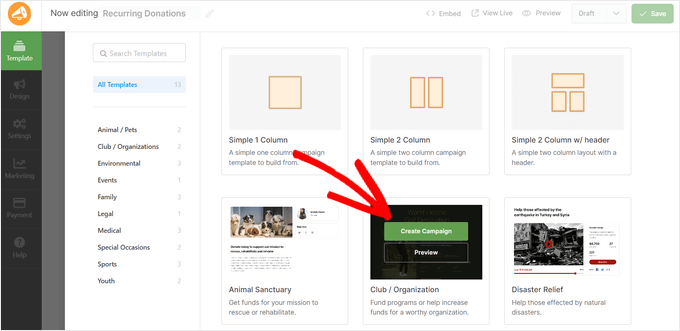
Next, you’ll be taken to a window that shows you all of the available templates you can use so that you don’t have to start from scratch.
That said, they also have blank, simple 1- or 2-column layouts you can use if you don’t see something that fits your use case.
For this example, we’ll use the ‘Club / Organization’ template. Hover over the template and click ‘Create Campaign.’
You’re now ready to start editing the look and feel of your form. You can add additional form fields, edit texts, add buttons, images, and videos, or tinker with the layout.
Everything is drag and drop, so to add a form field, just drag it from the left-side panel to the right-hand editor in the position you’d like it to be.
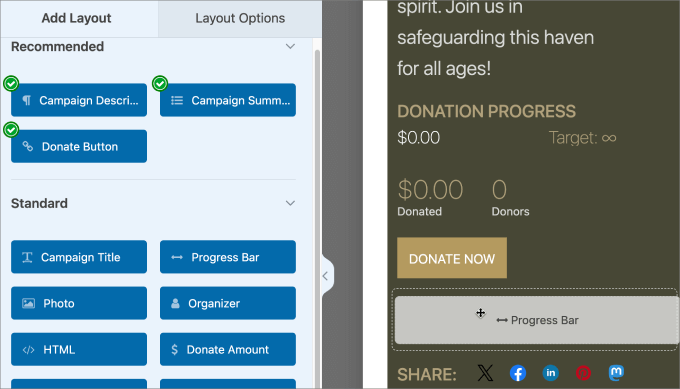
If you want to edit an existing field, just click on the element in the editor.
Then, you can make adjustments as to what appears on the form, like the text, colors, alignment, etc. All customizations will show up in the ‘Layout Options’ tab.
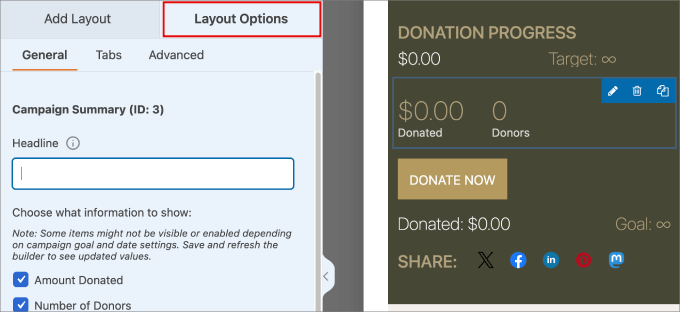
Next, you’ll head over to Settings » Donation Options. Here is where you can toggle all of the options when it comes to defining the donation parameters.
Scroll to ‘Recurring Donations.’ Then turn on the option ‘Allow Recurring Donations. In addition, it’s a good idea to turn on the ‘Allow Recurring Custom Donations’ as well. That way, donors can set a custom amount that they’re comfortable with.
You may want to choose the ‘Recurring Donation Amounts’ under the Default Tab to encourage repeat contributions. If you’d like to give donors complete freedom, you can allow donors to choose their donation period.
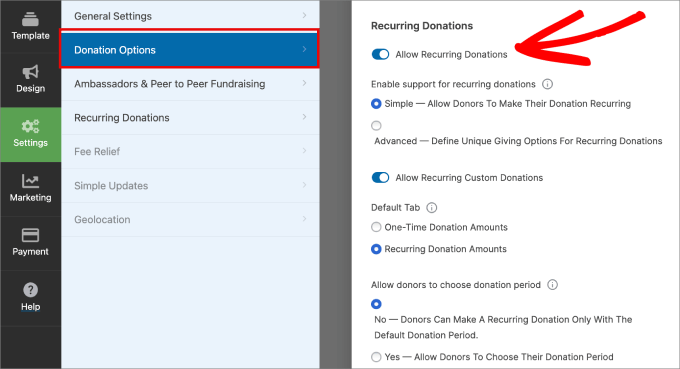
If you continue to scroll down the page, there are also options to customize the default period and select how often donors should be billed.
This will depend on your specific cause, but in many cases, it’s good to set donation periods to at least a month or longer.

If you’re happy with how the recurring donations form looks, you’re ready to publish. Just hit the ‘Save’ button first.
Then, select the dropdown menu under draft and click on ‘Publish.’
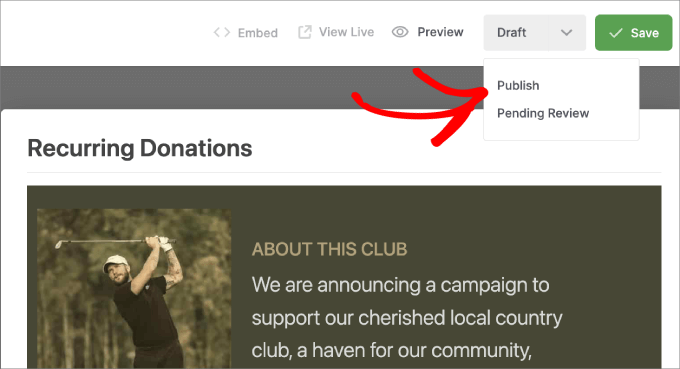
Once you’ve published your fundraising campaign, you can now embed the form onto any page or post.
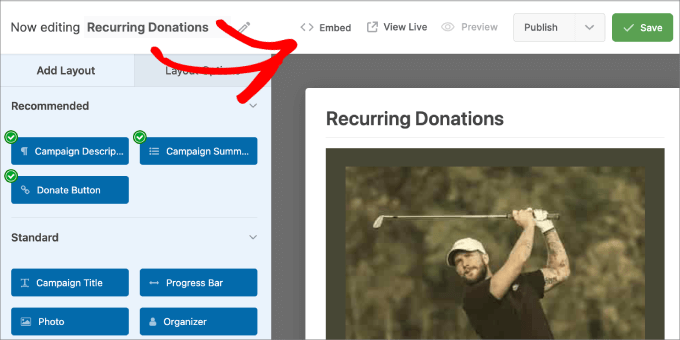
Click the ‘Embed’ button at the top.
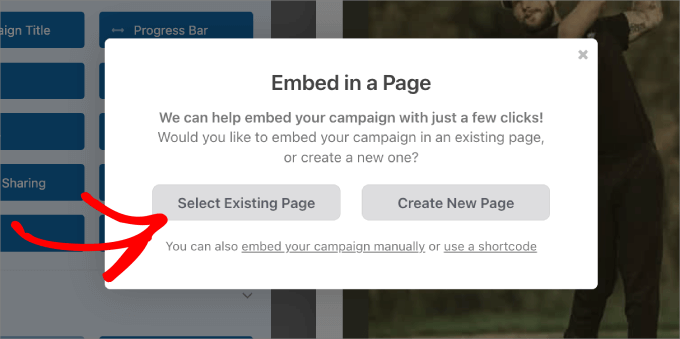
Then, choose ‘Select Existing Page’ to add it to a page on your website. Or if you don’t have one set up yet, hit ‘Create New Page.
From here, just choose the page to which you’d like to add the form.
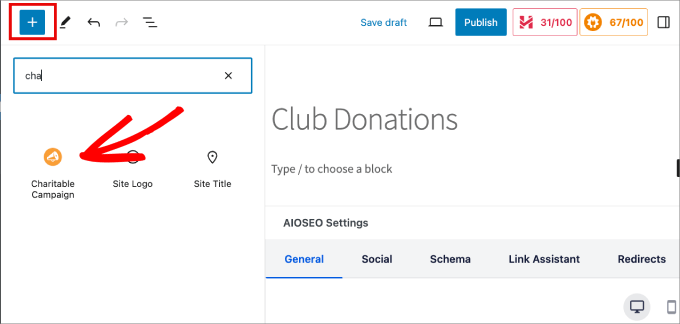
Once you’ve landed on your WordPress page’s edit screen, click on the ‘+’ icon.
Then, find and add the ‘Charitable Campaign’ block to your page.
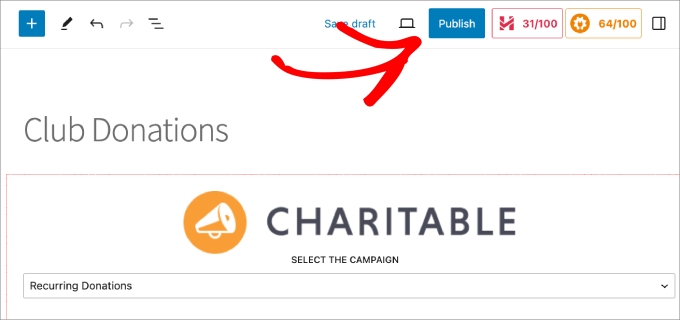
Select the campaign that you’ve just created.
Finally, hit the ‘Publish’ or ‘Update’ button to add the recurring donations form to your page.
Make sure to preview the form live to ensure that everything is working.
You might want to submit a test payment as well so that you can check that all donations go through to your Stripe account.

That’s all for creating a recurring donation form using Charitable!
Creating a Recurring Donation Form in WordPress with WP Simple Pay
WP Simple Pay is another good choice for accepting recurring payments. With over 13+ payment methods and 135+ currencies in 45+ countries, they offer the most flexibility.
That’s because you’re not just limited to credit card payments. For example, you can accept mobile payments such as Apple Pay, Google Pay, or even Venmo payments. In addition, they support ACH Direct Debits, Afterpay, Klarna, and others.
Step 1: Install the WP Simple Pay Plugin and Connect Your Stripe Account
To begin, you’ll need to download the WP Simple Pay plugin. Once activated, you’ll need to go through the WP Simple Pay Setup Wizard, which will walk you through the process step by step.
It’ll also lead you to connect WP Simple Pay with Stripe. All you’ll need to do is enter the email address that’s linked to your Stripe account.
But if you don’t have an existing Stripe account, then you can just set one up.

Now, you’re ready to create a donation form. Navigate to the WP Simple Pay » Add New page.
Step 2: Create Your Recurring Donations Form
You’ll be directed to select a template. Choose a template that fits your needs. For this tutorial, we’ll select the Mission Trip Fundraising Form. Simply hover over the option and select ‘Use Template.’
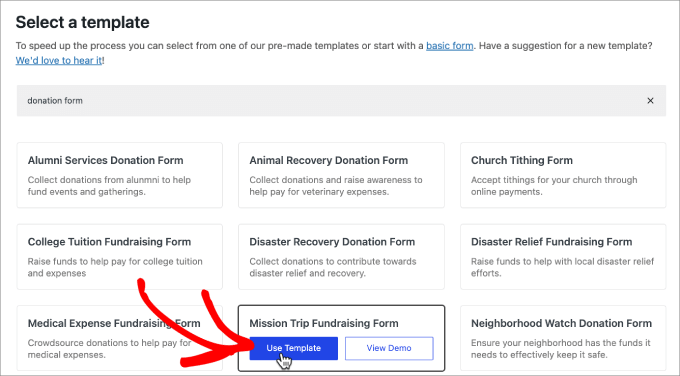
Once you’ve chosen the template, you’ll be sent to the form builder to configure the options inside.
You can feel free to customize the title and the description of the form. As for the ‘Type,’ you can leave it as an on-site payment form.
Also, you can choose to add a CAPTCHA to the form to avoid spam from bots.
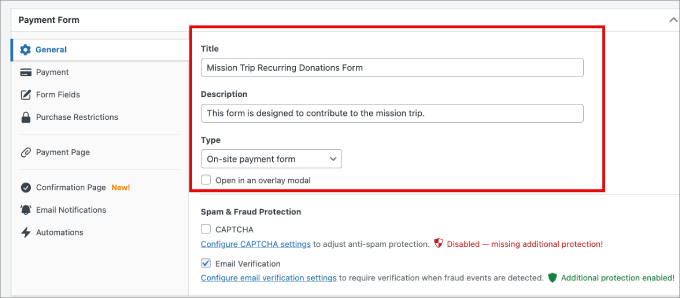
From here, you can navigate to the ‘Payment’ tab to ensure you charge recurring donations.
Under the ‘Price Options,’ expand the dropdown options for each donation amount. Or if there’s a different payment amount you’d like to add, click ‘Add Price.’
Once you’ve expanded the dropdown, feel free to give it a label if necessary or leave it blank. Then click on the ‘Subscription’ button instead of one-time, so that all donors will charged on a recurring basis.
In addition, make sure to check the box “Allow amount to be determined by user” if you want to give them the flexibility to choose their contribution amount.
Setting a minimum amount is a good idea, too, since that ensures you at least get a contribution that is meaningful to your cause while still allowing donors the freedom to pay an amount they’re comfortable with.
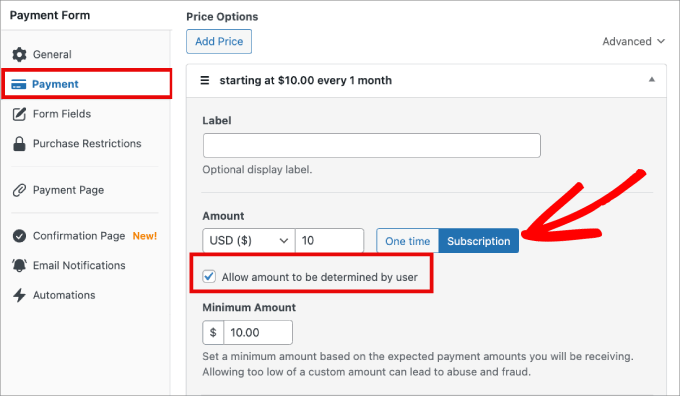
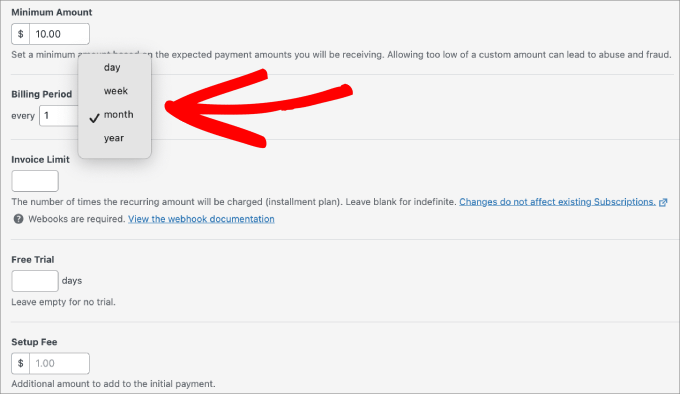
Then, scroll to the ‘Billing Period’ and select the frequency of each payment. You can choose to charge the donor daily, weekly, monthly, or yearly.
For the invoice limit, you can set a limit on how many times they will be charged. This is good if you’d like to send an end date for recurring payments. For instance, if a mission trip has a defined deadline, you can choose to charge donors monthly payments up to 12 times. You can also leave this option blank.
Additionally, you can give users a free trial option or add a setup fee.
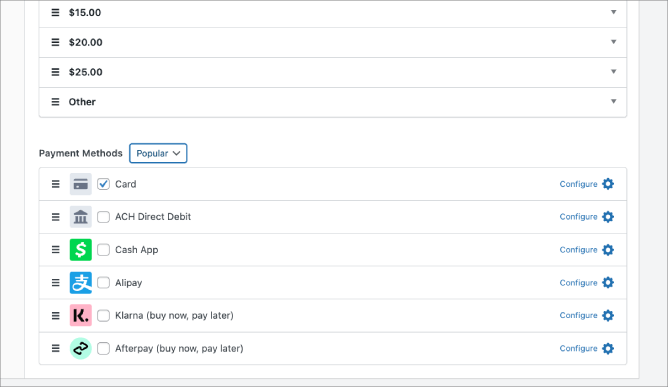
At the bottom of the screen, you can also select the various payments you’d like to accept.
More payment options can improve your conversion rates and allow more contributors to choose their preferred payment method.
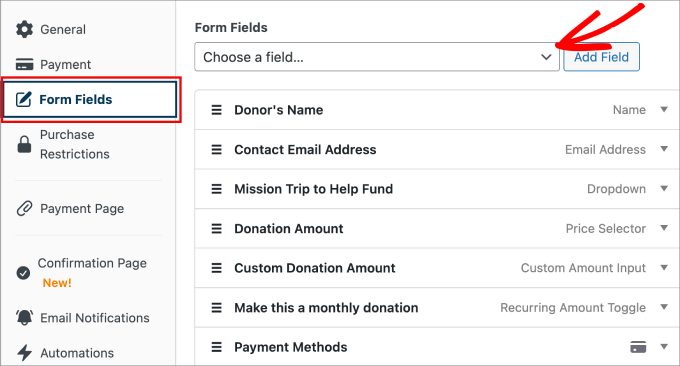
If you head over to the Form Fields tab, you can also customize the field options in your donation form. Just expand each field to make adjustments.
If you want to add a field to the existing form template, just select the dropdown menu next to the ‘Add Field’ button.
For instance, if you wanted to contact all donors via the phone, you could ask for their phone number. Or, if you want to send all donors a gift package for large contributions, you can ask for a shipping address.
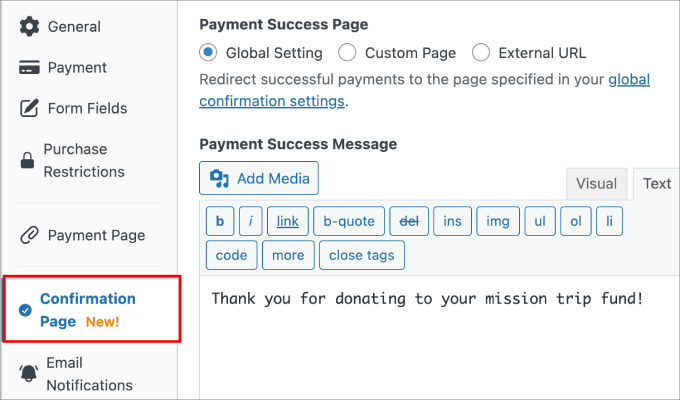
It’s a good idea to also add a thank you message once donors have made their contribution. It gives them confidence that their funds have been received.
Just go to the Confirmation Page tab and type the message you want to appear after they’ve made their donation.
Step 3: Publish the Recurring Donation Form.
Once you’re happy with the recurring donations form, you’re ready to publish it.
On the right side of the screen, hit ‘Publish.’
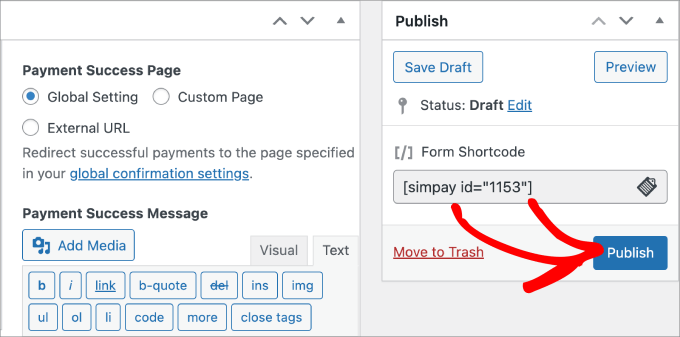
Next, go to your donations page or any existing post or page to which you’d like to add this form.
Click on the ‘+’ icon and select the WP Simple Pay block.
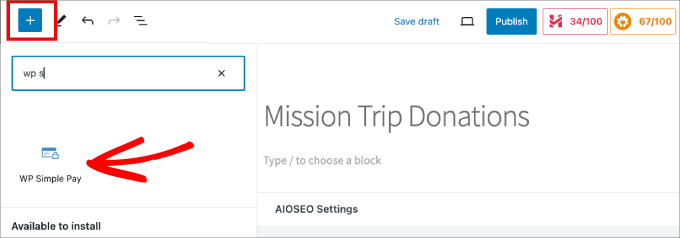
From there, you can choose the form you’ve just created.
And then click on ‘Publish’ or ‘Update.’
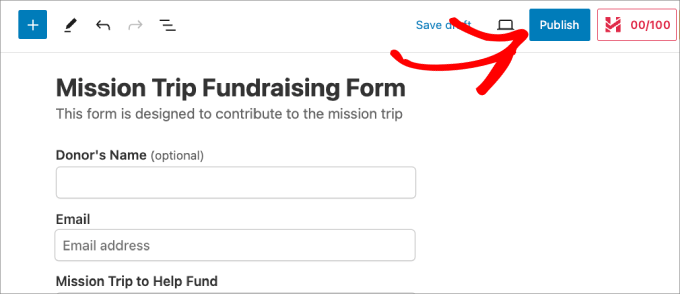
Make sure to preview the form to see if everything looks right and that donation payments are going through to your Stripe account.
There you have it for this method!
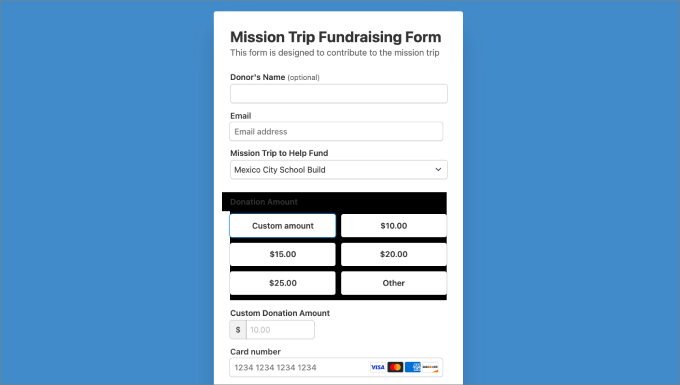
Creating a Recurring Donation Form in WordPress with WPForms
You can also use WPForms to accept recurring donations. WPForms is the best WordPress form builder with 1,800+ templates, including a variety of donation forms.
It’s a good method if you need to also create other forms, such as contact forms, opt-in forms, multi-page forms, user registration forms, surveys and polls, etc.
Step 1: Connect WPForms to Stripe
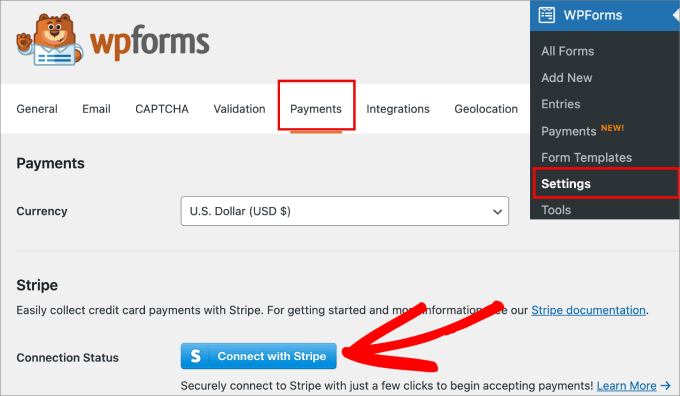
To begin, download the WPForms plugin. Upon activation, go ahead and WPForms » Settings. Then, head over to the Payments tab.
The default currency is configured to US dollars; however, you can change it to any currency if you’d like. Then scroll down and click the ‘Connect with Stripe’ button. This allows you to connect WPForms to your Stripe account to collect credit card payments.
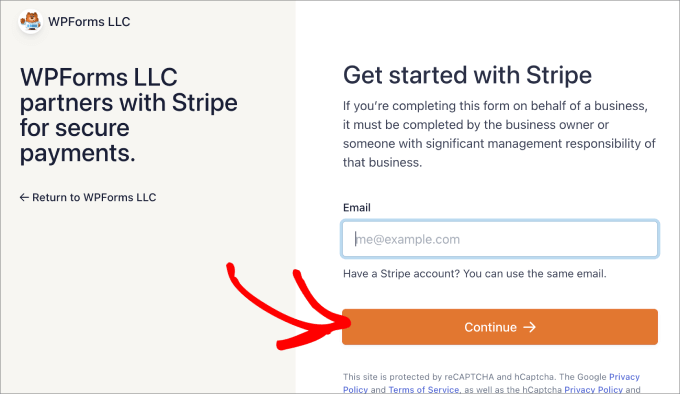
From here, you’ll need to enter your email address or create a new Stripe account.
Make sure to follow the instructions laid out in the Stripe Connect setup wizard to finish the process.
After you’ve gone through the process, you’ll be sent back to the WPForms setting page in your WordPress dashboard.
In the Payments tab, you’ll see a green checkmark indicating that Stripe is connected to WPForms.
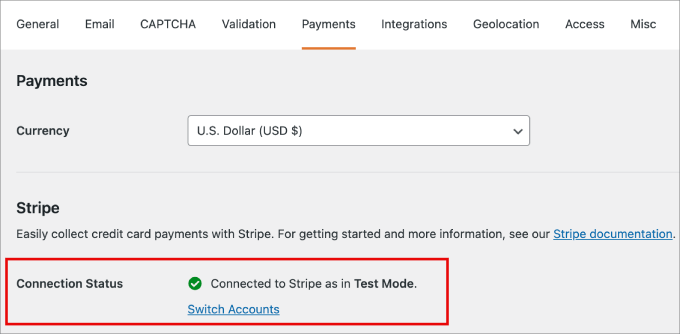
Once connected, you’re ready to start building your recurring donations form.
Step 2: Create a Recurring Donations Form
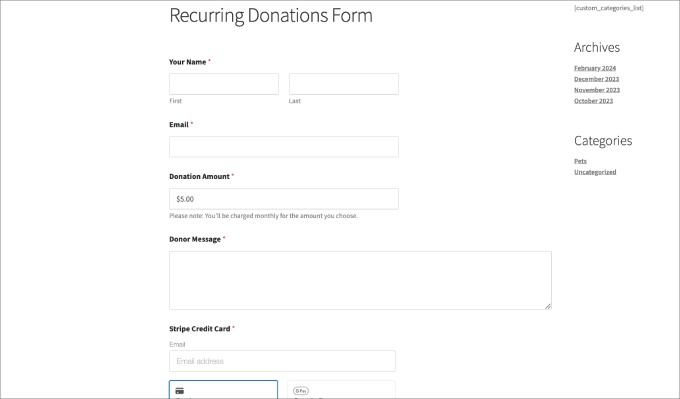
Next, go to WPForms » Add New. This takes you over to the drag-and-drop editor to build your new form.
Go ahead and enter a name for your form so that you can keep track of it should you have to make edits in the future.
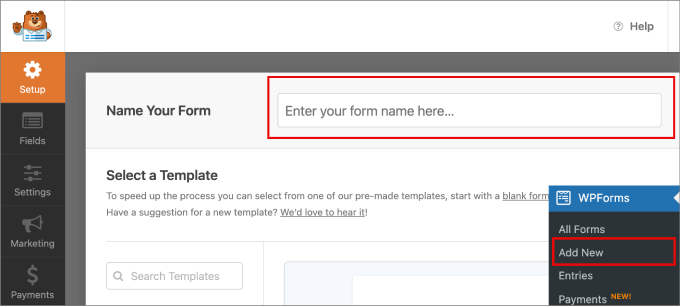
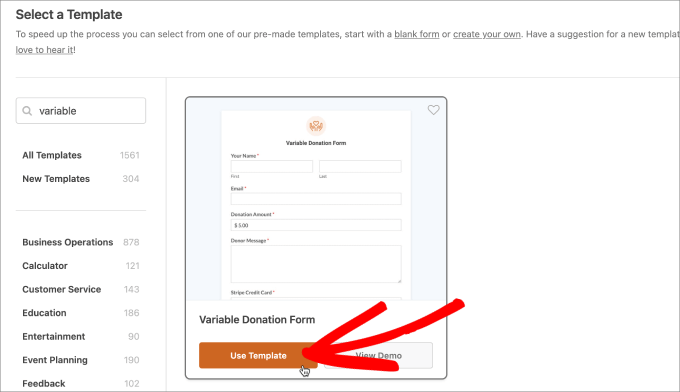
Then, search and select the Variable Donation Form template. There are other donation form templates you can also use, so you might want to experiment with them to see which is right for you.
Click on ‘Use Template.’
Now, you can customize the form and add any additional fields that make sense for your donations page.
You can edit any existing field by clicking on the element and then making the changes under the ‘Field Options’ tab.
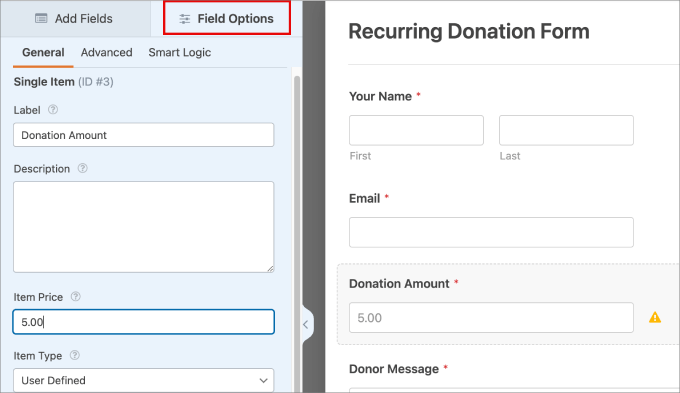
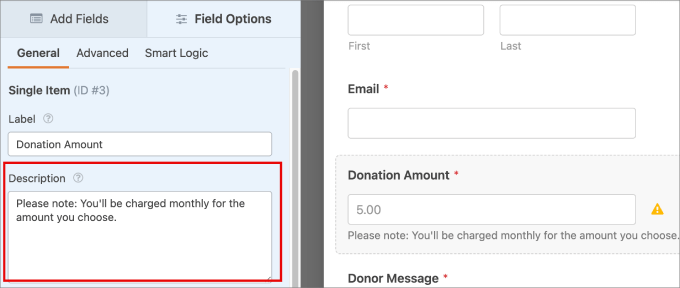
Since you’re automatically charging donors credit cards, you probably want to make it crystal clear that you’ll be taking recurring payments.
You can make a note in the description tab as a disclaimer.
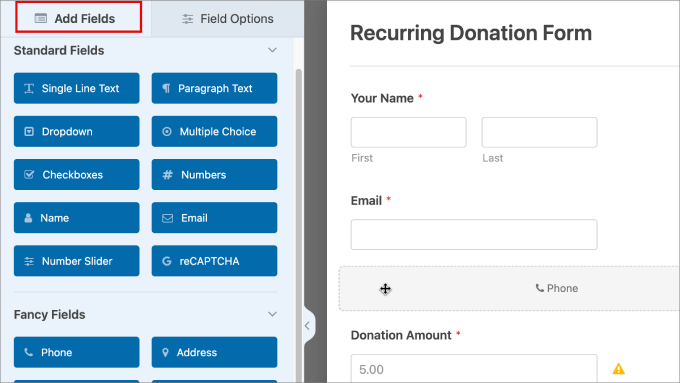
You can also go to the ‘Add Fields’ tab to add any additional fields that aren’t already on the form template.
For example, there’s a wide range of options you may want to consider, like adding a reCAPTCHA for security measures or a phone number if you plan on contacting your donors individually.
Simply drag the buttons to the editor to add the desired field option.
Step 3: Enable Recurring Payments
Next, head over to the Payments » Stripe tab. Then, turn on the option to ‘Enable recurring subscription payments.’
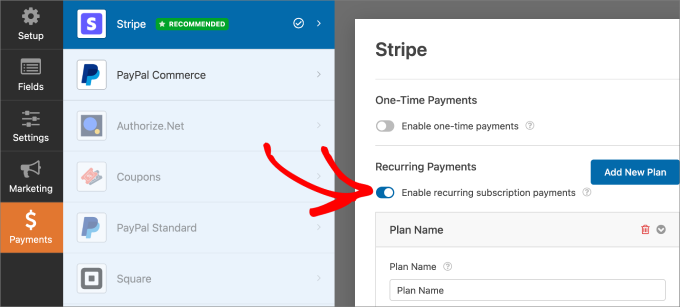
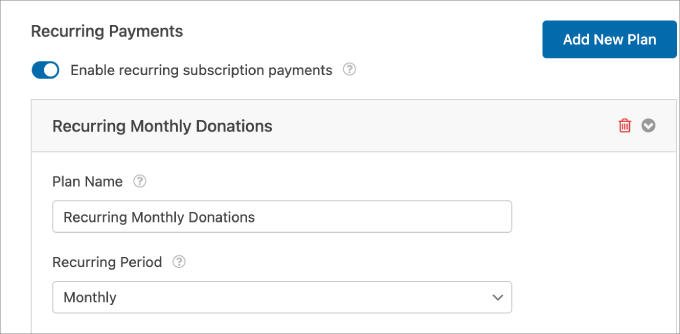
Once activated, you’ll have more options appear. You’ll be able to edit the Plan Name, which is a title that appears in your Stripe transactions.
Also, you can edit the Recurring Period. This is how often the credit card will be charged for recurring donations. In the dropdown menu, select the time periods available, such as daily, weekly, monthly, quarterly, semi-annually, or annually.
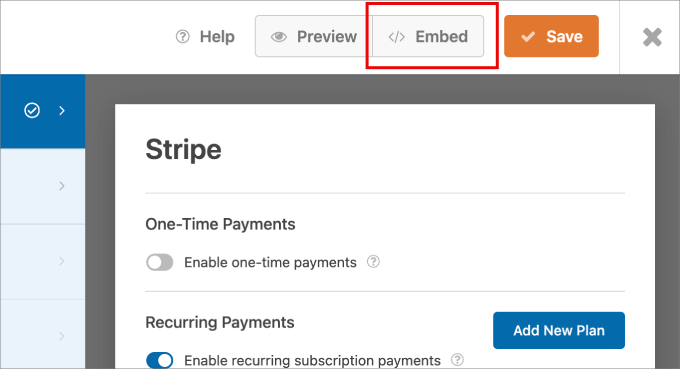
Once that is done, all you have to do is add the form to any WordPress page. Click ‘Save’ at the top to save all the changes you’ve made.
Then, click on the ‘Embed’ button.
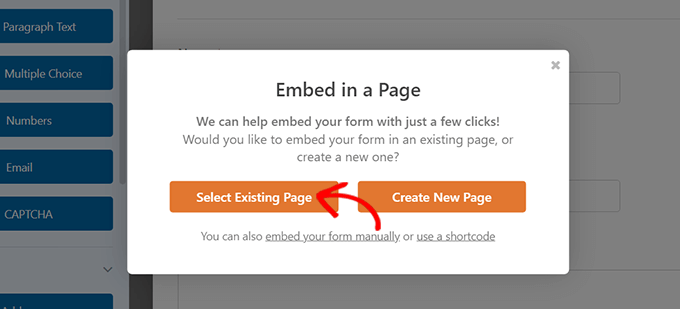
Assuming you already have a donations page, you can choose ‘Select Existing Page’ and pick the page you want to add the form to.
But if you don’t have one, hit the ‘Create New Page’ button.
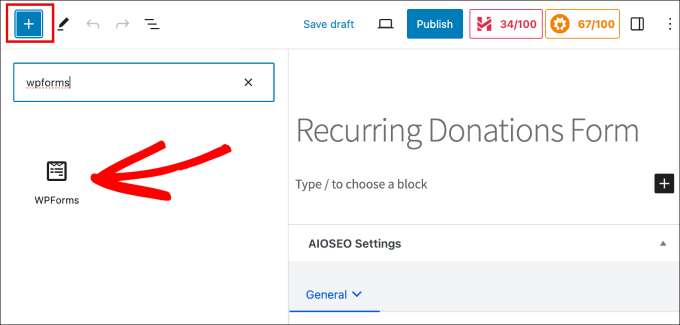
Now that you’re on the page, click on the ‘+’ icon.
Then, add the WPForms block to the page.
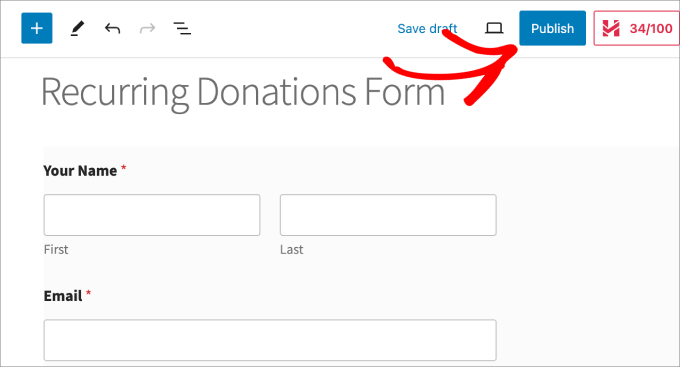
From here, select the recurring donations form you’ve just created.
Then hit ‘Publish.’
Lastly, go ahead and preview the page to make sure that everything looks good.
Also, check that you can accept payments to your Stripe account.
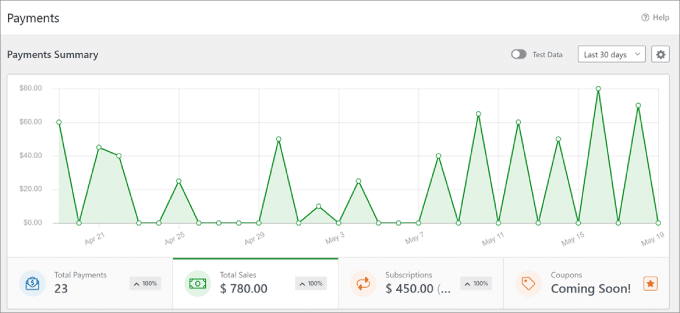
On the WPForms Payments page, you’ll be able to see all of the total payments, sales, and subscriptions you’ve received.
That way, you can track the performance of your donation form.
We hope this article helped you learn how to create a recurring donation form in WordPress. You may also want to see our ultimate guide to WordPress forms or our advice on donation form best practices.
If you liked this article, then please subscribe to our YouTube Channel for WordPress video tutorials. You can also find us on Twitter and Facebook.


Jiří Vaněk
The simplest solution for me seems to be using WP Forms, probably also because I already have it. Thank you for the detailed guide. I have recurring payments solved using a bank QR code, but it is very impractical, which is evident in practice where many people are asking me if they could choose another method (due to international payments). I would like to finally replace these QR codes, so I’ll try your method using WP Forms.
Hajjalah
Thanks for the clear explanations indeed. But according to the setting on this guide for creating a recurring donation form with WPForms, all settings involved are using Stripe as the payment method.
But Stripe is not largely available in some other locations. Can other popular payment systems like PayPal be added to the WPForms donations form?
WPBeginner Support
Yes WPForms does allow for other payment systems.
Admin
Dennis Muthomi
REAL QUIC QUESTION – do you know if there are any plugins that allow accepting donations in cryptocurrency?
WPBeginner Support
We do not have a recommended plugin for that at the moment.
Admin