Are you looking for a way to add Venmo in WordPress & WooCommerce?
Venmo makes it super easy to accept payments on your website. It is convenient, user-friendly, and is already used by about 70 million people. Letting people use a familiar payment method can increase conversions in your online store.
In this article, we will show you how to easily add Venmo in WordPress.

Why Use Venmo as a Payment Gateway
Venmo is a popular mobile payment service owned by PayPal, which is the most popular and trusted online payment gateway in the world. Currently, Venmo is only available in the U.S.
If you have a WooCommerce store based in the United States, then adding Venmo as one of the payment gateways is the right option because it allows your customers to make a purchase from their mobile phones without any hassle.
Not only does Venmo easily connect with users’ bank accounts, but the service also does not charge any fees for sending money from your Venmo balance or linked balance. These are big reasons why many U.S. residents opt for this mobile payment app.
Popular brands like Amazon, Macy’s, Walmart, and Samsung also offer Venmo as a payment gateway to their customers. With that being said, let’s see how you can easily add Venmo to WordPress.
It can be especially beneficial for service-based businesses as well. For example, restaurants, barbershops, photographers, and other small businesses may prefer to accept Venmo to save on transaction fees.
Now, let’s take a look at how to set up Venmo payments in WordPress and WooCommerce:
Method 1. Add Venmo in WordPress Using Payment Plugins Braintree
You can seamlessly integrate Venmo with your WooCommerce store using the Payment Plugins Braintree For WooCommerce plugin.
This WooCommerce plugin allows you to easily add Venmo as a payment gateway to your online store.
First, you need to install and activate the Payment Plugins Braintree plugin. For further instructions, check out our guide on how to install a WordPress plugin.
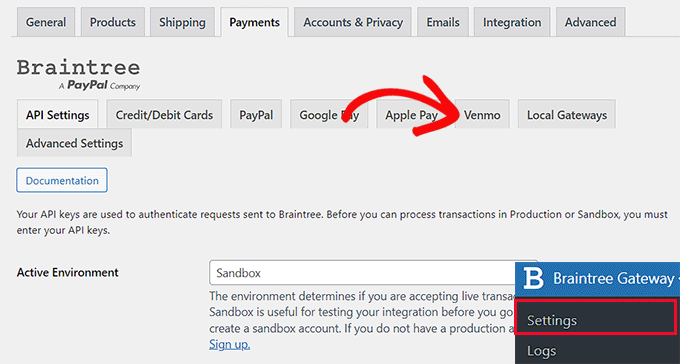
Head over to Braintree Gateway » Settings from your WordPress admin dashboard upon activation.
This will actually direct you to the WooCommerce ‘Payments’ page. You can also reach this page by heading to WooCommerce » Settings. The only difference will be that if you go through the WooCommerce menu item, the page will not have the Braintree logo.
Here, you will see all the Braintree gateways that you can integrate into your site. Simply click the ‘Venmo’ tab.
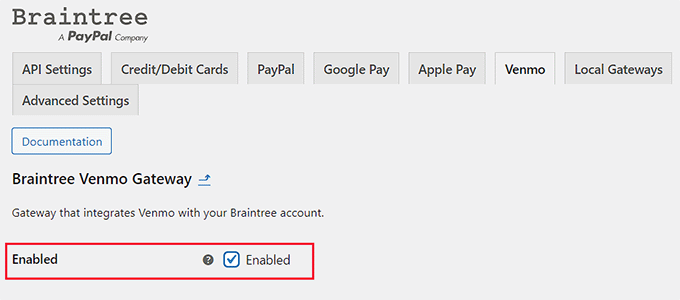
Now that you’re on the ‘Braintree Venmo Gateway’ tab, you will see an ‘Enabled’ checkbox at the top.
You need to make sure that it is checked. This plugin will allow your site to accept Venmo payments.
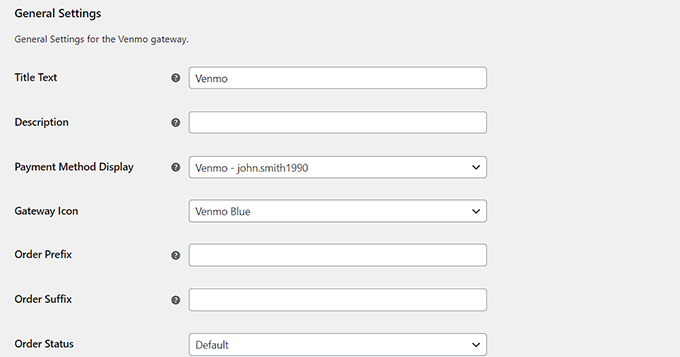
Next, go to ‘General Settings’ and fill in the details to set up your Venmo Gateway. For example, you can change the title or icon that appears to users or add a short description of the payment method.
After that, simply click the ‘Save Changes’ button at the bottom of the page to save your changes.
Now, Venmo has been added to your WordPress site, and you’re ready to accept payments in WooCommerce.
Method 2. Add Venmo in WordPress Using the Checkout With Venmo Plugin
Another way to add Venmo in WordPress is by using the Checkout With Venmo On WooCommerce plugin.
It is a well-known plugin that is used to integrate Venmo into WordPress.
The first thing you need to do is install and activate the Checkout With Venmo On WooCommerce plugin. For help, check out our guide on how to install a WordPress plugin.
Once the plugin is activated, go to WooCommerce » Venmo Link from the WordPress admin dashboard.
This will open up the ‘Venmo’ tab on the WooCommerce ‘Payments page.
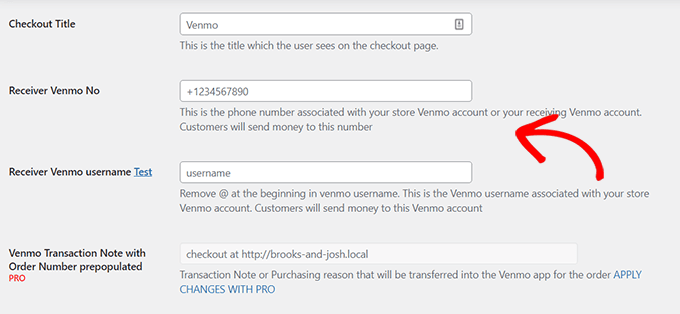
Here, you will find the ‘Enable VENMO’ option at the top of the page. Make sure that you check the box.
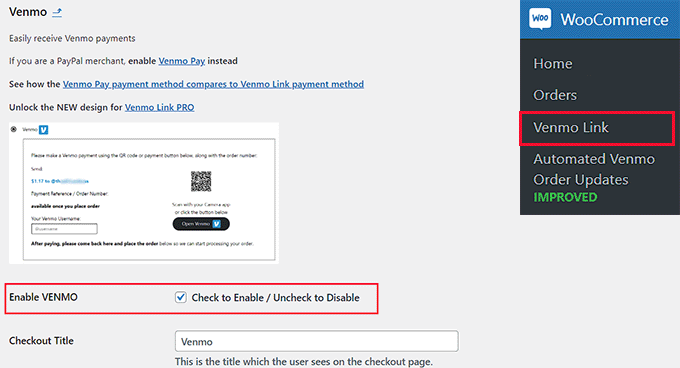
Next, simply fill out the details in the form below and then click on the ‘Save Changes’ button at the bottom of the page.
Congratulations! You’ve successfully integrated Venmo into WordPress.
Bonus: How to Set Up Installment Payments in WooCommerce
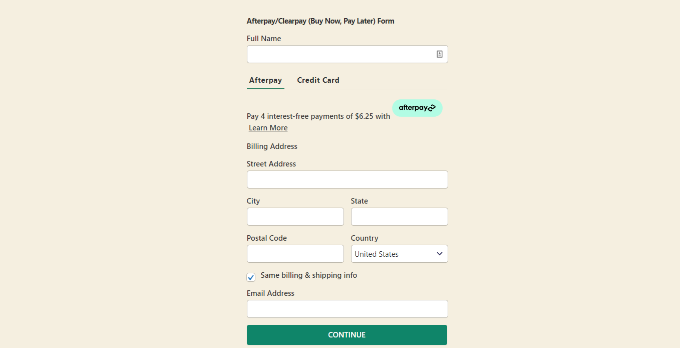
Now that you’ve added Venmo to WooCommerce, you may want to also add a ‘buy now, pay later’ option for customers.
Installment payments allow customers to split their purchases into smaller, more manageable payments over time rather than paying the full amount upfront.
This will boost sales and conversions, making high-priced products more accessible and differentiating your online store from competitors.
All you have to do is install a Stripe payment plugin that supports installment plans. We recommend WP Simple Pay, which supports buy now, pay later plans along with 13 different payment methods in 135+ currencies. It comes with pre-built form templates and lets you choose the billing period based on the days, weeks, months, or years.
If you are interested in learning more, just follow our guide on how to set up installment plans for WooCommerce.
That’s it! We hope you learned how to add Venmo to WordPress and WooCommerce. You may also want to check out our ultimate WooCommerce SEO guide and our expert picks for the best WooCommerce plugins to help grow your store.
If you liked this article, then please subscribe to our YouTube Channel for WordPress video tutorials. You can also find us on Twitter and Facebook.


Syed Balkhi says
Hey WPBeginner readers,
Did you know you can win exciting prizes by commenting on WPBeginner?
Every month, our top blog commenters will win HUGE rewards, including premium WordPress plugin licenses and cash prizes.
You can get more details about the contest from here.
Start sharing your thoughts below to stand a chance to win!
kzain says
This is informative for understanding how to potentially accept Venmo payments on WooCommerce!
The Braintree gateway with Venmo integration seems like a complete solution.