Do you want to create a child theme in WordPress?
A child theme is a WordPress theme that inherits the functionality of another WordPress theme. Many users create a child for their current theme so that they can safely customize their website design without losing changes when the theme developer releases an update.
In this article, we will show you how to create a child theme for your WordPress site.
How Does a Child Theme Work, and Why Do You Need It?
A child theme inherits all the features, functions, and styles of another WordPress theme. When you create a child theme, the original theme is called the parent theme.
The inheritance includes the parent theme’s style.css file, which defines the theme’s main style. The child theme can override or extend its inherited properties by adding its own files or by modifying the existing ones.
While it is possible to customize your WordPress theme without installing a child theme, there are several reasons why you may need one anyway:
- Child themes protect your customizations during theme updates, keeping them safe from being overwritten. If you modify the parent theme directly, then those tweaks might vanish when you update.
- Child themes let you safely try out new designs or features without messing up the site’s original theme, similar to a staging environment.
- If you know how to code, then child themes can make the development process more efficient. A child theme’s files are much simpler than a parent theme’s. You can focus on modifying only the parts of the parent theme that you want to change or expand on.
What to Do Before Creating a WordPress Child Theme
We’ve seen lots of WordPress users excited to dive into the technical stuff, only to get discouraged when errors pop up. We get it. That’s why it’s important to know what you are getting into before creating a child theme.
Here are some things we recommend you do first before continuing with this step-by-step guide:
- Be aware that you will be working with code. At the very least, you will need a basic understanding of HTML, CSS, PHP, and, optionally, JavaScript to understand what changes you need to make. You can read more about this in the WordPress theme handbook.
- Choose a parent theme that has your desired website design and features. If possible, find one where you only need to make a few changes.
- Use a local site or a staging site for theme development. You don’t want to create unintentional errors on your live site.
- Back up your website first.
There are several ways to create a child theme out of your existing theme. One is with manual code, while others require a plugin, which is a lot more beginner-friendly.
The first method may seem intimidating if you lack technical experience. That said, even if you choose one of the plugin methods, we still recommend reading through the manual method to familiarize yourself with the process and the files involved.
Pro Tip: Want to customize your theme without creating a child theme? Use WPCode to safely enable new features with custom code snippets without breaking your website.
With all that in mind, let’s get to how to create a child theme in WordPress. You can jump to the method you prefer using the links below:
- Method 1: Creating a Child WordPress Theme Manually
- Method 2: Creating a Child Classic Theme With a Plugin
- Method 3: Creating a Child Block Theme With a Plugin
- Bonus Tip: Find Out If Your Theme Has a Child Theme Generator
- How to Customize Your Classic Child Theme
- How to Customize Your Block Child Theme
- How to Edit a Child Theme's Template Files
- How to Add New Functionality to Your Child Theme
- How to Troubleshoot Your WordPress Child Theme
Method 1: Creating a Child WordPress Theme Manually
First, you need to open /wp-content/themes/ in your WordPress installation folder.
You can do this by using your WordPress hosting’s file manager or an FTP client. We find the first option to be much easier, so we will use that.
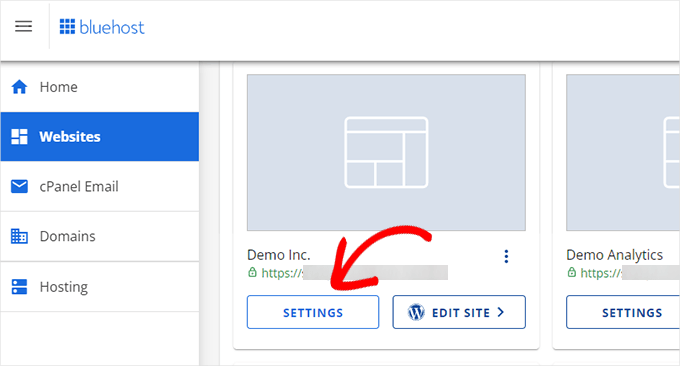
If you are a Bluehost client, then you can log in to your hosting account dashboard and navigate to the ‘Websites’ tab. After that, click ‘Settings.’
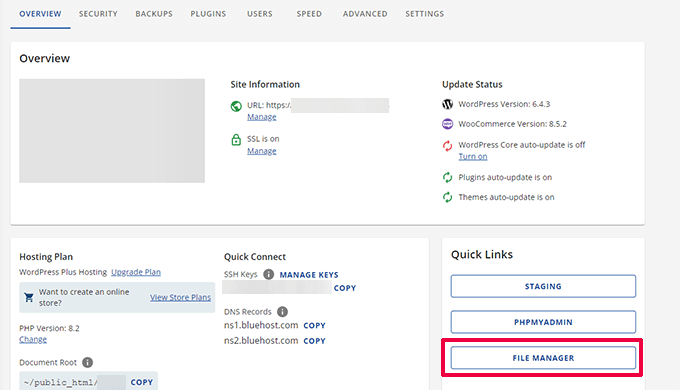
In the Overview tab, scroll down to the ‘Quick Links’ section.
Then, select ‘File Manager.’
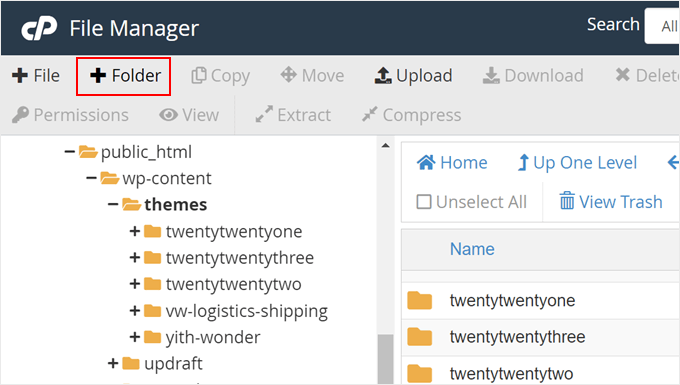
At this stage, you need to go to your website’s public_html folder and open the /wp-content/themes/ path.
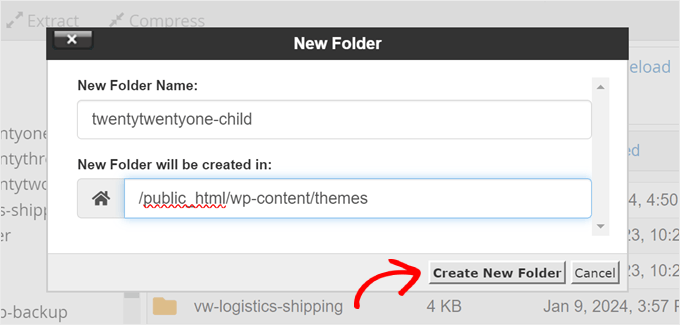
Here, just click the ‘+ Folder’ button in the top left corner to create a new folder for your child theme.
You can name the folder anything you want.
For this tutorial, we will just use the folder name twentytwentyone-child as we will use Twenty Twenty-One as our parent theme. Once done, just click ‘Create New Folder.’
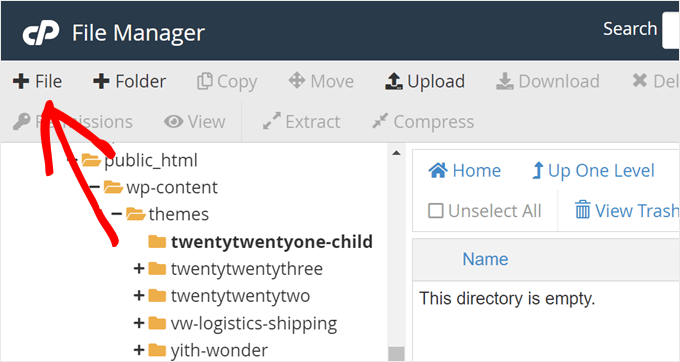
Next, you must open the folder you just made and click ‘+ File’ to create the first file for your child theme.
If you use an FTP client, then you can use a text editor like Notepad and upload the file later.
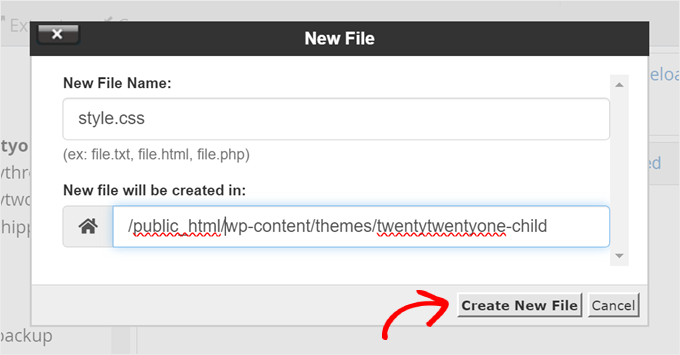
Go ahead and name this file ‘style.css’ ,as it is your child’s main stylesheet and will contain information about the child theme.
Then, click ‘Create New File.’
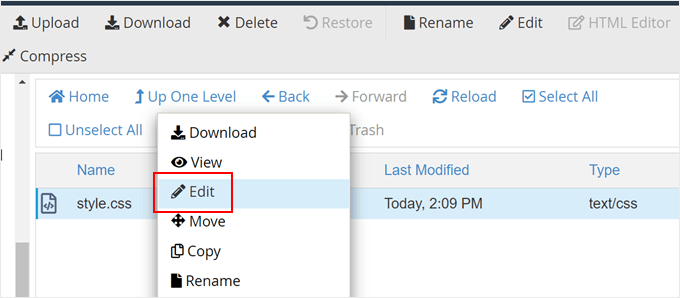
Now, just right-click on the style.css file.
After that, click ‘Edit’ to open a new tab like in the screenshot below.
In this new tab, you can paste the following text and adjust it based on your needs:
/*
Theme Name:   Twenty Twenty-One Child
Theme URI:    https://wordpress.org/themes/twentytwentyone/
Description:  Twenty Twenty-One child theme
Author:       WordPress.org
Author URI:   https://wordpress.org/
Template:     twentytwentyone
Version:      1.0.0
Text Domain:  twentytwentyonechild
*/
Once done, just click ‘Save Changes.’

The next thing you need to do is create a second file and name it functions.php. This file will import or enqueue the stylesheets from the parent theme’s files.
Once you’ve created the document, add the following wp_enqueue code:
add_action( 'wp_enqueue_scripts', 'my_theme_enqueue_styles' );
function my_theme_enqueue_styles() {
    $parenthandle = 'twenty-twenty-one-style'; // This is 'twenty-twenty-one-style' for the Twenty Twenty-one theme.
    $theme = wp_get_theme();
    wp_enqueue_style( $parenthandle, get_template_directory_uri() . '/style.css',
        array(), // if the parent theme code has a dependency, copy it to here
        $theme->parent()->get('Version')
    );
    wp_enqueue_style( 'custom-style', get_stylesheet_uri(),
        array( $parenthandle ),
        $theme->get('Version') // this only works if you have Version in the style header
    );
}
Once done, just save the file like in the previous step.
Note: For this method, we recommend reading the official Child Themes and Including Assets documentation to make sure your child theme’s stylesheets are loaded properly.
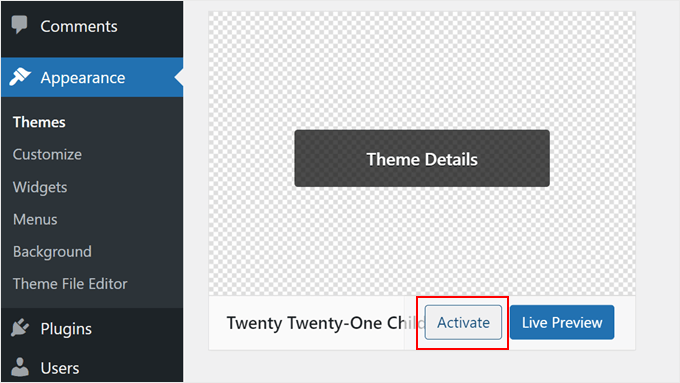
You’ve now created a very basic child theme. When you go to Appearance » Themes in your WordPress admin panel, you should see the Twenty Twenty-One Child option.
Click the ‘Activate’ button to start using the child theme on your site.
Method 2: Creating a Child Classic Theme With a Plugin
This next method uses the Child Theme Configurator plugin. This easy-to-use WordPress plugin lets you create and customize WordPress child themes quickly without using code, but it only works well with a classic (non-block) theme.
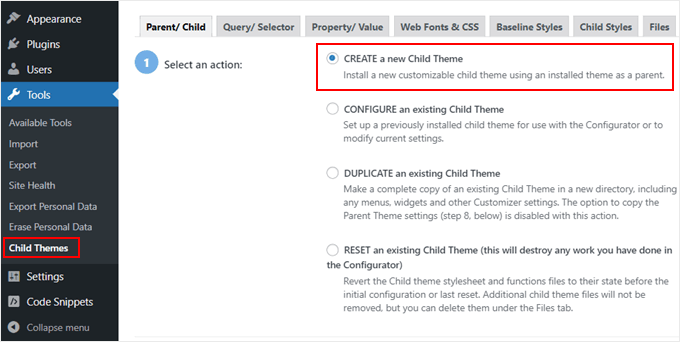
The first thing you need to do is install and activate the WordPress plugin. On activation, you need to navigate to Tools » Child Themes in your WordPress dashboard.
In the Parent/Child tab, you’ll be asked to choose an action. Just select ‘CREATE a new Child Theme’ to get started.
Then, select a parent theme from a dropdown menu. We will select the Hestia theme.
After that, just click the ‘Analyze’ button to make sure the theme is suitable for use as a parent theme.

Next, you will be asked to name the folder the child theme will be saved in. You can use any folder name you want.
Below that, you need to select where to save the new styles: in the primary stylesheet or a separate one.
The primary stylesheet is the default stylesheet that comes with your child theme. When you save new custom styles to this file, you are directly modifying the main styles of your child theme. Every modification will overwrite the original theme’s style.
The separate option allows you to save a new custom style to a separate stylesheet file. This is useful if you want to preserve the original theme’s style and not overwrite it.
For demonstration purposes, we will choose the first option. But as you get more creative with your child theme customizations, you can always repeat this process and select the second option.

Moving down, you have to choose how the parent theme’s stylesheet will be accessed.
We will just go with the default ‘Use the WordPress style queue’ as it will let the plugin determine the appropriate actions automatically.

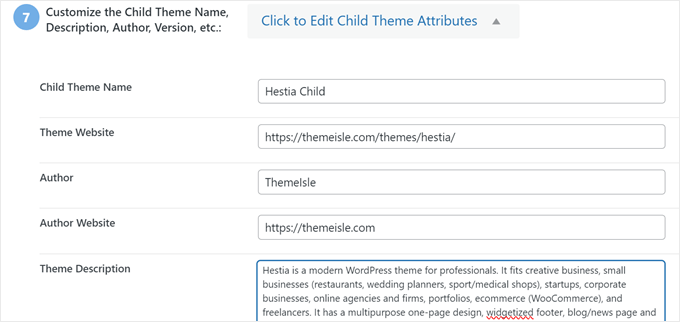
When you get to step 7, you’ll need to click the button labeled ‘Click to Edit Child Theme Attributes’.
You can then fill in the details of your child theme.
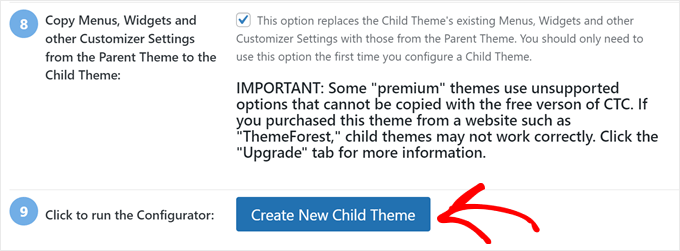
When you create a child theme manually, you will lose the parent theme’s menus and widgets. Child Theme Configurator can copy them from the parent theme to the child theme. Check the box in step 8 if you’d like to do this.
Finally, click the ‘Create New Child Theme’ button to make your new child theme.
The plugin will create a folder for your child theme and add the style.css and functions.php files you’ll use to customize the theme later.
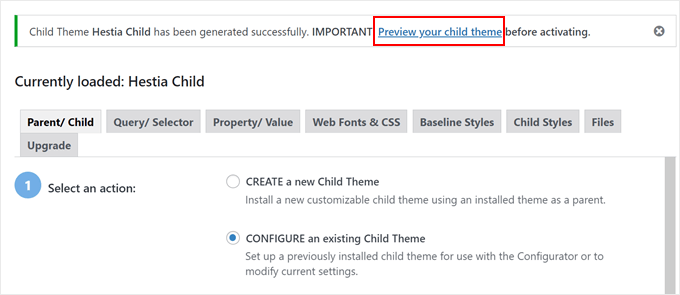
Before you activate the theme, you should click the link near the top of the screen to preview it and make sure it looks good and doesn’t break your site.
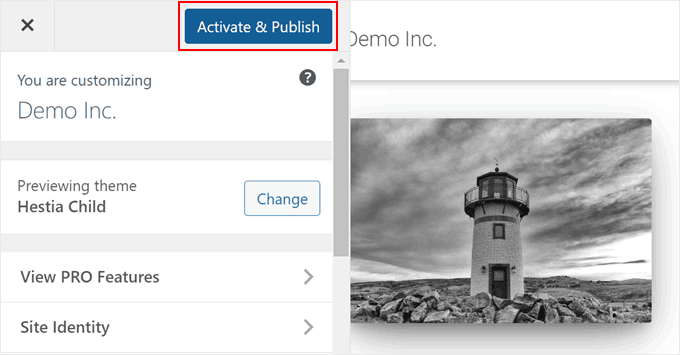
If everything seems to be working, click the ‘Activate & Publish’ button.
Now, your child theme will go live.
At this stage, the child theme will look and behave exactly like the parent theme.
Method 3: Creating a Child Block Theme With a Plugin
If you use a block theme, then WordPress offers an easy way to create a child theme with the Create Block Theme plugin.
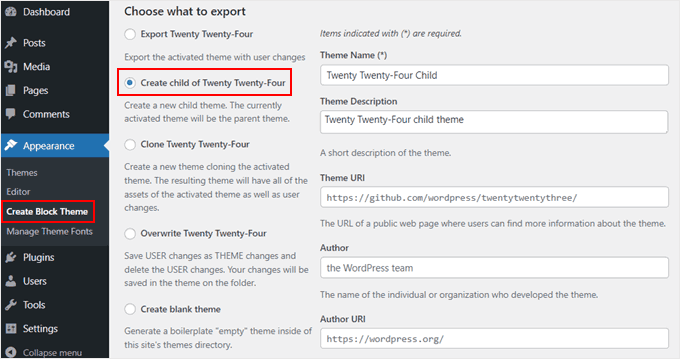
First, you will need to install and activate the WordPress plugin. After that, go to Appearance » Create Block Theme.
Here, simply select ‘Create child of [theme name].’ We are using Twenty Twenty-Four in this example.
Once you’ve selected that option, fill out your theme’s information.
Below that, you can do more things like uploading a screenshot for the theme to differentiate it from other themes, adding image credits, linking to must-have WordPress plugins, adding theme tags, and so on.
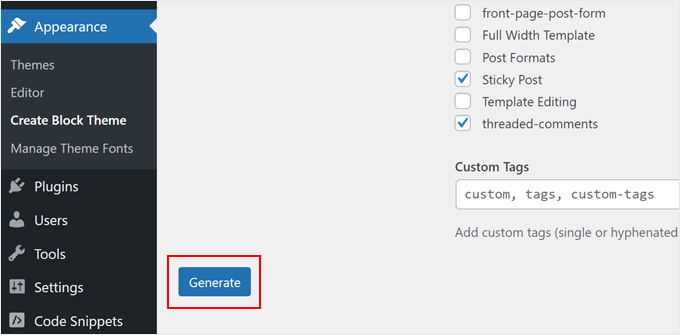
Once you are done configuring the settings, just scroll all the way down and hit the ‘Generate’ button.
The plugin will now create and download a new child theme zip file to your computer.
If you open it, you will see three files: readme, style.css, and theme.json.
The theme.json file defines various aspects of a block theme, including its colors, typography, layout, and more. The plugin creates this file by default so that you can override or extend the parent theme’s style in the child theme later on.
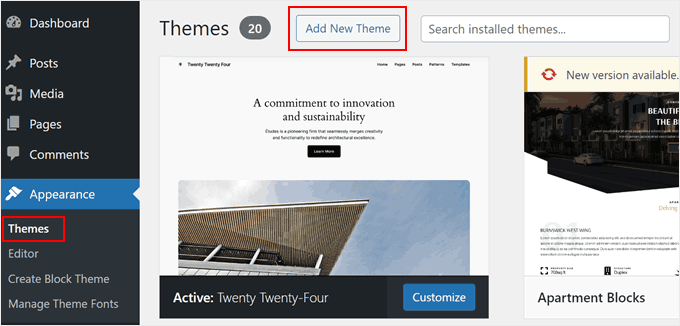
At this stage, all you need to do next is go to Appearance » Themes.
After that, click ‘Add New Theme.’
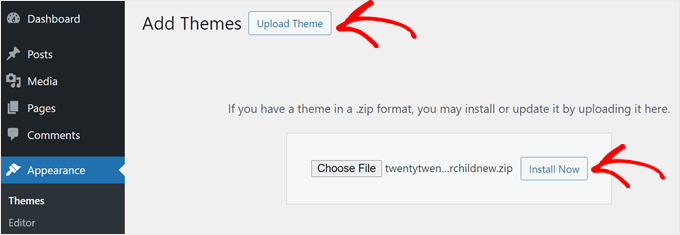
Next, select ‘Upload Theme.’
Then, choose the zip file and click ‘Install Now’ to install the WordPress theme.
Bonus Tip: Find Out If Your Theme Has a Child Theme Generator
If you are lucky, then your WordPress theme may already have an existing feature to create a child theme.
For example, if you use Astra, then you can go to the Astra Child Theme Generator website. After that, just fill out your child theme name and click the ‘Generate’ button.
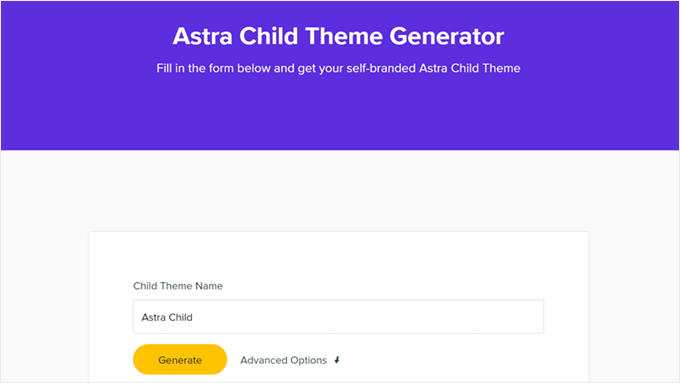
Your browser will then automatically download your child theme to your computer, which you can then install on WordPress yourself.
We also found some other popular WordPress themes that have a child theme generator:
How to Customize Your Classic Child Theme
Note: This section is for classic WordPress theme users. If you use a block theme, then just skip to the next section.
Technically, you can customize your child theme without code by using the Theme Customizer. The changes you make there won’t affect your parent theme. If you are not comfortable with coding yet, then feel free to use the Customizer.
That said, we also recommend customizing the child theme with code.
Besides learning more about WordPress theme development, code customization allows for the changes to be documented within the child theme’s files, making it easier to track them.
Now, the most basic way to customize a child theme is by adding custom CSS to the style.css file. To do that, you need to know what code you need to customize.
You can simplify the process by copying and modifying the existing code from the parent theme. You can find that code by using the Chrome or Firefox Inspect tool or by copying it directly from the parent theme’s CSS file.
Method 1: Copying Code from the Chrome or Firefox Inspector
The easiest way to discover the CSS code you need to modify is by using the inspector tools that come with Google Chrome and Firefox. These tools allow you to look at the HTML and CSS behind any element of a web page.
You can read more about the inspector tool in our guide on the basics of inspect element: customizing WordPress for DIY users.
When you right-click on your web page and use the inspect element, you will see the HTML and CSS for the page.
As you move your mouse over different HTML lines, the inspector will highlight them in the top window. It will also show you the CSS rules related to the highlighted element, like so:
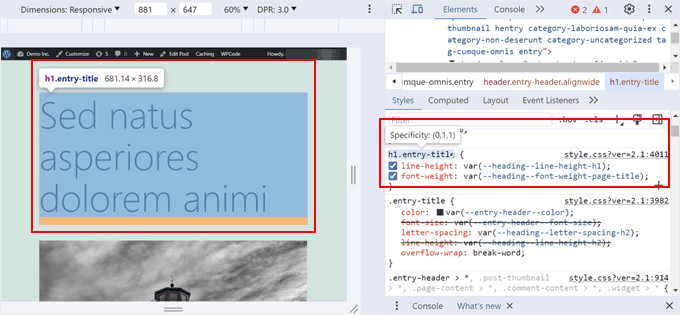
You can try editing the CSS right there to see how it would look. For example, let’s try changing the background color of the theme’s body to #fdf8ef. Find the line of code that says body { and inside it, the code that says color: .
Just click the color picker icon next to color: and paste the HEX code into the appropriate field, like so:
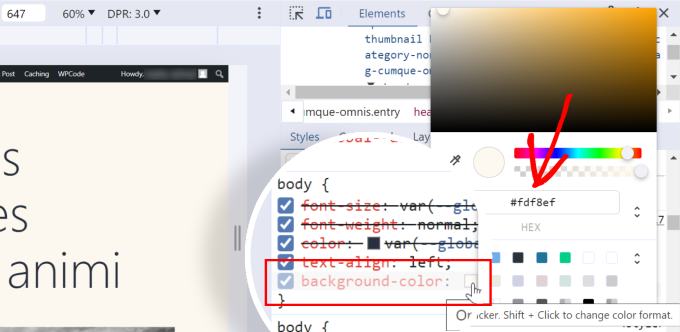
Now, you know how to change the background color using CSS. To make the changes permanent, you can open your style.css file in the child theme directory (using the file manager or FTP).
Then, paste the following code below the child theme information, like so:
/*
Theme Name:   Twenty Twenty-One Child
Theme URI:    https://wordpress.org/themes/twentytwentyone/
Description:  Twenty Twenty-One child theme
Author:       WordPress.org
Author URI:   https://wordpress.org/
Template:     twentytwentyone
Version:      1.0.0
Text Domain:  twentytwentyonechild
*/

body {
    background-color: #fdf8ef
}
Here is what it will look like if you go to the WordPress admin and open Appearance » Theme File Editor:
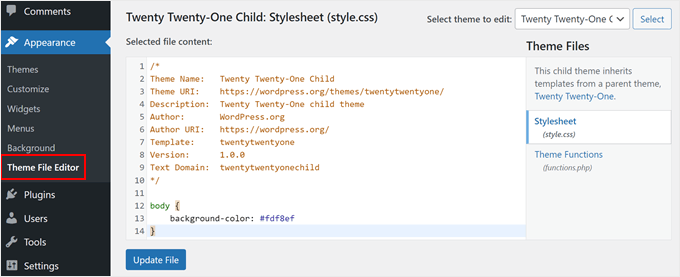
If you are a beginner and want to make other changes, then we recommend getting familiar with HTML and CSS so that you know exactly what element each code is referring to. There are many HTML and CSS cheat sheets online that you can refer to.
Here is the complete stylesheet that we have created for the child theme. Feel free to experiment and modify it:
/*
Theme Name:   Twenty Twenty-One Child
Theme URI:    https://wordpress.org/themes/twentytwentyone/
Description:  Twenty Twenty-One child theme
Author:       WordPress.org
Author URI:   https://wordpress.org/
Template:     twentytwentyone
Version:      1.0.0
Text Domain:  twentytwentyonechild
*/

.site-title {
color: #7d7b77;
}
.site-description {
color: #aba8a2;
}
body {
background-color: #fdf8ef;
color: #7d7b77;
}
.entry-footer {
color: #aba8a2;
}
.entry-title {
color: #aba8a2;
font-weight: bold;
}
.widget-area {
color: #7d7b77;
}
Method 2: Copying Code From the Parent Theme’s style.css File
Maybe there are a lot of things in your child theme that you want to customize. In that case, it may be quicker to copy some code directly from the parent theme’s style.css file, paste it into your child theme’s CSS file, and then modify it.
The tricky part is that a theme’s stylesheet file can look really long and overwhelming to beginners. However, once you understand the basics, it’s actually not that hard.
Let’s use a real example from the Twenty Twenty-One parent theme’s stylesheet. You need to navigate to /wp-content/themes/twentytwentyone in your WordPress installation folder and then open the style.css file in your file manager, FTP, or Theme File Editor.
You will see the following lines of code:
:root {
/* Colors */
--global--color-black: #000;
--global--color-dark-gray: #28303d;
--global--color-gray: #39414d;
--global--color-light-gray: #f0f0f0;
--global--color-green: #d1e4dd;
--global--color-blue: #d1dfe4;
--global--color-purple: #d1d1e4;
--global--color-red: #e4d1d1;
--global--color-orange: #e4dad1;
--global--color-yellow: #eeeadd;
--global--color-white: #fff;
--global--color-white-50: rgba(255, 255, 255, 0.5);
--global--color-white-90: rgba(255, 255, 255, 0.9);
--global--color-primary: var(--global--color-dark-gray); /* Body text color, site title, footer text color. */
--global--color-secondary: var(--global--color-gray); /* Headings */
--global--color-primary-hover: var(--global--color-primary);
--global--color-background: var(--global--color-green); /* Mint, default body background */
--global--color-border: var(--global--color-primary); /* Used for borders (separators) */
}
Lines 3 to 15 control the type of colors (like yellow, green, purple) that the entire theme will use in their specific HEX codes. And then, for lines like ‘global-color-primary’ or ‘global-color-secondary,’ that means those are the primary and secondary colors of that theme.
You can copy these lines of code to your child theme’s stylesheet and then change the HEX codes to create your perfect color scheme.
As you scroll down in the parent theme’s stylesheet, you will notice that other variables may have these color variables, too, like here:
/* Buttons */
--button--color-text: var(--global--color-background);
This basically means all button texts will use the same color as declared in --global--color-background:, which is mint green (--global--color-green: #d1e4dd). If you change the HEX in --global--color-green:, then the button text will look different, too.
Note: If you use the Twenty Twenty-One child theme and do not see any changes, then you may need to update the ‘Version’ part of the theme file information (for example, from 1.0 to 2.0) every time you update the style.css file.
You can also follow these tutorials to experiment with your child theme customizations:
- How to Change the Text Color in WordPress
- How to Change Your WordPress Logo Size (Works With Any Theme)
- How to Customize Blockquotes Style in WordPress Themes
- WordPress Body Class 101: Tips and Tricks for Theme Designers
- How to Add a Parallax Effect to Any WordPress Theme
How to Customize Your Block Child Theme
If you use a child block theme, then most of your customizations will be done to your theme.json file, not style.css.
However, during our testing, we found the process to be complicated. Unlike classic child themes, there’s a bigger knowledge gap you need to fill in (especially about JSON and how CSS is handled there) if you are new to WordPress theme development.
That said, we found a much easier alternative using the Create Block Theme plugin. This tool can record any changes made in the WordPress Full Site Editor in your child theme.json’s file. So, you won’t have to touch any code at all because the plugin will take care of it for you.
Let’s show you an example. First, open the WordPress Full Site Editor by going to Appearance » Editor.
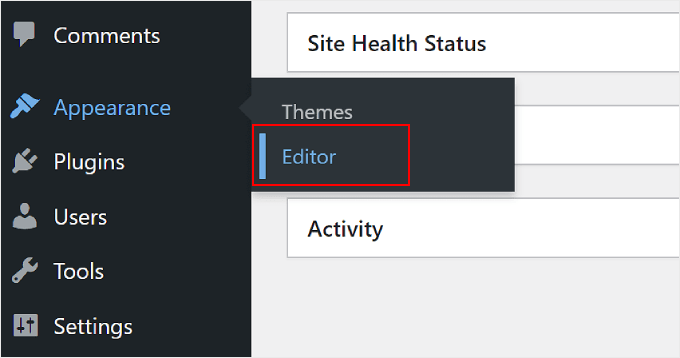
You will see several menus to choose from.
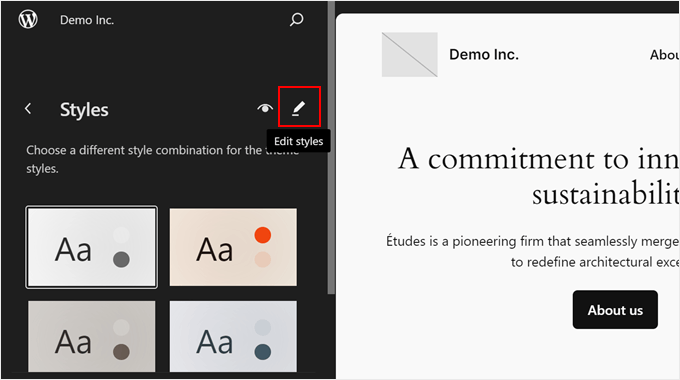
Here, just select ‘Styles.’
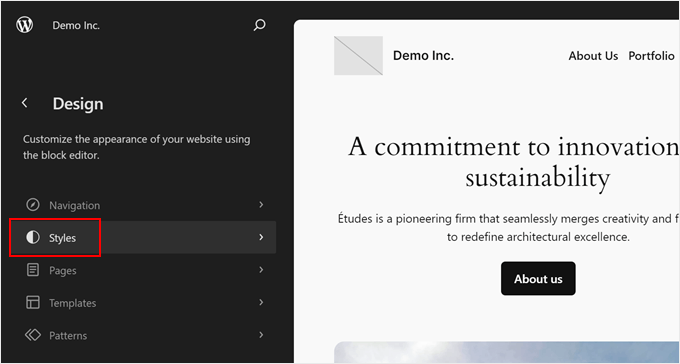
On the next page, you will see several built-in style combinations to choose from.
For our purpose, you can simply skip all of that and just click the pencil icon.
Now, let’s try changing some parts of your child theme, like the fonts.
For this example, go ahead and click ‘Typography’ in the right sidebar.
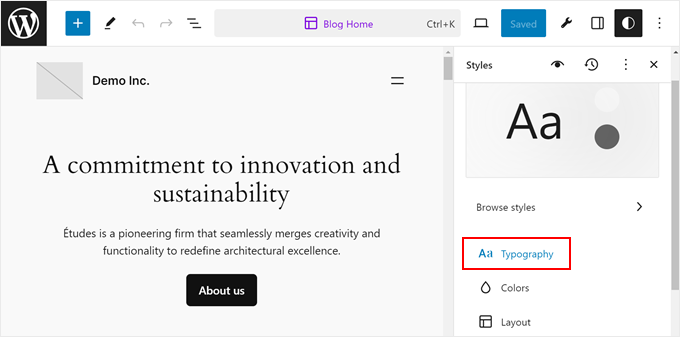
Next, you will see some options to change the theme’s global fonts for text, links, headings, captions, and buttons.
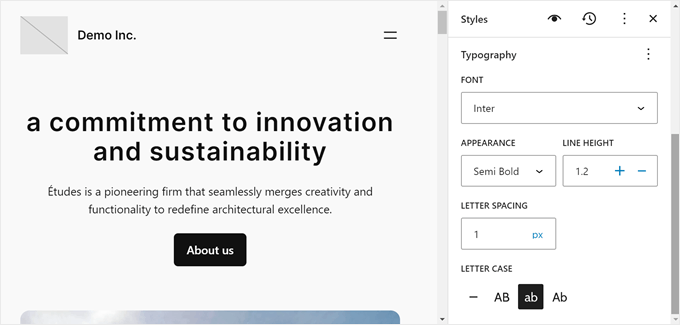
Let’s click ‘Headings‘ for the sake of demonstration.

In the Font dropdown menu, change the original pick to any font that’s available.
Feel free to change the appearance, line height, letter spacing, and letter casing if needed.
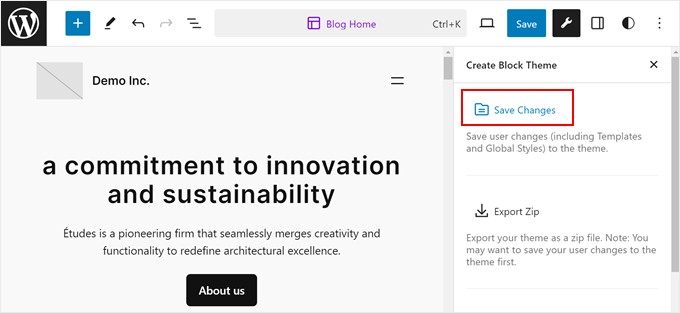
Once you are done, just click ‘Save.’ After that, you can click the Create Block Theme button (the wrench icon) next to ‘Save.’
Then, click ‘Save Changes.’ This will save all of your changes to the child theme.json file.
If you open your theme.json file, then you will see the changes reflected in the code.
Here’s what we saw after we updated our child theme:
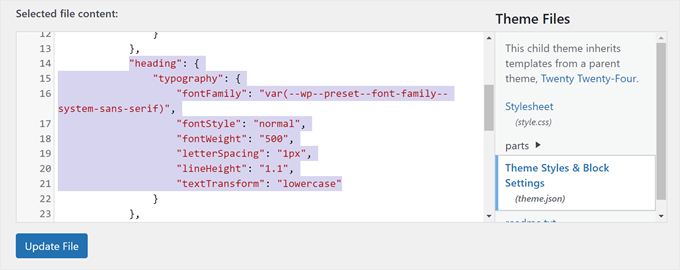
As you can see, now the file includes code that indicates that heading tags will use the Inter font with semi-bold appearance, 1.2 line height, 1 pixel line spacing, and in lowercase.
So, whenever you edit your child block theme, make sure to click the wrench icon and save your changes so that they are well-documented.
How to Edit a Child Theme’s Template Files
Most WordPress themes have templates, which are theme files that control the design and layout of a specific area inside a theme. For example, the footer section is usually handled by the footer.php file, and the header is handled by the header.php file.
Each WordPress theme also has a different layout. For example, the Twenty Twenty-One theme has a header, content loop, footer widget area, and footer.
If you want to modify a template, then you have to find the file in the parent theme folder and copy it to the child theme folder. After that, you should open the file and make the modifications you want.
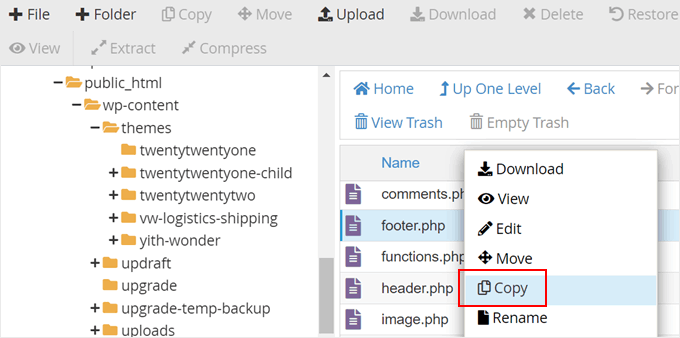
For example, if you use Bluehost and your parent theme is Twenty Twenty-One, then you can go to /wp-content/themes/twentytwentyone in your file manager. Then, right-click on a template file like footer.php and select ‘Copy.’
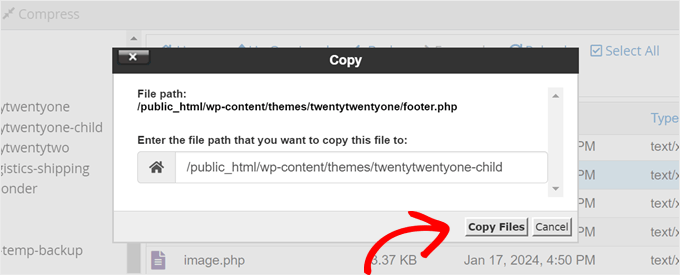
After that, enter the file path of your child theme.
Once you are done, simply click ‘Copy Files.’
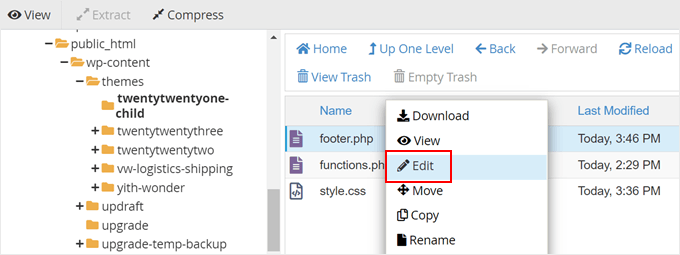
You will then be redirected to the file path.
To edit the footer.php file, just right-click on it and select ‘Edit.’
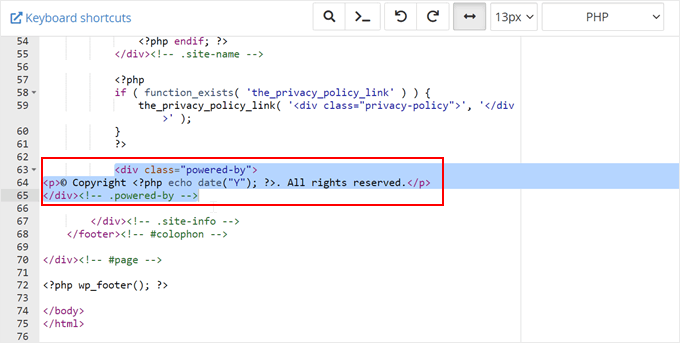
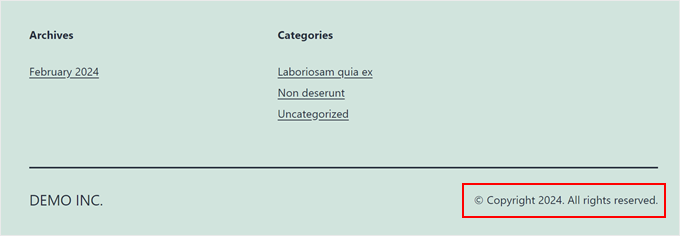
As an example, we will remove the ‘Proudly powered by WordPress’ link from the footer area and add a copyright notice there.
To do that, you should delete everything between the <div class= "powered-by"> tags:
<div class="powered-by">
				<?php
				printf(
					/* translators: %s: WordPress. */
					esc_html__( 'Proudly powered by %s.', 'twentytwentyone' ),
					'<a href="' . esc_url( __( 'https://wordpress.org/', 'twentytwentyone' ) ) . '">WordPress</a>'
				);
				?>
			</div><!-- .powered-by -->
Then you need to paste in the code you find below those tags in the example below:
<div class="powered-by">
<p>© Copyright <?php echo date("Y"); ?>. All rights reserved.</p>
</div><!-- .powered-by -->
Here’s what you should now have in the text editor:
Go ahead and save the file to make the changes official.
After that, visit your website to see the new copyright notice.
How to Add New Functionality to Your Child Theme
The functions.php file in a theme uses PHP code to add features or change default features on a WordPress site. It acts like a plugin for your WordPress site that’s automatically activated with your current theme.
You’ll find many WordPress tutorials that ask you to copy and paste code snippets into functions.php. But if you add your modifications to the parent theme, then they will be overwritten whenever you install a new update to the theme.
That’s why we recommend using a child theme when adding custom code snippets. In this tutorial, we will add a new widget area to our theme.
We can do that by adding this code snippet to our child theme’s functions.php file. To make the process even safer, we recommend using the WPCode plugin so that you don’t edit the functions.php file directly, reducing the risk of errors.
You can read our guide on how to add custom code snippets for more information.
Here is the code you need to add your functions.php file:
// Register Sidebars
function custom_sidebars() {

$args = array(
'id'            => 'custom_sidebar',
'name'          => __( 'Custom Widget Area', 'text_domain' ),
'description'   => __( 'A custom widget area', 'text_domain' ),
'before_title'  => '<h3 class="widget-title">',
'after_title'   => '</h3>',
'before_widget' => '<aside id="%1$s" class="widget %2$s">',
'after_widget'  => '</aside>',
);
register_sidebar( $args );

}
add_action( 'widgets_init', 'custom_sidebars' );
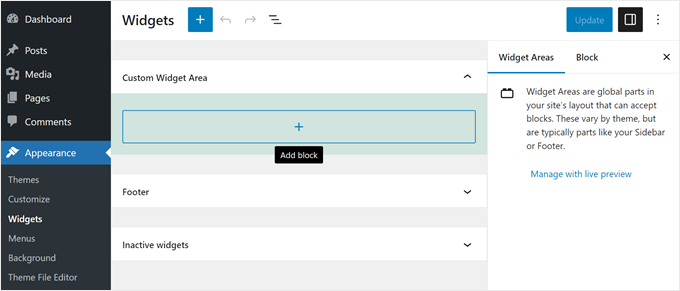
Once you save the file, you can visit the Appearance » Widgets page of your WordPress dashboard.
Here, you will see your new custom widget area that you can add widgets to.
There are plenty of other features you can add to your theme using custom code snippets. Check out these extremely useful tricks for the WordPress functions.php file and useful WordPress code snippets for beginners.
How to Troubleshoot Your WordPress Child Theme
If you’ve never created a child theme before, then there’s a good chance you’ll make some mistakes, and that’s normal. This is why we recommend using a backup plugin and creating a local site or staging environment to prevent fatal errors.
All that being said, don’t give up too quickly. The WordPress community is very resourceful, so whatever problem you are having, a solution probably already exists.
For starters, you can check out our most common WordPress errors to find a solution.
The most common errors you’ll probably see are syntax errors caused by something you missed in the code. You’ll find help in solving these issues in our quick guide on how to find and fix the syntax error in WordPress.
Additionally, you can always start again if something goes very wrong. For example, if you accidentally deleted something that your parent theme required, then you can simply delete the file from your child theme and start over.
We hope this article helped you learn how to create a WordPress child theme. You may also want to check out our ultimate guide to boost WordPress speed and performance and our expert pick of the best drag-and-drop page builders to easily design your website.
If you liked this article, then please subscribe to our YouTube Channel for WordPress video tutorials. You can also find us on Twitter and Facebook.


Syed Balkhi says
Hey WPBeginner readers,
Did you know you can win exciting prizes by commenting on WPBeginner?
Every month, our top blog commenters will win HUGE rewards, including premium WordPress plugin licenses and cash prizes.
You can get more details about the contest from here.
Start sharing your thoughts below to stand a chance to win!
Asad says
Sir, what should I write in function.php to call the Parent theme?
WPBeginner Support says
You would want to use the code from our article below the text /* enqueue scripts and style from parent theme */
Admin
Yogesh Sambare says
Hi, Team wpbeginner,
Thanks for this awesome guide, now I think I’m able to make my themes child theme, and it’s really helpful for me .
WPBeginner Support says
Glad you found our guide helpful!
Admin
Ricardo says
The line:
“wp_get_theme()->get(‘Version’) )”
Should be:
“wp_get_theme()->get(‘Version’) )”
cheers!
WPBeginner Support says
While our comments automatically changed that in your message, we see the issue, thank you for letting us know
Admin
Rubb says
Can I delete the plugin after I create the child theme?
WPBeginner Support says
Currently, you can do that with the plugin
Admin
Eitan says
You need to add quotation marks to the Y = (“Y”) at the echo date, or you’ll get an error. – echo date(“Y”)
WPBeginner Support says
Thank you for pointing out the typo
Admin
Bomo says
So now that we have created a child theme, how do we update the parent theme when the child theme is activated?
WPBeginner Support says
You would update the parent theme as you normally would. For safety, you may want to create a backup before you update the parent theme in case there is a conflict somewhere.
Admin
RYAD says
But do we have to activate the parent theme before we update and them desactivate it and reactivate the child theme ?
WPBeginner Support says
No, you can update the theme without it being active