Do you want to rename images and media files in WordPress?
Image file names can improve your SEO and help potential customers and visitors find your content. However, by default, WordPress doesn’t allow you to change an image’s file name after uploading it.
In this article, we will show you how to easily rename images and media files in WordPress.

Why Rename Images and Media File Names in WordPress?
Many popular search engines let users search for images. This means that interesting, helpful, or eye-catching images can often increase your blog traffic.
However, search engines need to understand what your images are about so they can show them to the right people at the right time.
Using meaningful, descriptive file names is a big part of image SEO. For example, a file name like new-york-skyline.jpg gives the search engines more information than DSC00789.jpg.
While WordPress lets you change the image caption and alt tag, it doesn’t let you change the file name after uploading.
This is a problem if you find new keywords and want to add them to your images, you used an unhelpful file name by accident, or you are uploading files directly from your phone.
Having said that, let’s take a look at how to easily rename images and media files in your WordPress blog.
How to Easily Rename Images and Media Files Using a Plugin
The easiest way to rename media files in WordPress is by using Phoenix Media Rename. This plugin allows you to rename media files without leaving the WordPress admin area.
The plugin will also update the file name for any images you’ve used in posts or pages. This can save you a lot of time and effort.
The first thing you need to do is install and activate Phoenix Media Rename. For more details, see our step-by-step guide on how to install a WordPress plugin.
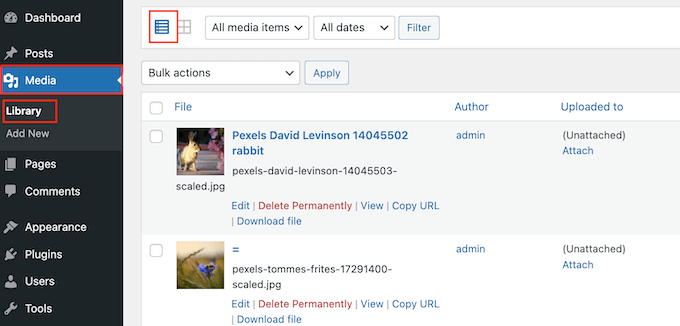
Upon activation, simply go to Media » Library. If the library shows the grid view, then you’ll need to switch to the list view by clicking on the list icon.

WordPress will now show more information about each media file, including its name.
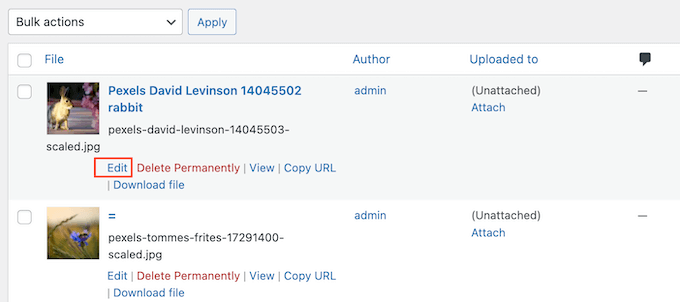
Simply hover your mouse over the image you want to rename on your WordPress website, and then click on the ‘Edit’ link when it appears.

This will open the image in your WordPress media edit screen. From here, you can optimize your images by changing the image alt text, caption, and more.
Scroll down to the bottom, and you’ll see a new ‘Filename’ field.

From here, you can change the file name. We recommend using a meaningful name that describes the image and adding any relevant keywords. It’s also a good idea to use all lowercase letters and add dashes in between words.
After that, simply click on the ‘Update’ button to save your changes. You will also see that the file name part of your file URL has also been changed.
Learn More Ways to Manage Your WordPress Files
Besides renaming file names, here are more ways you can organize your files in the media library:
- How to Organize WordPress Files in Media Library Folders
- How to Add Categories and Tags to WordPress Media Library
- How to Clean Up Your WordPress Media Library
- How to Easily Organize Media Uploads by Users in WordPress
- Great WordPress Plugins for Managing Images (Updated)
- How to Connect Google Drive to Your WordPress Media Library
- How to Change the Default Media Upload Location in WordPress
We hope this article helped you learn how to easily rename images and media files in WordPress. You may also want to see our guide on how to create a custom Instagram photo feed and our expert picks for the best SEO plugins and tools you should use.
Se você gostou deste artigo, inscreva-se em nosso canal do YouTube para receber tutoriais em vídeo sobre o WordPress. Você também pode nos encontrar no Twitter e no Facebook.


Syed Balkhi says
Hey WPBeginner readers,
Did you know you can win exciting prizes by commenting on WPBeginner?
Every month, our top blog commenters will win HUGE rewards, including premium WordPress plugin licenses and cash prizes.
You can get more details about the contest from here.
Start sharing your thoughts below to stand a chance to win!
Mrteesurez says
Thanks for sharing this.
I have some writers I want to give custom permission that is different for the subscriber or authors.
But is there any way to show specific category to specific authors or user role.
WPBeginner Support says
IF you mean you wanted to limit authors to a specific category then we have our guide below for how to set that up:
https://www.wpbeginner.com/plugins/how-to-restrict-authors-specific-category-in-wordpress/
Administrador
Jude Dille says
Very helpful website!
WPBeginner Support says
Thank you
Administrador
Vicky Bower says
Hi
I’m having an admin user issue after migrating my site from development to live.
WPBeginner Support says
It would depend on the error you are receiving, for a starting point you could take a look at our article here: https://www.wpbeginner.com/beginners-guide/beginners-guide-to-troubleshooting-wordpress-errors-step-by-step/
Administrador
Mary Hill says
Hi, I thought users were subscribers to my newsletter. I have 7000+. Can I import them to my mailchimp?
WPBeginner Support says
Hi Marry,
Yes you can, here is a tutorial to export user data, once you have the data you can open it in a spreadsheet program and keep the columns you need. However, when you add them to MailChimp they will be asked to verify their subscription.
Administrador
James says
This article is very old. Is Capability Manager Enhanced still the WP-Beginner recommended plugin for managing user roles? Thanks!
muaz farooq says
I really like this plugin.really helped me.but there is a problem.I want to show author my only one plugin setting.and in your pllugin Capability Manager Enhanced i cannot see my plugin option here.I there any solution?
DannyMe says
Just wondering, I want my Authors to be able to create posts, and the STATUS of these posts will automatically be: Pending Review OR Draft.
I want the posts made by Authors to be verified and approved by Editor who can publish.
Is this possible with this app?
If so how pls?
Debbie N. says
If a user cannot see everything in the admin menu is there a way they can use only one of the features? For instance, I’d like them to only be able to backup their website. Is there a way to add that to a role?
Ryan says
Thank you very much1 this is what I exactly looked for
Conni Stock says
I would like to grant access to a subscriber ONLY to the entries of a specific gravity form on my site to read live and export but not edit the form or the settings and/ or be able to view any other backend admin areas.
The data input into the form is needed as well as the files that will uploaded on the form submission.by the subsciber. I am trying to find a secure way to give access for a designated period of time. I have one web site and it is Not set up for multi site functions
Please advise. Any direction would be greatly appreciated.
Maritza says
Thank you so much! The best answer of what I was looking for. I am glad I found you
Alex Alonso says
Thank you. Much better than the documentation.
ankur khanna says
Thanks.. Its great… you made my week.. Cheerss.. keep clam and happy coding..
Hadi Omary says
i want to specify one of my taxonomy to be editable by one person
is there a way to do this ??
http://wordpress.stackexchange.com/questions/161089/how-to-specifies-an-author-editor-to-edit-one-category-only
Simon Lange says
any chance you release or test it for 3.9.2 and higher? 3.7.1 is more than 10months old. so you nice plugin wont be used anymore if its a risk to use.
Devanshu M says
I’m the admin of a blog . I have a author also . I disabled publish for author so that i can review posts before publishing but , as author click on submit for review , i am not getting any notification to review that ? Pls Help
WPBeginner Support says
We use Edit Flow plugin for that.
Administrador
Tony Franco says
Dear Sirs,
Thanks by the post!
I have this plugin installed, is there a way to make the subscribers upload images, and see just their images?
Now subscribers here just can edit their profile and upload images, but they can see other images of gallery too.. I think it is better to them see just their images….
Thanks and Regards,
Tony
hopeful says
how come no reply? i think it’s not possible because it’s a wordpress feature.
Faiz Akhtar says
Thanks !
Michael Rapino says
How about adding and removing permissions for installed plugins and specific menu items in the left WP navigation?
kristina suh says
Hi. I am interested in finding out that as well.
How do you give access to a new plugin/menu option eg. Calendar / staffing
thanks
Mozart Rocha says
What if I don’t have permission to install plugins?
WPBeginner Support says
Then you can not install plugins.
Administrador
Piet says
I think that Justin Tadlock’s Members is a far more comprehensive (read: useful) plugin than the one featured in this article
Correen says
Piet I have to agree. The Members plugin lays it all out and as an admin all you have to do is check/uncheck permission boxes. So far, so good for me.
Srihari Thalla says
Thanks a lot