Sharing old WordPress posts is one of our go-to tricks for getting more traffic and engagement without any extra effort. It can also keep your social media profiles active and interesting, even if you do not publish new content every day.
At WPBeginner, we regularly re-share our old content using our email newsletters, Facebook, X/Twitter, LinkedIn, and Reddit, especially our evergreen content that stays relevant over time.
But manually sharing these old posts can take time and effort. Thankfully, you can automate the task using WordPress plugins, making the process simple and efficient.
In this article, we will show you how to share your old WordPress posts automatically so your content can reach more people and you maintain an active online presence.
Why Share Your Old WordPress Blog Posts on Social Media?
By sharing old blog posts with your followers, you can attract more visitors to your WordPress website without any additional work. Repurposing existing content for social media can also save you time, freeing you up for other tasks.
Plus, you can attract new followers who might have missed your posts before. As a result, you can increase your pageviews without creating all-new content, leading to more email list subscribers, sales in your online store, and more.
With that said, let’s see how you can automatically share your old WordPress blog posts. You can use the quick links below to navigate through the tutorial:
Using ClickSocial to Automatically Share Old Content (Recommended)
The simplest way to share your old WordPress posts on social media is by using ClickSocial, which is one of the best social media plugins for WordPress.
It lets you quickly schedule your social media posts right from the WordPress dashboard. It offers an easy-to-use feature that specifically automates sharing old WordPress posts.
Installing and Setting Up ClickSocial
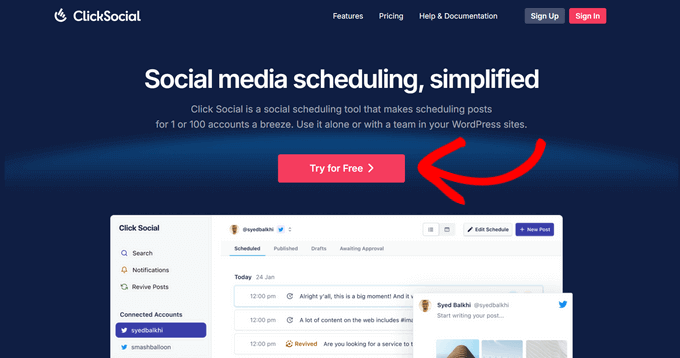
The first thing you need to do is visit the ClickSocial website and then click the ‘Try for Free’ button to sign up for an account. You can try the service for free for 14 days.
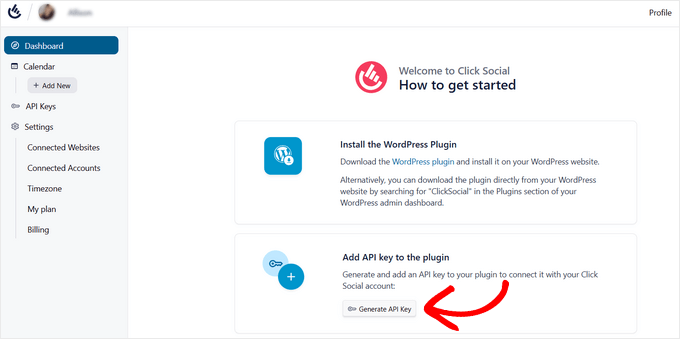
Next, you will need to generate an API key to connect your ClickSocial account to your website.
Simply click the ‘Generate API Key’ button from the ClickSocial dashboard.
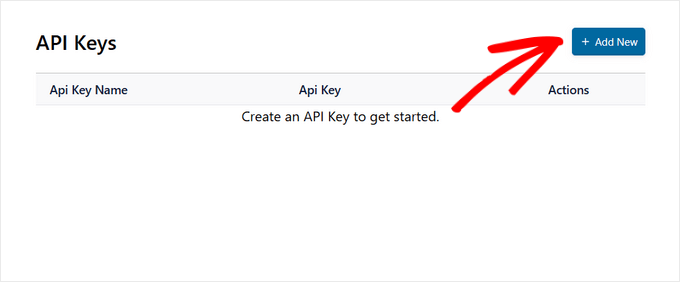
The next page lists your API keys, and it is most likely blank right now.
You can create a new API key by clicking the ‘Add New’ button.
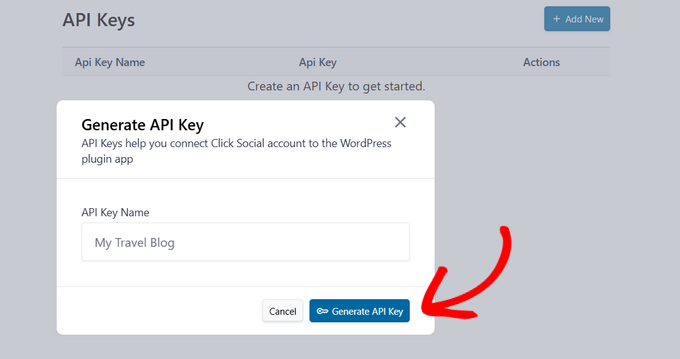
A popup will open where you can generate a new API key.
You need to enter a name for your API key, such as the name of your website, and then click the ‘Generate API Key’ button.
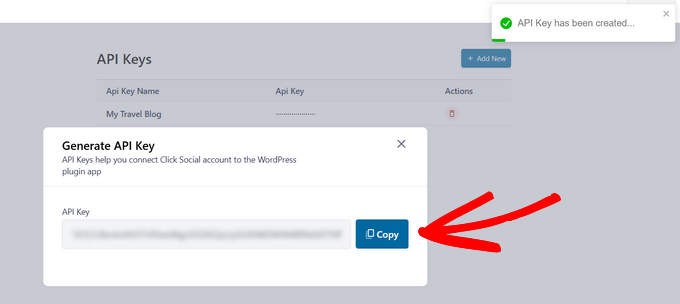
Congratulations, you have created your API key and can now connect your ClickSocial account with your website.
To do that, you should click the ‘Copy’ button and then return to your WordPress website.
Installing and Configuring the ClickSocial Plugin
Once you have finished setting up a ClickSocial account and have obtained an API key, you need to navigate to your WordPress dashboard to install and activate the free ClickSocial plugin.
If you need help, then see our guide on how to install a WordPress plugin.
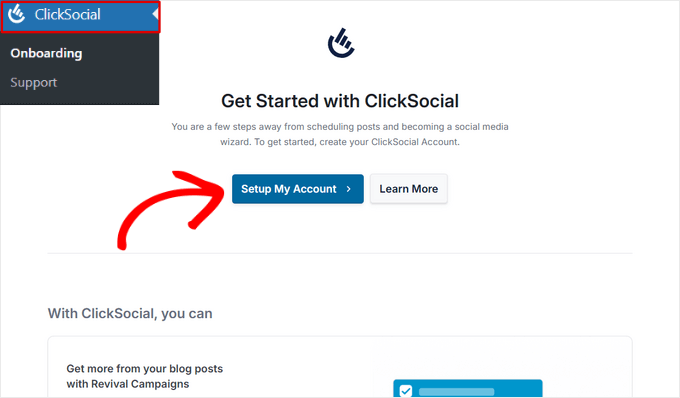
Upon activation, you need to head over to the ClickSocial » Onboarding page of your dashboard and then click the ‘Setup My Account’ button.
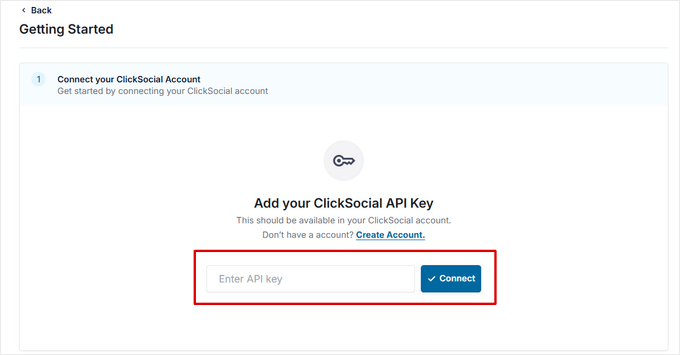
This will take you to a page where you can add the API key you copied earlier.
Simply paste it into the ‘Enter API key’ field and then click the ‘Connect’ button.
You are now ready to start connecting your social media accounts.
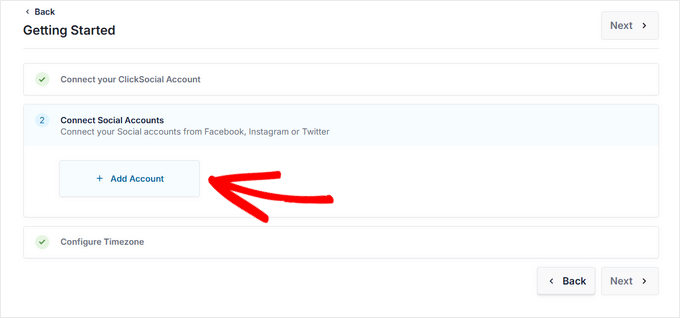
To add your first account, simply click the ‘Add Account’ button.
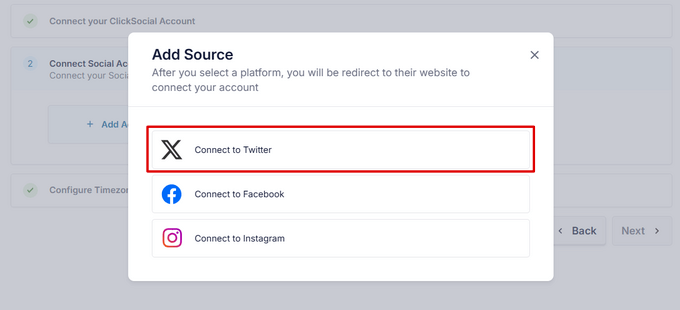
ClickSocial lets you connect with the most popular social media networks, such as Twitter/X, Facebook, and Instagram. We will demonstrate how to do this by adding Twitter as a source.
You can get started by clicking the ‘Connect to Twitter’ option.
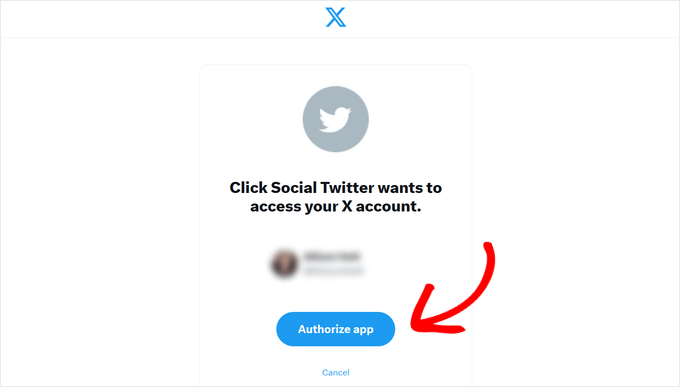
ClickSocial will immediately redirect you to the Twitter website so you can authorize the plugin to have access to your X account.
You do this by logging in to your account and then clicking the ‘Authorize app’ button.
You will now be redirected back to your website, where you can repeat the process for each social media account you wish to connect to.
Once all our social media accounts are connected, you can choose the timezone that will be used for scheduling your posts. You can choose the timezone of your ClickSocial account or WordPress website. For this tutorial, we will use our website’s timezone.
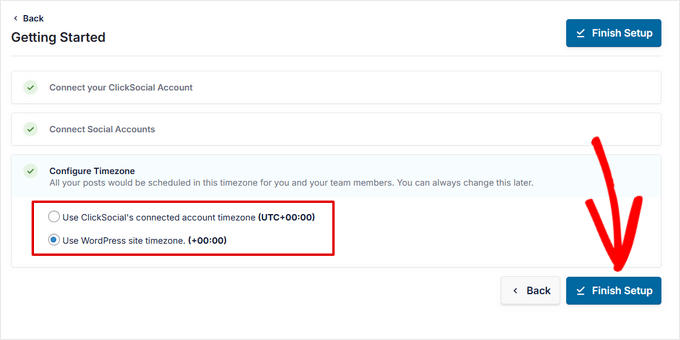
Make sure you click the ‘Finish Setup’ button to finalize your ClickSocial setup. You are now ready to start sharing your old WordPress posts.
Reviving Old Posts in ClickSocial
The ClickSocial feature you will use to share your old posts is called ‘Revive Posts’. This feature will revive old WordPress posts by automatically sharing them on social media.
You can get started by navigating to ClickSocial » Calendar and then clicking the ‘Revive Posts’ tab. Once there, you need to click the ‘Setup Revival Posts’ button.
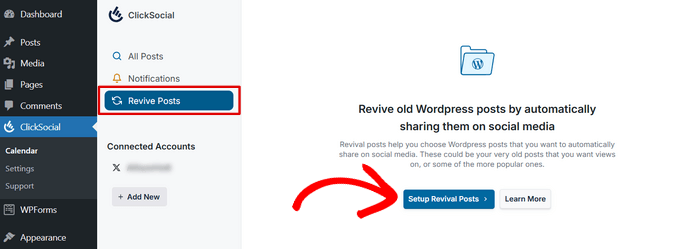
A wizard will pop up where you can set up a revival campaign.
The first step lets you choose the range of dates when the old posts you want to share were first published. You can optionally choose tags for the posts you want to share or not share and select the authors who wrote the articles you want to share.
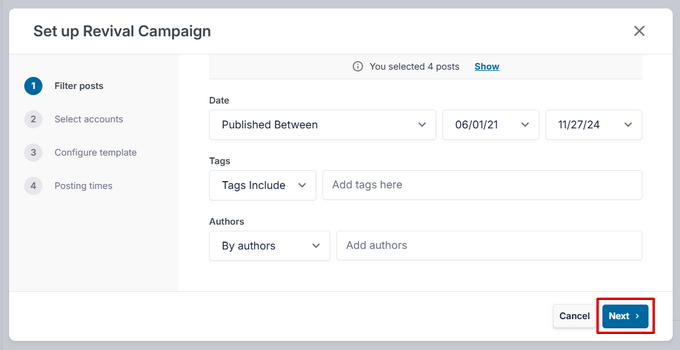
At the top of the popup, you will see the total number of posts selected by your criteria. Once you are happy with the filters, just click the ‘Next’ button to continue.
In the second step, you can choose the social accounts where you wish to share these posts. You will most likely want to select all of the accounts you have added.
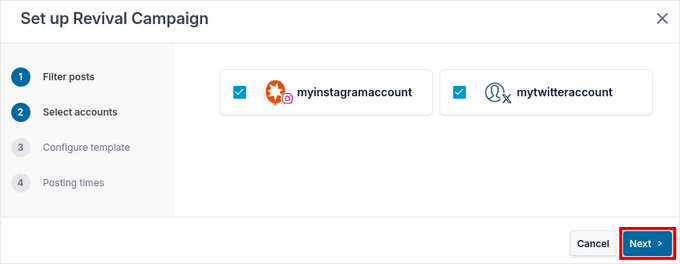
Once you have done that, you can click the ‘Next’ button to continue.
In the next step, you will create a post template. This will include the text that will be posted to social media, along with variables for the post title, excerpt, and short post link. If you like, you can also include categories as hashtags.
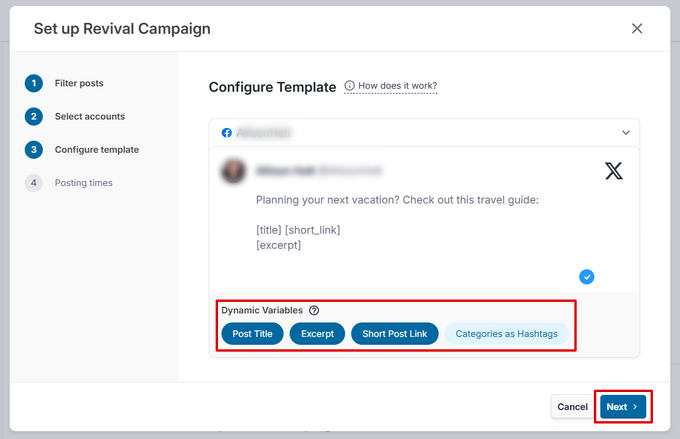
Note: If you are posting to multiple social accounts, then you need to create a separate template for each platform. You can expand each section by clicking the down arrow next to the account name.
When you have finished creating your templates, you should click the ‘Next’ button to continue.
The last step of the wizard lets you create a posting schedule for sharing your old posts. You can choose multiple slots on different days and times and add multiple posting times per day by clicking the ‘+ Add’ button.
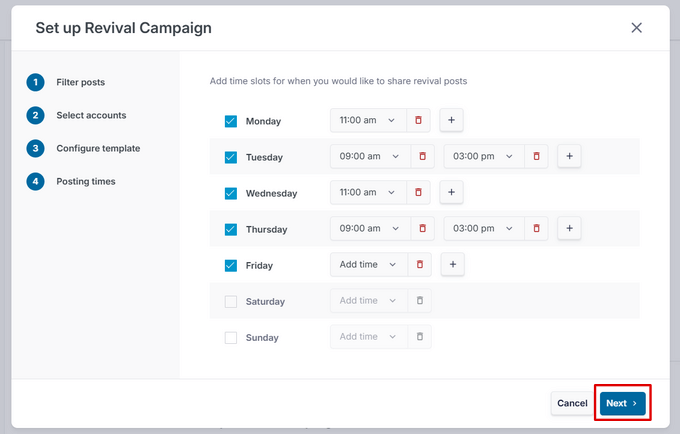
When you are finished, you can activate the revival campaign by clicking the ‘Next’ button.
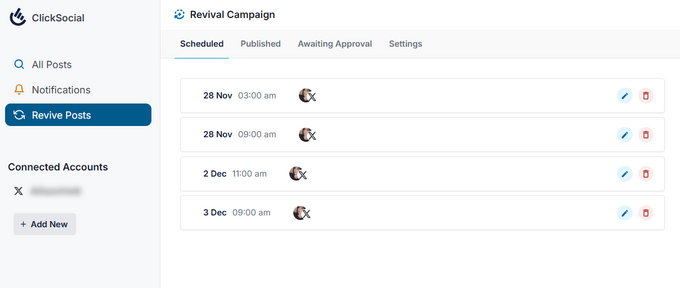
You will be taken to the campaign’s ‘Scheduled’ tab, where you can see the articles that will be shared on social media and the times they will be automatically posted.
Using Revive Social to Share Old Content (Free)
A second way to share your old blog posts is to use the Revive Social plugin. You can start with the free plan to share your old WordPress blog posts on social media to help increase traffic and keep your accounts active.
But first, if you want to share your old posts via X/Twitter, then you need to get an API key first. If you just want to use Facebook or other platforms, then you can skip this step.
Getting Your Platform API Keys (X/Twitter Only)
First, go to the X Developer Platform. Then, scroll down slightly and click on the ‘Get started’ button on the ‘Free’ option.
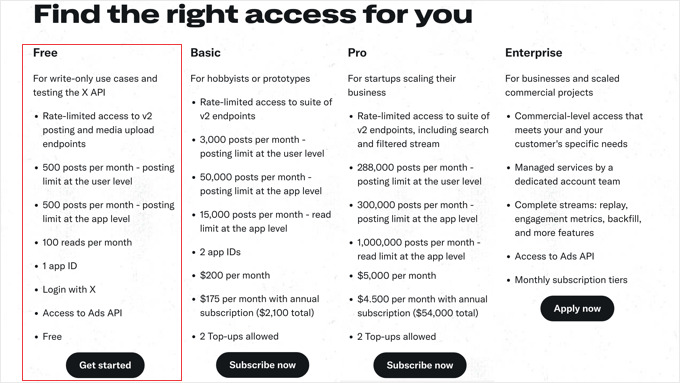
Once you have done that, you will be taken to a different page, where you can subscribe to an access level to the X API.
For demonstration purposes, we will just sign up for a free account.
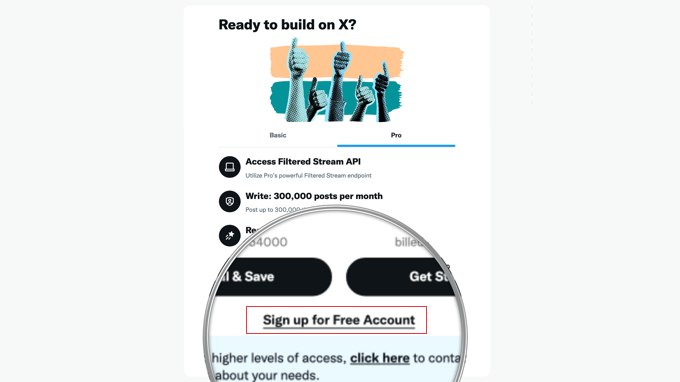
After agreeing to some terms and conditions, you will be redirected to the X Developer Portal.
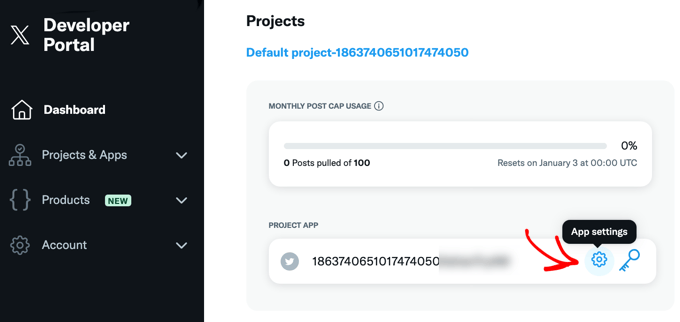
On the dashboard, you need to find the section that says ‘Project App.’ Then, click on the gear icon (App settings).
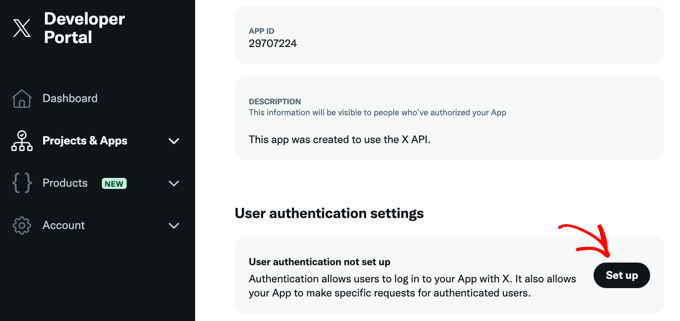
Next, you should scroll down to the section called ‘User authentication settings.’
Here, simply click the ‘Set up’ button.
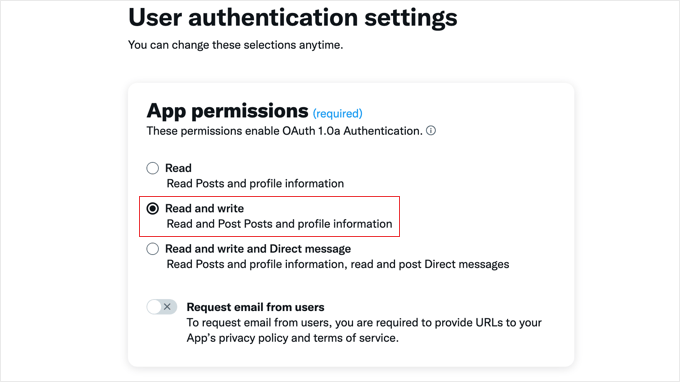
Now, we will enable OAuth Authentication so that X/Twitter can connect with the Revive Social WordPress plugin.
On the next page, select ‘Read and write’ for the App permissions.
Then, scroll down a little further to continue.
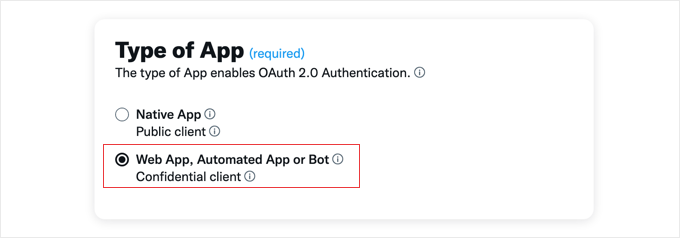
In the ‘Type of App’ section,n you need to select the ‘Web App, Automated App, or Bot’ option.
At this stage, you can scroll down to the ‘App info’ section.
For the Callback URI / Redirect URL, make sure to insert your website’s URL followed by /wp-admin/admin.php?page=TweetOldPost.
In the Website URL, insert your site’s domain name.
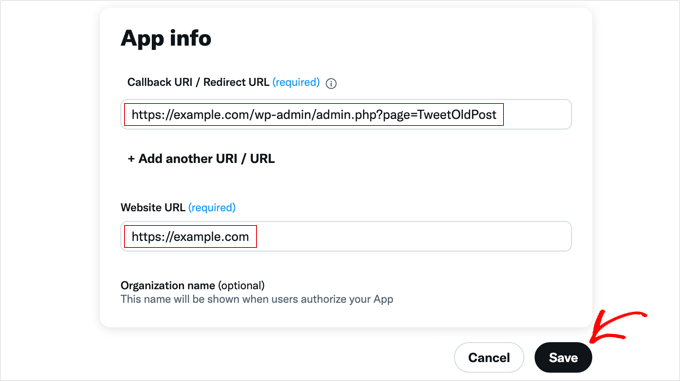
At this stage, you can scroll all the way down and click the ‘Save’ button to store your settings.
You will then be shown your OAuth 2.0 Client ID and Client Secret. You won’t need this information for this tutorial, but it is a good idea to copy and paste them in a safe location in case you need them in the future.
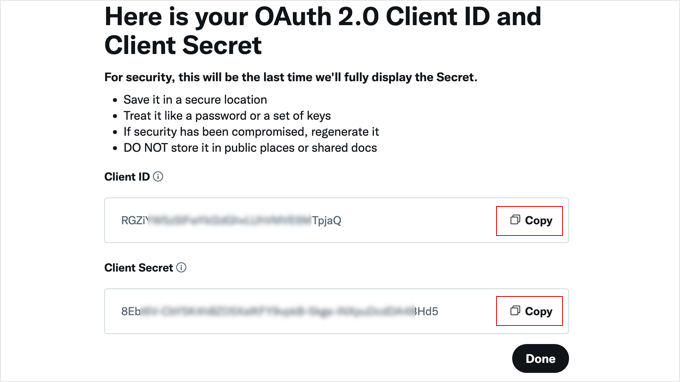
Once you have done this, you can click the ‘Done’ button, and you will be taken back to the X Developer Portal.
Once there, you should click on the ‘Keys and tokens’ tab at the top of the screen.
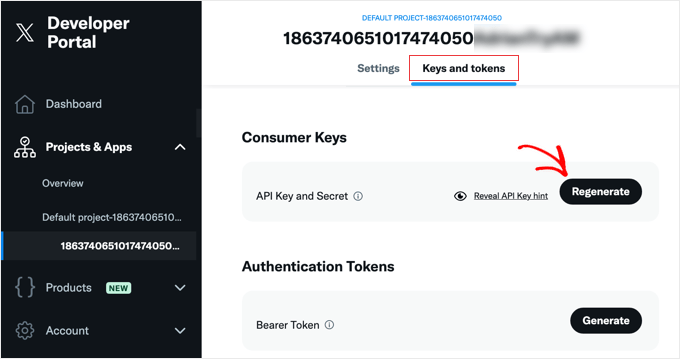
In the ‘Consumer Keys’ section, you need to click the ‘Regenerate’ button.
A popup will now appear. Simply click the ‘Yes, regenerate’ button to continue.
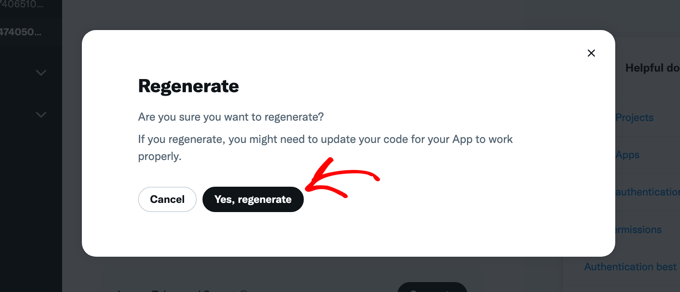
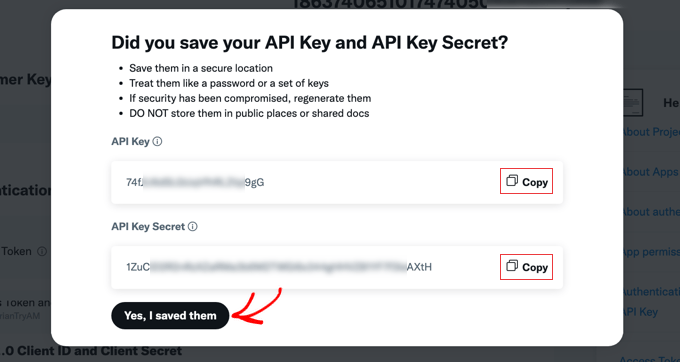
After this, you will see your API Key and API Key Secret.
You can either keep this X Developer Portal page open or store the keys somewhere safe so that you can easily copy them for the next step. If you do the second option, then make sure to click ‘Yes, I saved them’ to close the popup.
Installing and Setting Up the Revive Social Plugin
Now, you need to install and activate the Revive Social plugin. For more details, see our beginner’s guide on how to install a WordPress plugin.
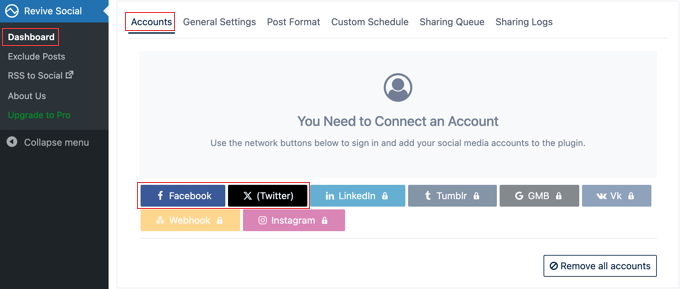
Upon activation, go to Revive Social » Dashboard and select the ‘Accounts’ tab. Then, just click on the social media button for the account you want to connect.
The free plugin supports Facebook and Twitter, but you can unlock extra social media profiles by upgrading to the pro version.
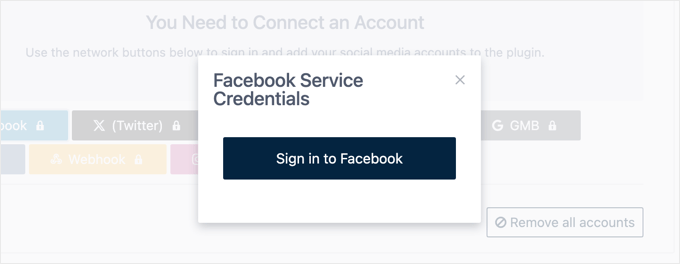
If you click on Facebook, then a popup will appear.
It will ask you to sign in to Facebook so that you can connect the plugin to the platform.
In this guide, we will show you how to automatically post old blogs on X/Twitter, because the process is a bit different.
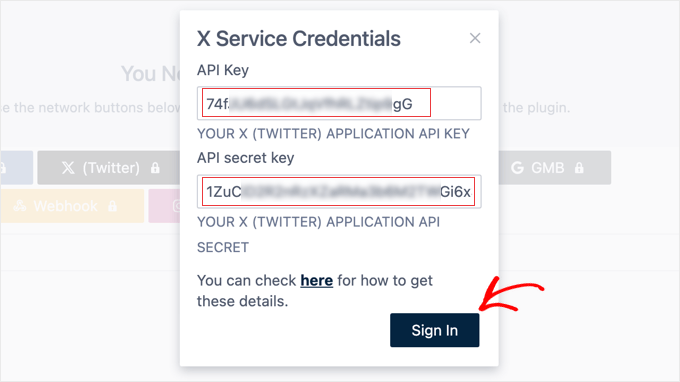
If you select the ‘X (Twitter)’ option, then you will be asked to insert the X application API keys you created earlier in this tutorial.
Once you do that, then just click ‘Sign In.’
The plugin will now bring you to the authentication page.
Here, just click on the ‘Authorize app’ button.
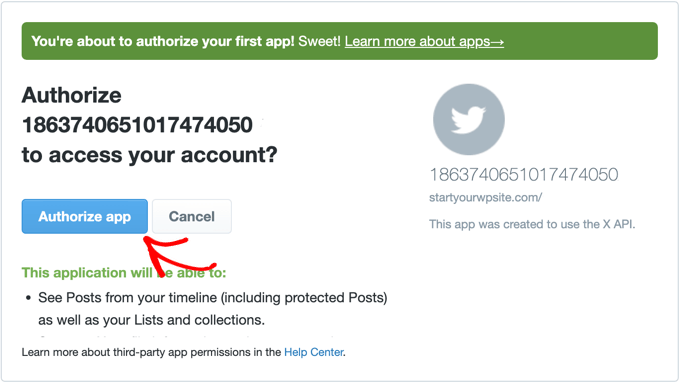
After that, you will be redirected back to the Revive Social plugin page.
Configuring the Post Social Sharing Settings
With the setup done, let’s click on the ‘General Settings’ tab.
First, you can change the ‘Minimum Interval Between Shares’. This is how many hours the plugin will wait in between sharing each post.
You can also set the ‘Minimum Post Age.’ This is the number of days that must pass before the post is considered ‘old.’

Below that, you can choose whether you’d like to share old posts again after all your old content has been shared. In this way, the plugin can constantly cycle through all your previously published posts.
To do this, simply check the box next to ‘Share More Than Once.’

After that, you can choose to include or exclude taxonomies.
Next to ‘Taxonomies,’ simply type in the category or tag you want to use. Then, decide whether to check or uncheck the ‘Exclude’ box.

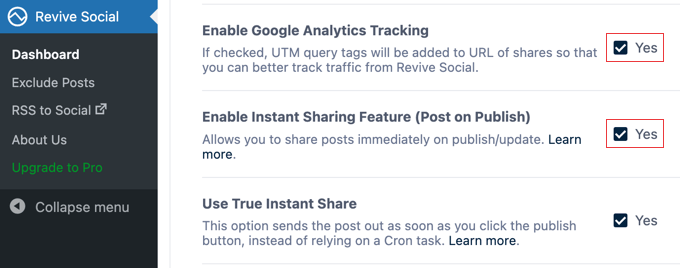
If you are tracking visitors to your WordPress website, then you can automatically add query tags to your old posts. This will help you better track how these old posts are performing.
To do this, simply check the box next to ‘Enable Google Analytics Tracking.’
Tip: If you don’t have Google Analytics set up yet, then see our beginner’s guide on how to install Google Analytics in WordPress.
If you want to share posts as soon as they are published, then you can check the box next to ‘Enable Instant Sharing Feature’ (see the screenshot above).
Once you are happy with the sharing settings, click the ‘Save’ button at the bottom of the page.
Customizing Your Social Media Posts for Sharing Old Content
The next step is to configure how your social media posts look when they are sharing your blog posts. To do this, click on the ‘Post Format’ tab at the top of the page.
On this page, you can select what content you want to share in the ‘Share Content’ dropdown. There are options for post title, post content, post title and content, and post excerpt.
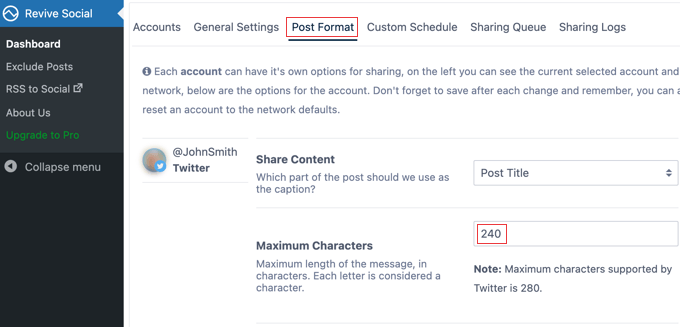
Then, you can change the length of the social media post in the ‘Maximum Characters’ box.
To get more traffic, make sure you check the box next to ‘Include Link.’

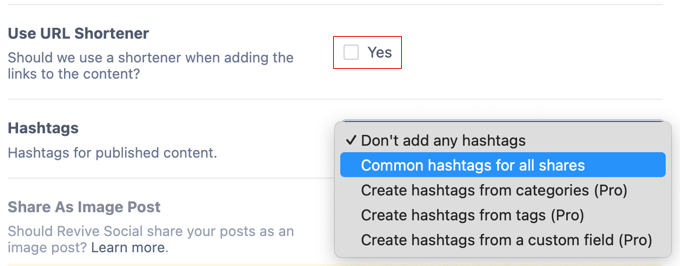
Further down the page, there is an option for using a URL shortener when adding links to your social posts.
With that done, you can add hashtags to your post. With the free version of the plugin, you can automatically add a common set of hashtags each time you post to social media. If you choose this option, a new field will appear where you can add the tags.
After that, make sure you click the ‘Save post format’ button at the bottom of the page.
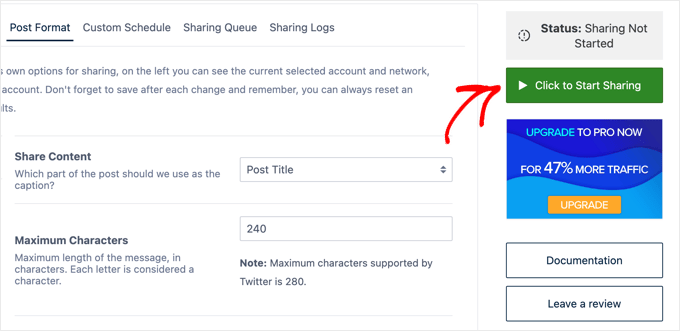
Once you have finished customizing the plugin settings, simply select the ‘Click to Start Sharing’ button at the top right of the screen.
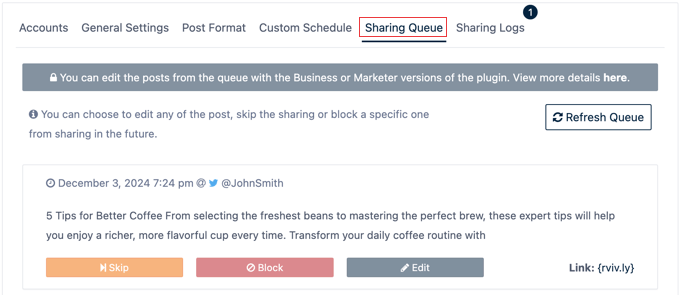
Now, if you select the ‘Sharing Queue’ tab, then you will be able to preview your posts before they’re shared on social media.
Here, you can skip posts, edit them, and even stop certain posts from being shared.
That’s it! Now, your old WordPress posts will automatically be shared on social media.
Other Ways to Automatically Share Your Blog Posts on Social Media
ClickSocial and Revive Social are not the only plugins you can use to automatically share your blog posts on social media. If you want to find an alternative, then we recommend using Uncanny Automator.
Uncanny Automator is the best WordPress automation plugin that helps you create automated workflows for your website. For example, you can use it to send out automated emails when a new post is published.
We also have plenty of guides featuring Uncanny Automator on how to automatically share blog posts on social media. You can check them out here:
- How to Automatically Tweet When You Publish a New Post in WordPress
- How to Automatically Publish from WordPress to Instagram
- How to Automatically Post to Facebook From WordPress
- How to Automate WordPress and Social Media With IFTTT (& More)
If you want more control over which old posts will get shared on social media, then you can also use a tool like Buffer. It’s a social media scheduling app that lets you choose the posts that will get shared at a specific time.
For more details, see our guide on how to schedule WordPress posts for social media.
We hope this article helped you learn how to automatically share your old WordPress posts. You may also want to see our guide on how to automatically create WordPress posts from YouTube videos or our ultimate social media guide for WordPress users.
If you liked this article, then please subscribe to our YouTube Channel for WordPress video tutorials. You can also find us on Twitter and Facebook.


Michael
Changes in Facebook policy dictate that the plugin must achieve authorization manage_pages and publish_pages. I’ve gone three rounds with Facebook and have yet to receive approval. Two months!
Uriahs
Hi Michael, this issue regarding has been fixed a while back, you no longer need to create an app to connect your accounts. All it takes now is a click of a button
Markus Martin
I only use it with twitter because twitter cards ovewrite its premium featured image option. It shows ugly links on Facebook and resets cached facebook urls and featured images. They should make the option to show featured link with image free, but make posting with image attached a premium version if they so desperately want money.
Dorothy
I installed plug in on Godaddy managed site and set up old according directions on your video. One post posted and no others have posted though it continues to say one will posts in 7 hr 30 minutes. What have I missed ? My settings: Min interval 8, min age 30, max age 0, share more once unchecked, posts box checked.
Also it says I have two accounts and I have only set up Twitter, unless I accidentally have two Twitter accounts by mistake. So how do I find out and how to rectify
I am not a computer person and new to WordPress. I may subscribe if I think it is beneficial. I have went to a local WP user group and it was over my head. Thanks for your assistance in this matter.
Rizwan
This revive old post plugin is not tested with 4.5.2, what to do now? any other plugin?
Gemma
This has just stopped working for me – giving a 301 instead of the link via Twitter. Deleted and reinstalled, played about with shortening link but no luck! Any resolution or alternative is appreciated, such a time saver!
Jim
if you have your new posts set to trigger your MailChimp account; will the revived posts also trigger your MailChimp account?
WPBeginner Support
If you revive posts in a way that they reappear in your RSS feed, then yes.
Admin
James Burnette
Thanks for the great post.
Melissa
The premium version is now $75.
Nouman Younas
Nice,,, i lll surely try this method on my one blog for checking results..
i have a question How to Automatically Share Your Old new Posts?
i don’t want to share it manually . and i also don’t want to give access of social media profiles to my all authors.
DanCarr
I assume you guys know about the free plugin “buffer old posts” so I’m curious why you would not mention it? It does the same as this plugin, but sends it all to Buffer instead. You can control how often it sends items and you can exclude posts and categories as well. I’ve been using it for a while and it works perfectly. I’d far rather send things to Buffer because then it slots in better with my normal daily postings.
sadman123
how to get a floating menu and a floating page navigator in wordpress
John
Nice post. I basically use Revive old Posts. Its a great plugin. But I stopped it due to the fact that I do not have much posts. I have roughly 30…