
For small businesses and online stores, email is the lifeblood of communication. But juggling marketing campaigns, order confirmations, user notifications, and customer inquiries can quickly become overwhelming.
At WPBeginner and our partner websites, we use email automation to save valuable time, ensure consistent communication, and improve our results.
In this article, we will show you how to send automated emails in WordPress to streamline your workflow and grow your business.

Why Send Automated Emails in WordPress?
Whether you have an online store, a membership site, or a small business website, you rely on email to keep it growing and running smoothly.
For example, you can use email to welcome new users and let them know when new content or products are available. Email is also useful for marketing campaigns and updating your customers on the progress of their orders.
You can even use email to notify yourself when there is a new post waiting for you to review or that a WordPress update needs to be installed.
Since email is used for so many tasks on your WordPress website, it only makes sense to save time and effort by automating as many emails as possible.
With that being said, let’s take a look at how to send automated emails in WordPress. Here are the topics we will cover in this tutorial:
1. Making Sure Your WordPress Email Is Being Sent Reliably
Before you start automating your emails, it’s important to make sure that emails from your website are being delivered reliably.
By default, most WordPress hosting companies do not have the mail function configured properly. To prevent their servers from abuse, many hosting companies even turn it off completely. In these cases, your WordPress emails will fail to reach users.
Luckily, you can fix this easily by using WP Mail SMTP. This plugin lets you send your WordPress email through a reliable SMTP platform, which is configured specifically to send emails like SendLayer, Gmail, Outlook, and more.
The free version of WP Mail SMTP should be more than sufficient for most websites. For more details, see our guide on how to fix WordPress not sending email.
2. Sending Automated Drip Emails Using Constant Contact
A good place to start thinking about email automation is the way you market your store or business. And one of the best ways to automate marketing is with a drip campaign.
What Is an Automated Drip Campaign?
Automated drip campaigns are email messages that automatically guide your users along a specific journey. They’re great for boosting user engagement on your WordPress site.
For example, these messages can welcome new users, promote important content, upsell products, target specific geographic regions, and encourage users to register for events.
To send automated drip notifications by email, we recommend using Constant Contact because it’s the best email marketing service on the market. However, you can use any other major email marketing platform, including Brevo (formerly Sendinblue), HubSpot, and others.
To start, you can visit the Constant Contact website and create an account. The software gives you a 60-day free trial, so you can try it out before committing to a premium plan.
Pro Tip: If you use our Constant Contact coupon code, then you can also get 20% off by purchasing upfront.
Creating a List of Contacts
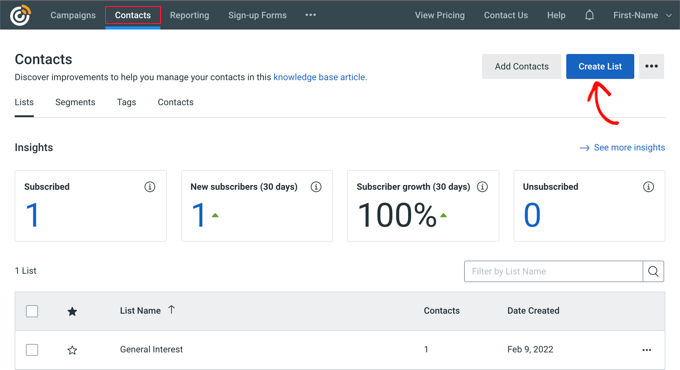
Once you sign up, you can visit the Constant Contact dashboard to create a contact list.
Constant Contact has already created a default list for you. However, you can create your own list by going to the ‘Contacts’ tab in the top menu and then clicking the ‘Create List’ button.
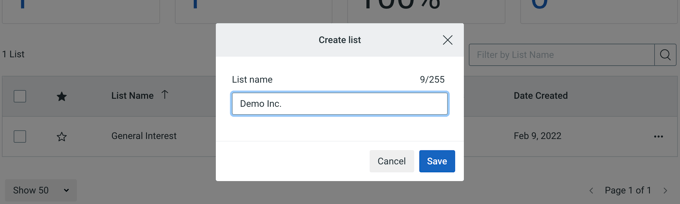
A popup window will appear where you can enter a name for your list.
After that, simply click the ‘Save’ button.
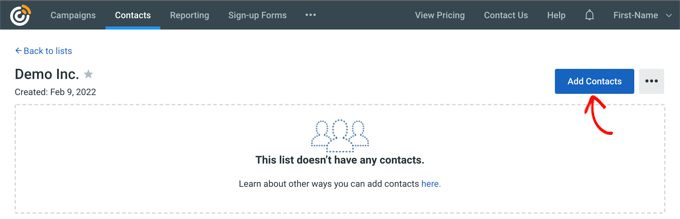
You can add contacts to the list by going to the ‘Contacts’ tab.
Then, just click the ‘Add Contacts’ button.
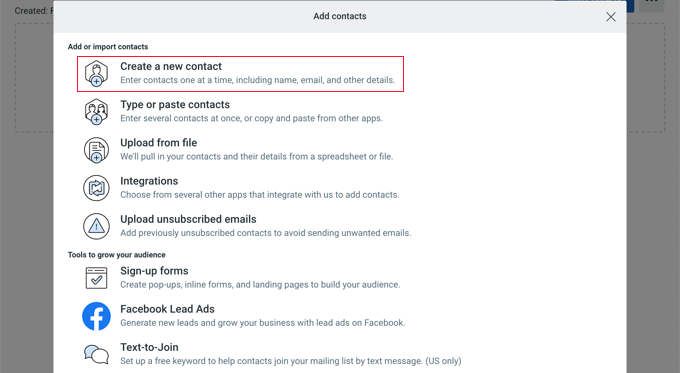
A popup window will open with multiple options for adding new contacts.
Now, you can add your contacts manually, upload them in a spreadsheet or CSV file, or import them from other apps.
Creating an Automated Drip Campaign
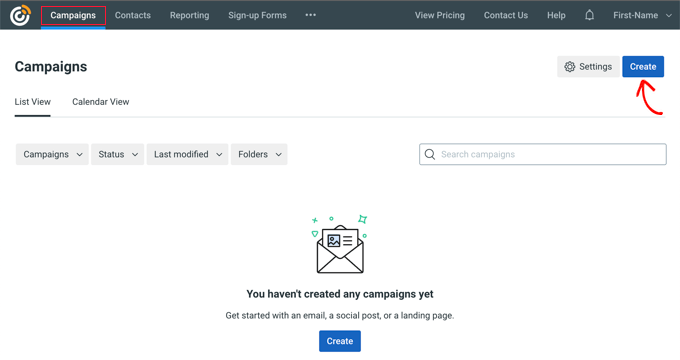
Once you’ve added your contacts, you need to create the drip campaign.
To do that, head over to the ‘Campaigns’ tab and then click the ‘Create’ button.
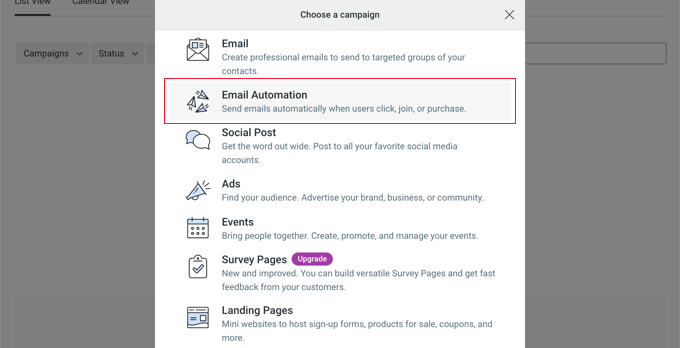
Next, Constant Contact will show you multiple options for creating a campaign.
Go ahead and select the ‘Email Automation’ campaign.
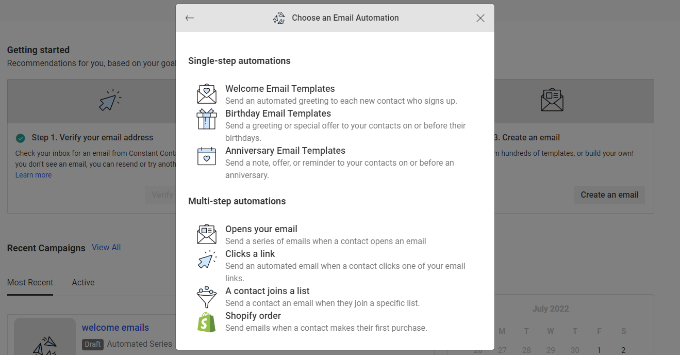
From here, you can select single-step automations or multi-step automation.
Single-step automations send just a single email, such as a welcome email. Multi-step automations let you create a series of emails that are automatically sent to your subscribers so you can let them know about your products and services, send special offers, and more.
In this tutorial, you’ll create a multi-step automation for when new subscribers join your email list. Go ahead and select the ‘A contact joins a list’ option.
Next, you will have to enter a name for your campaign.
Make sure you click the ‘Save’ button.

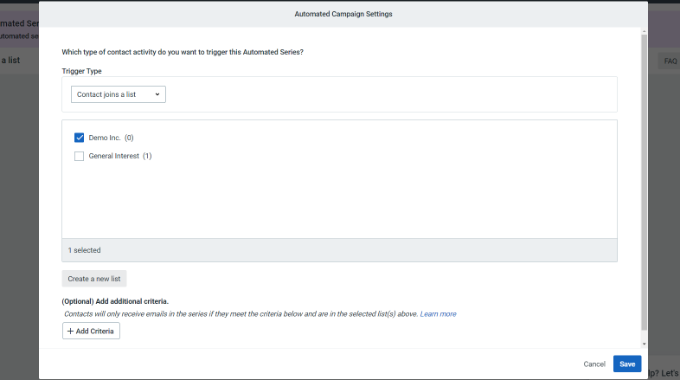
Constant Contact will then ask you to choose what activity will trigger the email. For example, the drip series is automatically triggered when a user joins your email list, opens an email, clicks a link, or buys a product.
You can use the default ‘Contact joins a list’ option as the trigger type. Then, you can choose the email list you created earlier. Go ahead and click the ‘Save’ button when you are done.
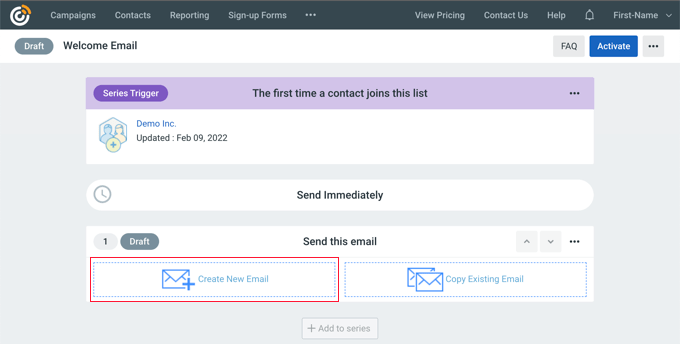
Creating the Emails for Your Drip Campaign
Now, you need to create the emails to send in your automated drip campaign. The first one you create will be sent automatically when the user signs up.
To begin, simply click the ‘Create New Email’ option.
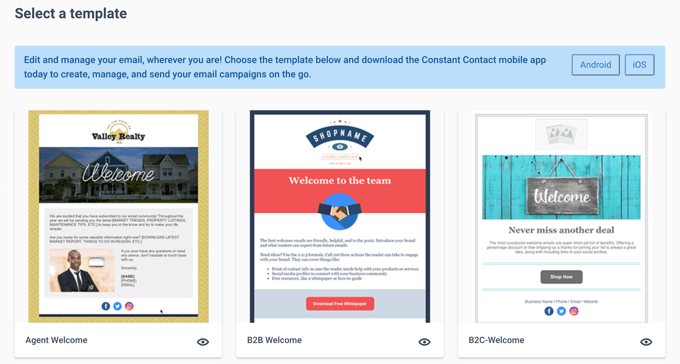
Constant Contact will now show different email templates to choose from.
For this tutorial, we will use the ‘Agent Welcome’ template.
You can customize the email template using the drag-and-drop email builder.
You can choose multiple elements from the menu on your left and place them on the template.
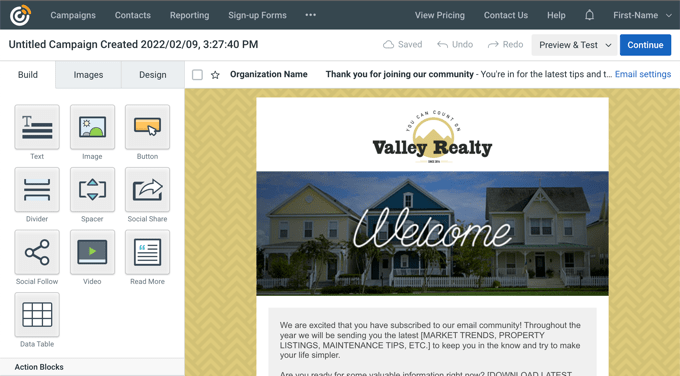
You also need to add the email’s content by removing the placeholder text and adding your own. Once you’ve done this, simply click the ‘Continue’ button at the top right of the editor, and the email will be added to the drip series.
Next, you can add a second email by clicking the ‘+ Add to series’ button and then the ‘Create New Email’ button.
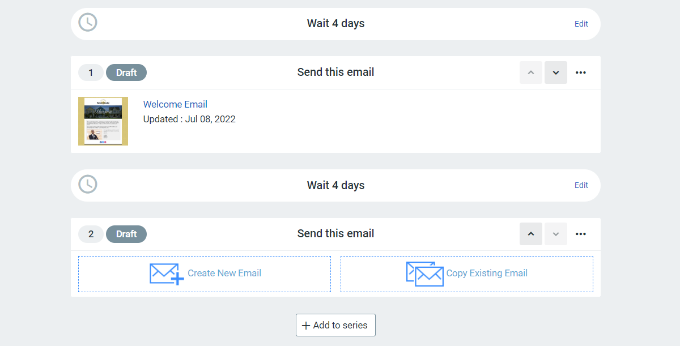
You’ll need to select a template and customize the new email as you did earlier. You can set the delay before the drip campaign sends its next email.
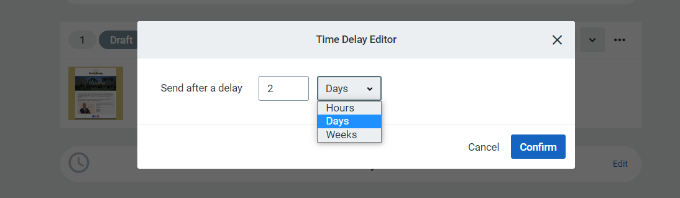
By default, this value is set to 4 days. You can change this by clicking the ‘Edit’ button in front of the section titled ‘Wait 4 days.’
This will open the ‘Time Delay Editor’ where you can choose when the next email in the drip campaign will be delivered. You can click the ‘Confirm’ button when you are done.
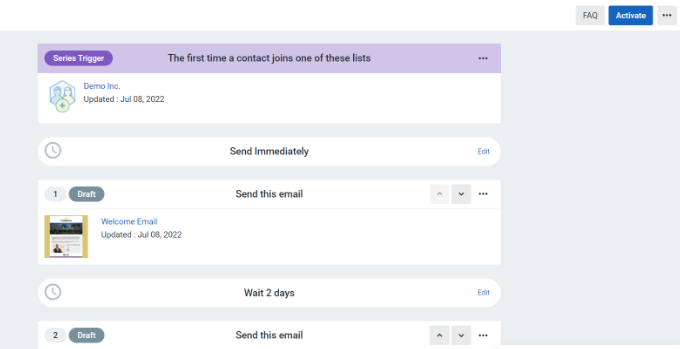
Now, you should see all your emails in the campaign summary area.
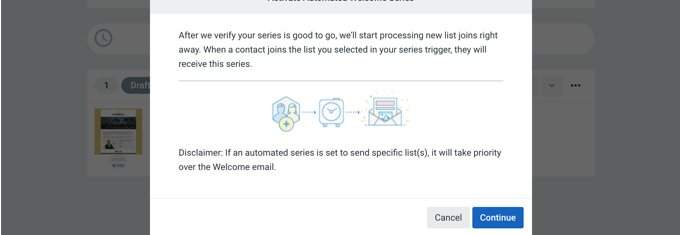
Go ahead and click the ‘Activate’ button in the upper-right corner to launch your campaign.
Constant Contact will then show a prompt to verify whether you wish to activate your campaign.
Simply click the ‘Continue’ button, and the tool will check if everything is working properly and activate your campaign.
You’ve now successfully launched your automated drip email campaign.
For more detailed instructions and to learn how to create a drip campaign using push notifications, see our guide on how to set up automated drip notifications in WordPress.
3. Sending Automated Transactional Emails With FunnelKit Automations
If you are running a WooCommerce store, then your customers will receive different transactional emails. These help them get order confirmations, track their order status, get invoices, and find more information about your online store.
You can customize and automate these emails using FunnelKit Automations, a popular WooCommerce plugin for marketing automation. It is a sister product to FunnelKit (formerly WooFunnels), a powerful sales funnel builder for WooCommerce.
First, you need to install and activate the FunnelKit Automations plugin. For more details, please see our guide on how to install a WordPress plugin.
Creating Email Automation Workflows With FunnelKit Automations
Upon activation, you need to go to Campaigns » Automations (Next-Gen) to add a new automation from your FunnelKit Automations dashboard.
Here, you will see a library of email types that make it simple to create new automations.
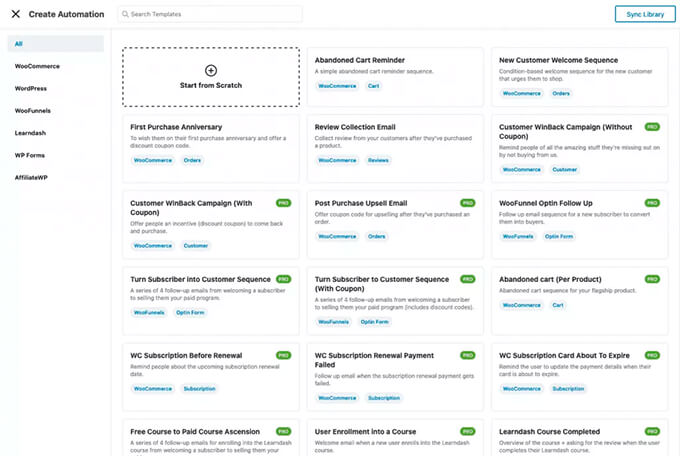
You can import an email automation workflow with a single click and then use the visual email automation builder to make any customizations that you need.
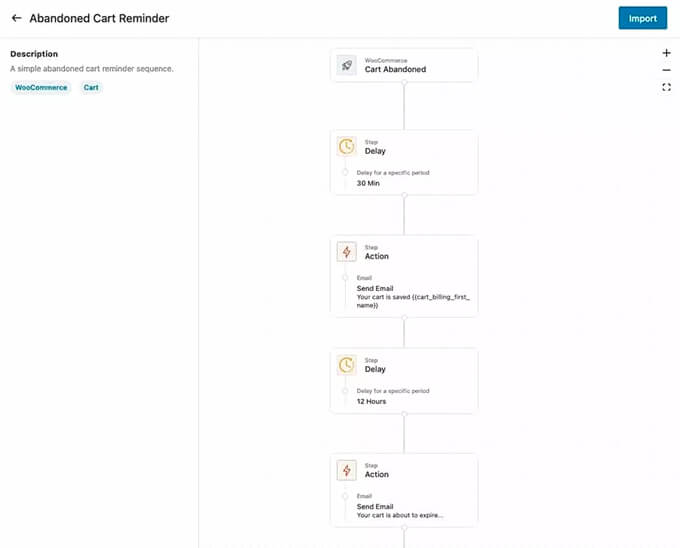
For example, here’s the workflow for Abandoned Cart Reminder.
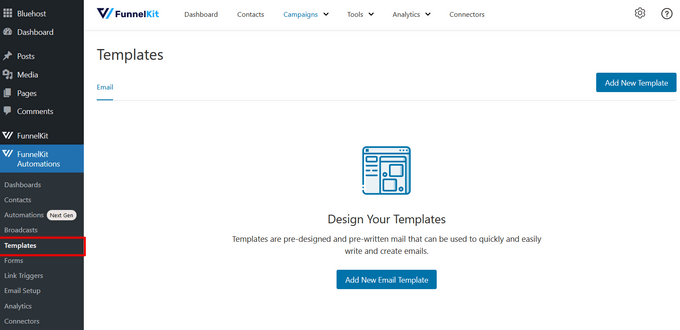
Customizing WooCommerce Emails With FunnelKit Automations
FunnelKit Automations lets you customize any WooCommerce email and create new emails using a drag-and-drop email builder inside WordPress.
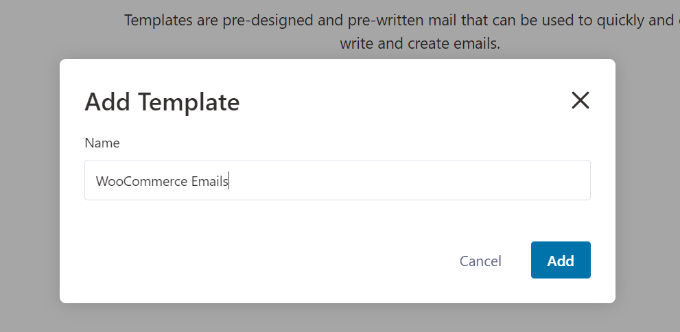
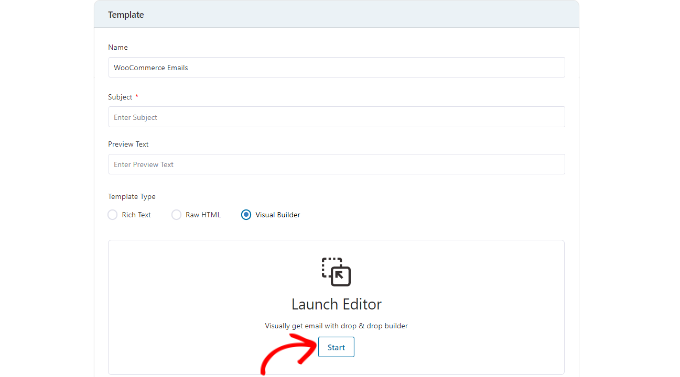
You can go to FunnelKit Automations » Templates from your WordPress dashboard and click the ‘Add New Email Template’ button.
Next, you can enter a name for your email template.
After that, make sure you click the ‘Add’ button to continue.
Now, the plugin will let you enter a subject line and preview text for your email.
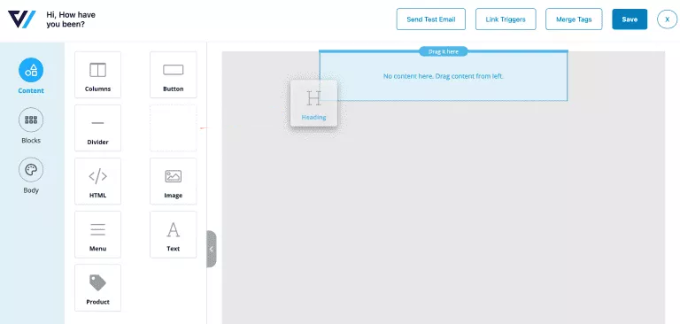
You can customize the content of your WooCommerce emails using rich text, HTML, or the visual builder.
The visual builder lets you select different elements from the menu on your left and place them on the template using drag and drop.
For instance, the ‘Content’ tab lets you can add columns, buttons, headings, menus, text, and more to the email template.
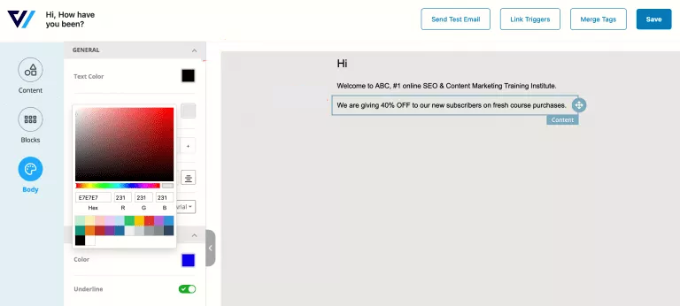
The ‘Body’ tab lets you further customize each element.
For example, you can change the text color, alignment, font, size, and more.
Once you are done, you can click the ‘Save’ button at the top.
For more detailed instructions, see our guide on how to customize WooCommerce emails. Once there, make sure you scroll down to the second section titled ‘Customizing WooCommerce Emails using FunnelKit Automations.’
4. Automating Marketing Emails Using Uncanny Automator
Of course, you’ll also still need to send marketing emails outside of your drip campaign. These are most effective when they are personalized and timely.
For example, you can use automated emails to showcase products similar to what your customer has already bought. Or you can automatically send users an email as soon as you publish a new article on your website.
You can do this easily by using Uncanny Automator. It’s the best WordPress automation plugin that allows you to create automated workflows for your WordPress site.
The free version easily connects with popular email marketing services such as Mailchimp, HubSpot, and others, making it easy to automate your email.
For this tutorial, we will use the free version of Mailchimp because it’s popular, and they offer a free forever plan where you can send up to 10,000 emails per month to 2,000 subscribers.
Getting Started With Uncanny Automator
The first thing you need to do is install and activate the free Uncanny Automator plugin. For more details, see our step-by-step guide on how to install a WordPress plugin.
Upon activation, head over to the Automator » Add New page to create your first recipe. In this tutorial, we’ll send an automated email to subscribers whenever we publish a new post.
You’ll be asked to select which type of recipe you want to create. You should choose ‘Logged-in users’ and then click the ‘Confirm’ button.

Setting Up the Automation Trigger
Next, you need to choose whether the automation will be triggered by Uncanny Automator or WordPress.
Since you will be sending an automated email when a new WordPress post is published, you should click on the ‘WordPress’ option.

Now, you can choose from a long list of available WordPress triggers.
You need to select the trigger labeled ‘A user publishes a type of post with a taxonomy term in a taxonomy.’
You can use the search feature to find this trigger more quickly.

If you like, you can get specific about the types of posts that will trigger the email. You can choose a post type and a specific category or tag from the drop-down menus.
For this tutorial, we’ll go with the default settings.

Make sure you click the ‘Save’ button when you have finished setting up the trigger.
Setting Up the Automation Trigger
Next comes the action part, where you choose what action will be triggered. To get started, simply click the ‘Add action’ button.

Now, you will be shown a long list of integrations that are available for the action.
You should click the Mailchimp icon to connect it to your website.

This will bring up a popup where you need to follow the on-screen instructions to finish the connection by logging into your Mailchimp account or creating a new one. Once connected, you will be able to choose what action you want to perform on your Mailchimp account.
You should then choose the option ‘Create a send a campaign’.

Now, you need to type a name for the campaign. You might like to use tokens so that the Mailchimp campaign name for each new post is different.
For example, you can click the ‘*’ button to the right of the field and select the ‘Post title’ token.
After that, you can use the drop-down menus to choose your audience and segment and fill in the subject and other details of your email.

You can compose your email in the ‘Email contents’ field. Make sure you use tokens so that the content is updated for each email campaign.
For instance, you can include tokens for the post title, post author display name, post excerpt, post URL, and featured image URL.
Once you are finished, you can switch the recipe from ‘Draft’ to ‘Live.’

From now on, when you publish a new article on your website, Mailchimp will automatically send an email to your subscribers.
You can learn more about building an effective mailing list in our guides on using Mailchimp and WordPress and how to create an email newsletter the right way.
You might also like to see our guide on how to automatically send a coupon to users who leave reviews in WooCommerce. It’s another good example of how you create automated emails using Uncanny Automator to build customer loyalty.
Bonus: Sending Automated Notification Emails
Now that you have set up automated emails for your users, you can do the same for yourself and your team.
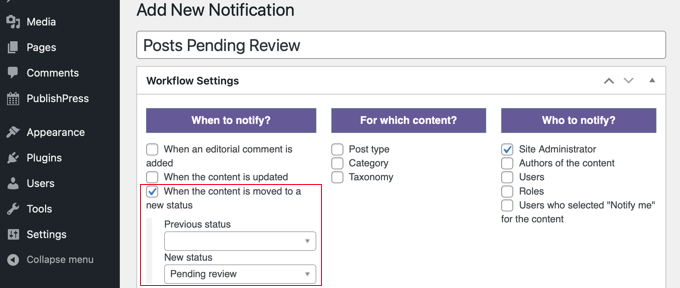
For example, you can create automated email notifications to keep track of issues that require your immediate attention, such as when an author submits a post for you to review.
You can also stop the WordPress notifications you don’t need from filling up your inbox, such as comment notifications.
To learn how to customize notification emails, see our step-by-step guide on how to add better custom notifications in WordPress.
Expert Guides on WordPress Email
We hope this tutorial helped you learn how to send automated emails in WordPress. You may also want to see some other articles related to WordPress email:
- How to Properly Configure Your WordPress Email Settings
- [SOLVED] How to Fix WordPress Not Sending Email Issue
- How to Use SMTP Server to Send WordPress Emails
- How to Set Up WP Mail SMTP with Any Host (Ultimate Guide)
- How to Send a Test Email From WordPress (The Easy Way)
- How to Change Sender Name in Outgoing WordPress Email
- How to Send Email to All Registered Users in WordPress
- How to Email Authors When Articles Are Published in WordPress
- Why You Should Never Use WordPress to Send Newsletter Emails
- Beginner’s Guide to WordPress Email Marketing Automation
If you liked this article, then please subscribe to our YouTube Channel for WordPress video tutorials. You can also find us on Twitter and Facebook.


")
Ayanda Temitayo
One thing I like about WpBeginner article is they know how to use illustration and images to explain post. This is a very long post but detailed, its worth the whole effort. I will definitely try out this automated emails in wordpress. It makes work easier.
Great article, Thanks for this. It is a helpful content.
WPBeginner Support
Glad you liked our article and our screenshots
Admin