Custom fields are a handy WordPress feature that lets you add information to your posts, pages, or custom post types.
By default, WordPress gives you fields to fill in the title, the main content of your post, and a featured image. But if you want to add extra information that WordPress doesn’t ask for, then you can use custom fields.
Many WordPress plugins and themes also use custom fields to store and display extra information on your WordPress website.

What Are WordPress Custom Fields Used For?
Custom fields can store extra information about a post, page, or custom post type that WordPress doesn’t allow by default.
For example, if you are writing a movie review, then you may want to add new details like the film’s release date, the director’s name, and the cast list.
Some plugins may also add custom fields in the WordPress content editor. For instance, All in One SEO (AIOSEO) uses them to let users fill in and store SEO metadata about the blog post.
WooCommerce also creates a custom post type for eCommerce products. It uses custom fields to store your product information.
Here are some other things you can do with custom fields:
- Store additional information for WordPress user registration.
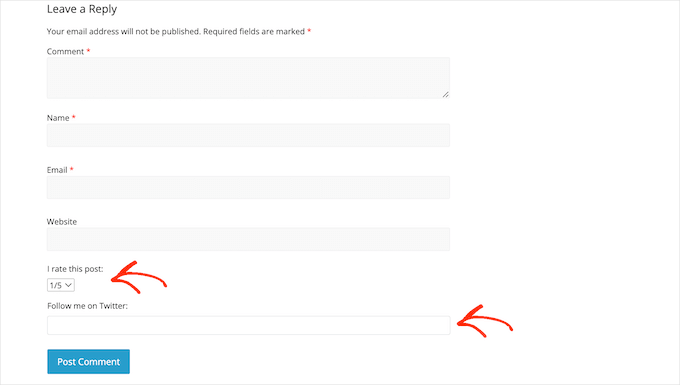
- Ask for extra details in the WordPress comment form.
- Create additional fields in WordPress taxonomies.
- Add new custom fields after a post has been published on your WordPress site.
How to Create a Custom Field in WordPress
To add custom fields, you need to open the Gutenberg editor for the post or page where you want to add the extra information.
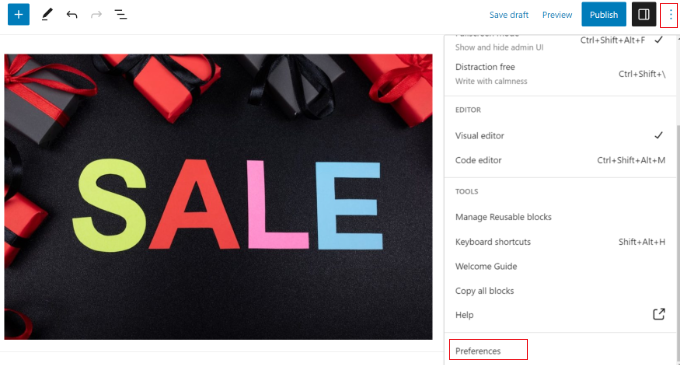
Then, click the three-dot menu at the top-right corner of the screen and select ‘Preferences.’
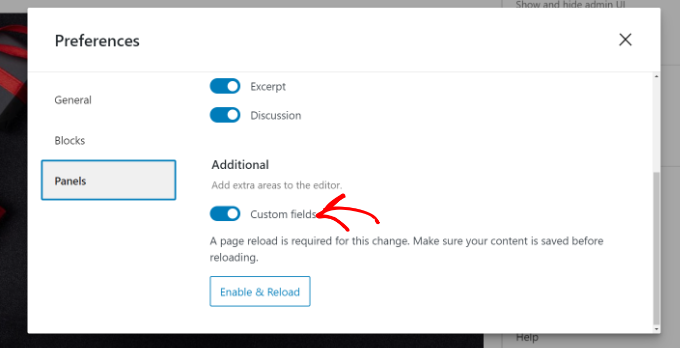
A popup window will now appear. Here, just switch to the ‘Panels’ tab and toggle on the ‘Custom fields’ setting.
After that, click the ‘Enable & Reload’ button so that the block editor can refresh itself.
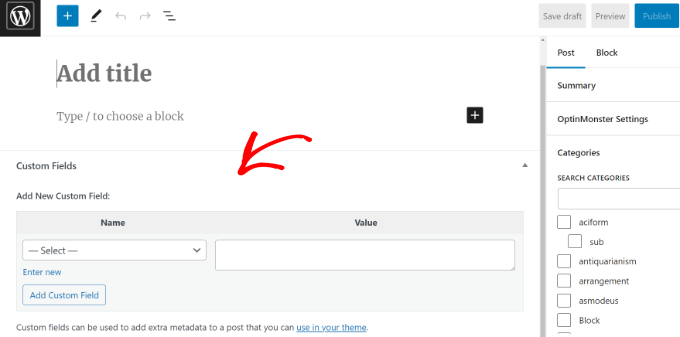
If you scroll down the page or post edit screen, you will now see a new Custom Fields section.
You will see a dropdown menu where you can select an existing custom field added by WordPress themes or plugins. But if you want to create a new custom field meta box, then simply click ‘Enter new.’
Now, just type down your custom field name and field value.
In our example, we named our custom field ‘Mood’, and the field data is ‘Happy.’ This is something you can do if you have a personal WordPress blog and want to tell users what mood you were in when writing the post.
Once done, just click on the ‘Add Custom Field’ button to save it.
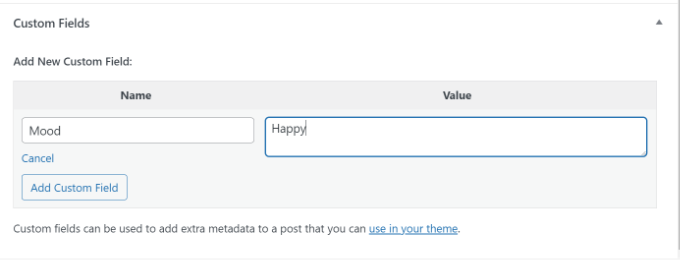
From there, you can continue editing your content or updating it.
Another way you can create custom fields is to use the Secure Custom Fields or Meta Box plugins. These plugins give you more control and settings to manage your custom fields.
For example, you can create a field group that organizes related custom fields together, making it easier to manage them as a set.
Within this field group, you can define field types such as text, number, image, or even complex field types like repeater fields or flexible content layouts. This allows for a wide range of data input.
Pro Tip: If you can’t see the custom fields option in your WordPress preferences menu, then you may have the Secure Custom Fields plugin installed. It disables the default custom fields setting so that you can use the plugin instead. Please refer to our guide on how to fix custom fields not showing in WordPress for more information.
How to Display Custom Field Values in WordPress Posts or Pages
By default, WordPress doesn’t display the custom field values you’ve added on the front end of your WordPress site. To do so, you will need to add a custom code snippet to your WordPress theme file, specifically the single post template (single.php) file.
Advanced users can back up their website before making any code changes and then create a child theme, but this is not beginner-friendly.
Because of that, we recommend using WPCode, the best code snippet plugin on the market. Our WordPress custom fields 101 guide shows you how to display custom field values safely with WPCode.
We also have a tutorial on how to display specific posts only if they have certain custom fields. This conditional function be handy if you want to create a custom page that only lists those posts.
Where Are Custom Fields Stored in WordPress?
Custom fields in WordPress are stored as metadata, separate from the main content of your posts, pages, or other types of content.
When you create a new post, page, or any other type of content, WordPress organizes this information into two distinct sections.
The first section contains the actual content you input using the post editor. This is the text, images, and other media you add to your post or page.
The second section holds metadata, which includes details about the post, such as the title, author, and the date and time it was published. Metadata is not the main content itself but provides additional information about the post.
We hope this article helped you learn more about custom fields in WordPress. You may also want to see our Additional Reading list below for related articles on useful WordPress tips, tricks, and ideas.
If you liked this article, then please subscribe to our YouTube Channel for WordPress video tutorials. You can also find us on Twitter and Facebook.
Additional Reading
- How to Add Custom Meta Boxes in WordPress Posts and Post Types
- How to Add Additional User Profile Fields in WordPress Registration
- How to Add Custom Fields to Comments Form in WordPress
- How to Add Custom Fields Automatically on Post Publish in WordPress
- WordPress Custom Fields 101: Tips, Tricks, and Hacks
- How to Fix Custom Fields Not Showing in WordPress (Easy Guide)


