Vous souhaitez ajouter un widget WordPress à l’en-tête de votre site ?
Les widgets vous permettent d’ajouter facilement des blocs de contenu à des sections spécifiques de votre thème, mais tous les thèmes n’incluent pas une zone de widgets d’en-tête.
Dans cet article, nous allons vous afficher comment ajouter facilement un widget WordPress à l’en-tête de votre site.

Pourquoi ajouter un widget en-tête à votre site WordPress ?
L’en-tête de votre site est l’une des premières choses que vos internautes verront lorsqu’ils visiteront votre site WordPress. En ajoutant un widget WordPress à votre en-tête, vous pouvez optimiser cette zone pour aider à capter l’attention des lecteurs.
La plupart des en-têtes de sites web comportent un logo personnalisé et un menu de navigation pour aider les internautes à se déplacer sur votre site.
Vous pouvez également ajouter un widget d’en-tête au-dessus ou au-dessous de cette zone pour mettre en avant des contenus utiles, des bannières publicitaires, des offres à durée limitée, des formulaires à une ligne, etc.
Ici, chez WPBeginner, nous avons un appel à l’action dans l’en-tête, directement sous le menu de navigation.

La plupart des thèmes WordPress disposent de zones prêtes à accueillir des widgets dans la colonne latérale et le pied de page, mais tous les thèmes n’ajoutent pas de zones prêtes à accueillir des widgets dans l’en-tête.
Note de l’éditeur : Si votre thème ne dispose pas d’une zone d’en-tête prête à accueillir des widgets, vous pouvez désormais créer des thèmes WordPress entièrement personnalisés à partir de zéro (sans aucun codage).
Mais tout d’abord, voyons étape par étape comment ajouter un widget WordPress à l’en-tête de votre site dans votre thème existant. Utilisez simplement les liens rapides ci-dessous pour passer directement à la méthode que vous souhaitez utiliser :
Méthode 1 : Ajouter un widget WordPress à l’en-tête de votre site dans les Réglages du thème WordPress
Beaucoup des meilleurs thèmes WordPress incluent une zone de widgets d’en-tête que vous pouvez personnaliser à votre guise.
Tout d’abord, vous devez vérifier si votre thème WordPress actuel supporte une zone de widgets WordPress dans l’en-tête.
Vous pouvez trouver cela en allant dans le personnalisateur de thème WordPress ou dans la zone des widgets de votre panneau d’administration WordPress. Pour ce faire, naviguez vers Apparence » Personnaliser et voyez s’il y a une option pour modifier l’en-tête.
Note : Si vous utilisez un thème bloc, alors vous ne verrez pas cette option dans votre colonne latérale d’administration. Au lieu de cela, vous devriez consulter notre guide sur la façon de personnaliser votre en-tête en utilisant l’éditeur de site complet de WordPress.
Dans cet exemple, le thème gratuit Astra dispose d’une option appelée » Constructeur d’en-tête « . Nous allons vous afficher comment utiliser cette fonctionnalité dans Astra, mais gardez à l’esprit que cela se présentera différemment selon le thème que vous utilisez.

Si vous cliquez dessus, vous accédez à un écran qui vous permet de modifier votre en-tête et d’ajouter des widgets.
En bas de l’écran, vous pouvez personnaliser complètement l’en-tête, ainsi que les zones situées au-dessus et au-dessous de l’en-tête. Il vous suffit de survoler l’une des zones vides et de cliquer sur l’icône « Plus ».

Sélectionné, un menu surgissant permet de sélectionner « Widget 1 ».
Vous pouvez choisir parmi d’autres options, mais vous devez sélectionner l’une des options « Widget » pour que l’en-tête soit prêt à accueillir un widget.

Pour ajouter une zone de widget à votre en-tête, cliquez sur la case « Widget 1 » qui se trouve dans la section du personnalisateur d’en-tête.
L’option d’ajout d’un widget apparaît.

Cliquez ensuite sur l’icône d’ajout de blocs « Plus » dans le menu de gauche.
Cette opération fait apparaître une fenêtre surgissante dans laquelle vous pouvez sélectionner un widget à ajouter à votre en-tête.

Vous pouvez continuer à personnaliser votre en-tête et ajouter autant de widgets que vous le souhaitez.
Une fois que vous avez terminé, n’oubliez pas de cliquer sur le bouton « Publier » pour enregistrer vos modifications.

Vous pouvez maintenant voir votre zone d’en-tête avec le ou les widgets que vous avez ajoutés.
Voici une capture d’écran de la façon dont elle apparaît sur notre site de démonstration.

Vous n’utilisez pas Astra ?
Une autre façon de vérifier si votre thème dispose déjà d’un widget d’en-tête WordPress est de naviguer vers Apparence » Widgets dans votre panneau d’administration WordPress.
Ensuite, voyez s’il y a une section de widgets libellée « En-tête » ou quelque chose de similaire.

Si c’est le cas, il suffit de cliquer sur l’icône du bloc d’ajout « Plus » pour faire apparaître le menu des widgets.
Vous pouvez ensuite ajouter le widget de votre choix en cliquant dessus.
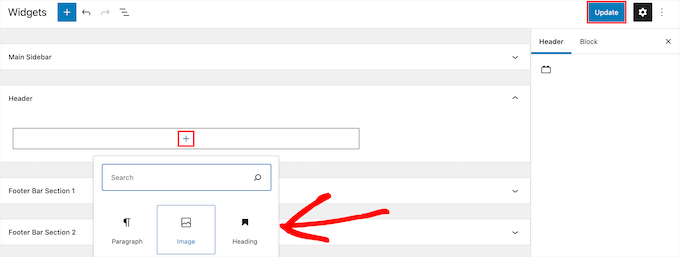
Confirmez-vous que vous avez bien cliqué sur le bouton « Mettre à jour » pour enregistrer vos modifications dans la zone du widget d’en-tête.
Méthode 2 : Ajouter un widget WordPress à l’en-tête de votre site en ajoutant du code à WordPress
Si votre thème WordPress ne dispose pas d’une zone de widgets WordPress dans l’en-tête, vous devrez l’ajouter manuellement en ajoutant du code à WordPress.
Si vous ne l’avez jamais fait auparavant, consultez notre guide sur la façon de copier et coller du code dans WordPress.
Ensuite, vous pouvez ajouter l’extrait de code suivant à votre fichier functions.php ou en utilisant une extension d’extraits de code telle que WPCode (recommandé) :
function wpb_widgets_init() {

	register_sidebar( array(
		'name'          => 'Custom Header Widget Area',
		'id'            => 'custom-header-widget',
		'before_widget' => '<div class="chw-widget">',
		'after_widget'  => '</div>',
		'before_title'  => '<h2 class="chw-title">',
		'after_title'   => '</h2>',
	) );

}
add_action( 'widgets_init', 'wpb_widgets_init' );
Pour plus de détails, vous pouvez consulter notre guide sur la façon d’ajouter du code personnalisé dans WordPress sans casser votre site.
Il vous guidera à travers la méthode WPCode.
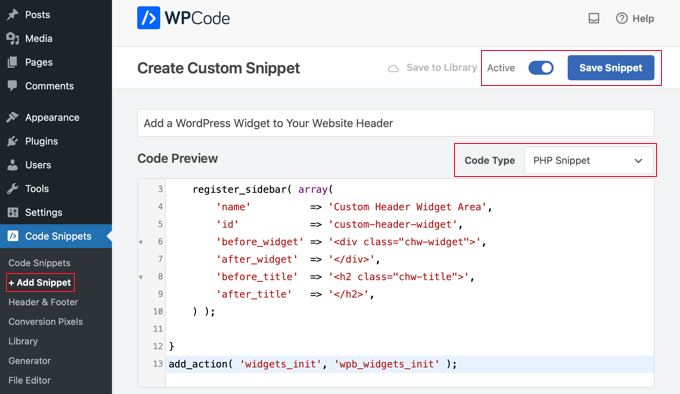
Ce code inscrit une nouvelle colonne latérale ou une zone prête à accueillir des widgets pour votre thème.
Si vous allez dans Apparence » Widgets, vous verrez une nouvelle zone de widget libellée » Zone de widget d’en-tête personnalisé « .

Maintenant, vous pouvez ajouter vos widgets à cette nouvelle zone. Pour plus de détails, consultez notre guide sur l’ajout et l’utilisation des widgets dans WordPress.
Cependant, votre widget d’en-tête ne s’affichera pas encore en direct sur votre site. Nous allons vous afficher la marche à suivre.
Afficher votre widget d’en-tête personnalisé dans WordPress
Maintenant que vous avez créé la zone du widget d’en-tête, vous devez indiquer à WordPress où l’afficher sur votre site.
Pour ce faire, vous devez modifier le fichier header.php de votre thème. Ensuite, vous devez ajouter le code suivant à l’endroit où vous souhaitez que le widget s’affiche :
<?php

if ( is_active_sidebar( 'custom-header-widget' ) ) : ?>
    <div id="header-widget-area" class="chw-widget-area widget-area" role="complementary">
	<?php dynamic_sidebar( 'custom-header-widget' ); ?>
    </div>

<?php endif; ?>
Ce code ajoutera la zone de widgets personnalisés que vous avez créée précédemment à l’en-tête de votre site.
Maintenant, vous pouvez visiter votre blog WordPress pour voir votre zone de widget d’en-tête en direct.

Style de la zone des widgets de l’en-tête de WordPress à l’aide de CSS
En fonction de votre thème, vous devrez peut-être aussi ajouter du CSS à WordPress pour contrôler l’affichage de la zone des widgets de l’en-tête et de chacun des widgets qu’elle contient. Cela peut se faire de plusieurs manières :
- Si vous utilisez un thème plus ancien, vous pouvez utiliser l’Outil de personnalisation du thème en visitant Apparence » Personnaliser dans votre tableau de bord WordPress.
- Si vous utilisez un thème en bloc, vous pouvez corriger l’absence de personnalisation du thème dans l’administration de WordPress.
- Si vous utilisez un thème en bloc, vous pouvez ajouter des CSS supplémentaires à l’aide de l’Éditeur de site complet en visitant Apparence » Éditeur dans votre Tableau de bord.
- Vous pouvez ajouter des CSS personnalisés à l’aide de l’extension WPCode (recommandée).
- Si vous ne connaissez pas le CSS, vous pouvez utiliser une extension comme CSS Hero.
Pour en savoir plus, consultez notre guide sur la façon d’ajouter facilement des CSS personnalisés à votre site WordPress.
Pour cet article, nous allons voir rapidement comment ajouter des CSS personnalisés à l’aide de l’extension WPCode et de l’Outil de personnalisation du thème WordPress.
Dans la méthode 2 ci-dessus, nous vous avons affiché comment utiliser WPCode pour ajouter un extrait de code à votre fichier functions.php. Vous pouvez également ajouter cette extension pour ajouter du CSS personnalisé.
Lorsque vous créez un nouvel extrait dans WPCode, assurez-vous de sélectionner le type de code « Extrait CSS » dans le menu déroulant de droite et que l’option « Insertion automatique » est sélectionnée.
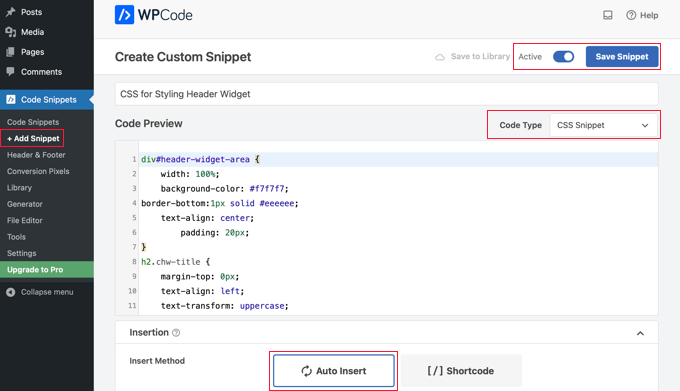
Dans la section de prévisualisation du code, vous devez ajouter le CSS pour styliser votre widget d’en-tête.
Voici un exemple de code CSS pour vous aider à démarrer :
div#header-widget-area {
    width: 100%;
    background-color: #f7f7f7;
border-bottom:1px solid #eeeeee;
    text-align: center;
		padding: 20px;
}
h2.chw-title {
    margin-top: 0px;
    text-align: left;
    text-transform: uppercase;
    font-size: small;
    background-color: #feffce;
    width: 130px;
    padding: 5px;
    }
Ensuite, vous devez vous assurer que le réglage « Actif » est activé, puis cliquer sur le bouton « Enregistrer l’extrait » en haut à droite de l’écran.
Pour utiliser l’Outil de personnalisation du thème à la place, vous devez naviguer vers Apparence » Personnaliser dans votre panneau d’administration WordPress. Le panneau du personnalisateur de thème de WordPress s’affiche. Vous devez cliquer sur l’onglet « Additional CSS ».
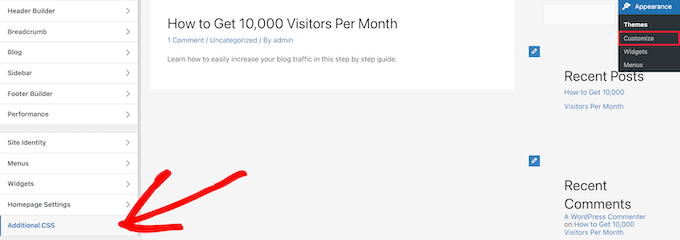
Cela vous permet d’ajouter des CSS supplémentaires directement à votre thème et de voir les modifications en temps réel.
Il suffit d’ajouter le code CSS que nous vous avons affiché ci-dessus dans la case « Additional CSS ».

Une fois que vous avez fini d’ajouter votre CSS, n’oubliez pas de cliquer sur le bouton « Publier » pour enregistrer vos modifications.
Voici à quoi ressemble le widget d’en-tête personnalisé avec les modifications CSS en direct.

Nous espérons que cet article vous a aidé à apprendre comment ajouter un widget WordPress à l’en-tête de votre site. Vous pouvez également consulter notre guide sur la façon de choisir le meilleur hébergeur WordPress et nos choix d’experts du meilleur logiciel de discussion en direct pour les petites entreprises.
If you liked this article, then please subscribe to our YouTube Channel for WordPress video tutorials. You can also find us on Twitter and Facebook.


Syed Balkhi says
Hey WPBeginner readers,
Did you know you can win exciting prizes by commenting on WPBeginner?
Every month, our top blog commenters will win HUGE rewards, including premium WordPress plugin licenses and cash prizes.
You can get more details about the contest from here.
Start sharing your thoughts below to stand a chance to win!
Rob Hartman says
This tutorial was PERFECT and I’ve successfully created the header widget, super light and no impact on page speed. I had hoped that I could use the same approach to add a widget area to my footer, and replace all Header related reference in both the Functions and footer.php – but in this instance the widget area was not registered.
Does this approach ONLY apply to the header area?
Regardless, thanks for a super concise tutorial.
WPBeginner Support says
The code should work even in a footer but your theme may not display the footer on every page as a common reason.
Administrateur
Sjoerd says
Hi! Thanks for the tutorial. What if I want to show the widget area above the primary menu instead of right below it?
WPBeginner Support says
You would then place the code above the menu instead of below it.
Administrateur
Gaston says
Thank you!!! I was looking for this
WPBeginner Support says
Glad our guide was helpful
Administrateur
Ranjit says
Thank you for tutorial, I have a one question how to add columns (2 or 3) in header widget ?
WPBeginner Support says
That would depend on your specific theme, we would first recommend reaching out to your specific theme’s support to see if they have a built-in method for what you’re wanting to do or have recommended settings.
Administrateur
Muhammad Kashif says
Hello, I added the custom header widget successfully, but after updating the theme my custom header widget is not working ? Please tell me the solution! Looking forward to your response. thanks
WPBeginner Support says
When you updated your theme you likely removed the code from the header.php. To prevent that in the future you can look at creating a child theme following our guide below:
https://www.wpbeginner.com/wp-themes/how-to-create-a-wordpress-child-theme-video/
Administrateur
Sophia says
Thank you so much! This was exactly what I was looking for. It works perfectly.
WPBeginner Support says
You’re welcome
Administrateur
Inayatali says
Thank You so much for this awesome post, this code works perfectly how I wanted.
WPBeginner Support says
You’re welcome, glad our article was helpful
Administrateur
Jim Rolt says
Excellent code snippets which I was able to adapt and style to do the jobs I wanted. Many thanks for this
WPBeginner Support says
Glad our guide could be helpful
Administrateur
Vildan says
Hi WP Beginner,
How do I get the widget area in the header on the right side of the menu? I want to add the ADD TO CART icon in there.
WPBeginner Support says
For placement, it would depend on the specific theme you are using, if you check with your theme’s support they should be able to let you know what part of your header.php file to add the code to or if they have a built-in method to do so.
Administrateur
Bathri Vijay says
Thank You WPBeginner Editorial Team giving a perfect blog to the beginners and middle class coders. It is a big platform to learn and to execute WordPress. You were the big reason for the success of many bloggers and business owners.
WPBeginner Support says
You’re welcome, glad you’ve been finding our content helpful
Administrateur
zambol says
Thanks for the tutorial. it works but the trouble I have is that it’s not responsible for mobile devices. is it possible to make the sidebar responsible?
WPBeginner Support says
I believe you mean responsive in which case, we sadly do not have a recommended method for making this widget responsive at the moment.
Administrateur
Gen says
Thanks,
it works. Now I can add some widget or ads without add plugins.
WPBeginner Support says
You’re welcome
Administrateur
anju says
how to show custom header bafore created header
WPBeginner Support says
Depending on your specific theme, if there is content before the header.php content, you would want to reach out to the theme’s support
Administrateur
dav says
hello,
I would like to make an header like the one in the first picture on the top of this page ( the list 25 website).
How can I make It?
Please help me!
WPBeginner Support says
It would depend on what you mean, you can add image icons to your menu items using: https://www.wpbeginner.com/plugins/how-to-add-image-icons-with-navigation-menus-in-wordpress/
Administrateur
dav says
Actually I’m talking about adding a middle header and right header widgets
WPBeginner Support says
That would depend heavily on your theme, you may want to look into a page builder plugin to easily create something like what you’re wanting.
Tehreem says
well I am unable to access my header.php ! is there any other way to display my header? like from css!
WPBeginner Support says
CSS would allow you to style the area once added but you would need to edit the php file to add the code for placing the section or you could use a page builder plugin as another option: https://www.wpbeginner.com/beginners-guide/best-drag-and-drop-page-builders-for-wordpress/
Administrateur
GoosePT says
Hello!
Perfect tutorial.
Im using it to create a Topbar, but im facing a problem the widgets (in my case 2) are one below the other.
How can I make them to be displayed side by side?
Lori says
Great tutorial, works perfectly. I would love to hear the answer to this one as well, I’m using for a similar setup and would like to displays widgets side by side.
PS – great site BTW, any time i need to add additional functionality or have an issue with something, I was start with wpbeginner.
WPBeginner Support says
Sadly, for a question like that it would require theme specific CSS modifications with how the widgets are added. You would likely need to use inspect element to find the CSS option that needs to be changed: https://www.wpbeginner.com/wp-tutorials/basics-of-inspect-element-with-your-wordpress-site/
Administrateur
J M Das says
This tutorial is very useful.
How to remove the white space above this widget area in Posts? Thanks for any help
Mikhail Koval says
What would I have to put in the header.php to ONLY show on the home page but not show on other pages?
WPBeginner Support says
Hi Mikhail,
You can use conditional tags like is_home or is_front_page to display things on certain pages in WordPress. For example:
If ( is_front_page() ) { // code you want to display on the homepage }1-click Use in WordPress
Administrateur
Anna says
Hi, this is really what I’m looking for and it would be great if I could get it to work! Creating the widget area works fine, displaying it does unfortunately not.. I would also like to display it only on the start page.
I´m not sure
1) where in the header file to put the display code
2) where to put this « only-on-startpage »-code and what code goes on line 2
I understand if my questions are too basic to bother with, but I would be really grateful if someone has time and patience for it anyway..:-) Thanks in advance!!
WPBeginner Support says
Hi Anna,
These are perfectly reasonable questions.
1. You need to put the display code based on where you want to display the header widget. For example, your theme’s header.php file may have a section to display site title, logo, description, and navigation menus. They will probably be wrapped around div tags. You will put your header widget code before or after these areas. If you are unsure, you can place the code at the end of the header.php file.
2. If you only want to display the widget area on your website’s front page then you can use conditional tags like this:
if ( is_front_page() ) { // your widget display code goes here }1-click Use in WordPress
Anna says
OK, I cheated and put the widget-code in the front-page.php instead, it worked! Thanks :-)!
Anna says
Hi again, it became visible on start page with css positioning!
Now it’s only the question of how to put together the only-on-start-page-code with the visibility code…
Thanks again for kindness and patience..)
Bruce Pratt says
Great tutorial! This helped me accomplish exactly what I wanted. Fantastic!
Paul Johnson says
Great tutorial thanks. I am trying to implement the JetPack Cookie Consent Widget and despite following your instructions the Cookie Consent bar still appears at the bottom of the page.
Is it possible the widget is overriding the code?
Keu says
Does this still work for Twentyseventeen? The functions.php part works fine, but the header.php part doesn’t.
thomas evans says
Hello
pls can someone here help me as how to make this responsive on any mobile device?
i want to insert a google adsense code here for ads 728 x 90 banner sizes but any time i do so, it shows perfectly on desktops but on mobile devices it becomes weird.
thank you
Anubhav Bhatt says
I have successfully created a header widget and It was really easy, thanks to you all. But I actually wanted it in the POSTS, not on the Homepage because I’m using Nikko Portfolio theme and it looks awful.
Please Help.
Soren says
Wow, I was actually able to do this…?! Thank you so much for an awesome guide!
Jeffrey says
I placed the code in my functions.php file and added my widget code in the header.php file and added my widget text and saved.
When I move on to editing pages, upon clicking Update, I get a white screen and can’t see my page.
I then have to go back to /wp-admin to see the dashboard. There are no console errors when I click update but just a white screen.
Jeffrey says
After troubleshooting, I have incorrect syntax in functions.php file.
thank you!
Derek says
This is great for that header advertizment thing, but what I want to do is add a pay pal donation button to my header. (Right side) cant believe there is no video tutorials out there on how to make a a widgetized header space to drag your pay pal widget into so that it appears on the right side of your header.. i can imagine there is alot of people who could benefit from an instructional on this.
Stephen Crawford says
This is a great tutorial, but I would like to create a widget area that can be placed above the header area would that also be possible?
Joey says
Just updated everything and it’s working great on my desktop. Now, if you could tell me how to get the widget to display on my mobile device that would be great! Did I mess something along the way?
Kushal says
Thank you so much for this post! Solved what I was looking for!
Mark says
Hi, many thanks for writing this, it has helped me massively. However, with my website: how do I get the widget to appear at the far right hand side. When I use the option to show search field in the header, this is the place I want it to go?
Thanks in advance!
Linda Holiner says
I am confused. I don’t understand how to get an image into the widget and let the user change the image. I don’t see where your image is coming from.
Thomas says
Would it be possible to make a tutorial about how to make a TopBar with sections (Social media icons, Notice, Search, Woocommerce cart).
No plugin does really do that well
Thanks
Liam says
How to make the widget do display only on desktop devices?
Tim says
If i want to add multiple custom widget areas do i need to add a new function to functions.php for each? or just add them in the area i want?
fahad says
I managed to use the widget in the navigation bar instead of the header area as I wanted to add a language toggle option at this section. I have a small problem where I can’t move the language two flags to the any horizontal location. I tried to add margin-right: 100px; to the advanced CSS section but it didn’t change. It might be something else centering all the navigation content but I want to make sure if it could be fixed with the widget.
Courtney says
Hey how did you edit the code to put it in the nav bar? I’m currently trying to do the same thing without any luck.
Leanore says
When I attempt to add more than one custom widget area, I receive a 500 Error on my website. Is there a reason for this? Is it possible to create more than one custom widget area for a theme?
WPBeginner Support says
Hi Leanore,
Yes, you can create multiple custom widget areas for your theme.
Administrateur
Antonis says
Hello,
Is it possible to briefly describe how to make multiple ones? I tried to copy the function and rename the elements but it wont work..
P.S Very handy code, thanks!!
nina says
Hi! When i try to update the function.php file, there is this fatal error:
Fatal error: Cannot redeclare wpb_widgets_init()
I am not sure if i did a wrong edit. Could you help
WPBeginner Support says
Hey Nina,
This means that wpb_widgets_init function already exists in your functions.php file. You will have to replace it like wpb2_widgets_init to make it unique or remove the previous code that you added.
Administrateur
Sam says
Hello,
Thanks so much for this, it is really helpful.
One issue I am running into: My widget is just a menu of a couple of text links to pages. Here is my site:
See how the text is all the way against the right side of the header area? I would like to use a right margin to line it up under « Contact » without turning the margin area white.
Also, would love to make the text black.
Many thanks if you can help with these tweaks!
Sam
Tommy says
Your blog is most helpful. Thank you for helping us made modifications to Twenty Seventeen. People like you make using a new wordpress theme like Twenty-seventeen much easier.
I am relatively new to word press and would like to try some additional modifications to Twenty seventeen.
I would like to create a new widget for wp pages. I am trying to figure out how I can take your blog information on how to make a new widget for the header and apply it to a wp page in the twenty seventeen theme. I am getting stuck.
Could you show us now to create a new widget for a page? That would be awesome.
Thanks
Tommy
WPBeginner Support says
Hey Tommy,
Please see how to create a custom WordPress widget.
Administrateur
Tom says
in Twenty Twelve theme, it put it under my menu and not in the header area.
liz says
same for me – did you find a solution Tom?
Bobby_qw says
Thank you very much Mr. Admin.You are teahing to us ‘how to make our own web site. l always follow your posting and l make my own web site. Thank you very much.
Shane Cunningham says
I used this and though it worked in adding a custom widget area to the top of my page, i could not get it to align with the other items in the header (company logo and nav menu) in Cherry. No matter where I put it in the header.php, it either appeared above or below the other items. I wanted to use it to create a phone number block between the logo and the nav menu. Though I could get it to center in correct spot horizontally, i could not get it to appear between them. To give you a better idea of what I need, imagine that on this very page’s header, you wanted to move the nav menu justified to the right and put your 800 number between it and the « wpbeginner » logo. How could I use this code (or a variation of it) to do that?
Kristin says
Thank you so much for this (and all) of your detailed tutorials! Could you please tell me how to implement a header widget, excluding the Homepage?
Massimo says
In the code that you added to header.php change the first line:
if ( is_active_sidebar( 'custom-header-widget' ) ) : ? >with this one:
if ( is_active_sidebar( 'custom-header-widget' ) && ! is_front_page ) : ?Massimo says
Sorry, I missed something!
The line that you have to add is:
if ( is_active_sidebar( 'custom-header-widget' ) && ! is_front_page() ) : ?>Kristin says
Thank you so much!
reus says
thank men, more power
Nirmal Kumar says
Thanks for this tutorial ☺ I used this code to create header for my website.
WPBeginner Support says
You are welcome
Administrateur
Mihaita Vulpe says
Wow, and i taught i was limited to adding widgets only in the sidebar, thanks for the tips.
Mihaita,
Yukio says
Wow this really look interesting and very useful; im going to try it and hope it works.