Do you want to create your own custom widgets in WordPress?
Widgets allow you to add non-content elements into a sidebar or any widget-ready area of your website. You can use widgets to add banners, advertisements, newsletter sign-up forms, and other elements to your website.
In this article, we will show you how to create a custom WordPress widget, step by step.

Note: This tutorial is for DIY WordPress users who are learning WordPress development and coding.
What Is a WordPress Widget?
WordPress widgets contain pieces of code that you can add to your website’s sidebars or widget-ready areas.
Think of them as modules that you can use to add different elements and features to your site.
By default, WordPress comes with a standard set of widgets that you can use with any WordPress theme. For more details, see our beginner’s guide on how to add and use widgets in WordPress.
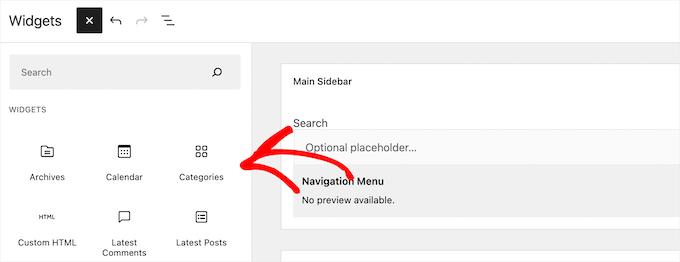
WordPress also allows developers to create their own custom widgets.
Many premium WordPress themes and plugins come with their own custom widgets that you can add to your sidebars.
For example, you can add a contact form, a custom login form, a photo gallery, an email list sign-up form, and more to a sidebar without writing any code.
Having said that, let’s see how you can easily create your own custom widgets in WordPress.
Before You Create a Custom Widget in WordPress
If you are learning WordPress coding, then you will need a local development environment. This gives you the freedom to learn and test things without the worry of your site being live.
You can install WordPress locally on Mac using MAMP or Windows using WAMP.
If you already have a live site, then you can move it to a local host. For more details, see our guide on how to move a live WordPress site to a local server.
After that, there are several ways to add your custom widget code in WordPress.
Ideally, you can create a site-specific plugin and paste your widget code there. This lets you add code to WordPress that isn’t dependent on your WordPress theme.
You can also paste the code into your theme’s functions.php file. However, it will only be available when that particular theme is active.
Another tool you can use is the WPCode plugin which allows you to easily add custom code to your WordPress website.
In this tutorial, we’ll create a simple widget that just greets visitors. The goal here is to familiarize yourself with the WordPress widget class.
Ready? Let’s get started.
Creating a Basic WordPress Widget
WordPress comes with a built-in WordPress Widget class. Each new WordPress widget extends the WordPress widget class.
There are 19 methods mentioned in the WordPress developer’s handbook that can be used with the WP Widget class.
However, for the sake of this tutorial, we will be focusing on the following methods.
- __construct() : This is the part where we create the widget ID, title, and description.
- widget : This is where we define the output generated by the widget.
- form : This part of the code is where we create the form with widget options for backend.
- update: This is the part where we save widget options in the database.
To create a custom widget, you can copy and paste the following code snippet to your functions.php file or in a site-specific plugin.
<?php

// Creating the widget
class wpb_widget extends WP_Widget {
	function __construct() {
		parent::__construct(
		// Base ID of your widget
			'wpb_widget',

			// Widget name will appear in UI
			__( 'WPBeginner Widget', 'textdomain' ),

			// Widget description
			[
				'description' => __( 'Sample widget based on WPBeginner Tutorial', 'textdomain' ),
			]
		);
	}

	// Creating widget front-end
	public function widget( $args, $instance ) {
		$title = apply_filters( 'widget_title', $instance['title'] );

		// before and after widget arguments are defined by themes
		echo $args['before_widget'];
		if ( ! empty( $title ) ) {
			echo $args['before_title'] . $title . $args['after_title'];
		}

		// This is where you run the code and display the output
		echo __( 'Hello, World!', 'textdomain' );
		echo $args['after_widget'];
	}

	// Widget Settings Form
	public function form( $instance ) {
		if ( isset( $instance['title'] ) ) {
			$title = $instance['title'];
		} else {
			$title = __( 'New title', 'textdomain' );
		}

		// Widget admin form
		?>
        <p>
            <label for="<?php echo $this->get_field_id( 'title' ); ?>">
				<?php _e( 'Title:', 'textdomain' ); ?>
            </label>
            <input
                    class="widefat" id="<?php echo $this->get_field_id( 'title' ); ?>"
                    name="<?php echo $this->get_field_name( 'title' ); ?>"
                    type="text"
                    value="<?php echo esc_attr( $title ); ?>"
            />
        </p>
		<?php
	}

	// Updating widget replacing old instances with new
	public function update( $new_instance, $old_instance ) {
		$instance          = array();
		$instance['title'] = ( ! empty( $new_instance['title'] ) ) ? strip_tags( $new_instance['title'] ) : '';

		return $instance;
	}

	// Class wpb_widget ends here
}

// Register and load the widget
function wpb_load_widget() {
	register_widget( 'wpb_widget' );
}

add_action( 'widgets_init', 'wpb_load_widget' );
An easier way to add custom code to your WordPress site is by using WPCode. It is the best code snippet plugin that helps manage and insert code snippets on your site without risking breaking anything.
First, you’ll need to install and activate the WPCode plugin on your site. If you need help, then please see our guide on how to install a WordPress plugin.
Upon activation, you can head to Code Snippets » + Add Snippet from the WordPress admin panel. From here, select the ‘Add Your Custom Code (New Snippet)’ option.

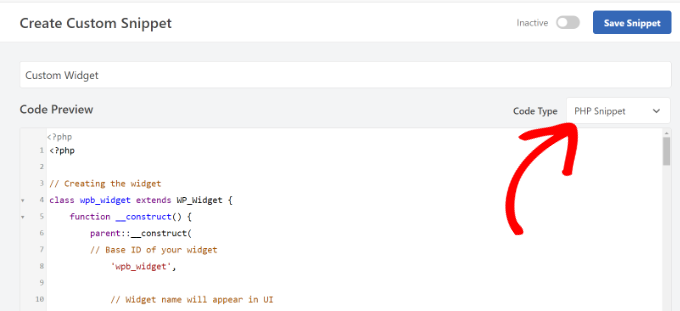
After that, you can paste the custom widget code in the Code Preview area.
You’ll also need to click the ‘Code Type’ dropdown menu and select the ‘PHP Snippet’ option.
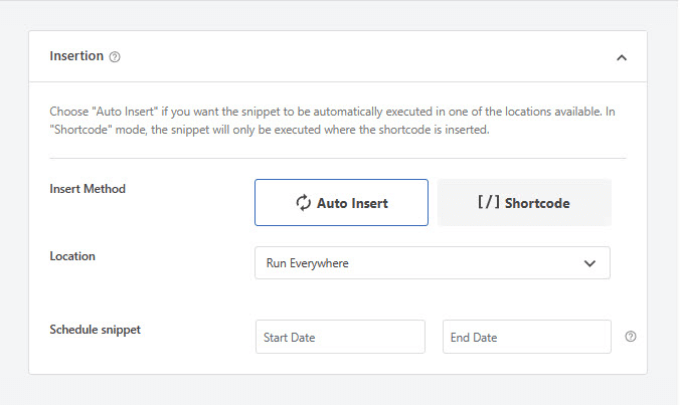
Next, you can scroll down and select the Insertion method for your code.
WPCode lets you choose where to run the code. For this tutorial, you can use the default options and run it everywhere.
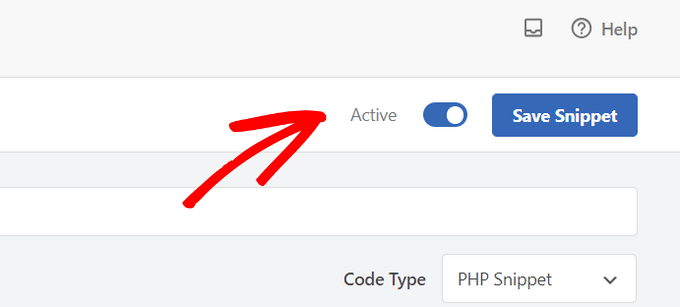
Once that’s done, you can scroll back to the top to Save the snippet.
To activate the snippet, simply click the toggle to Active.
To learn more, please see our guide on how to add custom code to WordPress site.
After adding the code to WordPress, you need to head over to the Appearance » Widgets page in your WordPress admin panel.
Then, click the ‘Plus’ add block icon, search for ‘WPBeginner Widget’, and select the new widget.

This widget has only one form field to fill in.
You can add your text and click on the ‘Update’ button to store your changes.
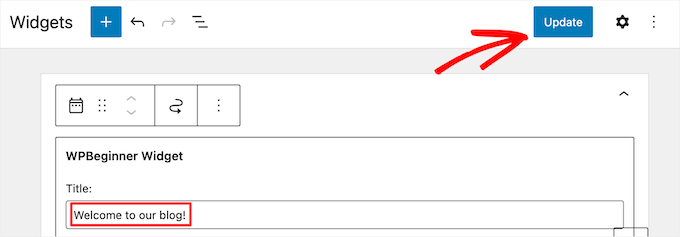
Now, you can visit your WordPress website to see the custom widget in action.

Adding Custom Widget in WordPress Classic Editor
If you’re using the classic widget editor to add new widgets to your site, then the process will be similar.
There will be a new widget called ‘WPBeginner Widget’ in the list of available widgets. You need to drag and drop this widget into your sidebar.
Then, enter a title and click ‘Save’ to save your widget settings.
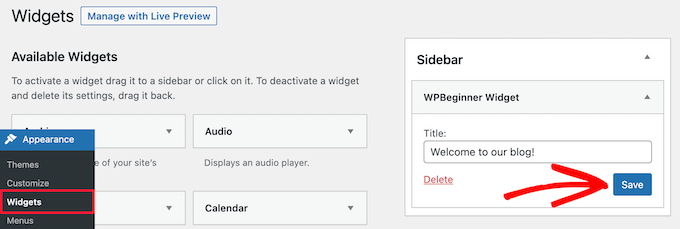
Your new custom widget will now be live on your website.
Now, let’s study the code again.
First, we registered the ‘wpb_widget’ and loaded our custom widget. After that, we defined what that widget does and how to display the widget’s back end.
Lastly, we defined how to handle changes made to the widget.
Now, there are a few things that you might want to ask. For example, what’s the purpose of textdomain?
WordPress uses ‘gettext’ to handle translation and localization. This textdomain and _e tells ‘gettext’ to make a string available for translation. To learn more, see our guide on how you can find translation ready WordPress themes.
If you are creating a custom widget for your theme, then you can replace textdomain with your theme’s text domain.
Alternatively, you can use a WordPress translation plugin to translate WordPress easily and create a multilingual WordPress site.
We hope this article helped you learn how to easily create a custom WordPress widget. You may also want to see our guide on the difference between a domain name and web hosting and our expert picks on the best free website hosting compared.
If you liked this article, then please subscribe to our YouTube Channel for WordPress video tutorials. You can also find us on Twitter and Facebook.


Syed Balkhi says
Hey WPBeginner readers,
Did you know you can win exciting prizes by commenting on WPBeginner?
Every month, our top blog commenters will win HUGE rewards, including premium WordPress plugin licenses and cash prizes.
You can get more details about the contest from here.
Start sharing your thoughts below to stand a chance to win!
Dan says
The ‘wpb_text_domain’ string is not found in the example code. I’m guessing the example code was updated and the article verbiage was not?
Also to confirm, is ‘wpb_text_domain’ actually ‘web_widget_domain’ from the sample code?
Thanks in advance for any feedback.
WPBeginner Support says
Thank you for pointing this out, we’ll update this article and clarify this better and make it clear.
Admin
marwan says
hi,
can I put the code as separate class.php and not in the functions.php
Karel Hanton says
Thank you for great tutorial. I add code to my test plugin and It works perfectly as described – I see the Widget in Appearance » Widgets list and I can add it to Sidebar.
But I do not see the new Widget on page editor list. Do I miss something, is there need another registration or settings?
Thanks again for help.
Aldo says
This is now displayed as a “Legacy Widget” in WordPress. Is there a new way to create widgets?
JP says
this is great, simple cut and paste example was exactly what I was looking for. Thanks!
WPBeginner Support says
You’re welcome
Admin
Banu says
I have created a CRUD Plugin and i need to use it in one page could you please guide me how to use that plugin in page ?
WPBeginner Support says
It would depend on how you set up the plugin, for having it on one page you could either look to use a shortcode for front-end display or look into the options API if you wanted to display it on the admin side of a site.
Admin
Kishan says
How can I create more than 1 custom widget?
And also, how can I set other fields like radio, checkbox, dropdown, text in widget?
WPBeginner Support says
You would need to replace the wpb_widget with what you want your new widget to be called and then the code would depend on what specifically you would like to add. If you take a look at the WordPress codex you can see the different codes available.
Admin
Carmen says
Hello!
Currently, I am developing a plugin and I need to create a widget to let the user add a specific functionality to his/her site.
I copied the code for your widget in a file and saved the file in my plugin’s directory. I used add_action and do_action in my plugin’s main file to load it but it still doesn’t work. Can you help me, please?
Thank you!
WPBeginner Support says
Sadly, that would depend heavily on how your plugin is set up, you may want to ensure both sections of this code are being loaded for the widget to be added and displayed
Admin
Maximilian K. says
A short question, what if i want to create widgets in where i also can place other widgets? Like empty bootstrap columns 6-3-3 e.g. and in each column i can place then widgets like image, text, latest posts etc.
Is there a command / keyword to signalize that there is place for other widgets in this widget…
because im kind of confused about my own created theme and how WP is working… you see im a beginner ^^
I already placed general information like page title, make widget areas in my footer so ich can place menus, related links etc. on it. It worked.
But now im confused how i can realize my content in wordpress as i designed it before. Maybe some keywords are helpful to read more about them.
WPBeginner Support says
That would require more customization than we go into in this article, you may need to look into how to create a sidebar for code you can use: https://www.wpbeginner.com/wp-themes/how-to-add-dynamic-widget-ready-sidebars-in-wordpress/
Admin
Lars says
Great tutorial! Worked perfectly.
WPBeginner Support says
Glad our tutorial could help
Admin
Watson Anikwai says
How do you get a custom post type field from wp database and use a widget to display on front end?
vicky says
i can’t add two custom widgets .. the second widget is not showing up….
what should i do???.. pls help
Ahad Bhatti says
Really understandable and helpful. Thank you.
Belitza Gomez says
hello, i would like to know where i can find in available widgets the “custom menu”. it doesn’t show and i haven’t been able to add a page to the footer through this widget.
thank you for your help!!!!
Samdoxer says
hi, how would i show a logo in place of text. would replacing logo url with the text suffice.
Thanks in advance.
WPBeginner Support says
Please see your theme settings or visit Appearance » Customizer page in admin area. There you will find an option to upload your logo image.
Admin
Gary Foster says
Which came first the widget or the app?
Does a widget have to be registered if so how Please?
How do you best protect your idea of a widget or app?
Thanks all
shelley says
These instructions worked beautifully for creating my custom widget. I cannot, however, figure out how to change the font size to 60px. I did manage to add CSS to Divi theme options that centered the text and added a line border. But how do I change the styling of the font please? Adding “font-size:60px” does not work. I want the font to be large, like a tagline running across the page. Thanks.
Ahmad Farhan says
Very helpfull. tankyou
Eyad says
Thanks so much for your tutorials
Luigi Briganti says
Hi! I hope you can help me.
I’ve created a custom post type that show the timetable for a shop. Of course, you can create as much timetables as you want, but my necessity is to show a given timetable in the sidebar of the website.
For this purpose I made a widget that loop the timetable posts showing only 1 (namely the first one, since I ordered in ASC order). This is a temporary solution, just to see if the widget works and it does, actually.
What I really want to do is to show in the backend a dropdown list of all posts belonging to “timetable” post type so that I can choose the one I need when I need it and show it in the frontend. How can I do this?
Thanks if you may/want to help.
Anees Ijaz says
Thanks Man for saving my time ..
Kevin says
I love this post, helped me often a lot! Thanks!