Do you want to find a translation-ready WordPress theme for your website?
WordPress is used by millions of websites in many different languages. It is also used to make multilingual websites. Finding the right theme to handle them all is important.
In this article, we’ll show you how to easily find and translate a translation-ready WordPress theme for your non-English or multilingual website.
What is a Translation-Ready WordPress Theme?
A translation-ready WordPress theme uses a standard set of practices in its code to make user-viewable strings translatable into other languages and locales.
WordPress uses the ‘gettext’ system to make the core software translatable into different languages. We will discuss this system later on in the article.
WordPress developers also use ‘gettext’ to create translation-ready WordPress themes and plugins so that you can make a multilingual WordPress website.
Let’s take a look at how to find and translate them.
How to Find Translation-Ready WordPress Theme
Even though WordPress has great support for creating websites in any language, theme developers may not find it necessary to create translation-ready themes.
If you are going to create a website in a language other than English, then you need to make sure that the theme you are purchasing or downloading is translation ready.
1. Finding a Free Translation Ready WordPress Theme
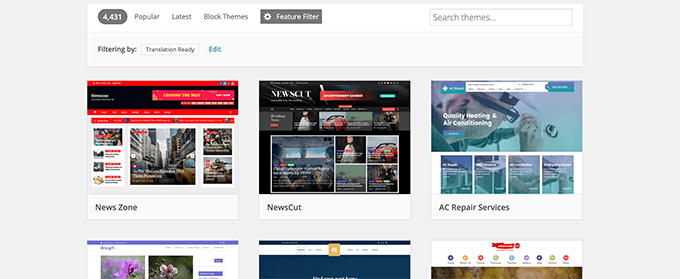
For free themes, you can go to WordPress.org’s Themes Directory and click on the ‘Feature Filter’ menu.

From here, you need to check the box next to the Translation Ready option and then click on the Apply Filters button at the top.

WordPress will now start showing you Themes that have indicated support for the translation-ready feature.
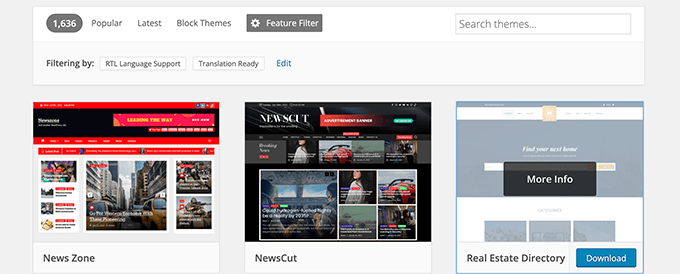
Now, if you are going to translate your theme into a right-to-left language like Arabic, Hebrew, Persian, and Urdu, then you should also check the ‘RTL Language Support’ option under the Feature Filter.

You can also further narrow down your search by checking other features you may be looking for in your theme.
Don’t forget to click on the ‘Apply Filters’ button to sort themes.
2. Finding a Premium Translation Ready WordPress Theme
Paid or premium WordPress themes are sold by third-party developers on their own websites.
Most of the top WordPress themes on the market are translation ready. This includes popular themes like Astra, Divi, and StudioPress themes. These are all translation ready.

You can usually find information about translation-readiness on the theme website. However, if you are unsure, then ask the theme developer before making the purchase.
Once you have found a translation-ready WordPress theme go ahead and install it on your WordPress site.
Need help? See our guide on how to install a WordPress theme with step-by-step instructions.
Translating a WordPress Theme
There are multiple ways to translate a translation-ready WordPress theme. You can choose a method depending on your requirements.
Before you begin, let’s first prepare your website for translations.
Select Languages for Your Website
First, you need to choose the language of your website. This will allow WordPress to automatically use the correct translation files for your theme.
If you are making a non-English website, then make sure that you have selected the language of your website in WordPress settings.
Simply go to the Settings » General page inside the WordPress admin area and scroll down to the Site Language section.

Now choose the language for your website and then click on the ‘Save Changes’ button.
This setting simply tells WordPress that the front end of this website is mainly in this particular language.
WordPress then uses this information to see if a translation is available for all your WordPress themes and plugins.
If there is a translation available, then it will automatically download and install it.
Otherwise, it will use the translations you provide in the next steps.
Lastly, if no translations are available for that language, then WordPress will use the theme as is, which is usually in the English language.
Translating a WordPress Theme with TranslatePress
This method is easier and recommended for all WordPress users.
It allows you to visually translate your WordPress theme with a live preview. You can see which strings you are translating, how they are used on your website, and how they look after you enter a translation.
You’ll be manually entering translations for each string, but the live preview will help you see more context.
First, you need to install and activate the TranslatePress plugin. For more details, see our step-by-step guide on how to install a WordPress plugin.
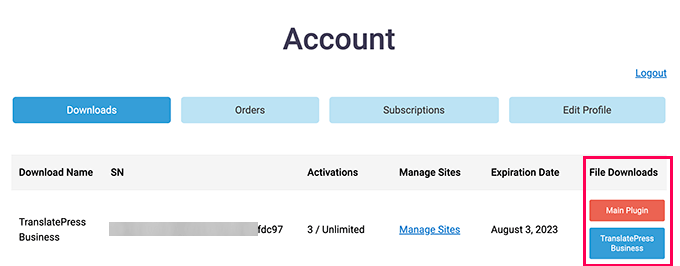
After purchasing the plugin, you can login to your account on the TranslatePress website.
Under your account, you’ll see two downloads. The Main plugin and the TranslatePress Business plugin that combines all the add-ons under your plan.
You’ll need to install and activate both plugins.
Once you have installed both plugins on your WordPress website, you are now ready to configure plugin settings.
Head to the Settings » TranslatePress page in your WordPress admin area and switch to the ‘License’ tab.
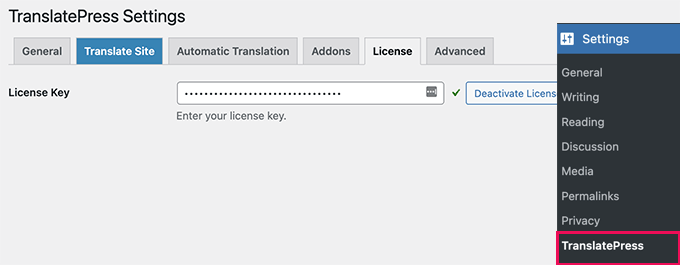
Here, you need to enter your plugin license key, you can find this information under your account on TranslatePress website.
Once you have activated the license key, switch to the ‘General’ tab under plugin settings. From here, you need to select the default language for your site.
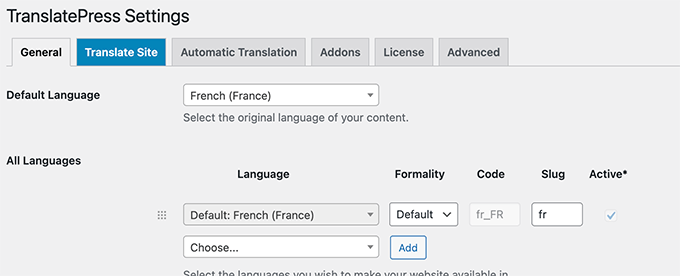
Below that, you can add other languages you want to add to your website.
You can also review other settings on the page. For instance, you can select language switcher options, set a subdirectory for the default language, and more.
Finally, click on the ‘Save Changes’ button to store your settings.
You are now ready to start translating your WordPress theme. Simply click the ‘Translate Site’ button in the top admin toolbar or on the settings page.

This will launch the Translate screen with a live preview of your website.
Simply hover your mouse over a piece of text. If that text is generated by your WordPress theme, then you’ll see a green pencil icon next to it.
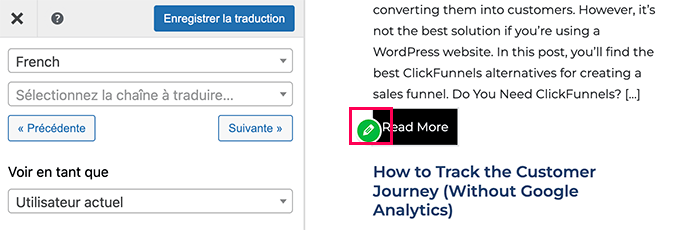
Clicking on it will display translation options in the left column. Go ahead and provide the translations for that string.
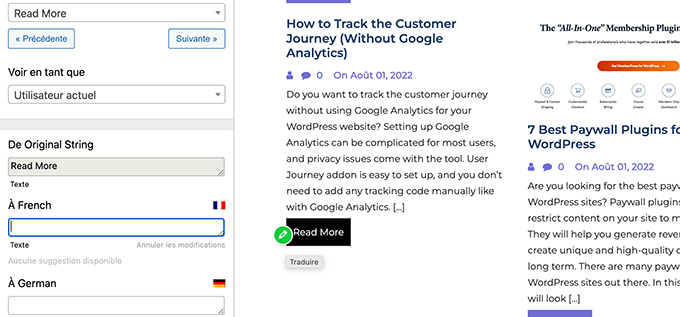
You can also translate your navigation menus and anything else you see onscreen.
Don’t forget to save your changes to store your translations.
Manually Translating a WordPress Theme
This method requires you to download WordPress translation templates and use translation-editor software to translate the theme manually.
First, you need to download the theme that you want to translate to your computer and then extract the theme files.
In the extracted files, you will find the ‘languages’ folder. This folder should have a POT file, or in some cases, there might be a .po or .mo file. In the example below, you can see hestia.pot is included.

What are .pot .po and .mo Files?
WordPress and WordPress themes use a system called ‘gettext’ for translations, localization, and internationalization.
In ‘gettext,’ the programmers use ‘gettext’ calls for every translatable area of the software. These are programming hints that indicate that a particular text is translatable.
These calls are then collected in a POT file.
Basically, a POT file is a template of translatable strings in a program.
Using a POT file, translators then generate a .po (Portable Object) file for their language. The name of the file refers to the language it is for.
For example, a French translation file would be named fr_FR.po. This is the file that you will be translating.
Lastly, the .mo files are the machine-readable format of the .po file. It will be generated from the .po file you get from the translation editor, so you don’t need to create it yourself.
That being said, let’s start translating your theme.
Translating WordPress Theme Using Poedit
You can simply edit .pot and .po files in any text editor of your choice. Most Linux-based distributions come pre-installed with command line tools that can be used to generate .mo files.
However, since you are just starting out with localization, it is highly recommended that you use a ‘gettext’ editor.
We will be translating a WordPress theme using Poedit, which is a ‘gettext’ editor available for Windows, Mac, and Linux. It is very easy to use and will help you quickly translate your WordPress theme without breaking files.
The first thing you need to do is install Poedit like you would install any other program for your operating system.
The first time you start Poedit after installing, it will prompt you to create a new project.

Clicking on ‘Create new’ will bring up a file select dialog box. You just need to select the POT file that came with your theme. Poedit will then ask you to choose the language you’ll be translating the theme into.

After language selection, the file will load in the translation editor.
The editor will list all translatable strings, and you can click on any string to translate it.
There are two boxes below this list. One is for the source string, and the other is for the translation.
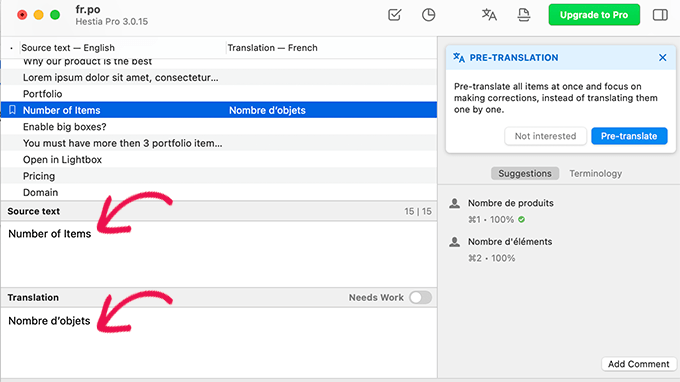
When you translate a string, Poedit will automatically move to the next string in the queue.
After adding a couple of translations simply click on the File » Save button to save your changes. Poedit will prompt you to provide a name for your PO file.

By default, Poedit will suggest a file name with language code (e.g. fr for French, de for German). However, WordPress needs these files in ‘language_country’ format.
For instance, if you are translating into French for an audience in France then you’ll need to use fr_FR.po as your file name. Similarly, if you were translating in Arabic for Egypt, then you will use ar_EG.po.
Tip: Use this link to find your country and language code
After entering the correctly formatted file name, click on the ‘Save’ button.
You can now go to the languages folder and you will see that Poedit has generated a .po file and a file with the .mo extension.

You can now switch back to Poedit and continue translating other parts of your WordPress theme.
Need to translate into more languages? No worries! Simply create a new project in Poedit and repeat this process.

Once you are finished, don’t forget to save your changes so that Poedit can update your PO and MO files.
Uploading Your Theme Translations
Once you are ready to upload your translations, simply connect to your WordPress website using an FTP client or the File Manager app in your hosting account control panel.
Once connected, upload the entire ‘languages’ folder from your computer to your WordPress theme folder located under /wp-content/themes/your-theme-name/
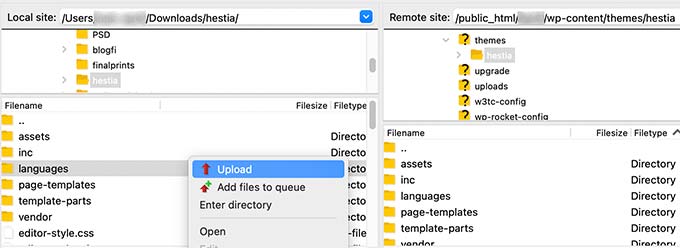
That’s all! WordPress will now start using the language files you uploaded to translate your theme.
Help Translate WordPress Theme and Plugins
If you are not a developer and want to help out the WordPress theme or plugin developer, then translation is a great way to contribute.
Consider submitting your translated PO files to your theme developers so that other WordPress users can use these on their websites as well.
You can also contribute to WordPress core software itself. The WordPress localization website has detailed information on how to join a WordPress localization team for many different languages.
We hope this article helped you learn how to easily find and translate a translation-ready WordPress theme. You may also want to see our guides on how to customize a WordPress theme or create a custom WordPress theme without coding.
If you liked this article, then please subscribe to our YouTube Channel for WordPress video tutorials. You can also find us on Twitter and Facebook.


Syed Balkhi says
Hey WPBeginner readers,
Did you know you can win exciting prizes by commenting on WPBeginner?
Every month, our top blog commenters will win HUGE rewards, including premium WordPress plugin licenses and cash prizes.
You can get more details about the contest from here.
Start sharing your thoughts below to stand a chance to win!
ALi ASGHAR says
Dear WEBBEGINNER’S Can u tell me Pls
How to create footer navigation menu
See sample
Same footer menu in footer
I am waiting your nice reply
WPBeginner Support says
Hi Ali,
If your WordPress theme has defined a navigation menu in the footer area, then you can just select that location when creating your menus.
Admin
Mat says
The biggest problem with themes is that relatively few themes can to work with multilanguage content by multilanguage plugins:
How can I find right themes with mulitlanguage content support?
or
How can I prepare my theme to use with a multilanguage content support?
WPBeginner Support says
Please see our article on how to find and translate translation ready WordPress themes.
Admin
Phong Bui says
After translation, from the displayed word is not. How do you solve this problem?
Thanks so much
Zimbrul says
One question I’ve got: after you finish translate the (let’s say) en_US .po file do you need to save as ro_RO.po (let’s say I translate in Romanian) and then send the ro_RO.po and .mo files in the language directory of the theme?
WPBeginner Support says
yes you should upload both files to your theme directory. Also if you have completely translated a theme you can contact theme developer and send them your .po file so that other users can benefit from it too.
Admin
Zimbrul says
Thanks for the clarification. I was starting to translate a theme in Romanian (WordPress is already in Romanian) language but it’s a kind of difficult because I don’t want to translate the theme options in Dashboard, I only want to translate the front end (the bits that are not already in Romanian from the default WordPress code.
Rama says
Very good guide to find and translate a translation ready word press theme and can be translated into several languages.
Chaim says
Thank you! It is very helpful.
Zimbrul says
Cannot say how much I appreciate this article! I’m using WordPress in English all the time but I also create websites in Romanian and I’d like all WordPress frontview to be in Romanian hence this comes extremely handy.
I think there is a confusion amongst WP users about translating themes, translating WordPress, using WordPress in your native language and building a multilanguage WordPress site.
Susan Smith says
Very interesting article! Zimbrul, I’ve used a really neat premium called WPML plugin for setting up multi-language site. It’s totally worth the money and allows for custom translations.
Zimbrul says
Susan, thanks for mentioning this plugin, I was nearly to buy it many times but I never did as I’m kinda “scared” of building and administer a bi-lingual site. Thanks for the tip. I might try it one day after I understand how SEO works for a multi-lingual site.