Möchten Sie ein WordPress-Widget in den Kopfbereich Ihrer Website einfügen?
Mit Widgets können Sie bestimmten Abschnitten Ihres Themes auf einfache Weise Inhaltsblöcke hinzufügen, aber nicht jedes Theme enthält einen Header-Widget-Bereich.
In diesem Artikel zeigen wir Ihnen, wie Sie ganz einfach ein WordPress-Widget in den Header Ihrer Website einfügen können.

Warum ein Header-Widget zu Ihrer WordPress-Website hinzufügen?
Der Header Ihrer Website ist eines der ersten Dinge, die Ihre Besucher sehen, wenn sie Ihre WordPress-Website besuchen. Durch Hinzufügen eines WordPress-Widgets zu Ihrer Kopfzeile können Sie diesen Bereich optimieren, um die Aufmerksamkeit der Leser zu gewinnen.
Die meisten Website-Kopfzeilen enthalten ein individuelles Logo und ein Navigationsmenü, um den Besuchern die Orientierung auf Ihrer Website zu erleichtern.
Sie können auch ein Header-Widget über oder unter diesem Bereich hinzufügen, um hilfreiche Inhalte, Werbebanner, zeitlich begrenzte Angebote, einzeilige Formulare und vieles mehr zu präsentieren.
Hier bei WPBeginner haben wir einen Header Call to Action direkt unter dem Navigationsmenü.

Die meisten WordPress-Themes verfügen über Widget-Bereiche in der Seitenleiste und in der Fußzeile der Website, aber nicht jedes Theme fügt Widget-Bereiche in der Kopfzeile hinzu.
Anmerkung des Herausgebers: Wenn Ihr Theme keinen Widget-kompatiblen Header-Bereich hat, können Sie jetzt komplett benutzerdefinierte WordPress-Themes von Grund auf erstellen (ohne jegliche Programmierung).
Doch zunächst möchten wir Ihnen Schritt für Schritt zeigen, wie Sie ein WordPress-Widget in die Kopfzeile Ihrer Website in Ihrem vorhandenen Theme einfügen können. Verwenden Sie einfach die unten stehenden Links, um direkt zur gewünschten Methode zu springen:
Methode 1: Fügen Sie in den WordPress-Theme-Einstellungen ein WordPress-Widget zur Kopfzeile Ihrer Website hinzu
Viele der besten WordPress-Themes enthalten einen Header-Widget-Bereich, den Sie nach Ihren Wünschen anpassen können.
Zunächst sollten Sie prüfen, ob Ihr aktuelles WordPress-Theme einen WordPress-Widget-Bereich in der Kopfzeile unterstützt.
Sie finden dies, indem Sie den WordPress-Theme-Customizer oder den Widget-Bereich Ihres WordPress-Administrationspanels aufrufen. Navigieren Sie dazu zu Erscheinungsbild “ Anpassen und sehen Sie nach, ob es eine Option zum Bearbeiten der Kopfzeile gibt.
Hinweis: Wenn Sie ein Block-Theme verwenden, werden Sie diese Option in Ihrer Admin-Seitenleiste nicht sehen. Stattdessen sollten Sie unsere Anleitung lesen, wie Sie Ihre Kopfzeile mit dem WordPress Full Site Editor anpassen können.
In diesem Beispiel hat das kostenlose Astra-Theme eine Option namens „Header Builder“. Wir zeigen Ihnen, wie Sie diese Funktion in Astra nutzen können. Beachten Sie jedoch, dass dies je nach verwendetem Theme anders aussehen wird.

Wenn Sie darauf klicken, gelangen Sie zu einem Bildschirm, auf dem Sie Ihre Kopfzeile bearbeiten und Widgets hinzufügen können.
Am unteren Rand des Bildschirms können Sie die Kopfzeile sowie die Bereiche über und unter der Kopfzeile vollständig anpassen. Bewegen Sie einfach den Mauszeiger über einen der leeren Bereiche und klicken Sie auf das „Plus“-Symbol.

Daraufhin wird ein Popup-Menü angezeigt, in dem Sie „Widget 1“ auswählen können.
Es stehen weitere Optionen zur Auswahl, aber Sie müssen eine der „Widget“-Optionen auswählen, um die Kopfzeile Widget-fähig zu machen.

Um Ihrer Kopfzeile einen Widget-Bereich hinzuzufügen, klicken Sie auf das Feld „Widget 1“, das sich im Abschnitt zur Anpassung der Kopfzeile befindet.
Daraufhin wird die Option zum Hinzufügen eines Widgets angezeigt.

Klicken Sie dann im linken Menü auf das Plus-Symbol zum Hinzufügen von Blöcken.
Daraufhin wird ein Popup-Fenster angezeigt, in dem Sie ein Widget auswählen können, das Sie Ihrer Kopfzeile hinzufügen möchten.

Sie können Ihre Kopfzeile weiter anpassen und so viele Widgets hinzufügen, wie Sie möchten.
Wenn Sie fertig sind, klicken Sie auf die Schaltfläche „Veröffentlichen“, um Ihre Änderungen zu speichern.

Jetzt können Sie den Kopfbereich mit dem oder den Widgets anzeigen, die Sie hinzugefügt haben.
Hier sehen Sie einen Screenshot, wie er auf unserer Demo-Website erscheint.

Sie verwenden Astra nicht?
Eine andere Möglichkeit zu sehen, ob Ihr Theme bereits ein WordPress-Header-Widget hat, ist die Navigation zu Darstellung “ Widgets in Ihrem WordPress-Admin-Panel.
Prüfen Sie dann, ob es einen Widget-Bereich mit der Bezeichnung „Kopfzeile“ oder etwas Ähnlichem gibt.

Wenn dies der Fall ist, klicken Sie einfach auf das Plus-Symbol zum Hinzufügen von Blöcken, um das Widgets-Menü aufzurufen.
Dann können Sie ein beliebiges Widget hinzufügen, indem Sie darauf klicken.
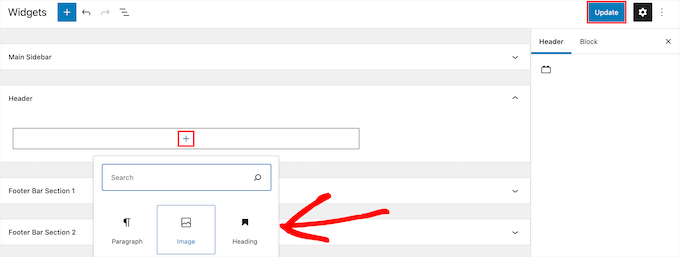
Klicken Sie unbedingt auf die Schaltfläche „Aktualisieren“, um Ihre Änderungen im Kopfzeilen-Widgetbereich zu speichern.
Methode 2: Hinzufügen eines WordPress-Widgets zur Kopfzeile Ihrer Website durch Hinzufügen von Code in WordPress
Wenn Ihr WordPress-Theme nicht über einen WordPress-Widget-Bereich in der Kopfzeile verfügt, müssen Sie ihn manuell hinzufügen, indem Sie Code in WordPress einfügen.
Wenn Sie dies noch nicht getan haben, lesen Sie unsere Anleitung zum Kopieren und Einfügen von Code in WordPress.
Dann können Sie den folgenden Code-Schnipsel in Ihre functions.php-Datei einfügen oder ein Code-Schnipsel-Plugin wie WPCode verwenden (empfohlen):
function wpb_widgets_init() {

	register_sidebar( array(
		'name'          => 'Custom Header Widget Area',
		'id'            => 'custom-header-widget',
		'before_widget' => '<div class="chw-widget">',
		'after_widget'  => '</div>',
		'before_title'  => '<h2 class="chw-title">',
		'after_title'   => '</h2>',
	) );

}
add_action( 'widgets_init', 'wpb_widgets_init' );
Weitere Einzelheiten finden Sie in unserem Leitfaden zum Hinzufügen von benutzerdefiniertem Code in WordPress, ohne Ihre Website zu beschädigen.
Es wird Sie durch die WPCode-Methode führen.
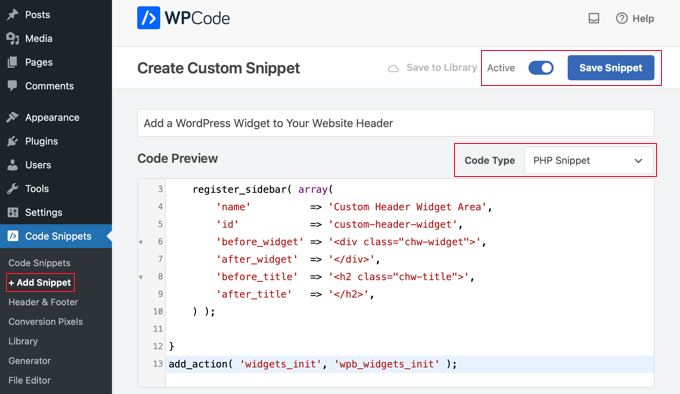
Dieser Code registriert eine neue Seitenleiste oder einen widgetfähigen Bereich für Ihr Thema.
Wenn Sie auf Erscheinungsbild “ Widgets gehen, sehen Sie einen neuen Widget-Bereich mit der Bezeichnung „Custom Header Widget Area“.

Jetzt können Sie Ihre Widgets zu diesem neuen Bereich hinzufügen. Weitere Einzelheiten finden Sie in unserem Leitfaden zum Hinzufügen und Verwenden von Widgets in WordPress.
Ihr Header-Widget wird jedoch noch nicht live auf Ihrer Website angezeigt. Wir zeigen Ihnen im Folgenden, wie Sie das machen.
Anzeige des benutzerdefinierten Header-Widgets in WordPress
Nachdem Sie nun den Header-Widget-Bereich erstellt haben, müssen Sie WordPress mitteilen, wo es auf Ihrer Website angezeigt werden soll.
Dazu müssen Sie die Datei header.php Ihres Themes bearbeiten. Dann müssen Sie den folgenden Code an der Stelle einfügen, an der das Widget angezeigt werden soll:
<?php

if ( is_active_sidebar( 'custom-header-widget' ) ) : ?>
    <div id="header-widget-area" class="chw-widget-area widget-area" role="complementary">
	<?php dynamic_sidebar( 'custom-header-widget' ); ?>
    </div>

<?php endif; ?>
Dieser Code fügt den benutzerdefinierten Widget-Bereich, den Sie zuvor erstellt haben, zu Ihrem Website-Header-Bereich hinzu.
Jetzt können Sie Ihren WordPress-Blog besuchen, um Ihren Header-Widget-Bereich live zu sehen.

Gestalten Sie Ihren WordPress-Header-Widget-Bereich mit CSS
Abhängig von Ihrem Theme müssen Sie eventuell auch CSS zu WordPress hinzufügen, um zu steuern, wie der Header-Widget-Bereich und die einzelnen Widgets darin angezeigt werden. Dies kann auf verschiedene Weise geschehen:
- Wenn Sie ein älteres Theme verwenden, können Sie den Theme Customizer verwenden, indem Sie in Ihrem WordPress-Dashboard auf Darstellung “ Anpassen gehen.
- Wenn Sie ein Block-Theme verwenden, dann können Sie den fehlenden Theme-Customizer im WordPress-Admin beheben.
- Wenn Sie ein Block-Theme verwenden, können Sie mit dem Full Site Editor zusätzliche CSS hinzufügen, indem Sie in Ihrem Dashboard auf Erscheinungsbild “ Editor gehen.
- Sie können benutzerdefinierte CSS mit dem WPCode-Plugin hinzufügen (empfohlen).
- Wenn Sie keine CSS-Kenntnisse haben, können Sie stattdessen ein Plugin wie CSS Hero verwenden.
Weitere Informationen finden Sie in unserem Leitfaden zum einfachen Hinzufügen von benutzerdefiniertem CSS zu Ihrer WordPress-Website.
In diesem Artikel werden wir einen kurzen Blick darauf werfen, wie man mit dem WPCode-Plugin und dem WordPress Theme Customizer benutzerdefiniertes CSS hinzufügt.
In Methode 2 haben wir Ihnen gezeigt, wie Sie mit WPCode einen Codeschnipsel zu Ihrer functions.php-Datei hinzufügen können. Sie können dieses Plugin auch verwenden, um benutzerdefiniertes CSS hinzuzufügen.
Wenn Sie ein neues Snippet in WPCode erstellen, vergewissern Sie sich, dass Sie den Codetyp „CSS Snippet“ aus dem Dropdown-Menü auf der rechten Seite auswählen und dass die Option „Auto Insert“ aktiviert ist.
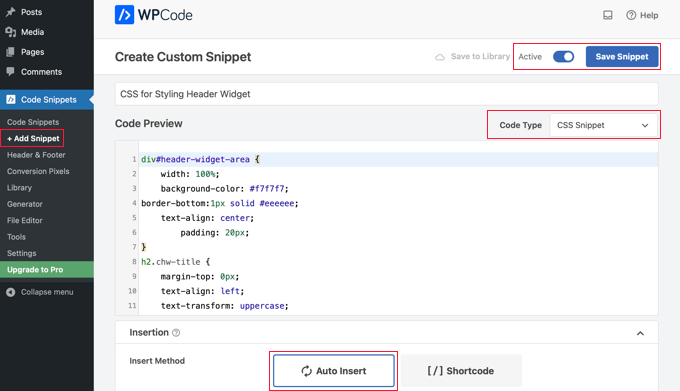
Im Abschnitt Codevorschau müssen Sie das CSS für das Styling Ihres Header-Widgets hinzufügen.
Hier finden Sie einige Beispiele für CSS-Code, die Ihnen den Einstieg erleichtern:
div#header-widget-area {
    width: 100%;
    background-color: #f7f7f7;
border-bottom:1px solid #eeeeee;
    text-align: center;
		padding: 20px;
}
h2.chw-title {
    margin-top: 0px;
    text-align: left;
    text-transform: uppercase;
    font-size: small;
    background-color: #feffce;
    width: 130px;
    padding: 5px;
    }
Vergewissern Sie sich anschließend, dass die Einstellung „Aktiv“ aktiviert ist, und klicken Sie dann auf die Schaltfläche „Snippet speichern“ oben rechts auf dem Bildschirm.
Um stattdessen den Theme Customizer zu verwenden, sollten Sie in Ihrem WordPress-Admin-Panel zu Darstellung “ Anpassen navigieren. Dadurch wird der WordPress-Theme-Customizer aufgerufen. Klicken Sie auf die Registerkarte „Zusätzliche CSS“.
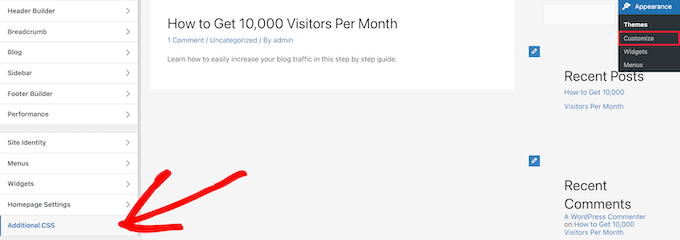
So können Sie zusätzliche CSS direkt zu Ihrem Thema hinzufügen und die Änderungen in Echtzeit sehen.
Fügen Sie einfach den CSS-Code, den wir Ihnen oben gezeigt haben, in das Feld „Zusätzliches CSS“ ein.

Sobald Sie Ihr CSS hinzugefügt haben, klicken Sie auf die Schaltfläche „Veröffentlichen“, um Ihre Änderungen zu speichern.
So sieht das benutzerdefinierte Kopfzeilen-Widget aus, wenn die CSS-Änderungen live sind.

Wir hoffen, dass dieser Artikel Ihnen geholfen hat, zu lernen, wie Sie ein WordPress-Widget in den Header Ihrer Website einfügen können. Vielleicht interessieren Sie sich auch für unseren Leitfaden zur Auswahl des besten WordPress-Hostings und unsere Expertenauswahl der besten Live-Chat-Software für kleine Unternehmen.
Wenn Ihnen dieser Artikel gefallen hat, dann abonnieren Sie bitte unseren YouTube-Kanal für WordPress-Videotutorials. Sie können uns auch auf Twitter und Facebook finden.


Syed Balkhi says
Hey WPBeginner readers,
Did you know you can win exciting prizes by commenting on WPBeginner?
Every month, our top blog commenters will win HUGE rewards, including premium WordPress plugin licenses and cash prizes.
You can get more details about the contest from here.
Start sharing your thoughts below to stand a chance to win!
Rob Hartman says
This tutorial was PERFECT and I’ve successfully created the header widget, super light and no impact on page speed. I had hoped that I could use the same approach to add a widget area to my footer, and replace all Header related reference in both the Functions and footer.php – but in this instance the widget area was not registered.
Does this approach ONLY apply to the header area?
Regardless, thanks for a super concise tutorial.
WPBeginner Support says
The code should work even in a footer but your theme may not display the footer on every page as a common reason.
Admin
Sjoerd says
Hi! Thanks for the tutorial. What if I want to show the widget area above the primary menu instead of right below it?
WPBeginner Support says
You would then place the code above the menu instead of below it.
Admin
Gaston says
Thank you!!! I was looking for this
WPBeginner Support says
Glad our guide was helpful
Admin
Ranjit says
Thank you for tutorial, I have a one question how to add columns (2 or 3) in header widget ?
WPBeginner Support says
That would depend on your specific theme, we would first recommend reaching out to your specific theme’s support to see if they have a built-in method for what you’re wanting to do or have recommended settings.
Admin
Muhammad Kashif says
Hello, I added the custom header widget successfully, but after updating the theme my custom header widget is not working ? Please tell me the solution! Looking forward to your response. thanks
WPBeginner Support says
When you updated your theme you likely removed the code from the header.php. To prevent that in the future you can look at creating a child theme following our guide below:
https://www.wpbeginner.com/wp-themes/how-to-create-a-wordpress-child-theme-video/
Admin
Sophia says
Thank you so much! This was exactly what I was looking for. It works perfectly.
WPBeginner Support says
You’re welcome
Admin
Inayatali says
Thank You so much for this awesome post, this code works perfectly how I wanted.
WPBeginner Support says
You’re welcome, glad our article was helpful
Admin
Jim Rolt says
Excellent code snippets which I was able to adapt and style to do the jobs I wanted. Many thanks for this
WPBeginner Support says
Glad our guide could be helpful
Admin
Vildan says
Hi WP Beginner,
How do I get the widget area in the header on the right side of the menu? I want to add the ADD TO CART icon in there.
WPBeginner Support says
For placement, it would depend on the specific theme you are using, if you check with your theme’s support they should be able to let you know what part of your header.php file to add the code to or if they have a built-in method to do so.
Admin
Bathri Vijay says
Thank You WPBeginner Editorial Team giving a perfect blog to the beginners and middle class coders. It is a big platform to learn and to execute WordPress. You were the big reason for the success of many bloggers and business owners.
WPBeginner Support says
You’re welcome, glad you’ve been finding our content helpful
Admin
zambol says
Thanks for the tutorial. it works but the trouble I have is that it’s not responsible for mobile devices. is it possible to make the sidebar responsible?
WPBeginner Support says
I believe you mean responsive in which case, we sadly do not have a recommended method for making this widget responsive at the moment.
Admin
Gen says
Thanks,
it works. Now I can add some widget or ads without add plugins.
WPBeginner Support says
You’re welcome
Admin
anju says
how to show custom header bafore created header
WPBeginner Support says
Depending on your specific theme, if there is content before the header.php content, you would want to reach out to the theme’s support
Admin
dav says
hello,
I would like to make an header like the one in the first picture on the top of this page ( the list 25 website).
How can I make It?
Please help me!
WPBeginner Support says
It would depend on what you mean, you can add image icons to your menu items using: https://www.wpbeginner.com/plugins/how-to-add-image-icons-with-navigation-menus-in-wordpress/
Admin
dav says
Actually I’m talking about adding a middle header and right header widgets
WPBeginner Support says
That would depend heavily on your theme, you may want to look into a page builder plugin to easily create something like what you’re wanting.
Tehreem says
well I am unable to access my header.php ! is there any other way to display my header? like from css!
WPBeginner Support says
CSS would allow you to style the area once added but you would need to edit the php file to add the code for placing the section or you could use a page builder plugin as another option: https://www.wpbeginner.com/beginners-guide/best-drag-and-drop-page-builders-for-wordpress/
Admin
GoosePT says
Hello!
Perfect tutorial.
Im using it to create a Topbar, but im facing a problem the widgets (in my case 2) are one below the other.
How can I make them to be displayed side by side?
Lori says
Great tutorial, works perfectly. I would love to hear the answer to this one as well, I’m using for a similar setup and would like to displays widgets side by side.
PS – great site BTW, any time i need to add additional functionality or have an issue with something, I was start with wpbeginner.
WPBeginner Support says
Sadly, for a question like that it would require theme specific CSS modifications with how the widgets are added. You would likely need to use inspect element to find the CSS option that needs to be changed: https://www.wpbeginner.com/wp-tutorials/basics-of-inspect-element-with-your-wordpress-site/
Admin
J M Das says
This tutorial is very useful.
How to remove the white space above this widget area in Posts? Thanks for any help
Mikhail Koval says
What would I have to put in the header.php to ONLY show on the home page but not show on other pages?
WPBeginner Support says
Hi Mikhail,
You can use conditional tags like is_home or is_front_page to display things on certain pages in WordPress. For example:
If ( is_front_page() ) { // code you want to display on the homepage }1-click Use in WordPress
Admin
Anna says
Hi, this is really what I’m looking for and it would be great if I could get it to work! Creating the widget area works fine, displaying it does unfortunately not.. I would also like to display it only on the start page.
I´m not sure
1) where in the header file to put the display code
2) where to put this „only-on-startpage“-code and what code goes on line 2
I understand if my questions are too basic to bother with, but I would be really grateful if someone has time and patience for it anyway..:-) Thanks in advance!!
WPBeginner Support says
Hi Anna,
These are perfectly reasonable questions.
1. You need to put the display code based on where you want to display the header widget. For example, your theme’s header.php file may have a section to display site title, logo, description, and navigation menus. They will probably be wrapped around div tags. You will put your header widget code before or after these areas. If you are unsure, you can place the code at the end of the header.php file.
2. If you only want to display the widget area on your website’s front page then you can use conditional tags like this:
if ( is_front_page() ) { // your widget display code goes here }1-click Use in WordPress
Anna says
OK, I cheated and put the widget-code in the front-page.php instead, it worked! Thanks :-)!
Anna says
Hi again, it became visible on start page with css positioning!
Now it’s only the question of how to put together the only-on-start-page-code with the visibility code…
Thanks again for kindness and patience..)
Bruce Pratt says
Great tutorial! This helped me accomplish exactly what I wanted. Fantastic!
Paul Johnson says
Great tutorial thanks. I am trying to implement the JetPack Cookie Consent Widget and despite following your instructions the Cookie Consent bar still appears at the bottom of the page.
Is it possible the widget is overriding the code?
Keu says
Does this still work for Twentyseventeen? The functions.php part works fine, but the header.php part doesn’t.
thomas evans says
Hello
pls can someone here help me as how to make this responsive on any mobile device?
i want to insert a google adsense code here for ads 728 x 90 banner sizes but any time i do so, it shows perfectly on desktops but on mobile devices it becomes weird.
thank you
Anubhav Bhatt says
I have successfully created a header widget and It was really easy, thanks to you all. But I actually wanted it in the POSTS, not on the Homepage because I’m using Nikko Portfolio theme and it looks awful.
Please Help.
Soren says
Wow, I was actually able to do this…?! Thank you so much for an awesome guide!
Jeffrey says
I placed the code in my functions.php file and added my widget code in the header.php file and added my widget text and saved.
When I move on to editing pages, upon clicking Update, I get a white screen and can’t see my page.
I then have to go back to /wp-admin to see the dashboard. There are no console errors when I click update but just a white screen.
Jeffrey says
After troubleshooting, I have incorrect syntax in functions.php file.
thank you!
Derek says
This is great for that header advertizment thing, but what I want to do is add a pay pal donation button to my header. (Right side) cant believe there is no video tutorials out there on how to make a a widgetized header space to drag your pay pal widget into so that it appears on the right side of your header.. i can imagine there is alot of people who could benefit from an instructional on this.
Stephen Crawford says
This is a great tutorial, but I would like to create a widget area that can be placed above the header area would that also be possible?
Joey says
Just updated everything and it’s working great on my desktop. Now, if you could tell me how to get the widget to display on my mobile device that would be great! Did I mess something along the way?
Kushal says
Thank you so much for this post! Solved what I was looking for!
Mark says
Hi, many thanks for writing this, it has helped me massively. However, with my website: how do I get the widget to appear at the far right hand side. When I use the option to show search field in the header, this is the place I want it to go?
Thanks in advance!
Linda Holiner says
I am confused. I don’t understand how to get an image into the widget and let the user change the image. I don’t see where your image is coming from.
Thomas says
Would it be possible to make a tutorial about how to make a TopBar with sections (Social media icons, Notice, Search, Woocommerce cart).
No plugin does really do that well
Thanks
Liam says
How to make the widget do display only on desktop devices?
Tim says
If i want to add multiple custom widget areas do i need to add a new function to functions.php for each? or just add them in the area i want?
fahad says
I managed to use the widget in the navigation bar instead of the header area as I wanted to add a language toggle option at this section. I have a small problem where I can’t move the language two flags to the any horizontal location. I tried to add margin-right: 100px; to the advanced CSS section but it didn’t change. It might be something else centering all the navigation content but I want to make sure if it could be fixed with the widget.
Courtney says
Hey how did you edit the code to put it in the nav bar? I’m currently trying to do the same thing without any luck.
Leanore says
When I attempt to add more than one custom widget area, I receive a 500 Error on my website. Is there a reason for this? Is it possible to create more than one custom widget area for a theme?
WPBeginner Support says
Hi Leanore,
Yes, you can create multiple custom widget areas for your theme.
Admin
Antonis says
Hello,
Is it possible to briefly describe how to make multiple ones? I tried to copy the function and rename the elements but it wont work..
P.S Very handy code, thanks!!
nina says
Hi! When i try to update the function.php file, there is this fatal error:
Fatal error: Cannot redeclare wpb_widgets_init()
I am not sure if i did a wrong edit. Could you help
WPBeginner Support says
Hey Nina,
This means that wpb_widgets_init function already exists in your functions.php file. You will have to replace it like wpb2_widgets_init to make it unique or remove the previous code that you added.
Admin
Sam says
Hello,
Thanks so much for this, it is really helpful.
One issue I am running into: My widget is just a menu of a couple of text links to pages. Here is my site:
See how the text is all the way against the right side of the header area? I would like to use a right margin to line it up under „Contact“ without turning the margin area white.
Also, would love to make the text black.
Many thanks if you can help with these tweaks!
Sam
Tommy says
Your blog is most helpful. Thank you for helping us made modifications to Twenty Seventeen. People like you make using a new wordpress theme like Twenty-seventeen much easier.
I am relatively new to word press and would like to try some additional modifications to Twenty seventeen.
I would like to create a new widget for wp pages. I am trying to figure out how I can take your blog information on how to make a new widget for the header and apply it to a wp page in the twenty seventeen theme. I am getting stuck.
Could you show us now to create a new widget for a page? That would be awesome.
Thanks
Tommy
WPBeginner Support says
Hey Tommy,
Please see how to create a custom WordPress widget.
Admin
Tom says
in Twenty Twelve theme, it put it under my menu and not in the header area.
liz says
same for me – did you find a solution Tom?
Bobby_qw says
Thank you very much Mr. Admin.You are teahing to us ‚how to make our own web site. l always follow your posting and l make my own web site. Thank you very much.
Shane Cunningham says
I used this and though it worked in adding a custom widget area to the top of my page, i could not get it to align with the other items in the header (company logo and nav menu) in Cherry. No matter where I put it in the header.php, it either appeared above or below the other items. I wanted to use it to create a phone number block between the logo and the nav menu. Though I could get it to center in correct spot horizontally, i could not get it to appear between them. To give you a better idea of what I need, imagine that on this very page’s header, you wanted to move the nav menu justified to the right and put your 800 number between it and the „wpbeginner“ logo. How could I use this code (or a variation of it) to do that?
Kristin says
Thank you so much for this (and all) of your detailed tutorials! Could you please tell me how to implement a header widget, excluding the Homepage?
Massimo says
In the code that you added to header.php change the first line:
if ( is_active_sidebar( 'custom-header-widget' ) ) : ? >with this one:
if ( is_active_sidebar( 'custom-header-widget' ) && ! is_front_page ) : ?Massimo says
Sorry, I missed something!
The line that you have to add is:
if ( is_active_sidebar( 'custom-header-widget' ) && ! is_front_page() ) : ?>Kristin says
Thank you so much!
reus says
thank men, more power
Nirmal Kumar says
Thanks for this tutorial ☺ I used this code to create header for my website.
WPBeginner Support says
You are welcome
Admin
Mihaita Vulpe says
Wow, and i taught i was limited to adding widgets only in the sidebar, thanks for the tips.
Mihaita,
Yukio says
Wow this really look interesting and very useful; im going to try it and hope it works.