Volete aggiungere un widget di WordPress all’area dell’intestazione del vostro sito web?
I widget consentono di aggiungere facilmente blocchi di contenuto a sezioni specifiche del tema, ma non tutti i temi includono un’area widget per l’intestazione.
In questo articolo vi mostreremo come aggiungere facilmente un widget di WordPress all’intestazione del vostro sito web.

Perché aggiungere un widget di intestazione al vostro sito WordPress?
L’intestazione del vostro sito web è una delle prime cose che i visitatori vedranno quando visiteranno il vostro sito WordPress. Aggiungendo un widget WordPress all’intestazione, potete ottimizzare quest’area per catturare l’attenzione dei lettori.
La maggior parte delle intestazioni dei siti web include un logo personalizzato e un menu di navigazione per aiutare i visitatori a orientarsi nel sito.
È inoltre possibile aggiungere un widget di intestazione sopra o sotto quest’area per presentare contenuti utili, banner pubblicitari, offerte a tempo limitato, moduli a riga singola e altro ancora.
Qui in WPBeginner, abbiamo una call to action nell’intestazione, direttamente sotto il menu di navigazione.

La maggior parte dei temi WordPress dispone di aree pronte per i widget nelle aree della barra laterale e del piè di pagina del sito, ma non tutti i temi aggiungono aree pronte per i widget nell’intestazione.
Nota dell’editore: Se il vostro tema non ha un’area dell’intestazione predisposta per i widget, ora potete creare temi WordPress completamente personalizzati da zero (senza alcuna codifica).
Prima, però, vediamo passo dopo passo come aggiungere un widget WordPress all’intestazione del vostro sito web con il tema esistente. Utilizzate i link rapidi qui sotto per passare direttamente al metodo che desiderate utilizzare:
Metodo 1: Aggiungere un widget di WordPress all’intestazione del sito web nelle impostazioni del tema di WordPress
Molti dei migliori temi WordPress includono un’area widget per l’intestazione che potete personalizzare a vostro piacimento.
Per prima cosa, è necessario verificare se il vostro tema WordPress attuale supporta un’area widget WordPress nell’intestazione.
È possibile trovarlo accedendo al personalizzatore del tema di WordPress o all’area dei widget del pannello di amministrazione di WordPress. Per farlo, andate su Aspetto ” Personalizzazione e verificate se c’è un’opzione per modificare l’intestazione.
Nota: se si utilizza un tema a blocchi, non si vedrà questa opzione nella barra laterale dell’amministrazione. Al contrario, dovreste consultare la nostra guida su come personalizzare l’intestazione utilizzando l’Editor completo del sito di WordPress.
In questo esempio, il tema gratuito Astra ha un’opzione chiamata “Costruttore di intestazioni”. Vi mostreremo come utilizzare questa funzione in Astra, ma tenete presente che l’aspetto sarà diverso a seconda del tema che state utilizzando.

Facendo clic su questo punto, si accede a una schermata per modificare l’intestazione e aggiungere widget.
Nella parte inferiore della schermata è possibile personalizzare completamente l’intestazione e le aree sopra e sotto l’intestazione. È sufficiente passare il mouse su una delle aree vuote e fare clic sull’icona ‘Più’.

Si apre un menu a comparsa in cui è possibile selezionare “Widget 1”.
Ci sono altre opzioni tra cui scegliere, ma è necessario selezionare una delle opzioni “Widget” per rendere la testata pronta per i widget.

Per aggiungere un’area widget all’intestazione, fare clic sul riquadro “Widget 1” che si trova nella sezione del personalizzatore dell’intestazione.
Viene visualizzata l’opzione per aggiungere un widget.

Quindi, fare clic sull’icona “Più” per aggiungere un blocco nel menu a sinistra.
Si apre una finestra a comparsa in cui è possibile selezionare un widget da aggiungere all’intestazione.

È possibile continuare a personalizzare l’intestazione e aggiungere tutti i widget desiderati.
Una volta terminato, assicurarsi di fare clic sul pulsante “Pubblica” per salvare le modifiche.

Ora è possibile visualizzare l’area dell’intestazione con il widget o i widget aggiunti.
Ecco una schermata di come appare sul nostro sito demo.

Non utilizzate Astra?
Un altro modo per vedere se il vostro tema ha già un widget per l’intestazione di WordPress è quello di navigare in Aspetto ” Widget nel pannello di amministrazione di WordPress.
Quindi, vedere se c’è una sezione di widget con l’etichetta “Intestazione” o qualcosa di simile.

Se c’è, è sufficiente fare clic sull’icona del blocco aggiuntivo “Più” per visualizzare il menu dei widget.
Quindi, è possibile aggiungere il widget desiderato facendo clic su di esso.
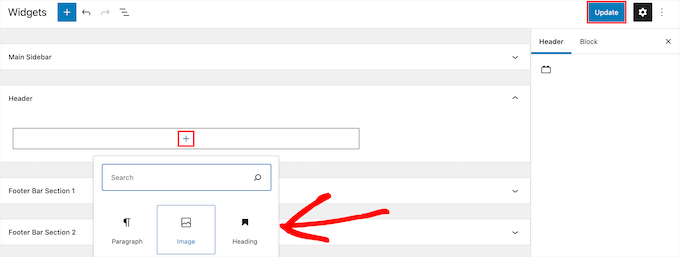
Assicurarsi di fare clic sul pulsante “Aggiorna” per salvare le modifiche apportate all’area del widget dell’intestazione.
Metodo 2: Aggiungere un widget di WordPress all’intestazione del sito web aggiungendo il codice a WordPress
Se il vostro tema WordPress non dispone di un’area widget WordPress nell’intestazione, dovrete aggiungerla manualmente aggiungendo del codice a WordPress.
Se non l’avete mai fatto prima, consultate la nostra guida su come copiare e incollare il codice in WordPress.
Quindi, si può aggiungere il seguente snippet di codice al file functions.php o utilizzando un plugin di snippet di codice come WPCode (consigliato):
function wpb_widgets_init() {

	register_sidebar( array(
		'name'          => 'Custom Header Widget Area',
		'id'            => 'custom-header-widget',
		'before_widget' => '<div class="chw-widget">',
		'after_widget'  => '</div>',
		'before_title'  => '<h2 class="chw-title">',
		'after_title'   => '</h2>',
	) );

}
add_action( 'widgets_init', 'wpb_widgets_init' );
Per maggiori dettagli, potete consultare la nostra guida su come aggiungere codice personalizzato in WordPress senza rompere il vostro sito.
Vi guiderà attraverso il metodo WPCode.
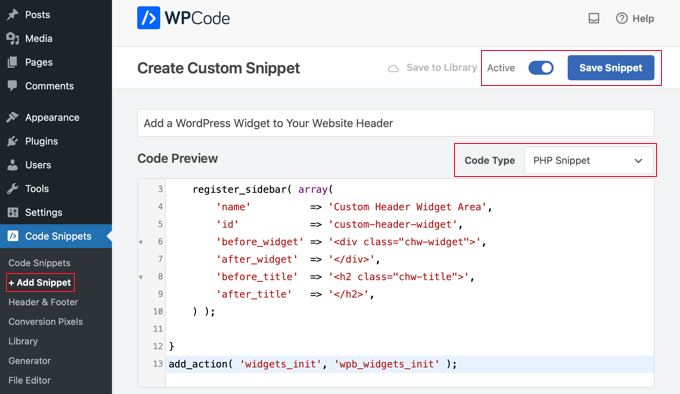
Questo codice registra una nuova barra laterale o un’area pronta per i widget per il tema.
Se si va in Aspetto ” Widget, si vedrà una nuova area widget denominata ‘Area widget intestazione personalizzata’.

Ora è possibile aggiungere i widget a questa nuova area. Per maggiori dettagli, consultate la nostra guida su come aggiungere e utilizzare i widget in WordPress.
Tuttavia, il widget dell’intestazione non verrà ancora visualizzato dal vivo sul sito web, ma vi mostreremo come farlo.
Visualizzazione del widget di intestazione personalizzato in WordPress
Ora che avete creato l’area del widget dell’intestazione, dovete dire a WordPress dove visualizzarlo sul vostro sito web.
Per farlo, è necessario modificare il file header.php del tema. Quindi, è necessario aggiungere il seguente codice nel punto in cui si desidera visualizzare il widget:
<?php

if ( is_active_sidebar( 'custom-header-widget' ) ) : ?>
    <div id="header-widget-area" class="chw-widget-area widget-area" role="complementary">
	<?php dynamic_sidebar( 'custom-header-widget' ); ?>
    </div>

<?php endif; ?>
Questo codice aggiungerà l’area widget personalizzata creata in precedenza all’area dell’intestazione del sito web.
Ora, potete visitare il vostro blog WordPress per vedere l’area del widget dell’intestazione dal vivo.

Modellare l’area del widget dell’intestazione di WordPress con i CSS
A seconda del tema, potrebbe essere necessario aggiungere del CSS a WordPress per controllare la visualizzazione dell’area del widget dell’intestazione e di ciascun widget al suo interno. Questo può essere fatto in diversi modi:
- Se si utilizza un tema meno recente, è possibile utilizzare il Theme Customizer visitando Aspetto ” Personalizza nella dashboard di WordPress.
- Se si utilizza un tema a blocchi, è possibile risolvere la mancanza del personalizzatore del tema nell’amministrazione di WordPress.
- Se si utilizza un tema a blocchi, è possibile aggiungere ulteriori CSS utilizzando l’Editor completo del sito, visitando Aspetto ” Editor nella propria dashboard.
- È possibile aggiungere CSS personalizzati utilizzando il plugin WPCode (consigliato).
- Se non si conoscono i CSS, si può utilizzare un plugin come CSS Hero.
Per saperne di più, consultate la nostra guida su come aggiungere facilmente CSS personalizzati al vostro sito WordPress.
In questo articolo daremo una rapida occhiata a come aggiungere CSS personalizzati utilizzando il plugin WPCode e il Theme Customizer di WordPress.
Nel metodo 2, abbiamo mostrato come utilizzare WPCode per aggiungere uno snippet di codice al file functions.php. È anche possibile aggiungere questo plugin per aggiungere CSS personalizzati.
Quando si crea un nuovo snippet in WPCode, assicurarsi di selezionare il tipo di codice “Snippet CSS” dal menu a discesa sulla destra e che l’opzione “Inserisci automaticamente” sia selezionata.
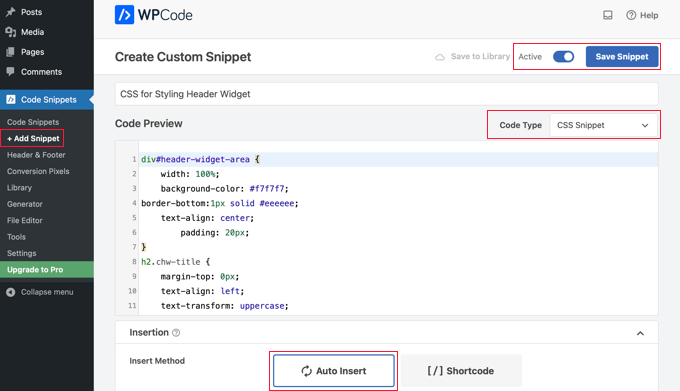
Nella sezione dell’anteprima del codice, è necessario aggiungere il CSS per lo stile del widget dell’intestazione.
Ecco alcuni esempi di codice CSS per aiutarvi a iniziare:
div#header-widget-area {
    width: 100%;
    background-color: #f7f7f7;
border-bottom:1px solid #eeeeee;
    text-align: center;
		padding: 20px;
}
h2.chw-title {
    margin-top: 0px;
    text-align: left;
    text-transform: uppercase;
    font-size: small;
    background-color: #feffce;
    width: 130px;
    padding: 5px;
    }
A questo punto, è necessario assicurarsi che l’impostazione “Attivo” sia attivata e quindi fare clic sul pulsante “Salva snippet” in alto a destra dello schermo.
Per utilizzare invece il Theme Customizer, è necessario andare su Aspetto ” Personalizza nel pannello di amministrazione di WordPress. In questo modo si apre il pannello di personalizzazione del tema di WordPress. È necessario fare clic sulla scheda “CSS aggiuntivi”.
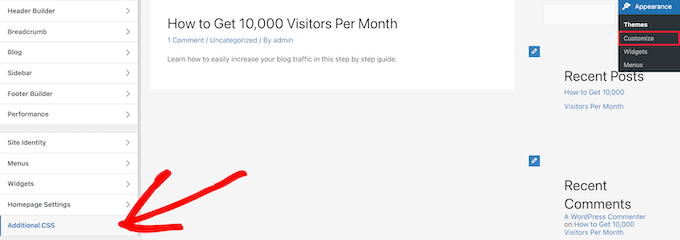
Ciò consente di aggiungere CSS aggiuntivi direttamente al tema e di vedere le modifiche in tempo reale.
Aggiungete semplicemente il codice CSS che vi abbiamo mostrato sopra nella casella “CSS aggiuntivo”.

Una volta terminata l’aggiunta del CSS, assicurarsi di fare clic sul pulsante “Pubblica” per salvare le modifiche.
Ecco come appare il widget dell’intestazione personalizzata con le modifiche CSS apportate.

Speriamo che questo articolo vi abbia aiutato a capire come aggiungere un widget di WordPress all’intestazione del vostro sito web. Potreste anche voler consultare la nostra guida su come scegliere il miglior hosting WordPress e la nostra selezione di esperti del miglior software di live chat per le piccole imprese.
Se questo articolo vi è piaciuto, iscrivetevi al nostro canale YouTube per le esercitazioni video su WordPress. Potete trovarci anche su Twitter e Facebook.


Syed Balkhi says
Hey WPBeginner readers,
Did you know you can win exciting prizes by commenting on WPBeginner?
Every month, our top blog commenters will win HUGE rewards, including premium WordPress plugin licenses and cash prizes.
You can get more details about the contest from here.
Start sharing your thoughts below to stand a chance to win!
Rob Hartman says
This tutorial was PERFECT and I’ve successfully created the header widget, super light and no impact on page speed. I had hoped that I could use the same approach to add a widget area to my footer, and replace all Header related reference in both the Functions and footer.php – but in this instance the widget area was not registered.
Does this approach ONLY apply to the header area?
Regardless, thanks for a super concise tutorial.
WPBeginner Support says
The code should work even in a footer but your theme may not display the footer on every page as a common reason.
Admin
Sjoerd says
Hi! Thanks for the tutorial. What if I want to show the widget area above the primary menu instead of right below it?
WPBeginner Support says
You would then place the code above the menu instead of below it.
Admin
Gaston says
Thank you!!! I was looking for this
WPBeginner Support says
Glad our guide was helpful
Admin
Ranjit says
Thank you for tutorial, I have a one question how to add columns (2 or 3) in header widget ?
WPBeginner Support says
That would depend on your specific theme, we would first recommend reaching out to your specific theme’s support to see if they have a built-in method for what you’re wanting to do or have recommended settings.
Admin
Muhammad Kashif says
Hello, I added the custom header widget successfully, but after updating the theme my custom header widget is not working ? Please tell me the solution! Looking forward to your response. thanks
WPBeginner Support says
When you updated your theme you likely removed the code from the header.php. To prevent that in the future you can look at creating a child theme following our guide below:
https://www.wpbeginner.com/wp-themes/how-to-create-a-wordpress-child-theme-video/
Admin
Sophia says
Thank you so much! This was exactly what I was looking for. It works perfectly.
WPBeginner Support says
You’re welcome
Admin
Inayatali says
Thank You so much for this awesome post, this code works perfectly how I wanted.
WPBeginner Support says
You’re welcome, glad our article was helpful
Admin
Jim Rolt says
Excellent code snippets which I was able to adapt and style to do the jobs I wanted. Many thanks for this
WPBeginner Support says
Glad our guide could be helpful
Admin
Vildan says
Hi WP Beginner,
How do I get the widget area in the header on the right side of the menu? I want to add the ADD TO CART icon in there.
WPBeginner Support says
For placement, it would depend on the specific theme you are using, if you check with your theme’s support they should be able to let you know what part of your header.php file to add the code to or if they have a built-in method to do so.
Admin
Bathri Vijay says
Thank You WPBeginner Editorial Team giving a perfect blog to the beginners and middle class coders. It is a big platform to learn and to execute WordPress. You were the big reason for the success of many bloggers and business owners.
WPBeginner Support says
You’re welcome, glad you’ve been finding our content helpful
Admin
zambol says
Thanks for the tutorial. it works but the trouble I have is that it’s not responsible for mobile devices. is it possible to make the sidebar responsible?
WPBeginner Support says
I believe you mean responsive in which case, we sadly do not have a recommended method for making this widget responsive at the moment.
Admin
Gen says
Thanks,
it works. Now I can add some widget or ads without add plugins.
WPBeginner Support says
You’re welcome
Admin
anju says
how to show custom header bafore created header
WPBeginner Support says
Depending on your specific theme, if there is content before the header.php content, you would want to reach out to the theme’s support
Admin
dav says
hello,
I would like to make an header like the one in the first picture on the top of this page ( the list 25 website).
How can I make It?
Please help me!
WPBeginner Support says
It would depend on what you mean, you can add image icons to your menu items using: https://www.wpbeginner.com/plugins/how-to-add-image-icons-with-navigation-menus-in-wordpress/
Admin
dav says
Actually I’m talking about adding a middle header and right header widgets
WPBeginner Support says
That would depend heavily on your theme, you may want to look into a page builder plugin to easily create something like what you’re wanting.
Tehreem says
well I am unable to access my header.php ! is there any other way to display my header? like from css!
WPBeginner Support says
CSS would allow you to style the area once added but you would need to edit the php file to add the code for placing the section or you could use a page builder plugin as another option: https://www.wpbeginner.com/beginners-guide/best-drag-and-drop-page-builders-for-wordpress/
Admin
GoosePT says
Hello!
Perfect tutorial.
Im using it to create a Topbar, but im facing a problem the widgets (in my case 2) are one below the other.
How can I make them to be displayed side by side?
Lori says
Great tutorial, works perfectly. I would love to hear the answer to this one as well, I’m using for a similar setup and would like to displays widgets side by side.
PS – great site BTW, any time i need to add additional functionality or have an issue with something, I was start with wpbeginner.
WPBeginner Support says
Sadly, for a question like that it would require theme specific CSS modifications with how the widgets are added. You would likely need to use inspect element to find the CSS option that needs to be changed: https://www.wpbeginner.com/wp-tutorials/basics-of-inspect-element-with-your-wordpress-site/
Admin
J M Das says
This tutorial is very useful.
How to remove the white space above this widget area in Posts? Thanks for any help
Mikhail Koval says
What would I have to put in the header.php to ONLY show on the home page but not show on other pages?
WPBeginner Support says
Hi Mikhail,
You can use conditional tags like is_home or is_front_page to display things on certain pages in WordPress. For example:
If ( is_front_page() ) { // code you want to display on the homepage }1-click Use in WordPress
Admin
Anna says
Hi, this is really what I’m looking for and it would be great if I could get it to work! Creating the widget area works fine, displaying it does unfortunately not.. I would also like to display it only on the start page.
I´m not sure
1) where in the header file to put the display code
2) where to put this “only-on-startpage”-code and what code goes on line 2
I understand if my questions are too basic to bother with, but I would be really grateful if someone has time and patience for it anyway..:-) Thanks in advance!!
WPBeginner Support says
Hi Anna,
These are perfectly reasonable questions.
1. You need to put the display code based on where you want to display the header widget. For example, your theme’s header.php file may have a section to display site title, logo, description, and navigation menus. They will probably be wrapped around div tags. You will put your header widget code before or after these areas. If you are unsure, you can place the code at the end of the header.php file.
2. If you only want to display the widget area on your website’s front page then you can use conditional tags like this:
if ( is_front_page() ) { // your widget display code goes here }1-click Use in WordPress
Anna says
OK, I cheated and put the widget-code in the front-page.php instead, it worked! Thanks :-)!
Anna says
Hi again, it became visible on start page with css positioning!
Now it’s only the question of how to put together the only-on-start-page-code with the visibility code…
Thanks again for kindness and patience..)
Bruce Pratt says
Great tutorial! This helped me accomplish exactly what I wanted. Fantastic!
Paul Johnson says
Great tutorial thanks. I am trying to implement the JetPack Cookie Consent Widget and despite following your instructions the Cookie Consent bar still appears at the bottom of the page.
Is it possible the widget is overriding the code?
Keu says
Does this still work for Twentyseventeen? The functions.php part works fine, but the header.php part doesn’t.
thomas evans says
Hello
pls can someone here help me as how to make this responsive on any mobile device?
i want to insert a google adsense code here for ads 728 x 90 banner sizes but any time i do so, it shows perfectly on desktops but on mobile devices it becomes weird.
thank you
Anubhav Bhatt says
I have successfully created a header widget and It was really easy, thanks to you all. But I actually wanted it in the POSTS, not on the Homepage because I’m using Nikko Portfolio theme and it looks awful.
Please Help.
Soren says
Wow, I was actually able to do this…?! Thank you so much for an awesome guide!
Jeffrey says
I placed the code in my functions.php file and added my widget code in the header.php file and added my widget text and saved.
When I move on to editing pages, upon clicking Update, I get a white screen and can’t see my page.
I then have to go back to /wp-admin to see the dashboard. There are no console errors when I click update but just a white screen.
Jeffrey says
After troubleshooting, I have incorrect syntax in functions.php file.
thank you!
Derek says
This is great for that header advertizment thing, but what I want to do is add a pay pal donation button to my header. (Right side) cant believe there is no video tutorials out there on how to make a a widgetized header space to drag your pay pal widget into so that it appears on the right side of your header.. i can imagine there is alot of people who could benefit from an instructional on this.
Stephen Crawford says
This is a great tutorial, but I would like to create a widget area that can be placed above the header area would that also be possible?
Joey says
Just updated everything and it’s working great on my desktop. Now, if you could tell me how to get the widget to display on my mobile device that would be great! Did I mess something along the way?
Kushal says
Thank you so much for this post! Solved what I was looking for!
Mark says
Hi, many thanks for writing this, it has helped me massively. However, with my website: how do I get the widget to appear at the far right hand side. When I use the option to show search field in the header, this is the place I want it to go?
Thanks in advance!
Linda Holiner says
I am confused. I don’t understand how to get an image into the widget and let the user change the image. I don’t see where your image is coming from.
Thomas says
Would it be possible to make a tutorial about how to make a TopBar with sections (Social media icons, Notice, Search, Woocommerce cart).
No plugin does really do that well
Thanks
Liam says
How to make the widget do display only on desktop devices?
Tim says
If i want to add multiple custom widget areas do i need to add a new function to functions.php for each? or just add them in the area i want?
fahad says
I managed to use the widget in the navigation bar instead of the header area as I wanted to add a language toggle option at this section. I have a small problem where I can’t move the language two flags to the any horizontal location. I tried to add margin-right: 100px; to the advanced CSS section but it didn’t change. It might be something else centering all the navigation content but I want to make sure if it could be fixed with the widget.
Courtney says
Hey how did you edit the code to put it in the nav bar? I’m currently trying to do the same thing without any luck.
Leanore says
When I attempt to add more than one custom widget area, I receive a 500 Error on my website. Is there a reason for this? Is it possible to create more than one custom widget area for a theme?
WPBeginner Support says
Hi Leanore,
Yes, you can create multiple custom widget areas for your theme.
Admin
Antonis says
Hello,
Is it possible to briefly describe how to make multiple ones? I tried to copy the function and rename the elements but it wont work..
P.S Very handy code, thanks!!
nina says
Hi! When i try to update the function.php file, there is this fatal error:
Fatal error: Cannot redeclare wpb_widgets_init()
I am not sure if i did a wrong edit. Could you help
WPBeginner Support says
Hey Nina,
This means that wpb_widgets_init function already exists in your functions.php file. You will have to replace it like wpb2_widgets_init to make it unique or remove the previous code that you added.
Admin
Sam says
Hello,
Thanks so much for this, it is really helpful.
One issue I am running into: My widget is just a menu of a couple of text links to pages. Here is my site:
See how the text is all the way against the right side of the header area? I would like to use a right margin to line it up under “Contact” without turning the margin area white.
Also, would love to make the text black.
Many thanks if you can help with these tweaks!
Sam
Tommy says
Your blog is most helpful. Thank you for helping us made modifications to Twenty Seventeen. People like you make using a new wordpress theme like Twenty-seventeen much easier.
I am relatively new to word press and would like to try some additional modifications to Twenty seventeen.
I would like to create a new widget for wp pages. I am trying to figure out how I can take your blog information on how to make a new widget for the header and apply it to a wp page in the twenty seventeen theme. I am getting stuck.
Could you show us now to create a new widget for a page? That would be awesome.
Thanks
Tommy
WPBeginner Support says
Hey Tommy,
Please see how to create a custom WordPress widget.
Admin
Tom says
in Twenty Twelve theme, it put it under my menu and not in the header area.
liz says
same for me – did you find a solution Tom?
Bobby_qw says
Thank you very much Mr. Admin.You are teahing to us ‘how to make our own web site. l always follow your posting and l make my own web site. Thank you very much.
Shane Cunningham says
I used this and though it worked in adding a custom widget area to the top of my page, i could not get it to align with the other items in the header (company logo and nav menu) in Cherry. No matter where I put it in the header.php, it either appeared above or below the other items. I wanted to use it to create a phone number block between the logo and the nav menu. Though I could get it to center in correct spot horizontally, i could not get it to appear between them. To give you a better idea of what I need, imagine that on this very page’s header, you wanted to move the nav menu justified to the right and put your 800 number between it and the “wpbeginner” logo. How could I use this code (or a variation of it) to do that?
Kristin says
Thank you so much for this (and all) of your detailed tutorials! Could you please tell me how to implement a header widget, excluding the Homepage?
Massimo says
In the code that you added to header.php change the first line:
if ( is_active_sidebar( 'custom-header-widget' ) ) : ? >with this one:
if ( is_active_sidebar( 'custom-header-widget' ) && ! is_front_page ) : ?Massimo says
Sorry, I missed something!
The line that you have to add is:
if ( is_active_sidebar( 'custom-header-widget' ) && ! is_front_page() ) : ?>Kristin says
Thank you so much!
reus says
thank men, more power
Nirmal Kumar says
Thanks for this tutorial ☺ I used this code to create header for my website.
WPBeginner Support says
You are welcome
Admin
Mihaita Vulpe says
Wow, and i taught i was limited to adding widgets only in the sidebar, thanks for the tips.
Mihaita,
Yukio says
Wow this really look interesting and very useful; im going to try it and hope it works.