Durch Hinzufügen von individuellem CSS können Sie das Layout und Design Ihrer Website über die Standardoptionen hinaus anpassen. So können Sie von Schriften und Farben bis hin zu Abständen und Animationen alles individuell anpassen und haben die volle kreative Kontrolle.
Früher mussten Benutzer von WordPress ihre Theme-Dateien direkt bearbeiten, um individuelle CSS hinzuzufügen, was für Anfänger sehr mühsam sein kann. Deshalb haben wir während unserer eigenen Blogging-Reise nach Alternativen gesucht.
Zum Glück gibt es einfachere, benutzerfreundlichere Möglichkeiten, individuelles CSS hinzuzufügen, z. B. mit dem Customizer des Themes, einem Code Snippets Plugin oder einem speziellen CSS Plugin.
In diesem Artikel zeigen wir Ihnen, wie Sie auf einfache Weise benutzerdefinierte CSS zu Ihrer WordPress-Website hinzufügen können, ohne irgendwelche Theme-Dateien zu bearbeiten.
Warum benutzerdefinierte CSS in WordPress hinzufügen?
CSS ist die Abkürzung für Cascading Style Sheets, eine Sprache, mit der Sie Ihre WordPress-Website gestalten können. CSS und HTML gehören zusammen, da CSS verwendet wird, um verschiedene HTML-Elemente wie Farbe, Größe, Layout und Anzeige zu gestalten.
Durch Hinzufügen von individuellem CSS können Sie das Design und das Erscheinungsbild Ihrer Website anpassen, was mit den Standard-Optionen nicht möglich ist. So haben Sie mehr Kontrolle und können Ihr WordPress Theme mit ein paar Zeilen Code individuell anpassen.
Nehmen wir zum Beispiel an, Sie möchten die Hintergrundfarbe jedes einzelnen Beitrags ändern, anstatt auf der gesamten Website die gleiche Farbe zu verwenden. Durch Hinzufügen eines individuellen CSS-Codes können Sie den Hintergrund eines bestimmten Beitrags oder einer Seite individuell anpassen.
In ähnlicher Weise können Sie den Stil und das Design der Kategorien in Ihrem eCommerce-Shop mit Hilfe von zusätzlichen CSS ändern.
In den folgenden Abschnitten werden verschiedene Möglichkeiten zum Hinzufügen individueller CSS zu Ihrer WordPress-Website erläutert. Sie können auf den unten stehenden Link klicken, um zu einem beliebigen Abschnitt zu springen, an dem Sie interessiert sind:
Sind Sie bereit? Dann fangen wir an.
Methode 1: Hinzufügen von benutzerdefiniertem CSS mit dem Theme Customizer
Seit WordPress 4.7 können Benutzer nun individuelle CSS direkt im WordPress-Adminbereich hinzufügen. Das ist super einfach, und Sie können Ihre Änderungen sofort in einer Live-Vorschau sehen.
Zunächst müssen Sie in Ihrem WordPress-Dashboard die Seite Design “ Anpassen aufrufen.
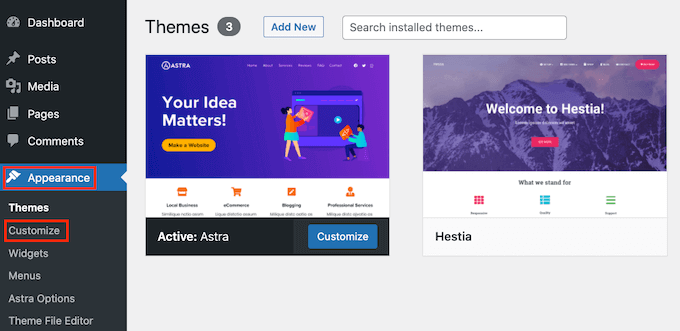
Dadurch wird die WordPress-Theme-Anpassungsschnittstelle gestartet.
Auf dieser Seite sehen Sie die Live-Vorschau Ihrer Website mit einer Reihe von Optionen zur individuellen Anpassung im linken Bereich. Klicken Sie einfach auf den Tab „Zusätzliche CSS“, um mit der Bearbeitung zu beginnen.
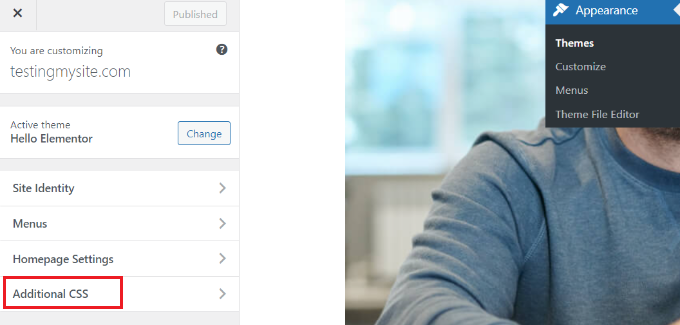
Der Tab wird Slide, um Ihnen eine einfache Box zu zeigen, in der Sie Ihr individuelles CSS hinzufügen können.
Sobald Sie eine gültige CSS-Regel hinzufügen, können Sie die Anwendung in der Live-Vorschau Ihrer Website sehen.

Sie können so lange individuellen CSS-Code hinzufügen, bis Sie mit den Änderungen auf Ihrer Website zufrieden sind.
Vergessen Sie nicht, oben auf den Button „Veröffentlichen“ zu klicken, wenn Sie fertig sind.
Hinweis: Jedes individuelle CSS, das Sie mit dem Theme Customizer hinzufügen, ist nur für dieses spezielle Theme verfügbar. Wenn Sie es mit anderen Themes verwenden möchten, müssen Sie es kopieren und in Ihr neues Theme einfügen, indem Sie die gleiche Methode anwenden.
Methode 2: Hinzufügen von benutzerdefiniertem CSS mit dem WPCode-Plugin
Mit der ersten Methode können Sie nur benutzerdefinierte CSS für das derzeit aktive Thema speichern. Wenn Sie das Thema wechseln, müssen Sie Ihr benutzerdefiniertes CSS möglicherweise kopieren und in das neue Thema einfügen.
Wenn Sie möchten, dass Ihr individuelles CSS unabhängig von dem von Ihnen verwendeten WordPress Theme angewendet wird, ist diese Methode genau das Richtige für Sie.
WPCode ist das beste Plugin für individuelle Codeschnipsel auf dem Markt mit über 2 Millionen Benutzern. Es macht nicht nur das Hinzufügen von individuellem Code in WordPress einfach, sondern bietet auch Funktionen wie eine integrierte Code-Snippets-Bibliothek, bedingte Logik, Konvertierungspixel und mehr.
Als Erstes müssen Sie das kostenlose WPCode Plugin installieren und aktivieren. Wenn Sie Hilfe benötigen, lesen Sie bitte unsere Anleitung zur Installation eines WordPress Plugins.
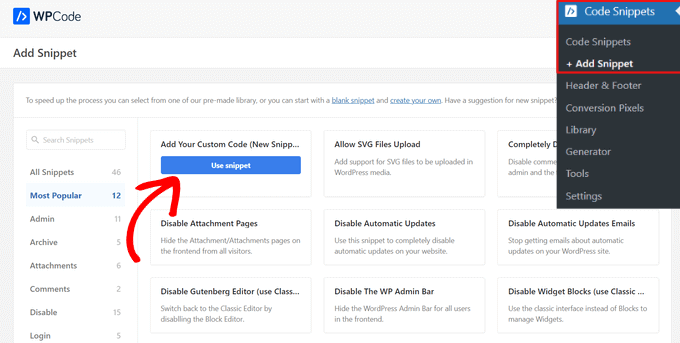
Nach der Aktivierung gehen Sie einfach im WordPress-Admin-Dashboard auf Code Snippets “ + Neu hinzufügen.
Dann können Sie bei Mauszeigerkontakt auf die Option „Fügen Sie Ihren individuellen Code (neues Snippet) hinzu“ in der Code-Snippets-Bibliothek klicken und dann auf „Snippet verwenden“.
Als nächstes können Sie oben auf der Seite einen Titel für Ihr individuelles CSS-Snippet hinzufügen. Das kann alles sein, was Ihnen hilft, den Code zu identifizieren.
Nachdem Sie einen Titel eingegeben haben, können Sie Ihr individuelles CSS in die Box „Codevorschau“ schreiben oder einfügen. Als Nächstes müssen Sie den „Codetyp“ festlegen, indem Sie die Option „CSS Snippet“ aus dem Dropdown-Menü auswählen.
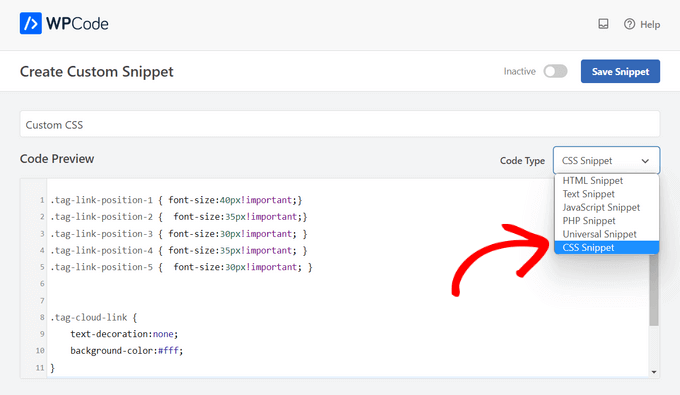
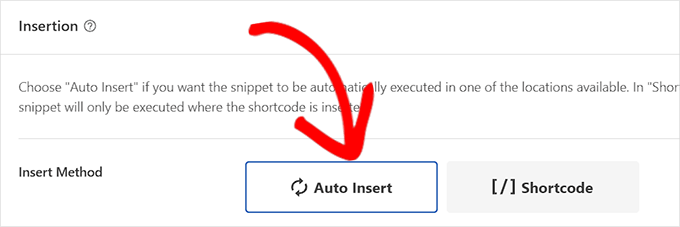
Scrollen Sie nun zum Abschnitt „Einfügen“ und wählen Sie die Methode „Automatisch einfügen“, wenn Sie den Code auf Ihrer gesamten WordPress Website ausführen möchten.
Wenn Sie den Code nur auf bestimmten Seiten oder Beiträgen ausführen möchten, können Sie die Methode ‚Shortcode‘ wählen.
Gehen Sie nun zum Anfang der Seite zurück.
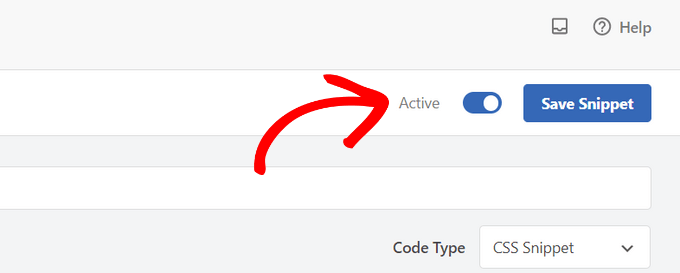
Schalten Sie dann einfach den Schalter auf „Aktiv“ um und klicken Sie auf den Button „Snippet speichern“.
Das war’s! Sie können Ihre WordPress-Website besuchen, um das individuell angepasste CSS in Aktion zu sehen.
Methode 3: Hinzufügen zusätzlicher CSS mit dem Full Site Editor (FSE)
Eine weitere Möglichkeit, individuelle CSS in WordPress hinzuzufügen, ist die Verwendung des Full Site Editors (FSE). Mit dem FSE können Sie das Layout und Design der gesamten Website mit dem WordPress Block-Editor bearbeiten, genau wie bei der Bearbeitung eines Blogbeitrags oder einer Seite.
Beachten Sie, dass der vollständige Website-Editor nur für ausgewählte Themes verfügbar ist. Weitere Einzelheiten finden Sie in unserem Artikel über die besten Themes für die Website-Bearbeitung in WordPress.
Die Verwendung eines Plugins zum Hinzufügen von CSS ist etwas einfacher. Wenn Sie jedoch kein Plugin verwenden möchten, zeigen wir Ihnen, wie Sie auf den Customizer zugreifen können, auch wenn er nicht mehr in Ihrem Verwaltungsmenü verfügbar ist.
Sie müssen sich lediglich bei Ihrer WordPress-Verwaltung anmelden. Kopieren Sie dann einfach die unten stehende URL und fügen Sie sie in Ihren Browser ein. Ersetzen Sie „example.com“ durch den Domainnamen Ihrer eigenen Website.
https://example.com/wp-admin/customize.php
Dadurch gelangen Sie zu einer eingeschränkten Version des Themenanpassers. Im Menü auf der linken Seite sollten Sie die Option zum Hinzufügen von benutzerdefinierten CSS am unteren Rand sehen.
Klicken Sie einfach auf den Tab „Zusätzliche CSS“.
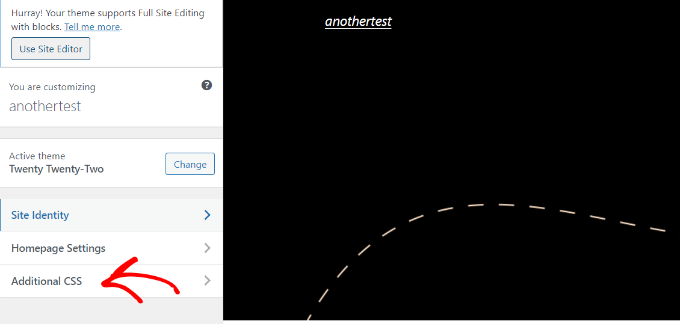
Geben Sie nun Ihren CSS-Code in den Bereich Zusätzliches CSS ein.
Nachdem Sie den Code hinzugefügt haben, klicken Sie einfach auf den Button „Veröffentlichen“, und schon sind Sie fertig.

Verwendung eines individuellen CSS-Plugins vs. Hinzufügen von CSS im Theme
Alle oben beschriebenen Methoden sind für Anfänger geeignet. Fortgeschrittene Benutzer können auch benutzerdefinierte CSS direkt zu ihren Themes hinzufügen.
Das Hinzufügen individueller CSS-Schnipsel zu Ihrem übergeordneten Theme wird jedoch nicht empfohlen. Ihre CSS-Änderungen gehen verloren, wenn Sie das Theme versehentlich aktualisieren, ohne Ihre individuellen Änderungen zu speichern.
Am besten ist es, stattdessen ein Child Theme zu verwenden. Viele Anfänger vermeiden es jedoch, ein untergeordnetes Theme zu erstellen, weil sie den Prozess einschüchternd finden. Außerdem wissen Anfänger oft nicht, wie sie das Child-Theme über das Hinzufügen von individuellem CSS hinaus verwenden werden.
Mit einem individuellen CSS Plugin können Sie Ihr individuelles CSS unabhängig von Ihrem Theme speichern. Auf diese Weise können Sie einfach zwischen Themes wechseln, und Ihr individuelles CSS bleibt erhalten.
Eine weitere großartige Möglichkeit, Ihrer WordPress-Website benutzerdefinierte CSS hinzuzufügen, ist die Verwendung des CSS Hero-Plugins. Mit diesem wunderbaren Plugin können Sie fast jeden CSS-Stil auf Ihrer WordPress-Website bearbeiten, ohne eine einzige Zeile Code zu schreiben.

Sie können auch individuelles CSS mit dem Plugin SeedProd hinzufügen.
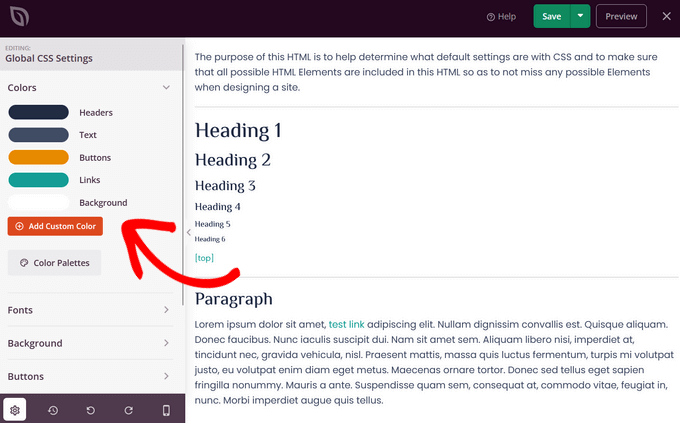
SeedProd ist ein Drag-and-drop Website-Builder, mit dem Sie individuelle WordPress Themes und Landing Pages für Ihre WordPress Website erstellen können. Sie können die globalen CSS-Einstellungen einfach bearbeiten; es ist kein Code erforderlich.
Wir hoffen, dass dieser Artikel Ihnen geholfen hat zu lernen, wie Sie Ihrer WordPress Website individuelles CSS hinzufügen können. Als Nächstes möchten Sie vielleicht auch unseren Leitfaden zum Entfernen von ungenutztem CSS in WordPress und zum Minifizieren von CSS/JavaScript-Dateien in WordPress lesen.
Wenn Ihnen dieser Artikel gefallen hat, dann abonnieren Sie bitte unseren YouTube-Kanal für WordPress-Videotutorials. Sie können uns auch auf Twitter und Facebook finden.


Syed Balkhi says
Hey WPBeginner readers,
Did you know you can win exciting prizes by commenting on WPBeginner?
Every month, our top blog commenters will win HUGE rewards, including premium WordPress plugin licenses and cash prizes.
You can get more details about the contest from here.
Start sharing your thoughts below to stand a chance to win!
Qasim Saeed says
Hello if I want to add a custom CSS on a specific page without any plugin then what? I think we add this via function? can you please tell me how to add CSS via functions.php and what is the best and secure way to add CSS for a specific page
WPBeginner Support says
You do not need to use functions to add CSS to specific pages, you would target the specific page in your CSS selector to have it only affect a single page on your site.
Admin
Jiří Vaněk says
Is it better to insert your own CSS in WordPress using a template or using WPCode?
WPBeginner Support says
Both options are valid choices it depends on personal preference and if the theme has the option in the editor.
Admin
Jiří Vaněk says
Thanks for the clarification, I wasn’t sure if, for example, a snippet using WPCode would be faster for the site’s response than integrating it into the template itself. So if it doesn’t matter, I’ll probably stick to best practice and keep it integrated in the template.
Bavi says
The adding of css is no longer available for free plan any alternatives??
WPBeginner Support says
Our tutorials are for WordPress.org sites, we do not have specifics for WordPress.com at the moment. We would recommend taking a look at our guide below for the comparison between the two and if you wanted to look to transfer your site from WordPress.com to a self hosted WordPress.org site.
https://www.wpbeginner.com/beginners-guide/self-hosted-wordpress-org-vs-free-wordpress-com-infograph/
Admin
Ben says
I never knew about the example.com/wp-admin/customize.php „trick“. Thanks! Worked like a charm!
WPBeginner Support says
Glad we could share this trick with you!
Admin
Dani says
Hi there,
I want to add custom CSS, but how can i remove it if smth goes wrong?
Bogdan says
Hey, this article is very good. One question though: Don’t I have to see the HTML page to add custom CSS? How do I add custom CSS if I don’t know the selectors and all of that?
WPBeginner Support says
We have a guide on using Inspect element that you can take a look at below for how to find the selectors:
https://www.wpbeginner.com/wp-tutorials/basics-of-inspect-element-with-your-wordpress-site/
Admin
cymon says
I am a new blogger. Is there a way to add page specific CSS code?
WPBeginner Support says
You would need to add the page ID as part of the CSS but yes you can.
Admin
Jitin Mishra says
Great article to add custom CSS in WordPress website. We are looking forward to such more informative posts
WPBeginner Support says
Glad you found our guide helpful
Admin
Mohsin says
I want to change my WordPress menu to mega menu with coding. Can i convert my website menu to mega menu using html, css and js? I don’t want to use a plugin for this work. If we add new functionality to WordPress website with custom coding, what are the best practices for which this custom work did not go ahead by updating theme or WordPress. Thanks!
WPBeginner Support says
You would want to create a child theme to keep your changes safe but you may need some PHP coding. We have a guide on creating a child theme you can take a look at below:
https://www.wpbeginner.com/wp-themes/how-to-create-a-wordpress-child-theme-video/
Admin
vijay v says
can we add external CSS file( by moving custom CSS) to increase page speed( after I added custom CSS it decreased loading speed), if yes how to do it?
thank you in advance
WPBeginner Support says
If we are understanding what you are looking for correctly, you would want to take a look at our article below:
https://www.wpbeginner.com/wp-tutorials/how-wordpress-plugins-affect-your-sites-load-time/
Admin
billy king says
Is „unorthodox“ CSS allowed in Child Theme or Custom CSS?
WPBeginner Support says
As long as the CSS targets what is on your site you can use any CSS you like.
Admin
Latonya Moore says
This is great but is there a way to only add css to one page? Example I only was to show or hide by hover or mouseover on one text.
WPBeginner Support says
You would either need to add a CSS class to the specific object or add the page ID to your CSS to limit it to that specific page. For how to find that information you would want to take a look at our article below on how to use inspect element:
https://www.wpbeginner.com/wp-tutorials/basics-of-inspect-element-with-your-wordpress-site/
Admin
shiva says
I have made some Changes in my website by editing some css codes in theme editor. What will happen if I update my wordpress to next version. Does it get error or gets back to base theme or my code will appear even after updating my wordpress just like before updation.
WPBeginner Support says
If you added your CSS in the Appearance>Customizer>Additional CSS area then your CSS changes will remain when you update your site.
Admin
Jo says
I have not quite finished building my website, but have updated from the free version so I can use css to make changes. My site is not yet live. With the upgrade to the premium version the update button has now changed to publish. Does this mean that when I click on publish to save any changes it will make my site live?
Also, I can’t remember which theme I used, how do I find out which theme I am using?
Thanks
WPBeginner Support says
It sounds like you are on WordPress.com, if you publish a post then it will be viewable to those who can see your site. With WordPress.com for a private site you are limited to: https://en.support.wordpress.com/settings/privacy-settings
You should be able to see the theme that is active under Appearance>Themes
Admin
Bruce William Taylor says
„The tab will slide to show you a simple box where you can add your custom CSS. As soon as you add a valid CSS rule, you will be able to see it applied on your website’s live preview pane.“
I already know WHERE to add the CSS. How do I know what CSS to add? How do I know what the „valid CSS rules“ are?
WPBeginner Support says
Hey Bruce,
For that you will need to learn some basic CSS. There are several websites that have step by step CSS tutorials for beginners. We recommend w3schools as they allow you to practice CSS with a live try it out box.
Admin
Ali says
Where is the Customize CSS Code storage because I have lost it while a transfer to a new hoster?
mahaveer says
i want to add external css and add images in css…..
Muhammad Adil says
What was the Bonus method?
Is that any Plugin I didn’t get that. Will you please ask me ?
Thanks
Aditya Khuteta says
Hi there! I want to change the size of price text on my website becuase the price text is too small there. Please guide me to do so.
Thanks
Frank Lurz says
2 Questions:
1. Just so I’m clear, „plugins“ are substitutes for writing CSS, a difficult task for those of us who know nothing about CSS — is that right?
2. Plugins listed for downloading on the WP plugins page are available for installation only to subscribers who have paid for the „Buisness“ Plan, is that right?
WPBeginner Support says
Hi Frank,
1. No, plugins are not substitute for writing custom CSS. You can write custom CSS without installing plugins. Please see our guide on what are WordPress plugins and how do they work for more details.
2. IF you are using WordPress.com, then yes you will need to upgrade to business plan. Please see our guide on the difference between self hosted WordPress.org vs free WordPress.com blog.
Admin
Annie Mitchell says
Hi,
I am a novice when it comes to building and designing websites and have no knowledge of css. I am using the Sydney theme on my website – and I have somehow managed to turn my paragraph font white. I have googled and notice a gentleman had the same issue. He fixed it downloading a plugin and using a custom css however I have tried and had no luck.
The css which he advised using is –
.entry-page p, .entry-post p {
color: black !important;
margin: 0 !important;
padding: 0 !important;
}
but I am not sure why it is not working for me. Any help would be much appreciated.
Thanks,
Annie
WPBeginner Support says
Hi Annie,
First we will recommend you to turn off all your WordPress plugins by deactivating them. After that, visit your website to see if this resolved your issue. If it did, then this means a setting in one of your plugins was causing the problem. If it doesn’t solve the issue, then try switching to a default theme like Twenty Seventeen. If that does fix your issue, then it means that some where in your theme you have changed the font settings.
If nothing works out, then you can try this custom CSS:
p { color:#000; }1-click Use in WordPress
Admin
Jose says
One of the plugins (Simple Custom CSS) hasn’t been updated for 2 years which in the world of WordPress plugins is a very long time. This is a security risk so I would personally look for an alternative.
Rebecca says
Hi
Sorry i don’t know anything about css and I am trying to solve a problem with not being able to search for plugins, but that is another story! I am posting here now because i am getting this message when i go to appearance / edit css / aditional css
“ There is 1 error which must be fixed before you can save.
Update anyway, even though it might break your site?“
Is this something i shoudl worry about?
the text in the box below it reads …
and just here there is a red fullstop
Hope someone can help.
Thank you
WPBeginner Support says
Hi Rebecca,
You can copy the CSS and paste it in a text file and save it as backup. Now delete every thing in Additional CSS box and start adding your custom CSS one rule at a time until the error appears again. This will help you locate the error and fix it.
Admin
James says
This no longer works for free accounts. The CSS option is no longer there and you need a business account to install a relevant plugin.
WPBeginner Support says
Hi James,
You are probably using WordPress.com. Please see our guide on the difference between self hosted WordPress.org vs free WordPress.com blog.
Admin
scott says
Before WP version 4.9, I used to be able to cut and paste my custom CSS (from the WP customizer) and paste it into Windows Notepad (and it would keep the formatting. I did this often to save it as a back up when I was adding new custom CSS — in case I made a mistake.
Now when pasting it in Notepad, it just runs all the CSS together without the line-by-line formatting in Notepad.
Any idea why or how I can fix it? I already have „word wrap“ mode set in Notepad.
Thanks.
WPBeginner Support says
Hi Scott,
You can try saving the code in other text editors like Notepad++. If the problem persists, then try WordPress troubleshooting tips.
Admin
Joe MacMillan says
This site is really good. My site didn’t have any link colors so I used this code /* unvisited link blue */
a:link {
Color: #196380;
}
/* visited link green */
a:visited {
color: #248f24;
}
/* mouse over link orange */
a:hover {
color: #ff3300;
}
/* selected link red*/
a:active {
color: #cc0000;
}
but it turned colors on for everything that is a link such as menu’s into a color.
I only want the colors for linking.
I would appreciate any help with this. Thanks
WPBeginner Support says
Hi Joe,
In your CSS, you didn’t define which areas should have links in these colors, which makes them apply to entire body. To figure out which areas you need to target, you will need to use the Inspect Tool to find out the CSS class used by your theme for the content block.
Let’s suppose the content block in your theme has a css class site-content, you will use it in your CSS like this:
.site-content a:link { color: #196380; } .site-content a:visited { color: #248f24; } .site-content a:active { color: #cc0000; } .site-content a:hover { color: #ff3300; }1-click Use in WordPress
Hope this helps
Admin
Rob says
I love your site!
Thanks for all the helpful articles.
I have a question regarding my wordpress premium plan.
I want to add the following script to my site.
var refTagger = {
settings: {
bibleVersion: „NKJV“
}
Can I add this to the custom css?
I don’t have the ability to access the header or footer in this plan
Thanks,
Rob
WPBeginner Support says
Hi Rob,
Nope, you cannot. Please see our guide on the difference between self hosted WordPress.org vs free WordPress.com blog.
Admin
sammy says
this is really a great article, i will have to start learning how to make my own css for my site
Thomas says
Hello,
this feature isn’t active for the site admin on a multisite WordPress network.
Do you think that activating it for site admin (with this plugin for example:) would create a security issue?
Thank you!
WPBeginner Support says
Hey Thomas,
Yes you can use a plugin to add custom CSS.
Admin
Thomas says
Hi,
yes I know (I have already used the very good Simple Custom CSS plugin), but I would prefer to use the native function since it is implemented in WordPress.
However, this function is only available for the network admin and not for the site admin on a multisite installation.
The rights can be easily changed to allow site admin to add their own custom CSS in the customizer (with the native WP function) (see this plugin: http://www.wordpress.org/plugins/multisite-custom-css/), and I wonder if this would create a security issue (based on the assumption that I can’t trust site admin)?
WPBeginner Support says
Hey Thomas,
Sorry, we totally misunderstood your question
We agree that will be a concern, this is why the feature is turned off. If you turn it on, then the users will be able to add unfiltered CSS. You should keep it switched off.
Brice says
I don’t know much about code so I’m just wondering if I make changes and click „save and publish“, is there a way to get the original code back if I don’t like the changes or do I need to copy and save the original code in the event I want to restore it?
Ruth Billheimer says
This is probably really naive, I don’t know much about code, so bear with me.. In the customise additional css, can you put in different things? I mean I have already put something in there that will change some of the colours. Now I want to put in something that will change the width of the page. (I am getting these bits of code from very helpful people, I know nothing!)
So will both of these things work? Or can you only change one thing? It doesn’t look like the page width has changed
Jos Schuurmans says
Hi there,
It used to be possible to edit style.css from within WP admin, under the Appearance menu.
On WP multisite it was through the network’s themes submenu. Has that feature been depricated?
Cheers,
Jos
Judy says
Great post, thanks!
Can anybody help me with this? I did a small customization on my logo using CSS Hero. Then I’ve copied these exact 9 strings of code into my Simple Custom CSS plugin, after deactivating CSS Hero. I thought I could reproduce the same CSS Hero customization on my logo using Simple Custom CSS, but instead it’s not working.
I refreshed the page and cleared the cache, but the customization still doesn’t take effect. Why’s that?
Thanks,
Judy
Robin says
This is all that is on my CSS Style Sheet.
/*
Welcome to custom CSS
To learn how this works, see
*/
Do I erase his and add my new font code? Help????
WPBeginner Support says
Yes. These are just comments to help new users get started.
Admin
Paul H. says
OUTSTANDING PLUGIN!!!
I spent much time trying to get the built in WP Editor to „style“ my custom page, with no luck…
I searched for a plugin to see if there was one and found yours… within minutes I’d installed your plugin and activated it, then input my CSS, clicked update and then refreshed my custom page… it’s perfect!
A+++
Ian says
Hi Guys,
I’ve installed the Simple custom CSS plugin & activated it. I have a table created on one of my webpages that I wanted to have a border around it.
As a result, I have added the following code to my simple custom CSS plugin
table {
border: 2px solid black;
}
and updated the Custom CSS but nothing happened – I still don’t get any border on my webpage table.
Any suggestions?
Regards
Ian
Molly Setzer says
Hey Ian,
It’s likely that you are not calling it by the correct css selector. Use the most defined selector to grab the element. For example, if your table has a class of „info“ then calling it by the more specific table.info will help you reach the element. Check if it has more selectors in the html.
ramneet says
Thanks for sharing. it just wonderful way of learning WordPress i like it.
Estee Peter says
How do i add custom css via my existing specific website plugin
this is the following code
.mobileonly {
display: none;
}
@media screen and (max-width: 480px) {
.mobileonly {
display: inline;
}
}
.hidemobileonly {
display: inline;
}
@media screen and (max-width: 480px) {
.hidemobileonly {
display: none;
}
}
Gary Zielke says
Does the Custom CSS plugin work on individual pages.
i.e can I add style to a single page and not the whole theme?
Thanks
WPBeginner Support says
No it doesn’t work on individual pages.
Admin
Tori Tran says
thank you ^^
Russell Bruce says
Would it not be useful to explain what CSS does and why it is useful
Joey says
Thanks, I wish I realized this sooner because I’ve made all my css changes on the style.css file since I’m making the changes locally but are you saying that if for some reason Genesis decides to update the particular child theme I used I will lose those changes? I don’t know if I’ve ever seen them update their child themes although I’ve only been using Genesis for a few months so I suppose it is entirely possible they will update certain ones here and there. I think going forward I’ll make my changes in the plugin especially if the site is live.
suzie says
Use the theme you like and create a ‚child theme‘
The child theme is then unique to your website.
Make any changes only on your child theme.
The theme designer may update their theme, but your changes will remain. (Depending on the designers update you may need to tweak your changes, but that’s unlikely).
Rodney says
Great article.
I just wanted to add here. There’s a lot of option here specially sites running in WordPress, building/creating custom css is simple. Most wordpress themes usally support adding custom css without having to create or add additional plugins.
I also agree, and the best option here is using a child theme instead.
thanks