Optimizing your images before uploading them to WordPress greatly improves your website speed. Yet many beginners have slow websites simply because they upload unoptimized images.
At WPBeginner, we make image optimization best practices a part of our regular blogging routine. We make sure that all of our authors create images with the right dimensions and then reduce image file size using a variety of graphics tools.
In this article, we will show you how to optimize your images for faster web performance without losing quality. We will also share automatic image optimization plugins for WordPress that can make your life easy.
Since this is a comprehensive guide on image optimization for the web, we have created an easy-to-follow table of contents:
- What Is Image Optimization?
- What Are the Benefits of Image Optimization?
- How to Save and Optimize Images for Web Performance
- Best Image Optimization Tools and Programs
- Best Image Optimization Plugins for WordPress
- Final Thoughts and Best Practices for Image Optimization
- Expert Guides on Improving WordPress Performance
1. What Is Image Optimization?
Image optimization is the process of saving and delivering images in the smallest possible file size without reducing the overall image quality.
While the process sounds complex, it’s actually quite easy these days. You can use one of the many image optimization plugins and tools to automatically compress images by up to 80% without any visible loss in image quality.
Here’s an example of an optimized vs. unoptimized image:
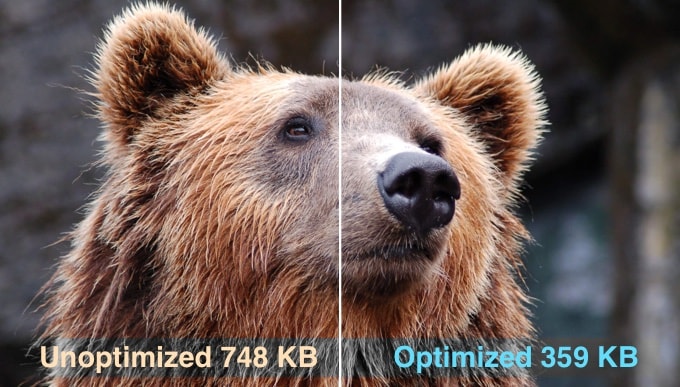
As you can see, when optimized properly, the same image can be up to 80% smaller than the original without any loss in quality. In this example, the image is 52% smaller.
How Does Image Optimization Work?
In simple terms, image optimization works by using compression technology.
Compression can be ‘lossy’ or ‘lossless’.
Lossless compression reduces the overall file size with absolutely no loss of image quality. With lossy compression, there may be a minor loss in quality, but ideally, it won’t be noticeable to your visitors.
What Does It Mean to Optimize Images?
You may have received a recommendation to optimize images from your WordPress hosting support or a speed test tool and wonder what you need to do.
You will need to reduce the file size of your images by optimizing them for the web. We’ll show you how to do that step-by-step.
2. What Are the Benefits of Image Optimization?
While there are many benefits to optimizing your images, here are the top ones that you should know:
- Faster website speed
- Improved SEO rankings
- A higher overall conversion rate for sales and leads
- Less storage and bandwidth (which can reduce hosting and CDN costs)
- Faster website backups (which can reduce the cost of backup storage)
Images are the second heaviest item on a web page after videos. According to the HTTP archive, images make up 42% of an average web page’s total weight.
Since we know fast websites rank higher in search engines (SEO) and have better conversions, image optimization is something that every business website must do if they want to succeed online.
Now you might be wondering how big a difference image optimization can really make.
According to a Strangeloop study, a one-second delay in website load time can cost you 7% of sales, 11% fewer pageviews, and a 16% decrease in customer satisfaction.
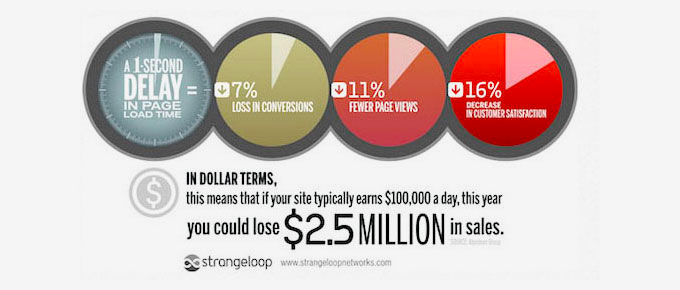
If these aren’t enough reasons to speed up your website, then you should know that search engines like Google also give preferential SEO treatment to faster-loading websites.
This means that by optimizing your images for the web, you can both improve website speed and boost WordPress SEO rankings.
Video Tutorial
If you’d prefer written instructions, then just keep reading.
3. How to Save and Optimize Images for Web Performance
The key to successful image optimization for web performance is to find the perfect balance between the smallest file size and acceptable image quality.
The three things that play a huge role in image optimization are:
- Image file format (JPEG vs. PNG vs. GIF)
- Compression (higher compression = smaller file size)
- Image dimensions (height and width)
By choosing the right combination of the three, you can reduce your image size by up to 80%.
Let’s take a look at each of these in more detail.
1. Image File Format
For most website owners, the only three image file formats that really matter are JPEG, PNG, and GIF. Choosing the right file type plays an important role in image optimization.
To keep things simple, you want to use JPEGs for photos or images with lots of colors, PNGs for simple or transparent images, and GIFs for animated images only.
For those who don’t know the difference between each file type, the PNG image format is uncompressed, which means it is a higher-quality image. The downside is that file sizes are much larger.
On the other hand, JPEG is a compressed file format that slightly reduces image quality in order to provide a significantly smaller file size.
Whereas GIF only uses 256 colors along with lossless compression, which makes it the best choice for animated images.
On WPBeginner, we use all three image formats based on the type of image.
2. Compression
The next thing is image compression which plays a huge role in image optimization.
There are different types and levels of image compression available. The settings for each will vary depending on your image compression tool.
Most image editing tools like Adobe Photoshop, ON1 Photo, GIMP, Affinity Photo, and others have built-in image compression features.
You can also save images normally and then use a web tool like TinyPNG or JPEGmini for easier image compression.
Although they require some manual effort, these two methods allow you to compress images before uploading them to WordPress, and this is what we do on WPBeginner.
There are also several popular WordPress plugins like Optimole and EWWW Image Optimizer that can automatically compress images when you first upload them. This is convenient, and many beginners and even large corporations prefer to use these image optimization plugins.
We will share more about using WordPress plugins later in the article.
3. Image Dimensions
Normally, when you import a photo from your phone or a digital camera, it has a very high resolution and large file dimensions (height and width).
Typically, these photos have a resolution of 300 DPI and dimensions starting from 2000 pixels and more. While high-quality photos are well-suited for print or desktop publishing, their large sizes make them unsuitable for websites.
Reducing the image dimensions to something more reasonable can significantly decrease image file size. You can simply resize images using image editing software on your computer.
For example, we optimized a photo with a resolution of 300 DPI and image dimensions of 4900×3200 pixels. The original file size was 1.8 MB.
We chose the JPEG format for higher compression and changed the dimensions to 1200×795 pixels. The file size was reduced to just 103 KB. That’s 94% smaller than the original file size.
Now that you know the three important factors in image optimization, let’s take a look at various image optimization tools for website owners.
4. Best Image Optimization Tools and Programs
As we mentioned earlier, most image editing software comes with image optimization and compression settings.
Outside of the image editing software, there are also several powerful free image optimization tools that you can use to optimize images for the web (with just a few clicks).
We recommend using these tools to optimize images before you upload them to WordPress, especially if you are a perfectionist.
This method helps you save disk space on your WordPress hosting account, and it guarantees the fastest image with the best quality since you manually review each image.
Adobe Photoshop
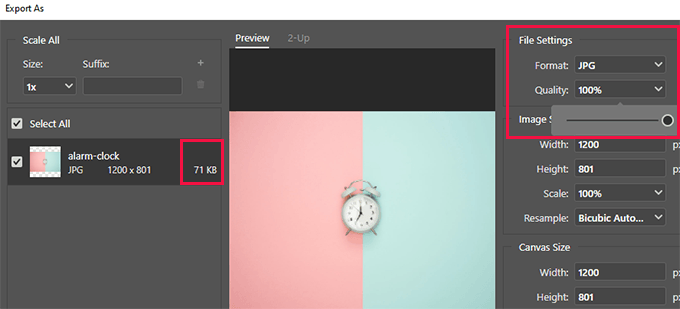
Adobe Photoshop is a premium image editing application that lets you export images with a smaller file size for the web.
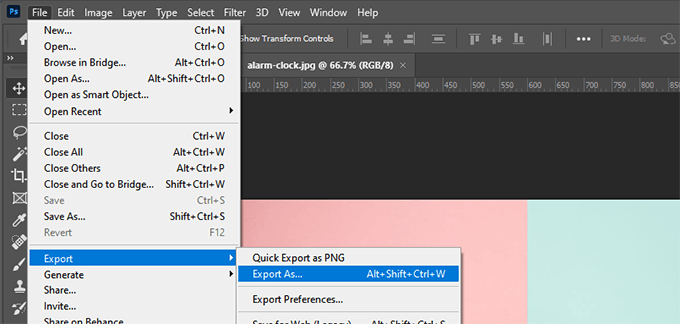
Using the export dialog, you can choose an image file format (JPG, PNG, GIF) that gives you the smallest file size.
You can also reduce image quality, colors, and other options to further decrease file size.
GIMP
GIMP is a free and open-source alternative to Adobe Photoshop. It can be used to optimize your images for the web. The downside is that it is not as easy to use as some other solutions on this list.
First, you need to open your image in GIMP and then select the File » Export As… option. This will bring up the Export Image dialog box, where you can give your file a new name. Next, you need to click the ‘Export’ button.
You will now see the image export options. For JPEG files, you can use the ‘Quality’ slider to select the compression level and reduce file size.
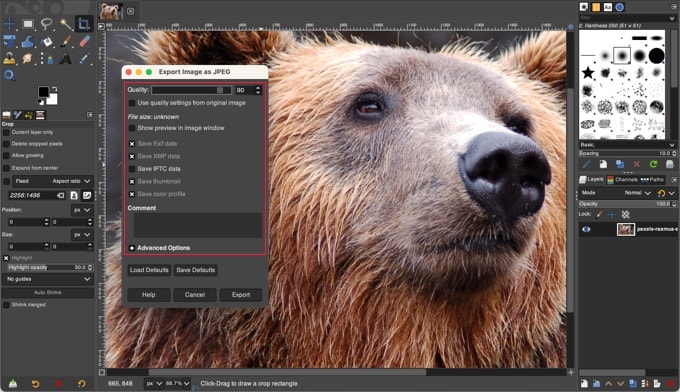
Finally, you should click on the ‘Export’ button to save the optimized image file.
TinyPNG
TinyPNG is a free web app that uses a smart lossy compression technique to reduce the size of your PNG and JPEG files. All you have to do is go to their website and upload your images using simple drag and drop.

They will compress the image and give you a download link.
They also have an extension for Adobe Photoshop, which is what we use as part of our image editing process because it lets you access TinyPNG from inside Photoshop.
For developers, they have an API to convert images automatically. Additionally, for beginners, they have a WordPress plugin that will do it for you. We’ll talk about this more later.
JPEGmini
JPEGmini uses a lossless compression technology that significantly reduces the size of images without affecting their perceived quality. You can also compare the quality of the original image and the compressed image.
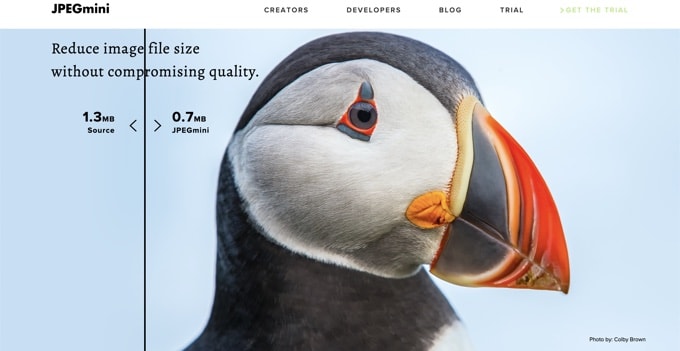
You can use their web version for free or purchase the program for your computer. They also have a paid API to automate the process for your server.
ImageOptim
ImageOptim is a Mac utility that allows you to compress images without losing any quality by finding the best compression parameters and removing unnecessary color profiles.
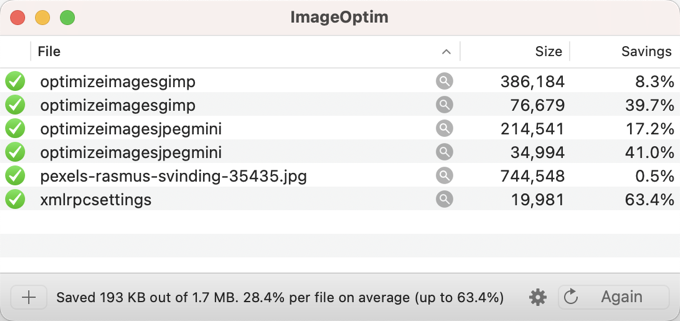
A Windows alternative to this is Trimage.
5. Best Image Optimization Plugins for WordPress
We believe that the best way to optimize your images is by doing it before uploading them to WordPress. However, if you run a multi-author site or need an automated solution, then you can try a WordPress image compression plugin.
Here is our list of the best WordPress image compression plugins:
- Optimole, a popular plugin by the team behind ThemeIsle
- EWWW Image Optimizer
- JPEG, PNG & WebP Image Compression, a plugin by the TinyPNG team mentioned above
- Imagify, a plugin by the popular WP Rocket team
- ShortPixel Image Optimizer
- Smush
- reSmush.it
- Envira Gallery is a WordPress gallery plugin with built-in image compression
These WordPress image optimization plugins will help you speed up your website.
6. Final Thoughts and Best Practices for Image Optimization
If you are not saving images optimized for the web, then you need to start doing so now. It will make a huge difference in your site speed, and your users will thank you for it.
Not to mention, faster websites are great for SEO, and you will likely see an increase in your search engine rankings.
Outside of image optimization, the two things that will significantly help you speed up your website are using a WordPress caching plugin and using a WordPress CDN.
Alternatively, you can use a managed WordPress hosting company because they often offer both caching and CDN as part of the platform.
Expert Guides on Improving WordPress Performance
We hope this article helped you learn how to optimize your images in WordPress. You may also want to see some other articles related to improving WordPress performance:
- The Ultimate Guide to Boost WordPress Speed & Performance
- How to Speed up WooCommerce Performance
- How to Offload WordPress Media to Improve Website Speed
- Best WordPress Caching Plugins to Speed Up Your Website
- How to Optimize Core Web Vitals for WordPress (Ultimate Guide)
- How to Reduce Time to First Byte (TTFB) in WordPress – Expert Tips
- How to Use GTmetrix Plugin to Improve WordPress Site Performance
- Fastest WordPress Hosting (Performance Tests)
- Important Metrics to Measure on Your WordPress Site
- How to Properly Run a Website Speed Test
- How to Stress Test a WordPress Website
If you liked this article, then please subscribe to our YouTube Channel for WordPress video tutorials. You can also find us on Twitter and Facebook.


Diane Talbotier
Hi, does resizing mean changing the size of the images as they are shown on the website, or resizing the size of the file , please?
And how do I know what is the optimal size?
WPBeginner Support
It would depend on what you mean, for compression in this guide, it is the size for the file. You can also reduce the width and height of an image if it is too large. Your specific theme would determine the specific image size you want to use.
Admin
Terri
You mentioned in your optimise example that your original photo was 300dpi, then you optimised it to a smaller file size. But you did not say what the target dpi was. Is it 72 for web? Or higher? Thanks for the informative article.
WPBeginner Support
That would depend on your personal preference and how large you are wanting/needing the images to be.
Admin
Romel
thanks a lot it cleared a lot of doubts.
WPBeginner Support
Glad our article was helpful
Admin
Odenyi Emmanuel Chidera
What I like most about wpbeginner is how they will give you information on what to implement on your own site but also tell you what they are using on their own site. It really helps me decide faster. Learning from a master is always easier. Thanks.
WPBeginner Support
You’re welcome, glad you like our content
Admin
Luz Manalo-Cruz
I’ve compressed images via TinyPNG and tried to replace the heavier images on my site with these (ie. I deleted the heavy photos and uploaded the compressed ones). However the media library is still uploading the old heavier images. Does that mean that I can’t replace the old images already uploaded? Will it only upload the compressed images that have not been uploaded at all?
WPBeginner Support
If you are replacing the heavier images, you would want to ensure you don’t have caching on your site that is showing the old image and when you upload the new image that you are uploading the correct image.
Admin
Giovanna
Thanks for the informative article, Syed.
Moving forward I am going to make sure to always use optimized images. Do you recommend I go back to already published posts and replace my images with optimized ones?
WPBeginner Support
If possible we would recommend updating your older images, the plugins we recommended should handle that for you
Admin
Percy Young
Thank you for your post. many nice tools. I wonder if theres any thing to be done to rezize images that have been previously uploaded, and how to delete images the worpress is not using any more.
WPBeginner Support
If you need to generate new images you could follow our guide here:
https://www.wpbeginner.com/plugins/regenerate-thumbnails-new-image-sizes-wordpress/
For removing the extra images there are media cleanup plugins that you are able to use
Admin
WPBeginner Support
Glad you’ll use our recommendations
Admin
Dr Amandeep Sandhu
Thanks for sharing such ideas….!
WPBeginner Support
You’re welcome, thanks for reading our articles
Admin
İbrahim BOZKURT
I’m a WordPress developer. I am writing from Turkey.
Very difficult to find quality WordPress resources.
I discovered you. I didn’t know English but learned English. Thanks to you everything.
WPBeginner Support
Thank you for reading our articles and congratulations on learning a new language
Admin
Felipe Adan Lerma
Hi, it seems maybe WordPress has incorporated some of this into its current image upload process, at least in the Premium bracket?
I ask cause I now get the option to choose the actual size or something larger or smaller?
Or is that process not an optimization / reduction in size of the image?
Thanks so much! Very important useful topic.
Adan
WPBeginner Support
It sounds like you may be talking about WordPress.com and they have custom plugins setup for sites on their service
Admin
Felipe Adan Lerma
Ahhh, yes, I forget the two WP’s differ, sorry. I’m still trying to figure out how to work where I am w/WP & it’s definitely via their .com sites. Thank so much then, WP – Adan
WPBeginner Support
No worries, should it help we have our article listing the differences here:
https://www.wpbeginner.com/beginners-guide/self-hosted-wordpress-org-vs-free-wordpress-com-infograph/
Anna
Very helpful info!! I was just researching how to do this when your email came through! Saved em time and effort and had just the advice I was looking for.
WPBeginner Support
Glad our guide and newsletter could be helpful
Admin
Lindsay
When saving on photoshop what width do you suggest for optimum web performance?
My theme is saving 1600×1050 for optimum header but what should I do for the body images. Theme designer doesn’t have a recommendation.
WPBeginner Support
If you’re going through the other steps in this article then the image size would be what would fit your content’s dimensions best so WordPress wouldn’t need to resize the image.
Admin
edccde
Please update that youtube video.First of all Jpegmini isn’t a web app and it is a software which i have to install in my pc.
WPBeginner Support
Thank you for letting us know about the video, we’ll certainly look into updating the video
Admin
Jackie
Is there way to compress images already uploaded to wordpress? Or do I need to compress all my images and then reupload into WP? THanks in advance for the advices.
Irina
Hi,
Need an advice: I need to upload Low res and Hi-res images (1200pix at 300dpi) so my customers can download them. I have no questions about LR image optimization. How can I save hi-res images? The size is up to 2 MB. I have hundreds of thousands of images…
Ratan Kumar
This post is awesome and really add value to my site. However, I recently tried to save images from flipkart but it saved in very low pixel format. Wondering if you can help me to figure out on how to do that.
Ray
I already bulk uploaded 1500 product images that were connected to image urls I found on the internet.
Now that I have those 1500 images already in my Media Library, how can I go back and resize and compress them?
Also, I’m confused about whether resizing means changing the size of the images as they are shown on the website, or resizing the size of the file.
Thanks!
Sara Lewis
what about the plugin ewww image optimizer?
WPBeginner Support
Hey Sara,
Yes its a good alternative. However, for better results we would still recommend optimizing images in your image editing program before uploading to WordPress.
Admin
Donna
I will be travelling to a place where internet connectivity is limited and expensive. So, I want to reduce the file size of my photos before I go online to upload them to my blog. Can someone please recommend for me what resolution and dpi would be good to use? The app I am planning to use asks for three measurements:
resolution – from 200 to 2048
DPI – from 72×72 to 300×300
jpeg quality (compression level) – from 0.00 to 1.00
Carrie
In the video she changes her pic. I understand the screen in PS. But you have not explained what should the width and height be in pixels for WP the limit is 2mb. What would be a good standard for sliders, etc for a wp site?
Carrie
Sorry for being the dunce in the corner, but could someone please clarify one thing? I installed the WP Smush it plugin and have been slowly working through all the photos I’ve uploaded to my site for the last 2 years. I’m doing 50 at a time, the free limit. However, now that I have the plugin, for future photo uploads, does having it mean I don’t have to use any other program to resize my photos before uploading them to my WP site? If I have an 8 MB photo and upload it to my site, the plugin does everything for me? I just want to confirm that the original photo is not still uploaded and saved to my host server, SiteGround. My site is wicked slow, I’ve run tons of diagnostics, and I still can’t figure out why except that everything points to my photos. Thanks!
Tony Squibb
Hi Carrie, I’m defo not an expert in any way but I do have experience with WP Smush it and yes, future uploads should be auto ‘smushed’. There is a little notification in the media gallery as you do so.
To check the causes of your slow site you can use GTmetrix and then open the waterfall page where it will show the times of the individual pages items loading. Once you know what is the problem you can then address it.
I hope that helps from one ‘dunce’ to another
Carrie
Hi Tony,
Thanks for weighing in! Unfortunately I uninstalled WP Smush and tried EWWW Image Optimizer along with the Thumbnail Regerate plugin (based on another bloggers suggestion) and royally messed up the photos on my site. I’m a newb with regards to how to manage my files through the FTP on my web host, so I ended up deleting a bunch of images (as in hundreds) and re-uploading them after resizing them manually in an image program. Turns out that too was a bad idea. Now I have a bunch of error messages when I render my site in my Google Console because when Google crawls my site, those files are now gone or moved. AGH! I’m on the verge of simply paying someone to revamp my site or quitting altogether. But I really appreciate that you took the time to leave a helpful comment.
Happy New Year! May 2017 be better than 2016.
Jeff
hi
Best Image Optimization Plugins for WordPress Site Which is?
Gagan
I was thinking what if i upload my Images to Google Blogger and use them on my wordpress Site by “Insert From URL” option?
Any suggestion if this is a Good Idea or no?
Thanks in advance
Zimbrul
I came back here as I’m looking for plugins that upload a large image as a optimised image straight to WordPress. I’m sure I’ve seen this somewhere here at WP Beginner but I cannot find it.
WPBeginner Support
Please take a look at Optimizing images with WP Smush pros, cons, and alternatives.
Admin
Jack
Photoshop is definitely the best one, for online services, kraken.io and resizeimage.net are good alternatives to tinypng.
tanveer
is xnview a good option for compressing images?
WPBeginner Support
We haven’t tried it.
Admin
Larry Aldrich
Someone mentioned RIOT in an earlier comment. It is my go-to app for minimizing images BEFORE you upload them. The compression rate is close to phenomenal. Sorry MAC users, but it’s only available for Windows.
Martin
Hello WPBeginner,
I would be very interested in the Windows version of Trimage you have apparently seen.
On the Trimage homepage you just see a link asking for help with the windows port…
Greg
I have got used to using Fireworks even though I have CS3
Zimbrul
Me too. I use CSS4 and still go to Fireworks for image optimisation.
Marianne P.
I just checked out the Trimage site and did not see the Windows version – just various *nix versions. Please point me in the right direction. Thanks so much – really great article!
Corinna
I was wondering if there was any way of reducing the size of the images already uploaded to a site? I have changed the way I upload them so in future all my images will be smaller. But I thought maybe it would be useful to change the size of those already uploaded.
Julie Anglesey
I would also like to know how to reduce the size of images already uploaded.
Zimbrul
It’s (or was) Smush-It.
Samiullah Khan
Search the web too much to find good solution to optimize images; but most of them most of them doesn’t let’s see tools mentioned in this post work or not
Graham
The article defines PNG as an uncompressed file format, but as far as I know, standard PNGs use lossless compression.
And I think it would be helpful to mention why you might choose one format over another for continuous tone images (eg. a photo) vs. limited palette images (eg. a logo).
Rob Dewing
Why no mention of Photoshop Elements, the cut down home use version of Photoshop? It does 90+% of the things full phat Photoshop will do, including ‘save for web’ image compression, all for less than $100.
Ines
Would you recommend to use Flickr to upload your images and then copy the HTML code to your wordpress site? What would you suggest for travel blogs that contain lots of pictures? Thanks.
WPBeginner Support
You can add flickr photos in WordPress by simply pasting the photo URL in a post. Normally we would not recommend it, because people will be viewing and finding your photos on Flickr and may never even get a chance to visit your website. However, if you feel that building a community around your photos on flickr is more useful for you, then sure go ahead.
Admin
Benjamin
You could add kraken.io to your list. It does the same thing as Jpegmini but also works with PNG images.
Aurel
I am using RIOT, which is free, very fast and exelent program.
Debra Torres
I’ve been using the Yahoo Smush it tool at: http://www.smushit.com/ysmush.it/
Would you recommend this one? Or are the others you mentioned better?
WPBeginner Support
Smushit is a great tool too. But try other tools we mentioned and compare the results.
Admin
James DiGioia
There is WordPress plugin for Smush.it:
http://wordpress.org/plugins/wp-smushit/
This makes it easier to compress images using Smush.it without having to prep them beforehand.
Youri van Dijk
I was about to mention that plugin as well. I generally do save my images optimized myself, but for clients that are not very familiar with these tools installing the plugin is a huge benefit.
John Mauldin
Your article is VERY timely. Just encountered the need to reduce hundreds of photos for a kitchen and bath showroom. Bought JPEGmini since I could only do 20 photos a day in the free version but $19.99 is nothing for the ability to drag and drop entire folders into the program and have it zip them in seconds/minutes. Thanks so much for the help!
Haseeb
Isn’t there any automated way of doing this on wordpress? How about ‘WP Smush.it’ ?
Editorial Staff
You can automate the process with some tools that we mentioned or using this plugin:
http://wordpress.org/plugins/ewww-image-optimizer-cloud/
But why create more server load when this can be resolved by educating the user.
Admin
Marlene
Great article, however I was under the impression that any images with text on them should be saved as PNG files for best sharpness….?
Editorial Staff
PNG will definitely have a higher quality, but most folks won’t be able to tell the difference unless you put them side-by-side. If you can speed up your site with a non-noticeable difference, then why not
Admin
Adam W. Warner
Great article, and an important subject many WordPress admins miss.
[Link Removed]
Lynn
Lightroom has a number of presets for exporting to Facebook and Web – do those compress the photo files sufficiently or should I still turn to Photoshop?
Editorial Staff
Not sure about lightroom and how it exports image. You can run a side-by-side test.
Admin
Graham
Lightroom will do pretty much the same job as Photoshop when exporting photos to JPEGs.
Bill Wells
Lightroom is the go-to for photographers; it allows you to optimise your photos in batches and then will export the batch to your preferred pixel size and compression in a number of formats, including jpeg. It also automatically adds your copyright message to the batch if you want.
I don’t know about batch-processing in Photoshop but I use it for major image manipulation only.
I guess if you’re doing graphics or heavy manipulation, use Photoshop but if you’re using lots of photos and just want them to look their best, use Lightroom.
Scott Wyden Kivowitz
I’m a big advocate for many of the products you mentioned. Now I get to add this link to my resources for whenever customers ask me this exact question. Thanks Syed.
Editorial Staff
You’re very welcome Scott.
Admin
Dave Kulas
If you are taking the pictures yourself for your website …. set your camera to take a picture at 800 x 600 and at less resolution. Some camera have a Good – Better – Best resolution setting … use the “GOOD” setting. . You should get an image that will load quickly.
If you already have some images … take a look at for FREE … http://www.getpaint.net ….. I have been using it for years. I take the HUGE photos given to me by clients … then RE-SIZE them to 800 x 600. Then I use the built in compression tool to compress the image.
Steven Alig
I would not recommend taking low resolution photos.
You will want to take your original photos at higher resolutions just in case you want to use them for something else. Plus if you take photos at a higher resolution, you will have the ability to crop in on an area if desired.
If the photos are a lower resolution, you will not have that option and will be stuck with what you have taken as the original.
Mark Pridham
I have to agree with Steven on this. I highly recommend taking high resolution images in your camera. You then have a large file that you can work with, It very easy to reduce file size from a hi-res image, but impossible to go the other way. By taking hi-res images, you also have the option of using them for print work if the need arises, Generally, I end up with the large, raw image, a cropped and retouched print image, and a smaller image for web-based work.
Michael Maye
I would agree too about taking full high resolution photos. Then resize down and compress for uploading to your website. You will always have the original high res photo for other uses.
Zimbrul
I usually use Fireworks and then Tiny PNG if required.
Editorial Staff
Yup that’s a good combination
Admin
Geoffrey Gordon
Great article Syed.
However I really think that fireworks is the king when it comes to optimising images for the web and its a whole lot cheaper than Photoshop.
Editorial Staff
Thanks Geoffrey. Yup I know Photoshop is expensive which is why I mentioned other free tools as well. GIMP and Fireworks both has this functionality.
Admin
paul
So I’ll just follow the options as seen on the image in this article’s Photoshop section and it’s all good?
Editorial Staff
Yup, if you do that, then you will have probably one of the best performance results. However depending on an image, some might not look as good, so in those cases we try the Very High. Do it on case by case basis, but most images would be fine.
Admin
Andrew Brown
You discuss using Photoshop, which is way beyond most bloggers needs or price – why do you not refer to Lightroom, which also has an excellent image export option, including an option to restrict the max file size, as well as save by dimension or using a set dpi.
Once some one knows the comp screens work at 72dpi, the rest becomes much easier, and it becomes amazing as to how easy it is to have a web template amongst the export options without needing any real in depth knowledge of what needs to be done.
Editorial Staff
Andrew,
Yes we understand that Photoshop is expensive which is why we mentioned several other free options. Just updated the article now to add a link to GIMP right below photoshop.
As for Lightroom, didn’t mention it because we don’t use it. Same reason why Fireworks was left out.
Admin