Wussten Sie, dass die Optimierung Ihrer Bilder vor dem Hochladen in WordPress einen großen Einfluss auf die Geschwindigkeit Ihrer Website haben kann?
Wenn sie einen neuen Blog starten, laden viele Anfänger einfach Bilder hoch, ohne sie für das Web zu optimieren. Diese großen Bilddateien machen Ihre Website langsamer.
Sie können dies beheben, indem Sie die besten Praktiken zur Bildoptimierung als Teil Ihrer regelmäßigen Blogging-Routine anwenden.
In diesem Artikel zeigen wir Ihnen, wie Sie Ihre Bilder für eine schnellere Web-Performance ohne Qualitätsverlust optimieren können. Außerdem stellen wir Ihnen automatische Bildoptimierungs-Plugins für WordPress vor, die Ihnen das Leben erleichtern können.
Da dies ein umfassender Leitfaden zur Bildoptimierung für das Web ist, haben wir ein übersichtliches Inhaltsverzeichnis erstellt:
- What Is Image Optimization?
- What Are the Benefits of Image Optimization?
- How to Save and Optimize Images for Web Performance
- Best Image Optimization Tools and Programs
- Best Image Optimization Plugins for WordPress
- Final Thoughts and Best Practices for Image Optimization
- Expert Guides on Improving WordPress Performance
1. Was ist Bildoptimierung?
Bei der Bildoptimierung geht es darum, Bilder in der kleinstmöglichen Dateigröße zu speichern und bereitzustellen, ohne die Bildqualität insgesamt zu beeinträchtigen.
Dieser Prozess klingt zwar kompliziert, ist aber heutzutage eigentlich ganz einfach. Sie können eines der vielen Bildoptimierungs-Plugins und -Tools verwenden, um Bilder automatisch um bis zu 80 % zu komprimieren, ohne dass die Bildqualität sichtbar leidet.
Hier ist ein Beispiel für ein optimiertes und ein nicht optimiertes Bild:
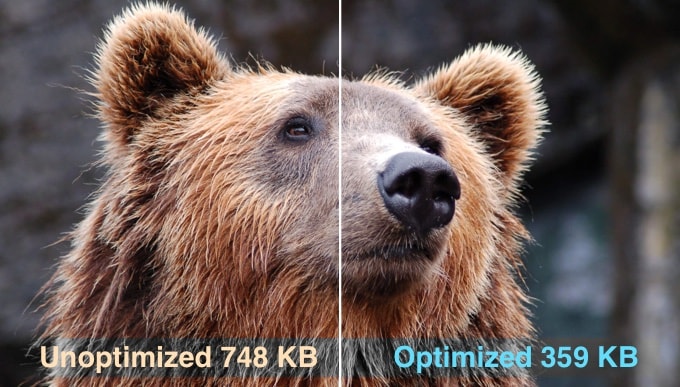
Wie Sie sehen, kann dasselbe Bild bei richtiger Optimierung bis zu 80 % kleiner sein als das Original, ohne dass es zu Qualitätseinbußen kommt. In diesem Beispiel ist das Bild 52 % kleiner.
Wie funktioniert die Bildoptimierung?
Vereinfacht gesagt, funktioniert die Bildoptimierung mit Hilfe der Komprimierungstechnik.
Die Komprimierung kann „verlustbehaftet“ oder „verlustfrei“ sein.
Bei der verlustfreien Komprimierung wird die Gesamtgröße der Datei verringert, ohne dass die Bildqualität beeinträchtigt wird. Bei verlustbehafteter Komprimierung kann es zu einem geringfügigen Qualitätsverlust kommen, der aber im Idealfall für Ihre Besucher nicht wahrnehmbar ist.
Was bedeutet es, Bilder zu optimieren?
Vielleicht haben Sie von Ihrem WordPress-Hosting-Support oder einem Geschwindigkeitstest-Tool eine Empfehlung zur Optimierung von Bildern erhalten und fragen sich, was Sie tun müssen.
Sie müssen die Dateigröße Ihrer Bilder reduzieren, indem Sie sie für das Web optimieren. Wir zeigen Ihnen, wie Sie das Schritt für Schritt tun können.
2. Was sind die Vorteile der Bildoptimierung?
Die Optimierung Ihrer Bilder hat viele Vorteile, aber hier sind die wichtigsten, die Sie kennen sollten:
- Schnellere Website-Geschwindigkeit
- Verbesserte SEO-Rankings
- Eine höhere Gesamtumwandlungsrate für Verkäufe und Leads
- Weniger Speicherplatz und Bandbreite (was die Hosting- und CDN-Kosten senken kann)
- Schnellere Website-Backups (was die Kosten für die Speicherung von Backups senken kann)
Bilder sind nach Videos das zweitwichtigste Element auf einer Webseite. Nach Angaben des HTTP-Archivs machen Bilder 42 % des Gesamtgewichts einer durchschnittlichen Webseite aus.
Da wir wissen, dass schnelle Websites in Suchmaschinen (SEO) besser ranken und bessere Konversionen haben, ist Bildoptimierung etwas, das jede Unternehmenswebsite tun muss, wenn sie online erfolgreich sein will.
Jetzt fragen Sie sich vielleicht, wie groß der Unterschied ist, den die Bildoptimierung wirklich machen kann.
Laut einer Studie von Strangeloop kann eine Verzögerung von einer Sekunde bei der Ladezeit einer Website Sie 7 % Umsatz, 11 % weniger Seitenaufrufe und 16 % weniger Kundenzufriedenheit kosten.
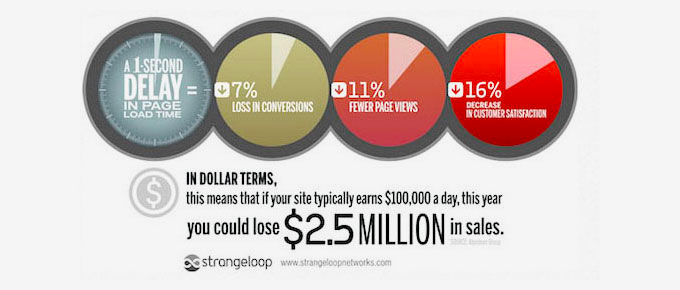
Wenn das nicht genug Gründe sind, um Ihre Website zu beschleunigen, dann sollten Sie wissen, dass Suchmaschinen wie Google schnell ladende Websites auch bei der Suchmaschinenoptimierung bevorzugen.
Das bedeutet, dass Sie durch die Optimierung Ihrer Bilder für das Web sowohl die Geschwindigkeit Ihrer Website verbessern als auch die SEO-Rankings von WordPress steigern können.
Video-Anleitung
Wenn Sie eine schriftliche Anleitung bevorzugen, dann lesen Sie einfach weiter.
3. Speichern und Optimieren von Bildern für die Webleistung
Der Schlüssel zu einer erfolgreichen Bildoptimierung für die Web-Performance liegt darin, die perfekte Balance zwischen der kleinsten Dateigröße und einer akzeptablen Bildqualität zu finden.
Die drei Dinge, die bei der Bildoptimierung eine große Rolle spielen, sind:
- Bilddateiformat (JPEG vs. PNG vs. GIF)
- Komprimierung (höhere Komprimierung = geringere Dateigröße)
- Bildabmessungen (Höhe und Breite)
Durch die Wahl der richtigen Kombination dieser drei Faktoren können Sie die Bildgröße um bis zu 80 % reduzieren.
Schauen wir uns jede dieser Möglichkeiten einmal genauer an.
1. Bilddateiformat
Für die meisten Website-Besitzer sind die einzigen drei Bilddateiformate, die wirklich wichtig sind, JPEG, PNG und GIF. Die Wahl des richtigen Dateityps spielt eine wichtige Rolle bei der Bildoptimierung.
Der Einfachheit halber sollten Sie JPEGs für Fotos oder Bilder mit vielen Farben, PNGs für einfache oder transparente Bilder und GIFs nur für animierte Bilder verwenden.
Für diejenigen, die den Unterschied zwischen den einzelnen Dateitypen nicht kennen: Das PNG-Bildformat ist unkomprimiert, was bedeutet, dass es eine höhere Bildqualität aufweist. Der Nachteil ist, dass die Dateigrößen viel größer sind.
JPEG hingegen ist ein komprimiertes Dateiformat, bei dem die Bildqualität leicht reduziert wird, um die Dateigröße deutlich zu verringern.
GIF hingegen verwendet nur 256 Farben und eine verlustfreie Kompression, was es zur besten Wahl für animierte Bilder macht.
Auf WPBeginner verwenden wir alle drei Bildformate, je nach Art des Bildes.
2. Komprimierung
Der nächste Punkt ist die Bildkomprimierung, die eine große Rolle bei der Bildoptimierung spielt.
Es gibt verschiedene Arten und Stufen der Bildkomprimierung. Die jeweiligen Einstellungen hängen von Ihrem Bildkomprimierungsprogramm ab.
Die meisten Bildbearbeitungsprogramme wie Adobe Photoshop, ON1 Photo, GIMP, Affinity Photo und andere haben integrierte Bildkomprimierungsfunktionen.
Sie können Bilder auch normal speichern und dann ein Webtool wie TinyPNG oder JPEGmini zur einfacheren Bildkomprimierung verwenden.
Obwohl sie einen gewissen manuellen Aufwand erfordern, ermöglichen diese beiden Methoden die Komprimierung von Bildern, bevor sie in WordPress hochgeladen werden, und das ist es, was wir auf WPBeginner tun.
Es gibt auch mehrere beliebte WordPress-Plugins wie Optimole und EWWW Image Optimizer, die Bilder automatisch komprimieren können, wenn Sie sie zum ersten Mal hochladen. Das ist praktisch, und viele Anfänger und sogar große Unternehmen bevorzugen die Verwendung dieser Plugins zur Bildoptimierung.
Wir werden später in diesem Artikel mehr über die Verwendung von WordPress-Plugins berichten.
3. Bild Abmessungen
Wenn Sie ein Foto von Ihrem Handy oder einer Digitalkamera importieren, hat es in der Regel eine sehr hohe Auflösung und große Dateigrößen (Höhe und Breite).
Diese Fotos haben in der Regel eine Auflösung von 300 DPI und Abmessungen ab 2000 Pixel und mehr. Hochwertige Fotos eignen sich zwar gut für den Druck oder das Desktop-Publishing, sind aber aufgrund ihrer großen Größe für Websites ungeeignet.
Durch Verkleinern der Bildgröße auf ein vernünftiges Maß kann die Dateigröße erheblich reduziert werden. Sie können die Größe von Bildern einfach mit einer Bildbearbeitungssoftware auf Ihrem Computer ändern.
Wir haben zum Beispiel ein Foto mit einer Auflösung von 300 DPI und einer Bildgröße von 4900×3200 Pixeln optimiert. Die ursprüngliche Dateigröße betrug 1,8 MB.
Wir wählten das JPEG-Format für eine höhere Komprimierung und änderten die Abmessungen auf 1200×795 Pixel. Die Dateigröße wurde auf nur 103 KB reduziert. Das sind 94 % weniger als die ursprüngliche Dateigröße.
Nachdem Sie nun die drei wichtigen Faktoren bei der Bildoptimierung kennen, wollen wir uns nun verschiedene Tools zur Bildoptimierung für Website-Betreiber ansehen.
4. Beste Bildoptimierungs-Tools und -Programme
Wie bereits erwähnt, verfügen die meisten Bildbearbeitungsprogramme über Einstellungen zur Bildoptimierung und -komprimierung.
Neben der Bildbearbeitungssoftware gibt es auch mehrere leistungsstarke kostenlose Bildoptimierungstools, mit denen Sie Bilder für das Web optimieren können (mit nur wenigen Klicks).
Wir empfehlen die Verwendung dieser Tools, um Bilder zu optimieren, bevor Sie sie in WordPress hochladen, insbesondere wenn Sie ein Perfektionist sind.
Diese Methode hilft Ihnen, Speicherplatz auf Ihrem WordPress-Hosting-Konto zu sparen, und sie garantiert das schnellste Bild mit der besten Qualität, da Sie jedes Bild manuell überprüfen.
Adobe Photoshop
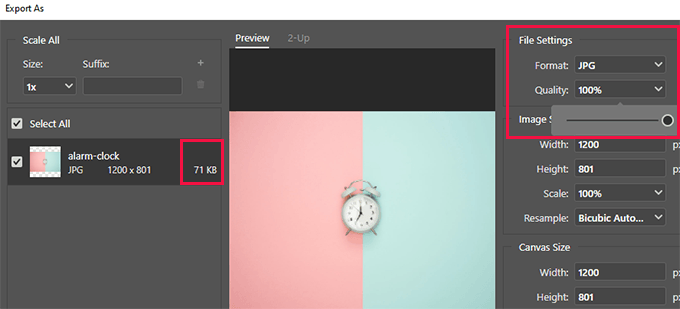
Adobe Photoshop ist eine erstklassige Bildbearbeitungsanwendung, mit der Sie Bilder mit einer kleineren Dateigröße für das Web exportieren können.
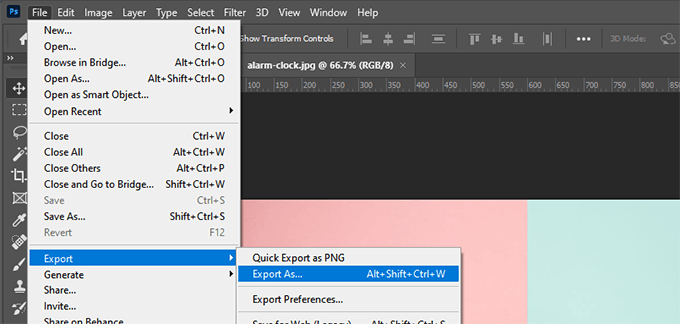
Im Exportdialog können Sie ein Bilddateiformat (JPG, PNG, GIF) wählen, das die kleinste Dateigröße ergibt.
Sie können auch die Bildqualität, die Farben und andere Optionen reduzieren, um die Dateigröße weiter zu verringern.
GIMP
GIMP ist eine kostenlose und Open-Source-Alternative zu Adobe Photoshop. Es kann verwendet werden, um Ihre Bilder für das Web zu optimieren. Der Nachteil ist, dass es nicht so einfach zu bedienen ist wie einige andere Lösungen auf dieser Liste.
Zuerst müssen Sie Ihr Bild in GIMP öffnen und dann die Option Datei “ Exportieren als... wählen. Daraufhin wird das Dialogfeld „Bild exportieren“ angezeigt, in dem Sie Ihrer Datei einen neuen Namen geben können. Als Nächstes müssen Sie auf die Schaltfläche „Exportieren“ klicken.
Sie sehen nun die Optionen für den Bildexport. Bei JPEG-Dateien können Sie mit dem Schieberegler „Qualität“ die Komprimierungsstufe auswählen und die Dateigröße reduzieren.
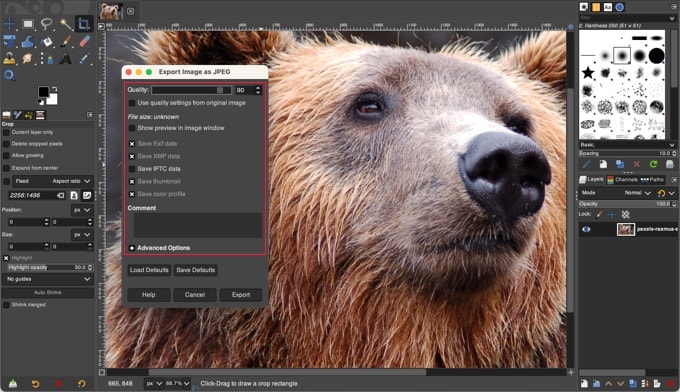
Abschließend sollten Sie auf die Schaltfläche „Exportieren“ klicken, um die optimierte Bilddatei zu speichern.
TinyPNG
TinyPNG ist eine kostenlose Webanwendung, die eine intelligente verlustbehaftete Komprimierungstechnik verwendet, um die Größe Ihrer PNG- und JPEG-Dateien zu reduzieren. Alles, was Sie tun müssen, ist, die Website zu besuchen und Ihre Bilder per Drag & Drop hochzuladen.
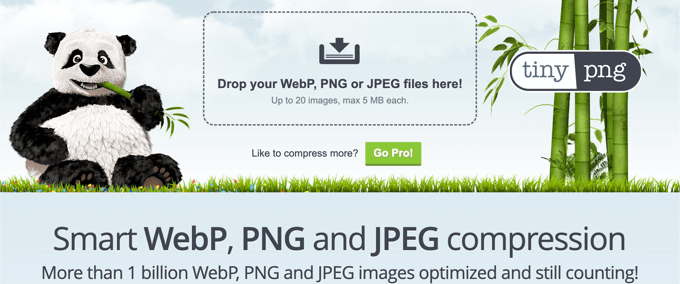
Sie komprimieren das Bild und geben Ihnen einen Download-Link.
Es gibt auch eine Erweiterung für Adobe Photoshop, das wir für unsere Bildbearbeitung verwenden, weil es den Zugriff auf TinyPNG aus Photoshop heraus ermöglicht.
Für Entwickler gibt es eine API zur automatischen Konvertierung von Bildern. Außerdem gibt es für Anfänger ein WordPress-Plugin, das diese Aufgabe für Sie übernimmt. Wir werden später mehr darüber sprechen.
JPEGmini
JPEGmini verwendet eine verlustfreie Komprimierungstechnologie, die die Größe von Bildern erheblich reduziert, ohne deren wahrgenommene Qualität zu beeinträchtigen. Sie können auch die Qualität des Originalbildes mit der des komprimierten Bildes vergleichen.
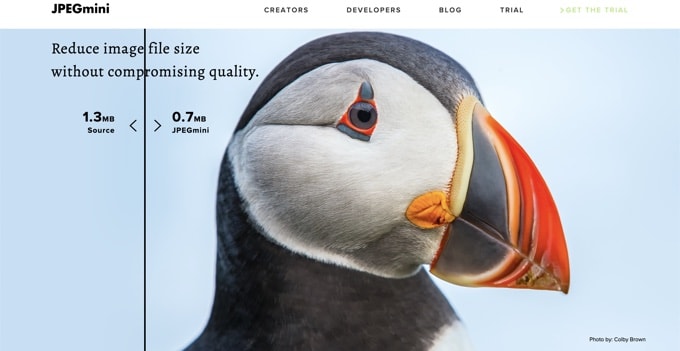
Sie können die Webversion kostenlos nutzen oder das Programm für Ihren Computer kaufen. Sie haben auch eine kostenpflichtige API, um den Prozess für Ihren Server zu automatisieren.
ImageOptim
ImageOptim ist ein Mac-Dienstprogramm, mit dem Sie Bilder ohne Qualitätsverlust komprimieren können, indem Sie die besten Komprimierungsparameter finden und unnötige Farbprofile entfernen.
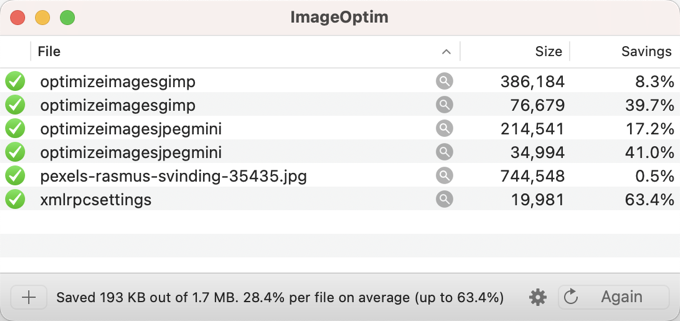
Eine Windows-Alternative dazu ist Trimage.
5. Beste Bildoptimierungs-Plugins für WordPress
Wir glauben, dass Sie Ihre Bilder am besten optimieren können, bevor Sie sie in WordPress hochladen. Wenn Sie jedoch eine Website mit mehreren Autoren betreiben oder eine automatisierte Lösung benötigen, können Sie ein WordPress-Plugin zur Bildkomprimierung verwenden.
Hier ist unsere Liste der besten WordPress Plugins zur Bildkomprimierung:
- Optimole, ein beliebtes Plugin des Teams hinter ThemeIsle
- EWWW Image Optimizer
- JPEG, PNG & WebP Image Compression, ein Plugin des oben erwähnten TinyPNG-Teams
- Imagify, ein Plugin des beliebten WP Rocket-Teams
- ShortPixel Bildoptimierer
- Smush
- reSmush.it
- Envira Gallery ist ein WordPress-Galerie-Plugin mit integrierter Bildkompression
Diese WordPress-Plugins zur Bildoptimierung helfen Ihnen, Ihre Website zu beschleunigen.
6. Abschließende Überlegungen und bewährte Praktiken für die Bildoptimierung
Wenn Sie keine für das Web optimierten Bilder speichern, sollten Sie dies jetzt tun. Es wird einen großen Unterschied in der Geschwindigkeit Ihrer Website machen, und Ihre Nutzer werden es Ihnen danken.
Ganz zu schweigen davon, dass schnellere Websites gut für die Suchmaschinenoptimierung (SEO) sind, und Sie werden wahrscheinlich einen Anstieg Ihrer Platzierungen in den Suchmaschinen feststellen.
Abgesehen von der Bildoptimierung sind die beiden Dinge, die Ihnen helfen werden, Ihre Website zu beschleunigen, die Verwendung eines WordPress-Caching-Plugins und die Verwendung eines WordPress-CDN.
Alternativ können Sie auch ein verwaltetes WordPress-Hosting-Unternehmen verwenden, da diese häufig sowohl Caching als auch CDN als Teil der Plattform anbieten.
Expertenanleitungen zur Verbesserung der WordPress-Leistung
Da Sie nun wissen, wie Sie Ihre Website durch die Optimierung Ihrer Bilder beschleunigen können, möchten Sie vielleicht noch einige andere Artikel zur Verbesserung der WordPress-Leistung lesen.
- Der ultimative Leitfaden zur Steigerung der Geschwindigkeit und Leistung von WordPress
- Wie man die Leistung von WooCommerce beschleunigt
- Beste WordPress Caching Plugins zur Beschleunigung Ihrer Website
- Optimieren von Core Web Vitals für WordPress (ultimative Anleitung)
- Verkürzung der Zeit bis zum ersten Byte (TTFB) in WordPress – Expertentipps
- Verwendung des GTmetrix-Plugins zur Verbesserung der Leistung von WordPress-Websites
- Schnellstes WordPress-Hosting (Leistungstests)
- Wichtige Metriken, die Sie auf Ihrer WordPress-Website messen sollten
- Wie man einen Website-Geschwindigkeitstest richtig durchführt
- Wie man eine WordPress-Website einem Stresstest unterzieht
Wir hoffen, dass dieser Artikel Ihnen geholfen hat zu lernen, wie Sie Ihre Bilder in WordPress optimieren können. Vielleicht interessieren Sie sich auch für unseren Leitfaden zur Verbesserung der WordPress-Sicherheit oder für unsere Expertenauswahl der besten WordPress-Plugins für Unternehmenswebsites.
Wenn Ihnen dieser Artikel gefallen hat, dann abonnieren Sie bitte unseren YouTube-Kanal für WordPress-Videotutorials. Sie können uns auch auf Twitter und Facebook finden.


Syed Balkhi says
Hey WPBeginner readers,
Did you know you can win exciting prizes by commenting on WPBeginner?
Every month, our top blog commenters will win HUGE rewards, including premium WordPress plugin licenses and cash prizes.
You can get more details about the contest from here.
Start sharing your thoughts below to stand a chance to win!
Mrteesurez says
This is a comprehensive guide.
It’s essential to optimize images in order to have fast website loading and content delivery.
You quoted that images are the second heaviest after video, what of audio, is audio lighter than images and how ?
WPBeginner Comments says
Audio would tend to be between images and video. That said, depending on the amount of audio and the audio filetype, this is not an exact rule and it just depends on the files in question.
Michelle N says
Would love to say that this has been incredibly helpful, easy to digest and implement, I appreciate all the tools provided. Thank you! – from a beginner blogger
WPBeginner Support says
Glad our guide was helpful
Admin
mohadese esmaeeli says
By the way, another question I have is whether, when using image optimization plugins and optimizing previously uploaded images, the new images replace the old ones? Or do the original images remain in the WordPress media library, with the optimized images alongside them?
WPBeginner Support says
It would depend on the specific plugin you are using as some will replace the image while others have the option to keep the original.
Admin
Jiří Vaněk says
Many of them give you a choice whether you want to keep the original images or delete them. From personal experience, I recommend keeping the original images on the website (at least as a backup).
mohadese esmaeeli says
Hello,
Greetings to you. This article appears to be quite comprehensive. I became acquainted with your website a few days ago and started reading the articles. I have decided to implement the same process on my website as I read through these articles.
I quickly reached point 2, focusing on site speed. To be honest, I have been working on my site for just a few days, and I have only managed to achieve a 10% increase in site speed.
WPBeginner Support says
An improvement is still an improvement, we’re glad to hear our guide is helpful
Admin
mohadese esmaeeli says
Yes, that’s exactly right. In this vast and competitive world, those who are always improving their website and offering something more than their competitors will be the winners. Otherwise, we will be the losers.
Moinuddin Waheed says
Having optimizes images for websites or blogs is very important for the speed of the website.
Heavy image sizes takes time to load and causes the website to slow.
I have used some of the plugins for image optimisation.
But I think best option is to use caching plugins and CDN for the websites.
it lets the website speed not only fast but also helps in retaining the visitors.
WPBeginner Support says
CDNs are normally for speed instead of retention but a fast loading site does help keep your visitors and helps make them want to return
Admin
Lewis says
First of all, it’s important to note that not all image file types are created equal. JPEGs are generally going to be much smaller in file size than PNGs, for example, so it’s important to choose the right file type for the job.
Additionally, when it comes to resizing images, you should always resize them before you upload them to your website. This way, you can avoid having to serve oversized images to your visitors, which can slow down your site.
Finally, I wanted to point out that there are a number of plugins available that can help you automate the process of optimizing your images. WP Smush is a great option that can help you save time and ensure that your images are always properly optimized.
WPBeginner Support says
Thanks for sharing your comment
Admin
Rebecca Gelsi says
This is brilliant, thank you. I’m using JPEGmini after reading this article and am so relieved to have this aspect of our site sorted.
Andy says
Thanks for the normal and simple explanation. I made a few mistakes with my photo content on my site, but with the help of your explanations, I figured out exactly what I needed to do. Thank you!
WPBeginner Support says
Glad our guide was helpful
Admin
Tania says
So helpful!! Thank you for sharing. Quick question – If I compress my images to an optimal/acceptable KB size directly in Photoshop using the Save for web setting mentioned above, and then upload to WordPress…is there a need to also run Shortpixel or another image compression plugin? Or is that redundant?
Trying to understand if there are added benefits to using a plugin vs Photoshop. Would love to hear your thoughts. Thanks!
WPBeginner Support says
The plugins are an alternative, if you optimize your images before uploading them, you wouldn’t need to use an image optimization plugin
Admin
Shiv Raj Bhatt says
Great idea to optimize images for faster loading website. Thanks for the info.
WPBeginner Support says
Glad you like our content
Admin
Lauren says
Excellent and thorough! Thank you!
WPBeginner Support says
Glad our guide was helpful
Admin
Eddier Naranjo says
The optimization plugins make a copy of the „heavy“ image and serve the optimized version. But that increases the storage space on the site.
Is there a way to delete the old version and leave only the optimized image?
WPBeginner Support says
We would recommend checking with the support for the plugin that you are using as they normally have an option to remove the unoptimized version.
Admin
Diane Talbotier says
Hi, does resizing mean changing the size of the images as they are shown on the website, or resizing the size of the file , please?
And how do I know what is the optimal size?
WPBeginner Support says
It would depend on what you mean, for compression in this guide, it is the size for the file. You can also reduce the width and height of an image if it is too large. Your specific theme would determine the specific image size you want to use.
Admin
Terri says
You mentioned in your optimise example that your original photo was 300dpi, then you optimised it to a smaller file size. But you did not say what the target dpi was. Is it 72 for web? Or higher? Thanks for the informative article.
WPBeginner Support says
That would depend on your personal preference and how large you are wanting/needing the images to be.
Admin
Romel says
thanks a lot it cleared a lot of doubts.
WPBeginner Support says
Glad our article was helpful
Admin
Odenyi Emmanuel Chidera says
What I like most about wpbeginner is how they will give you information on what to implement on your own site but also tell you what they are using on their own site. It really helps me decide faster. Learning from a master is always easier. Thanks.
WPBeginner Support says
You’re welcome, glad you like our content
Admin
Luz Manalo-Cruz says
I’ve compressed images via TinyPNG and tried to replace the heavier images on my site with these (ie. I deleted the heavy photos and uploaded the compressed ones). However the media library is still uploading the old heavier images. Does that mean that I can’t replace the old images already uploaded? Will it only upload the compressed images that have not been uploaded at all?
WPBeginner Support says
If you are replacing the heavier images, you would want to ensure you don’t have caching on your site that is showing the old image and when you upload the new image that you are uploading the correct image.
Admin
Giovanna says
Thanks for the informative article, Syed.
Moving forward I am going to make sure to always use optimized images. Do you recommend I go back to already published posts and replace my images with optimized ones?
WPBeginner Support says
If possible we would recommend updating your older images, the plugins we recommended should handle that for you
Admin
Percy Young says
Thank you for your post. many nice tools. I wonder if theres any thing to be done to rezize images that have been previously uploaded, and how to delete images the worpress is not using any more.
WPBeginner Support says
If you need to generate new images you could follow our guide here:
https://www.wpbeginner.com/plugins/regenerate-thumbnails-new-image-sizes-wordpress/
For removing the extra images there are media cleanup plugins that you are able to use
Admin
WPBeginner Support says
Glad you’ll use our recommendations
Admin
Dr Amandeep Sandhu says
Thanks for sharing such ideas….!
WPBeginner Support says
You’re welcome, thanks for reading our articles
Admin
İbrahim BOZKURT says
I’m a WordPress developer. I am writing from Turkey.
Very difficult to find quality WordPress resources.
I discovered you. I didn’t know English but learned English. Thanks to you everything.
WPBeginner Support says
Thank you for reading our articles and congratulations on learning a new language
Admin
Felipe Adan Lerma says
Hi, it seems maybe WordPress has incorporated some of this into its current image upload process, at least in the Premium bracket?
I ask cause I now get the option to choose the actual size or something larger or smaller?
Or is that process not an optimization / reduction in size of the image?
Thanks so much! Very important useful topic.
Adan
WPBeginner Support says
It sounds like you may be talking about WordPress.com and they have custom plugins setup for sites on their service
Admin
Felipe Adan Lerma says
Ahhh, yes, I forget the two WP’s differ, sorry. I’m still trying to figure out how to work where I am w/WP & it’s definitely via their .com sites. Thank so much then, WP – Adan
WPBeginner Support says
No worries, should it help we have our article listing the differences here:
https://www.wpbeginner.com/beginners-guide/self-hosted-wordpress-org-vs-free-wordpress-com-infograph/
Anna says
Very helpful info!! I was just researching how to do this when your email came through! Saved em time and effort and had just the advice I was looking for.
WPBeginner Support says
Glad our guide and newsletter could be helpful
Admin
Lindsay says
When saving on photoshop what width do you suggest for optimum web performance?
My theme is saving 1600×1050 for optimum header but what should I do for the body images. Theme designer doesn’t have a recommendation.
WPBeginner Support says
If you’re going through the other steps in this article then the image size would be what would fit your content’s dimensions best so WordPress wouldn’t need to resize the image.
Admin
edccde says
Please update that youtube video.First of all Jpegmini isn’t a web app and it is a software which i have to install in my pc.
WPBeginner Support says
Thank you for letting us know about the video, we’ll certainly look into updating the video
Admin
Jackie says
Is there way to compress images already uploaded to wordpress? Or do I need to compress all my images and then reupload into WP? THanks in advance for the advices.
Irina says
Hi,
Need an advice: I need to upload Low res and Hi-res images (1200pix at 300dpi) so my customers can download them. I have no questions about LR image optimization. How can I save hi-res images? The size is up to 2 MB. I have hundreds of thousands of images…
Ratan Kumar says
This post is awesome and really add value to my site. However, I recently tried to save images from flipkart but it saved in very low pixel format. Wondering if you can help me to figure out on how to do that.
Ray says
I already bulk uploaded 1500 product images that were connected to image urls I found on the internet.
Now that I have those 1500 images already in my Media Library, how can I go back and resize and compress them?
Also, I’m confused about whether resizing means changing the size of the images as they are shown on the website, or resizing the size of the file.
Thanks!
Sara Lewis says
what about the plugin ewww image optimizer?
WPBeginner Support says
Hey Sara,
Yes its a good alternative. However, for better results we would still recommend optimizing images in your image editing program before uploading to WordPress.
Admin
Donna says
I will be travelling to a place where internet connectivity is limited and expensive. So, I want to reduce the file size of my photos before I go online to upload them to my blog. Can someone please recommend for me what resolution and dpi would be good to use? The app I am planning to use asks for three measurements:
resolution – from 200 to 2048
DPI – from 72×72 to 300×300
jpeg quality (compression level) – from 0.00 to 1.00
Carrie says
In the video she changes her pic. I understand the screen in PS. But you have not explained what should the width and height be in pixels for WP the limit is 2mb. What would be a good standard for sliders, etc for a wp site?
Carrie says
Sorry for being the dunce in the corner, but could someone please clarify one thing? I installed the WP Smush it plugin and have been slowly working through all the photos I’ve uploaded to my site for the last 2 years. I’m doing 50 at a time, the free limit. However, now that I have the plugin, for future photo uploads, does having it mean I don’t have to use any other program to resize my photos before uploading them to my WP site? If I have an 8 MB photo and upload it to my site, the plugin does everything for me? I just want to confirm that the original photo is not still uploaded and saved to my host server, SiteGround. My site is wicked slow, I’ve run tons of diagnostics, and I still can’t figure out why except that everything points to my photos. Thanks!
Tony Squibb says
Hi Carrie, I’m defo not an expert in any way but I do have experience with WP Smush it and yes, future uploads should be auto ’smushed‘. There is a little notification in the media gallery as you do so.
To check the causes of your slow site you can use GTmetrix and then open the waterfall page where it will show the times of the individual pages items loading. Once you know what is the problem you can then address it.
I hope that helps from one ‚dunce‘ to another
Carrie says
Hi Tony,
Thanks for weighing in! Unfortunately I uninstalled WP Smush and tried EWWW Image Optimizer along with the Thumbnail Regerate plugin (based on another bloggers suggestion) and royally messed up the photos on my site. I’m a newb with regards to how to manage my files through the FTP on my web host, so I ended up deleting a bunch of images (as in hundreds) and re-uploading them after resizing them manually in an image program. Turns out that too was a bad idea. Now I have a bunch of error messages when I render my site in my Google Console because when Google crawls my site, those files are now gone or moved. AGH! I’m on the verge of simply paying someone to revamp my site or quitting altogether. But I really appreciate that you took the time to leave a helpful comment.
Happy New Year! May 2017 be better than 2016.
Jeff says
hi
Best Image Optimization Plugins for WordPress Site Which is?
Gagan says
I was thinking what if i upload my Images to Google Blogger and use them on my wordpress Site by „Insert From URL“ option?
Any suggestion if this is a Good Idea or no?
Thanks in advance
Zimbrul says
I came back here as I’m looking for plugins that upload a large image as a optimised image straight to WordPress. I’m sure I’ve seen this somewhere here at WP Beginner but I cannot find it.
WPBeginner Support says
Please take a look at Optimizing images with WP Smush pros, cons, and alternatives.
Admin
Jack says
Photoshop is definitely the best one, for online services, kraken.io and resizeimage.net are good alternatives to tinypng.
tanveer says
is xnview a good option for compressing images?
WPBeginner Support says
We haven’t tried it.
Admin
Larry Aldrich says
Someone mentioned RIOT in an earlier comment. It is my go-to app for minimizing images BEFORE you upload them. The compression rate is close to phenomenal. Sorry MAC users, but it’s only available for Windows.
Martin says
Hello WPBeginner,
I would be very interested in the Windows version of Trimage you have apparently seen.
On the Trimage homepage you just see a link asking for help with the windows port…
Greg says
I have got used to using Fireworks even though I have CS3
Zimbrul says
Me too. I use CSS4 and still go to Fireworks for image optimisation.
Marianne P. says
I just checked out the Trimage site and did not see the Windows version – just various *nix versions. Please point me in the right direction. Thanks so much – really great article!
Corinna says
I was wondering if there was any way of reducing the size of the images already uploaded to a site? I have changed the way I upload them so in future all my images will be smaller. But I thought maybe it would be useful to change the size of those already uploaded.
Julie Anglesey says
I would also like to know how to reduce the size of images already uploaded.
Zimbrul says
It’s (or was) Smush-It.
Samiullah Khan says
Search the web too much to find good solution to optimize images; but most of them most of them doesn’t let’s see tools mentioned in this post work or not
Graham says
The article defines PNG as an uncompressed file format, but as far as I know, standard PNGs use lossless compression.
And I think it would be helpful to mention why you might choose one format over another for continuous tone images (eg. a photo) vs. limited palette images (eg. a logo).
Rob Dewing says
Why no mention of Photoshop Elements, the cut down home use version of Photoshop? It does 90+% of the things full phat Photoshop will do, including ’save for web‘ image compression, all for less than $100.
Ines says
Would you recommend to use Flickr to upload your images and then copy the HTML code to your wordpress site? What would you suggest for travel blogs that contain lots of pictures? Thanks.
WPBeginner Support says
You can add flickr photos in WordPress by simply pasting the photo URL in a post. Normally we would not recommend it, because people will be viewing and finding your photos on Flickr and may never even get a chance to visit your website. However, if you feel that building a community around your photos on flickr is more useful for you, then sure go ahead.
Admin
Benjamin says
You could add kraken.io to your list. It does the same thing as Jpegmini but also works with PNG images.
Aurel says
I am using RIOT, which is free, very fast and exelent program.