
Are you worried about moving your WordPress site to a new domain name? It is a scary thought for many website owners.
You don’t want to lose the search rankings and traffic you worked so hard to build. One wrong move could result in broken links and lost visitors.
We have migrated hundreds of websites successfully. We know the exact steps you need to take to ensure nothing breaks during the process.
In this guide, we will show you how to easily move WordPress to a new domain without losing SEO.
Migrating your WordPress site to a new domain name can be scary, but it doesn’t have to be. We are here to walk you through every step of the process.
You can click on any of the links below to go to a particular step of migrating your WordPress site to a new domain name:
- What to Know Before You Change Domains
- Pre-Steps: What You Need to Get Started
- Step 1: Create a Duplicator Package of Your WordPress Site
- Step 2: Create a Database for Your New Domain Name
- Step 3: Unpack WordPress on Your New Domain Name
- Step 4: Set Up Permanent 301 Redirects
- Step 5: Notify Google About Your New Domain
- Notify Your Users About the New Domain Name
- Frequently Asked Questions About Moving a WordPress Site
- Video Tutorial
- Additional Resources
What to Know Before You Change Domains
Before you start, there are a few things you should know.
The process of transferring to a new domain will temporarily affect your search engine rankings since Google and other search engines will need to adjust to the changes.
It will also temporarily affect your search traffic. Please keep in mind that this is normal, and it happens to all websites that switch to a new domain.
However, you can dramatically decrease the SEO impact by following this guide. We will show you the right way of moving your WordPress site to a new domain name, setting up proper 301 redirects, and notifying search engines.
Please note that this guide is not for moving a WordPress site to a new host. This is for switching a domain name only. While the process is similar, there are a few extra steps. These extra steps will help you to protect your SEO rankings and traffic.
Lastly, if your old website is on WordPress.com, then you need to follow the instructions in our guide on how to move from WordPress.com to WordPress.org instead.
Pre-Steps: What You Need to Get Started
In this guide, we are assuming that you have your WordPress website set up on oldsite.com, and you are trying to migrate it to newsite.com.
We are also assuming that you already have a WordPress hosting account and you are familiar with your web hosting control panel.
You’ll also need to know how to use an FTP client like FileZilla or how to edit files using the File Manager app available in your hosting account dashboard.
In case you don’t have a web hosting provider or are looking to switch to a new one, we recommend using Bluehost (great for small sites + comes with a free domain) and either SiteGround or WP Engine (great for larger sites or online stores).
Once you have those things in place, you are ready to start the process!
Step 1: Create a Duplicator Package of Your WordPress Site
The first thing you need to do is create a full backup of your WordPress site.
You’ll then use this backup to create a duplicate of your website so that you can set up the redirects properly from your old domain to the new one.
While there are many WordPress backup plugins available, we will be using Duplicator for this tutorial.
Duplicator is the best WordPress backup and migration plugin. We have used it to migrate countless websites for our own businesses as well as customers. We have found it to work reliably, even for very large websites.
Note: There is also a free version of Duplicator available, which you can use for this migration. However, we recommend upgrading to a paid plan to unlock more features like automatic cloud backups, 1-click website recovery, easier migrations, and more.
Let’s start by installing and activating the Duplicator plugin on your old domain name. For more details, see our step-by-step guide on how to install a WordPress plugin.
Once activated, the plugin will add a Duplicator menu item in your WordPress admin. You need to go to the Duplicator » Backups page and then click on the ‘Create New’ button to create a new backup or copy of your WordPress site.

Duplicator will now initialize the backup wizard. It will automatically assign a name to this package.
Click on the ‘Next’ button to continue.

Duplicator will now run some tests to see if everything is in order. If the plugin finds an issue, then you will see a warning with instructions.
If all items are marked ‘Good,’ then click on the ‘Build’ button.

The plugin will now start creating a duplicator package of your website files. Depending on the size of your site, this process may take a few minutes.
Once finished, you’ll see a ‘Download’ option. Clicking it will show you options to download Both Files or download Installer and Archive (zip) separately.
Choose ‘Download Both Files’ to download them to your computer.

The Archive file is a complete copy of your WordPress files. It includes your WordPress themes, permalink settings, plugins, uploads, and any other files created by WordPress plugins.
The installer script is a PHP file that will automate and run the WordPress migration by unpacking the archive file.
Step 2: Create a Database for Your New Domain Name
Before moving your WordPress site to the new domain, you’ll need a new SQL database to unpack WordPress on your new domain name.
If you have already created a database, then you can skip this step.
To create a database, you need to visit your hosting account’s cPanel dashboard, scroll down to the ‘Databases’ section, and then click on the ‘MySQL Databases‘ icon.
Note: If you are using a Managed WordPress Hosting provider like WP Engine, you may not need to do this step manually. You can refer to your host’s documentation for adding a new site or database.
We will show you how to locate it on Bluehost, but the basic instructions are the same and should apply to all hosting providers.
Log in to your Bluehost account dashboard and click on the ‘Settings’ button under your website.

Under your site settings, you need to switch to the ‘Advanced’ tab.
Scroll down a little to the cPanel section and click ‘Manage’.

This will open the cPanel dashboard.
Scroll down to the Databases section and click on the ‘MySQL Databases’ option.

Note: Your hosting control panel may look slightly different than the screenshots. However, you should still be able to find a Databases section with an option to create a new database.
Simply provide a name for your database and then click on the ‘Create Database’ button.

cPanel will now create a new database for you. After that, you need to scroll down to the MySQL Users section.
Next, provide a username and password for your new user and click on the ‘Create User’ button. Make sure to note the username and password in a safe place.

The new user you just created still does not have permission to work on the database. Let’s change that.
Scroll down to the ‘Add User to Database’ section. First, select the database user you created from the dropdown menu next to the ‘User’ field. Then select the new database you just created and click on the ‘Add’ button.

Next, you will be asked to choose privileges for the user.
Select ‘All Privileges’ and click on the ‘Make Changes’ button to continue.

Your database is now ready and can be used to move WordPress to the new domain name.
Make sure to note down the database name, username, and password. You’ll need this information in the next step.
Step 3: Unpack WordPress on Your New Domain Name
Now, you need to upload the Duplicator files you downloaded earlier to your new domain name.
The Duplicator package includes your WordPress installation as well. This means you don’t need to install WordPress on your new domain.
First, connect to your domain name using an FTP client. Once connected, make sure that the root directory of your website is completely empty.
After that, you can upload the archive and installer files to the root directory. This is usually called public_html.
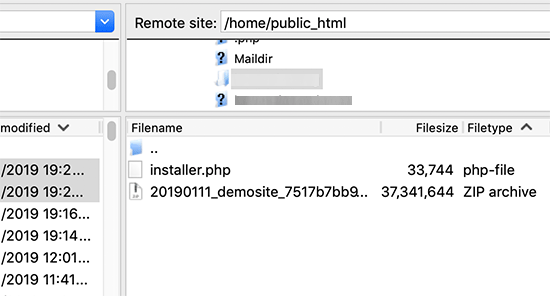
Once both files have finished uploading, you are now ready to unpack WordPress.
Open a new browser tab and go to the following URL:
http://example.com/installer.php
Don’t forget to replace example.com with your new domain name. This will launch the Duplicator migration wizard.
Note: If your new domain doesn’t open or takes you to a different page, then you may need to wait for the DNS settings to update. This can take up to 24 hours, but it usually happens much faster.

The installer will look for the archive file and then automatically select options for you on the screen.
Scroll down a little to enter the information for the database you created in the previous step.

Below that, Duplicator will automatically show you the URL of your old domain and your new domain.
If everything looks good, click on the ‘Validate’ button to continue.

Duplicator will now attempt to connect to the database using the information you provided.
Upon success, it will show you a Validation Pass. Otherwise, it will show you a warning with details on how to fix it.

Click on the ‘Next’ button to continue.
Duplicator will now start importing your WordPress website. Once finished, you will see a success message with an Admin Login button.

Duplicator will automatically update URLs to your new domain name. You can now click on the ‘Admin Login’ button to enter the WordPress admin area of your new site.
Once you log in, Duplicator will automatically clean up the installation files (installer.php and the zip archive). This is a critical security step, so make sure to check the notification confirming these files have been deleted.
Step 4: Set Up Permanent 301 Redirects
The next step is to point users arriving on your old domain name to the new domain. This is done by setting up 301 redirects.
301 redirects are very important for SEO and user experience. Adding them will allow you to automatically redirect users and search engines to your new domain name.
In other words, whenever someone lands on a post or page on your old domain, they will be automatically redirected to the same post or page on your new domain instead of seeing a 404 error.
At this point, you have two websites: one on your old domain and an identical one on your new domain.
To keep your redirects in place, you must keep your old WordPress installation active so it can continue to redirect visitors to the new one.
There are two ways to set up the redirects. The first method is easy and just takes a few clicks. The second method requires you to edit files manually.
Method 1: Set Up 301 Redirects With All in One SEO
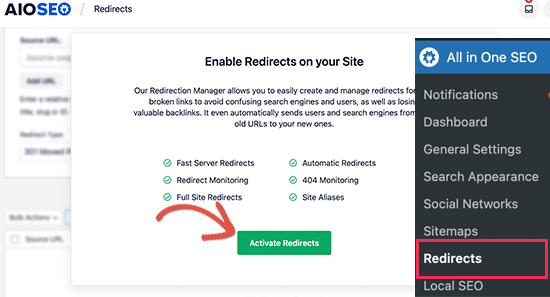
For this method, you’ll need All in One SEO (AIOSEO). It is the best WordPress SEO plugin on the market and allows you to easily optimize your WordPress website for SEO.
First, you need to switch back to the WordPress dashboard of your old website. Next, install and activate the All in One SEO plugin. For more details, see our step-by-step guide on how to install a WordPress plugin.
Note: You’ll need at least the Pro version of the plugin to access the redirect manager addon. You can also set up AIOSEO on your new WordPress site to boost your search engine rankings and traffic even more.
Upon activation on your old domain, you need to visit the All in One SEO » Redirects page and click on the ‘Activate Redirects’ button.
Next, you need to switch to the ‘Full Site Redirect’ tab and turn on the ‘Relocate Site’ toggle.
After that, you need to enter your new domain name next to the ‘Relocate to domain’ option.
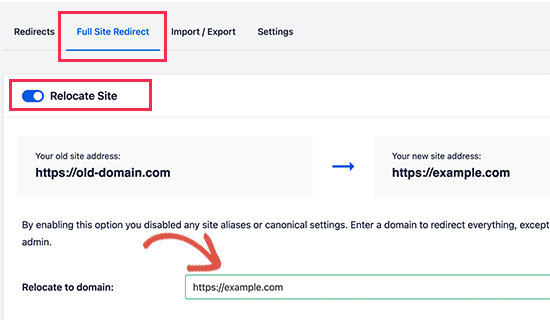
Don’t forget to click on the ‘Save Changes’ button to store your settings.
Method 2: Manually Set Up Redirects to New Domain
This method requires you to edit the WordPress .htaccess file on your old domain name.
Note: This only works if your hosting server uses Apache. If you are using NGINX (common with managed hosting like WP Engine), you won’t have an .htaccess file. In that case, please use Method 1 instead.
First, you need to connect to your old site using FTP and edit the .htaccess file.
This will be located in the same directory as your wp-includes or wp-admin folder. Open the .htaccess file and paste the following lines of code at the very top:
#Options +FollowSymLinks
RewriteEngine on
Unchanged: RewriteRule ^(.*)$ http://www.newsite.com/$1 [R=301,L]
Make sure you replace newsite.com with your new domain in the above code.
Once you have applied these changes, then visit your old domain name. It should automatically redirect you to the new domain.
If it doesn’t, then it means the redirection is not set up properly, and your server likely doesn’t support redirect rules. You need to contact the support team at your web hosting company to get RewriteEngine turned on.
Step 5: Notify Google About Your New Domain
Now that you have moved WordPress to a new domain name and set up redirects, it is time to notify Google about your change of address. This will help Google find your new website domain quickly and start showing it in search results.
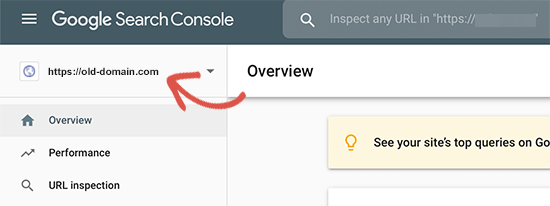
First, you need to make sure that both your new and old domains are added to the Google Search Console as two different properties. See step 1 in our Google Search Console guide for instructions.
Next, you need to select the old domain name as the active property in your Google Search Console account dashboard.
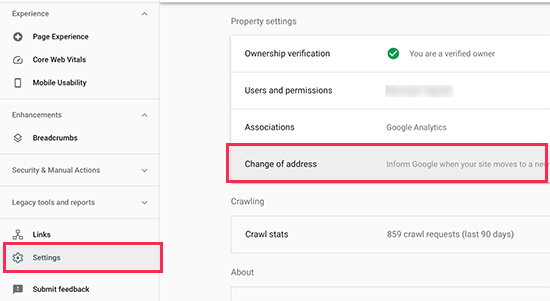
After that, click on the Settings menu from the left column.
Now, you can click on the ‘Change of address’ tool.
Now, you need to select your new domain from the Update Google section.
Then, you should click on the ‘Validate & Update’ button.
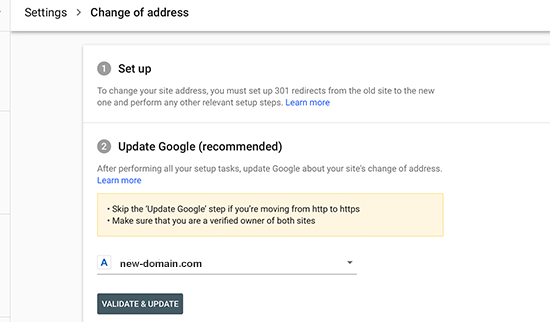
That’s all. Google will now validate that your old domain is redirecting to the new domain and save your changes.
On the next screen, Google Search Console will show you a step-by-step wizard to submit your change of address request.
Notify Your Users About the New Domain Name
While the 301 redirects do their job, it is always good to make a public announcement about the migration.
You can do this by simply writing a blog post on your new site and sharing it on your social media accounts.
If you have an email newsletter or push notification subscribers, then you should send out an announcement to them, too.
This can be helpful in a lot of ways.
First and foremost, your users are more likely to remember the new domain once they read about it.
Second, you can ask your users to let you know if they see any bugs. You alone cannot test your site in every type of browser or system environment, so it’s always helpful to have a fresh pair of eyes look at it.
Frequently Asked Questions About Moving a WordPress Site
We understand you might still have some questions about migrating your WordPress site to a new domain. Here are answers to some of the most common ones we receive to help give you complete confidence in the process.
1. Will changing my domain name permanently hurt my SEO?
No, it won’t. As long as you follow the correct steps, moving your site will not permanently hurt your SEO. While a temporary dip in rankings and traffic is normal as search engines process the change, this guide is designed to minimize that impact.
By properly setting up 301 redirects (Step 4) and notifying Google via the Search Console (Step 5), you are telling search engines exactly where you’ve moved, allowing them to transfer your existing authority to the new domain.
2. Do I need to keep my old domain after moving to the new one?
Yes, you absolutely need to keep your old domain name active for the foreseeable future. Your old domain is what hosts the permanent 301 redirects that guide both users and search engines to your new site. Letting it expire would break all of those links, leading to lost traffic and a significant drop in your SEO rankings.
3. How long does the entire domain migration process take?
The technical steps in this guide, from backing up your site to setting up redirects, can typically be completed in a few hours. However, it will take longer for search engines like Google to fully crawl and index your new domain. While notifying Google speeds this up, it can take several weeks for your rankings to fully stabilize after the move.
4. Can I move my WordPress site without using a plugin like Duplicator?
While it is technically possible to move a site manually by transferring files via FTP and exporting/importing the database, we strongly advise against it for most users.
A manual migration is complex and has a much higher risk of errors, such as missed URL updates or database connection issues. A plugin like Duplicator automates these critical steps, making the process safer, faster, and more reliable.
5. What is the main difference between moving to a new domain vs. a new host?
Think of it like this: moving to a new domain is like changing your business’s street address. Moving to a new host is like changing the company that owns the building, but your address stays the same. This guide is specifically for changing your address (domain), which has unique SEO requirements, like the 301 redirects, that are critical for success.
Video Tutorial
Additional Resources
We hope that this tutorial helped you move your WordPress site to a new domain name. The following articles and tutorials will help you track and regain your SEO rankings after migrating to a new domain name:
- The Ultimate WordPress SEO Migration Checklist (For Beginners)
- How to Check If Your WordPress Blog Posts Are Ranking for the Right Keywords
- How to Track Website Visitors to Your WordPress Site
- Tips to Optimize Your Blog Posts for SEO Like a Pro (Checklist)
If you liked this article, then please subscribe to our YouTube Channel for WordPress video tutorials. You can also find us on Twitter and Facebook.


")
John
Hello, is a redirection set at the old domain’s registration also giving the same results SEO-wise? In case we want to delete the old site and only keep the domain for a couple of years, thanks.
WPBeginner Support
As there is a domain change there will be a small change to your SEO but there shouldn’t be a major change when redirecting to the new URL.
Admin
Jiří Vaněk
I built a blog on a subdomain, and now I’m considering whether to move the blog to the main domain after two years and use it as my knowledge portfolio. I was quite hesitant to take this step because I’m obviously afraid that the SEO I’ve built over two years will be lost, and I’ll lose my rankings. This article gave me a pretty good insight into how to do it with minimal impact, and I’m grateful for it. Now I have hope that it can be done without being too painful.
Dennis Muthomi
I particularly appreciate the emphasis on setting up 301 redirects (Step 4). In my experience, this was crucial for maintaining SEO rankings. I used the All in One SEO plugin as suggested, and it made the process much smoother.
One additional tip I’d like to share: After completing the migration, I found it helpful to use MonsterInsights to closely monitor my traffic and user behavior on the new domain. This allowed me to quickly identify and address any issues that arose post-migration.
Moinuddin Waheed
When we migrate our blog to the new domain name and all the files and database gets into its new domain , how long does it take for Google to know that it has to rank this new domain?
Also old domain names have domain authority and new domain names will take time to build a domain authority, how does seo remain unaffected if we switch to new domain?
WPBeginner Support
The 301 redirects are what tell Google to take note of the new domain. There is no specific timeline for when Google will update but as Google crawls the 301 redirects it will redirect and update your listing in search results. While your old links rank they will also redirect to the new location.
Admin
Moinuddin Waheed
Thanks for the reply and clarification about the query.
I think after some time of the full setup to the new domain, isn’t it prudent to completely close the old domain and focus on new domain.
or is it better to let 301 redirect continuously redirects to the posts and page and in the meantime when we fully satisfy that all old domain requests are redirects to new one, only then we take decision to stop old domain.
WPBeginner Support
You would want to check the analytics for the old domain, if you are still getting a good amount of traffic to that domain that is being redirected then you would keep the old domain active, if you are not getting visits to your old domain you would then look to close it.
Mrteesurez
Thanks for this reply and support, it also beneficial to me. I didn’t think of checking the analytics report of the old domain to determine if there is much traffics to close it or not. I have learnt my lesson here. Thanks m
WPBeginner Support
If you reach out to your host they can sometimes help and temporarily override their upload limits to get your files into your hosting.
Admin
Jackie
What if my file size to be uploaded is over the max 500MB, and I am using Bluehost to upload the files?
Moinuddin Waheed
for redirecting to new domain, it is better to use the plugin itself that you have suggested i.e all in one seo which is easy to do for all with no coding knowledge people.
And as for accessing the .htaccess file and manually changing it to redirect is somewhat only technical expertise people will look forward to.
Don
Hi, thank you so much for your guide. We our doing a rebranding resulting in a name change and new url. Our WP administrator will be doing the migration and 301 redirect. Aside from notifying our database and social media followers in our newsletter, I am wondering if we can create a landing page on the new site for the redirects that announces the rebranding, and then segues into the new site after a preset interval.
WPBeginner Support
If you wanted to instead of redirect 1 to 1 the articles, you could certainly redirect the entire site to a landing page.
Admin
Unarine Leo Netshifhefhe
My website has been hacked and I haven’t really gotten time to fix it that much, I would like to know if this problem of it been hacked has some kind of effect on SEO? Does it affect it badly? And my website stops appearing?
WPBeginner Support
It would depend on if anything changed on the front-end of your site but it can have a negative effect on your site’s SEO.
Admin
Simon
How do I use FTP client to connect my domain?
WPBeginner Support
You would not use FTP for your domain, you would want to use the tools in either your domain registrar or hosting provider.
Admin
Manu Philip
Thank you ! It helped a lot
WPBeginner Support
Glad our guide was helpful!
Admin