Are you looking for a way to add shipment tracking to your WooCommerce store?
With shipment tracking, customers can get real-time updates on their orders. This way, they can keep track of an upcoming delivery and enjoy a worry-free shopping experience.
In this article, we will show you how to add shipment tracking to WooCommerce to increase your customer satisfaction.
Why Should You Add Shipment Tracking to WooCommerce?
By adding shipment tracking functionality to WooCommerce, you can increase customer trust in your brand.
When customers have no idea where their package is, this can make them worried and suspicious of your business. Giving your buyers order tracking after checkout can provide them with some peace of mind that their item is on its way.
Plus, as a store owner, having shipment tracking details in WooCommerce can help you track exactly where a package is at any given time.
If there is a problem or a delay, then you can easily get in touch with the shipping company and tell your customer about the situation. This allows you to provide better customer service.
Overall, WooCommerce shipment tracking is a simple way to keep everyone in the loop and make your customers happy.
With that in mind, let’s look at how to add tracking information to your WooCommerce website. Here is a quick summary of the steps we will cover in our tutorial:
Step 1: Install Advanced Shipment Tracking for WooCommerce
For this tutorial, we will use the Advanced Shipment Tracking for WooCommerce plugin. It is one of the top-rated WooCommerce shipping plugins on the market, and it can easily add tracking numbers to your customer account pages and order emails.
Plus, this free plugin has built-in integrations with over 300 shipping services, like FedEx, DHL, and USPS. International options like DPD, Canada Post, and Australia Post are also available.
We will use the free version of the plugin in our tutorial. If you need more advanced features, then you can use the Advanced Shipment Tracking Pro plan.
The Pro plan comes with third-party add-ons from platforms like Printful, ShipStation, and AfterShip. Plus, it is compatible with TrackShip, a post-shipping platform that can automate order status tracking for customers.
You can start by installing and activating the Advanced Shipment Tracking for WooCommerce plugin. For a step-by-step guide, check out our tutorial on how to install a WordPress plugin.
Step 2: Configure the Plugin Settings
Now, we will configure the WooCommerce shipment tracking plugin’s settings.
At this point, you will see that there is a ‘Shipment Tracking’ option in your WooCommerce menu. Go ahead and click on it to open the plugin page.
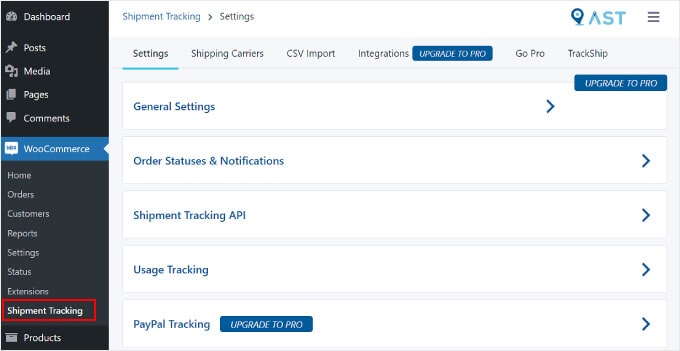
On this page, there are several areas you will want to configure.
Settings
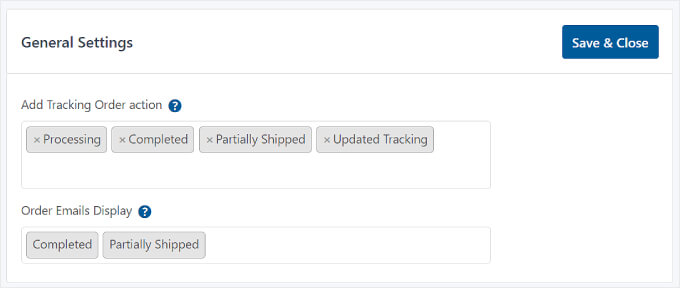
This tab contains several settings to customize your WooCommerce order tracking functionality. One is ‘General Settings’.
In the ‘Add Tracking Order action’ section, you can select the types of order statuses to display on your WooCommerce Order page.
With the ‘Order Emails Display’, you can choose which order status emails will contain a tracking URL to send to customers. The tracking information will also be available on the customer’s View Order or My Account page.
For Pro users, you can also create custom order statuses.
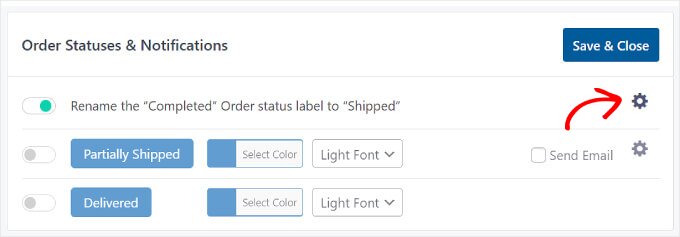
Below that is ‘Order Statuses & Notifications.’ Here, you can change if the status should say ‘Completed’ or ‘Shipped’ when the order is finished.
To edit how the WooCommerce email notification looks like, you can click on the gear icon next to ‘Rename the “Completed” Order status label to “Shipped”‘.
You will then arrive at the ‘Email Customizer’, which looks like the WordPress Theme Customizer.
Here, you can modify the design and content of the WooCommerce order and shipping email templates.
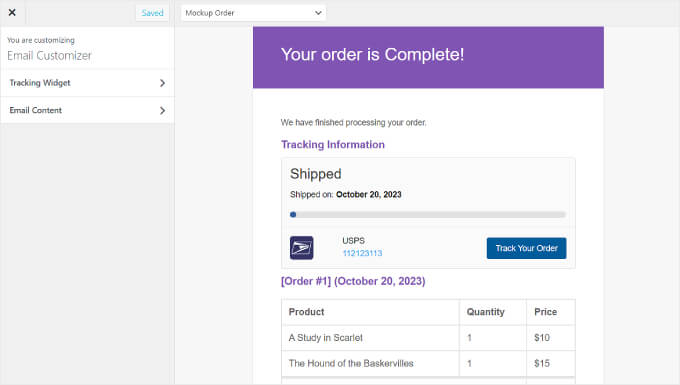
Next is ‘Shipment Tracking API’.
This feature lets you update tracking numbers from third-party services and complete orders from external systems. This setting allows you to adjust the shipping date format when tracking information is updated from other platforms.
Unless you are using a specialized third-party platform to manage your shipping, there is no need to change this setting, and you can leave it as is.

Under that setting, you will find the ‘Usage Tracking’ menu.
In this section, you can choose to get email notifications for security and feature updates and share some basic WordPress environment information with the plugin’s developers.
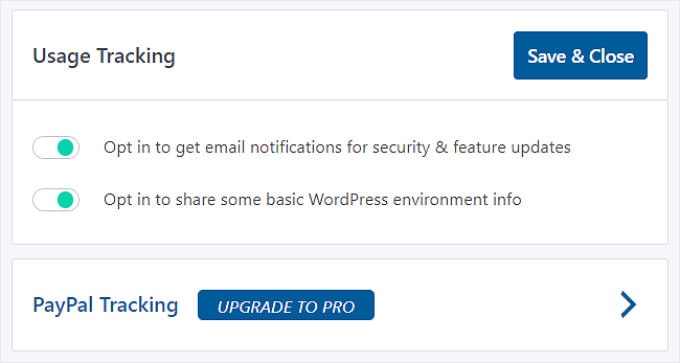
At the bottom, you will see that you can also enable PayPal order tracking if you upgrade to the Pro version of Advanced Shipment Tracking.
This feature will automatically send the order tracking code and status from WooCommerce to PayPal when orders have been marked ‘Shipped’ or ‘Completed’.
Once you have finished editing each shipment tracking setting, simply click the ‘Save & Close’ button.
Shipping Carriers
In the ‘Shipping Carriers’ tab, you can find over 300 shipping providers that have integrated with the Advanced Shipment Tracking plugin.
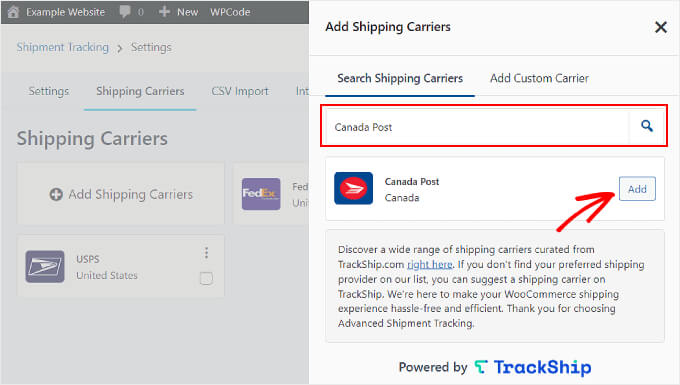
To add a shipping service to WooCommerce, just click ‘Add Shipping Carriers’.

A window will appear on the left side of the page.
Go ahead and type in your shipping carrier’s name in the search bar and click ‘Add’ to insert them into your list.
At this stage, it’s also a good idea to add a shipping calculator to your WordPress site. This feature can help visitors easily calculate the shipping cost of their order.
Additionally, if you offer a free shipping service, then consider adding a free shipping bar on your WooCommerce site. This way, potential customers know that there is a special reward happening.
Step 3: Add Shipment Tracking Info to Your Orders
After configuring all the plugin’s settings, let’s start adding shipment tracking details to your orders in WooCommerce.
There are two ways to do this, and we will cover both methods.
Adding Shipment Tracking Info to Individual Orders
If you have a small inventory, then you can insert the shipment tracking info into individual orders.
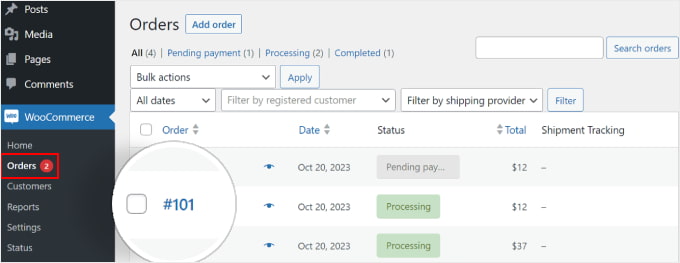
To do this, simply go to WooCommerce » Orders. You will now see that there are ‘Status’ and ‘Shipment Tracking’ columns in your orders list.
Then, select an order to add the tracking number to. In this example, we will use order #101.
Alternatively, you can click the ‘Add Order’ button at the top if you are manually inserting a customer order.
After that, you will see a ‘Shipment Tracking’ section on the right side of the order page. Go ahead and click the ‘Add Tracking Info’ button.
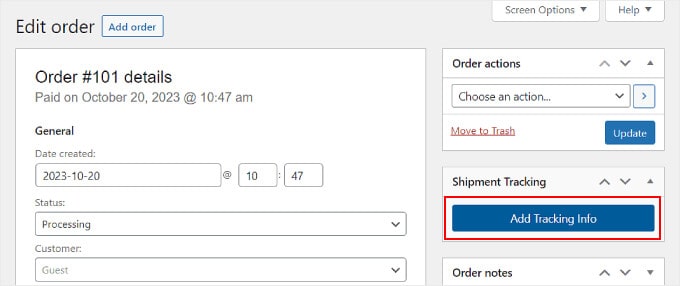
Now, a window will appear on the right side of the order page. You can insert the appropriate information in the Tracking number, Shipping Provider, and Date shipped fields.
If the order has been shipped, just tick the ‘Completed’ or ‘Shipped’ box. Otherwise, you can leave it alone.
That’s it! All you need to do now is click the ‘Fulfill Order’ button.
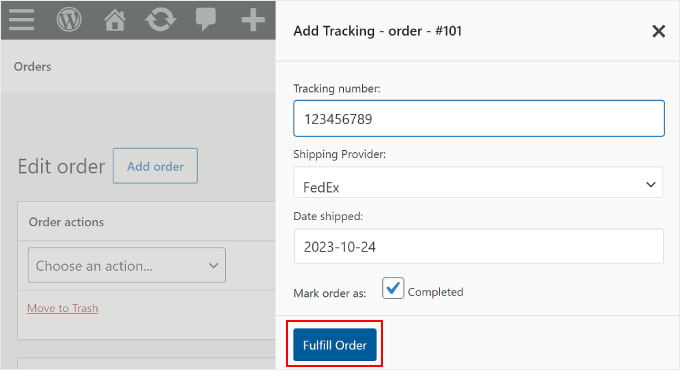
If you ticked the ‘Completed’ or ‘Shipped’ box, then clicking the ‘Fulfill Order’ button will automatically send an order email notification to the customer. The email includes a tracking link.
In some cases, you may not want to tick the ‘Completed’ or ‘Shipped’ box because the package has not been sent yet.
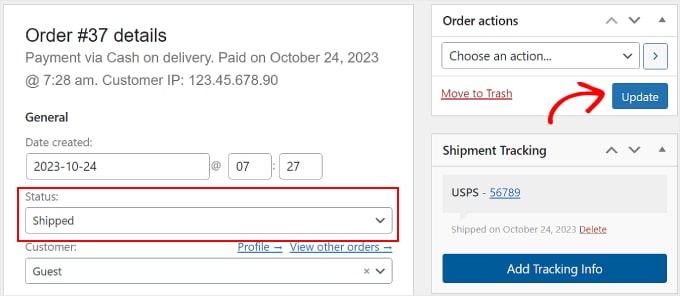
In that case, if you want to send the customer an email notification that their order has been delivered, then simply go back to the same order.
Then, in the ‘Order # details’ section, click on the ‘Status’ dropdown menu and change it to ‘Completed’ or ‘Shipped’. After that, click the ‘Update’ button inside the ‘Order actions’ section.
Bulk Import Your Shipment Tracking Data to Your Orders
If you have a large inventory, then it’s better to create a spreadsheet CSV file of your orders with their tracking information. You can then bulk import this file to the Advanced Shipment Tracking plugin.
This way, you won’t have to manually input the order tracking details for each shipped item.
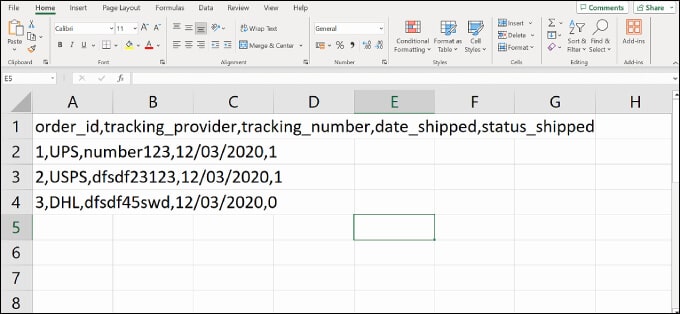
Before we continue with this method, make sure that the CSV file you have includes the following shipping tracking information:
- Order ID
- Shipping service
- Tracking number
- Order delivery date
- Shipped status, where 1 indicates the order has been shipped, and 0 indicates it has not
Here’s a CSV file sample that the plugin provides for its users:
To import a CSV file to the plugin, navigate to WooCommerce » Shipment Tracking.
Then, simply switch to the ‘CSV Import’ tab.
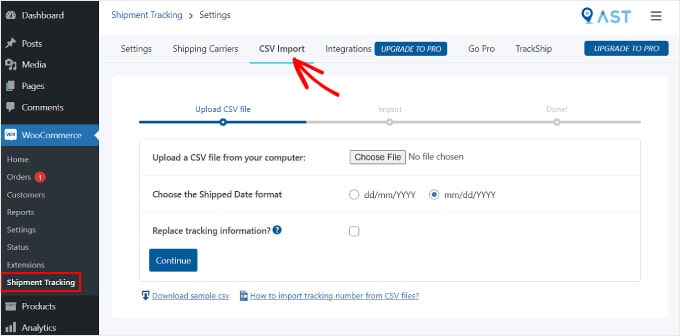
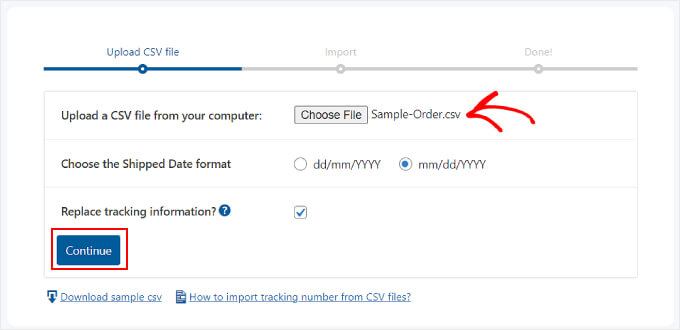
Here, you can click the ‘Choose File’ button and select your spreadsheet. Then, just pick a date format.
If you want to replace the existing tracking details for all the orders, then tick the ‘Replace tracking information?’ box.
Otherwise, you can leave the setting as is. The plugin will add the new tracking information next to the data that’s already there on the order tracking page.
Once done, you can click the ‘Continue’ button to start importing the file.
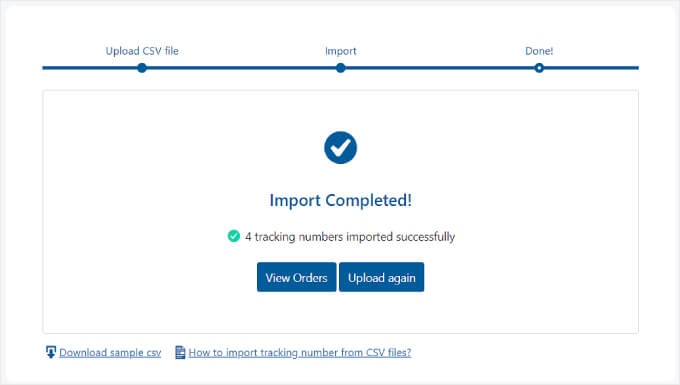
After the upload is completed, you will get a notification like the one below.
If some imports fail, you can use the previous method of adding the order tracking information individually.
Step 4: Test Your Order Tracking Email Notifications
To make sure the shipment tracking runs smoothly, it’s good to preview and test your WooCommerce emails to see if the plugin works.
If you want to do this, you can go to your online store and place an order like a regular customer would. You should use your own email address so that you can see what the email notification looks like.
Expert Tip: Emails sent directly from WordPress sometimes go missing or end up in your customers’ spam folders.
To prevent this, you can see our guides on how to fix the WordPress not sending emails issue and how to fix WooCommerce not sending order emails.
Then, go back to your WordPress admin panel, find your fake order, and add false tracking information by following the instructions in Step 3. You can use random numbers like ‘123456789’.
If you set the order status to ‘Completed’ or ‘Shipped’ and you receive an email with your order tracking link, then this means the tracking works.
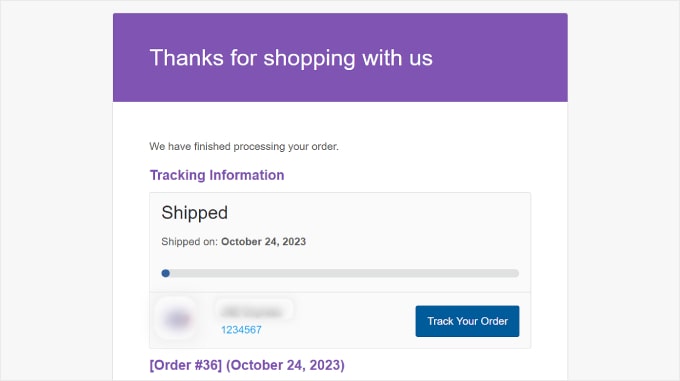
Here’s what the email should look like. If you click the ‘Track Your Order’ button, it will lead you to the shipping provider’s website.
Do you want to send other types of notifications from WooCommerce? Check out our guide on how to set up abandoned cart emails and how to send Twilio SMS notifications from WooCommerce.
Bonus Tip: Optimize Your WooCommerce Pages to Improve User Experience
Giving customers their order tracking link is just one way to optimize the customer journey in WooCommerce. However, don’t forget to improve other parts of your online store as well, like the design of your eCommerce storefront.
A user-friendly, visually appealing website can make it easier for customers to navigate your store and buy items. Not only can this boost customer satisfaction, but it will also encourage repeat purchases.
While WooCommerce comes with default store pages, not all of them may suit your business needs.
This is where SeedProd comes in. It is the best WordPress page builder plugin that makes it easy to design your WooCommerce online store.
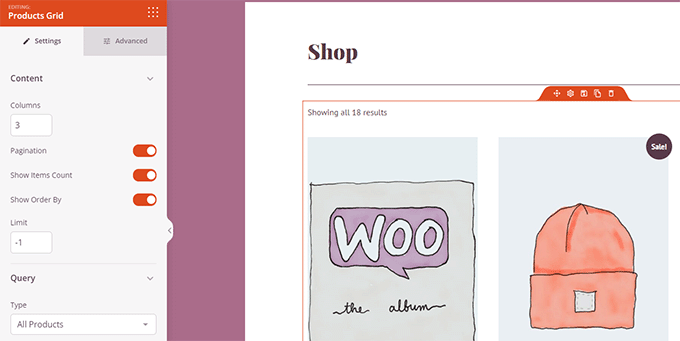
With SeedProd, you won’t need any technical experience to make your WooCommerce site easy to navigate. You can easily customize your checkout, product pages, landing pages, and more with its handy drag-and-drop tool and page templates.
If you need a hands-on guide, head over to our tutorial on how to edit WooCommerce pages without code.
We hope this article has helped you with setting up shipment tracking on your WooCommerce website. You may also want to see our list of the best WooCommerce plugins and our guide on how to create a WooCommerce popup to boost sales.
If you liked this article, then please subscribe to our YouTube Channel for WordPress video tutorials. You can also find us on Twitter and Facebook.


Syed Balkhi says
Hey WPBeginner readers,
Did you know you can win exciting prizes by commenting on WPBeginner?
Every month, our top blog commenters will win HUGE rewards, including premium WordPress plugin licenses and cash prizes.
You can get more details about the contest from here.
Start sharing your thoughts below to stand a chance to win!
Mrteesurez says
I can not wait to integrate this into my store, Woocomerce is really a game changer.
Please, I will check out the plugin but I want to ask if only support shipping around US or worldwide as in the case if different location across various country. Or does it integrate to Google map ?
WPBeginner Comments says
Yes, the plugin supports many carriers, a number of which ship worldwide.
Enricka Julien says
I run a kitchenware dropshipping store and recently installed this plugin to keep track of orders. After reading your post, I realized I could have done better in some areas. I used to think setting up a dropshipping store was easy, but it’s not. It requires specific skills that need to be acquired or improved over time. I’m trying dropshipping for the second time; my first attempt was with Shopify. However, I’m more optimistic about my chances of success with WordPress, especially with helpful platforms like WPBeginner to guide me.
WPBeginner Support says
Glad to hear our guide was helpful and we wish you luck with your WordPress site
Admin
Ram E. says
I’m not an expert dropshipper but I always thought shipment and tracking are things your supplier should handle. Anyways, WP and WC are great platforms. And you’re right, there are helpful resources available like WPBeginner to guide you.
Ahmed Omar says
Thanks you for this incredibly detailed guide on implementing shipment tracking in WooCommerce! The explanation is not only thorough but also user-friendly, making it easy for anyone to follow.
It’s evident that a lot of effort went into creating this resource, and it’s greatly appreciated. Thanks for making complex processes feel so manageable.
WPBeginner Support says
You’re welcome, glad you found our instructions helpful!
Admin
Shafqat Khan says
Terrific article! Adding shipment tracking in WooCommerce is vital for boosting customer trust and satisfaction. Your step-by-step guide for the Advanced Shipment Tracking plugin is clear and comprehensive. The two methods for adding tracking info, especially bulk import for larger inventories, are great. The bonus section on optimizing WooCommerce pages is a valuable addition. Thanks for sharing this useful guide!
WPBeginner Support says
Glad to hear you found our guide useful
Admin
Kamil says
Thank you for this article that shows how to add shipment tracking to WooCommerce. I think this is a very useful feature that increases customer trust and satisfaction. I installed the **Advanced Shipment Tracking for WooCommerce** plugin and I am happy with it. My question is: Is there a way to integrate this plugin with other courier services, such as DHL or UPS?
WPBeginner Support says
There are multiple shipping provider options UPS is one and the plugin’s support can help with other integrations.
Admin