While managing our WordPress blog, one of the challenges we faced was that some of our contributors used blocks that didn’t align with our content strategy or design guidelines.
For instance, they were adding tables that broke our mobile layout or embedding forms in articles where we didn’t want them. This got us thinking: wouldn’t it be great if we could customize which blocks different user roles can access?
In this article, we’ll show you how to hide blocks from specific users in the WordPress content editor.

Why Hide Blocks from Specific Users in the Content Editor?
WordPress blocks (or Gutenberg blocks) are content elements you add to your blog post or page, including images, videos, texts, and more. Many WordPress plugins also add blocks to the content editor.
To maintain content consistency and streamline your editorial workflow, it can be beneficial to hide or disable certain blocks based on user roles.
For example, you might hide the tables block for authors and contributors to avoid clutter. Or, restrict access to plugin-specific blocks like WPForms to control where you can place forms in your WordPress theme.
That said, let’s see how to hide or disable blocks for specific users on your WordPress website.
Hiding Blocks from Specific Users in WordPress Editor
The best way to manage your block visibility based on user roles is by using the PublishPress Blocks plugin. It gives you more control over the WordPress block editor and adds more blocks like an image slider, search bar, pricing table, and more.
First, you’ll need to install and activate the PublishPress Blocks plugin. The free version has a good set of features for this tutorial, but feel free to upgrade to the Pro version to get more advanced tools.
If you need help with the plugin installation, then please see our guide on how to install a WordPress plugin.
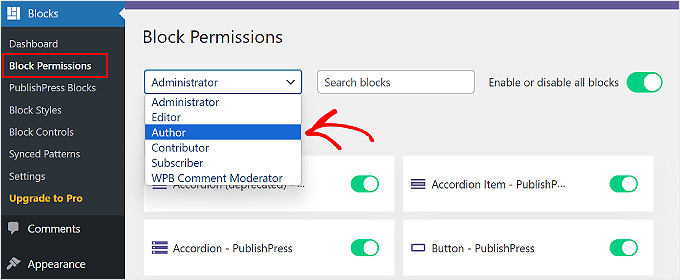
Once installed, you can head to the Blocks » Block Permissions plugin settings from the WordPress dashboard.
Then, you can choose a user profile whose block permissions you’d like to modify from the dropdown menu at the top.

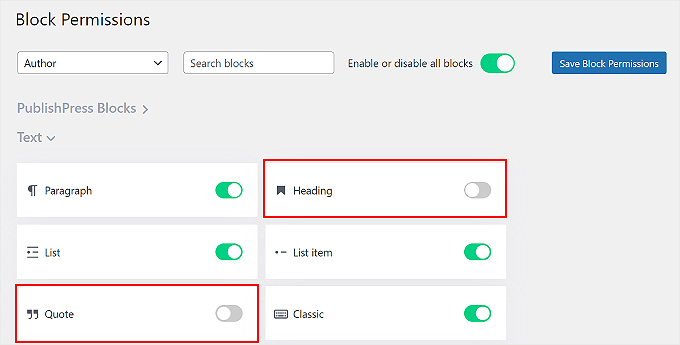
To hide a block from the selected user role, simply click the toggle to disable it.
For example, in the image below, we will disable the ‘Heading’ and ‘Quote’ blocks for any user with the Author role.

Don’t forget to click the ‘Save Block Permissions’ button when you’re done.
Additionally, you can click ‘Enable or disable all blocks’ to activate or deactivate all of the blocks at once for a specific user role. This feature may come in handy if the user is not supposed to deal with editing your post or page content, like a comment moderator.
That’s it! You’ve successfully disabled the block for a user role on your WordPress site. Now, you can repeat this to hide or show blocks for other WordPress user roles.
Learn More Ways to Customize Your Block Editor
Want to add more functionality to the Gutenberg block editor? Here are some other ideas you can try out:
- How to Add Collaboration in WordPress Block Editor (Google-Doc Style)
- How to Replace ‘Add Title’ Placeholder Text in WordPress
- How to Use Distraction Free Fullscreen Editor in WordPress
- How to Add a Blog Post Checklist to the WordPress Editor
- How to Create a Custom WordPress Block (Easy Way)
- How to Customize the Background Color of WordPress Block Editor
- How to Disable Fullscreen Editor in WordPress
We hope this article helped you learn how to hide blocks from specific users in the WordPress editor. You may also want to see our guide on WordPress post revisions and our expert picks of the best Gutenberg block plugins for WordPress.
If you liked this article, then please subscribe to our YouTube Channel for WordPress video tutorials. You can also find us on Twitter and Facebook.


Have a question or suggestion? Please leave a comment to start the discussion.