WPBeginner

Beginner's Guide for WordPress

  • Blog
    • Beginners Guide
    • News
    • Opinion
    • Showcase
    • Themes
    • Tutorials
    • WordPress Plugins
  • Start Here
    • How to Start a Blog
    • Create a Website
    • Start an Online Store
    • Best Website Builder
    • Email Marketing
    • WordPress Hosting
    • Business Name Ideas
  • Deals
    • Bluehost Coupon
    • SiteGround Coupon
    • WP Engine Coupon
    • HostGator Coupon
    • Domain.com Coupon
    • Constant Contact
    • View All Deals »
  • Glossary
  • Videos
  • Products
X
☰
Beginner's Guide for WordPress / Start your WordPress Blog in minutes
Choosing the Best
WordPress Hosting
How to Easily
Install WordPress
Recommended
WordPress Plugins
View all Guides

WPBeginner» Blog» Tutorials» How to Create Flipbox Overlays and Hovers in WordPress

How to Create Flipbox Overlays and Hovers in WordPress

Last updated on February 17th, 2021 by Editorial Staff
76 Shares
Share
Tweet
Share
Pin
Free WordPress Video Tutorials on YouTube by WPBeginner
How to Create Flipbox Overlays and Hovers in WordPress

Want to add flipbox overlays and image hover effects to your WordPress site?

Even if you’re using a high-quality WordPress theme, you might feel limited by customization options. Flipboxes and image hovers add eye-catching animated effects to your site.

In this article, we’ll show you how to add flip box overlays and image hovers to your WordPress site.
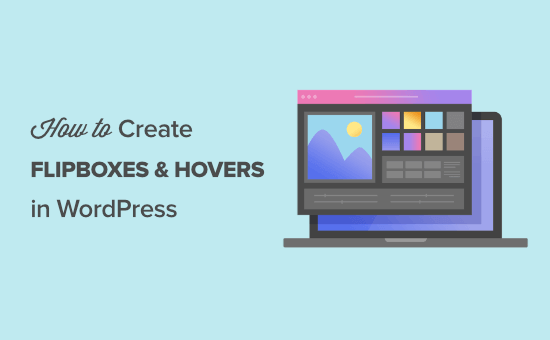
How to create flipbox overlays and hovers in WordPress

What is a Flipbox?

A flip box is a box that flips over when you bring your mouse over it. You can add this hover animation effect to specific sections of your website including text boxes and images.

Flipbox Demo Animation

The term comes from the unique “flip” feature that happens when the mouse hovers over the image. You can control how the image flips, along with the information and design of both sides of the image.

If your website is relatively static, then you can use a flipbox effect to make it feel more interactive.

For example, you can add an image hover flipbox to a product pricing page. That way when users hover over your pricing tiers, the price will show up.

Or, if you’re a freelancer, you can add logos of company’s you’ve worked with that flip and link to each project.

While these animated effects can enhance your website’s user experience, it’s important not to go overboard.

Think of the flipbox effect like adding seasoning to a meal. It’s there to enhance the existing flavors and ingredients, but too much and it’ll ruin the dish.

That being said, let’s take a look at how you can add flipbox overlays and image hover effects to your WordPress blog or website.

How to Create Flipbox Overlays and Hover Effects in WordPress

You can add flipboxes and hover effects to your WordPress site using many methods such as the Elementor page builder, or adding custom CSS.

However, the approach we recommend is using the Flipbox – Awesomes Flip Boxes Image Overlay plugin. This plugin is flexible and easy to use. It’s the best flipbox and image hover WordPress plugin.

The free version of the plugin offers you speed and simplicity. Once the plugin is installed, you can quickly add good-looking flip boxes to your site.

If you need more customization options, then you may want to upgrade to the premium version of the plugin. This lets you to control the colors of your flipboxes and add custom CSS.

You may find that existing templates already look great when added to your site, in this case, there’s no need to upgrade.

The first thing you’ll need to do is install and activate the Flipbox – Awesomes Flip Boxes Image Overlay plugin. For more details, see our step-by-step guide on how to install a WordPress plugin.

Once the plugin is installed and activated, you can create your first flipbox by going to Flip Box » Create New.
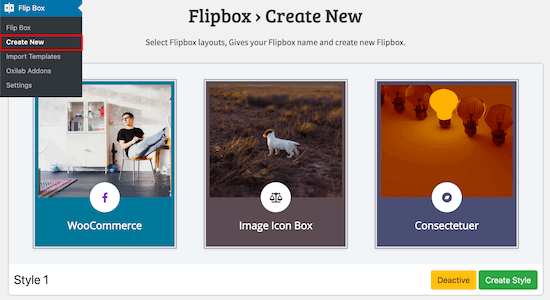
Create a new flipbox

This brings up the entire selection of templates.

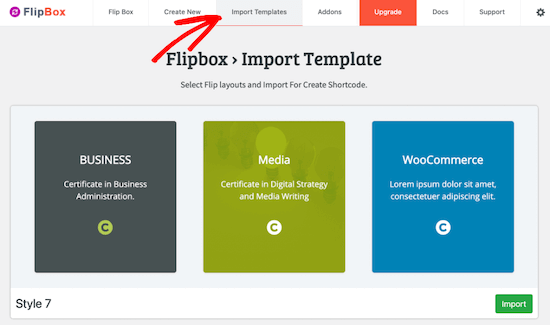
If those aren’t enough, then you can click the ‘Import Templates’ menu option for even more templates you can use.

Import a flipbox template

With the free version of the plugin, there are 5 different templates to choose from, plus another 10 templates that you can import.

To import a new customizable template, click the ‘Import’ button next to the Style number.

Flipbox click import button

Now, it’s time to select and start customizing your template.

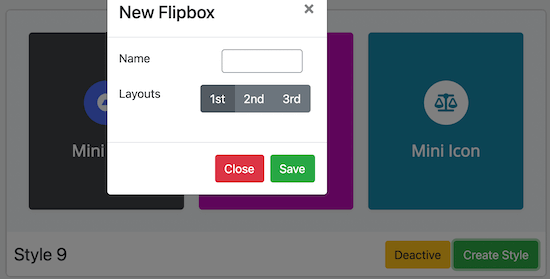
You need to click on ‘Create Style’ to load your first flipbox design.

This will bring up a pop-up menu where you can name your flipbox, and choose which layout want to customize.

Choose what flipbox to customize

The 1st, 2nd, 3rd ‘Layouts’ options match the individual flipboxes in the layout. Click ‘Save’ once you’ve made your choices.

It’s important to mention that your final design will closely match the flipbox template, so it’s best to pick a template that resembles how you want it to look on your website.

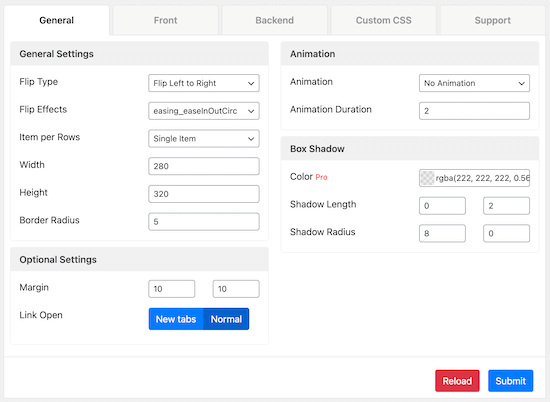
There are three main tabs you will use to change the look of your flipbox, ‘General’, ‘Front’, and ‘Backend’.

Flipbox general settings menu

On each of these tabs, you can change the fonts, padding, and margins. But, we think the default options already look great.

Next, we’ll change the text on both sides of the flipbox.

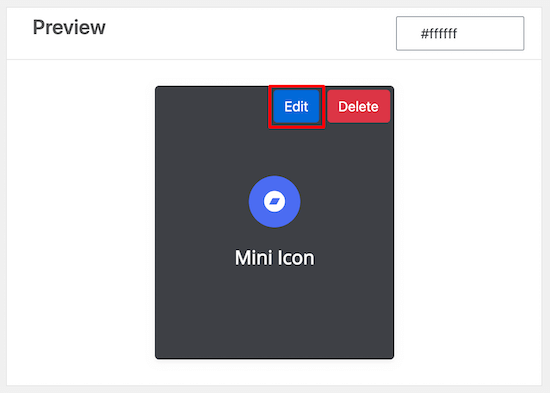
Hover over the flipbox at the bottom of the screen and click ‘Edit’.

Flipbox preview edit text

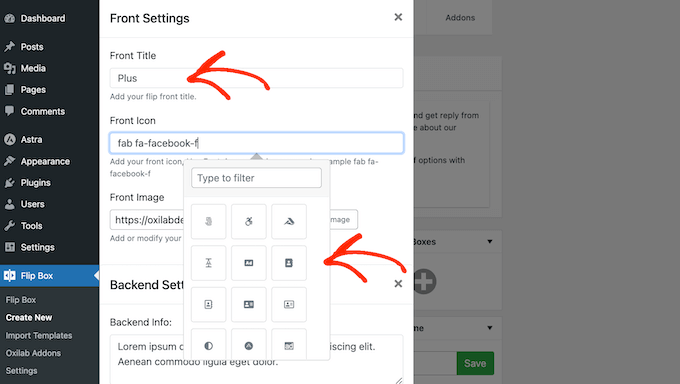
This will bring up a pop-up window that lets you change the front text, back text, and background image.

To change the title, edit the ‘Front Title’ text box and the ‘Font Icon:’ box if you want a different icon to display.

Change flipbox front title and icon

If you want to add a background image, then click ‘Upload Image’ to the right of the ‘Front Image’ option.

Next, upload a new image or select an image from your existing Media library.

Upload front background image for flipbox

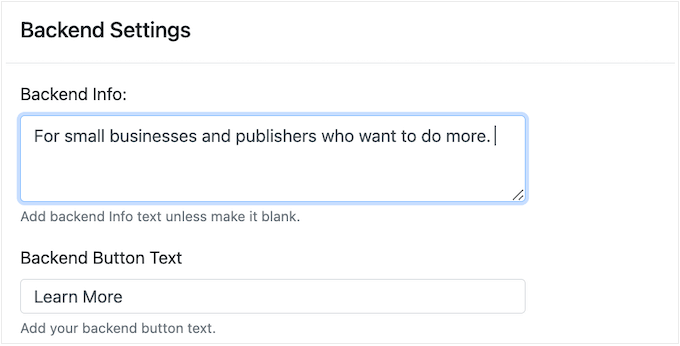
After that, you’ll follow the same series of steps for the back of the flipbox under the ‘Backend Settings’.

Here you can change the title and text that displays when the card flips.

Change backend flipbox text

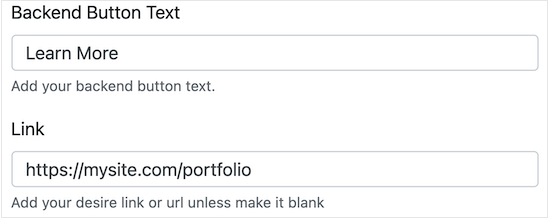
You can also change the ‘Backend Button text’ and ‘Link’ fields.

These change the button text and where your users will go when it’s clicked.

Add backend flipbox button and link

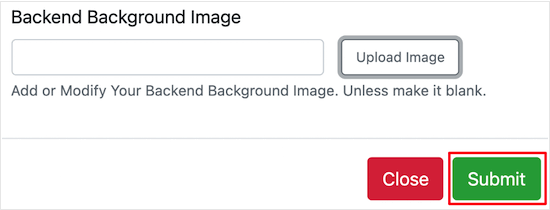
Finally, click ‘Upload Now’ to change the background image on the back of the flipbox.

Same as above, you can either upload an image, or select one from your Media library.

Upload backend background image

Once you’re done editing, make sure to click the ‘Submit’ button to save your changes.

You’ll notice that your new changes will show up in the ‘Preview’ window right away.

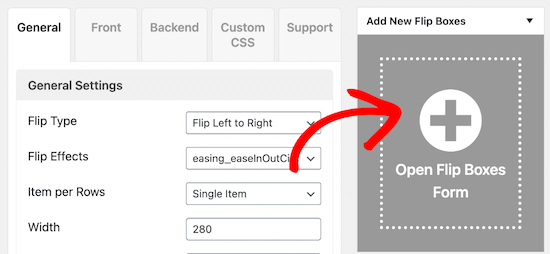
If you want to create an entire row of flipboxes, then click the ‘+’ icon in the ‘Add New Flip Boxes’ meta box.

Add a row of flipboxes

This will bring up a pop-up box similar to the one above that lets you customize your second flipbox.

By now you’ve created and customized your flipboxes, so it’s time to add them to your WordPress site.

The easiest way to do this is using the included shortcode. On the right-hand side of your screen, there’s a meta box labeled ‘Shortcode’, copy the shortcode that resembles the image below.

Copy flipbox shortcode

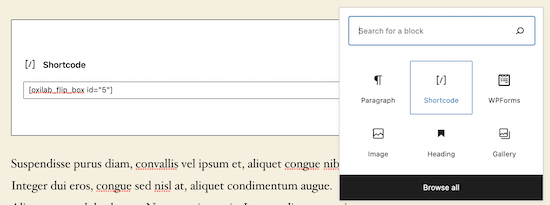
Next, navigate to a page or post where you’d like to add the flipbox and paste your shortcode.

Then, click ‘Publish’ or ‘Update’ if your post is already live.

Paste flipbox shortcode

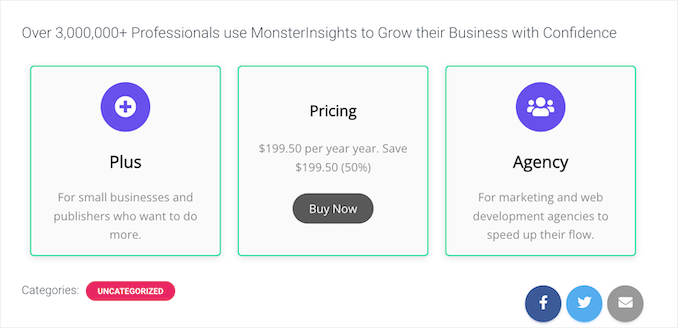
Your new flipboxes will now be live on your site.

Notice that as you resize your browser window, the flipboxes adjust since they are 100% responsive.

Flipbox live WordPress display

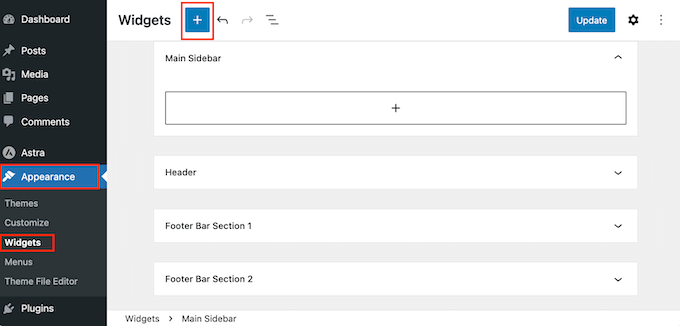
This plugin also includes a flipbox widget that you can add to any widget area supported by your theme.

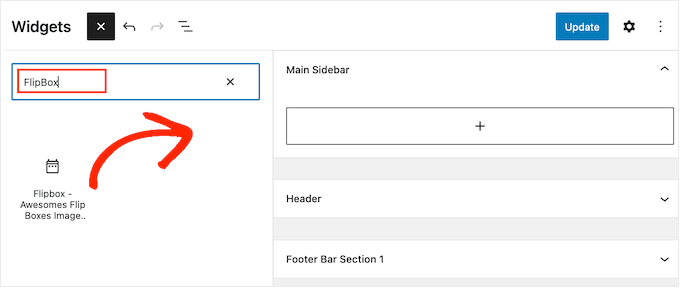
To do this navigate to Appearance » Widgets and find the widget titled ‘Flipbox – Awesomes Flip Boxes Image Overlay’.

Add flipbox widget

Then you can drag and drop the widget to your preferred location.

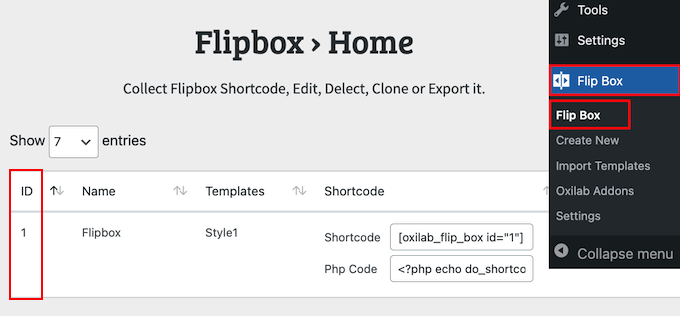
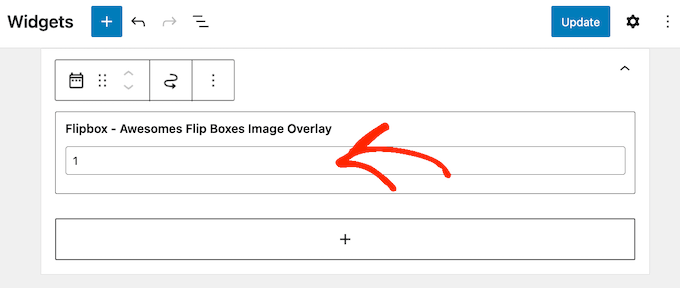
Finally, input the style id, which can be found in the main Flipbox plugin menu, and click ‘Save’.

Flipbox widget id

We hoped this article helped you learn how to add flipbox overlays and hovers to your WordPress site. You may also want to see our guide on optimizing images for SEO, and our troubleshooting guide on fixing common WordPress image issues.

If you liked this article, then please subscribe to our YouTube Channel for WordPress video tutorials. You can also find us on Twitter and Facebook.

76 Shares
Share
Tweet
Share
Pin
Popular on WPBeginner Right Now!
  • How to Properly Move Your Blog from WordPress.com to WordPress.org

  • Checklist

    Checklist: 15 Things You MUST DO Before Changing WordPress Themes

  • How to Fix the Error Establishing a Database Connection in WordPress

    How to Fix the Error Establishing a Database Connection in WordPress

  • Revealed: Why Building an Email List is so Important Today (6 Reasons)

    Revealed: Why Building an Email List is so Important Today (6 Reasons)

About the Editorial Staff

Editorial Staff at WPBeginner is a team of WordPress experts led by Syed Balkhi. Trusted by over 1.3 million readers worldwide.

The Ultimate WordPress Toolkit

Comments

  1. Congratulations, you have the opportunity to be the first commenter on this article.
    Have a question or suggestion? Please leave a comment to start the discussion.

Leave a Reply Cancel reply

Thanks for choosing to leave a comment. Please keep in mind that all comments are moderated according to our comment policy, and your email address will NOT be published. Please Do NOT use keywords in the name field. Let's have a personal and meaningful conversation.

Over 1,320,000+ Readers

Get fresh content from WPBeginner

Featured WordPress Plugin
PushEngage
PushEngage
Increase your website traffic & revenue with push notifications. Learn More »
How to Start a Blog How to Start a Blog
I need help with ...
Starting a
Blog
WordPress
Performance
WordPress
Security
WordPress
SEO
WordPress
Errors
Building an
Online Store
Useful WordPress Guides
    • 7 Best WordPress Backup Plugins Compared (Pros and Cons)
    • How to Fix the Error Establishing a Database Connection in WordPress
    • Why You Need a CDN for your WordPress Blog? [Infographic]
    • 30 Legit Ways to Make Money Online Blogging with WordPress
    • Self Hosted WordPress.org vs. Free WordPress.com [Infograph]
    • Free Recording: WordPress Workshop for Beginners
    • 24 Must Have WordPress Plugins for Business Websites
    • How to Properly Move Your Blog from WordPress.com to WordPress.org
    • 5 Best Contact Form Plugins for WordPress Compared
    • Which is the Best WordPress Popup Plugin? (Comparison)
    • Best WooCommerce Hosting in 2021 (Comparison)
    • How to Fix the Internal Server Error in WordPress
    • How to Install WordPress - Complete WordPress Installation Tutorial
    • Why You Should Start Building an Email List Right Away
    • How to Properly Move WordPress to a New Domain Without Losing SEO
    • How to Choose the Best WordPress Hosting for Your Website
    • How to Choose the Best Blogging Platform (Comparison)
    • WordPress Tutorials - 200+ Step by Step WordPress Tutorials
    • 5 Best WordPress Ecommerce Plugins Compared
    • 5 Best WordPress Membership Plugins (Compared)
    • 7 Best Email Marketing Services for Small Business (2021)
    • How to Choose the Best Domain Registrar (Compared)
    • The Truth About Shared WordPress Web Hosting
    • When Do You Really Need Managed WordPress Hosting?
    • 5 Best Drag and Drop WordPress Page Builders Compared
    • How to Switch from Blogger to WordPress without Losing Google Rankings
    • How to Properly Switch From Wix to WordPress (Step by Step)
    • How to Properly Move from Weebly to WordPress (Step by Step)
    • Do You Really Need a VPS? Best WordPress VPS Hosting Compared
    • How to Properly Move from Squarespace to WordPress
    • How to Register a Domain Name (+ tip to get it for FREE)
    • HostGator Review - An Honest Look at Speed & Uptime (2021)
    • SiteGround Reviews from 4464 Users & Our Experts (2021)
    • Bluehost Review from Real Users + Performance Stats (2021)
    • How Much Does It Really Cost to Build a WordPress Website?
    • How to Create an Email Newsletter the RIGHT WAY (Step by Step)
    • Free Business Name Generator (A.I Powered)
    • How to Create a Free Business Email Address in 5 Minutes (Step by Step)
    • How to Install Google Analytics in WordPress for Beginners
    • How to Move WordPress to a New Host or Server With No Downtime
    • Why is WordPress Free? What are the Costs? What is the Catch?
    • How to Make a Website in 2021 – Step by Step Guide
Deals & Coupons (view all)
LiveChat logo
LiveChat Inc Coupon
Get a 30 day free trial and 30% OFF LiveChat, one of the best live chat service providers for WordPress users.
LearnDash
LearnDash Coupon
Get the lowest price on the best learning management system (LMS) plugin for WordPress.
Featured In
About WPBeginner®

WPBeginner is a free WordPress resource site for Beginners. WPBeginner was founded in July 2009 by Syed Balkhi. The main goal of this site is to provide quality tips, tricks, hacks, and other WordPress resources that allows WordPress beginners to improve their site(s).

Join our team: We are Hiring!

Site Links
  • About Us
  • Contact Us
  • FTC Disclosure
  • Privacy Policy
  • Terms of Service
  • Free Blog Setup
  • Free Business Tools
  • Growth Fund
Our Sites
  • OptinMonster
  • MonsterInsights
  • WPForms
  • SeedProd
  • Nameboy
  • RafflePress
  • Smash Balloon
  • AIOSEO

Copyright © 2009 - 2021 WPBeginner LLC. All Rights Reserved. WPBeginner® is a registered trademark.

Managed by Awesome Motive | WordPress hosting by SiteGround | WordPress Security by Sucuri.