Do you want to create a WordPress plugin but don’t know where to start?
WordPress plugins allow you to add custom features to your website. There are thousands of them available for free, and you can even create your own custom WordPress plugins.
In this guide, we will show you how to create a WordPress plugin and how to begin your WordPress plugin development journey.
What Do You Need to Create Your First WordPress Plugin?
WordPress plugins are like apps for your WordPress website. Just like apps on your phone, you can install plugins in WordPress to add new features.
To learn more about WordPress plugins, see our guide on WordPress plugins and how they work.
To create your first WordPress plugin you’ll need basic knowledge of coding languages like PHP, CSS, HTML, and JavaScript.
This may sound like a lot, but don’t worry; you can still follow our tutorial. We will walk you through the process step by step, and by the end of it, you will have enough understanding of WordPress programming to create a simple WordPress plugin.
For this reason, we will stick to the basics and won’t dive into advanced WordPress coding skills.
Second, you’ll need a local development environment to test your WordPress plugin on your computer. To set this up, see our guide on how to install WordPress on your Windows computer or Mac).
You can also test your plugin on a staging website. However, if an error occurs, you may end up breaking your website, making it inaccessible.
See our guide on how to fix common WordPress errors to tackle those issues.
You will also need a plain text editor to write your code. Notepad or TextEdit will work fine. However, if you want to try something more advanced, then check out these code editors for developers.
With those ready, let’s get started with the tutorial. You can use the quick links below to skip to a specific topic:
Creating a Basic WordPress Plugin
The first step is to create a new folder on your desktop or documents folder and name it something like wpb-plugin-tutorial or my-first-plugin.
Next, you need to create a new file in your text editor and save it inside your plugin folder as wpb-plugin-tutorial.php or my-first-plugin.php. The important thing is the .php extension, but you can name the file whatever you want.
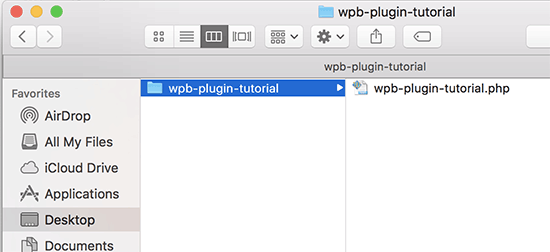
You’ll need to open that PHP file with your text editor.
The first thing you need to add to your plugin file is the plugin header. This comment block simply tells WordPress the name of your plugin, version, website, plugin author name, and more:
/*
Plugin Name:  WPBeginner Plugin Tutorial
Plugin URI:   https://www.wpbeginner.com
Description:  A short little description of the plugin. It will be displayed on the Plugins page in WordPress admin area.
Version:      1.0
Author:       WPBeginner
Author URI:   https://www.wpbeginner.com
License:      GPL2
License URI:  https://www.gnu.org/licenses/gpl-2.0.html
Text Domain:  wpb-tutorial
Domain Path:  /languages
*/
After adding the plugin header, you can start adding the plugin code below it.
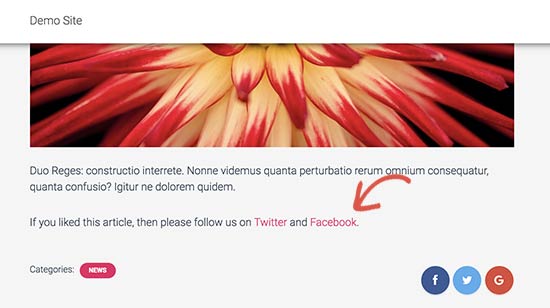
For this tutorial, we are going to create a simple plugin that adds a message at the end of each article asking users to follow us on Twitter.
Simply copy and paste the following code below your plugin header block:
<?php
function wpb_follow_us($content) {

// Only do this when a single post is displayed
if ( is_single() ) {

// Message you want to display after the post
// Add URLs to your own Twitter and Facebook profiles

$content .= '<p class="follow-us">If you liked this article, then please follow us on <a href="http://twitter.com/wpbeginner" title="WPBeginner on Twitter" target="_blank" rel="nofollow">Twitter</a> and <a href="https://www.facebook.com/wpbeginner" title="WPBeginner on Facebook" target="_blank" rel="nofollow">Facebook</a>.</p>';

}
// Return the content
return $content;

}
// Hook our function to WordPress the_content filter
add_filter('the_content', 'wpb_follow_us');
Don’t forget to replace Twitter and Facebook profile URLs with your own before saving your changes.
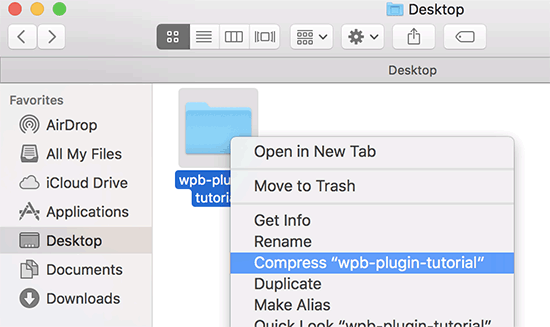
Now go to the desktop on your computer and create a zip file for the plugin folder.
Mac users can right-click on the folder and select ‘Compress wpb-plugin-tutorial’. Windows users can right-click on the folder and select ‘Compress to zip file’.
Installing and Activating Your First WordPress Plugin
Now that we have created the plugin, it is time to install it so that you can test it out. For step-by-step instructions, you can check out our article on how to install a WordPress plugin.
Head over to the WordPress admin area on your website and visit the Plugins » Add New page.
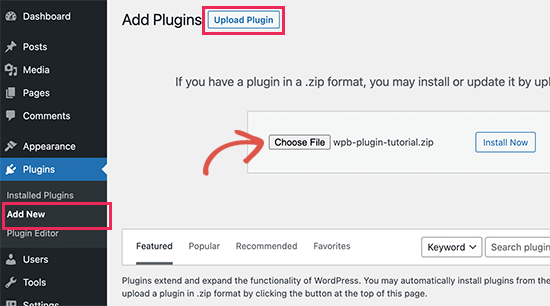
You need to click on the ‘Upload Plugin’ button at the top to upload your plugin. This will show you the plugin upload box.
Go ahead and click on the ‘Choose File’ button to select the zip file you just created. Next, click on the ‘Install Now’ button to upload and install the plugin.
Once it’s installed, go ahead and activate the plugin.
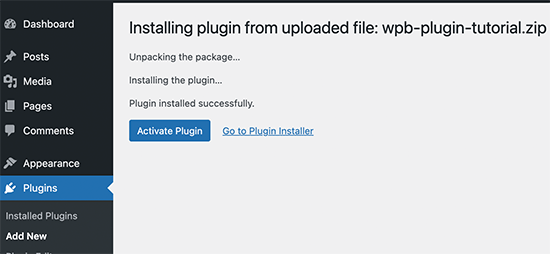
You can now visit your website to see the plugin in action.
You will be able to see the new paragraph at the end of all your single posts.
Submitting Your Plugin to WordPress.org Plugin Repository
If you want your plugin to be discovered and used by other WordPress users, then you can submit it to WordPress.org’s plugin repository.
To do that, first, you will need to create a ‘Read Me’ file for your plugin. Open a blank text file and save it as readme.txt in your plugin folder.
This readme.txt file needs to meet WordPress.org’s readme file syntax. The information you add in the readme.txt file will be displayed on your plugin’s page on WordPress.org.
Here is a sample readme.txt file that you can use as a starting point:
=== Your Plugin Name ===
Contributors: WPBeginner
Tags: wpbeginner, plugin tutorial
Requires at least: 6.0
Tested up to: 6.2
Stable tag: 1.0
License: GPLv2 or later
License URI: http://www.gnu.org/licenses/gpl-2.0.html

A WordPress plugin to teach beginners how to write a WordPress plugin.

== Description ==

This simple plugin is part of our beginner's guide to writing a WordPress plugin.

== Installation ==

1. Upload the plugin folder to your /wp-content/plugins/ folder.
1. Go to the **Plugins** page and activate the plugin.

== Frequently Asked Questions ==

= How do I use this plugin? =

Answer to the question

= How to uninstall the plugin? =

Simply deactivate and delete the plugin.

== Screenshots ==
1. Description of the first screenshot.
1. Description of the second screenshot.

== Changelog ==
= 1.0 =
* Plugin released.
Now let us explain a little bit about how the WordPress plugin readme file syntax works, so you can customize it for your plugin.
The first line of the plugin’s read me is your plugin name. This name will appear in the WordPress.org plugin directory as your plugin’s title.
The next line is Contributors. These are the user IDs responsible for managing your plugin on WordPress.org. If you don’t already have a WordPress.org user account, then you can create a free WordPress.org user account to get your user ID.
The ‘Requires at least’ and ‘Tested up to’ refer to the WordPress versions your plugin works with. The ‘Stable tag’ is the version of your own plugin.
You can leave the ‘License’ fields as GPL and the URL the same.
Then, you can edit the Description area to explain what your plugin does.
After editing your plugin’s readme file, don’t forget to save your changes.
Now your plugin is ready to be reviewed by WordPress.org’s plugins team. To submit your plugin, you will need a free WordPress.org account.
Visit the Add Your Plugin page, and if you are not already logged in, then click on the ‘please log in’ button.
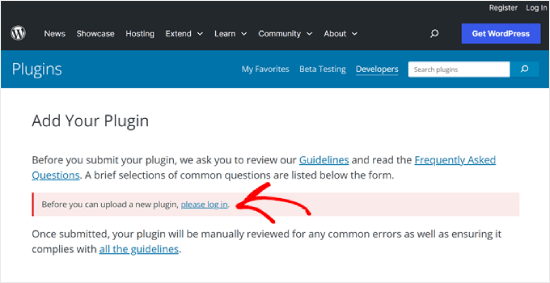
Once logged in, you’ll be able to upload and submit your plugin for review.
Simply click on the ‘Select File’ button to choose your plugin’s zip file. After that, just check all of the boxes that apply and click ‘Upload.’

The WordPress.org plugin review team will then look at your plugin code for common errors and security checks. Once approved, you’ll receive an email from the plugins team.
This email will contain a link to the Subversion (SVN) repository of your plugin hosted on WordPress.org.
Using Subversion (SVN) to Upload Your Plugin
Subversion is a version control software. It allows users to make changes to files and directories while keeping a record of changes, managing different versions, and allowing collaboration.
You’ll need an SVN client installed on your computer to upload your plugin to WordPress.org.
Windows users can use SilkSVN or TortoiseSVN (free). Mac users can install SmartSVN or Versions App on their computers.
In this article, we will show you screenshots of the Versions App for Mac. However, the process is very similar in all SVN apps with a GUI.
Once installed, you need to open the Versions app and check out a copy of your WordPress plugin’s repository. Simply click on the ‘New Repository Bookmark’ button.
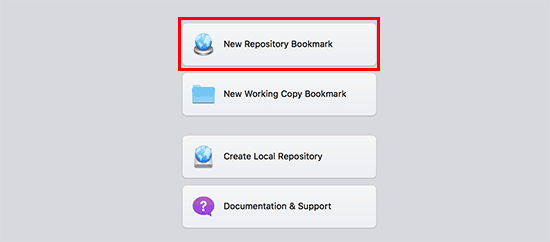
This will bring up a popup where first, you need to provide a name for this bookmark. You can name it after your plugin.
After that, you need to add your WordPress plugin’s SVN repository URL.
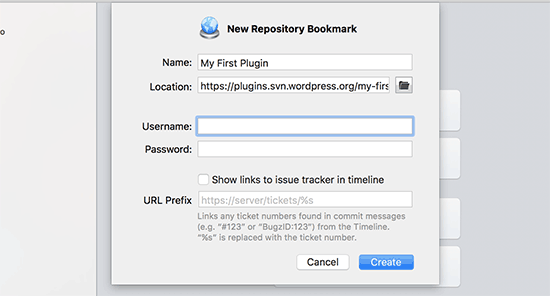
Click on the ‘Create’ button to connect with your repository.
The Versions App will now download a copy of your plugin’s repository to your computer. Next, right-click on your repository name in the browser view and then select ‘Checkout’.
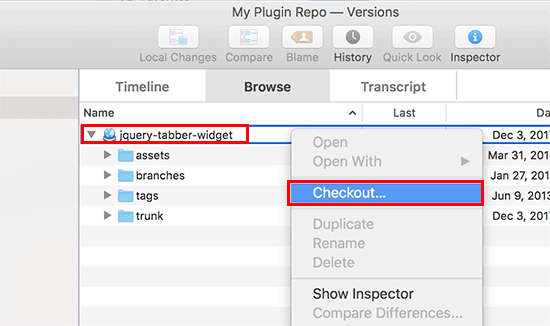
You will be asked to provide a name for the folder and select a location where you want to store it on your computer. You can use the same folder name as your plugin directory and click on the ‘Checkout’ button to continue.
Versions app will now create a local copy of your plugin on your computer. You can view it under your plugin’s repository or browse it using the Finder app.
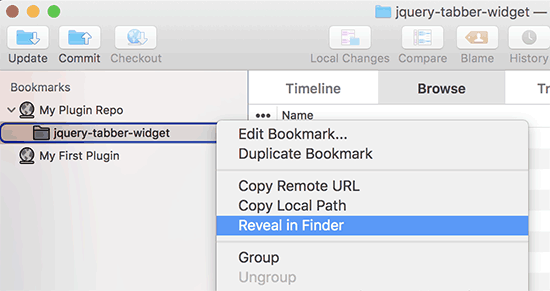
Now you need to copy your plugin files and paste them inside the trunk folder of your local repository.
As you do that, you will notice a question mark icon next to new files in the Versions app.
Since these files didn’t exist before, you need to ‘Add’ them. Select the new files and click on the ‘Add’ button to add these files to your local folder.
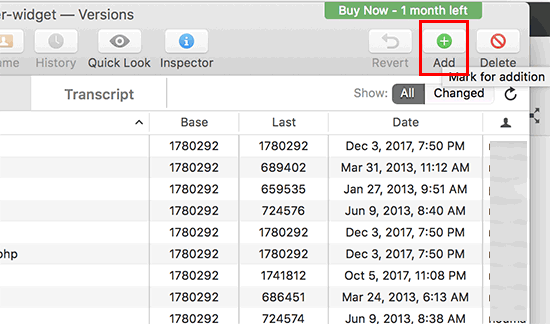
Now that your plugin files are added to the subversion, you are now ready to upload them. Basically, you will be syncing changes in your local folder and the subversion directory.
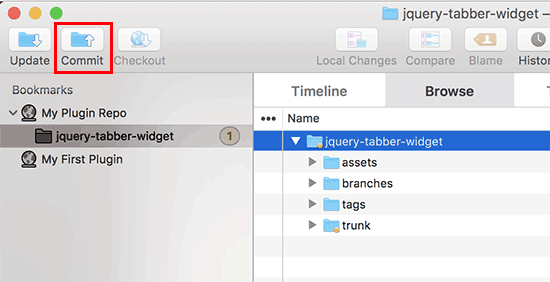
Click on your local repository to select it, and then click on the ‘Commit’ button.
A new popup will appear.
You will see the list of changes and a box to add a commit message. Just click ‘Commit’ to proceed.
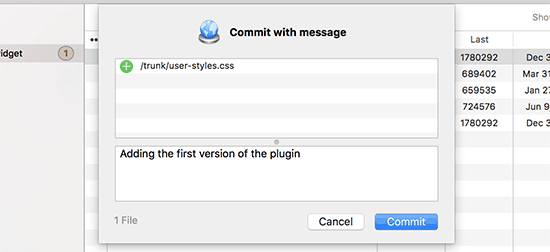
Your SVN app will now sync your changes and commit them to your plugin’s repository.
Now that you have uploaded your plugin files to the trunk, it’s time to tag them to a version.
Go to the local copy of your plugin and copy the files inside the trunk folder. After that, you need to open the tags folder and, inside it, create a new folder.
Name this folder after a version name. Make sure that it matches the version you have entered in your plugin’s header. In the sample code above, we have used version 1.0 for our plugin.
After adding the 1.0 folder in /tags/ folder. You will notice the question mark icon next to the folder name in the Version app.
Since this is a new folder, you will need to click on the ‘Add’ button to include the folder and all its files in the repository.

After that, you can go ahead and click on the ‘Commit’ button to sync your changes. You can continue editing your plugin files in the local copy.
Once you are done with your changes, simply click on the commit button to sync them with the WordPress.org repository.
If you have made some major changes to your plugin, then you’ll want to add a new version by adding a new folder named after the version number. Make sure that the version number matches your plugin’s header.
You can now preview your plugin in the WordPress.org plugins directory.
Adding Artwork to Your Plugin on WordPress.org

WordPress.org allows you to add artwork and screenshots with your plugins. These items need to follow standard naming practices and should be uploaded using Subversion.
Plugin Header Banner
This is the large image that appears at the top of the plugin page. It could be in 772 x 250 or 1544 x 500 pixels in jpeg or png file formats. It should always be named like this:
- banner-772×250.jpg or banner-772×250.png
- banner-1544×500.jpg or banner-1544×500.png
Plugin Icon
This smaller square-shaped image file is displayed as a plugin icon in search results and plugin listings. It could be in 125 x 125 or 250 x 250 pixels in jpeg or png file formats.
This icon file should be named like this:
- icon-128×128.jpg or icon-128×128..png
- icon-256×256.jpg or icon-256×256.png
Screenshots
Screenshot files should be named using the following format:
- screenshot-1.png
- screenshot-2.png
You can add as many as you like. These screenshots should appear in the same order as the screenshot descriptions in your readme.txt file.
Once you have prepared all the artwork, you can place it into the assets folder of your plugin’s local copy.
After that, you will notice a question mark icon next to the assets folder. Click on the ‘Add’ button to add the new assets file to your repository.
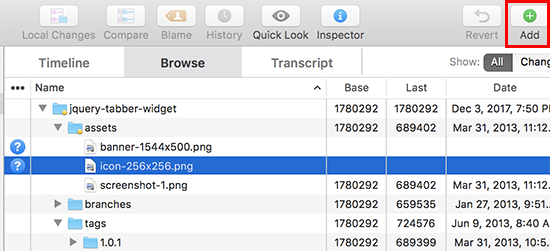
Finally, go ahead and click on the commit button to upload your files to the WordPress.org repository. After a while, you will be able to see the artwork appear on your plugin page.
Ultimate Guides to Learn WordPress Plugin Development
WordPress plugins can be as simple as the one we showed you above. They can also be much more powerful, like an eCommerce plugin, membership plugins, contact form, or photo gallery plugins.
Some powerful WordPress plugins can also have add-ons. These add-ons work like plugins that extend other plugins.
Here are some resources that will help you learn more ways to add functionality to your WordPress plugins:
- Useful WordPress code snippets for beginners
- Adding a shortcode in WordPress
- functions.php file tricks that you can now use in a site-specific plugin
- Creating custom post types and taxonomies
- Properly adding stylesheets and JavaScript in WordPress
We hope this article helped you learn how to create a WordPress plugin. You may also want to take a look at these must-have WordPress plugins and study their source code for more examples or see our guide on how to code a website.
If you liked this article, then please subscribe to our YouTube Channel for WordPress video tutorials. You can also find us on Twitter and Facebook.


Syed Balkhi says
Hey WPBeginner readers,
Did you know you can win exciting prizes by commenting on WPBeginner?
Every month, our top blog commenters will win HUGE rewards, including premium WordPress plugin licenses and cash prizes.
You can get more details about the contest from here.
Start sharing your thoughts below to stand a chance to win!
Onno says
Loved this article. Followed it as an exercise to get into developing a WP plugin. Good overview of the basics without getting distracted with details. The code does need some updating. That helped me helped me exercise my troubleshooting skills
It needs the php tag in the beginning. And there are some convention changes but those are not really relevant for the article.
Thanks for this article and hope I could give something back
WPBeginner Support says
The plugin should have the php tag in our code snippet but thank you for letting us know!
Admin
Dennis Muthomi says
As someone with no coding experience, I found this article on WordPress plugin development to be incredibly helpful and well-explained.
Even though I don’t see myself coding a plugin anytime soon, I managed to understand some key concepts thanks to the clear step-by-step instructions. I especially liked learning about how developers can submit their plugins to the WordPress Plugin Repo.
even though I do not see myself coding one, one thing for sure is that I have learned something new today! Thank you WPBeginner!
WPBeginner Support says
Glad to hear you found our guide helpful!
Admin
mohadese esmaeeli says
How interesting that every feature we have in mind can be created as a plugin and installed in WordPress. I’ve installed the Jannah theme on my site, but it has some shortcodes, and I’m planning to change the theme. With the method you provided, maybe I can keep the shortcodes of the previous theme as a plugin alongside the new theme.
WPBeginner Support says
It would require some coding knowledge but you could look to add the features to your new theme
Admin
maven says
How do you end the plugin code? with this } or what?
WPBeginner Support says
It would depend on the code you are using, you want to use } if there is an opening { that needs to be closed but you do not need a specific end of file marker.
Admin
andrea vironda says
What would happen if I avoid to use “add_filter(‘the_content’, ‘wpb_follow_us’);”?
WPBeginner Support says
If you don’t use that code then the paragraph with your follow links would not be added to the end of the content. The $content is the links to be added and the add_filter is what includes it in the content.
Admin
andrea vironda says
What’s the meaning of “Text Domain” and “Domain path”?
WPBeginner Support says
The Text domain is used to tell where your text is located for translation purposes and must be the same as the folder name.
The Domain path is where translations for your plugin can be found.
Admin
Ritik says
Thanks,
its very helpfull.
WPBeginner Support says
Glad we could show how to create a plugin in a beginner friendly way
Admin
Raja Poudel says
Your explanation is very simple to understand for me as a beginner in wordpress plugin development.
WPBeginner Support says
Glad you found our guide helpful
Admin
Ahroihan says
Hello,
I want to make a plugin, can you give me tutorial about it?
Thank you
mamta says
hi,i’m php developer and wordpress developer.i would like to create custom wordpress plugin.please send tutorials.
Siva says
Hi i am php and wordpress developer, so i want to create custom wordpress plugin
please give me plugin tutorials and help to create plugin.
ramesh ram says
hi,i’m php developer and wordpress developer.i would like to create custom wordpress plugin.please send tutorials.
Marcy says
I’m a virgin programer, but have decided to create my own plug in for a fund raiser thermometer for my adoption blog because none of the ones I’ve found are comparable with my WP version and have what I want on them… and needless to say, I need help, direction, tips, something similar to what I need that I can tweek… etc. Please help ! thanks
suresh says
It’s Good Article and it’s much simple
Shrini says
Good article to learn WP plugin development…
JasonCrews says
WordPressmodder is a viagra site now
rakeshtiwary022 says
hi am php and wordpress developer, so i want to create custom wordpress plugin
please give me plugin tutorials and help to create plugin
email:-rakeshtiwary022@gmail.com
HomeTivi says
hi am php and wordpress developer, so i want to create custom wordpress plugin
please give me plugin tutorials and help to create plugin
MannuSingh says
hi am php and wordpress developer, so i want to create custom wordpress plugin
please give me plugin tutorials and help to create plugin
BanksBen says
I have a limited knowledge of php . I am integrating my old site in to my new wp site my old site is a PHP SQL driven system that collects leads and stores them.My site is http://www.moverscommunity.com/ and http://tsveetech.com
Bagesh Singh says
I am a programmer. From last two days I am trying to create custom plugin and it’s help me better thanks a lot.
Nigel says
Thanks for this great collection of articles. I can’t wait to get started hacking together my own plugin
Dadang Iskandar says
I am very grateful to find this article because I’m learning php programming. very nice brother
John Franklin says
Very nice, I’m a huge fan of WordPress and it’s great to see new really useful plugins getting released. I’ll download and check it out, looks exactly like what I have been looking for for weeks. So, thanks alot!
Kent Tan says
Nice collection of tutorials. Where can I get the more advanced stuff – e.g. creating an options page to configure the plugin etc?
Editorial Staff says
Buy one of the plugin books… Study the Codex, and the Trunk.
Admin
Brad says
Thanks for the article, have always wanted to know a little more about making plugins so now I will give it a try!
Rosti The Snowman says
I think this list will be really helpful
thanks
I also agree you should change the title
Tim Trice says
Two of the first four cover the same function of echoing “Hello World” (the first, at least, let’s you customize the echo statement). I’d like to see some more articles focused on plugin standards, deactivation hooks and removing data from the DB as well as exports.
Joe says
+1 change title
Marco says
Well, I suggest to change the title from “How to Create a WordPress Plugin” to “A list of the best tutorials to help you create your own WordPress Plugin”.
Anwer says
Well that’s good Idea..!!!Agree with you
Nikunj Tamboli says
Nice article will try to create couple of plugin using the article here