
You’ve done it! Your WordPress plugin is ready to go. Now you’re probably wondering how to get it to the plugin repository so that thousands of WordPress users can discover and use it.
At WPBeginner, we maintain several popular WordPress plugins in the official directory. So we know this submission process inside and out, including all the common pitfalls that can delay your plugin’s approval.
The WordPress plugin directory isn’t just a storage space. It’s a bustling marketplace where millions of users search for solutions every day. Getting your plugin listed correctly can mean the difference between obscurity and widespread adoption.
From our experience submitting multiple plugins, we’ve learned that the process isn’t as straightforward as many developers expect. But don’t worry, we’ll walk you through the exact steps to follow when submitting plugins to the WordPress Plugin Directory.
Why Add Your Plugin to the WordPress Plugin Directory?
If you have created a WordPress plugin that you think would be useful to others, then you should consider adding it to the official WordPress plugin directory. This has lots of benefits for you as a developer.
The plugin directory is the first place many users go when looking for plugins for their WordPress site. Adding your plugin to WordPress will make it easier for users to find it and give you greater credibility as a developer.
Plus, you won’t have to pay for the bandwidth required to download your plugin. The WordPress repository will also automatically keep track of how many people have downloaded it and will notify them when there is an upgrade.
The directory will also help you support the plugin. Users can rate your plugin, leave feedback and bug reports, and make use of the support forum.

Of course, there are also some requirements and restrictions. The first is that your plugin must have a license that’s compatible with WordPress. GPLv2 or later is recommended.
There are also some ethical considerations to keep in mind. The plugin must not do anything illegal or morally offensive, and you can’t include links to external websites without first getting the users’ permission.
After you submit the plugin, it will be manually reviewed for common errors and compliance with the WordPress plugin submission guidelines. That process can take between 1 and 10 days.
With that being said, let’s have a look at how to add your plugin to the WordPress plugin directory. Here are the steps we’ll cover:
You can use the quick links above to navigate through this article.
Step 1: Create a readme.txt File for Your Plugin
The first thing you need to do is create a ‘Read Me’ file for your plugin. This will be displayed on your plugin’s page in the plugin directory and needs to use the right formatting.
Here is a sample file you can use as a starting point. You will need to paste it into your text editor and save the file as readme.txt in your plugin folder:
=== Your Plugin Name ===

Contributors: Your WordPress.org Username
Tags: wpbeginner, plugin tutorial
Requires at least: 6.0
Tested up to: 6.2
Stable tag: 1.0
License: GPLv2 or later
License URI: http://www.gnu.org/licenses/gpl-2.0.html

A WordPress plugin to teach beginners how to write a WordPress plugin.

== Description ==

This simple plugin is part of our beginner's guide to writing a WordPress plugin.

== Installation ==

1. Upload the plugin folder to your /wp-content/plugins/ folder.
1. Go to the **Plugins** page and activate the plugin.

== Frequently Asked Questions ==

= How do I use this plugin? =

Answer to the question

= How to uninstall the plugin? =

Simply deactivate and delete the plugin.

== Screenshots ==
1. Description of the first screenshot.
1. Description of the second screenshot.

== Changelog ==
= 1.0 =
* Plugin released.
You will need to customize the file for your own plugin, so we will explain how the WordPress plugin readme file syntax works.
The first line is the ‘Plugin Name’ and will appear in the WordPress plugin directory as your plugin’s title.
The next line is ‘Contributors.’ These are the WordPress.org user IDs responsible for managing your plugin. If you don’t already have a user ID, then you will need to create a free WordPress.org user account.
The ‘Requires at least’ and ‘Tested up to’ fields refer to the WordPress versions your plugin works with. The ‘Stable tag’ is the version of your own plugin.
You can leave the License fields the same. Then, you should edit the ‘Description’ area to explain what your plugin does.
After editing your plugin’s readme file, don’t forget to save your changes. It’s also a good idea to run the file through the official Readme Validator and address any issues that are identified.
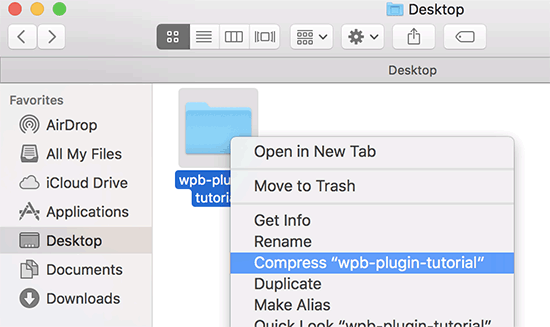
Finally, you should right-click on your plugin folder and create a zip file. Mac users should select ‘Compress [plugin name],’ and Windows users can select ‘Send to » Compressed (zipped) folder.’
Step 2: Submit Your Plugin to the Directory for Review
Now, your plugin is ready to be reviewed by WordPress.org’s plugins team.
To submit it, visit the Add Your Plugin page. If you are not already logged in, then click on the ‘Log in’ button in the top right corner of the screen.

Once logged in, you will be able to upload and submit your plugin for review.
Simply click on the ‘Select File’ button to select your plugin’s zip file. And then, check all of the boxes that apply and click on the ‘Upload’ button.

The WordPress.org plugin review team will then take a look at your plugin code for common errors and security checks. Once approved, you will receive an email from the plugins team.
This email will contain a link to the Subversion (SVN) repository where your plugin will be hosted on WordPress.org. You will need to use this link when you upload your plugin.
Step 3: Upload Your Plugin Using Subversion (SVN)
Once your plugin is approved, you will need to use Subversion (SVN) to upload the plugin.
Subversion is an open-source version control system. It allows users to make changes to files and directories while keeping a record of changes, managing different versions, and collaborating with other users.
You will need an SVN client installed on your computer to upload your plugin. Windows users can use SilkSVN or TortoiseSVN (free). Mac users can install SmartSVN or the Versions app on their computers.
In this article, we will use the Versions app for Mac. However, the process is very similar in all the SVN apps listed above.
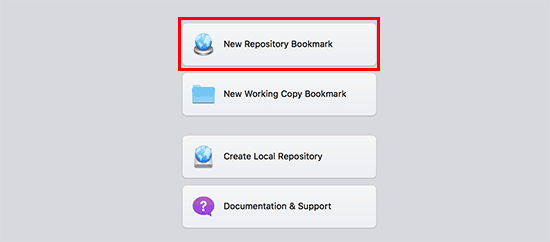
Once installed, you need to open the Versions app and check out a copy of your WordPress plugin’s repository. To do that, simply click on the ‘New Repository Bookmark’ button.
This will bring up a popup where first, you need to provide a name for this bookmark. You can name it after your plugin. After that, you need to add your WordPress plugin’s SVN repository URL.
You can leave the username and password fields blank.
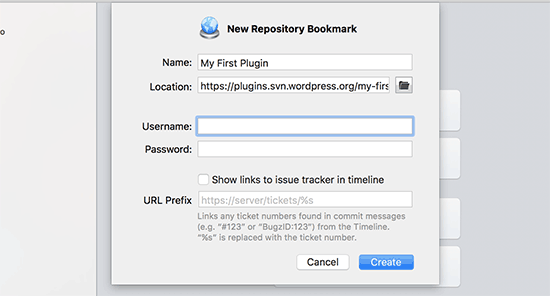
Now, you should click the ‘Create’ button. Versions will connect with your repository and download a copy of your plugin’s repository to your computer.
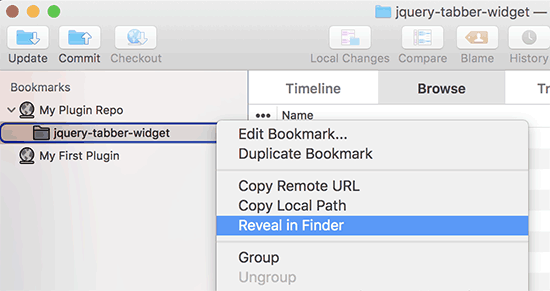
Next, you need to right-click on the repository name in the browser view and then select ‘Checkout’.

You will be asked to provide a name for the folder and select a location where you want to store it on your computer. You can use the same folder name as your plugin directory and click on the ‘Checkout’ button to continue.
The Versions app will now create the folders needed for your plugin on your computer. You can view it in your plugin’s repository or browse it in Finder.
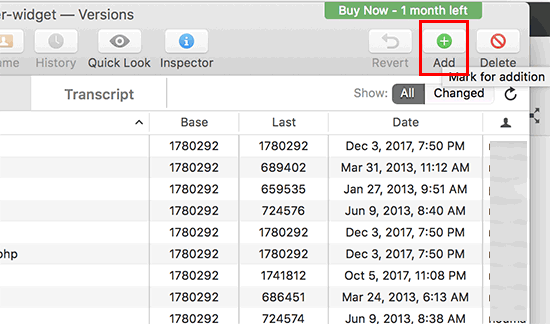
Now, you need to copy your plugin files and paste them inside the trunk folder of your local repository.
As you do that, you will notice a question mark icon next to new files in the Versions app.
Since these files didn’t exist before, you need to add them. Select the new files and click on the ‘Add’ button to add these files to your local folder.
Now that your plugin files are added to Subversion, you are ready to upload them. You do this by syncing changes in your local folder and the subversion directory.
You should click on your local repository to select it and then click on the ‘Commit’ icon.
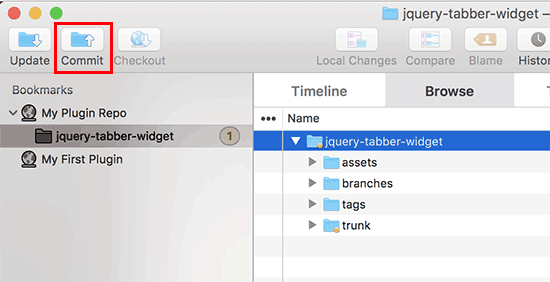
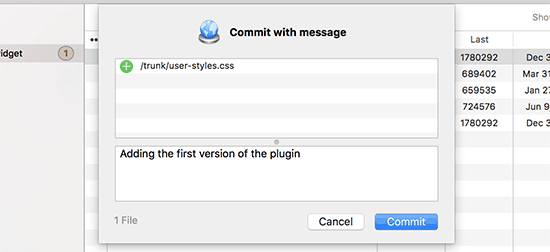
A new popup will appear, and you will see the list of changes and a box to add a commit message.
Once you click the ‘Commit’ button, the Versions app will sync your changes and commit them to your plugin’s repository.
Now that you have uploaded your plugin files to the trunk, it’s time to tag them to a version.
Go to the local copy of your plugin and copy the files inside the trunk folder. After that, you need to open the tags folder and create a new folder inside it.
Name this folder with a version name. Make sure that it matches the version you have entered in your plugin’s header. In the sample code above, we have used version 1.0 for our plugin.
After adding the 1.0 folder, you need to paste your plugin files inside. Since this is a new folder, you will also need to click on the ‘Add’ button to include the folder and all its files in the repository.
After that, you can go ahead and click on the ‘Commit’ icon to sync your changes as you did earlier. You can now visit the WordPress plugins directory and preview your plugin.
Whenever you need to edit your plugin files, you should edit the local copy. Once you are done with your changes, simply click on the ‘Commit’ icon to sync them with the WordPress plugin directory.
When you have made major changes to your plugin, you will want to add a new version by adding a new folder with that version number to the tags folder. Make sure that the version number matches your plugin’s header.
Step 4: Add Artwork to the WordPress Plugin Directory

Now, we can add some artwork and screenshots to the WordPress plugin directory. These items need to follow standard naming practices and should be uploaded using Subversion.
Plugin Header Banner
The header banner is the large image that appears on top of the plugin page. Its size should be 772×250 or 1544×500 pixels, and you should use the JPEG or PNG file format.
Depending on the size of your image and the file type, you will need to give your header banner one of these names:
- banner-772×250.jpg
- banner-772×250.png
- banner-1544×500.jpg
- banner-1544×500.png
Plugin Icon
The icon is a smaller square image and will be displayed in search results and plugin listings. Its size should be 128×128 or 256×256 pixels, and you should use the JPEG or PNG file format.
Depending on the size of your image and the file type, you will need to give your icon one of these names:
- icon-128×128.jpg
- icon-128×128.png
- icon-256×256.jpg
- icon-256×256.png
Screenshots
You can add as many screenshots as you like. These screenshots should be listed in the screenshot descriptions in your readme.txt file.
Screenshot files should be named like this:
- screenshot-1.png
- screenshot-2.png
Once you have prepared all the artwork, you can place it into the assets folder of your plugin’s local copy.
After that, you will notice a question mark icon next to the assets folder. You will need to click on the ‘Add’ button to add new assets files to your repository.
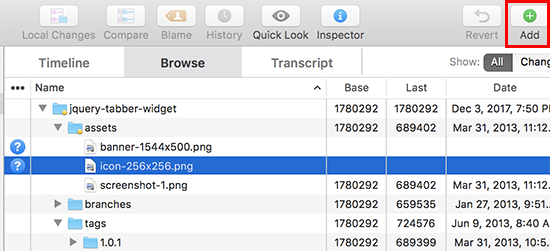
Finally, go ahead and click on the ‘Commit’ icon to upload your files to the WordPress plugin directory.
After a while, you will be able to see the artwork appear on your plugin page.
Bonus: Resources for WordPress Plugin Developers
If you’re looking to further your WordPress development journey, here are some valuable resources:
- How and Why You Should Leave Reviews on WordPress – Discover the importance of community feedback and learn how to contribute meaningful reviews to other plugins.
- How to Make New Feature Suggestions for WordPress – Learn how to effectively propose new features to the WordPress core, contributing to the platform’s evolution.
- WordPress Career Options – How to Make a Living With WordPress – Explore various career paths in the WordPress ecosystem, from plugin development to theme design and beyond.
- Most Successful WordPress Businesses and Companies Today – Get inspired by success stories in the WordPress world and see what’s possible with dedication and innovation.
We hope this tutorial helped you learn how to add your plugin to the WordPress plugin directory. You may also want to check out our pick of the best WordPress development agencies and our ultimate guide on how to use the WordPress app on the iPhone, iPad, and Android.
If you liked this article, then please subscribe to our YouTube Channel for WordPress video tutorials. You can also find us on Twitter and Facebook.
")


Jorian
Thanks for this article! My question is, do they still approve new plugins, or do they only update existing ones?
I tried to get my plugin approved, but they sent me a long list of errors from an automated bot. Interestingly, most of the errors that caused my plugin to be rejected are found in most well-known plugins (if you check them with the PCP plugin).
It felt like a veiled message saying: we are not interested in your plugin.
WPBeginner Support
New plugins are still approved. For existing plugins they will more slowly require the same as other plugins, with the size of some popular plugins it will take time for older plugins to come into compliance and the repository is giving developers time to update their plugins safely.
Admin
Matthew
You have typos in the icon size, the file names are correct but its 128×128 not 150×150, and 256×256 not 250×250 for the actual image dimensions.
WPBeginner Support
Thank you for spotting that, we’ll be sure to fix the typo
Admin
Jiří Vaněk
You did a great job describing what is, for me, a rather complex process of adding a plugin to the repository. I haven’t created a plugin myself yet, but I was interested in this article mainly to get an idea of how the process works. I was also very interested in whether plugins are tested for security flaws or issues. You explained that very well. Thanks a lot.
Mrteesurez
I have created a simple plugin to upload to the plugin directory, this guide will help to proper upload it to get it approved but I am yet to create a readme file. I will use the format you gave here. thanks.
WPBeginner Support
You’re welcome, glad our guide could help you set up your readme
Admin
Jindo Nguyen
Thank you !.
You helped me solve the issue when uploading my first plugin. Your guide really easier than using the command line.
This is my new plugin which approval some months ago based on your article.
Mo a
What happens after the plugin is uploaded for the first time? How long should I expect to wait before I can find it on Wordpress.org and download it directly via the Wordpress plugin search?
Thank you for a great article!
Ralph
When trying to upload my plugin files via Tortoise’s SVN Commit option, the commit was blocked because of the following error: “Please provide the commit message that describes the changes you are making.”
It was easily fixed by entering “First commit.” in the “Message” box (below the “Recent messages” button) of the Commit dialog.
Thanks for the tutorial!
Parth
I have created wordpress plugin
I want to host it into wordpress.org
Can anyone let me know what should be the value of license?
I want to make it free
What should i write in licese for readme.text file
WPBeginner Support
You can add these two lines to the header of your plugin’s readme.txt file
1-click Use in WordPress
Admin
Ralph
I simply left the license line out of the readme file… WP will then assume your plugin is licensed under the default GPLv2 license, which is fine in most cases.
mihir
Hi i tried to checkout and getting errors which i mentioned in this Q – http://stackoverflow.com/questions/20313760/unable-to-connect-to-wordpress-repository-url-by-tortoise-svn please help.
Haseeb Ahmad Ayazi
A very well-explained post for those who are newbies in wp development like me .
Keely
Wish I could find a SIMPLE tutorial on this – nobody seems to want to explain it REALLY SIMPLY. I hate getting irritated when I’m doing something new.
wpbeginner
@mrahmadawais When it is your first time, then you will SVN all folders…. tags, trunk, branches….
But once that is done, you only need to commit the changes that are needed.
mrahmadawais
@jdblundell can you tell me a bit
mrahmadawais
can someone elaborate me the last step? when we upload through svn ? what should we upload which folder?
jdblundell
Thanks for this! I had one dickens of a time trying to upload my plugin (http://casadeblundell.com/jonathan/wordpress/) originally and after I upgraded it last I haven’t been able to post the latest version.
I’ll have to walk through this and see what I’m missing – although the only real change is that the plugin works with the latest WordPress version.