At WPBeginner, we always add screenshots to our articles because they make things more engaging and easier to follow.
By adding screenshots to your WordPress blog posts, you can visually show step-by-step instructions, highlight specific features, or provide visual context to advanced topics.
This can improve search engine rankings, knowledge retention, and the user experience.
In this beginner’s guide, we will show you how to take a screenshot for your WordPress blog posts, step by step.

The Benefits of Taking Screenshots for Your Blog Posts
Adding high-quality screenshots to your WordPress blog can make your content more engaging. These are screen captures or snapshots of whatever is on your mobile or desktop screen.
You can use screenshots for a tutorial and guide users step by step. This way, people will know exactly where to click and what to enter when setting up software or plugins.
Similarly, you can use screenshots for a roundup or list post. For example, let’s say you are writing about the best email marketing tools. You can take screenshots of each tool’s homepage and show them in your content.
Since there are so many different ways to take a screenshot, we have created a step-by-step guide on how to take a screenshot for your own blog on different devices and apps. You won’t even need to use a WordPress plugin for it.
To make it easy for you, we have also created a table of contents below so you can quickly find the method that applies to you:
How to Take a Screenshot Using Droplr
Droplr is a popular screen capture app. It allows you to easily take a screenshot on your computer and share it.
Droplr automatically saves the screenshots and screen recordings to the cloud and provides a link to share with others. Plus, you can manage all your screenshots from a dashboard and share the quality content on any platform, including WordPress.
It works great with Mac, Windows, and Chromebook devices to quickly capture a selected area or entire screen. There is also a Chrome extension, so you can quickly take screenshots from your browser.
Droplr also integrates with popular apps like Slack, Microsoft Teams, Gmail, Adobe Photoshop, and more.
Taking Screenshots Using Droplr Desktop App
To take a screenshot using Droplr, you will first need to install the app for your preferred device. After that, you can click the Droplr icon in the Mac menu bar or the Windows Taskbar.
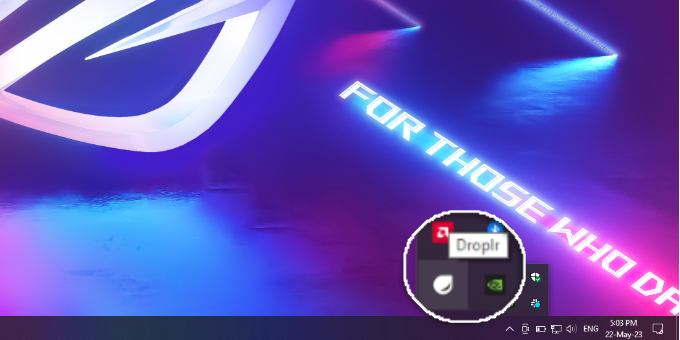
From here, simply click the ‘Screenshot’ option.
If you are a Mac user, then you can also press ‘Option + Shift + 4’ to capture the screenshots. You can press ‘Alt + Shift + 4’ on Windows to take a screenshot with Droplr.
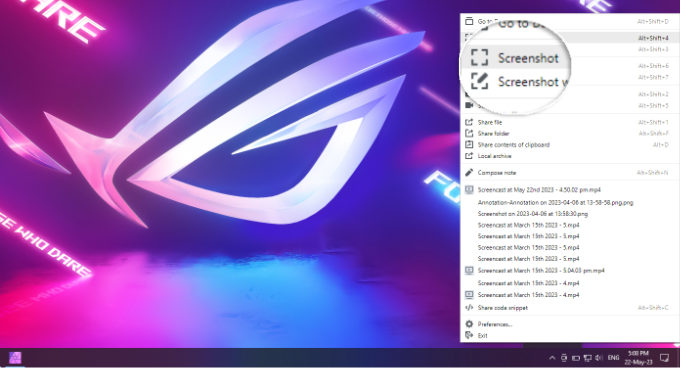
Next, you need to select the area you’d like to take a screenshot of.
Droplr will open the screenshot in a browser window as soon as you are done. Here, you can download the image or share the link with others.
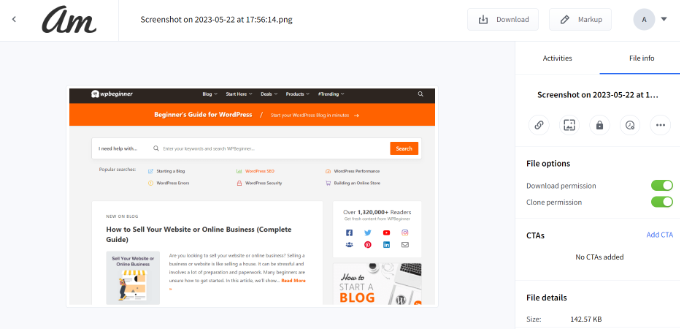
If you click the ‘Markup’ button at the top, then you will find options to edit the screenshot.
For instance, you can add arrows to point at a button or an important feature. You can also draw shapes, add emojis, blur different parts of the image, add text, and more.
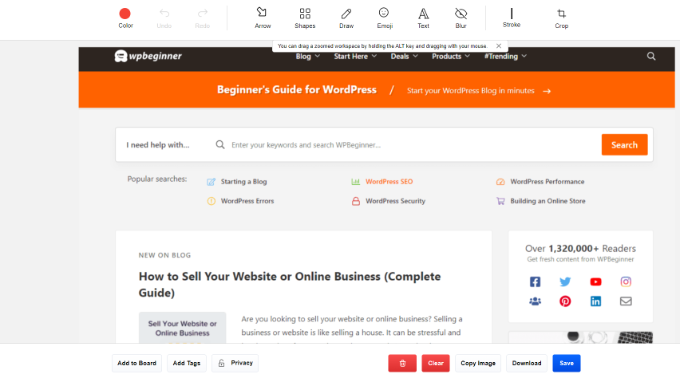
Once you are done, simply save the image or download it. Once that is done, add it to your blog content.
Taking Screenshots Using Droplr Chrome Extension
You can also use the Droplr Chrome extension to take screenshots and screen recordings. The extension works just like the desktop app, and you can easily access it from the Chrome extension toolbar.
First, you will need to install the Droplr extension by visiting the Chrome web store.
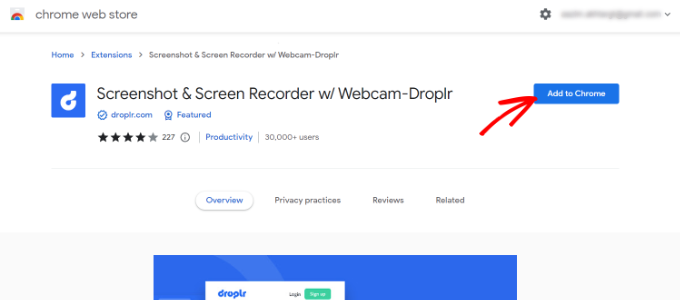
Then, click on ‘Add to Chrome’.
Once the extension is added, you can click on the Droplr icon from the toolbar at the top of your browser.
Next, you can screenshot a selected area, application window, full screen, or entire page.
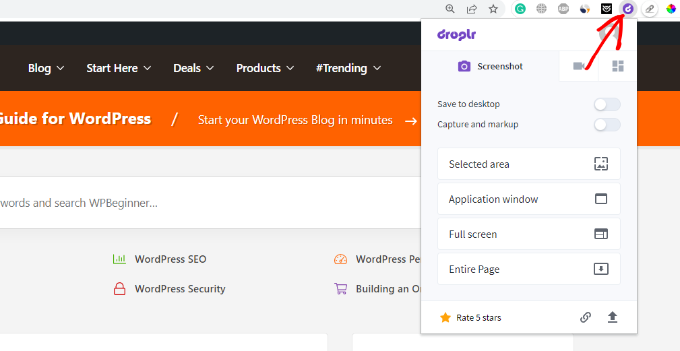
After taking a screenshot, Droplr will open the image in a new tab with a link that you can share.
Droplr also allows you to create a video screencast to create quick tutorials with audio. Simply click the Droplr icon in your browser’s menu bar and select the TV icon to record your screen.
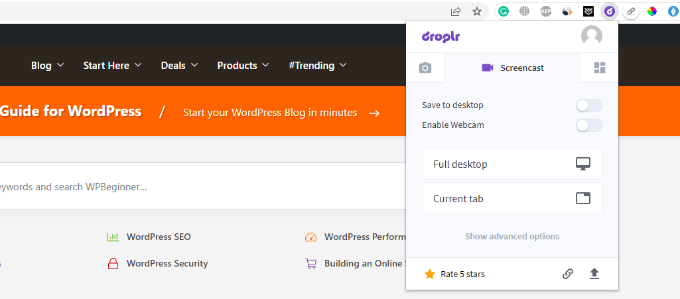
If you choose the ‘Full desktop’ option, then you will need to select which window to record. On the other hand, you can use the ‘Current tab’ option and screencast your browser tab.
How to Take a Screenshot on Mac
If you are using a Mac device and want to take a screenshot for your first blog post, then there are several options.
On Mac devices, you can capture the entire screen, a selected portion of your screen, a specific window, and more.
To take a screenshot of the entire screen on a Mac device, simply press ‘Shift + Command + 3’, and it will capture your screen.
If you want to capture a selected portion, then press ‘Shift + Command + 4’. Next, click and drag the crosshair (pointer) to take a screenshot of the selected area.

If you want to take a screenshot of a specific window, then press ‘Shift + Command + 4’ and also press the ‘Space bar’ on your keyboard.
You will see that the pointer will change into a camera icon. Simply drag the camera icon on a window to highlight and capture it.
☝ Note: Not all apps will allow you to take a screenshot of their window. In that case, you can take a screenshot of the selected portion and crop it.
By default, all the screenshots will be saved on your desktop with the capturing time/date as the filename and .png as the file extension.
How to Take a Screenshot on Windows
To take a screenshot on Windows devices, you will need to press the ‘PrtSc’ keys on your keyboard. This will capture the entire screen.
Next, you can open this screenshot in image editing software like Adobe Photoshop or Affinity Photo, crop the required area, and save it on your computer.
Another way of taking screenshots is by using the Snipping tool that comes pre-installed in Windows.
The tool lets you capture a specific part of your screen and automatically save it to a clipboard.
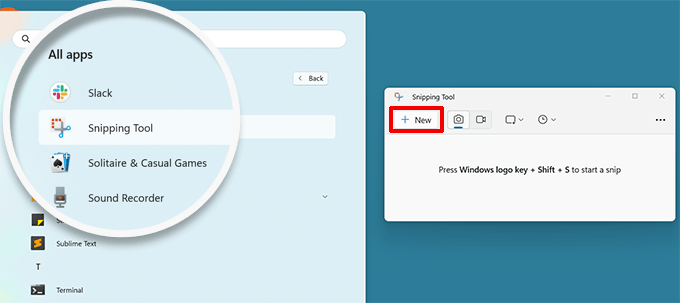
Another way to take screenshots in Windows is by pressing the ‘Windows + Shift + S’ keys to start taking screenshots with the Snipping tool.
Next, click and drag the pointer to select an area on your screen. It will capture the screenshot automatically when you release the right click.
Since the screenshot is saved to a clipboard, you can paste it into any image editing software like Adobe Photoshop for further changes and then save it on your computer.
How to Take a Screenshot on Chromebook
In Chromebook, you can simply click the Screenshot key with a camera icon. This will take a screenshot of your entire screen or a selected area.
Besides that, you can click the Quick Settings option in the right corner and then select the ‘Screen Capture’ option.

After that, you need to choose whether you’d like to capture the entire screen or a selected area.
Once you have taken a screenshot, it will be automatically copied to the Clipboard.
If you are using Chrome OS 64.0.3282.134 or later, then you can simply press the ‘Power + Volume Down’ buttons to capture your entire screen.
To take a screenshot of a selected area, you need to press the ‘Ctrl + Shift + Switch Window’ keys. Then, click and drag the crosshair (pointer) to select the area that you want to capture.
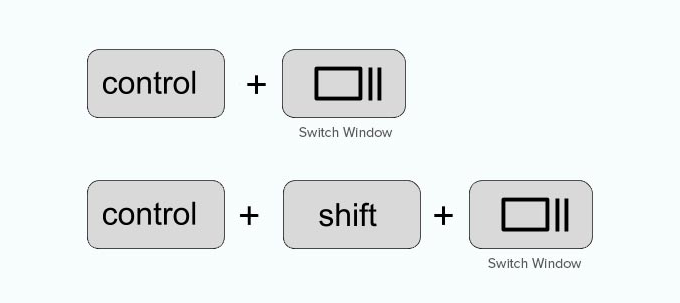
Upon releasing the click, you will see a notification in the bottom right corner of your screen that shows your screenshot is saved in the ‘Downloads’ folder.
If you are using a Chromebox with an external (general) keyboard attached to it, then press ‘Ctrl + F5’ to take a screenshot. The F5 key will function the same as the ‘Switch Window’ key on a Chromebook.
How to Take a Screenshot on iPhone
Taking a screenshot on iPhones and other smartphones is actually quite simple.
If you are using an iPhone X or higher, then you need to open your blog post or the app on the screen. After that, simply press the ‘Side’ button on the right side and the ‘Volume Up’ button on the left side of your phone.
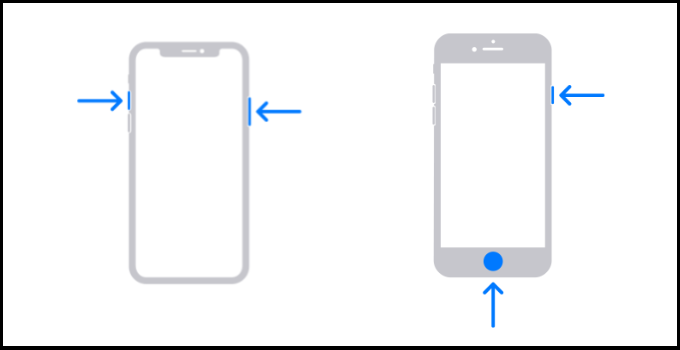
Make sure that you press both buttons at the same time. This will take a screenshot of the screen and save it to the ‘Screenshots’ folder on your phone.
If you are using an iPhone 8 or earlier model, then open the screen that you want to capture. Then, simply press the ‘Power + Home’ buttons at the same time to take a screenshot.
How to Take a Screenshot on Android Phone
There are many different phone manufacturers that sell smartphones with Android OS (such as Samsung Galaxy, Motorola, Google Pixel, etc). However, most new devices follow the same universal process to take a screenshot.
On your Android phone, you need to open the screen that you want to capture. Next, press the ‘Power + Volume Down’ buttons together.
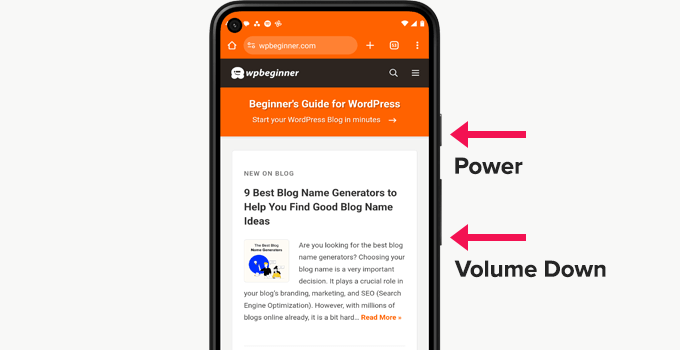
This will take the screenshot and save it in your photo gallery.
We hope this article helped you learn how to take a screenshot for new blog posts on your WordPress website. You may also want to see our expert picks for tools to create better images for your blog posts and our ultimate guide to image SEO.
If you liked this article, then please subscribe to our YouTube Channel for WordPress video tutorials. You can also find us on Twitter and Facebook.


Dennis Muthomi
Thanks for this!
I especially love the Droplr section. I was aware of native screenshot tools but hadn’t thought of using a dedicated app for this.
Being able to edit and markup screenshots in the browser is a total game changer for my workflow.
Jiří Vaněk
Windows 11 no longer requires the shortcut Windows + Shift + S as you mention in the article. Since a certain update, Microsoft changed the functionality of the Print Screen key. Now, simply pressing the PrtScn key launches the Snipping Tool automatically, without needing the keyboard shortcut. You can then make a selection of the part you need, and it will automatically be saved to the clipboard. The classic print screen no longer works and this new function is triggered instead. It’s simpler and eliminates the need to remember the long keyboard shortcut. Just for your information.
Mrteesurez
Fine, thank you for the information you shared with us. The new updates that comes with simply pressing the PrtScn key is really helpful and making things faster than ever. Everyone has to learn this. Thanks.
Mrteesurez
Nice post, This showed you really care for your users, for publishing these kind of posts just to make everything possible and easy for bloggers and WordPress users generally.
This post is helpful, it helped me discovered some new ways and methods to take screenshots for my website. Thanks.
WPBeginner Support
You’re welcome, glad we could share some recommended methods
Admin
A Owadud Bhuiyan
I am using the light shot.
The main benefit I am getting is sharing links for the screenshot.
What’s your option regarding a light shot?
WPBeginner Support
We have not tested that at the moment but we would recommend having your images on your site itself instead of embedding from external sites when able
Admin
A Owadud Bhuiyan
Thanks for your recommendation, I never thought about it.
Jiří Vaněk
In Windows 10, I used the classic screenshot method – essentially, using the Print Screen and pasting it into a drawing tool or atc. That was quite cumbersome. Now, with the new screenshot feature in Windows 11, I’ve become so accustomed to it that it significantly eases my work. I use the Print Screen function every day, both at work (as a technician in a data center communicating with people) and while writing my blog. It’s probably the most frequently used function for me in Windows, along with Ctrl+V and Ctrl+C
Ralph
All this years and I didn’t even know windows have snipping tool option. I used to press prtsc and crop it in paint. It is 10 seconds but still… over the years this is horrible waste of time. Thank you for that info. This hits hard…
WPBeginner Support
Glad we could share this helpful tool
Admin
Jiří Vaněk
In Windows 11, the classic print screen has already been replaced by snippings, and it’s great. So Windows 11 automatically turns on snippings tool on the printscreen button.
Ahmed Omar
I was using print screen button or snipping tool in windows for loooong time.
No this will help me, more easy and efficient
Thank you from Heart
WPBeginner Support
You’re welcome
Admin
Moinuddin waheed
I have mostly used snipping tool to take the snapshot for the desired portion of the screen for my blog posts especially the tutorials or guide.
I have realised that in each of your posts there are multiple screen shots to make the description self elaborative and it makes engaging and easy to understand.
The Android part is this tutorial is especially helpful.
WPBeginner Support
Glad our guide was helpful
Admin
Susan Slater Morris
About 25 years ago I had to update some workbooks for Word and Excel. I used the print screen key then alt and v to paste the screenshot into word. I would then crop the image in word. Eventually, I found out that if I used alt and print screen together while a dialog box was on the screen it would only take a screen shot of the dialog box. That saved a lot of time.
WPBeginner Support
Thank you for sharing the tricks you used!
Admin
Pbd.news
Knowledgeable guidelines
WPBeginner Support
Thank you
Admin
Md Shahidullah
I love your blog and dairy i read your post. I started a blog site for bangladeshi reader. Can i translate your post in bangla?
WPBeginner Support
Hi Md Shahidullah,
We would appreciate if you only translate an excerpt of the article with a link back to the original article.
Admin
Florin
I was wondering if taking a picture of my computer screen that shows a copyrighted photograph will be considered copyright infringement? Same for the screenshot of a newspaper page let’s say.
Ryan M
I love Cloudshot for Windows. It’s totally free and allows me to upload to the internet with one click. I can also do instant editing before uploading or saving locally.
Bob Hatcher
I probably do a dozen screen shots a week on a PC. the Ctrl-PrintScreen combo works best. But, BY FAR the easiest graphics program is IrfanView. It’s a snap to paste the image in and then select the piece you want. GET IRFANVIEW.