Connecting Slack with WordPress can significantly enhance your website management workflow. This integration allows you to receive real-time notifications about important events on your site directly in your Slack channels.
Whether it’s a new sale on your WooCommerce store, a customer support request, or a comment on your latest blog post, Slack can keep you instantly informed. This helps you stay on top of your WordPress site’s activities and respond promptly to user interactions.
In this article, we’ll show you how to easily integrate Slack with WordPress and set up automated notifications for your site.

Why Integrate Slack with WordPress?
If you use Slack as your work communication platform, then you may want to integrate it with WordPress to get automated notifications about your website right in Slack.
For example, you can set up workflows that automatically post to Slack every time:
- A customer asks for help via email or live chat
- A lead submits a quote request form
- A writer updates a post on your blog
- A customer purchases something from your online store
- A visitor registers for your online webinar
- A student signs up for a new course on your membership website
Here’s what an automated WordPress notification may look like in Slack:
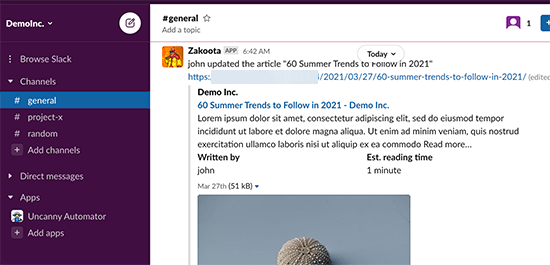
At WPBeginner, we use Slack for all our teams, and we have many Slack notifications that allow us to respond to important events quickly. This saves us time, effort, and money while also improving the visitor experience and helping us spot any security threats.
With that in mind, let’s see how you can easily integrate Slack with WordPress. You can use these quick links to navigate through the steps:
Video Tutorial
If you prefer written instructions, then just keep reading.
Step 1: Install Uncanny Automator and Connect It With Slack
The easiest way to connect Slack with WordPress is by using Uncanny Automator. It is the best WordPress automation plugin that helps you create automated tasks and workflows without writing any code.
Uncanny Automator acts as a bridge so you can get different WordPress plugins talking to each other. For example, whenever someone completes a form, Uncanny Automator can automatically add them to your email list.
There is a free Uncanny Automator plugin that lets you automate many common tasks and connect them with Slack.
However, if you want to use Uncanny Automator for WooCommerce workflows, you will need the Pro version, which is what we’ll use for this guide.
The first thing you need to do is install and activate the Uncanny Automator plugin. For more details, see our step-by-step guide on how to install a WordPress plugin.
After that, you need to head over to Automator » Settings and enter your license key. Then, click on ‘Activate license.’
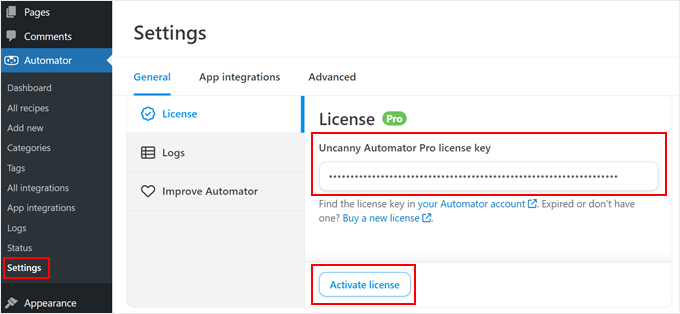
Now that Uncanny Automator is set up, let’s connect it to your Slack workspace by clicking on the ‘App Integrations’ tab.
In the left-hand menu, select ‘Slack’ and then click on ‘Connect Slack workspace.’
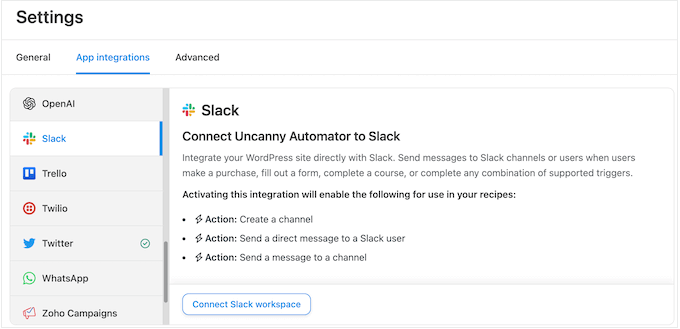
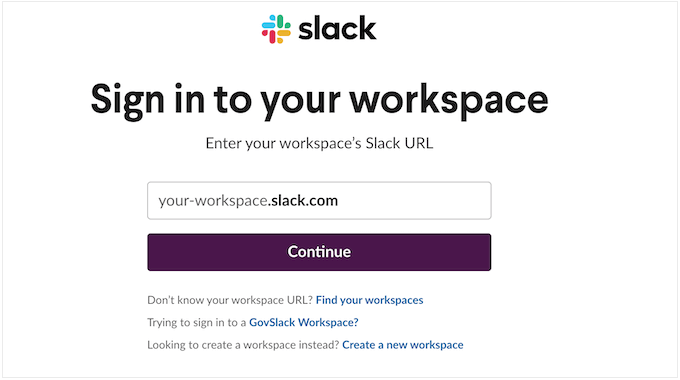
This opens a screen where you can sign into your Slack workspace.
Simply type in the workspace you want to use, then click ‘Continue.’
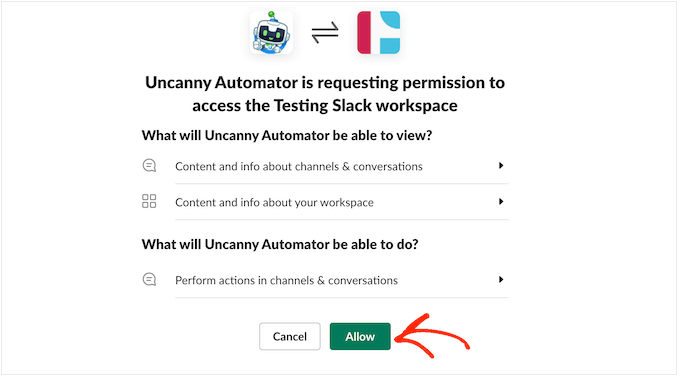
After choosing a workspace, Uncanny Automator will show some information about the data it will have access to and the actions it can perform in your Slack workspace.
If you are happy to go ahead, then click on ‘Allow.’
This will take you back to the Slack settings page on your WordPress website with a message confirming that Uncanny Automator now has access to Slack.
You will also see a preview of how Uncanny Automator’s messages will appear in Slack.
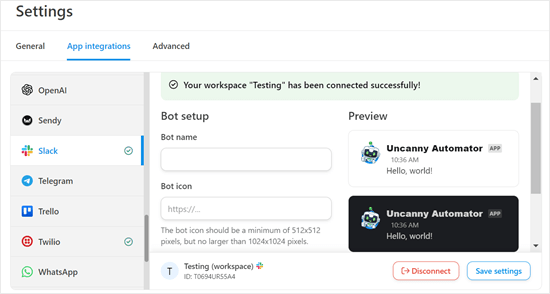
If you want, you can change the bot name and icon using the settings under ‘Bot setup.’
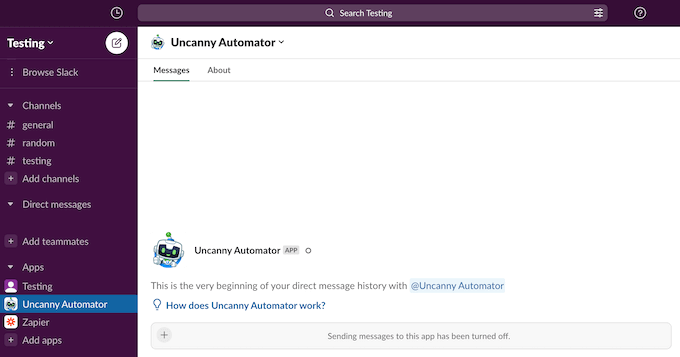
You have now successfully connected your WordPress blog or website to Slack. If you visit your Slack workspace, then you will see Uncanny Automator in the sidebar.
Step 2: Create a WordPress or WooCommerce Automation Recipe for Slack
You are now ready to create an automated workflow in WordPress. In this section, we will show you how to set up automation recipes for WordPress and WooCommerce.
Creating a WordPress Automation Recipe for Slack
To get started, go to Automator » Add New. You will be asked whether you want to create a ‘Logged-in’ recipe or an ‘Everyone’ recipe.
Logged-in recipes can only be triggered by logged-in users, such as people who have access to your WordPress admin. On the other hand, anyone like visitors to your website can trigger ‘Everyone’ recipes.
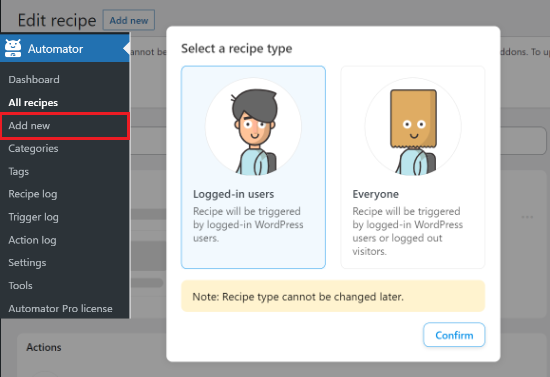
As an example, we will create a recipe that publishes a Slack notification every time someone updates a post on your WordPress blog. With that in mind, you must choose ‘Logged-in users’ and then select ‘Confirm.’
Next, type in a title for the recipe. This title is just for your reference, so you can use anything you want.
Each Uncanny Automator recipe has two parts: triggers and actions.
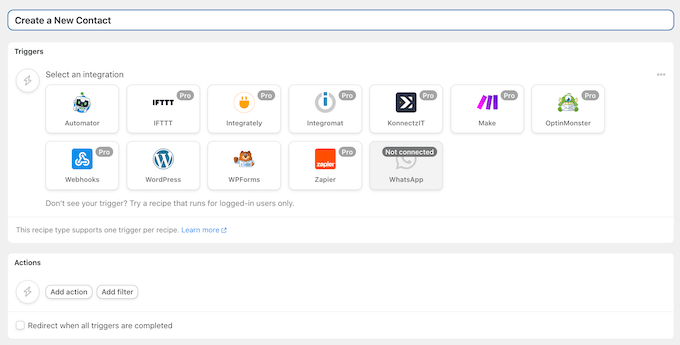
A trigger is any event that starts the automated workflow, such as someone buying a product in your online marketplace. Actions are the tasks the recipe will perform, for example, posting a new message to Slack.
First, you need to set the trigger part of the recipe by choosing an integration.
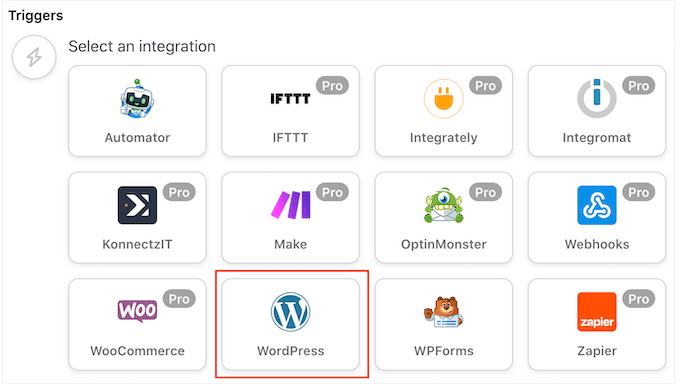
Uncanny Automator will automatically detect any integrations that you have already installed on your website. As you can see in the image below, it has automatically detected WordPress Core, OptinMonster, WooCommerce, and WPForms.
To start, simply click on the ‘WordPress’ integration.
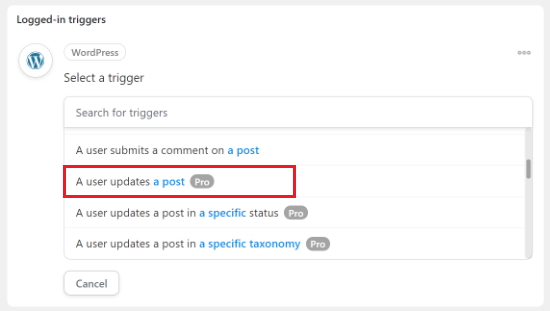
Next, you need to select the event that will trigger the recipe.
Go ahead and choose ‘A user updates a post’ as the trigger event.
Next, you can choose the post types that will trigger the recipe. Since you only want to notify Slack when a blog is updated, open the ‘Post Type’ dropdown and select ‘Post.’
Do you only want to get notifications for a specific blog post? Then, simply open the ‘Post’ dropdown and choose from the list.
If you want to get notified about all blogs, set ‘Post’ to ‘Any post.’
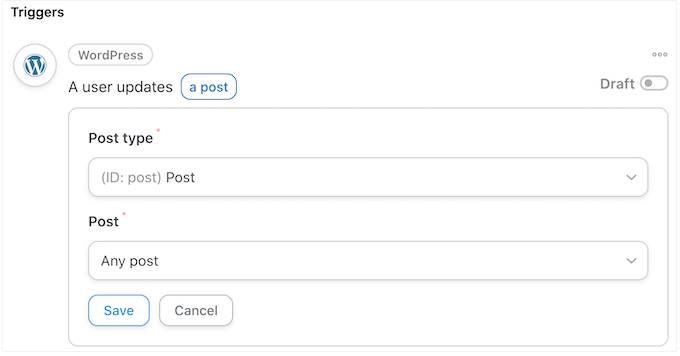
After that, click on the ‘Save’ button.
Once you have set the trigger event, the next step is configuring the action. Simply click on the ‘Add action’ button to continue.
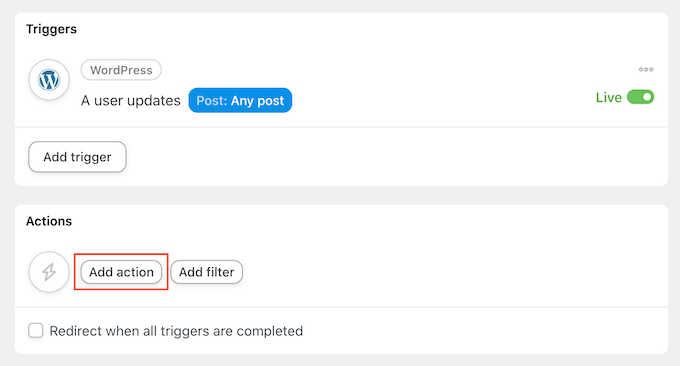
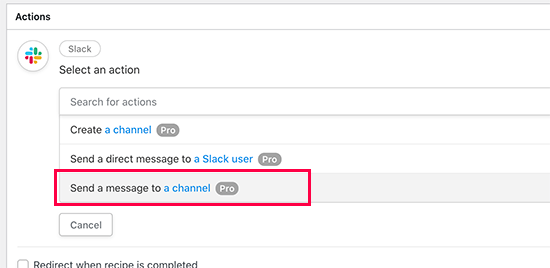
You can now choose ‘Slack’ as your integration.
With that done, you need to choose an action event. Simply go ahead and select ‘Send a message to a channel.’
You can now open the ‘Slack Channel’ dropdown and choose where Uncanny Automator will send the message.
After that, type the message into the ‘Message’ box.
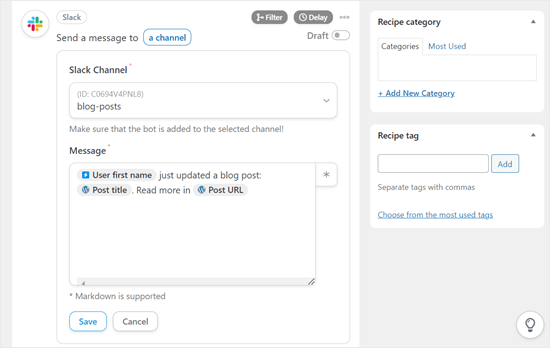
You can use plain text and tokens, which Uncanny Automator will replace with real values. For example, you will usually want to add a link to the new post so that Slack users can visit it easily.
To add a token, simply click on the ‘*’ symbol. Then, click on the trigger action, which, in this case, is ‘A user updates any post.’
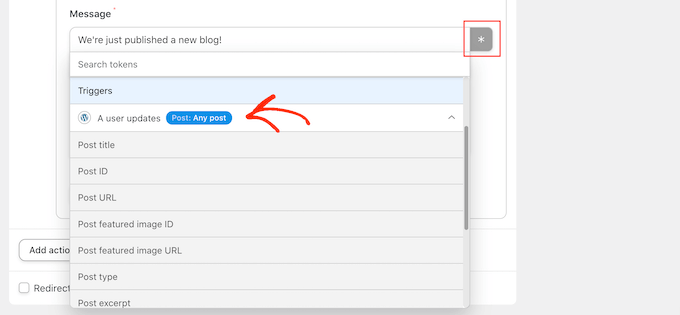
You can now click to add a token to the message.
When you are happy with the message, click on the ‘Save’ button to store your changes.
Creating a WooCommerce Automation Recipe for Slack
Uncanny Automator works with all of the must-have WordPress plugins, including WooCommerce. If you run an eCommerce store, then you want to be notified about new orders so you can start processing them right away.
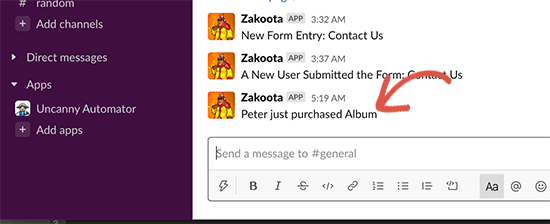
Let’s create a recipe that posts to Slack whenever a customer buys a product in your WooCommerce store.
The same as before, select a recipe type to get started. Then, type in a title for your recipe and choose WooCommerce as the trigger.
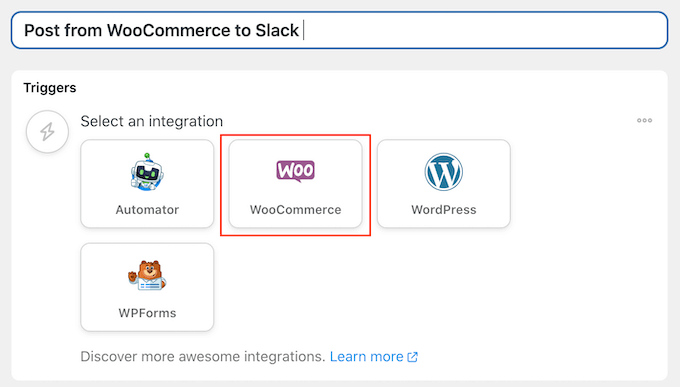
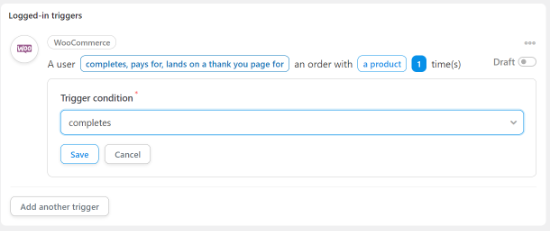
In the Trigger dropdown, choose: ‘A user completes, pays for, lands on a thank you page for an order with a product’.
You can then open the ‘Triggers’ dropdown and choose ‘Completes.’
After that, go ahead and click on the ‘Add Action’ button.
Next, simply choose ‘Slack’ as your integration.
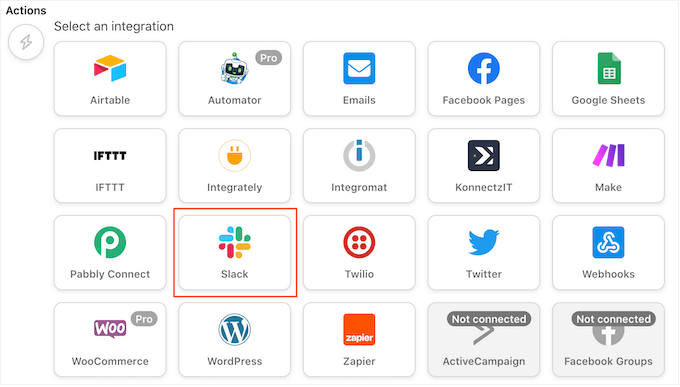
Just like before, select ‘Send a message to a channel’ as your action and choose the channel where you want to post the notifications.
For example, in the following image, we are posting to a channel called ‘General.’
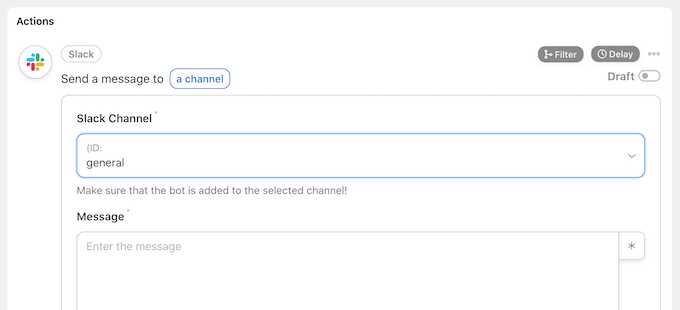
After that, you can create the message you want to post.
You can type in plain text or add tokens by clicking on the ‘*’ button.
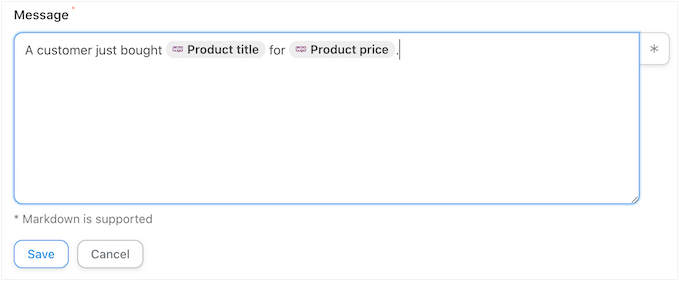
When you are happy with the message you have created, don’t forget to click on the ‘Save’ button to store your changes.
Step 3: Publish Your Slack Workflow in WordPress
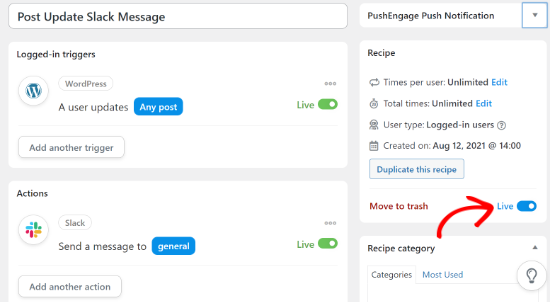
It’s time to publish the recipe. In the ‘Recipe’ box, click the ‘Draft’ switch so that it shows ‘Live’ instead.
Now, every time someone asks for help through your ticket form or updates a blog post on your site, the recipe will run and post a message to Slack.
Bonus Tips: Enhancing Team Communication Beyond Slack
While integrating Slack with WordPress is a great start, there are many other tools and plugins that can further improve your team’s communication and productivity.
While Slack is popular, it’s not the only team communication tool out there. Depending on your team’s needs, you might find other platforms more suitable.
Our guide on the best team communication tools for small businesses covers a range of options to help you find the perfect fit for your team.
If your team struggles with email overload, consider using a shared inbox tool. These solutions can help you organize, delegate, and respond to emails more effectively as a team.
If you run a business, then having a robust customer support system is crucial. Help desk plugins can transform your WordPress site into an efficient customer service platform.
We hope this article helped you learn how to integrate Slack with WordPress. You may also want to see our guide on how to add a chatbot in WordPress and our expert picks of the best knowledge base plugins for WordPress.
If you liked this article, then please subscribe to our YouTube Channel for WordPress video tutorials. You can also find us on Twitter and Facebook.


Syed Balkhi says
Hey WPBeginner readers,
Did you know you can win exciting prizes by commenting on WPBeginner?
Every month, our top blog commenters will win HUGE rewards, including premium WordPress plugin licenses and cash prizes.
You can get more details about the contest from here.
Start sharing your thoughts below to stand a chance to win!