
I once needed to access my website’s images for a design project while working offline. Unfortunately, WordPress does not offer a simple button to download your entire library at once.
Downloading thousands of files individually is frustrating and wastes valuable time. You need a way to grab all your images and videos in a single batch.
In my experience managing websites, having a local copy of your media files is also vital for creating safe backups. It ensures you never lose your hard work during a server switch.
In this guide, I will show you how to download your entire WordPress media library using three easy methods.

Why Download Your WordPress Media Library?
There are several important reasons why you might want a complete copy of your media library:
- Offline Backups: It provides a secure, separate backup of all your valuable images, videos, and audio files.
- Site Migrations: While migration plugins handle this automatically, having a manual copy of your media files acts as a safety net when moving to a new WordPress host.
- Easy Access: You can quickly use your images for social media, presentations, or other projects without needing to log into your website every time.
Now, let’s take a look at how to download your WordPress media library. You can use the quick links below to quickly navigate through the article:
- Use a Free Plugin to Download Your Media Library (Easiest for Small Sites)
- Download Media Files From a WordPress Backup
- Download Your Media Library Manually (Advanced)
- Frequently Asked Questions (FAQs) About Downloading the WordPress Media Library
- Additional Resources
Method 1: Use a Free Plugin to Download Your Media Library (Easiest for Small Sites)
For websites with a smaller media library, this is the fastest and most direct method. It’s a simple, one-click solution that gets the job done without any complicated steps.
For this method, I recommend the free ZIP from Media plugin. It is a lightweight and focused tool designed to do just one thing: download your media library as a zip file.
Step 1: Install and Activate the ZIP from Media Plugin
First, you need to install and activate the ZIP from Media plugin.
If you need help, then you can see our detailed guide on how to install a WordPress plugin.
Step 2: Download Your Media Library as a Zip File
Once activated, go to ZIP from Media » Generate ZIP from your WordPress admin sidebar. You will see a very simple page with a button.
Simply click the ‘Download Media’ button. The plugin will immediately start compressing your entire media library into a single zip file. On most websites, this will work perfectly.

Depending on the size of your media library, this may take some time. You will receive an email to notify you when it is complete.
After that, you can click the ‘Download ZIP’ button to save your media library to your computer.

What to Do If You See a Timeout Error
If you have a very large media library (for example, hundreds of high-resolution images), then this plugin might time out on some web hosts. You might see an error message like ‘Fatal Error: Maximum Execution Time Exceeded.’
This sounds scary, but don’t worry! Your website is not broken. This is a common server safety setting that stops a single task from running for too long.
If this happens, then you have two simple options:
- For advanced users, you can try to increase the PHP time limit. However, this requires editing server files, which we don’t recommend for beginners. You can see our guide on how to fix the maximum execution time exceeded error.
- For an easier solution, I recommend simply using one of the other methods in this article. Both Method 2 (using a backup) and Method 3 (using cPanel) are designed to handle large libraries without timing out.
Method 2: Download Media Files From a WordPress Backup
This method is perfect for users who are already making regular backups of their site (which everyone should be doing). Your media library is always included in a full-site backup, so you just need to know where to find it.
I recommend using a trusted backup plugin like Duplicator. It is a popular WordPress plugin designed for creating full-site backups and migrating websites.
Step 1: Create and Download Your Site Backup
First, you’ll need to create a ‘Full Site’ or ‘Media Only’ backup of your website.
For a complete walkthrough, you can follow our ultimate guide on how to back up your WordPress site.

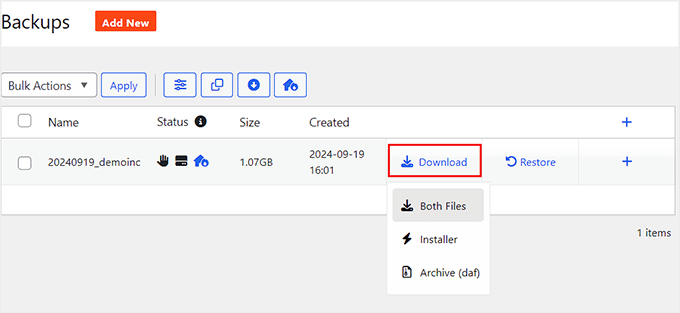
When the backup process is complete, Duplicator will show you a screen with download links right inside your WordPress dashboard. You then need to download the ‘Archive’ file.
Important: Make sure you are downloading the Zip version of the archive, as this will allow you to easily extract the files on your computer.
Simply click the ‘Download’ button to save the file.
Note: Since this backup contains your entire website, the file may be very large. Ensure you have enough storage space on your computer before downloading.
Your media library is located inside the wp-content/uploads folder within this backup file.
Step 3: Locate Your Media Library Files
Now, find the backup zip file you just downloaded on your computer. Unzip this file, and you will see a folder containing all of your website’s files and directories.
Navigate inside this folder to find the wp-content directory. Inside wp-content, you will find the uploads folder. This folder is your entire media library. You can now copy this folder to your desktop or anywhere else you need it.
Method 3: Download Your Media Library Manually (Advanced)
This method is for more technical users who are comfortable working directly with their website’s files using either their hosting control panel (like cPanel) or an FTP client.
I will show you how to use both. Compressing the folder in cPanel is much faster. However, FTP is a good alternative if you have an unstable internet connection, as it allows you to resume downloads if they get interrupted.
Using Your Hosting cPanel File Manager
Most WordPress hosting providers offer a web-based File Manager in their cPanel dashboard. Simply log in to your hosting account, open the File Manager, and navigate to your site’s root directory (usually public_html, or a folder named after your domain).
From there, go into the wp-content folder. Find the uploads folder, right-click on it, and select the ‘Compress’ or ‘Archive’ option.

Choose the ‘Zip Archive’ format and let it process.
Once the new zip file is created, right-click on it and select ‘Download’ to save it to your computer.

Using an FTP Client
An FTP client is an application that lets you manage your website’s files directly. If you prefer this method, then you can use a popular free tool like FileZilla.
To get started, you’ll need to connect to your server using your FTP credentials. In the remote site panel, navigate to the /wp-content/ directory.
Find the uploads folder, right-click on it, and click ‘Download’. This will download the folder to whichever location is currently selected in the ‘Local site’ panel on the left side of your FTP client.
Important: Downloading via FTP can be slower than the other methods. This is because the FTP client must verify each individual file (handshake) rather than downloading one single compressed archive.

Frequently Asked Questions (FAQs) About Downloading the WordPress Media Library
I know you might still have a few questions about this process. To help, I’ve answered some of the most common ones I hear from readers.
Where are WordPress media files stored by default?
By default, WordPress stores all your media uploads in the /wp-content/uploads/ folder on your hosting server. The files are usually organized into subfolders by year and month.
Will downloading my media library slow down my live site?
Generally, it won’t. The process of downloading simply creates a copy of your files and shouldn’t impact your site’s performance for visitors. Compressing a very large library in cPanel can use a lot of server resources for a short time. While this is usually not noticeable, it could cause a brief slowdown on some shared hosting plans.
Can I download images from just a specific month or year?
Yes, and the easiest way to do this is with Method 3 (cPanel or FTP). WordPress automatically organizes your media into folders by year and month inside the /wp-content/uploads/ directory. You can simply navigate to a specific folder, like 2025/08, and download just that folder.
Additional Resources
I hope this article helped you easily download your entire WordPress media library. You may also want to see our these additional resources:
- How to Backup Your WordPress Site (Ultimate Guide)
- Best WordPress Image Compression Plugins (Compared)
- How to Organize WordPress Files in Media Library Folders
- How to Fix Common Image Issues in WordPress
- Which is the Best WordPress Gallery Plugin? (Performance Compared)
If you liked this article, then please subscribe to our YouTube Channel for WordPress video tutorials. You can also find us on Twitter and Facebook.

")
")

Jiří Vaněk
Personally, the best way for me was always via FTP, where I downloaded the wp-content folder. There, I was always sure that I would have the entire folder with media somewhere in the backup, because wordpress stores all files there, including media files.
Siphiwe Phakathi
Thank you so much.
WPBeginner Support
You’re welcome!
Admin
DAVE
before it hit download, I have a silly question, does the export media library copy or remove my photos from my site? I just want to save a copy. Nowhere did I read that part???
WPBeginner Support
You would download a copy, it would not remove content from your site.
Admin
Saddam Kassim
Hi, This plugin is no more exist. Please add a new one in your post. Thanks in advance.
WPBeginner Support
Thank you for letting us know, we’ll be sure to keep an eye out for plugins ot methods we would recommend.
Admin
DAVE
Is their a way to do it without a plug in.
WPBeginner Support
You could manually download the files using FTP as one option.
Admin
rr
plugin no longer exist
WPBeginner Support
Thank you for letting us know, we’ll keep an eye out for alternatives we would recommend.
Admin
Colin JE
DownML is no longer available
WPBeginner Support
Thank you for letting us know, we’ll keep an eye out for alternatives we would recommend.
Admin
Nik
Export Media Library seems to do the same.
WPBeginner Support
There are normally multiple plugin options people can use, our recommendation is one we tested on the publish date of the article
Admin
Maureen Eyeofdali
Yep, the plugin recommended here has violations and is NOT available for downloading. Alternatives?
WPBeginner Support
We do not have a recommended alternative at the moment but we will be sure to update our article once we find a plugin we would recommend.
Admin
Krish Murali Eswar
For the first time, wpbeginner has failed me. The plugin downml is deprecated and is not available for download any more. can you please update the post.
WPBeginner Support
Thank you for letting us know, we will be sure to take a look at alternatives
Admin
B Andi
so why don’t people use the built in import/export tool from WP ? why use a plugin when functionality is already there ?
WPBeginner Support
The built-in tool does not export the media library, it saves links to where the media is located and when you import the file it will have the option to download the media from where it was previously hosted
Admin
karthik
“This plugin was closed on October 23, 2018 and is no longer available for download. Reason: Guideline Violation”… please suggest us any other plugin…
WPBeginner Support
Thank you for letting us know, we’ll be sure to look into alternatives for downML
Admin
Ph
This plugin no longer exists.
WPBeginner Support
Thank you for letting us know, we’ll be sure to look into alternatives for downML
Admin
Dan Schaller
I also had problems with this plugin. The website for it is no longer alive, and the email contact offered bounced back.
I have used WP File Manager to do this successfully, although it takes more steps.
All-in-One WP Migration also lets you choose to only capture media files.
Teresa
This plugin didn’t work for me. Error said “zip open failed. Exiting”
Sara
Am I not able to do this without purchasing a business plan?
WPBeginner Support
Hi Sara,
You are probably using WordPress.com. Please see our guide on the difference between self hosted WordPress.org vs free WordPress.com blog.
Admin
Amar Sijercic
I have a huge media library of 680 MB and the downml plugin displays an error. Is there a way to override tis or is there a plugin that can do this?
WPBeginner Support
Hi Amar,
What error do you see?
Admin
Doug Ison
So how do you import them and have it show up in the database? What plugin do you use for that?
Francisco
Thank you! This was really helpful
Blythe
It didn’t work. It only selected most of the pictures, but it left quite a few
Anissa
I tried this but it says my file is too big. Is there a way to select just some of the pictures?
Sara
Hi , My wordpress media library having 771 files while exporting media library using downML plugin error occurs as – Media Library contains 771 files in excess of 174.46 MiB…Now how i export my media files is any other plugins there if anyone know the solution please let me know thanks in advance..
hyrein
increase the limit in php.ini
mikko
Does not keep foder structure. Does not support öäå charachters (wordpress with utf-8mb4 sql)
(down)
Elias
Thank you so much!!! You saved me a ton of time and effort!!!!
WPBeginner Support
We are glad you found it helpful.
Admin
Ram Bharadwaj
How do i download the images included in the Home slider Only?
Vlad
Thanks for the article. Does anyone know if I can download my entire media gallery via ftp, optimise all photos on my PC and then re-upload without messing up the site? I’ve tried using some WP plugins for optimisation of photos, but I’m still not entirely happy with the result, so I’d like to do them on my PC. But then, I’d like to avoid having to edit all posts and pages in order to add the photos again.
Kevin Pike
Just used the downML plugin after reading this post. The good news: it worked… the bad news, the zip folder is just the files i.e. it removes the folder path structure. If you need to quickly move things FTP or a better clone plugin is best.
Kyle
You can also use wp clone which makes a .zip file. If you only want the media just open the zip file and go to the wp-content folder and then uploads. It will all be in the folders that wordpress puts them in
dragons
Please do you know of a way to download the Media Library from a WP.COM install?? It is crazy they say to do it manually.
Deana
Thank you, I did’n know about plugin. I always download ML in old way via FTP.